Here in this post we will see how to implement the same.
This could be helpful in situation where throughout the system you wish to have similar behaviour on specific condition. In general we will have to write code in every object with same set of logic, variables, and functions and so on.
Although still in this case too we will require to add code to every object, but only one time.
Think of you need to enhance or make changes in behaviour again you will have to go through each objects and do the required change. But using this feature we can keep it centralized and manage from single place, without going through each objects again.
Here below I am taking example one explained by Microsoft help basic concept, will come up with my version with some more effective usage later sometime.
When users change the address of a customer, you want to check that the address does not include invalid characters, which in this walkthrough is a plus sign (+).
To accomplish this, you will publish an event that is raised when the Address field on page 21 Customer Card is changed.
To handle the event when it is raised, you will add an event subscriber function that includes logic that checks the address value and returns a message to the user if it contains a plus sign.
Publishing the Event
To publish an event, you create a C/AL function that is set up to be an event publisher. An event publisher function can be added in any object, such as a codeunit, page, or table.
In this procedure we will add the event publisher function to a new codeunit, in which you can potentially add more event publisher functions for other events later.
Because you might want to change this event implementation in the future, you decide to create an integration event type.
The event publisher requires a single text parameter for handling the address of the customer.
Create a new codeunit
The codeunit for the event publisher I have created 50000 - Event Publisher.
Now we will add the event publisher function to publish the event.

To create the event publisher function to publisher the event
- Define a function OnAddressLineChanged.
- Open the properties for the OnAddressLineChanged function, select the function, and then in the View menu, choose Properties. Set the properties as follows:
- Set the Local property to No.
Setting this property makes the function available to be called from the other objects.
- Set the Event property to Publisher. This makes the function an event publisher.
- Set the EventType property to Integration.
- Close the Properties

- Add a local parameter to the function for the address of the customer as described in the following steps:
- On the Functions tab, select the OnAddressLineChanged function, and then choose the Locals
The C/AL Locals window opens.
- On the Parameters tab, in the Name field, enter line.
- Set the DataType field to Text.
- Set the Length field to 100.

Important
An event publisher function cannot have a return value, variables, or text constants; otherwise you will not be able to compile the function.
The new function appears in the C/AL Editor with the following signature:
[IntegrationEvent] OnAddressLineChanged(line : Text[100])

You can now raise the event in the application.
Raising the Event
After creating the event publisher function to publish the event, now we will add code to the application to raise the event where it is required.
In this case, the event will raise when the Address field is changed on the page 21 Customer Card.
Therefore, we will add code to the Address - OnValidate() trigger in C/AL code of the page. Raising an event basically involves calling the event publisher function that publishes the event.
To raise the event
- In the development environment, open page 21 Customer Card as follows:
- Add a C/AL variable that specifies the object that publishes the event. In this case, the event publisher object is codeunit 50000 Event Publisher, which contains the event publisher function OnAddressLineChanged that you created in the previous procedure.

- In C/AL code, add the following code on the Address - OnValidate() trigger to raise the event:
Publisher.OnAddressLineChanged(Address);
This calls the event publisher function to raise the event.

- Save and compile the changes to the page.
The event can now be subscribed to and handled.
Subscribing to and Handling an Event
Once an event has been published you can add code to the application that subscribes to and handles the event when it is raised.
For example, in this case when a user changes the address of a customer (the event), you want code that checks that the value does not contain a plus sign.
Subscribing to and handling an event is accomplished by creating a C/AL function that is set up as an event subscriber and subscribes to a specific event (defined by an event publisher function). The event subscription function contains the application logic for handling the raised event.
In this case, we will create an event subscriber function that subscribes to the OnAddressLineChanged function in codeunit 50000 Event Publisher.
Unlike an event publisher function, an event subscriber function can only reside in a codeunit object. This procedure will add the event subscriber function to a new codeunit, in which you can potentially add more event subscriber functions for other events later.
To create a new codeunit
- In the development environment, create a new codeunit that has the ID 50001 and the name Event Subscriber.
To create the event subscriber function to subscribe to and handle the event
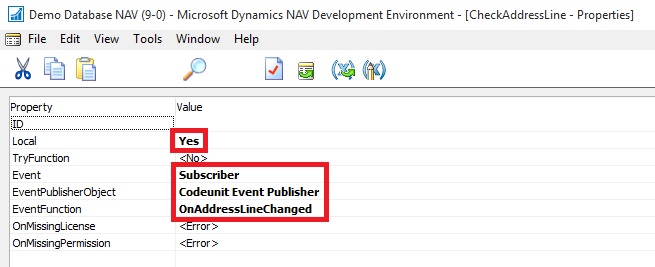
- Create Function CheckAddressLine.

- Choose Properties. Set the properties as follows:
- Set the Event property to Subscriber to make the function an event subscriber.
- Set the EventPublisherObject property to Codeunit My Publishers.
This is the codeunit that contains the event publisher function (OnAddressLineChanged) that you want to subscribe to.
- In the EventFunction property, select the OnAddressLineChanged integration event.
This field reads all the published events in the event publisher object.
Note
When you get a message that asks whether you want to overwrite the edited function's signature, choose Yes to continue.
- A local parameter that has the name line and the data type Text has been automatically added to the new CheckAddressLine
- The new function appears in the C/AL Editor with the following signature:
LOCAL [EventSubscriber] CheckAddressLine(line : Text[100])
You can now add code to handle the event.
- To handle the event, add the following code to the CheckAddressLine function in the C/AL editor:
IF (STRPOS(line, '+') > 0) THEN BEGIN
ERROR('Cannot use a plus sign (+) in the address [' + line + ']');
END
This code checks the value of the Address field on page 21 Customer Card when is has been changed and returns a message if the value contains a plus sign.

Viewing the New Event Subscription
After you create an event subscriber, you can view information about it in page 9510 Event Subscriptions. This page provides information about all the current event subscriptions in the application. You can open this page directly from the development environment or from a Microsoft Dynamics NAV client.
To view the event subscription from the development environment
- On the Tools menu, choose Debugger, and then choose Event Subscriptions.

To view the event subscription from a Microsoft Dynamics NAV client
- Start the Microsoft Dynamics NAV client.
- In the Search box, enter Sessions, and then choose the related link.

The Even Subscription Window will look like:

Testing the Event
To test the event implementation, you can run page 21 Customer Card from the development environment.
- In the Address field, add a plus sign, and then choose the OK
The following message appears:
Cannot use a plus sign (+) in the address [].
[] contains the value of the Address field.

I will come up with more details on this topic later in my future posts.