Friday 31 July 2015

Creating File Attachment to Mail for Report

We generally get requirements from clients to send report output as attachment to the mail.

In Microsoft Dynamics Navision 2015 this feature is available at most of the places, but we can design for other earlier versions too.

Long-time back I was having this requirement from one of my client, those days I scanned lots of website and tried lots of method. This one I found compact and easy to use. Their after whenever I get similar requirements I prefer using this.

Today I wish to share the same with others, as I have used it in my several implementations and found it working perfect and tested with several clients.

Let’s see this, it could help someone getting his work done in easy way and can save lots of time from hit and try with several methods.

First step, I will create a function which will help us generating the file on Service tier and down load to local temporary folder, so that we can easily access and attach to our mail.

Let’s give it a meaningful name like: DownloadToClientFileName

I will define two parameters for this Function as below:


VarNameDataTypeSubtypeLength
NoServerFileNameText250
NoToFileText250

I will define Return Value of Function as: Text of Length 250

I will define Local Variables for Function as below:


NameDataTypeSubtypeLength
ClientFileNameText250
objScriptAutomation'Microsoft Script Control 1.0'.ScriptControl
CRText1

Now we will write Code for the Function as below:
ClientFileName := ToFile;

IF NOT DOWNLOAD(ServerFileName, '', '<TEMP>','', ClientFileName) THEN

EXIT('');

IF CREATE(objScript,TRUE,TRUE) THEN

BEGIN

CR := ' '; CR[1] := 13;

objScript.Language := 'VBScript';

objScript.AddCode(

'function RenameTempFile(fromFile, toFile)'+CR+

'set fso = createobject("Scripting.FileSystemObject")'+CR+

'set x = createobject("Scriptlet.TypeLib")'+CR+

'path = fso.getparentfoldername(fromFile)'+CR+

'toPath = path+"\"+left(x.GUID,38)'+CR+

'fso.CreateFolder toPath'+CR+

'fso.MoveFile fromFile, toPath+"\"+toFile'+CR+

'RenameTempFile = toPath'+CR+

'end function');

ClientFileName := objScript.Eval('RenameTempFile("'+ClientFileName+'","'+ToFile+'")');

ClientFileName := ClientFileName+'\'+ToFile;

END;

EXIT(ClientFileName);

Second Step, I will write code to call this function to attach the file to Mail and send using SMTP as below:
//SMTP is an Variable of Codeunit SMTP Mail

SMTP.CreateMessage(SenderName,SenderAddress,Recipient,Subject,Body,TRUE);

//SenderName,SenderAddress,Recipent is an email addresses

SMTP.AppendBody(Body);

CLEAR(MailReport);

//MailReport is Variable for Report of which output we want to use as attachment.

//Name & ToFile is Text type variable of Length 250

Name := STRSUBSTNO('Estimate No. %1.pdf', SalesHeader.”No.”);

//Creating File Name

ToFile := Name;

FileName := TEMPORARYPATH + ToFile;

//We are using temporarypath OS Variable to get the path for file

MailReport.SetMailFilters(SalesHeader);

MailReport.SAVEASPDF(FileName);

ToFile := DownloadToClientFileName(FileName, ToFile);

SMTP.AddAttachment(ToFile);

FILE.ERASE(FileName);

SMTP.Send;

Now you can create a template function and use where ever require.

Defining Discount & Sales Price for an Item

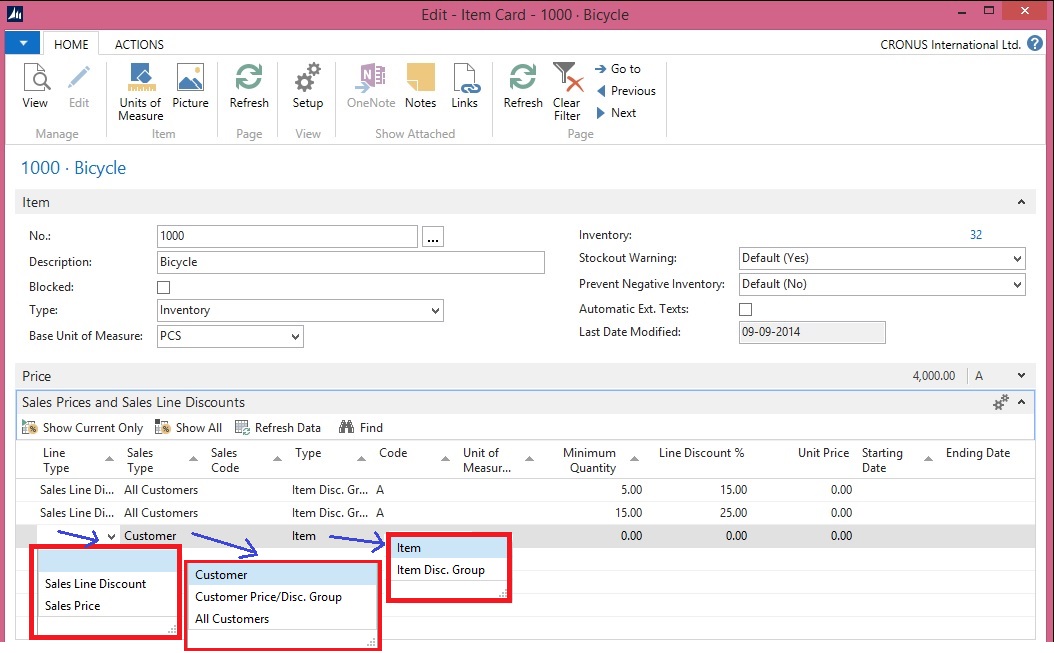
This set of demonstration will present the new, simplified way of setting sales prices and discounts for items in Microsoft Dynamics NAV 2015.
SPND-1

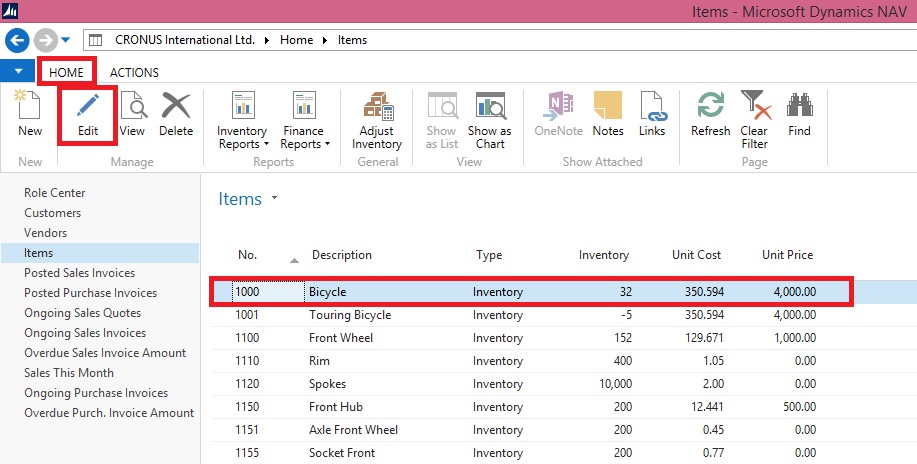
  • On the Role Center, choose Items to open the list of existing items.

  • Select item 1000, and then, on the Home tab, in the Manage group, choose Edit.

  • In the Item Card window, on the Sales Prices and Line Discounts FastTab, create a new line.


SPND-2

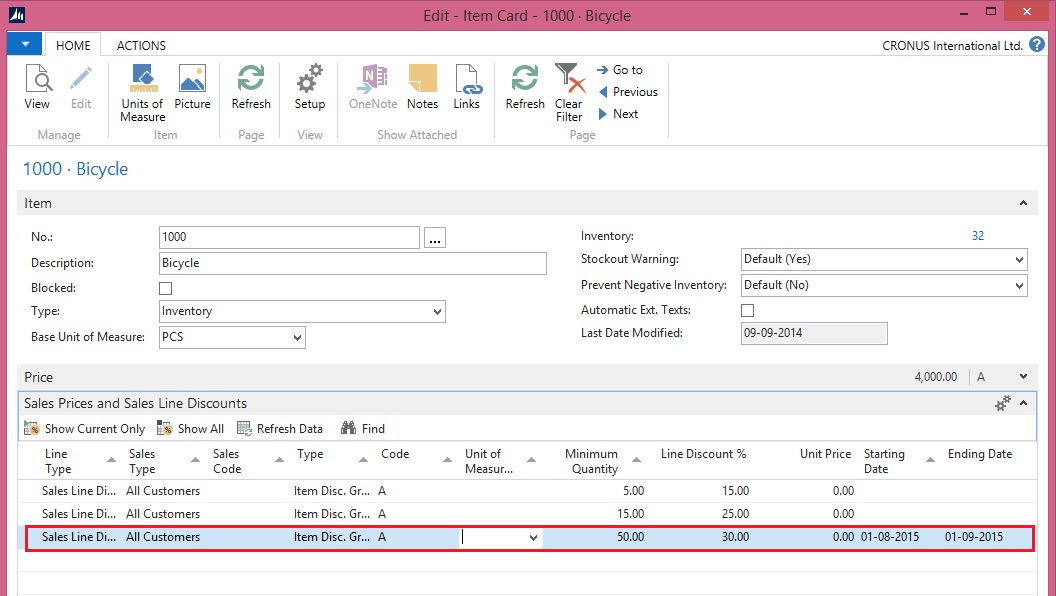
Set a Discount for an Item

  • On the line, set the following values:


Line Type: Sales Line Discount

Sales Type: All Customers

Type: Item Disc. Group

Minimum Quantity: 50

Line Discount %: 30.00

Starting Date: August 1 2015.

Ending Date : Sep 1 2015


  • Choose the OK button


Pick an existing item, for example, item number 1000.

Set a 30 percent line discount for the item for all customers who buy 50 or more of these items in one invoice. The discount will be valid from Aug 1, 2015 to Sep 1, 2015.
SPND-3
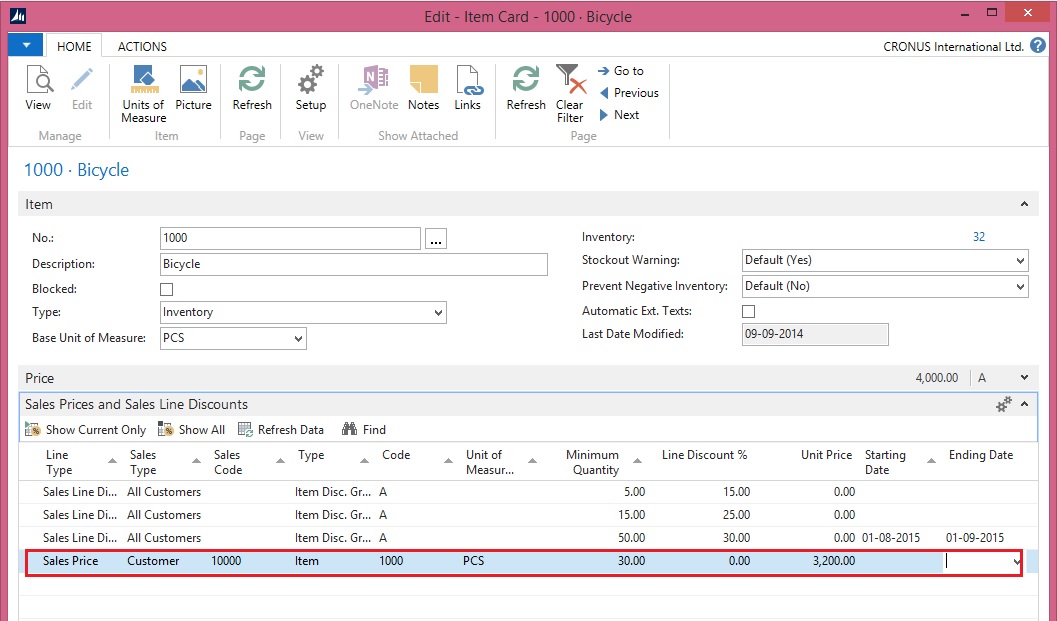
Set a Sales Price for an Item

  • On the line, set the following values:


Line Type: Sales Price

Sales Type: Customer

Sales Code: No. 10000

Type: Item

Minimum Quantity: 30

Unit Price: 3200.


  • Choose the OK button


Pick an existing item

Set a lower sales price for this item, for a specific customer, with the condition that the customer buys 30 or more of these items in one invoice.
SPND-4

Thursday 30 July 2015

Managing Report Layouts

Microsoft Dynamics NAV 2015 enables reports to have a single built-in RDLC and Word layout, shared among tenants, as well as any number of customized layouts per tenant.

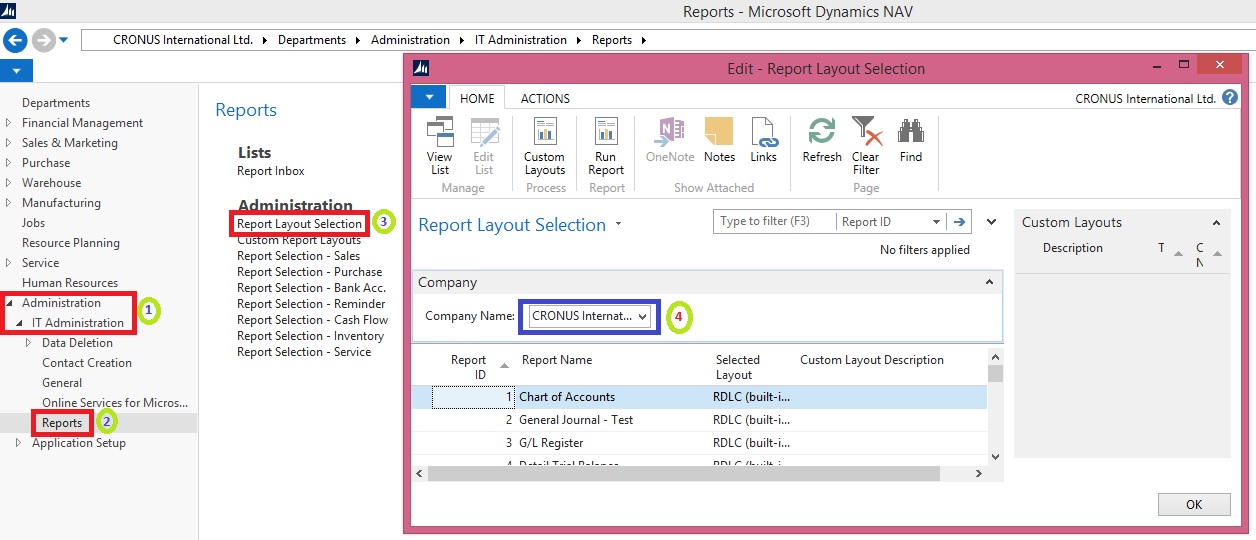
To browse and manage which layout is currently used for a given report, a new Report Layout Selection list page has been introduced.

We will use the Report Layout Selection page to switch between and run the RDLC and Word layouts that are shipped as part of the new Sales Invoice report 1306.

  • Open Report Layout Selection page by doing one of the following:

  • In the Search box, enter Report Layout Selection, and then choose the related link.

  • In the navigation pane, choose Departments, Administration, IT Administration, Reports, and then Report Layout Selection.

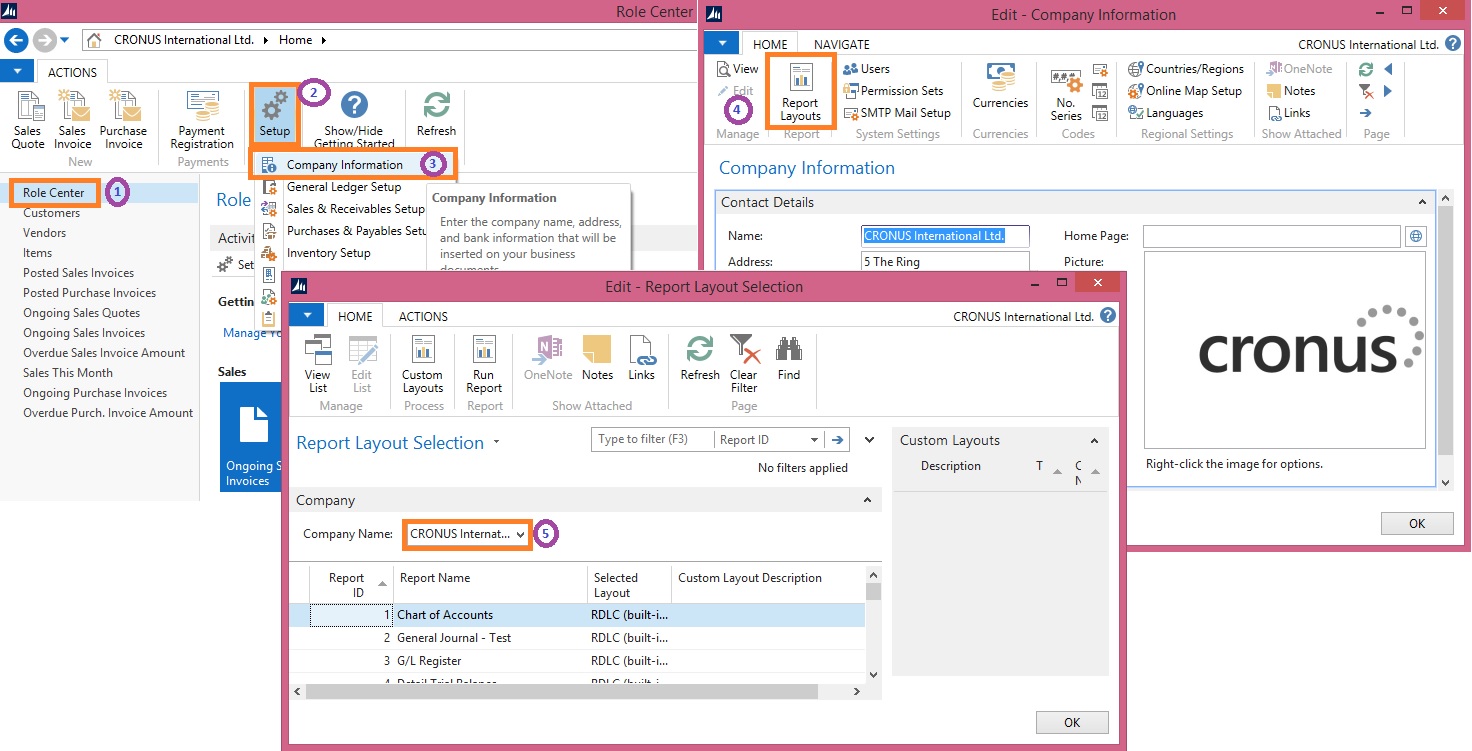
  • In the Small Business Role Center, on the Actions tab, choose Setup, Company Information, and then choose Report Layouts.

  • Ensure that the Company Name field is set to the correct company because reports layouts are company-specific.


ReportLayout-2

ReportLayout-3

The Report Layout Selection page lists all of the reports that are available for the company that is specified in the Company field at the top of the window.

The Selected Layout field specifies the layout that is currently used for a given report.

A report can be set up with more than one report layout, which you can then switch among as needed.

Depending on the layouts that are available for a report, you can choose to use a built-in RDLC layout, a built-in Word layout, or a custom layout.

From the Report Layout Selection page, it is also possible to manage custom layouts for reports.

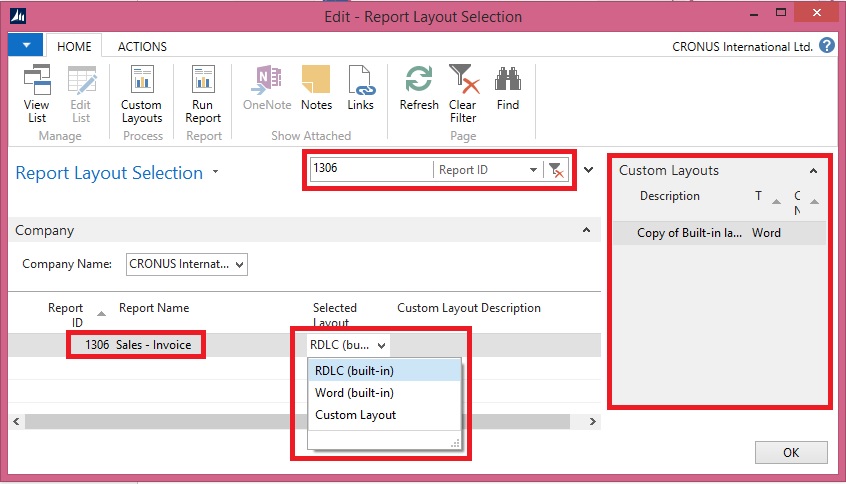
  • In the list, locate the document report 1306 Sales – Invoice by doing one of the following:

  • Scroll down through the list.

  • Filter on the Report ID equal to 1306.

  • Select the row for report 1306.

  • Choose the down arrow in the Selected Layout field to show the options (RDLC, Word, and Custom).


ReportLayout-4

First we will have a look at the new report 1306 Sales - Invoice, which has a built-in RDLC and Word layout. Out of the box, it does not have any custom layouts – we will add these in later posts.

As you can see, the RDLC (built-in) is typically the layout that selected by default. This can, however, be controlled by using the Default Layout property on the specific report object in Microsoft Dynamics NAV Development Environment.

Notice that the page also contains a Custom Layouts FactBox. This lists any available custom layouts for a selected report in the list. If there are no custom layouts for the report, then you will have to create one first.

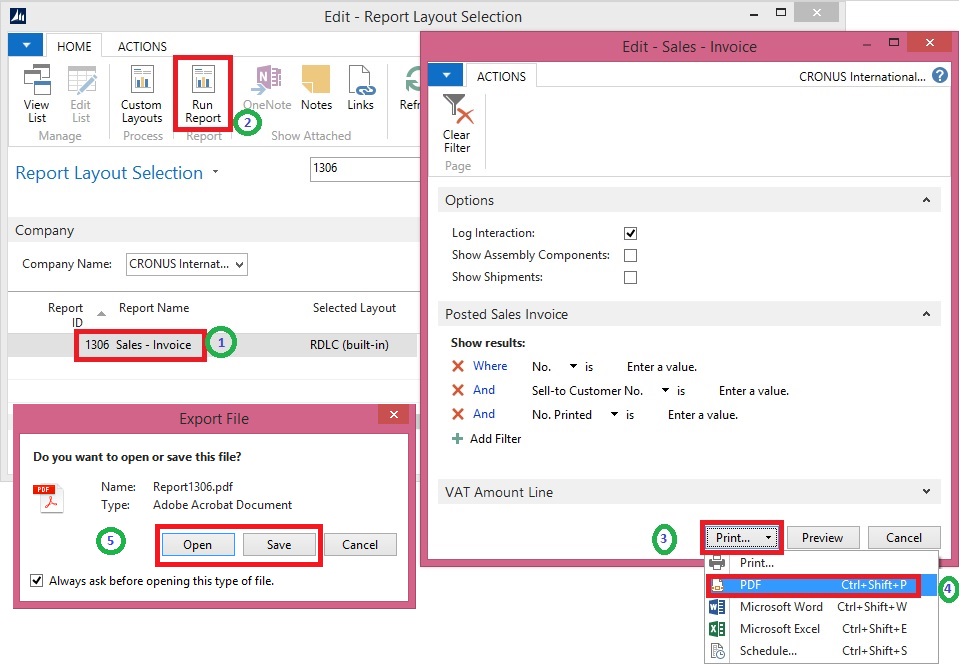
  • In the row for report 1306, set the Selected Layout field to RDLC (built-in).

  • On the Home tab, in the Report group, choose Run Report.

  • In the resulting report request page, use default values, and then select the Print button and choose PDF.

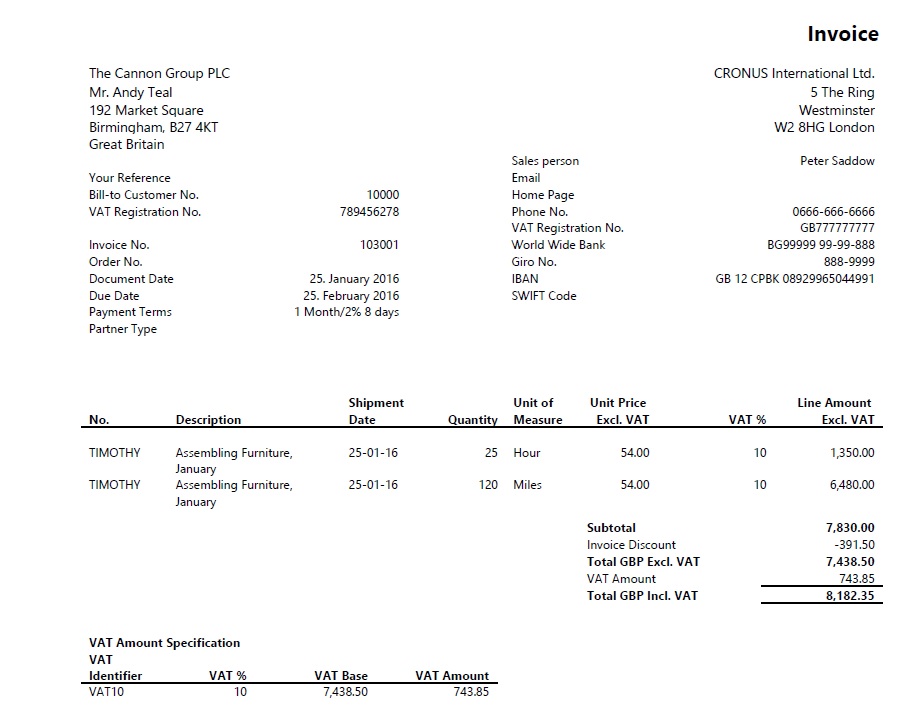
  • Open and inspect the resulting PDF file for report, which is based on the RDLC layout.


We will now select and run the built-in RDLC layout for report 1306 Sales – Invoice from the Report Layout Selection list page.

ReportLayout-5

ReportLayout-6

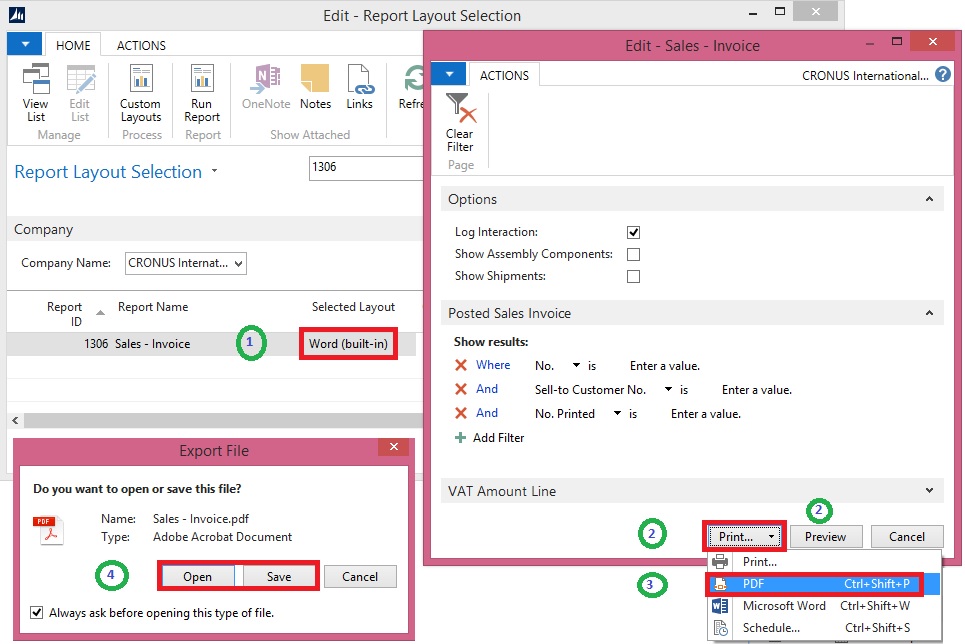
  • In the Report Layout Selection page, select the line for report 1306, and then set the Selected Layout field to Word (built-in).

  • On the Home tab, in the Report group, choose Run Report.

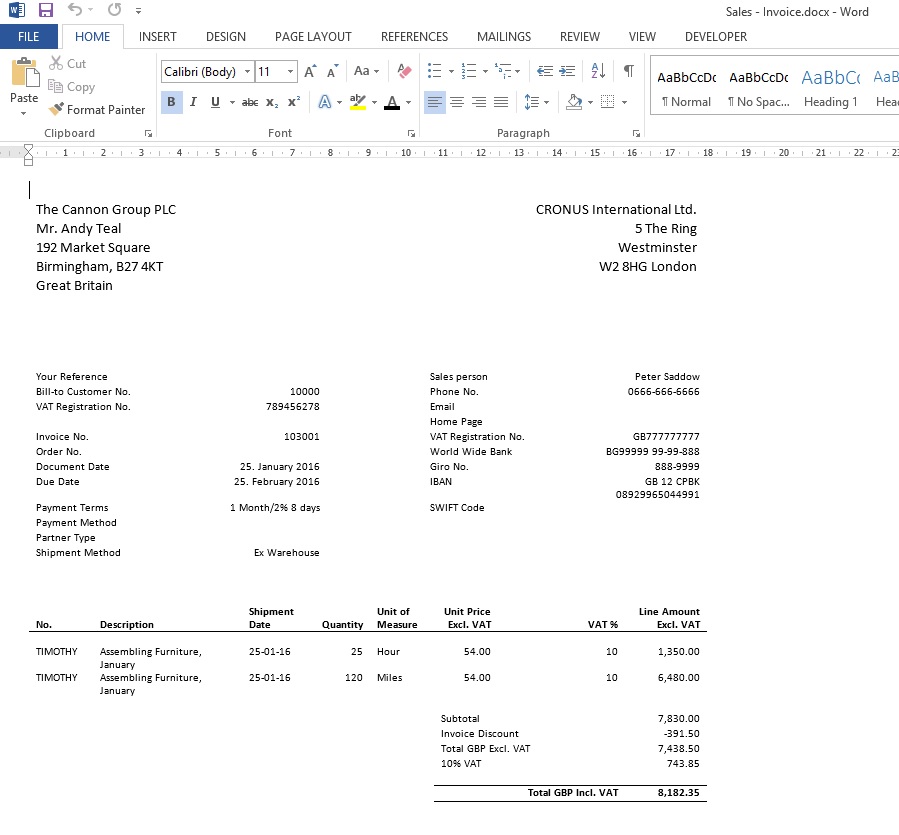
  • In the resulting report request page, use default values, and the select the Print button and choose PDF. [Note: This might not work for all client setups because it relies on server-side PDF conversion. As an alternative, use the Preview option on the request page, which will result in a Word document.)

  • Open and inspect the resulting PDF file for the report, which is based on the Word layout


Finally, we will change the layout to the built-in Word layout and then run the report.

ReportLayout-7

ReportLayout-8

Using Report Selector to run Report

The required steps to use the reports are shown:

  • Open the Report Selection – for example Sales page by doing one of the following:

  • In the Search box, enter Report Selection – Sales, and then choose the related link.

  • In the navigation pane, choose Departments, Administration, IT Administration, and then Reports.


In the Report Selection – Sales window, do the following:

  • Set the Usage field to Invoice.

  • In the Report ID field, replace 206 with 1306 (an New Mini Document Report.in 2015)

  • Choose the OK button.


ReportSelector

Set up the report selection to run report 1306 instead of report 206 when printing invoices.

Word Document Reports and Custom Layouts

Reporting functionality has been greatly improved in Microsoft Dynamics NAV 2015 by adding support for defining report layouts in Word, and enabling end users to create custom RLDC and Word layouts for their reports. These two features make it easier to create visually pleasing document reports, as well as allow end users to modify reports to their liking with as little partner involvement as desired.

Today I am sharing again all the posts from earlier archive, if you missed you can find all of them below.

Soon I will come up with more posts on this topic. Till then go through below links and develop your skills so that we can take up few more complex ones.

  1. How many types of Layout is supported in NAV 2015?

  2. How to. Specify the Default Built-in Report Layout

  3. Import and Export a Word Report Layout

  4. Add Fields from a Report Dataset to a Word Report Layout

  5. Adding Image Fields

  6. Removing Label and Data Fields

  7. To create a Word report layout for a report

  8. Designing Report Layouts from the Microsoft Dynamics NAV Development Environment

  9. Creating my first Word List Report in Navision 2015

  10. To modify the Word report layout

  11. Creating Custom Word Layout for Document Reports in Navision 2015

  12. Creating Word Mail Merge Report in Microsoft Dynamics Navision 2015

  13. The New Report Scheduling feature for end users running reports in Microsoft Dynamics Navision 2015

Wednesday 29 July 2015

Disabling the Stockout Warning Message - in Navision 2015

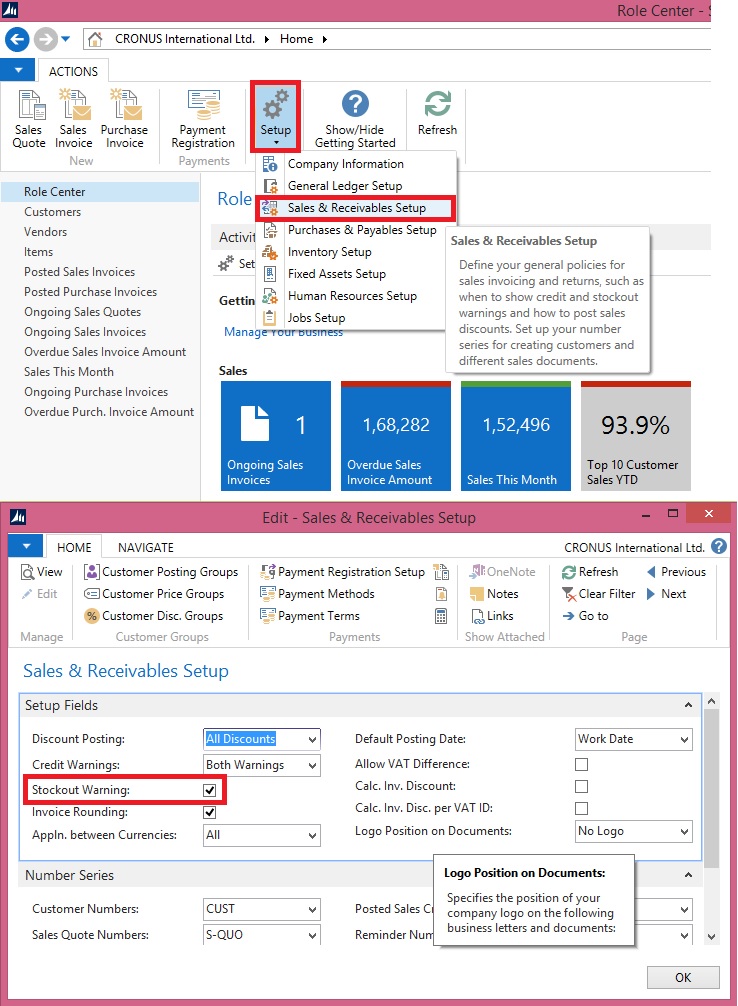
By default, Microsoft Dynamics NAV 2015 is set up so that you get a warning message when you enter sales invoice lines with items that are not on stock.

In this scenario, you will learn how to disable this warning in the Sales & Receivables Setup window.


    • On the Role Center, on the Home tab, in the Setup group, choose Setup.

    • On the drop-down menu, choose Sales & Receivables Setup.


StockOutWarningMessage

  • In the Sales & Receivables Setup window, deselect the Stockout Warning check box.


  • Choose the OK button


You will now no longer get warnings on sales invoice lines for items that are not on stock.

Preventing Posting of Sales Invoices that Are Not on Stock - in Navision 2015

By default, Microsoft Dynamics NAV 2015 is set up so that you are allowed to post sales invoices that contain items that you currently do not have on stock.

You can change that behavior to allow posting an invoice only if all the items on the lines are on stock. In this scenario, you will learn how to do it through the Inventory Setup page.

  • On the Role Center, o the Home tab, in the Setup group, choose Setup.

  • On the drop-down menu, choose Inventory Setup. The Inventory Setup window opens.


PrevNegSIPosting-1

  • In the Inventory Setup window, select the Prevent Negative Inventory check box.

  • Choose the OK button..

Correct a Posted Sales Invoice in Nav 2015

Today we will learn correct a posted sales invoice.

In previous versions of Microsoft Dynamics NAV, this required a number of steps.

This scenario demonstrates how to perform the same action in Microsoft Dynamics NAV 2015.

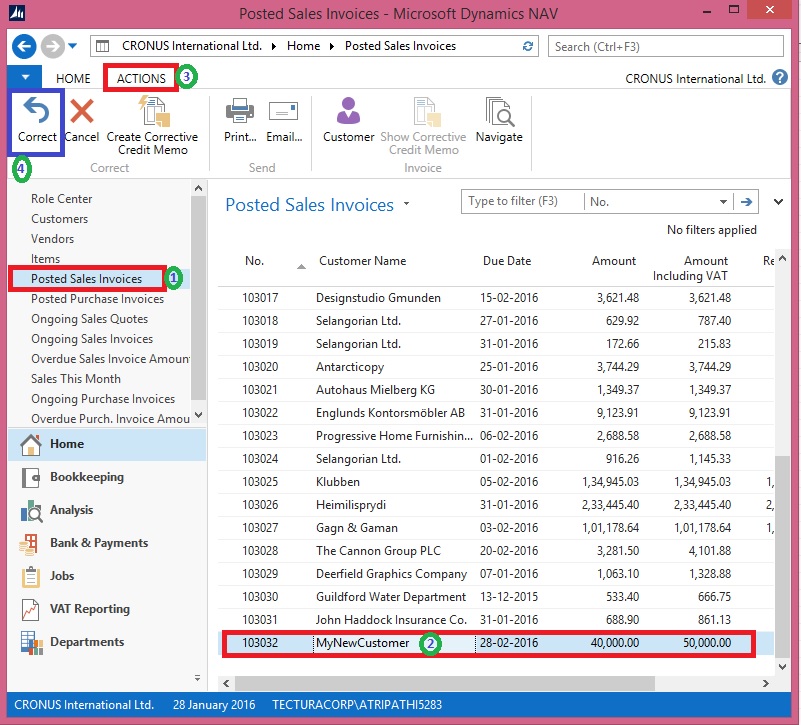
  • On the Role Centre, choose Posted Sales Invoices to open the list of posted sales invoices.

  • In the list of posted sales invoices, select the sales invoice that you posted in previous post, if not done click here to see the process we followed in earlier post.

  • On the Home tab, in the Manage group, choose View.

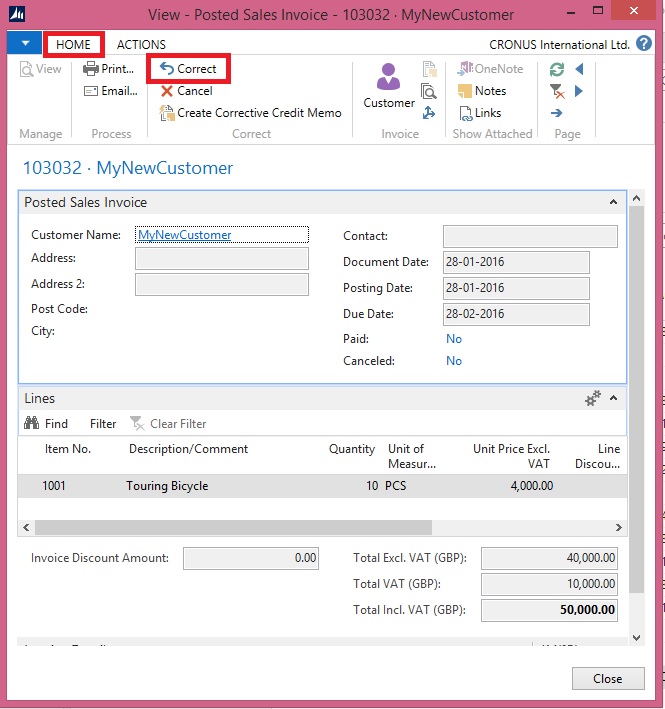
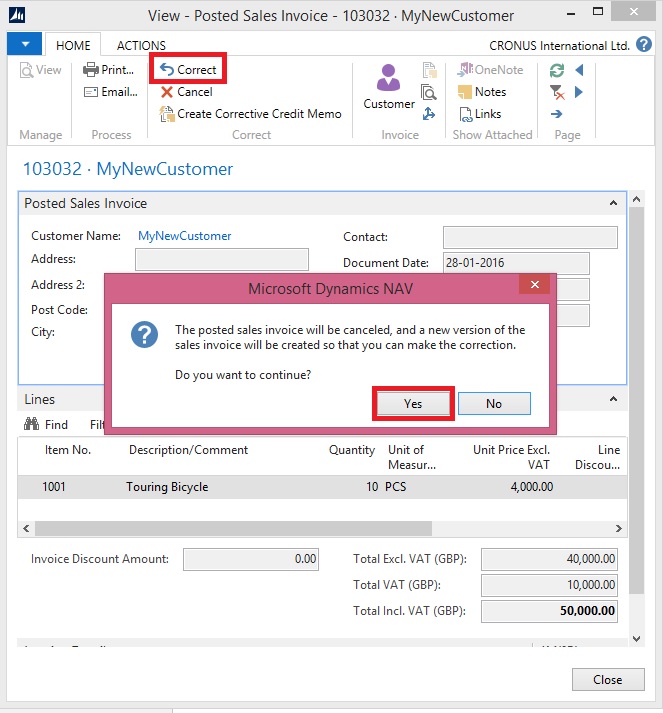
  • On the Home tab, in the Correct group, choose Correct, and then choose the Yes button


CorrectPSI-1
 or

CorrectPSI-2

The posted sales invoice is now cancelled with a credit memo. A new sales invoice has been created for you.

CorrectPSI-3

  • To open the automatically generated New Invoice that was created, choose Yes.

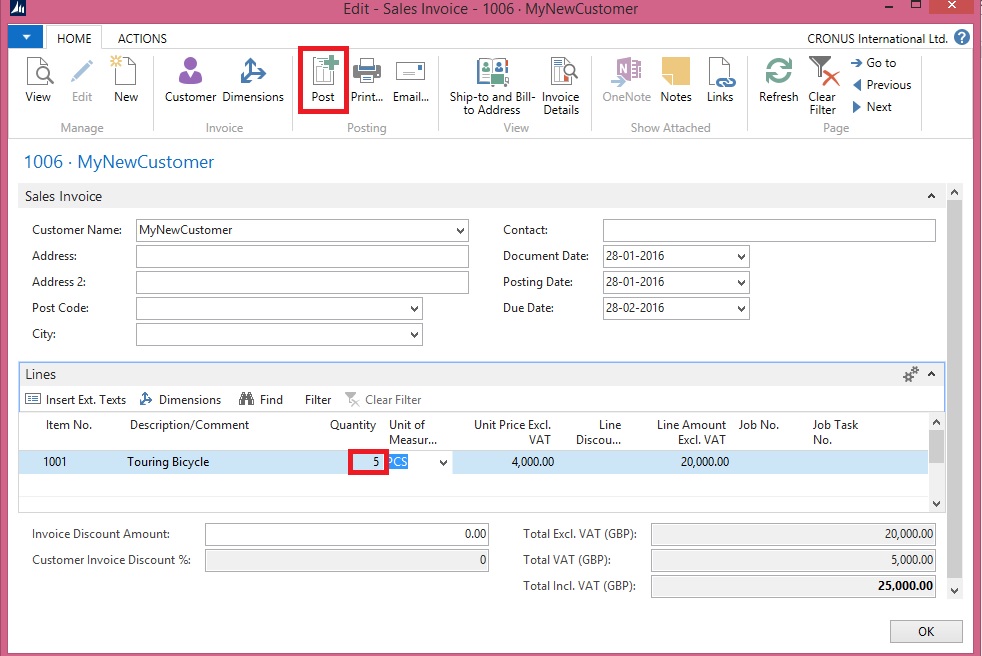
  • On the new sales invoice Perform the required changes. I am changing the Quantity in my example.


CorrectPSI-4

  • On the Home tab, in the Posting group, choose Post to post the corrected sales invoice.

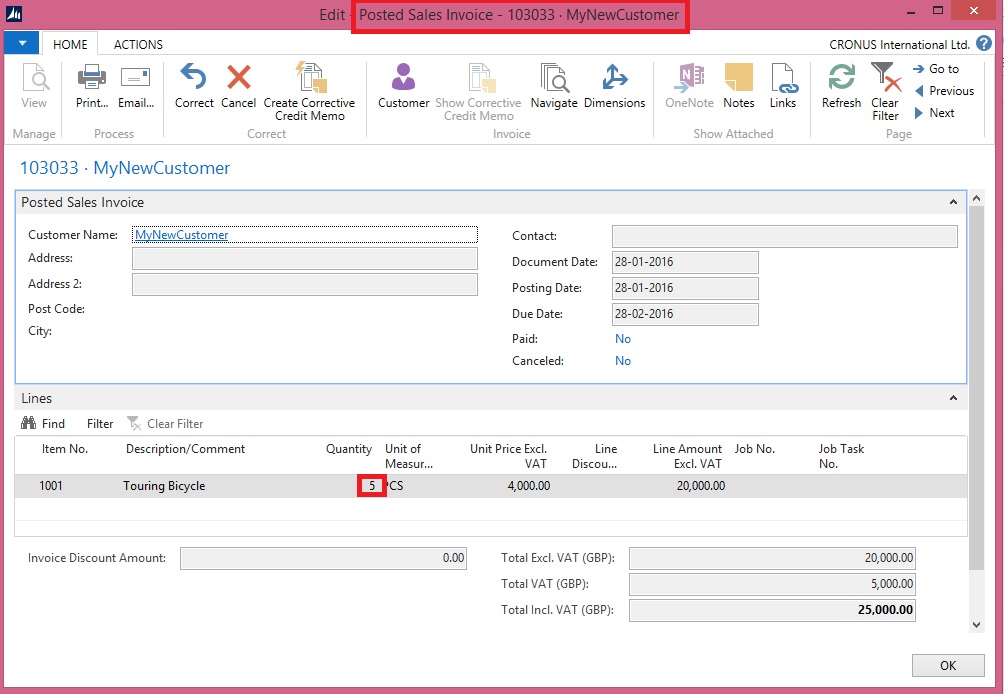
  • Respond Yes to review the posted New Sales Invoice.


CorrectPSI-5

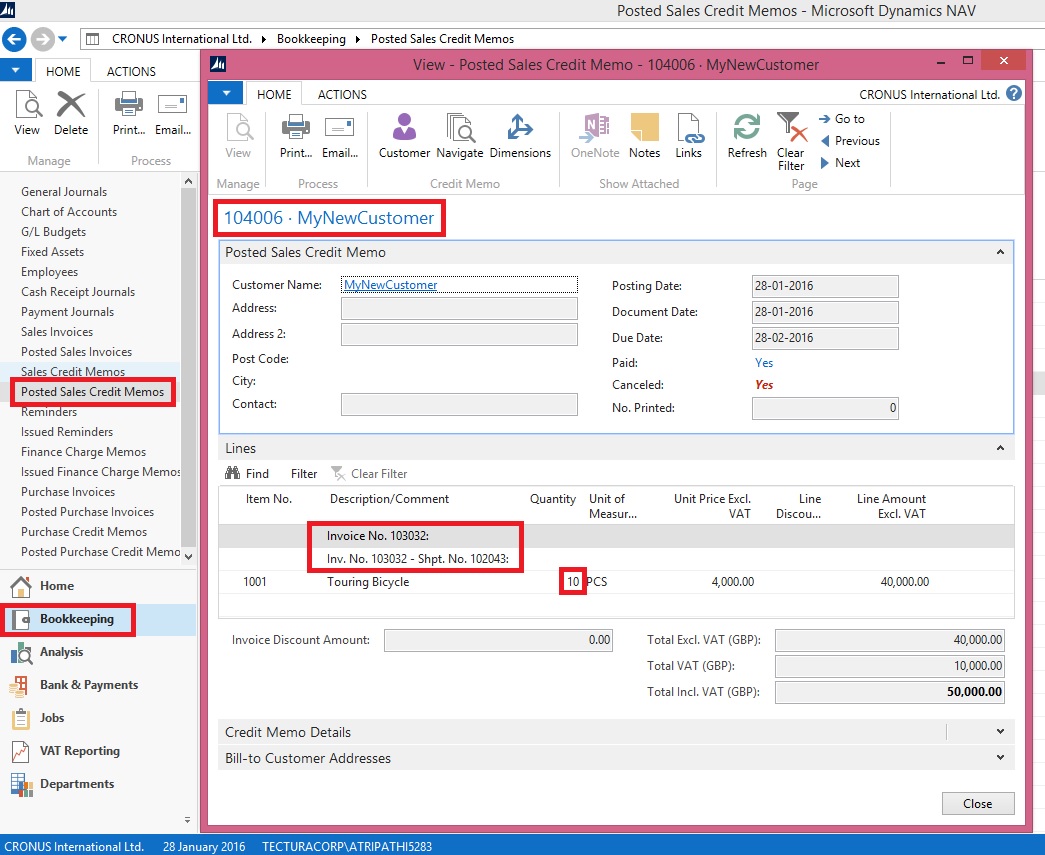
  • To review the Posted Credit Memo for the above Invoice Correction find as below:


CorrectPSI-6

We are done. It’s easy na.

Tuesday 28 July 2015

Create a Sales Invoice for a new Customer

In this session we will create a sales invoice for a new customer (Customer we don’t have in our Master).

To follow Step by Step you need to do a small setup:

Open the User Personalization and Set your Profile ID as below:

SINewCustomer-1

Select your Profile as “SMALL BUSINESS

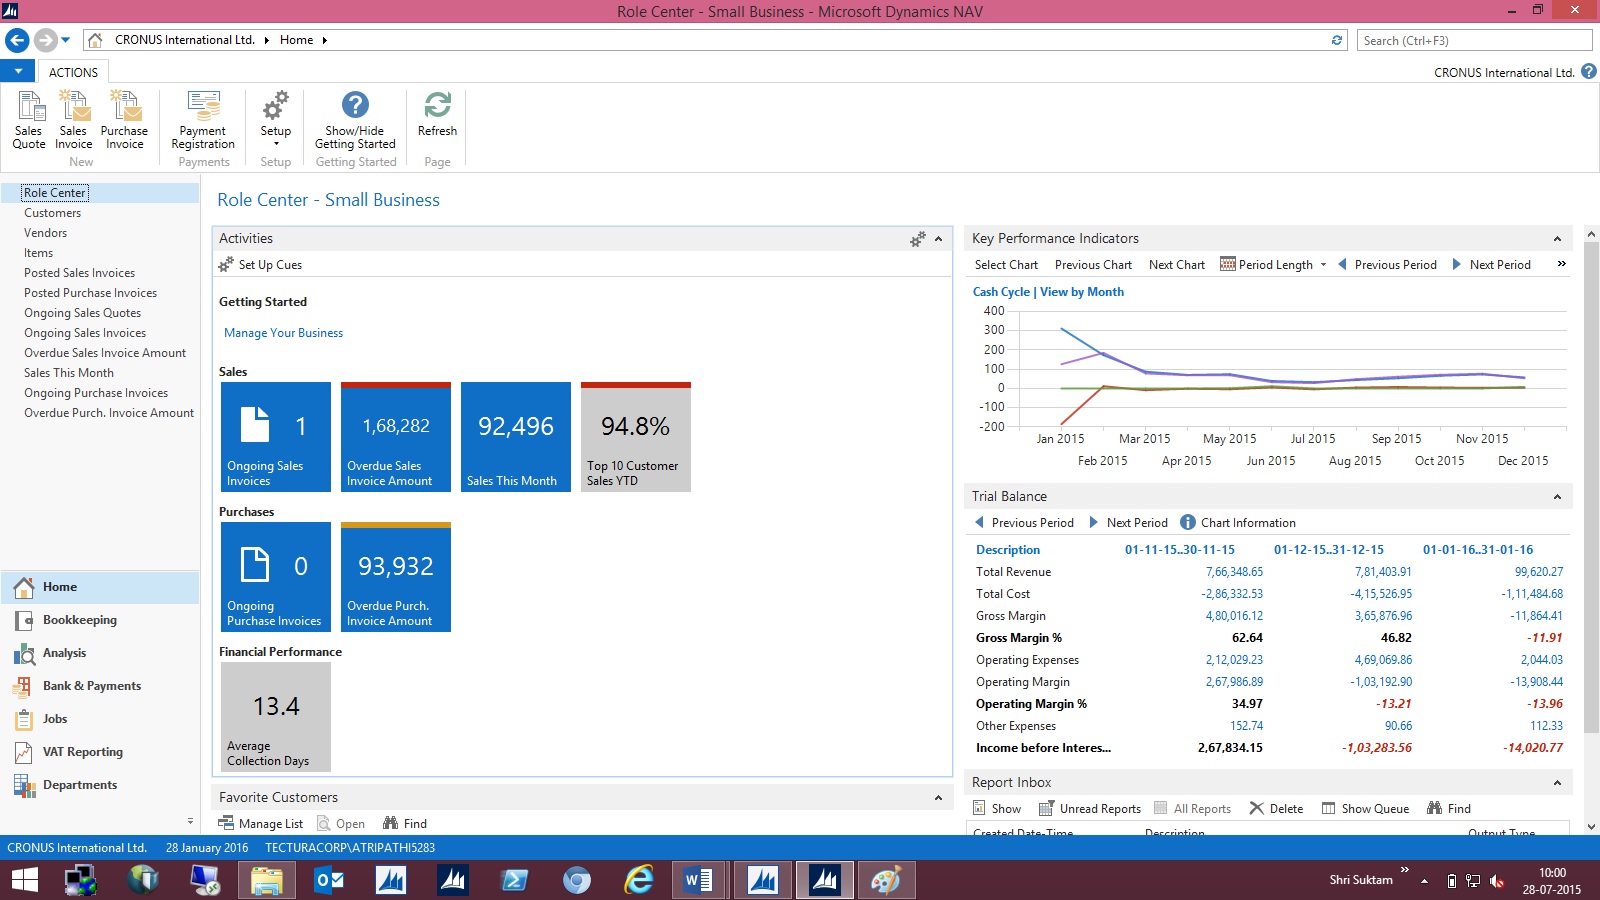
Your Role Center will look like below:

SINewCustomer-2

  • On the Role Center, choose Ongoing Sales Invoices to open the list of ongoing sales Invoices.

  • On the Home tab, in the New group, choose New to create a new sales invoice.

  • In the Customer Name field, type the name of the new customer, and then press Enter or Tab to leave the field


Create the sales invoice for the new customer.

Notice that some fields are marked with red asterisks to tell which fields must be filled.

SINewCustomer-3

  • In the pop-up dialog, choose Yes to create the new customer

  • In the Templates window, select Customer DOMESTIC (or as desired), and then choose the OK button.


SINewCustomer-4

  • The Customer Card window opens in edit mode. Choose the OK button to close it.


SINewCustomer-5

  • The page closes and focus is back on the sales invoice that is now updated with the customer data.

  • In the Sales Invoice window, on the Lines FastTab, create a new line:


         Enter some line data for example : Item No.: 1001, Quantity: 10

  • On the Home tab, in the Posting group, choose Post.

  • Choose Yes.


SINewCustomer-6

  • Choose No to review the posted sales invoice, as of now we don’t require.


Helpful where we require instant Customer registration for recording the Orders. Later we will fill out rest of the details regarding Customer.

UpdatePropagation Property

Sets a value that specifies what happens when a main page with a subpage is updated.

The UpdatePropagation property is available on part controls and has two options; Subpage and Both.

If UpdatePropagation is set to Subpage, an update action will update the subpage only.

If UpdatePropagation is set to Both, an update action will update both the main page and the subpage.

This is useful if a value on the subpage changes, and you want a main page total to be refreshed automatically.

Use the UpdatePropagation property to update a main page total, when the amount on the subpage lines is updated. Add a CurrPage.UPDATE(); call, for example, in the OnValidate trigger on the subpage to have the UpdatePropagation property take effect.

Let’s do it practically how it works:

I am taking Sales Order for demo of above property.

Let’s start with adding a field in Sales Header Table
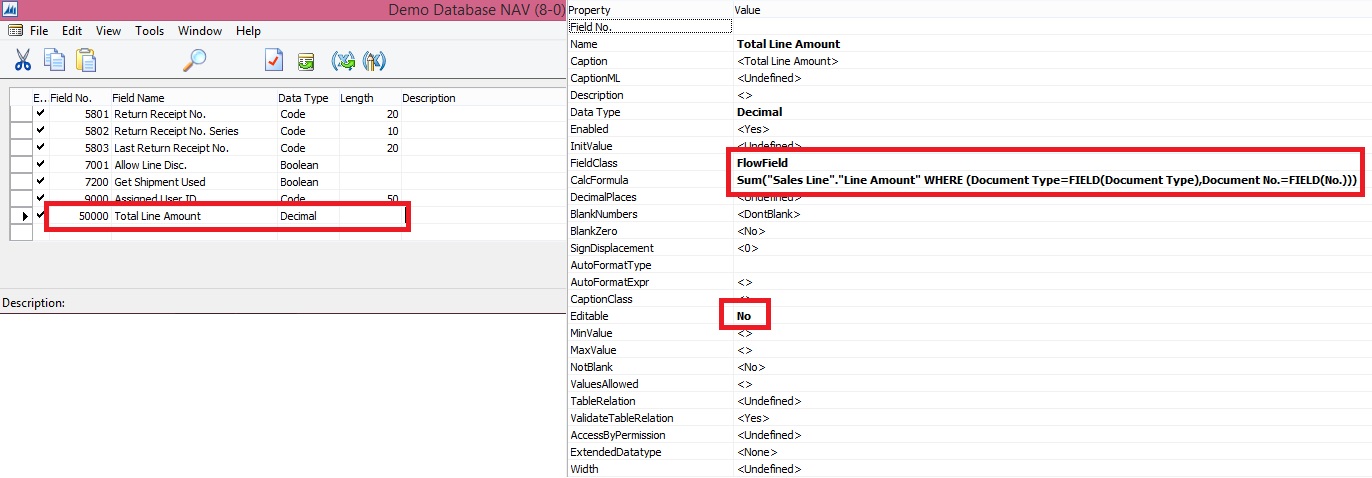
UpdatePropagation-1

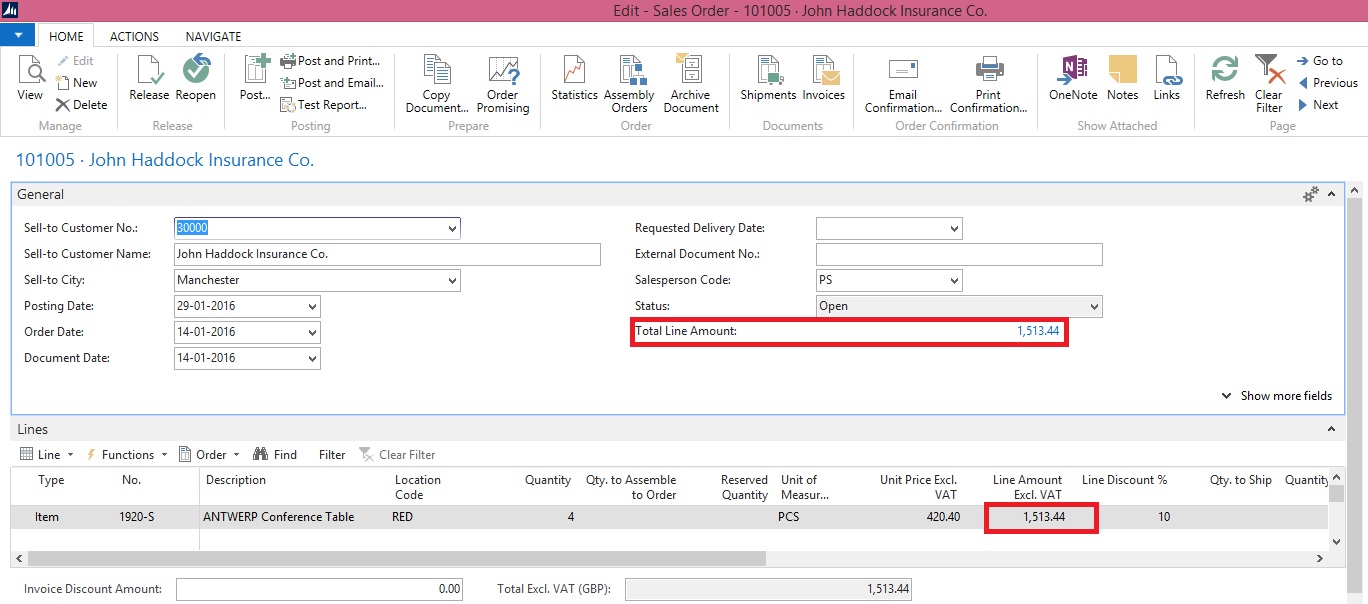
I have added Total Line Amount as Flow field to Sum Line Amount from Lines.

Next I will add this field to Sales Order Page.
UpdatePropagation-2

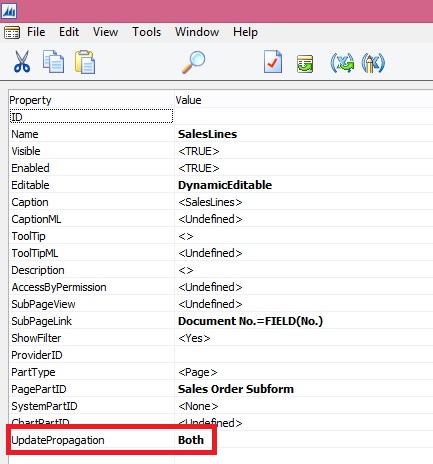
If we run now and make changes in Lines the Total Line amount will not update until we refresh the Page. To enable auto refresh we will be required to add Update Propagation Property of the Subpage to Both.
UpdatePropagation-3

After doing this if I make any changes which changes the Line Amount for the lines, The Total Line Amount in Header will get updated automatically, we will not require to refresh the page.
UpdatePropagation-4

We are done, so simple.

Tuesday 21 July 2015

Data Upgrade Codeunit in Navision 2015 – Part -2

We have seen how to create Upgrade code unit in our previous post.

Please go through it, if not seen earlier the Data Upgrade Codeunit in Navision 2015 – Part -1 here 

Let us continue from where we left our previous post.

We have created the Upgrade code unit to copy the data to upgrade table while performing destructive changes to My Sales Customer table.

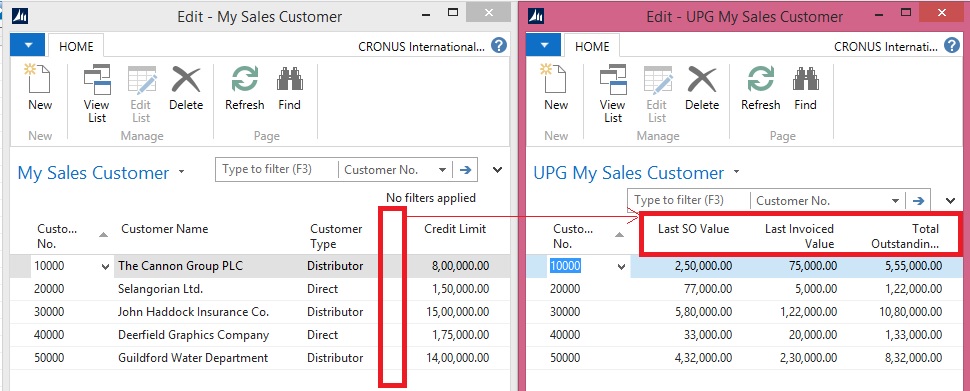
We removed certain fields from the My Sales Customer table and the related information was moved to UPG My Sales Customer table.

Now it’s time to move these information to actual table we create for this purpose My Detailed Customer Entry table.

Although in this example this table will be exact copy of UPG My Sales Customer table, so simply we need to copy records to My Detailed Customer Entry table.

But some time we may require to add certain more field’s value while moving the data Like Entry No, Posting date to maintain the data integrity. Like think of some Service type of information you are maintaining then the same set of record may repeat number of times on different dates, then in this case we will require to add certain fields like Entry No. and Posting Dates.

Let us assume we will be maintain data of My Detailed Customer Entry in incremental way as of situation on every transaction. Balances will be maintained as of when transaction was performed.

Although this example is not feasible or practice but still we are continuing to just see how to write Upgrade Function for such purpose.

Our today’s task is to design and run data upgrade function to move data from the upgrade table to its new location.

Now the fields are deleted from the My Sales Customer table and the data is saved in the UPG My Sales table. The next step is to create the new table where the data will reside (My Detailed Customer Entry) and move the data into that table.

Let’s create the table to be used for recording of all future Customer Balances and to accommodate the data we already had in the My Sales Customer table and which we moved into the UPG My Customer table.

  • In the Object Designer select the Tables button and then select New button to create a new table

  • Define the table layout based on the layout shown in the Screenshot.


Upgrade Codeunit 2 - 1

  • In the Dev. Environment menu, select File-Save action to save the table.

  • On the Save dialogue, define ID, Name = My Detailed Customer Entry, and select OK to save the table.

  • Close the table editor.


We will now create a new function which will contain the code to migrate the data from the upgrade table to the new table.

Note that the FunctionType property of the newly created function is set to “Upgrade”. This is how the NAV server can later figure out which function from the upgrade codeunit it must execute.

The function marked as “Upgrade” function can call functions marked as “Normal” if necessary.

  • In the Object Designer select the Codeunits button, select codeunit 50000 UPGTK Codeunit and then select the Design button.

  • In the Dev. Environment menu, select View-C/AL Globals action and in the form which is opened select the Functions tab.

  • Enter the name of the function, e.g. UpgradeCustomerDetails
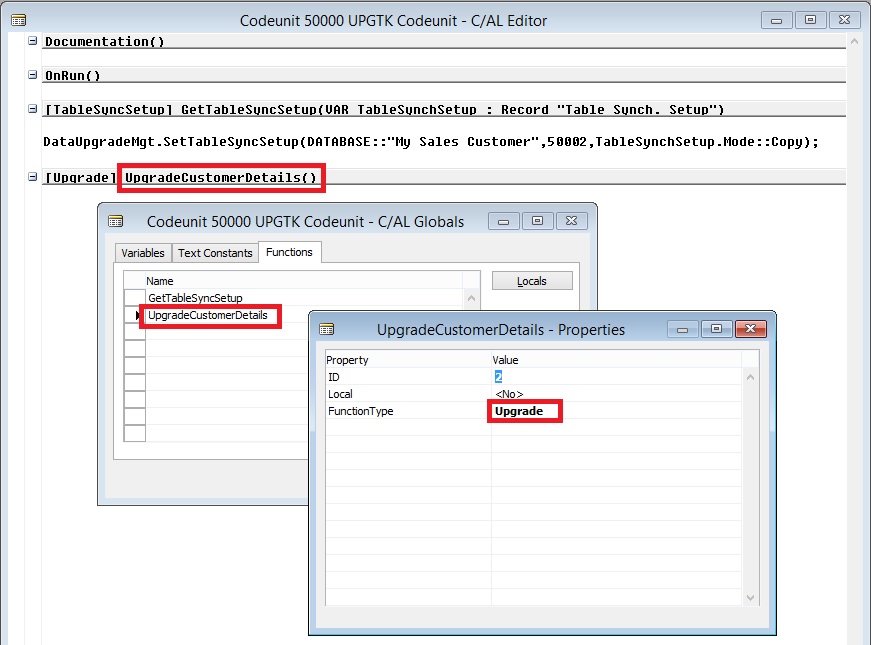

Upgrade Codeunit 2 - 2

  • Select the UpgradeCustomerDetails function on the Functions tab and then select the Locals button to define function parameters.

  • On the C/AL Locals form, select Variables tab and add 3 local variables as shown in the Screenshot section.

  • Close the C/AL Locals and C/AL Globals forms to return to the C/AL Editor.


Upgrade Codeunit 2 - 3

The code we add to the UpgradeCustomerDetails function will copy the data from the UPG My Sales Customer table to the My Detailed Customer Entry table and then clean up the UPG Vehicle table.

  • Code like the Screenshot into the UpgradeCustomerDetails function.


//>> Upgrade Code

EntryNo := 1;

WITH UpgCustomer DO BEGIN

IF FINDSET THEN

REPEAT

DetailedCustomerEntry.INIT;

DetailedCustomerEntry."Entry No." := EntryNo;

DetailedCustomerEntry."Customer No." := "Customer No.";

DetailedCustomerEntry."As of Date" := today;

DetailedCustomerEntry."Last SO Value" := "Last SO Value";

DetailedCustomerEntry."Last Invoiced Value" := "Last Invoiced Value";

DetailedCustomerEntry."Total Outstanding Value" := "Total Outstanding Value";

DetailedCustomerEntry.INSERT;

EntryNo := EntryNo + 1;

UNTIL NEXT = 0;

DELETEALL;

END;

//<<Upgrade Code

  • In the Dev. Environment menu, select File-Save action to save the codeunit.

  • On the Save dialogue select OK button.

  • Close the codeunit editor.


Upgrade Codeunit 2 - 4

  • In the Dev. Environment menu select Tools – Data Upgrade – Start… action.

  • Agree to the confirmation dialogue.

  • In the Start Data Upgrade window select the OK button.


You can start the data upgrade process from the Dev. Environment, or from Microsoft Dynamics NAV 2015 Administration Shell, using Start-NAVDataUpgrade cmdlet.

The NAV server will locate all upgrade codeunits and will invoke all upgrade functions within these codeunits for all companies in the database.

If you have multiple upgrade functions in your upgrade codeunit, you can choose to execute them in parallel or in sequence. You can also choose to stop at first error, or continue execution of other functions, see the list of all failed ones, fix them and start them again using the Data Upgrade - Resume… action.

  • In the Dev. Environment menu select Tools – Data Upgrade – Start… action.

  • Agree to the confirmation dialogue.

  • In the Start Data Upgrade window select the OK button.


Upgrade Codeunit 2 - 5

Upgrade Codeunit 2 - 6

  • In the Object Designer select the Tables button, then select table My Detailed Customer Entry and select Run button


Upgrade Codeunit 2 - 7

You can see that the data from the upgrade table was successfully transferred into the new table.

Now since our data is sitting in its right place, now we can remove objects we are using for Upgrade purpose.

Now the data upgrade is completed and we need to remove the objects used within that process.

Force-delete the upgrade table, since the data was already transferred into the new table.

Delete the upgrade codeunit to make sure the old synchronization instructions defined in it are not used by the NAV server when you decide to change the My Sales Customer table again. Alternatively (if you want to reuse the upgrade codeunit later) you can choose to change the type of the GetTableSynchSetup function to “Normal”.

Upgrade Codeunit 2 - 8

Now we are done with our Upgrade project.

Conclusion


This set of demonstrations have provide you the insight, new way of running the data upgrade in Microsoft Dynamics NAV 2015 by involving the schema synchronization and upgrade codeunits.

The new approach:

  • Simplifies the upgrade environment, since all steps are performed by the latest version of the product.

  • Increases the data upgrade performance, since it is possible to parallelize execution of the data upgrade functions within the upgrade codeunit and across companies.

  • Reduces the amount of code to be written to handle the data upgrade, since some actions are now executed automatically by the NAV Server.

  • Allows data upgrade to be invoked by the NAV server, minimizing the number of manual actions which should be performed during the data upgrade.

  • Uses familiar upgrade toolkit design concepts (e.g. upgrade tables, upgrade functions).
Sunday 19 July 2015

Data Upgrade Codeunit in Navision 2015 – Part -1

Let us start with background preparation.

I have prepared a table with below fields and filled with some sample data.

DataUpgradeCU-1

Fill in the My Sales Customer table with demo data.

Make sure you have data in all columns, preferably create several records in this table.

Now when the fields are deleted from the My Sales Customer Table and the data is saved in the UPG My Sales Customer table, we will create the new table where the data will reside in the new version (My Detailed Customer Entry) and move that data into that table using Data Upgrade action in the Dev. Environment.

Since now my project requirement is to refactor the My Sales Customer table and delete the fields which store the information about the Sales Information (“Value” fields), we need to create an intermediate upgrade table where the data from those fields will be stored until you move it into the new My Detailed Customer Entry table.

We will perform below action:

  • Open the Object Designer and select table My Sales Customer

  • Select the Design button to open the table in the designer.

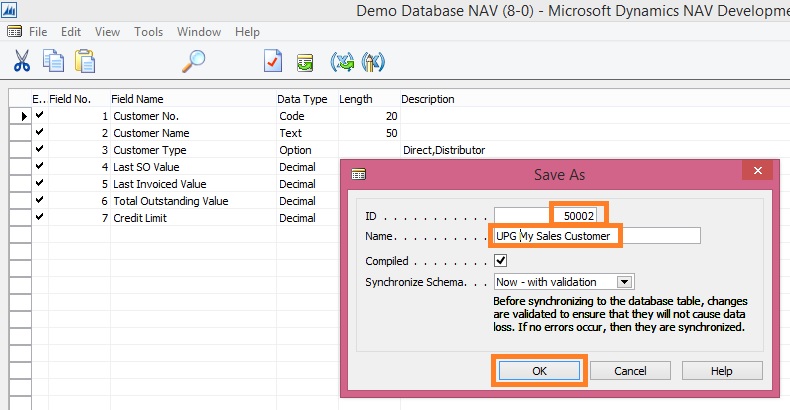
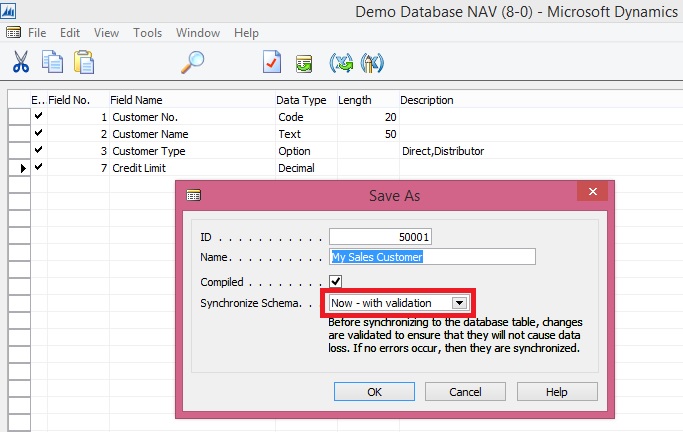
  • In the Dev. Environment menu, select File-Save As… action.

  • Change the ID value to New ID, change the Name to UPG My Sales Customer and select OK button to close the dialogue and create a copy of the table.


DataUpgradeCU-1

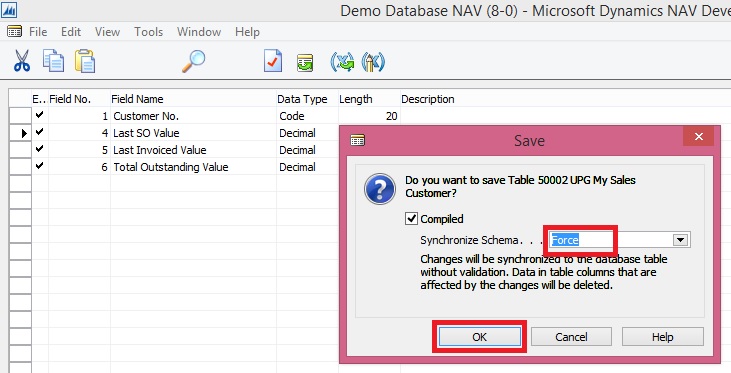
  • In table UPG My Sales Customer delete fields Customer Name, Customer Type and Credit Limit.

  • In the Dev. Environment menu, select File-Save action.

  • On the Save dialogue, set the Synchronize Schema option to “Force” and  select OK button to close the dialogue.


DataUpgradeCU-1

  • In the Object Designer select the Codeunits button and then click New to start creating a new upgrade codeunit.

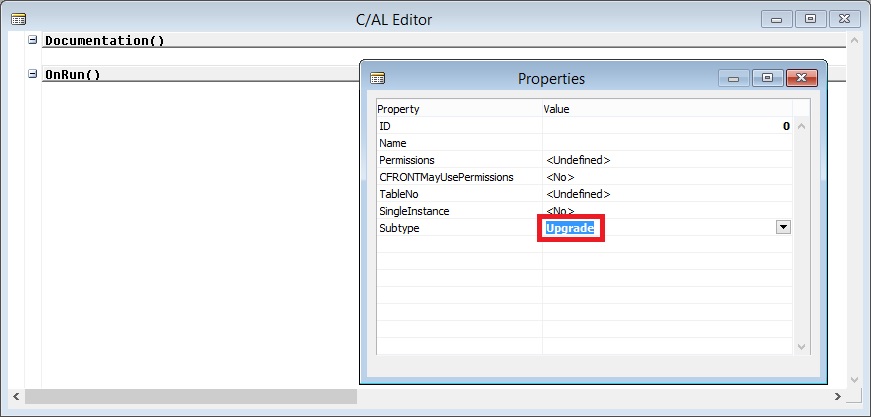
  • In the Dev. Environment menu, select View-Properties action to start editing the properties of the codeunit.

  • Change the Subtype property to Upgrade and close the Properties form.


DataUpgradeCU-1

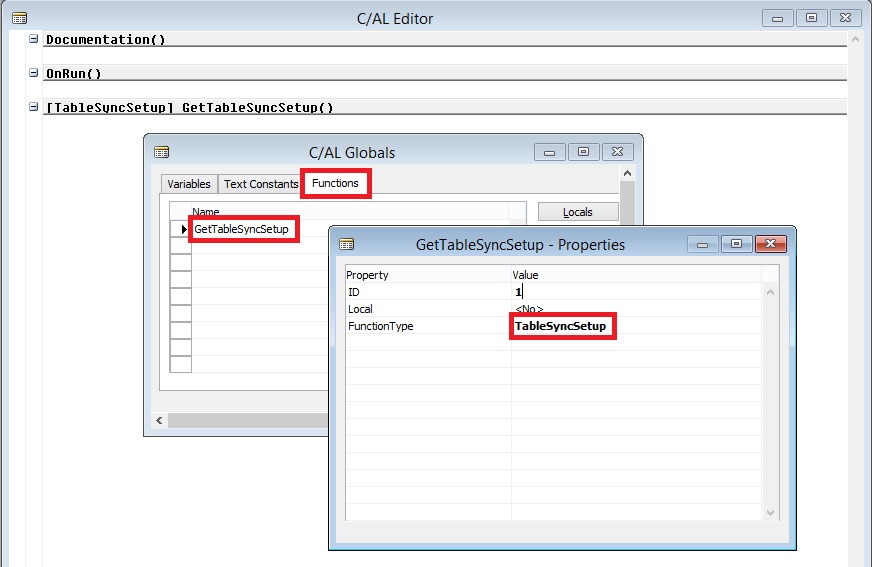
  • In the Dev. Environment menu, select View-C/AL Globals action and in the form which is opened select the Functions tab.

  • Enter the name of the function, e.g. GetTableSyncSetup

  • In the Dev. Environment menu, select View-Properties action to start editing the properties of the function.

  • Change the FunctionType property to TableSyncSetup and close the Properties form.


DataUpgradeCU-1

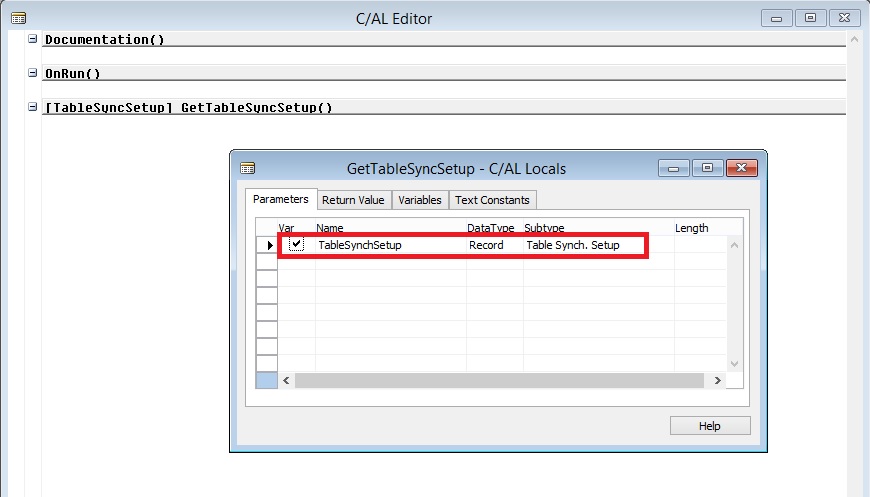
  • Select the GetTableSyncSetup function on the Functions tab and then select the Locals button to define function parameters.

  • Add a parameter of DataType = Record, Subtype = Table Synch. Setup, Name = TableSynchSetup, Var = Yes.


DataUpgradeCU-1

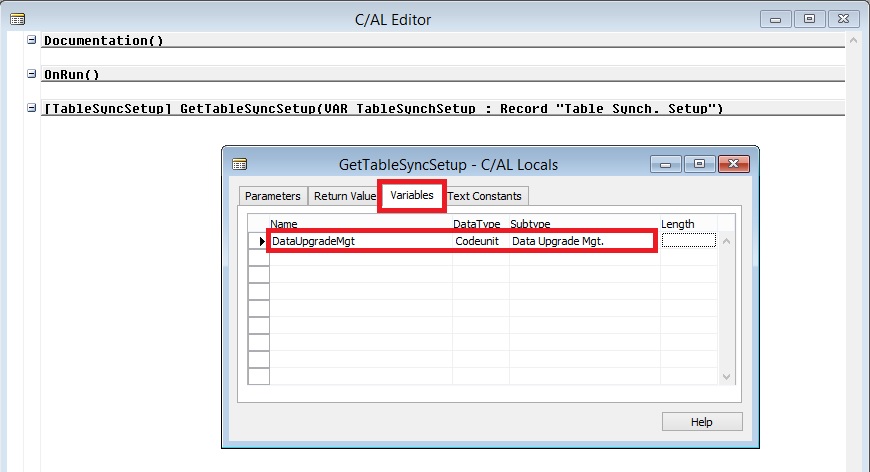
  • On the C/AL Locals form, select Variables tab and add a local variable of DataType = Codeunit, Subtype = Data Upgrade Mgt.

  • Close the C/AL Locals and C/AL Globals forms to return to the C/AL Editor.


DataUpgradeCU-1

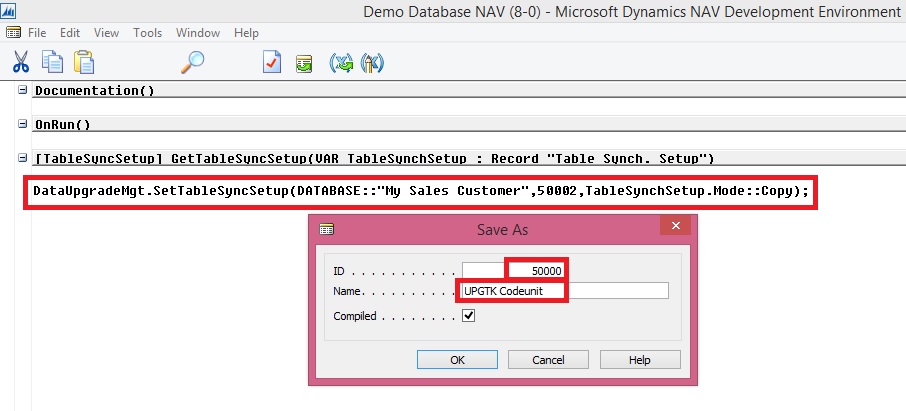
  • In the GetTableSyncSetup function, add the C/AL statement as presented on the screenshot.

  • In the Dev. Environment menu, select File-Save action to save the codeunit.

  • On the Save dialogue, define ID , Name = UPGTK Codeunit, and select OK to save the codeunit.

  • Close the codeunit editor.


DataUpgradeCU-1

[

//>>Data Upgrade Code

// To copy data from table My Sales Customer to UPG My Sales Customer table

DataUpgradeMgt.SetTableSyncSetup

(

DATABASE::"My Sales Customer",

50002,

TableSynchSetup.Mode::Copy

);

//<<Data Upgrade Code

]

  • In the Object Designer, select the Tables button and then select the My Sales Customer table in the list of tables.

  • Click Design to open the table in the table designer.

  • Delete the following fields:

  • Last SO Value

  • Last Invoiced Value

  • Total Outstanding Value

  • In the Dev. Environment menu, select File-Save action.

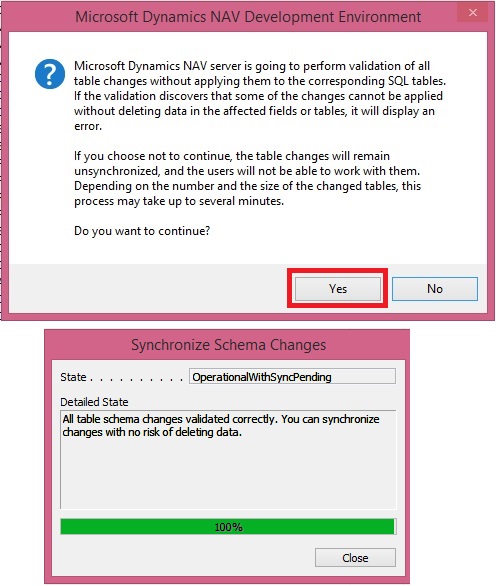
  • On the Save dialogue, notice that the Synchronize Schema option is set to “Now – with validation” and select OK button to close the dialogue.


DataUpgradeCU-1

  • In the Object designer, find table UPG My Sales Customer and click Run to check if the data was copied there by the schema synchronization.


DataUpgradeCU-1

Here we are now done with the Part -1 of our exercise. Next step is to move this temp data in respective table as part of our Upgrade. We will see upgrade part in our next post.

Saturday 18 July 2015

Schema Synchronization in Microsoft Dynamics Navision 2015

NAV 2015 provides you with flexibility of deciding when and how your table changes should be synchronized with corresponding SQL tables.

What is table synchronization?

SchemaSync-1

NAV 2013 R2:- Schema synchronization executes automatically on any connection to the Server.

NAV 2015:- Schema synchronization executes on demand by the Server.

Way the Synchronization works:

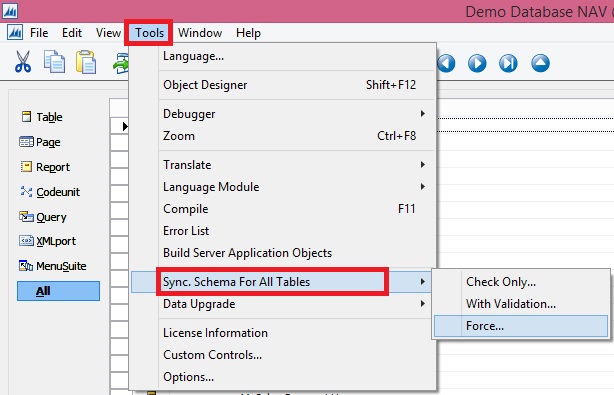
  1. Per Table Synchronization

  2. Synchronizing schema changes for all tables


SchemaSync-2

Now let us see how it works:

SchemaSync-3

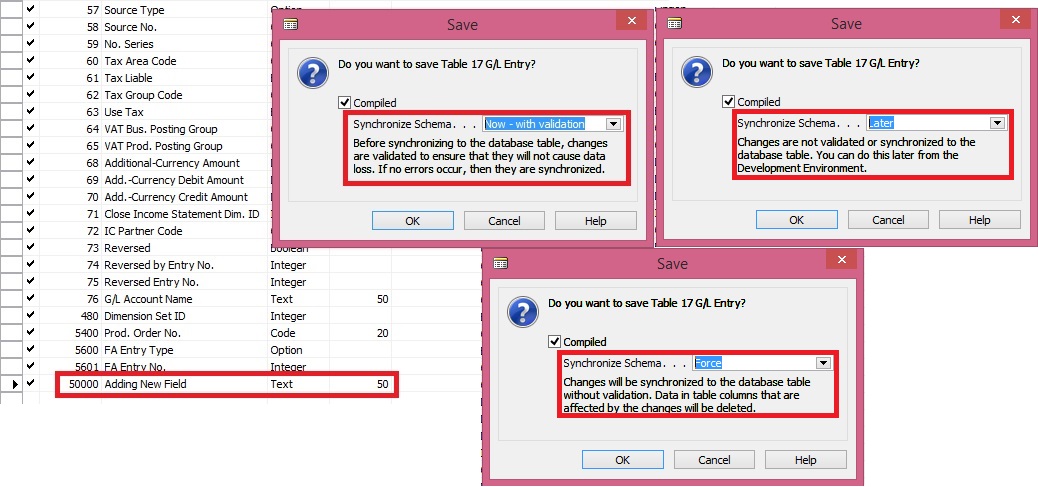
Add/Modify/Delete Fields (change table definition) we will be prompted for Synchronizing the Schema.

It gives three options description is self-explanatory.

Some time we have to do major changes to the tables which takes lots of time to sync, we can postpone the sync process by selecting Later. Once we are done with all of our changes we can go with synchronization in one go.

SchemaSync-4

We get same options.

New option Check Only….

SchemaSync-5

This option will only report outcome and will not Sync the Schema.

Since we have just added new field so no risk as reported by above check.

Now I will delete one field from the table and let’s see what result comes.

SchemaSync-6

Summary of the 3 options as below:

SchemaSync-7

When data loss is reported while changes in table definition is referred as destructive changes.

SchemaSync-8

You use upgrade codeunits when you make changes to a table definition, either from the Microsoft Dynamics NAV Development Environment or during an upgrade. Upgrade codeunits migrate existing business data from the old table structure into the new table structure. An upgrade codeunit serves the following purposes:

  • Provides instructions for how to handle data changes to a table during schema synchronization.

  • Provides the logic for migrating existing data in the business data table from the old format to the new format after schema synchronization.


A typical example of when to use an upgrade codeunit is when you remove a field from a table definition and you do not want to lose the existing data in the business data table. Instead, you want to use it somewhere else in the new application.

You implement upgrade codeunits when you make destructive changes to tables in Microsoft Dynamics NAV Development Environment. After you have created an upgrade codeunit to handle table changes, you can use it when you upgrade data from an earlier version of Microsoft Dynamics NAV to the current version. A single upgrade codeunit will typically contain table schema synchronization instructions and data migration logic for multiple tables that have changed from one version of Microsoft Dynamics NAV to another.

SchemaSync-9

I will come back on this topic in another post with more details.

And many more options like PowerShell Sync with above options.

Benefits:-

Perform on demand – transparency -> As developer and system administrator, you are in control when to call the schema synchronization and how to synchronize table changes. You can invoke it, plan for it and schedule for it on a case by case basis. You can also monitor its progress and monitor the state of your database (tenant).

Not blocking other changes – productivity -> Schema Synchronization has become more granular. It can be performed per table object as well as for all table changes at once. When one table is being synchronized you are no longer blocked, and you can continue making changes to other tables.

Opened for additional instructions – flexibility -> Using upgrade codeunits you can provide input for the schema synchronization to do extra tasks, like automatically moving or copying data into upgrade tables, checking the changes or forcefully applying them where necessary. (Will come up with more details on this in my next post)