Watch this video for more details.
This video demonstrates how to dynamically load certificates during web services communication in Microsoft Dynamics NAV.
https://youtu.be/NW_ZiW6J790
Showing posts with label Security. Show all posts
Showing posts with label Security. Show all posts
Wednesday, 20 April 2016

Saturday, 29 August 2015
Security filter—record-level security
Security filters—record level security/access control can be explained by for accessing G/L Accounts. Let's take an example where we want the user to view only balance sheet G/L Accounts.
To accomplish the record-level security, we use security filters from the Permissions window. Click on the Assist Edit button in the Security Filters field in the Permissions window and select the field on which we want to apply filters.
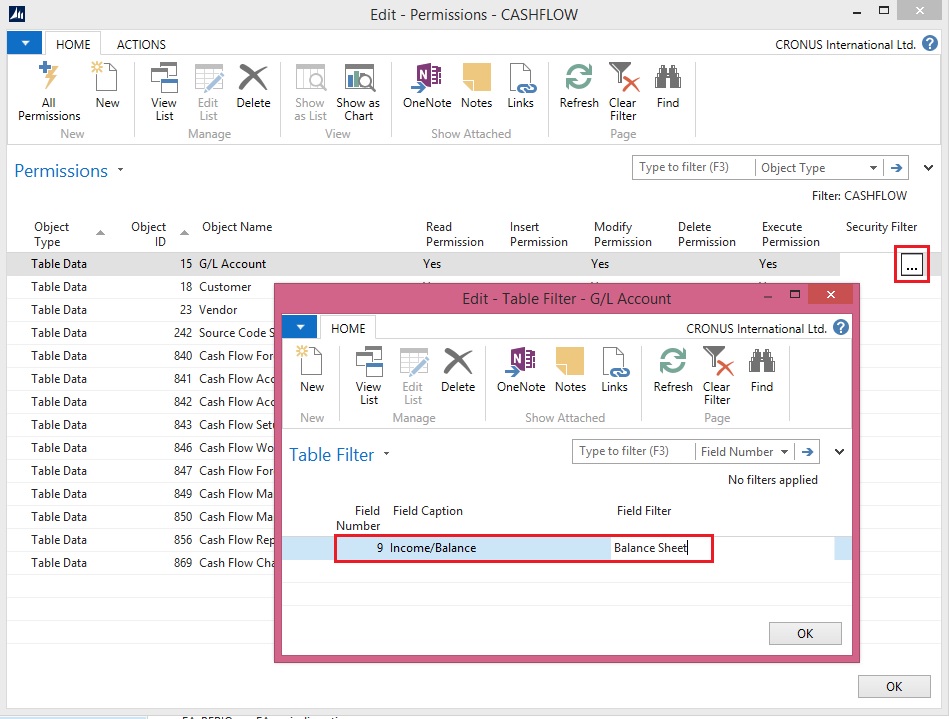
Record-level security is available only if we are using the SQL database, need not to mention for NAV 2015.
How to: Set Security Filters
You set security filters to limit the access that a user has to data in a table. You set security filters on permission sets, which you assign to users.
To set a security filter
In the Search box, enter Permission Sets, and then choose the related link.
On the Permission Sets page, select the permission set to which you want to add a security filter, and then choose Permissions.
On the Permissions page, on the row for the table data to which you want to add a security filter, in the Security Filter column, choose the AssistEdit button.
The Table Filter page opens.
In the Table Filter page, in the Field Number column, select the field on which you want to limit a user's access.
For example, if you want to create a security filter so that a user can view only sales with a specific salesperson code, then choose the field number for the Salesperson Code field.
The Field Caption column in the Table Filter page is filled in automatically after you select the field number.
In the Field Filter column, enter the value of field that you want to use to limit access.
For example, to limit a user's access to only Annette Hill's sales, enter AH, which is the salesperson code for Annette Hill, in the Field Filter column.
Note
Record level security filters do not support wildcard characters. This means that you cannot use * and ? in the filters. You can use other symbols, delimiters and, operators, such as, <, >, |, &, .., and =. If you do not enter an operator, then the default operator = is used.
Security filters support Unicode characters. The maximum length of a security filter is 200 characters, including all field names, delimiters, symbols, and operators that used in the filter.
When multiple permission sets that refer to the same table data are assigned to a user, they are combined so that the least restrictive filter is used. You should not repeat a table in multiple permission sets if you plan to combine those permissions sets for one user.
Security Filter Modes
Query objects and Record objects, including both explicit record variables and implicit records on pages, reports, or XMLports, have a property named SecurityFiltering, which describes how security filters are applied.
The possible values of the SecurityFiltering property are: Filtered, Validated, Ignored, Disallowed
Filtered
If a record is set to Filtered, then any security filters that have been set are respected for this instance of the record. To the user, it is as if records outside the security filters that do not exist.
An example scenario in which you use the Filtered value is that one salesperson is not allowed to view customers, sales quotes, or sales orders that belong to another salesperson. When the salesperson opens a list of customers or sales documents, or runs reports such as the Customer - Top 10 List report, he sees his filtered view of customers, sales quotes, and sales orders.
Validated
If a record is set to Validated, then any security filters that have been set are respected for this instance of the record, and an error occurs if the code attempts to access a record that is outside the range of the security filters.
An example scenario in which you use the Validated value is that one parts purchaser in a warehouse is responsible for only one location and can view and create purchase orders for only that location. However, some purchase orders have lines for multiple locations. Only a parts purchaser who has access to all locations should be allowed to post these purchase orders that have lines for multiple locations. All other purchasers receive an error.
If security filters have been set, then the Validated value decreases performance.
The Validated value is used mainly for compatibility with the security model in earlier versions of Microsoft Dynamics NAV. MS recommend that you use the other modes when you implement your security model.
Ignored
If a record is set to Ignored, then any security filters that have been set are ignored for this instance of the record.
An example scenario in which you use the Ignored value is that one salesperson is not allowed to view customers, sales quotes, or sales orders that belong to another salesperson. However, to post his sales orders, the salesperson must have access to all entries in the Customer Ledger Entry table so that the posting algorithm can find the last sales order entry number and generate the correct number for the next entry. In the code that posts sales orders, you set the SecurityFiltering property of the record variable to Ignored, but for record variables in other parts of the code, you set the SecurityFiltering property to either Filtered or Validated.
When you set the SecurityFiltering property on a record to Ignored, the administrator who sets a security filter is not informed that the security filter will be ignored. You must be careful when you set the SecurityFiltering property that it does not cause unintended information disclosure.
Disallowed
If a record is set to Disallowed, then setting any security filter on the record causes an error.
An example scenario in which you use the Disallowed value is that you have batch jobs that must be run only by users who have access to all records in the related tables, otherwise the batch jobs can cause incorrect and potentially harmful results. The partner developer sets record variables on these batch jobs to Disallowed so that a user who does not have access to all records in the related tables receives an error.
Important
It is not supported to change the default Filtered value of the SecurityFiltering property on implicit records on pages.
If you keep the default values after you upgrade from Microsoft Dynamics NAV 2009 to Microsoft Dynamics NAV 2015, then the behavior is the same in all cases except the following:
In earlier versions, the COUNT Function (Record) ignored security filters and always returned the total number of records unless you called the SETPERMISSIONFILTER function to get a filtered count. In Microsoft Dynamics NAV 2015, the COUNT function adheres to the SecurityFiltering property.
In earlier versions, on a page, you could modify or insert a record outside of the range of your security filters but in Microsoft Dynamics NAV 2015, you cannot.
Note
For Query variables, the Validated value of the SecurityFiltering property is not allowed.
Security Filters and FlowFields
If you set a security filter on a table that is used in a FlowField calculation, then the calculated value of the FlowField is filtered, based on the security filter and the security filter mode of the record variable for the record in the table.
For example, if you set a security filter so that a user can only view sales with a specific salesperson code, and if the security filter mode is Filtered, then when the user views a FlowField that calculates total sales, the user can see the total of only those sales that have the specific salesperson code. In earlier versions of Microsoft Dynamics NAV, the security filter mode value was Validated and in this example, the user received an error.
Programming Examples
For these examples, you have a table that has 100 records. Each record has an ID field that is the primary key of the table. The values of the ID field that are currently in the database range from 1 to 100. In this example, you set a security filter on the table data for ID=1..50. Then, in a codeunit you create a record variable for the table.
Performance Impact of Security Filtering Mode
If security filters are set on a table, then setting the SecurityFiltering property to Validated on a record instance of that table causes a decrease in performance.
The Microsoft Dynamics NAV Server must go through every record in the table to validate the record instead of adding the filters to the query that is sent to SQL Server.
If security filters are not set, then setting the SecurityFiltering property to Validated has no performance impact.
Note
MS recommend that you change commonly used record variables from the default value of Validated to either Filtered or Ignored to improve performance.
To accomplish the record-level security, we use security filters from the Permissions window. Click on the Assist Edit button in the Security Filters field in the Permissions window and select the field on which we want to apply filters.
Record-level security is available only if we are using the SQL database, need not to mention for NAV 2015.
How to: Set Security Filters
You set security filters to limit the access that a user has to data in a table. You set security filters on permission sets, which you assign to users.
To set a security filter
In the Search box, enter Permission Sets, and then choose the related link.
On the Permission Sets page, select the permission set to which you want to add a security filter, and then choose Permissions.
On the Permissions page, on the row for the table data to which you want to add a security filter, in the Security Filter column, choose the AssistEdit button.
The Table Filter page opens.
In the Table Filter page, in the Field Number column, select the field on which you want to limit a user's access.
For example, if you want to create a security filter so that a user can view only sales with a specific salesperson code, then choose the field number for the Salesperson Code field.
The Field Caption column in the Table Filter page is filled in automatically after you select the field number.
In the Field Filter column, enter the value of field that you want to use to limit access.
For example, to limit a user's access to only Annette Hill's sales, enter AH, which is the salesperson code for Annette Hill, in the Field Filter column.
Note
Record level security filters do not support wildcard characters. This means that you cannot use * and ? in the filters. You can use other symbols, delimiters and, operators, such as, <, >, |, &, .., and =. If you do not enter an operator, then the default operator = is used.
Security filters support Unicode characters. The maximum length of a security filter is 200 characters, including all field names, delimiters, symbols, and operators that used in the filter.
When multiple permission sets that refer to the same table data are assigned to a user, they are combined so that the least restrictive filter is used. You should not repeat a table in multiple permission sets if you plan to combine those permissions sets for one user.
Security Filter Modes
Query objects and Record objects, including both explicit record variables and implicit records on pages, reports, or XMLports, have a property named SecurityFiltering, which describes how security filters are applied.
The possible values of the SecurityFiltering property are: Filtered, Validated, Ignored, Disallowed
Filtered
If a record is set to Filtered, then any security filters that have been set are respected for this instance of the record. To the user, it is as if records outside the security filters that do not exist.
An example scenario in which you use the Filtered value is that one salesperson is not allowed to view customers, sales quotes, or sales orders that belong to another salesperson. When the salesperson opens a list of customers or sales documents, or runs reports such as the Customer - Top 10 List report, he sees his filtered view of customers, sales quotes, and sales orders.
Validated
If a record is set to Validated, then any security filters that have been set are respected for this instance of the record, and an error occurs if the code attempts to access a record that is outside the range of the security filters.
An example scenario in which you use the Validated value is that one parts purchaser in a warehouse is responsible for only one location and can view and create purchase orders for only that location. However, some purchase orders have lines for multiple locations. Only a parts purchaser who has access to all locations should be allowed to post these purchase orders that have lines for multiple locations. All other purchasers receive an error.
If security filters have been set, then the Validated value decreases performance.
The Validated value is used mainly for compatibility with the security model in earlier versions of Microsoft Dynamics NAV. MS recommend that you use the other modes when you implement your security model.
Ignored
If a record is set to Ignored, then any security filters that have been set are ignored for this instance of the record.
An example scenario in which you use the Ignored value is that one salesperson is not allowed to view customers, sales quotes, or sales orders that belong to another salesperson. However, to post his sales orders, the salesperson must have access to all entries in the Customer Ledger Entry table so that the posting algorithm can find the last sales order entry number and generate the correct number for the next entry. In the code that posts sales orders, you set the SecurityFiltering property of the record variable to Ignored, but for record variables in other parts of the code, you set the SecurityFiltering property to either Filtered or Validated.
When you set the SecurityFiltering property on a record to Ignored, the administrator who sets a security filter is not informed that the security filter will be ignored. You must be careful when you set the SecurityFiltering property that it does not cause unintended information disclosure.
Disallowed
If a record is set to Disallowed, then setting any security filter on the record causes an error.
An example scenario in which you use the Disallowed value is that you have batch jobs that must be run only by users who have access to all records in the related tables, otherwise the batch jobs can cause incorrect and potentially harmful results. The partner developer sets record variables on these batch jobs to Disallowed so that a user who does not have access to all records in the related tables receives an error.
Important
It is not supported to change the default Filtered value of the SecurityFiltering property on implicit records on pages.
If you keep the default values after you upgrade from Microsoft Dynamics NAV 2009 to Microsoft Dynamics NAV 2015, then the behavior is the same in all cases except the following:
In earlier versions, the COUNT Function (Record) ignored security filters and always returned the total number of records unless you called the SETPERMISSIONFILTER function to get a filtered count. In Microsoft Dynamics NAV 2015, the COUNT function adheres to the SecurityFiltering property.
In earlier versions, on a page, you could modify or insert a record outside of the range of your security filters but in Microsoft Dynamics NAV 2015, you cannot.
Note
For Query variables, the Validated value of the SecurityFiltering property is not allowed.
Security Filters and FlowFields
If you set a security filter on a table that is used in a FlowField calculation, then the calculated value of the FlowField is filtered, based on the security filter and the security filter mode of the record variable for the record in the table.
For example, if you set a security filter so that a user can only view sales with a specific salesperson code, and if the security filter mode is Filtered, then when the user views a FlowField that calculates total sales, the user can see the total of only those sales that have the specific salesperson code. In earlier versions of Microsoft Dynamics NAV, the security filter mode value was Validated and in this example, the user received an error.
Programming Examples
For these examples, you have a table that has 100 records. Each record has an ID field that is the primary key of the table. The values of the ID field that are currently in the database range from 1 to 100. In this example, you set a security filter on the table data for ID=1..50. Then, in a codeunit you create a record variable for the table.
| Security filter mode | Example |
| Filtered | If you set the SecurityFiltering property on the record variable to Filtered, then the code behaves as if records with ID values from 1 to 50 are the only records that exist. If you call the FIND, FINDFIRST, FINDLAST, or FINDSET function on the record variable without any additional filters besides the security filter, then the function only finds records with ID values from 1 to 50. If you call the DELETEALL function, then it successfully deletes records with ID values from 1 to 50. It does not delete records with ID values greater than 50, and it does not return an error. If you modify a record, for example, by calling the MODIFY function on a record with an ID value less than 50, then the function succeeds. If you call the MODIFY function on a record with an ID value greater than 50, then it fails because you do not have access to the record. If you insert a record with an ID less than 50 and the record does not already exist, the INSERT function succeeds. If you insert a record with an ID greater than 50 and the record does not already exist, it fails because you do not have access to the record. If you call the GET function on a record with an ID value less than 50, then the function succeeds. If you call the GET function on a record with an ID value greater than 50, then it fails. |
| Validated | If you set the SecurityFiltering property on the record variable to Validated, then the code behaves as if records with ID values from 1 to 100 exist, but you only have access to the records that are specified by the security filter. If you call the FIND, FINDFIRST, FINDLAST, or FINDSET function on the record variable without additional filters, it finds all 100 records, but a NEXT function call to the record with ID value 51 fails because you do not have access to it. If you call the DELETEALL function, it fails because it finds all 100 records but you do not have access to all of them. If you modify a record with an ID value less than 50, it succeeds. If you modify a record with an ID value greater than 50, it fails. If you insert a record with an ID less than 50 and the record does not already exist, it succeeds. If you insert a record with an ID greater than 50 and the record does not already exist, it fails. |
| Ignored | If you set the SecurityFiltering property on the record variable to Ignored, then the code behaves as if all security filters that are set do not exist for that instance of the record. Any of the FIND functions find all 100 records. The DELETEALL function deletes all 100 records. You can insert and modify records in any range, regardless of security filters. |
| Disallowed | If you set the SecurityFiltering property on the record variable to Disallowed, then as long as a security filter is set on the record, any code that uses the record variable causes an error. |
Performance Impact of Security Filtering Mode
If security filters are set on a table, then setting the SecurityFiltering property to Validated on a record instance of that table causes a decrease in performance.
The Microsoft Dynamics NAV Server must go through every record in the table to validate the record instead of adding the filters to the query that is sent to SQL Server.
If security filters are not set, then setting the SecurityFiltering property to Validated has no performance impact.
Note
MS recommend that you change commonly used record variables from the default value of Validated to either Filtered or Ignored to improve performance.
Friday, 21 August 2015
Creating the Multitenant Environment
Before you start I will recommend to go through my earlier post on Multitenancy Concept & Overview here.
To start with the below steps you will require 2 Accounts preferably Domain Accounts:
How to setup these accounts and what permissions are required for these accounts I would recommend to go through my earlier post on Provisioning the Microsoft Dynamics NAV Server Account here.
Add both the above account to Navision Database with Super permission.
In order to create a multitenant environment (here for Demo Database NAV (8-0)), the following steps need to be done:

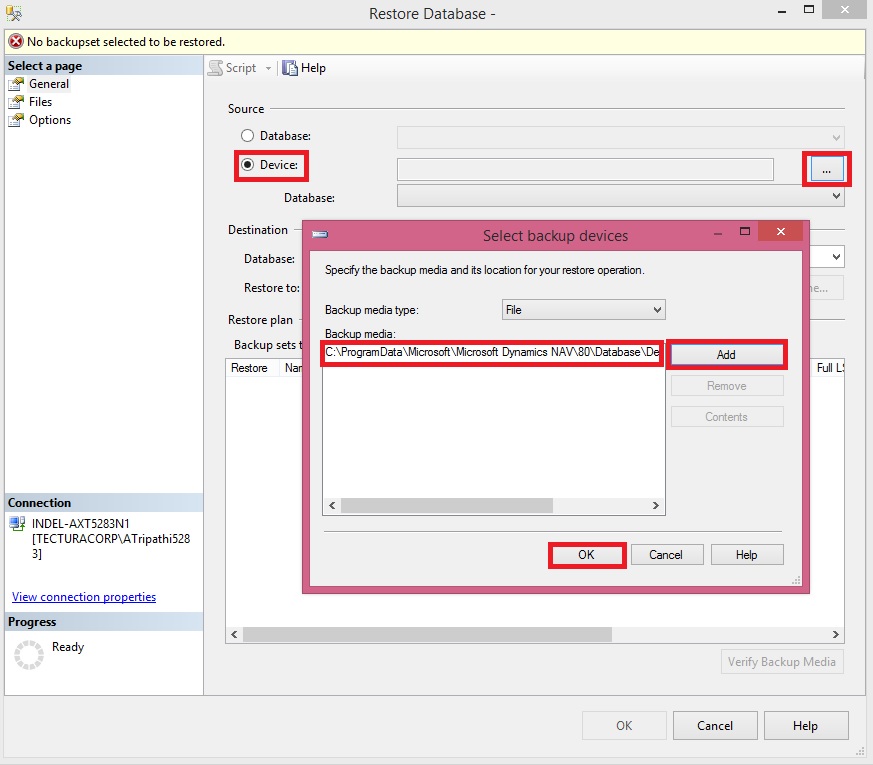
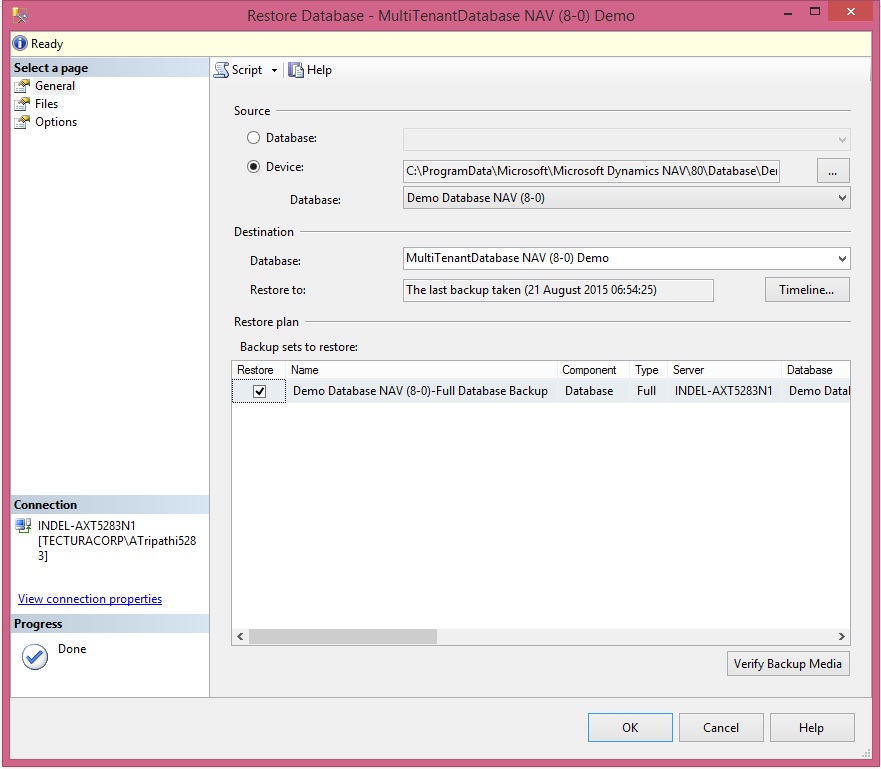


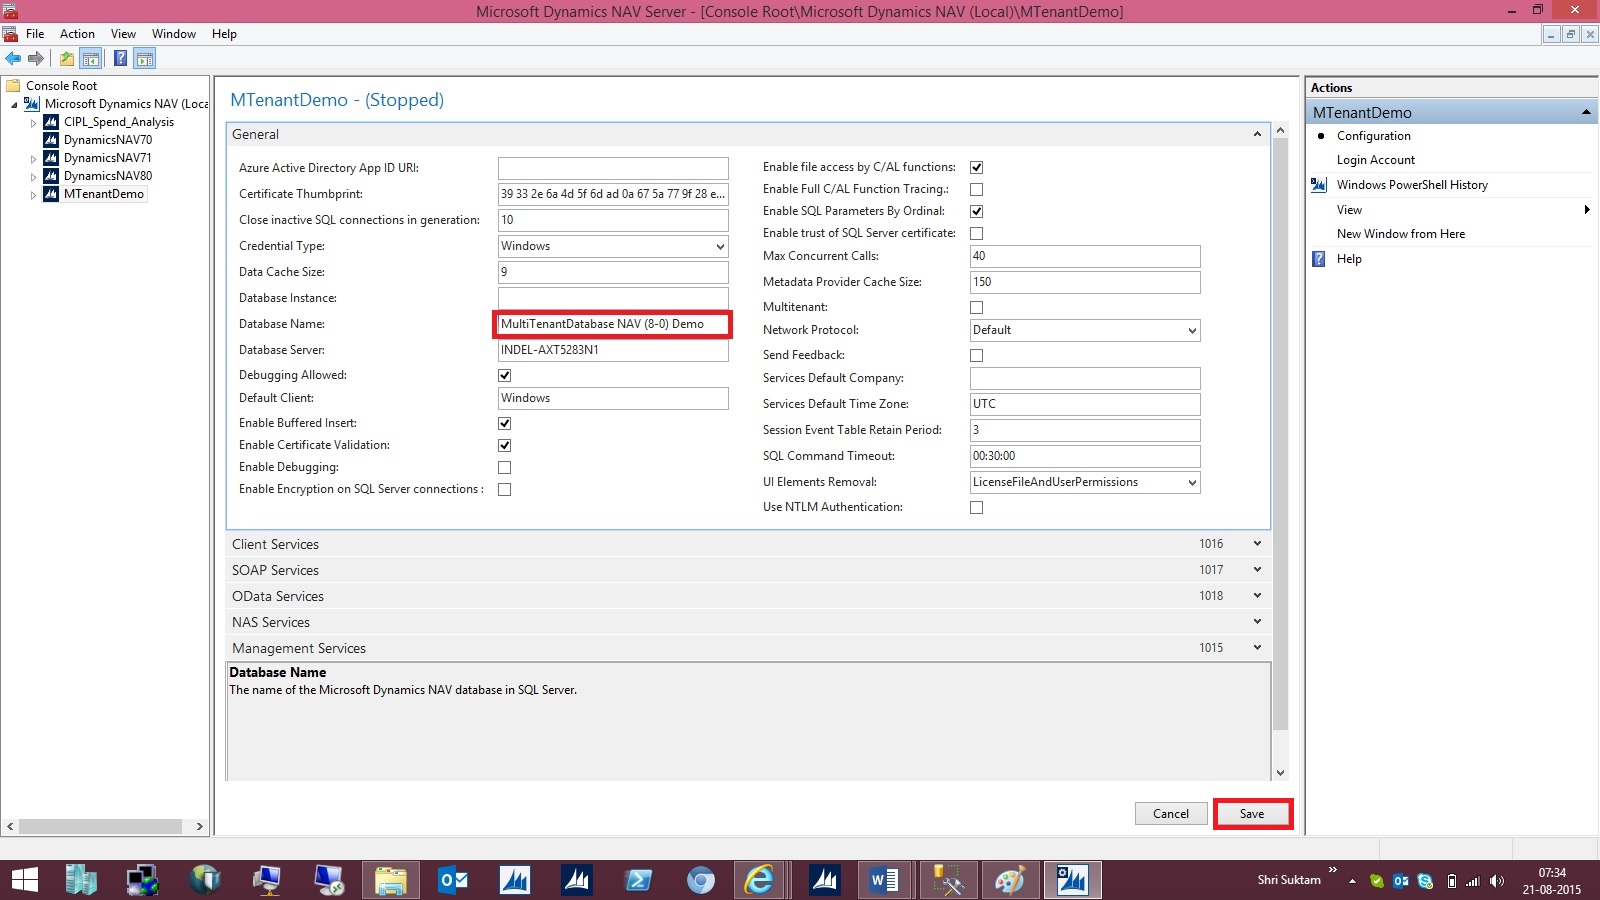
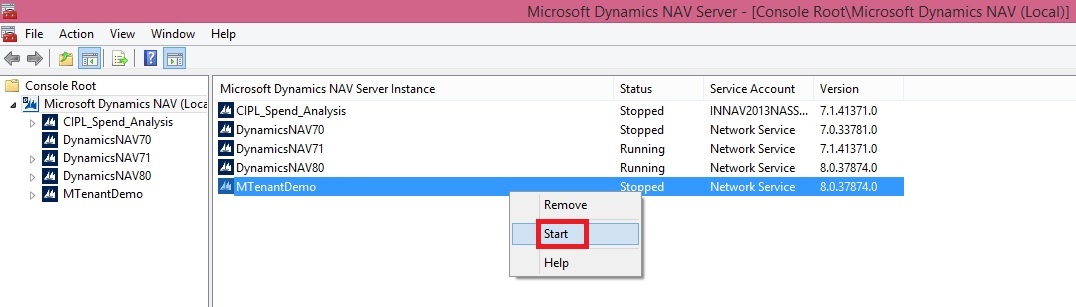


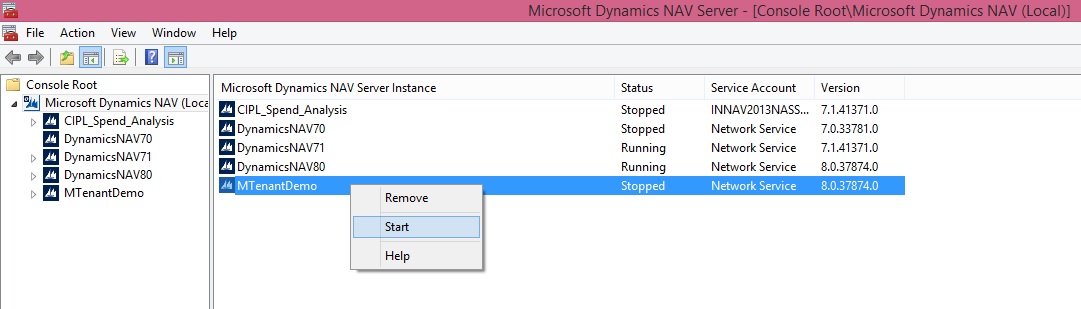


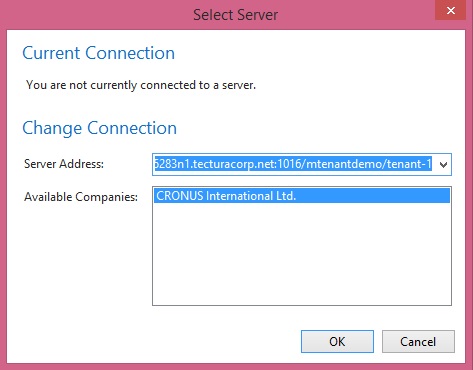
You now have a template you can use when you want to create a application and a tenant.
Restore the Tenant Database as Tenant-2, Tenant-3, Tenant-4, Tenant-5 etc.
Mount the Tenant Databases to NAV Service MTenantDemo as per above steps.
Now you have One Application & 5 Business Data Tenants Mounted.
You will do development in Application Database MultiTenantDatabase NAV (8-0) Demo_App and then Sync your modifications to Business Data Databases named Tenant-1/2/3/4/5 etc.
To Sync your objects to Tenants you will use below script in NAV 2015 Administration Shell:
I will explain in more detail on Creating Tenants, Synchronizing Tenants and uploading License for Tenants in more details in my next upcoming post.
To start with the below steps you will require 2 Accounts preferably Domain Accounts:
- An Account for running MS Dynamics Navision Service
- An Administrator account for Database & RTC
How to setup these accounts and what permissions are required for these accounts I would recommend to go through my earlier post on Provisioning the Microsoft Dynamics NAV Server Account here.
Add both the above account to Navision Database with Super permission.
In order to create a multitenant environment (here for Demo Database NAV (8-0)), the following steps need to be done:
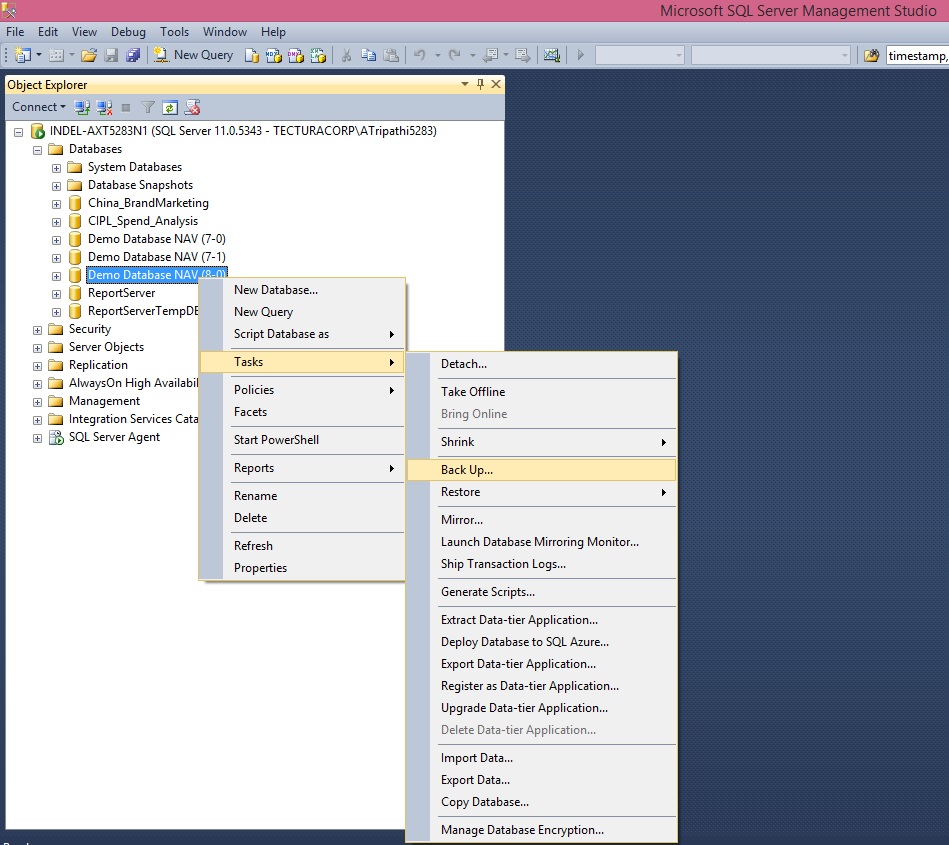
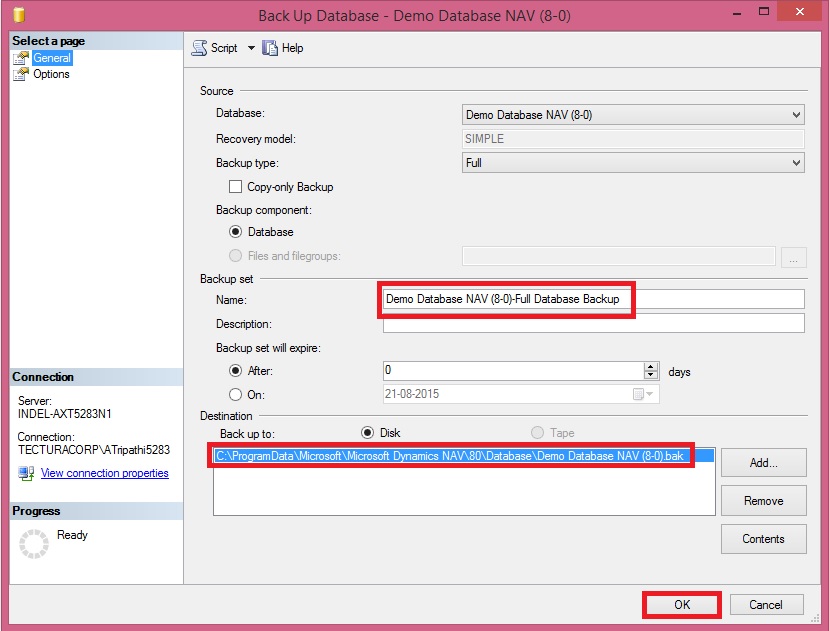
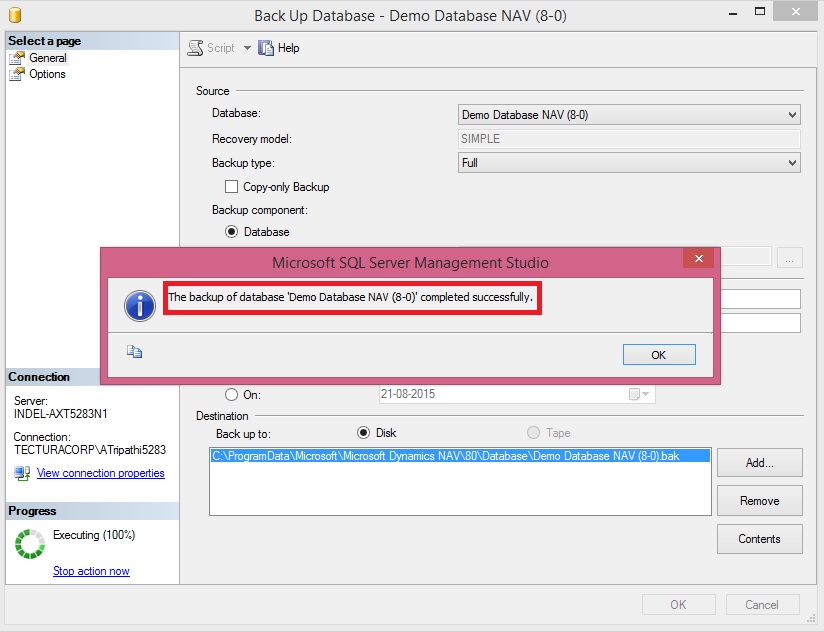
- Take an SQL Backup of the running Demo Database NAV (8-0) database.
- Restore the newly made SQL Backup to a new database (MultiTenantDatabase NAV (8-0) Demo).
- On the NAV Server, using the NAV 2015 Administration console, create a new NAV Server Instance named MTenantDemo
- Edit the instance and set the database to newly created MultiTenantDatabase NAV (8-0) Demo database, and set the instance to be started with NAV Service user.
- Start MTenantDemo – and see if you can log in
- Once you have confirmed the MultiTenantDatabase NAV (8-0) Demo database and MTenantDemo is running, split the database in an application part and a data part:
- Open the NAV 2015 Administration Shell (or Windows PowerShell ISE and load the NavAdminTool)
- Export the application part from the MultiTenantDatabase NAV (8-0) Demo database to a new database (MultiTenantDatabase NAV (8-0) Demo_App):
Export-NavApplication -DatabaseServer INDEL-AXT5283N1 -DatabaseName 'MultiTenantDatabase NAV (8-0) Demo' -DestinationDatabaseName 'MultiTenantDatabase NAV (8-0) Demo_App’
- Remove the application part from the MultiTenantDatabase NAV (8-0) Demo database:
Remove-NAVApplication -DatabaseServer INDEL-AXT5283N1 -DatabaseName 'MultiTenantDatabase NAV (8-0) Demo'
- Using the NAV 2015 Administration console, edit the MTenantDemo instance and set the database to newly created MultiTenantDatabase NAV (8-0) Demo_App database

- And select Multitenant (set it to True):
- Save and restart MTenantDemo
- Either through a Powershell commandlet in the NAV 2015 Administration Shell or by using the NAV 2015 Administration console mount a tenant named Tenant-1 on the MTenantDemo NAV Instance:
- Start NAV using the new tenant:
- In Companies rename the Company Name to Tenant-1
- Take an SQL Backup using the MultiTenantDatabase NAV (8-0) Demo_App database, and call it “App_template.bak”
- Take an SQL Backup using the MultiTenantDatabase NAV (8-0) Demo database, and call it “Tenant_template.bak”
You now have a template you can use when you want to create a application and a tenant.
Restore the Tenant Database as Tenant-2, Tenant-3, Tenant-4, Tenant-5 etc.
Mount the Tenant Databases to NAV Service MTenantDemo as per above steps.
Now you have One Application & 5 Business Data Tenants Mounted.
You will do development in Application Database MultiTenantDatabase NAV (8-0) Demo_App and then Sync your modifications to Business Data Databases named Tenant-1/2/3/4/5 etc.
To Sync your objects to Tenants you will use below script in NAV 2015 Administration Shell:
Set-ExecutionPolicy unrestricted –Force
Import-Module 'C:\Program Files\Microsoft Dynamics NAV\80\Service\NavAdminTool.ps1'
Sync-NAVTenant MTenantDemo -Force -Tenant ‘MultiTenantDatabase NAV (8-0) Demo’
I will explain in more detail on Creating Tenants, Synchronizing Tenants and uploading License for Tenants in more details in my next upcoming post.
Multitenancy Concept & Overview
You will get step by step walkthrough on how to implement Multitenancy in my next upcoming post.
You can choose to migrate your Microsoft Dynamics NAV solution to a multitenant deployment architecture where you maintain a single application that is used by two or more companies that store their data in separate databases.
This can make maintenance of your solution easier if you support multiple customers with the same application functionality.
Tenants and Companies
When you upgrade your application and the data to Microsoft Dynamics NAV 2015, you have a database that has the same number of companies as you had before the upgrade.
This database is considered a tenant.
This does not mean that you have to turn your solution into a multitenant deployment. But it means that you can if you want to.
For example, your Microsoft Dynamics NAV deployment in the earlier version consisted of a database that has 20 companies.
In other words, you support 20 companies that all share the same application functionality.
Here we are considering, the companies are separate companies that have nothing to do with each other except that they are supported by you in one database.
In Microsoft Dynamics NAV 2015, you can choose to extract the application-wide tables into a separate database and keep the data for all 20 companies in the original database. This becomes a single-tenant business data database.
Then, you can choose to split the business data database into one for each company so that you run a truly multitenant environment.
The application is stored separately in the application database, and you maintain application functionality centrally.
Pros
When you modify the application, you make the changes available to one tenant at a time. As a result, if something goes wrong, all other tenants are not affected.
Compare this to earlier versions of Microsoft Dynamics NAV where a database could contain several companies. These companies could be related or not, but they would all use the same application and write to the same database. Also, when you modified the application, it would affect all companies immediately. So if something went wrong, all companies would be affected.
Cons
The email logging functionality in Microsoft Dynamics NAV requires the Microsoft Dynamics NAV Server service account to have access to the Exchange server. But in a multitenant deployment, this is not always possible.
Separating Application Data from Business Data
Microsoft Dynamics NAV 2015 separates tables that describe the application from the tables that contain business data. Depending on your deployment scenario, you can choose to store all Microsoft Dynamics NAV tables in one database, or you can export the application tables to a dedicated database.
In multitenant deployments, the application must be stored in a dedicated database.
Application Database versus Business Data Databases
The application database contains tables that describe your application.
This includes a description of the objects that your application consists of, and other data that is common to all tenants.
The data that users enter in your application is stored in the business data database because this data is specific to their company.
Optionally, you can create multiple business data databases, such as if you want to support your customers as tenants.
When you have exported the application tables to a separate database, you can no longer access the business database from the Microsoft Dynamics NAV Development Environment. This is because the metadata for the tables in the business database is stored in the application database and modified in that database.
For example, if you want to modify a report, you modify the report object in the application database. Then, when you deploy the updated application to your production environment, when a user accesses the report, they see the modified report.
Microsoft Dynamics NAV includes Windows PowerShell cmdlets that help you export application tables to a dedicated database, and other cmdlets to help you maintain a multitenant deployment.
Distribution of the System Tables in Each Database
The application tables are system tables that define the application. Other system tables remain in the business data database.
The following table describes which system tables are moved to the application database when you run the Export-NAVApplication cmdlet and which tables remain in the business data database.
Microsoft Dynamics NAV Windows PowerShell Cmdlets
Microsoft Dynamics NAV 2015 includes Windows PowerShell cmdlets for administration and for merging and modifying application object files.
The cmdlets are available in two Windows PowerShell modules: Microsoft Dynamics NAV 2015 Administration Shell and Microsoft Dynamics NAV 2015 Development Shell.
The cmdlets are implemented in Windows PowerShell 3.0, which is included with Windows Server 2012 and Windows 8.
Alternatively to running Microsoft Dynamics NAV 2015 Administration Shell and Microsoft Dynamics NAV 2015 Development Shell from where they are installed, you can import the relevant module into the Windows PowerShell Integrated Scripting Environment (ISE).
Starting a Microsoft Dynamics NAV 2015 Administration Shell Session
You must run the Microsoft Dynamics NAV 2015 Administration Shell as an Administrator. On the computer that is running Microsoft Dynamics NAV Server, choose Start, in the Search box, type Microsoft Dynamics NAV 2015 Administration Shell, right-click the related link, and then choose Run as Administrator.
To run the cmdlets in the Microsoft Dynamics NAV 2015 Administration Shell, you must be a member of the local Administrator group on the computer where the Microsoft Dynamics NAV 2015 Administration Shell is installed.
Starting a Microsoft Dynamics NAV 2015 Development Shell Session
On the computer that is running Microsoft Dynamics NAV Development Environment, choose Start, in the Search box, type Microsoft Dynamics NAV 2015 Development Shell, and then choose the related link.
Creating Tenants from Companies
If your Microsoft Dynamics NAV solution includes multiple companies in one database, you can choose to migrate to multitenancy where the Microsoft Dynamics NAV companies become tenants of your application database.
Companies in Multitenancy Deployments
In Microsoft Dynamics NAV 2015, you can maintain multiple companies in each business database, and you can choose to export all or some of the companies to separate tenant databases.
A tenant database can contain one or more companies. Therefore, you can deploy the number of tenants that suits your solution. This varies between solutions.
You may prefer to have a dedicated tenant database for each legal entity in your deployment. Or you may prefer to have a tenant database for each group of legal entities where each legal entity is a Microsoft Dynamics NAV company in that tenant database.
In this example, we assume that your current deployment consists of one or more databases with multiple companies in each database.
If you migrate your solution as suggested by the examples in this section, you will have a deployment where your application is stored in a dedicated application database.
Each company in the original database will be moved into a dedicated business database, which is mounted as tenants on a Microsoft Dynamics NAV Server instance.
Before you can create tenants from Microsoft Dynamics NAV companies, you must have exported the application to a dedicated application database.
Running a Windows PowerShell Script to Create Tenants from Companies
Microsoft Dynamics NAV includes a sample Windows PowerShell script and a sample SQL script, HowTo-MoveCompanyToTenant.ps1 and HowTo-MoveCompanyToTenant.sql.
These scripts illustrate how you can move company-specific data to new business databases and mount them as new tenants.
You can modify the scripts and then run them in the Microsoft Dynamics NAV 2015 Administration Shell.
Sample Windows PowerShell Scripts for Microsoft Dynamics NAV
The Microsoft Dynamics NAV product media includes a folder that has examples of how you can use the Microsoft Dynamics NAV Windows PowerShell cmdlets to upgrade, deploy, and maintain your Microsoft Dynamics NAV solution.
Microsoft Dynamics NAV Sample Scripts
The sample Windows PowerShell scripts are available in the WindowsPowerShellScripts folder on the Microsoft Dynamics NAV product media.
You can copy the folder to your computer and use the scripts as a starting point for managing your own solution.
Depending on your solution, you can then add the sample Windows PowerShell module into the Microsoft Dynamics NAV 2015 Administration Shell or Microsoft Dynamics NAV 2015 Development Shell and then run the scripts.
The current version of Microsoft Dynamics NAV includes the following sample modules.
Running the Sample Scripts
The sample scripts are designed to be run from the context of the Windows PowerShell module that is part of each collection of sample scripts.
For example, to run the scripts for upgrading to Microsoft Dynamics NAV, import the NAVUpgradeSamples.psm1 module into the Microsoft Dynamics NAV 2015 Administration Shell.
Similarly, to run the sample scripts for merging application objects, open the HowTo-Start-Import-NAV-Module.ps1 script in the Windows PowerShell IDE, navigate the command prompt to the folder where you placed the samples, and then run the script.
The HowTo-MoveCompanyToTenant.ps1 script uses Microsoft Dynamics NAV cmdlets and SQL commands to copy data from a Microsoft Dynamics NAV company in a business database to a new tenant database.
It mounts the tenant database on a Microsoft Dynamics NAV Server instance, and then deletes the data and the company from the original database.
You can adapt the scripts to your solution and rename them so that they do not start with “HowTo-“. Then, you can run the MoveCompanyToTenant.ps1 script in Windows PowerShell with the relevant parameters as shown in the following example.
In the example, the script will move the CRONUS International Ltd. company from the Demo Database NAV (8-0) database to a new tenant database, CRONUS1.
The script also adds an account for the Microsoft Dynamics NAV Server instance in the new database and removes the company from the original database.
All information that is stored in shared tables, but which is specific to the company, is copied to the new tenant. The following table describes the parameters and the parameter values in the example.
The script uses the sqlcmd utility to create the database, assign database permissions to the service account, and move the data. This utility is part of SQL Server. The script creates four temporary tables in the original database to handle user-specific data, company-specific data, tables that will not be moved, and user IDs. You must modify the MoveCompanyToTenant.sql script to change the default values.
After this step, you have an application database and a business data database for each company in the original database. The company-specific business data databases are tenants, and your solution is multitenant.
If you want to move back to storing application tables and business data in a single database, you can use the Microsoft Dynamics NAV Windows PowerShell cmdlets to merge the databases.
Merging an Application Database with a Tenant Database
In Microsoft Dynamics NAV 2015, you can separate the application data into a dedicated application database.
However, if you want revert the separation of application data and business data, you can merge the two databases.
Microsoft Dynamics NAV includes Windows PowerShell cmdlets that can help you merge the databases, and you can use the cmdlets in a script that runs in Windows PowerShell.
When you merge the two databases, you migrate to single-tenancy.
In a multitenant deployment, you can merge a single tenant with the application tables and leave the remaining tenants in the existing deployment.
In that case, you add the application tables to the relevant tenant database and leave the original application database unchanged. If you have separated the application data into a dedicated database but you have not used it in a multitenant deployment, you can also use the cmdlet and a sample script to merge the two databases.
Migrating to Single-Tenancy
Before you can start the merge of the two databases, you must collect the relevant information. If you write a script, you must be able to provide values for the parameters that the Windows PowerShell cmdlets require. The migration includes the following main steps:
Each step is explained in more details in the following sections.
Step 1: Gather the Prerequisite Information
The sample scripts require the following information:
Step 2: Merge the Two Databases
To merge the application database and the tenant database, you must run the Microsoft Dynamics NAV 2015 Administration Shell as an administrator.
Depending on your scenario, you can copy one of the sample scripts and update the variables based on the prerequisite information that you gathered in the previous section.
This section includes two sample scripts that you can base your own script on.
The first script merges an application database and a tenant database that is currently a tenant in a multitenant deployment.
The second script merges an application database and a tenant database that has not been mounted on a Microsoft Dynamics NAV Server instance as a tenant.
In both scenarios, you can create scripts that are based on these samples, provide value for the variables, run the script, and the review the output to make sure that you achieved the expected result.
Step 3: Change the Client Connection Endpoints
The first sample script creates a new Microsoft Dynamics NAV Server instance with a name that is based on the specified tenant ID.
The script only enables the management services endpoint in the Microsoft Dynamics NAV Server configuration settings.
You must also configure the server instance to enable client services, SOAP web services, and OData web services.
You must send the configuration changes to the users who access the reconfigured tenant. Otherwise, they are not able to connect to the database.
The second sample script illustrates a simpler scenario where you move the application tables to the only database that accessed the application database. As a result, all client endpoints continue as they did before, and you do not have to update any clients.
Step 4: Post-Migration Clean-Up
In the first scenario where you move a tenant from multitenancy to single-tenancy, you must update the Microsoft Dynamics NAV Server account and database permissions.
Also, any tenant-specific files that have been saved to the original server location must be moved to the relevant location on the new server.
You will get step by step walkthrough on how to implement Multitenancy in my next upcoming post.
You can choose to migrate your Microsoft Dynamics NAV solution to a multitenant deployment architecture where you maintain a single application that is used by two or more companies that store their data in separate databases.
This can make maintenance of your solution easier if you support multiple customers with the same application functionality.
Tenants and Companies
When you upgrade your application and the data to Microsoft Dynamics NAV 2015, you have a database that has the same number of companies as you had before the upgrade.
This database is considered a tenant.
This does not mean that you have to turn your solution into a multitenant deployment. But it means that you can if you want to.
For example, your Microsoft Dynamics NAV deployment in the earlier version consisted of a database that has 20 companies.
In other words, you support 20 companies that all share the same application functionality.
Here we are considering, the companies are separate companies that have nothing to do with each other except that they are supported by you in one database.
In Microsoft Dynamics NAV 2015, you can choose to extract the application-wide tables into a separate database and keep the data for all 20 companies in the original database. This becomes a single-tenant business data database.
Then, you can choose to split the business data database into one for each company so that you run a truly multitenant environment.
The application is stored separately in the application database, and you maintain application functionality centrally.
Pros
When you modify the application, you make the changes available to one tenant at a time. As a result, if something goes wrong, all other tenants are not affected.
Compare this to earlier versions of Microsoft Dynamics NAV where a database could contain several companies. These companies could be related or not, but they would all use the same application and write to the same database. Also, when you modified the application, it would affect all companies immediately. So if something went wrong, all companies would be affected.
Cons
The email logging functionality in Microsoft Dynamics NAV requires the Microsoft Dynamics NAV Server service account to have access to the Exchange server. But in a multitenant deployment, this is not always possible.
Separating Application Data from Business Data
Microsoft Dynamics NAV 2015 separates tables that describe the application from the tables that contain business data. Depending on your deployment scenario, you can choose to store all Microsoft Dynamics NAV tables in one database, or you can export the application tables to a dedicated database.
In multitenant deployments, the application must be stored in a dedicated database.
Application Database versus Business Data Databases
The application database contains tables that describe your application.
This includes a description of the objects that your application consists of, and other data that is common to all tenants.
The data that users enter in your application is stored in the business data database because this data is specific to their company.
Optionally, you can create multiple business data databases, such as if you want to support your customers as tenants.
When you have exported the application tables to a separate database, you can no longer access the business database from the Microsoft Dynamics NAV Development Environment. This is because the metadata for the tables in the business database is stored in the application database and modified in that database.
For example, if you want to modify a report, you modify the report object in the application database. Then, when you deploy the updated application to your production environment, when a user accesses the report, they see the modified report.
Microsoft Dynamics NAV includes Windows PowerShell cmdlets that help you export application tables to a dedicated database, and other cmdlets to help you maintain a multitenant deployment.
Distribution of the System Tables in Each Database
The application tables are system tables that define the application. Other system tables remain in the business data database.
The following table describes which system tables are moved to the application database when you run the Export-NAVApplication cmdlet and which tables remain in the business data database.
| Application database | Business data database |
| Chart | Access Control |
| Client Add-in | Active Session |
| Client Add-in Resources | Company |
| Debugger Breakpoint | Device |
| Debugger Watch | Document Service |
| Object | Integration Page |
| Object Metadata | Object Metadata Snapshot |
| Object Tracking | Object Translation |
| Permission | Page Data Personalization |
| Permission Set | Printer Selection |
| Profile | Record Link |
| Profile Metadata | Report List Translation |
| Send-To Program | Session Event |
| Server Instance | User |
| Style Sheet | User Default Style Sheet |
| Web Service | User Metadata |
| User Personalization | |
| User Property |
Microsoft Dynamics NAV Windows PowerShell Cmdlets
Microsoft Dynamics NAV 2015 includes Windows PowerShell cmdlets for administration and for merging and modifying application object files.
The cmdlets are available in two Windows PowerShell modules: Microsoft Dynamics NAV 2015 Administration Shell and Microsoft Dynamics NAV 2015 Development Shell.
- The Microsoft Dynamics NAV 2015 Administration Shell includes cmdlets for administering the Microsoft Dynamics NAV deployment, such as adding and configuring Microsoft Dynamics NAV server instances, databases, and users. The Microsoft Dynamics NAV 2015 Administration Shell is installed with the Microsoft Dynamics NAV Server.
- The Microsoft Dynamics NAV 2015 Development Shell includes cmdlets for merging and modifying application object files. The Microsoft Dynamics NAV 2015 Development Shell is installed with the Microsoft Dynamics NAV Development Environment.
The cmdlets are implemented in Windows PowerShell 3.0, which is included with Windows Server 2012 and Windows 8.
Alternatively to running Microsoft Dynamics NAV 2015 Administration Shell and Microsoft Dynamics NAV 2015 Development Shell from where they are installed, you can import the relevant module into the Windows PowerShell Integrated Scripting Environment (ISE).
Starting a Microsoft Dynamics NAV 2015 Administration Shell Session
You must run the Microsoft Dynamics NAV 2015 Administration Shell as an Administrator. On the computer that is running Microsoft Dynamics NAV Server, choose Start, in the Search box, type Microsoft Dynamics NAV 2015 Administration Shell, right-click the related link, and then choose Run as Administrator.
To run the cmdlets in the Microsoft Dynamics NAV 2015 Administration Shell, you must be a member of the local Administrator group on the computer where the Microsoft Dynamics NAV 2015 Administration Shell is installed.
Starting a Microsoft Dynamics NAV 2015 Development Shell Session
On the computer that is running Microsoft Dynamics NAV Development Environment, choose Start, in the Search box, type Microsoft Dynamics NAV 2015 Development Shell, and then choose the related link.
Creating Tenants from Companies
If your Microsoft Dynamics NAV solution includes multiple companies in one database, you can choose to migrate to multitenancy where the Microsoft Dynamics NAV companies become tenants of your application database.
Companies in Multitenancy Deployments
In Microsoft Dynamics NAV 2015, you can maintain multiple companies in each business database, and you can choose to export all or some of the companies to separate tenant databases.
A tenant database can contain one or more companies. Therefore, you can deploy the number of tenants that suits your solution. This varies between solutions.
You may prefer to have a dedicated tenant database for each legal entity in your deployment. Or you may prefer to have a tenant database for each group of legal entities where each legal entity is a Microsoft Dynamics NAV company in that tenant database.
In this example, we assume that your current deployment consists of one or more databases with multiple companies in each database.
If you migrate your solution as suggested by the examples in this section, you will have a deployment where your application is stored in a dedicated application database.
Each company in the original database will be moved into a dedicated business database, which is mounted as tenants on a Microsoft Dynamics NAV Server instance.
Before you can create tenants from Microsoft Dynamics NAV companies, you must have exported the application to a dedicated application database.
Running a Windows PowerShell Script to Create Tenants from Companies
Microsoft Dynamics NAV includes a sample Windows PowerShell script and a sample SQL script, HowTo-MoveCompanyToTenant.ps1 and HowTo-MoveCompanyToTenant.sql.
These scripts illustrate how you can move company-specific data to new business databases and mount them as new tenants.
You can modify the scripts and then run them in the Microsoft Dynamics NAV 2015 Administration Shell.
Sample Windows PowerShell Scripts for Microsoft Dynamics NAV
The Microsoft Dynamics NAV product media includes a folder that has examples of how you can use the Microsoft Dynamics NAV Windows PowerShell cmdlets to upgrade, deploy, and maintain your Microsoft Dynamics NAV solution.
Microsoft Dynamics NAV Sample Scripts
The sample Windows PowerShell scripts are available in the WindowsPowerShellScripts folder on the Microsoft Dynamics NAV product media.
You can copy the folder to your computer and use the scripts as a starting point for managing your own solution.
Depending on your solution, you can then add the sample Windows PowerShell module into the Microsoft Dynamics NAV 2015 Administration Shell or Microsoft Dynamics NAV 2015 Development Shell and then run the scripts.
The current version of Microsoft Dynamics NAV includes the following sample modules.
| Parent folder | Module name | Description |
| ApplicationMergeUtilities | Contains sample scripts that illustrate different ways of using Windows PowerShell cmdlets to merge and modify application objects. The sample scripts use the Microsoft.Dynamics.Nav.Model.Tools.psd1 module, which you must import first. | |
| Cloud | HowTo | Contains sample scripts and files for deploying a fully functional end-to-end Microsoft Dynamics NAV solution on Microsoft Azure virtual machines. |
| NAVAdministration | Illustrates how Windows PowerShell can be used to automate the provisioning and management of Microsoft Dynamics NAV installations on a virtual machine (VM). | |
| NAVRemoteAdministration | Illustrates how Windows PowerShell can be used to automate the provisioning and management of Microsoft Dynamics NAV installations on Azure VMs. | |
| NAVRemoteAdministrationSamples | Provides examples of a fully automated deployment of Microsoft Dynamics NAV on Azure. | |
| Multitenancy | NAVMultitenancySamples | Illustrates how you can automate the steps that are required to migrate to a multitenant deployment architecture.. |
| Upgrade | NAVUpgradeModule | Illustrates how you can automate the upgrade of a Microsoft Dynamics NAV 2013 database to Microsoft Dynamics NAV 2015.. |
Running the Sample Scripts
The sample scripts are designed to be run from the context of the Windows PowerShell module that is part of each collection of sample scripts.
For example, to run the scripts for upgrading to Microsoft Dynamics NAV, import the NAVUpgradeSamples.psm1 module into the Microsoft Dynamics NAV 2015 Administration Shell.
Similarly, to run the sample scripts for merging application objects, open the HowTo-Start-Import-NAV-Module.ps1 script in the Windows PowerShell IDE, navigate the command prompt to the folder where you placed the samples, and then run the script.
The HowTo-MoveCompanyToTenant.ps1 script uses Microsoft Dynamics NAV cmdlets and SQL commands to copy data from a Microsoft Dynamics NAV company in a business database to a new tenant database.
It mounts the tenant database on a Microsoft Dynamics NAV Server instance, and then deletes the data and the company from the original database.
You can adapt the scripts to your solution and rename them so that they do not start with “HowTo-“. Then, you can run the MoveCompanyToTenant.ps1 script in Windows PowerShell with the relevant parameters as shown in the following example.
MoveCompanyToTenant -ServerInstance ‘DynamicsNAV’ -FromDatabase 'Demo Database NAV (8-0)' -CompanyName 'CRONUS International Ltd.' -OldTenantName default -NewTenantName CRONUS1 -ServiceAccount 'NT AUTHORITY\NETWORK SERVICE' -DatabaseServer MySQLServer
In the example, the script will move the CRONUS International Ltd. company from the Demo Database NAV (8-0) database to a new tenant database, CRONUS1.
The script also adds an account for the Microsoft Dynamics NAV Server instance in the new database and removes the company from the original database.
All information that is stored in shared tables, but which is specific to the company, is copied to the new tenant. The following table describes the parameters and the parameter values in the example.
| Parameter | Value | Description |
| ServerInstance | DynamicsNAV | The name of the Microsoft Dynamics NAV Server instance. |
| FromDatabase | Demo Database NAV (8-0) | The name of the business database that the company must be moved from. This database must have been upgraded to Microsoft Dynamics NAV 2015, and you must have exported the application tables to an application database.. |
| CompanyName | CRONUS International Ltd. | The name of the company that you want to move to a new tenant database. |
| OldTenantName | default | The name of the tenant in the database that you are exporting from. In many cases, you are working with a single-tenant business database that contains multiple companies. If you did not specify another ID for the tenant when you created the tenant database, specify default. If you have added more tenants to the solution, you must specify the tenant name. |
| NewTenantName | CRONUS1 | The name of the new tenant database. In the example, this is based on the name of the original company. But because this value will identify the tenant, the value must be unique. For example, if the name of the company is Spotsmeyer’s Furnishings, the name of the new tenant database can be SPOTSMEYERS. Alternatively, you can use a naming scheme of your choice, such as TENANT1, TENANT2, and so on. |
| ServiceAccount | NT AUTHORITY\NETWORK SERVICE | The account that Microsoft Dynamics NAV Server uses to access SQL Server. In a default deployment, this is the NT AUTHORITY\NETWORK SERVICE account. |
| DatabaseServer | MySQLServer | The name of the database tier server where the current business database is located. The new tenant database for the exported company will be created on the same server. |
| RemoveCompanyWhenMoved | Specifies if each company must be deleted in the original tenant database when it is created in the new tenant database. The default value is true. Therefore, you must set the parameter to false if you do not want the script to delete the companies. |
The script uses the sqlcmd utility to create the database, assign database permissions to the service account, and move the data. This utility is part of SQL Server. The script creates four temporary tables in the original database to handle user-specific data, company-specific data, tables that will not be moved, and user IDs. You must modify the MoveCompanyToTenant.sql script to change the default values.
After this step, you have an application database and a business data database for each company in the original database. The company-specific business data databases are tenants, and your solution is multitenant.
If you want to move back to storing application tables and business data in a single database, you can use the Microsoft Dynamics NAV Windows PowerShell cmdlets to merge the databases.
Merging an Application Database with a Tenant Database
In Microsoft Dynamics NAV 2015, you can separate the application data into a dedicated application database.
However, if you want revert the separation of application data and business data, you can merge the two databases.
Microsoft Dynamics NAV includes Windows PowerShell cmdlets that can help you merge the databases, and you can use the cmdlets in a script that runs in Windows PowerShell.
When you merge the two databases, you migrate to single-tenancy.
In a multitenant deployment, you can merge a single tenant with the application tables and leave the remaining tenants in the existing deployment.
In that case, you add the application tables to the relevant tenant database and leave the original application database unchanged. If you have separated the application data into a dedicated database but you have not used it in a multitenant deployment, you can also use the cmdlet and a sample script to merge the two databases.
Migrating to Single-Tenancy
Before you can start the merge of the two databases, you must collect the relevant information. If you write a script, you must be able to provide values for the parameters that the Windows PowerShell cmdlets require. The migration includes the following main steps:
- Gather the prerequisite information.
- Merge the two databases.
- Migrate from multitenancy to single-tenancy.
- Migrate from two databases to one database.
- Change the client connection endpoints.
- Post-migration clean-up.
Each step is explained in more details in the following sections.
Step 1: Gather the Prerequisite Information
The sample scripts require the following information:
- Identify the name of the Microsoft Dynamics NAV Server server instance that the tenant database is connected to. This value is used as the input for the serverInstance variable in the sample scripts.
- Identify the name of the application database that the tenant database is connected to. This value is used as the input for the appDatabaseName variable in the sample scripts.
- Identify the name of the tenant database that you want to merge with the application database. This value is used as the input for the tenantDatabaseName variable in the sample scripts.
- If you are migrating from a multitenant deployment, identify the tenant ID of the tenant database. This value is used as the input for the tenantId variable in the sample scripts.
- Make sure that you have the server role called securityadmin in the relevant instance of SQL Server.
- Make sure that you have the db_owner role for both the application database and the tenant database.
- Make sure that you are a member of the Administrators security group on the server that runs the Microsoft Dynamics NAV Server instance and where the Windows PowerShell scripts run.
Step 2: Merge the Two Databases
To merge the application database and the tenant database, you must run the Microsoft Dynamics NAV 2015 Administration Shell as an administrator.
Depending on your scenario, you can copy one of the sample scripts and update the variables based on the prerequisite information that you gathered in the previous section.
This section includes two sample scripts that you can base your own script on.
The first script merges an application database and a tenant database that is currently a tenant in a multitenant deployment.
# PURPOSE: This sample script migrates a tenant in a multitenant deployment to a single-tenant deployment.
### Modify these variables with values appropriate to your environment ###
$serverInstance = ""
$appDatabaseName = ""
$tenantDatabaseName = ""
$tenantId = ""
### You should not need to modify any variables below this line ###
# Save the current multitenancy configuration.
Save-NAVTenantConfiguration -ServerInstance $serverInstance
# Create a new server instance for the requested tenant.
New-NAVServerInstance -ServerInstance $tenantId -ManagementServicesPort 7045
# Dismount the requested tenant from the multitenant server instance.
Dismount-NAVTenant -ServerInstance $serverInstance -Tenant $tenantId
# Save the updated multitenancy configuration.
Save-NAVTenantConfiguration -ServerInstance $serverInstance
# Remove any application tables from the tenant database if these were not already removed.
Remove-NAVApplication -DatabaseName $tenantDatabaseName
# Copy the application tables from the current application database to the tenant database.
Export-NAVApplication -DatabaseName $appDatabaseName -ApplicationDatabaseName $tenantDatabaseName
# Reconfigure the CustomSettings.config file for the new server instance to use the tenant database.
Set-NAVServerConfiguration -ServerInstance $tenantId -KeyName DatabaseName -KeyValue $tenantDatabaseName -WarningAction Ignore
# Reconfigure the CustomSettings.config to use single-tenant mode.
# Set-NAVServerConfiguration -ServerInstance $serverInstance -KeyName Multitenant -KeyValue false -WarningAction Ignore
# Start the new server instance if it is not running.
Set-NAVServerInstance -ServerInstance $tenantId -Start
# Dismount all tenants on the new server instance that are not using the current tenant database.
Get-NAVTenant -ServerInstance $tenantId | where {$_.Database -ne $tenantDatabaseName} | foreach { Dismount-NAVTenant -ServerInstance $tenantId -Tenant $_.Id }
# Save the new single-tenant configuration.
Save-NAVTenantConfiguration -ServerInstance $tenantId
Write-Host "Operation complete." -foregroundcolor cyan
The second script merges an application database and a tenant database that has not been mounted on a Microsoft Dynamics NAV Server instance as a tenant.
# PURPOSE: This sample script merges an application database and a tenant database that are not part of a multitenant deployment.
### Modify these variables with values appropriate to your environment ###
$serverInstance = ""
$appDatabaseName = ""
$tenantDatabaseName = ""
### You should not need to modify any variables below this line ###
# Save the current server configuration.
Save-NAVTenantConfiguration -ServerInstance $serverInstance
# Stop the server instance if it is running.
Set-NAVServerInstance -ServerInstance $serverInstance -Stop
# Remove any application tables from the tenant database if these have not already been removed.
Remove-NAVApplication -DatabaseName $tenantDatabaseName
# Copy the application tables from the application database to the tenant database.
Export-NAVApplication -DatabaseName $appDatabaseName -ApplicationDatabaseName $tenantDatabaseName
# Reconfigure the CustomSettings.config to use the tenant database.
Set-NAVServerConfiguration -ServerInstance $serverInstance -KeyName DatabaseName -KeyValue $tenantDatabaseName -WarningAction Ignore
# Reconfigure the CustomSettings.config to use single-tenant mode
# Set-NAVServerConfiguration -ServerInstance $serverInstance -KeyName Multitenant -KeyValue false -WarningAction Ignore
# Start the server instance.
Set-NAVServerInstance -ServerInstance $serverInstance -Start
# Dismount all tenants that are not using the current tenant database.
Get-NAVTenant -ServerInstance $serverInstance | where {$_.Database -ne $tenantDatabaseName} | foreach { Dismount-NAVTenant -ServerInstance $serverInstance -Tenant $_.Id }
# Save the current single-tenant configuration.
Save-NAVTenantConfiguration -ServerInstance $serverInstance
Write-Host "Operation complete." -foregroundcolor cyan
In both scenarios, you can create scripts that are based on these samples, provide value for the variables, run the script, and the review the output to make sure that you achieved the expected result.
Step 3: Change the Client Connection Endpoints
The first sample script creates a new Microsoft Dynamics NAV Server instance with a name that is based on the specified tenant ID.
The script only enables the management services endpoint in the Microsoft Dynamics NAV Server configuration settings.
You must also configure the server instance to enable client services, SOAP web services, and OData web services.
You must send the configuration changes to the users who access the reconfigured tenant. Otherwise, they are not able to connect to the database.
The second sample script illustrates a simpler scenario where you move the application tables to the only database that accessed the application database. As a result, all client endpoints continue as they did before, and you do not have to update any clients.
Step 4: Post-Migration Clean-Up
In the first scenario where you move a tenant from multitenancy to single-tenancy, you must update the Microsoft Dynamics NAV Server account and database permissions.
Also, any tenant-specific files that have been saved to the original server location must be moved to the relevant location on the new server.
You will get step by step walkthrough on how to implement Multitenancy in my next upcoming post.
Provisioning the Microsoft Dynamics NAV Server Account
The Microsoft Dynamics NAV Server account is used by Microsoft Dynamics NAV clients to log on to the Microsoft Dynamics NAV Server instance.
The Microsoft Dynamics NAV Server then uses the service account to log on to the Microsoft Dynamics NAV database.
When you install Microsoft Dynamics NAV Server, you identify an Active Directory account to provide credentials for the server. By default, Setup runs Microsoft Dynamics NAV Server under the Network Service account, a predefined local account used by the service control manager. This account has minimum privileges on the local computer and acts as the computer on the network.
Microsoft recommends that you create a domain user account for running Microsoft Dynamics NAV Server.
The Network Service account is considered less secure because it is a shared account that can be used by other unrelated network services. Any users who have rights to this account have rights to all services that are running on this account.
If you create a domain user account to run Microsoft Dynamics NAV Server, you can use the same account to run SQL Server, whether or not SQL Server is on the same computer.
Because Microsoft Dynamics NAV Setup and the New-NavDatabase cmdlet configure the required permissions for the Microsoft Dynamics NAV Server account, you will typically use the procedures in this topic when you change the Microsoft Dynamics NAV Server account for an existing installation.
To provision a Microsoft Dynamics NAV Server account, complete the following procedures as described in this topic:
Provisioning a Domain User Account
If you are running the Microsoft Dynamics NAV Server under a domain user account, you must:
Enabling the account to log in as a service
Depending on various factors, the account may or may not already have this ability.
For example, if you have already installed SQL Server and configured it to run under the same account, SQL Server will have modified the account to log in as a service.
Add the Log on as a service Right to an Account
Considered for Windows 8.1, for other versions please check accordingly.
You can use this procedure to add the Log on as a service right to an account on your computer.
Membership in the local Administrators group, or equivalent, is the minimum required to complete these procedures.
To add the "Log on as a service" right to an account on your local computer

To add the "Log on as a service" right to an account for a Group Policy object, when you are on a server that is joined to a domain or a domain controller
When this permission is lacking, Microsoft Dynamics NAV Server server instances may not be able to start.
Enabling the account to register an SPN on itself
To enable secure mutual authentication between clients and Microsoft Dynamics NAV Server, you must configure the Microsoft Dynamics NAV Server account to self-register Service Principal Names (SPNs).
Mutual authentication is recommended in a production environment but may not be necessary in a testing or staging environment. The following procedure assumes a computer running Windows Server 2008 or Windows Server 2008 R2. On Windows 7 or Windows Vista you would need to install the Remote Server Administration Tools first.
To enable the Microsoft Dynamics NAV Server account to register an SPN on itself
Giving the account necessary database privileges in SQL Server
The Microsoft Dynamics NAV Server account must be a member of the db_owner database role on the Microsoft Dynamics NAV database.
When you install the Microsoft Dynamics NAV database by using Microsoft Dynamics NAV Setup or the New-NAVDatabase PowerShell cmdlet, you can specify the Microsoft Dynamics NAV Server account.
In these cases, the server account that you specify should already have the necessary privileges in SQL Server. If you change the Microsoft Dynamics NAV Server account for an existing installation, then you should verify the account has the required privileges in SQL Server.
To verify database privileges after you create your Microsoft Dynamics NAV database, use SQL Server Management Studio and, if necessary, modify database privileges.
If you installed the Demo option in Microsoft Dynamics NAV Setup, then the Network Service account already has the necessary database privileges.
To assign necessary database privileges for the Microsoft Dynamics NAV Server account
It is also possible to script these steps in SQL Server Management Studio:
Provisioning the Network Service Account
The only circumstance where it is necessary to take any action with regard to the Network Service account is when change the Microsoft Dynamics NAV Server account on an existing installation from a domain account to the Network Service.
In this situation you must verify that the account has the necessary database privileges in SQL Server, as per Giving the account necessary database privileges in SQL Server, above.
The Microsoft Dynamics NAV Server then uses the service account to log on to the Microsoft Dynamics NAV database.
When you install Microsoft Dynamics NAV Server, you identify an Active Directory account to provide credentials for the server. By default, Setup runs Microsoft Dynamics NAV Server under the Network Service account, a predefined local account used by the service control manager. This account has minimum privileges on the local computer and acts as the computer on the network.
Microsoft recommends that you create a domain user account for running Microsoft Dynamics NAV Server.
The Network Service account is considered less secure because it is a shared account that can be used by other unrelated network services. Any users who have rights to this account have rights to all services that are running on this account.
If you create a domain user account to run Microsoft Dynamics NAV Server, you can use the same account to run SQL Server, whether or not SQL Server is on the same computer.
Because Microsoft Dynamics NAV Setup and the New-NavDatabase cmdlet configure the required permissions for the Microsoft Dynamics NAV Server account, you will typically use the procedures in this topic when you change the Microsoft Dynamics NAV Server account for an existing installation.
To provision a Microsoft Dynamics NAV Server account, complete the following procedures as described in this topic:
Provisioning a Domain User Account
If you are running the Microsoft Dynamics NAV Server under a domain user account, you must:
- Enable the account to log in as a service
- Enable the account to register an SPN on itself
- Give the account necessary database privileges in SQL Server
Enabling the account to log in as a service
Depending on various factors, the account may or may not already have this ability.
For example, if you have already installed SQL Server and configured it to run under the same account, SQL Server will have modified the account to log in as a service.
Add the Log on as a service Right to an Account
Considered for Windows 8.1, for other versions please check accordingly.
You can use this procedure to add the Log on as a service right to an account on your computer.
Membership in the local Administrators group, or equivalent, is the minimum required to complete these procedures.
To add the "Log on as a service" right to an account on your local computer
- To open Local Security Policy, click Start, point to Control Panel, point to Administrative Tools, and then double-click Local Security Policy.
- In the console tree, double-click Local Policies, and then click User Rights Assignment.
- In the details pane, double-click Log on as a service.
- Click Add User or Group, and then add the appropriate account to the list of accounts that possess the Log on as a service right.
To add the "Log on as a service" right to an account for a Group Policy object, when you are on a server that is joined to a domain or a domain controller
- Click Start, point to Run, type mmc, and then click OK.
- On the File menu, click Add/Remove Snap-in.
- In Add/Remove Snap-in, click Add, and then, in Add Standalone Snap-in, double-click Group Policy Object Editor.
- In Group Policy Object, click Browse, browse to the Group Policy object (GPO) that you want to modify, click OK, and then click Finish.
- Click Close, and then click OK.
- In the console tree, click User Rights Assignment.
- Where?
- GroupPolicyObject [ComputerName] Policy
- Computer Configuration
- Windows Settings
- Security Settings
- Local Policies
- User Rights Assignment
- In the details pane, double-click Log on as a service.
- If the security setting has not yet been defined, select the Define these policy settings check box.
- Click Add User or Group, and then add the appropriate account to the list of accounts that possess the Log on as a service right.
When this permission is lacking, Microsoft Dynamics NAV Server server instances may not be able to start.
Enabling the account to register an SPN on itself
To enable secure mutual authentication between clients and Microsoft Dynamics NAV Server, you must configure the Microsoft Dynamics NAV Server account to self-register Service Principal Names (SPNs).
Mutual authentication is recommended in a production environment but may not be necessary in a testing or staging environment. The following procedure assumes a computer running Windows Server 2008 or Windows Server 2008 R2. On Windows 7 or Windows Vista you would need to install the Remote Server Administration Tools first.
To enable the Microsoft Dynamics NAV Server account to register an SPN on itself
- Start the Active Directory Users and Computers snap-in in Microsoft Management Console (MMC):
- Choose Run on the Start menu, type mmc on the command line, and the choose OK.
- When the console opens, select Add/Remove Snap-In from the File menu, select Active Directory Users and Computers, and choose Add. If you do not see Active Directory Users and Computers in the list of available snap-ins, you may need to use Server Manager to install the Active Directory Domain Services role on your server computer.
- In MMC, select Active Directory Users and Computers in the tree view and choose Advanced Features from the View menu.
- Expand the domain node in the tree view and choose Users.
- Right-click the service account, select Properties, and then choose to display the Security tab.
- Choose SELF in the Group or user names list.
- Under Permissions for SELF, in the lower part of the panel, scroll down to Write public information and select the Allow column.
- Choose OK to exit the Properties panel, and close Active Directory Users and Computers.
Giving the account necessary database privileges in SQL Server
The Microsoft Dynamics NAV Server account must be a member of the db_owner database role on the Microsoft Dynamics NAV database.
When you install the Microsoft Dynamics NAV database by using Microsoft Dynamics NAV Setup or the New-NAVDatabase PowerShell cmdlet, you can specify the Microsoft Dynamics NAV Server account.
In these cases, the server account that you specify should already have the necessary privileges in SQL Server. If you change the Microsoft Dynamics NAV Server account for an existing installation, then you should verify the account has the required privileges in SQL Server.
To verify database privileges after you create your Microsoft Dynamics NAV database, use SQL Server Management Studio and, if necessary, modify database privileges.
If you installed the Demo option in Microsoft Dynamics NAV Setup, then the Network Service account already has the necessary database privileges.
To assign necessary database privileges for the Microsoft Dynamics NAV Server account
- Start SQL Server Management Studio and connect to the instance where the Microsoft Dynamics NAV database is installed.
- Create a login for the Microsoft Dynamics NAV Server account.
- Navigate the tree view: Security, Logins
- Right-click Logins and choose New Login.
- Choose Search, and use the Select User or Group dialog box to identify the Microsoft Dynamics NAV Server account.
- Choose OK to exit the New Login dialog box.
- Add the login as a user on the master database.
- Navigate the tree view: Databases, System Databases, master, Security, Users.
- Right-click Users and choose New User.
- Choose the ellipse button at the far right of the second line in the Database User – New dialog box.
- In the Select Login dialog box, enter or browse for the login you created for the Microsoft Dynamics NAV Server account.
- Enter a name in the User name field (the first line in the Database User - New dialog box).
- Choose OK to exit the Database User - New dialog box.
- Grant the Microsoft Dynamics NAV Server login permissions on the master database. In the tree view, right-click master and choose Properties. Then do the following in the Database Properties – master dialog box.
- Under Select a Page, choose Permissions.
- Under Name, choose the login you created for the Microsoft Dynamics NAV Server account name.
- Under Permissions for <username>, on the Explicit tab, scroll down to down to the Select line, and select the check box in the Grant column.
- Choose OK to exit the Database Properties – master dialog box.
- Navigate the tree view: Databases, System Databases, master, Tables, System Tables.
- Right-click the dbo.$ndo$srvproperty table and choose Properties.
- Under Select a Page, choose Permissions.
- Choose Search, and use the Select User or Group dialog box to identify the login for the Microsoft Dynamics NAV Server account.
- Under Permissions for <username>, on the Explicit tab, scroll down to down to the Select line, and select the check box in the Grant column.
- Choose OK to exit the Table Properties – dbo.$ndo$srvproperty dialog box.
- Grant the login the necessary database roles on the Microsoft Dynamics NAV database.
- Navigate the tree view: Databases, <your Microsoft Dynamics NAV database>, Security, Users.
- Right-click Users and choose New User.
- In the Database User – New dialog box, choose the ellipse button at the far right of the second line.
- Select the login you created for the Microsoft Dynamics NAV Server account name and choose OK.
- Under Database role membership, select the db_owner check boxe.
- Choose OK to exit the Database User – New dialog box.
- Right-click your Microsoft Dynamics NAV database and choose Properties.
- Under Select a Page, choose Permissions.
- Choose Search, and use the Select User or Group dialog box to identify login you created for the Microsoft Dynamics NAV Server account.
- Under Permissions for <username>, on the Explicit tab, scroll down to down to the View database state line, and select the check box in the Grant column.
- Choose OK to exit the Database Properties dialog box for your Microsoft Dynamics NAV database.
It is also possible to script these steps in SQL Server Management Studio:
USE [master]
GO
CREATE LOGIN [domain\accountname] FROM WINDOWS
CREATE USER [domain\accountname] FOR LOGIN [domain\accountname]
GRANT SELECT ON [master].[dbo].[$ndo$srvproperty] TO [domain\accountname]
GO
USE [Microsoft Dynamics NAV Database]
GO
CREATE USER [domain\accountname] FOR LOGIN [domain\accountname]
ALTER ROLE [db_owner] ADD MEMBER [domain\accountname]
GRANT VIEW DATABASE STATE TO [domain\accountname]
Provisioning the Network Service Account
The only circumstance where it is necessary to take any action with regard to the Network Service account is when change the Microsoft Dynamics NAV Server account on an existing installation from a domain account to the Network Service.
In this situation you must verify that the account has the necessary database privileges in SQL Server, as per Giving the account necessary database privileges in SQL Server, above.
Wednesday, 19 August 2015
Enhancing Microsoft Dynamics NAV Server Security
Microsoft Dynamics NAV Server is a .NET-based Windows Service application that works exclusively with SQL Server databases.
Microsoft Dynamics NAV Server provides an additional layer of security between clients and the database. It leverages the authentication features of the Windows Communications Framework to provide another layer of user authentication and uses impersonation to ensure that business logic is executed in a process that has been instantiated by the user who submitted the request. This means that authorization and logging of user requests are performed on a per-user basis.
Login Account
After you install Microsoft Dynamics NAV Server, the default configuration is for the service to log on using the NT Authority\Network Service account. If Microsoft Dynamics NAV Server and SQL Server are on different computers, then MS recommends that you configure Microsoft Dynamics NAV Server to log on using a dedicated Windows domain user account instead. This account should not be an administrator either in the domain or on any local computer. A dedicated domain user account is considered more secure because no other services and therefore no other users have permissions for this account.
Disk Quotas
Client users can send files to be stored on Microsoft Dynamics NAV Server, so MS recommend that administrators set up disk quotas on all computers running Microsoft Dynamics NAV Server.
This can prevent users from uploading too many files, which can make the server unstable. Disk quotas track and control disk space usage for NTFS volumes, which allows administrators to control the amount of data that each user can store on a specific NTFS volume.
Limiting Port Access
The Microsoft Dynamics NAV Setup program opens a port in the firewall on the computer where you install Microsoft Dynamics NAV Server. By default, this is port 7046.
To improve security, you can consider limiting access to this port to a specific subnet. One way is to use netsh, which is a command-line tool for configuring and monitoring Windows-based computers at a command prompt.
The specific version of this command that you would use is netsh firewall set portopening. For example, the following command limits access to port 7046 to the specified addresses and subnets:
netsh firewall set portopening protocol=TCP port=7046 scope=subnet addresses=LocalSubnet
You can learn more on netsh command here.
Microsoft Dynamics NAV Server provides an additional layer of security between clients and the database. It leverages the authentication features of the Windows Communications Framework to provide another layer of user authentication and uses impersonation to ensure that business logic is executed in a process that has been instantiated by the user who submitted the request. This means that authorization and logging of user requests are performed on a per-user basis.
Login Account
After you install Microsoft Dynamics NAV Server, the default configuration is for the service to log on using the NT Authority\Network Service account. If Microsoft Dynamics NAV Server and SQL Server are on different computers, then MS recommends that you configure Microsoft Dynamics NAV Server to log on using a dedicated Windows domain user account instead. This account should not be an administrator either in the domain or on any local computer. A dedicated domain user account is considered more secure because no other services and therefore no other users have permissions for this account.
Disk Quotas
Client users can send files to be stored on Microsoft Dynamics NAV Server, so MS recommend that administrators set up disk quotas on all computers running Microsoft Dynamics NAV Server.
This can prevent users from uploading too many files, which can make the server unstable. Disk quotas track and control disk space usage for NTFS volumes, which allows administrators to control the amount of data that each user can store on a specific NTFS volume.
Limiting Port Access
The Microsoft Dynamics NAV Setup program opens a port in the firewall on the computer where you install Microsoft Dynamics NAV Server. By default, this is port 7046.
To improve security, you can consider limiting access to this port to a specific subnet. One way is to use netsh, which is a command-line tool for configuring and monitoring Windows-based computers at a command prompt.
The specific version of this command that you would use is netsh firewall set portopening. For example, the following command limits access to port 7046 to the specified addresses and subnets:
netsh firewall set portopening protocol=TCP port=7046 scope=subnet addresses=LocalSubnet
You can learn more on netsh command here.
Friday, 7 August 2015
Implementing Security Certificates to support login over a WAN
Today we will set up an environment to test integrating certificates into a configuration for connecting computers running the Microsoft Dynamics NAV Windows client or Microsoft Dynamics NAV Web Server components to Microsoft Dynamics NAV Server instances over a wide area network (WAN) with the chain trust configuration.
What all we need to get our today’s exercise done?
To complete this process, we will need:

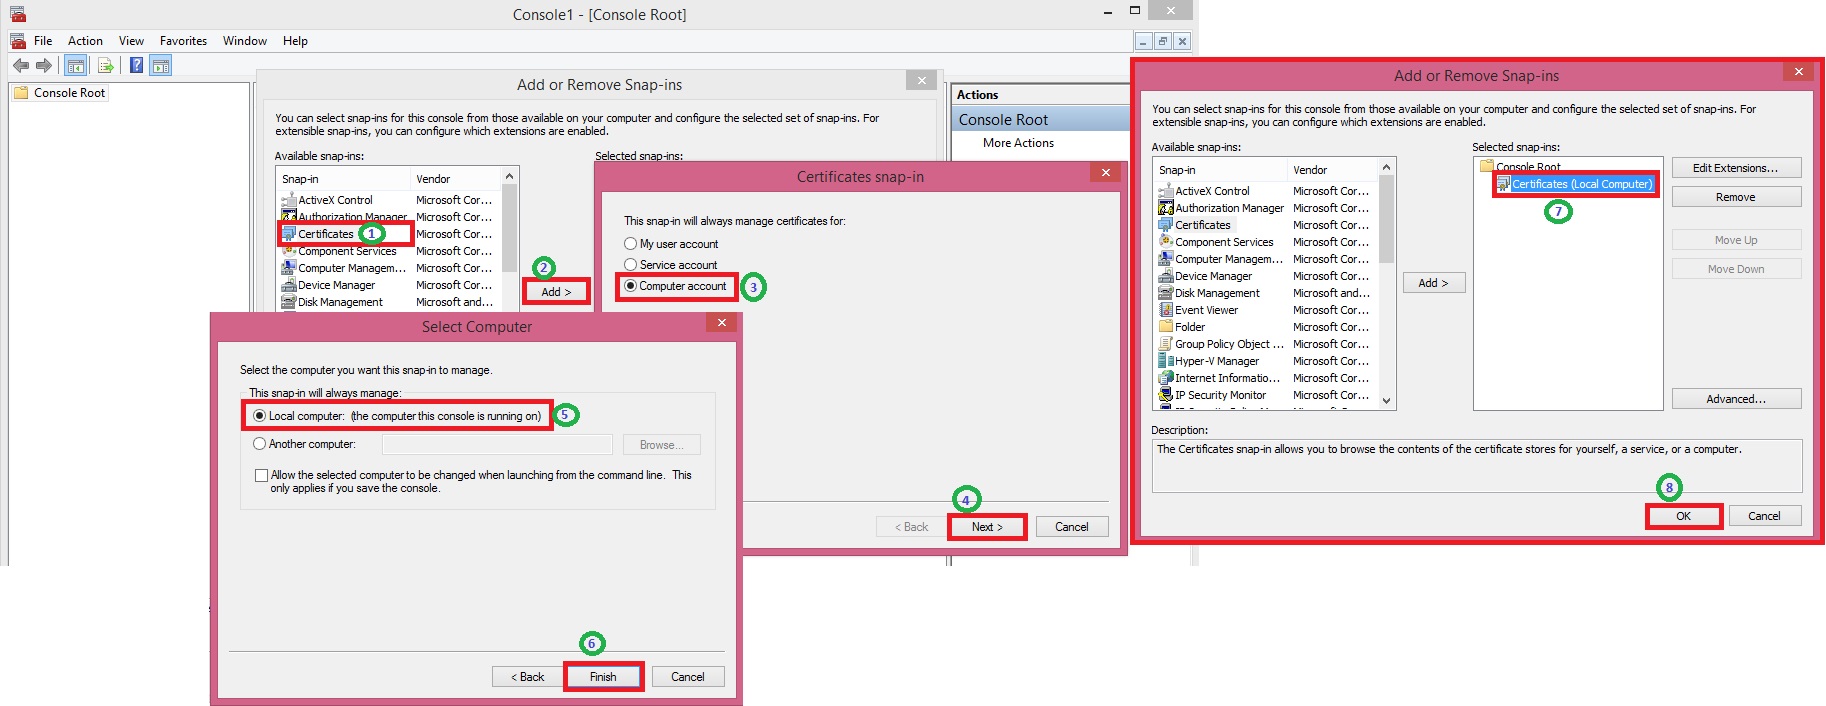

We created and installed a root certification authority (CA) and a server certificate on the computer running Microsoft Dynamics NAV Server in previous posts.
If not please follow below posts and then return here to continue.
Previous Step Link- How to create a root CA and a private key file by using the makecert.exe utility
Previous Step Link- How to create certificate revocation list for the root certification authority
Previous Step Link- How to create and install a test certificate for the Microsoft Dynamics NAV Server computer
Previous Step Link- How to grant access to the certificate’s private key to the service account for the Microsoft Dynamics NAV Server
How to modify the Microsoft Dynamics NAV Server configuration file to support login over a WAN


To modify the Microsoft Dynamics NAV Windows client configuration file to add certificate information
The location of this file is Users\<username>\AppData\Roaming\Microsoft\Microsoft Dynamics NAV.
By default, this file is hidden. Therefore, you may have to change your folder options in Windows Explorer to view hidden files.


I am using NavUserPassword as credential Type in this example.
When you start the client, you are prompted for a valid user name and password for the server domain.

Enter your User Name and Password to Login, I have created one for my testing as below:

To modify the Microsoft Dynamics NAV Web client configuration file to add certificate information
This too works as above, credentials will be asked when you open WebClient.
While writing this post I am not having Web Client installed on my computer so unable include screen shots for same.
What all we need to get our today’s exercise done?
To complete this process, we will need:
- The Certificates snap-in for Microsoft Management Console (MMC). If you do not already have this snap-in installed, then follow these steps:
- Choose Start, choose Run, and then type Mmc.exe.
- In the console, on the File menu, choose Add/Remove Snap-in.
- In the Add Standalone Snap-in dialog box, select Certificates, choose Computer Account, choose Local Computer, and then choose Add.
- The makecert.exe utility. The makecert.exe utility is installed with Microsoft Visual Studio and Microsoft Windows SDK.
We created and installed a root certification authority (CA) and a server certificate on the computer running Microsoft Dynamics NAV Server in previous posts.
If not please follow below posts and then return here to continue.
Previous Step Link- How to create a root CA and a private key file by using the makecert.exe utility
Previous Step Link- How to create certificate revocation list for the root certification authority
Previous Step Link- How to create and install a test certificate for the Microsoft Dynamics NAV Server computer
Previous Step Link- How to grant access to the certificate’s private key to the service account for the Microsoft Dynamics NAV Server
How to modify the Microsoft Dynamics NAV Server configuration file to support login over a WAN
- Start the Microsoft Dynamics NAV Server Administration tool.
- Stop the Microsoft Dynamics NAV Server instance.
- Modify the following settings for the Microsoft Dynamics NAV Server instance in the Microsoft Dynamics NAV Server Administration tool.
| Key | New value | Description |
| ClientServicesCredentialType(General tab) | NavUserPassword or Username | This parameter is on the General tab in the Microsoft Dynamics NAV Server Administration tool. The default value is Windows. When you change it to NavUserPassword or Username, client users who connect to the server are prompted for user name and password credentials. |
| CertificateThumbprint(Client Services tab) | Value of the Thumbprint field in the previous post | The default value is <key>. Remove any leading or trailing spaces in the thumbprint. |
- Choose Save.
- Restart the Microsoft Dynamics NAV Server instance.
To modify the Microsoft Dynamics NAV Windows client configuration file to add certificate information
- Open the ClientUserSettings.config configuration file.
The location of this file is Users\<username>\AppData\Roaming\Microsoft\Microsoft Dynamics NAV.
By default, this file is hidden. Therefore, you may have to change your folder options in Windows Explorer to view hidden files.
- Modify the following settings.
| Key | New value | Description |
| ClientServicesCredentialType | NavUserPassword or Username | The default value is Windows. When you change it to NavUserPassword or Username, client users who connect to the server are prompted for user name and password credentials |
| DnsIdentity | The subject name of the service certificate | The default value is <identity>.For this exercise, set the key to NavServiceCert. |
I am using NavUserPassword as credential Type in this example.
- Save and close the ClientUserSettings.config file.
When you start the client, you are prompted for a valid user name and password for the server domain.
Enter your User Name and Password to Login, I have created one for my testing as below:
To modify the Microsoft Dynamics NAV Web client configuration file to add certificate information
- On the computer that is installed the Microsoft Dynamics NAV Web Server components, open the installation folder for the Microsoft Dynamics NAV Web client. By default, the folder is C:\Program Files\Microsoft Dynamics NAV\80\Web Client.
- Open the web.config file in a text editor, such as Notepad.
- Find the <DynamicsNavSettings> element, and then change the following settings:
| Key | New value | Description |
| ClientServicesCredentialType | NavUserPassword or Username | The default value is Windows. When you change it to NavUserPassword or Username, client users who connect to the server are prompted for user name and password credentials. |
| DnsIdentity | The subject name of the service certificate | For this exercise, set the key to NavServiceCert. |
- Save the web.config file.
This too works as above, credentials will be asked when you open WebClient.
While writing this post I am not having Web Client installed on my computer so unable include screen shots for same.
Subscribe to:
Posts (Atom)