Monday 29 June 2015

To modify the Word report layout

1. In the development environment, export the Word report layout as a Word document file to your computer or network.

Export Word Template

2. Open the Word document file in Word 2013 and make changes.


To make basic layout changes, such as adding or removing tables and cells, formatting text, or changing margins, use the editing features of Word.

Open Word Template


To add fields from the report dataset to the layout, use the custom XML part for the report to add content controls that map to the fields.

AddFields


3. Save your changes, and then close the Word report layout document.
4. Import the Word document into the report.


Import Word Template

To create a Word report layout for a report

In the development environment, open the report in Report Dataset Designer as follows.

  1. On the Tools menu, choose Object Designer.

  2. In Object Designer, choose Report, select the report, and then choose the Design button.

  3. On the Tools menu, choose Word Layout, and then choose New, and then choose the OK button.

  4. Save the report object.


Create Layout

A blank Word report layout is created on the report object. The report layout includes a custom XML part for the current report dataset. You can now design the layout in Word.

A Word report layout determines the content and format of a report when it is viewed and printed from the Microsoft Dynamics NAV client. When you modify a Word report layout, you specify the fields of the report dataset to include on report and how the fields are arranged. You also define the general format of the report, such as text font and size, margins, and background images. You will typically arrange the content of the report by adding tables to the layout.

You insert dataset fields in the layout by using a custom XML part that is automatically generated for the report when you create the Word report layout.

How to. Specify the Default Built-in Report Layout

You can specify whether a report uses a built-in RDLC or Word report layout as the default layout.

To specify the default report layout


    1. In the development environment, on the Tools menu, choose Object Designer.

    2. In Object Designer, choose Report, select the report that you want to modify, and then choose Design.

    3. In Report Dataset Designer, select a blank row, and then on the View menu, choose Properties.

    4. In the Report - Properties window, set the DefaultLayout property to RDLC or Word.

    5. DefaultLayout

    6. Save and compile the report..


Friday 26 June 2015

Enhanced Cues

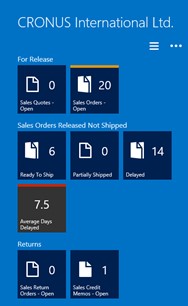
Cues appear as tiles in the Microsoft Dynamics NAV client that display business data and key performance indicators (KPIs) on RoleCenters. Microsoft Dynamics NAV 2015 includes the following new features that expand the data that can be displayed in a Cue, and enhance Cue set up and appearance.

Coloured Indicators

You can configure the Cue to display a bar along its upper border that changes colour based on the data in the cue.
New Images

You can change the image that displays on the Cue or set up the Cue without an image. There are several images to choose from.
Normal Fields

In previous Microsoft Dynamics NAV versions, you could only set up Cues based on FlowFields for data. In Microsoft Dynamics NAV 2015, you can also use normal fields, which expands your possibilities for the Cue data source, such as using Query objects or source expressions.
Decimal and Text Data Types

In previous Microsoft Dynamics NAV versions, you could only set up Cues to display on integer data types. In Microsoft Dynamics NAV 2015, you can also use decimal and text data types. This provides you with additional data aggregation possibilities instead of just COUNT, such as SUM, MAX, MIN, and AVG.
Custom Formatting of Data

By using the AutoFormat property, you customize the format of the value that appears in a Cue. For example, you can set the number of decimal places, or place a symbol such as a +, -, or %, before or after a value.
Cues

Show Mandatory Property

With Microsoft Dynamics NAV a new property called ShowMandatory has been introduced on page fields. The ShowMandatory property is set on page fields and marks the field with a red asterisk on the UI.

ShowMandatory Property

NOTE:The ShowMandatory property can be used to mark all page fields, but does not enforce any validation of the field. This means that the user will be able to close a page without entering data.

Commenting and uncommenting multiple lines of C/AL Code

We can add and remove comment marks manually for each line till now. But from now the Comment Selection and Uncomment Selection options available in the Edit menu. The Comment Selection and Uncomment Selection options enable you to comment or uncomment multiple lines of code all at once.

  • To comment lines of code, select the lines, and then, in the Edit menu, choose Comment Selection (Shift+Ctrl+K).


  • To uncomment lines of code, select the lines, and then choose Uncomment Selection (Shift+Ctrl+O).


Comment / UnComment Selection

Microsoft Dynamics NAV Tablet Client

In Microsoft Dynamics NAV 2015 Microsoft introduced a new interface called Microsoft Dynamics NAV for Tablet. The Microsoft Dynamics NAV for Tablet allows users in small and medium sized businesses to access data from a tablet. Developing for Microsoft Dynamics NAV for Tablet is very similar to developing for the Microsoft Dynamics NAV Web client using the Microsoft Dynamics NAV Development Environment.

To open Microsoft Dynamics NAV for Tablet in browser mode

  • The Role Center for the default company


http://NavisionWebClient:7080/DynamicsNAV80/WebClient/tablet.aspx


  • The Role Center for a specific company


http://NavisionWebClient:7080/DynamicsNAV80/WebClient/tablet.aspx?company=CRONUS%20International%20Ltd.


  • A specific page


http://NavisionWebClient:7080/DynamicsNAV80/WebClient/tablet.aspx?page=22


Replace (http://NavisionWebClient:7080/DynamicsNAV80) with URL for Web Client in your environment.

How it looks:

Tab Screen

You will have to install below App: http://apps.microsoft.com/windows/en-in/app/d8a4908d-61f2-4740-b4fc-b559fbdd2e51

Microsoft Dynamics NAV 2015 Readiness Library

If you want to find out more about this release, please have a look at below link, Partner Source Login Required. https://mbs.microsoft.com/partnersource/northamerica/readiness-training/readiness-training-news/NAV2015ReadinessLibrary