This cumulative update includes all hotfixes and regulatory features that have been released for Microsoft Dynamics NAV 2016, including hotfixes and regulatory features that were released in previous cumulative updates.
This cumulative update replaces previously released cumulative updates. You should always install the latest cumulative update.
It may be necessary to update your license after implementing this hotfix to gain access to new objects included in this or a previous cumulative update (this only applies to customer licenses).
For a list of cumulative updates released for Microsoft Dynamics NAV 2016, see released cumulative updates for Microsoft Dynamics NAV 2016 (https://support.microsoft.com/kb/3108728/ ) . Cumulative updates are intended for new and existing customers who are running Microsoft Dynamics NAV 2016.
For more details see below link, Partner/Customer Source required.
https://mbs2.microsoft.com/Knowledgebase/kbdisplay.aspx?scid=kb,en-us,3182131
Sunday, 7 August 2016
Cumulative Update 22 for Microsoft Dynamics NAV 2015 (Build 46580)- Released in Aug 2016
This cumulative update includes all hotfixes and regulatory features that have been released for Microsoft Dynamics NAV 2015, including hotfixes and regulatory features that were released in previous cumulative updates.
Note You must convert the database if you are upgrading to this cumulative update from a cumulative update earlier than cumulative update 9 (build 41779). For more information, see Converting a Database (https://msdn.microsoft.com/en-us/library/dn271650(v=nav.80).aspx) in Help for Microsoft Dynamics NAV.
This cumulative update replaces previously released cumulative updates. You should always install the latest cumulative update.
It may be necessary to update your license after implementing this hotfix to gain access to new objects included in this or a previous cumulative update (this only applies to customer licenses).
For a list of cumulative updates released for Microsoft Dynamics NAV 2015, see released cumulative updates for Microsoft Dynamics NAV 2015 (https://support.microsoft.com/kb/3014609/ ) . Cumulative updates are intended for new and existing customers who are running Microsoft Dynamics NAV 2015.
For more details see below link, Partner/Customer Source required.
https://mbs2.microsoft.com/Knowledgebase/kbdisplay.aspx?scid=kb,en-us,3182130
Cumulative Update 34 for Microsoft Dynamics NAV 2013 R2 (Build 46577)- Released in Aug 2016
This cumulative update includes all hotfixes and regulatory features that have been released for Microsoft Dynamics NAV 2013 R2, including hotfixes and regulatory features that were released in previous cumulative updates.
This Cumulative Update replaces previously released cumulative updates. You should always install the latest cumulative update.
Note Implementing this cumulative update will require a database upgrade.
Licenses versioning
Microsoft Dynamics NAV 2013 R2 cumulative updates and license key versioning:
More details is made available in the October 2014 release of the Microsoft Dynamics Perpetual Licensing Guide.
It may be necessary to update your license after implementing this hotfix to gain access to new objects included in this or a previous cumulative update (this only applies to customer licenses).
For a list of cumulative updates released for Microsoft Dynamics NAV 2013 R2, see released cumulative updates for Microsoft Dynamics NAV 2013 R2 (https://support.microsoft.com/kb/2914930/ ) . For a complete list of all hotfixes released in cumulative updates for Microsoft Dynamics NAV 2013 R2, view the following CustomerSource and PartnerSource pages:
Cumulative updates are intended for new and existing customers who are running Microsoft Dynamics NAV 2013 R2.
For more details see below link Partner/Customer Source required.
https://mbs2.microsoft.com/Knowledgebase/kbdisplay.aspx?scid=kb,en-us,3182128
This Cumulative Update replaces previously released cumulative updates. You should always install the latest cumulative update.
Note Implementing this cumulative update will require a database upgrade.
Licenses versioning
Microsoft Dynamics NAV 2013 R2 cumulative updates and license key versioning:
- Microsoft Dynamics NAV 2013 R2 license keys are backward compatible with Microsoft Dynamics NAV 2013 instances.
- Microsoft Dynamics NAV 2013 license keys may not be used with Microsoft Dynamics NAV 2013 R2 instances. Microsoft Dynamics NAV 2013 license keys will not work with Microsoft Dynamics NAV 2013 R2 CU10 (or later) instances.
- Microsoft Dynamics NAV 2013 and Microsoft Dynamics NAV 2013 R2 license keys are not forward compatible with Microsoft Dynamics NAV 2015 instances.
More details is made available in the October 2014 release of the Microsoft Dynamics Perpetual Licensing Guide.
It may be necessary to update your license after implementing this hotfix to gain access to new objects included in this or a previous cumulative update (this only applies to customer licenses).
For a list of cumulative updates released for Microsoft Dynamics NAV 2013 R2, see released cumulative updates for Microsoft Dynamics NAV 2013 R2 (https://support.microsoft.com/kb/2914930/ ) . For a complete list of all hotfixes released in cumulative updates for Microsoft Dynamics NAV 2013 R2, view the following CustomerSource and PartnerSource pages:
CustomerSource
Overview of Released Application Hotfixes for Microsoft Dynamics NAV 2013 R2 (https://mbs.microsoft.com/customersource/Global/NAV/downloads/hot-fixes/NAV2013R2AppHotfixOverview)
Overview of Released Platform Hotfixes for Microsoft Dynamics NAV 2013 R2 (https://mbs.microsoft.com/customersource/Global/NAV/downloads/hot-fixes/NAV2013R2PlatformHotfixOverview)
PartnerSource
Overview of Released Application Hotfixes for Microsoft Dynamics NAV 2013 R2 (https://mbs.microsoft.com/partnersource/global/deployment/downloads/hot-fixes/NAV2013R2AppHotfixOverview)
Overview of Released Platform Hotfixes for Microsoft Dynamics NAV 2013 R2 (https://mbs.microsoft.com/partnersource/global/deployment/downloads/hot-fixes/NAV2013R2PlatformHotfixOverview)
Cumulative updates are intended for new and existing customers who are running Microsoft Dynamics NAV 2013 R2.
For more details see below link Partner/Customer Source required.
https://mbs2.microsoft.com/Knowledgebase/kbdisplay.aspx?scid=kb,en-us,3182128
Cumulative Update 41 for Microsoft Dynamics NAV 2013 (Build 46576)- Released in Aug 2016
This cumulative update includes all hotfixes and regulatory features that have been released for Microsoft Dynamics NAV 2013, including hotfixes and regulatory features that were released in previous cumulative updates.
This cumulative update replaces previously released cumulative updates. You should always install the latest cumulative update.
It may be necessary to update your license after implementing this hotfix to gain access to new objects included in this or a previous cumulative update (this only applies to customer licenses).
For a list of cumulative updates released for Microsoft Dynamics NAV 2013, see released cumulative updates for Microsoft Dynamics NAV 2013 (https://support.microsoft.com/kb/2842257/ ) . For a complete list of all hotfixes released in cumulative updates for Microsoft Dynamics NAV 2013, view the following CustomerSource and PartnerSource pages:
Cumulative updates are intended for new and existing customers who are running Microsoft Dynamics NAV 2013.
For more details see below link Partner/Customer Source is Required.
https://mbs2.microsoft.com/Knowledgebase/kbdisplay.aspx?scid=kb,en-us,3182126
This cumulative update replaces previously released cumulative updates. You should always install the latest cumulative update.
It may be necessary to update your license after implementing this hotfix to gain access to new objects included in this or a previous cumulative update (this only applies to customer licenses).
For a list of cumulative updates released for Microsoft Dynamics NAV 2013, see released cumulative updates for Microsoft Dynamics NAV 2013 (https://support.microsoft.com/kb/2842257/ ) . For a complete list of all hotfixes released in cumulative updates for Microsoft Dynamics NAV 2013, view the following CustomerSource and PartnerSource pages:
CustomerSource
Overview of Released Application Hotfixes for Microsoft Dynamics NAV 2013 (https://mbs.microsoft.com/customersource/Global/NAV/downloads/hot-fixes/NAV2013AppHotfixOverview)
Overview of Released Platform Hotfixes for Microsoft Dynamics NAV 2013 (https://mbs.microsoft.com/customersource/Global/NAV/downloads/hot-fixes/NAV2013PlatformHotfixOverview)
PartnerSource
Overview of Released Application Hotfixes for Microsoft Dynamics NAV 2013 (https://mbs.microsoft.com/partnersource/global/deployment/downloads/hot-fixes/NAV2013AppHotfixOverview)
Overview of Released Platform Hotfixes for Microsoft Dynamics NAV 2013 (https://mbs.microsoft.com/partnersource/global/deployment/downloads/hot-fixes/NAV2013PlatformHotfixOverview)
Cumulative updates are intended for new and existing customers who are running Microsoft Dynamics NAV 2013.
For more details see below link Partner/Customer Source is Required.
https://mbs2.microsoft.com/Knowledgebase/kbdisplay.aspx?scid=kb,en-us,3182126
Wednesday, 3 August 2016
Save General Journals as Standard Journal in Navision
Do you Know you can save the General Journal as Standard Journal and retrive edit and post it later.
Many of time we pass entries of same Nature, Like Rent, Salary, Bills etc.. just an example you can decide upon which entries you post frequently and club it as Standard Journal to save your time.
You can create once and retrive it every month or when ever required and Post it in future/later.This can serve you as template for future use.
Let us see how we can use this feature.

Open your General Journal.
Make entries which you do oftenly. Don't put Postng Date & Document No. Complete your all entries.
Next we will save this as Standard Journal for future use.
From Action choose Save as Standard Journal.

Give Code & Name for your Journal Template.
If Amounts are fixed every time you can enter them too and while Save choose Save Amount.
No Let us review the entry that we saved.
From Action Choose Get Standard Journal.
This will display you all Saved Standard General Journals.

Select the required Journal Code and Click on Edit.

This is what is Saved in your Standard Journal.
Let use return to the Standard Journal List.
Select desired/ earlier saved Std. Journal and Click on OK.

Confirmation of Std. Journal retrived and Journals created in General Journal Page.
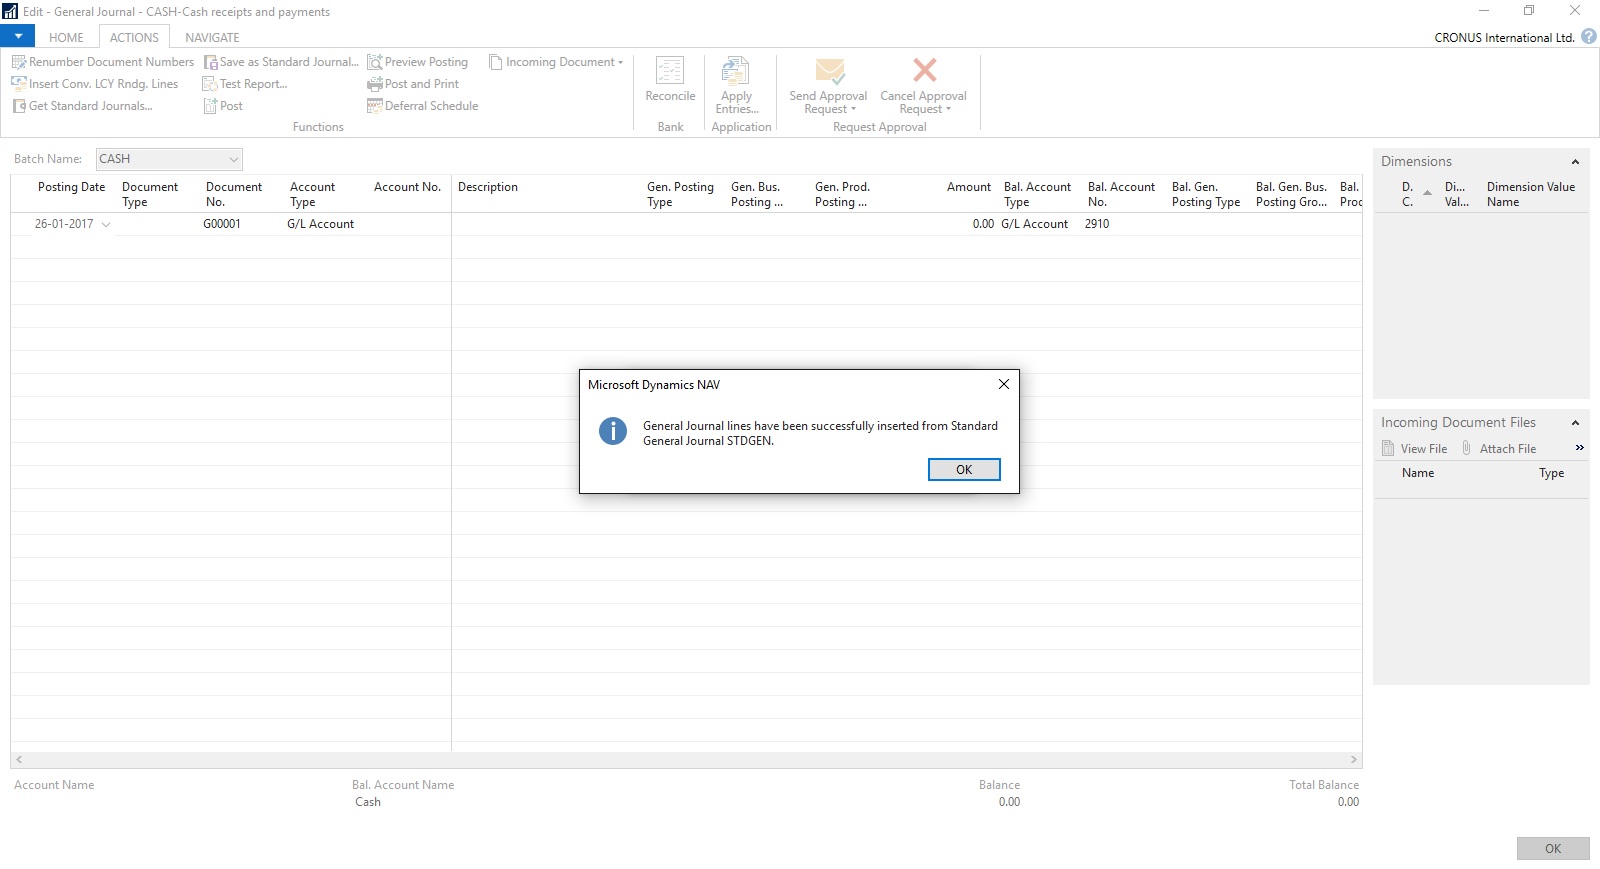
Your General Journal gets populated with values you saved to Std. Journal.
Have you Noticed, Posting Date as your Work Date and Next Document No. from your assigned No. Series is populated Automatically.

Fill the Amount and any other required fields and Post the Journal.
Next time when again you wish to post similar entries just retrive it and continue.
Thats all for todays Post, What you are waiting for give it a try.
I will comeup with more details in my upcoming Posts, till then keep exploring and Learning.
Many of time we pass entries of same Nature, Like Rent, Salary, Bills etc.. just an example you can decide upon which entries you post frequently and club it as Standard Journal to save your time.
You can create once and retrive it every month or when ever required and Post it in future/later.This can serve you as template for future use.
Let us see how we can use this feature.
Open your General Journal.
Make entries which you do oftenly. Don't put Postng Date & Document No. Complete your all entries.
Next we will save this as Standard Journal for future use.
From Action choose Save as Standard Journal.
Give Code & Name for your Journal Template.
If Amounts are fixed every time you can enter them too and while Save choose Save Amount.
No Let us review the entry that we saved.
From Action Choose Get Standard Journal.
This will display you all Saved Standard General Journals.
Select the required Journal Code and Click on Edit.
This is what is Saved in your Standard Journal.
Let use return to the Standard Journal List.
Select desired/ earlier saved Std. Journal and Click on OK.
Confirmation of Std. Journal retrived and Journals created in General Journal Page.
Your General Journal gets populated with values you saved to Std. Journal.
Have you Noticed, Posting Date as your Work Date and Next Document No. from your assigned No. Series is populated Automatically.
Fill the Amount and any other required fields and Post the Journal.
Next time when again you wish to post similar entries just retrive it and continue.
Thats all for todays Post, What you are waiting for give it a try.
I will comeup with more details in my upcoming Posts, till then keep exploring and Learning.
Tuesday, 2 August 2016
Creating Views - to Save Filtered Lists in NAV
Do you Know you can save the Page as View with filters.
Many of time we access to Page and apply same set of Filters to fetch our data. You can save the same for quick retrival of data applying the filters automatically in future access.
You save the Page with Filters as View.
Let us see small example how to achieve it.
First we will open the List Page in my case i am having one customized Customer List.
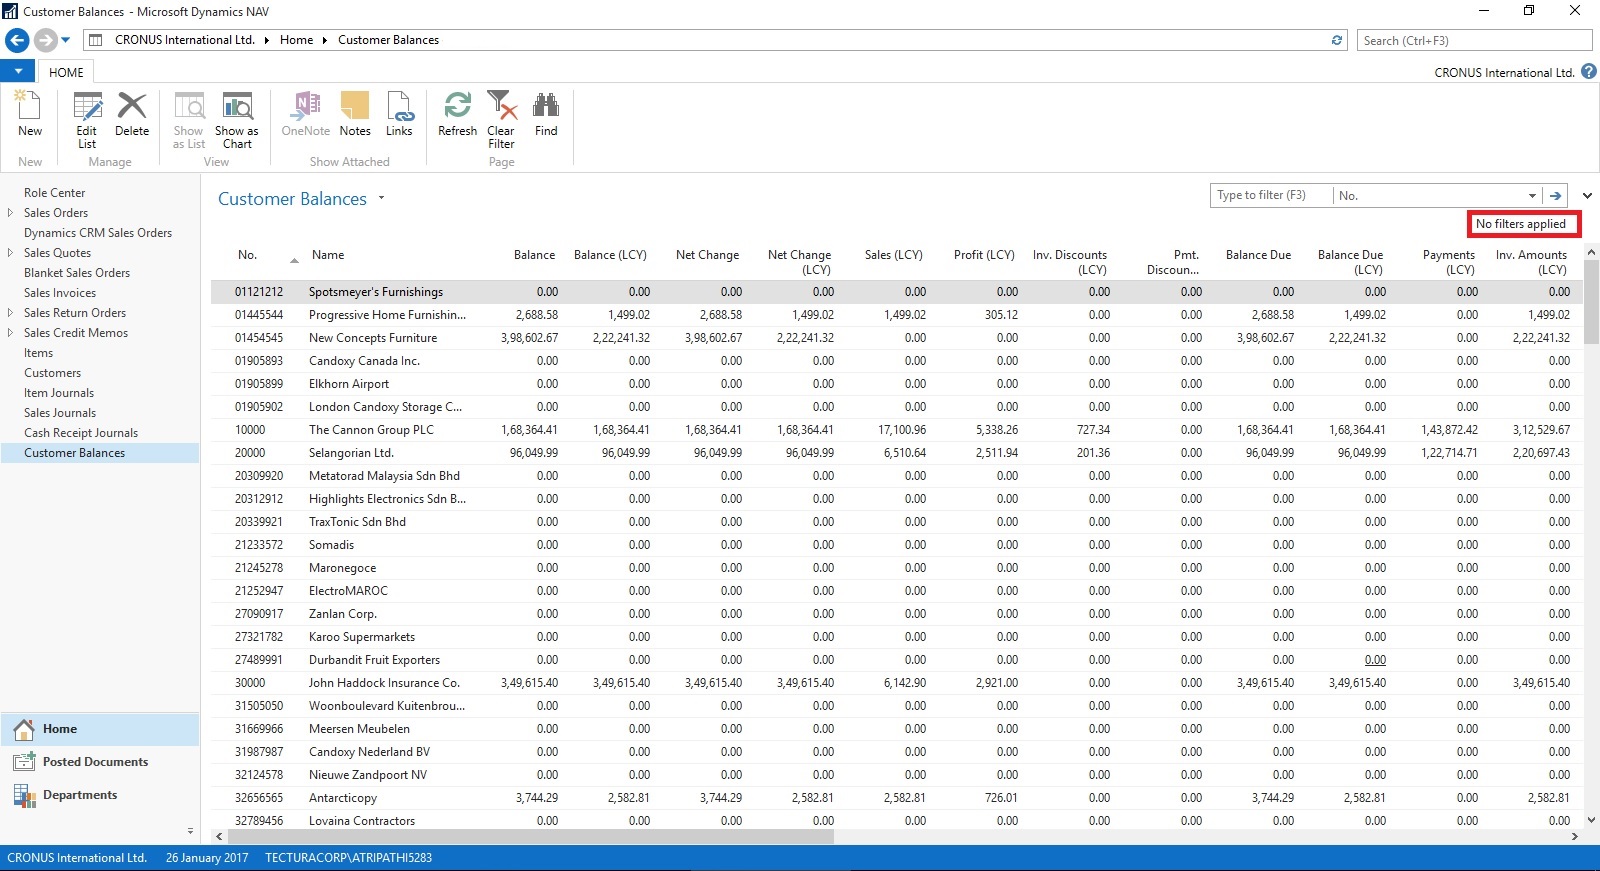
Suppose this is the Page which i use for Balances Retrival each month and on daily basis.
I Enter Filter as Balance > 5000 & Current Month Filter whenever i wish to check balances for my reporting or followup purpose.
For Date Filter i use (-CM..CM) sothat when i open this view next month it takes the appropriate Filter for that month.

Click on the Page Name post applying all the required Filters.
Select Save View as.
Give the Name for the View.
Select the Location to save the View.
On Confirmation respond as Yes.

Your View will be Saved, You can create as much Views as desired using different Filters.

Small and good Feature.
What you are waiting for give it a try.
I will comeup with more information in my upcoming posts, till then keep exploring and learning.
Many of time we access to Page and apply same set of Filters to fetch our data. You can save the same for quick retrival of data applying the filters automatically in future access.
You save the Page with Filters as View.
Let us see small example how to achieve it.
First we will open the List Page in my case i am having one customized Customer List.
Suppose this is the Page which i use for Balances Retrival each month and on daily basis.
I Enter Filter as Balance > 5000 & Current Month Filter whenever i wish to check balances for my reporting or followup purpose.
For Date Filter i use (-CM..CM) sothat when i open this view next month it takes the appropriate Filter for that month.
Click on the Page Name post applying all the required Filters.
Select Save View as.
Give the Name for the View.
Select the Location to save the View.
On Confirmation respond as Yes.
Your View will be Saved, You can create as much Views as desired using different Filters.
Small and good Feature.
What you are waiting for give it a try.
I will comeup with more information in my upcoming posts, till then keep exploring and learning.
Sunday, 31 July 2016
Configuring Single Sign-On using Office 365 on Navision 2016
Today we will see how we can enable Single Sign-On using Office 365 for Navision 2016.
Before we start we should have Virtual Machine ready on Azure with Navision 2016 installed, Certificates and Nav User is configured. Endpoints are open so that web client can be used from outside Virtual Machine on internet.
It should be hosted on Public IP, then only we will be able to configure it.
For details regarding Azure Subscription you can see my earlier post here.
For details regarding Creating Virtual Machines you can see my earlier post here.
You also need Office 365 Subscription ready for use and you can use the AD of same to configure your Single Sign-On.
Let us start with Admin console of office 365. Click on Azure AD this will create Management Console to work with AD.

Enter your details and click on Next.

Enter your details and click on Next, Finally Sign Up.

It will take few minutes to configure and make it available for you.
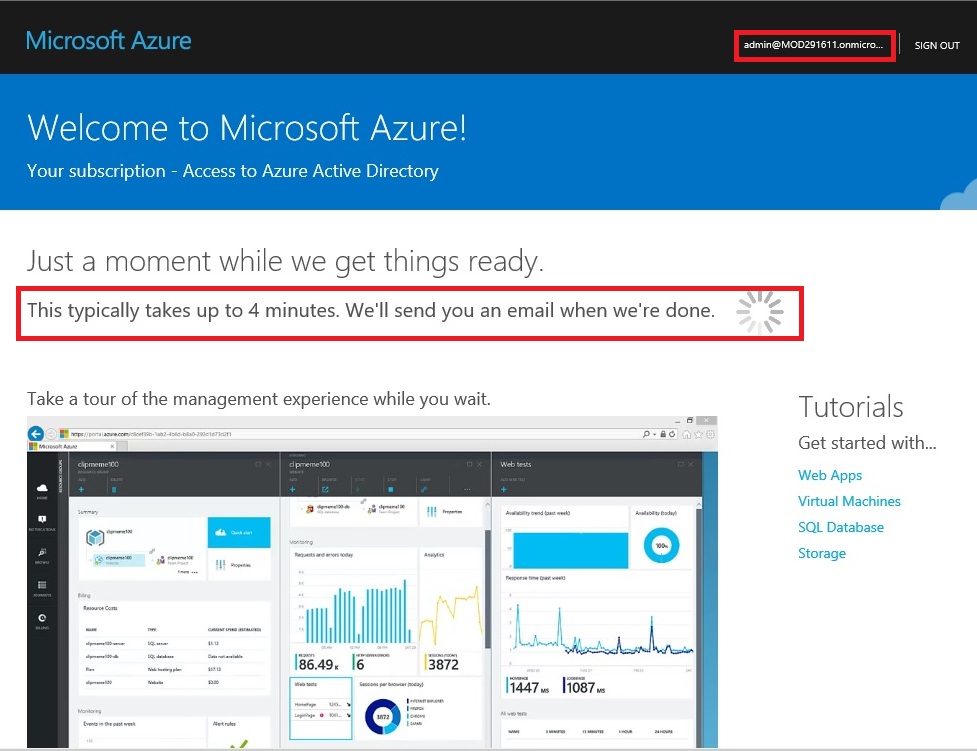
Once your Subscription is ready click on Start Managing my Service.

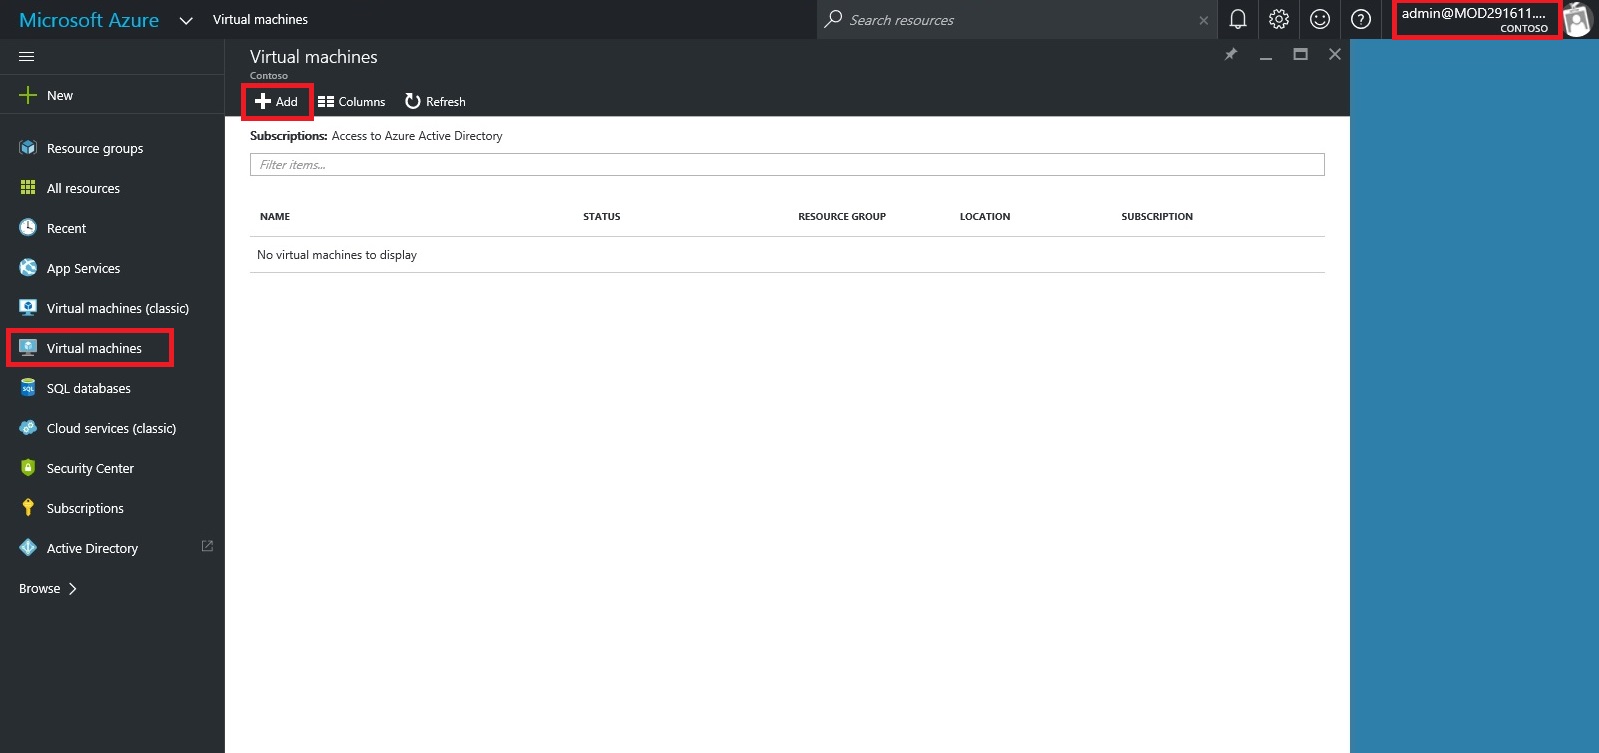
From Management Console click on Virtual Machine, if you dont have already to create one for you.
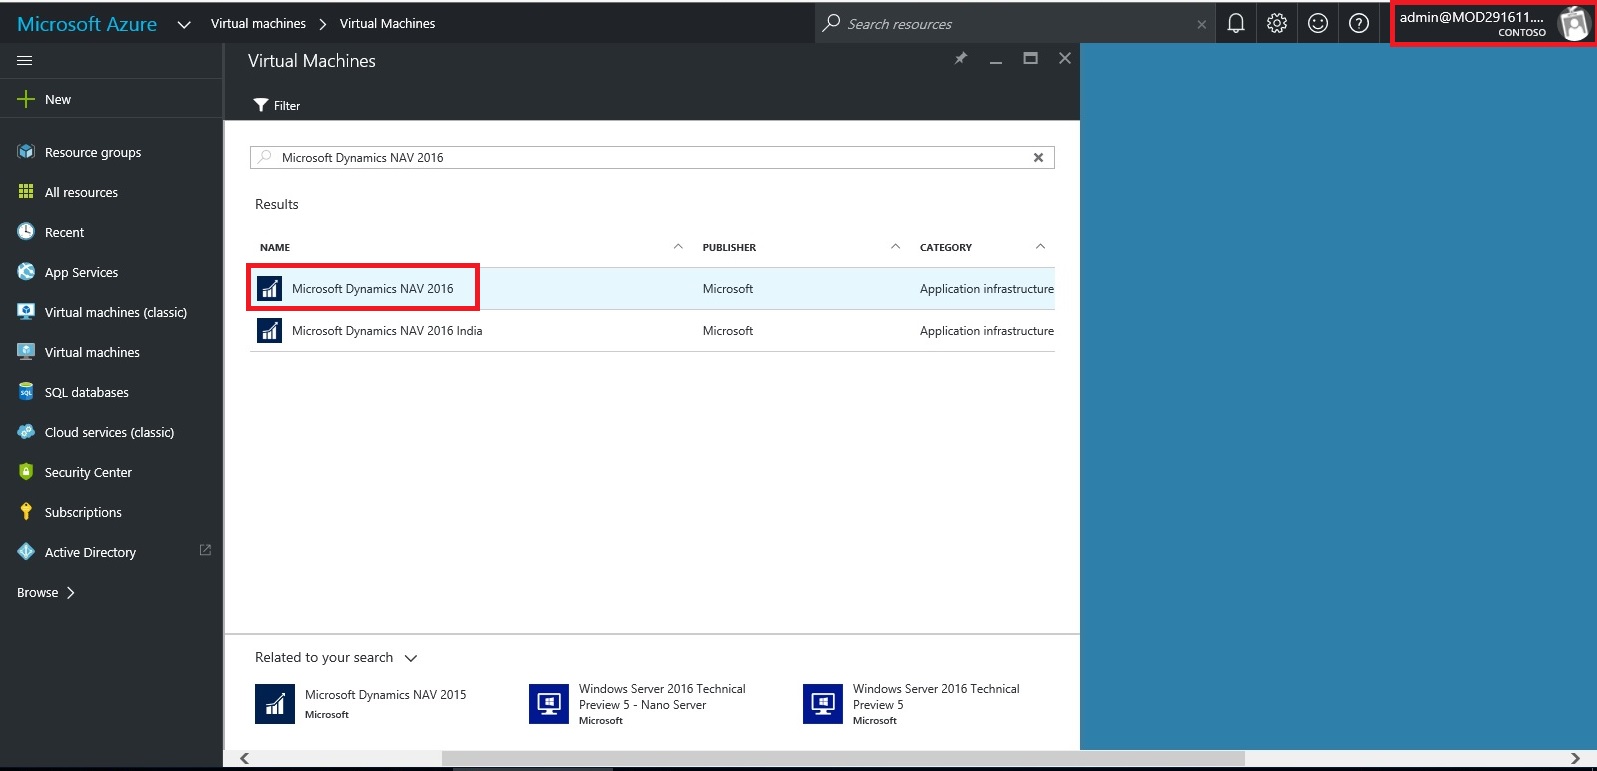
Select the Virtual Machine in Search for Microsoft Dynamics Nav 2016.

Select the approprite Virtual Machine from the List.
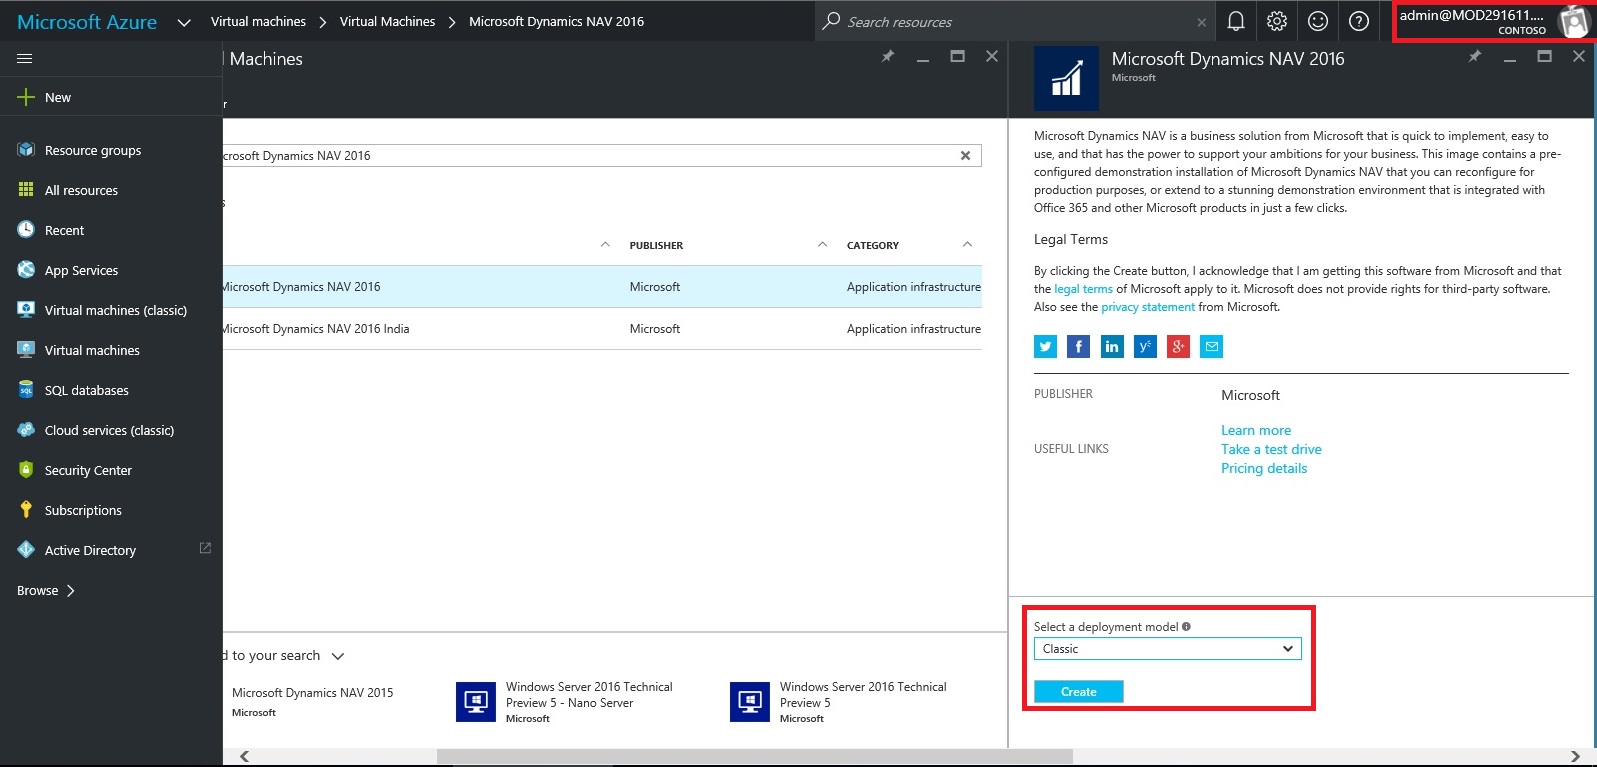
Enter your details and Create. For more details see the link provided on top of the post.
Let us return to our AD, Click on Applications. This will List all you Apps currently available with your AD or office 365.

Click on Add to configure your Application.
Give a Name and Select Web Application/or Web API, as we are configuring for Web Client today. Click on Next.

Enter your Web Client URL and Office portal AD URL. Click on OK.

Your New application gets registered with your AD.
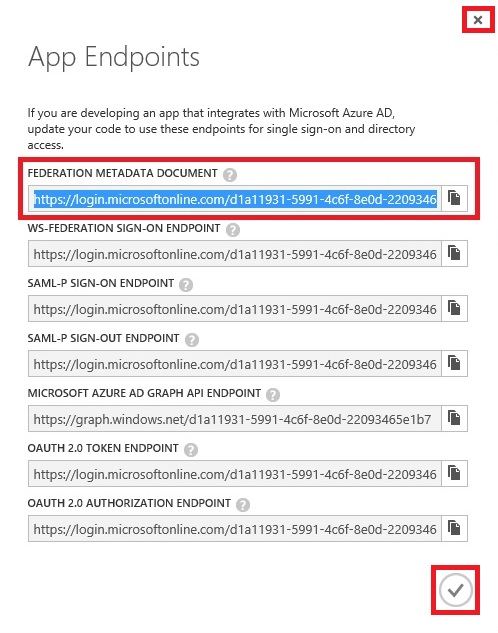
Select the created Application and Click on View Endpoints.

Copy the Federation MetaData URL and keep it handy at safe place we will require this in our next step. Close the window we are not performing any changes here.
Open your Navision User Card.In Office 365 Authentication enter your Office portal user email id which you will be using for Single Sign-On.

Open your Navision Service Instance configuration and enter Federal MetaData URL which we copied in our previous step.
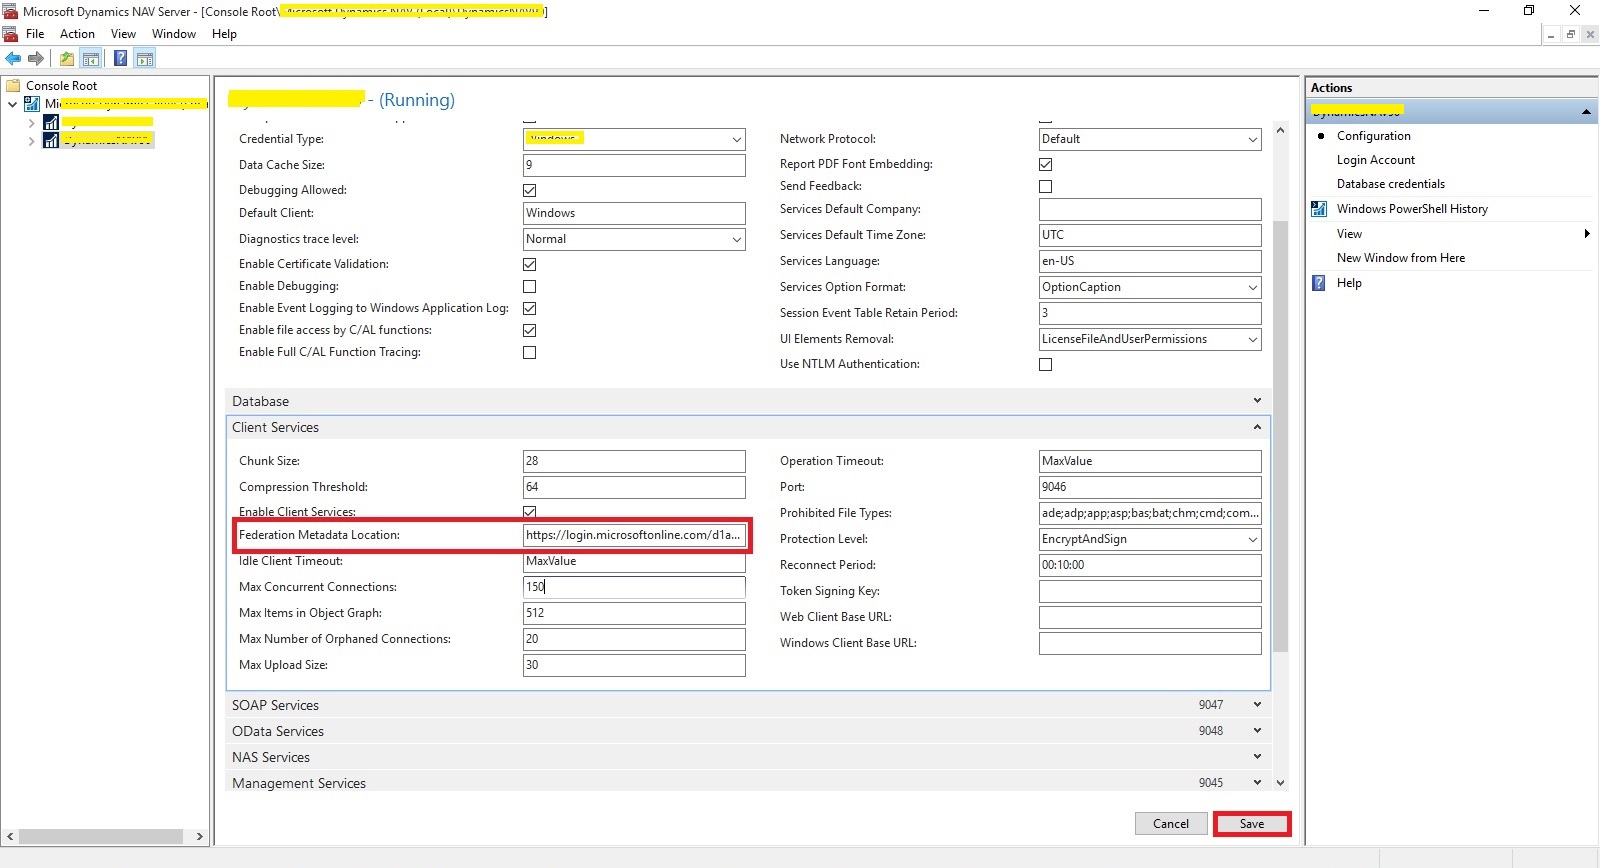
Restart you NAV Service.

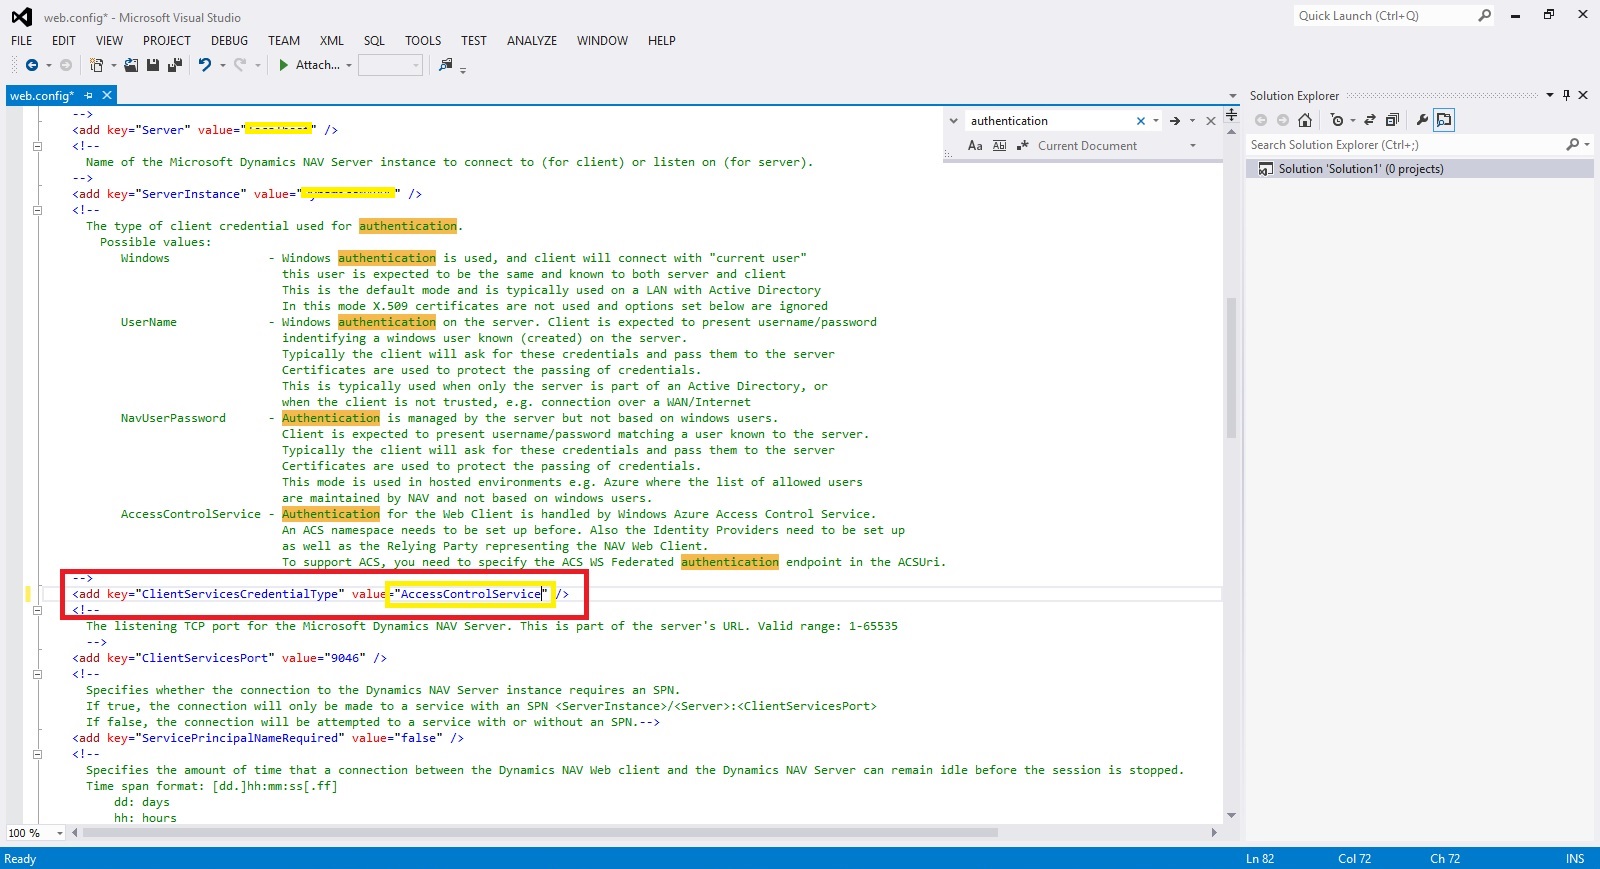
Open the Web Client Folder under your IIS. Edit your Web.config file using prefered Editor.

Enter you Client Service Credentials as AccessControlService.
Change value of ACS URI as below. You have full explaination of same in the file itself.
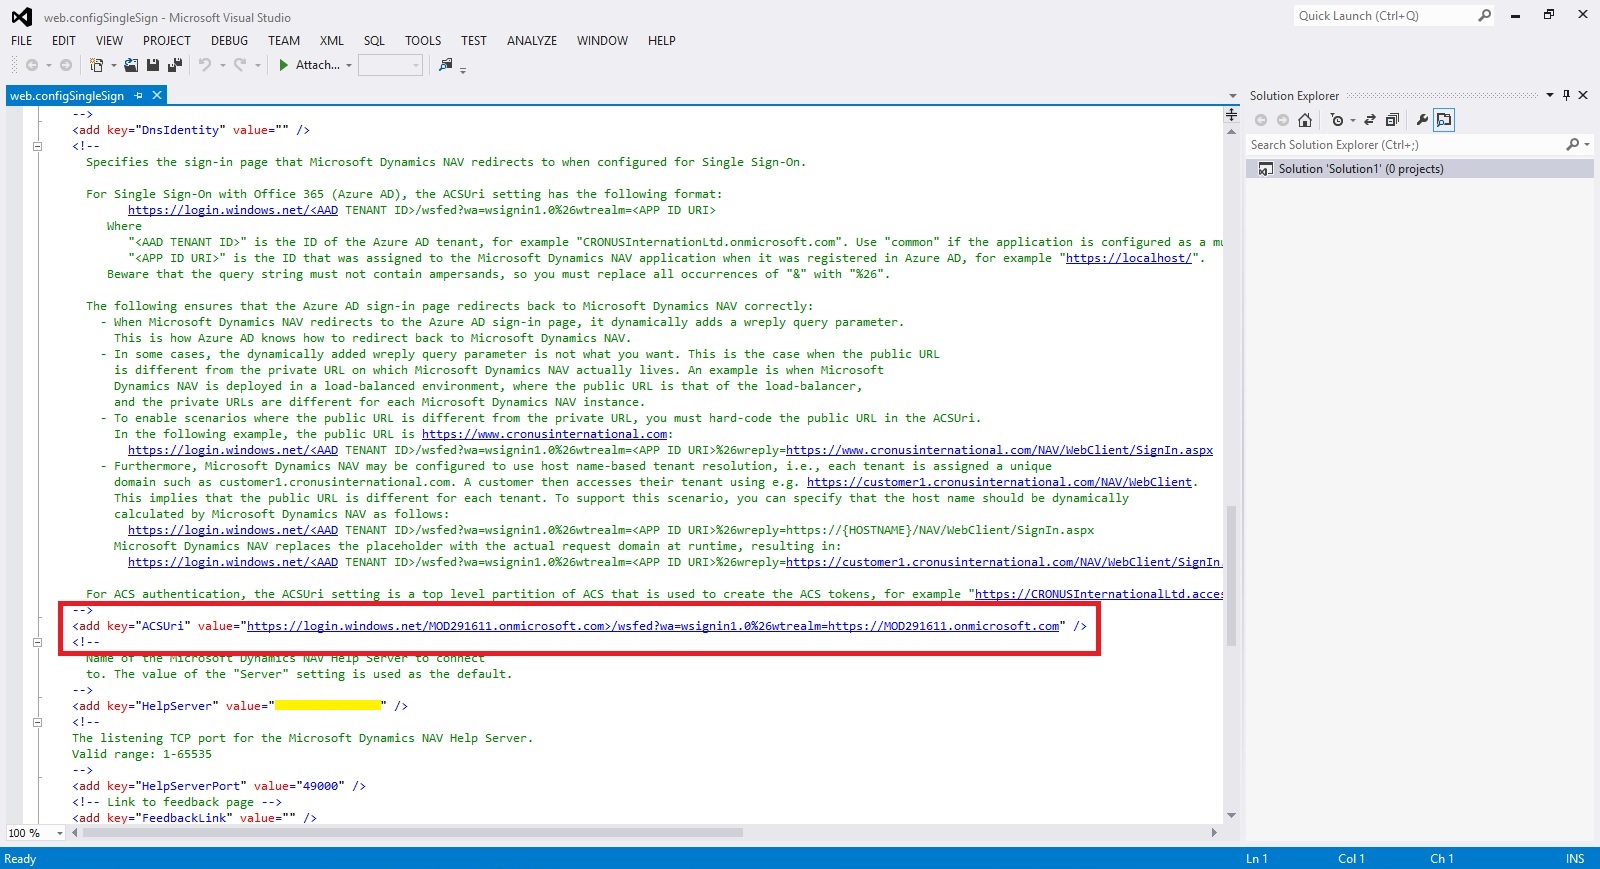
Thats all, Now you open your web client and you will be redirected to Office 365 Login Page, enter your valid office 365 e-mail user id and password you will be authenticated and Web Client is opened.
Thats all for today, I will come up with moredetails in my upcoming posts.
Till then keep exploring and learning.
Before we start we should have Virtual Machine ready on Azure with Navision 2016 installed, Certificates and Nav User is configured. Endpoints are open so that web client can be used from outside Virtual Machine on internet.
It should be hosted on Public IP, then only we will be able to configure it.
For details regarding Azure Subscription you can see my earlier post here.
For details regarding Creating Virtual Machines you can see my earlier post here.
You also need Office 365 Subscription ready for use and you can use the AD of same to configure your Single Sign-On.
Let us start with Admin console of office 365. Click on Azure AD this will create Management Console to work with AD.
Enter your details and click on Next.
Enter your details and click on Next, Finally Sign Up.
It will take few minutes to configure and make it available for you.
Once your Subscription is ready click on Start Managing my Service.
From Management Console click on Virtual Machine, if you dont have already to create one for you.
Select the Virtual Machine in Search for Microsoft Dynamics Nav 2016.
Select the approprite Virtual Machine from the List.
Enter your details and Create. For more details see the link provided on top of the post.
Let us return to our AD, Click on Applications. This will List all you Apps currently available with your AD or office 365.
Click on Add to configure your Application.
Give a Name and Select Web Application/or Web API, as we are configuring for Web Client today. Click on Next.
Enter your Web Client URL and Office portal AD URL. Click on OK.
Your New application gets registered with your AD.
Select the created Application and Click on View Endpoints.
Copy the Federation MetaData URL and keep it handy at safe place we will require this in our next step. Close the window we are not performing any changes here.
Open your Navision User Card.In Office 365 Authentication enter your Office portal user email id which you will be using for Single Sign-On.
Open your Navision Service Instance configuration and enter Federal MetaData URL which we copied in our previous step.
Restart you NAV Service.
Open the Web Client Folder under your IIS. Edit your Web.config file using prefered Editor.
Enter you Client Service Credentials as AccessControlService.
Change value of ACS URI as below. You have full explaination of same in the file itself.
Thats all, Now you open your web client and you will be redirected to Office 365 Login Page, enter your valid office 365 e-mail user id and password you will be authenticated and Web Client is opened.
Thats all for today, I will come up with moredetails in my upcoming posts.
Till then keep exploring and learning.
Saturday, 30 July 2016
Working with Alerts in Power BI
Knowing about changes to important metrics quickly some time can help you taking quick decisions or help you keep eyes on things you care most.
With data driven alerts in Power BI, you can now get notifications when a metric you care about on your dashboard exceeds a set threshold.
Alert notifications will be sent to you as an email, and appear in your notification center on the web and in mobile apps.
You can set alerts for your numeric tiles featuring cards and gauges only. You have control over how often you want to be notified about your data, and whether you want to receive an email when your data goes beyond the limits you set.
Only you can see the alerts you set, even if you share your dashboard.
Alerts only work on data that is refreshed. When data refreshes, Power BI looks to see if an alert is set for that data. If the data has reached an alert threshold, an alert is triggered.
Alerts only work with numeric data types.
Alerts only work on data that is refreshed. They do not work on static data.
Today we will see how to work with Alert feature in Power BI.
Login to your Power BI using your credentials.
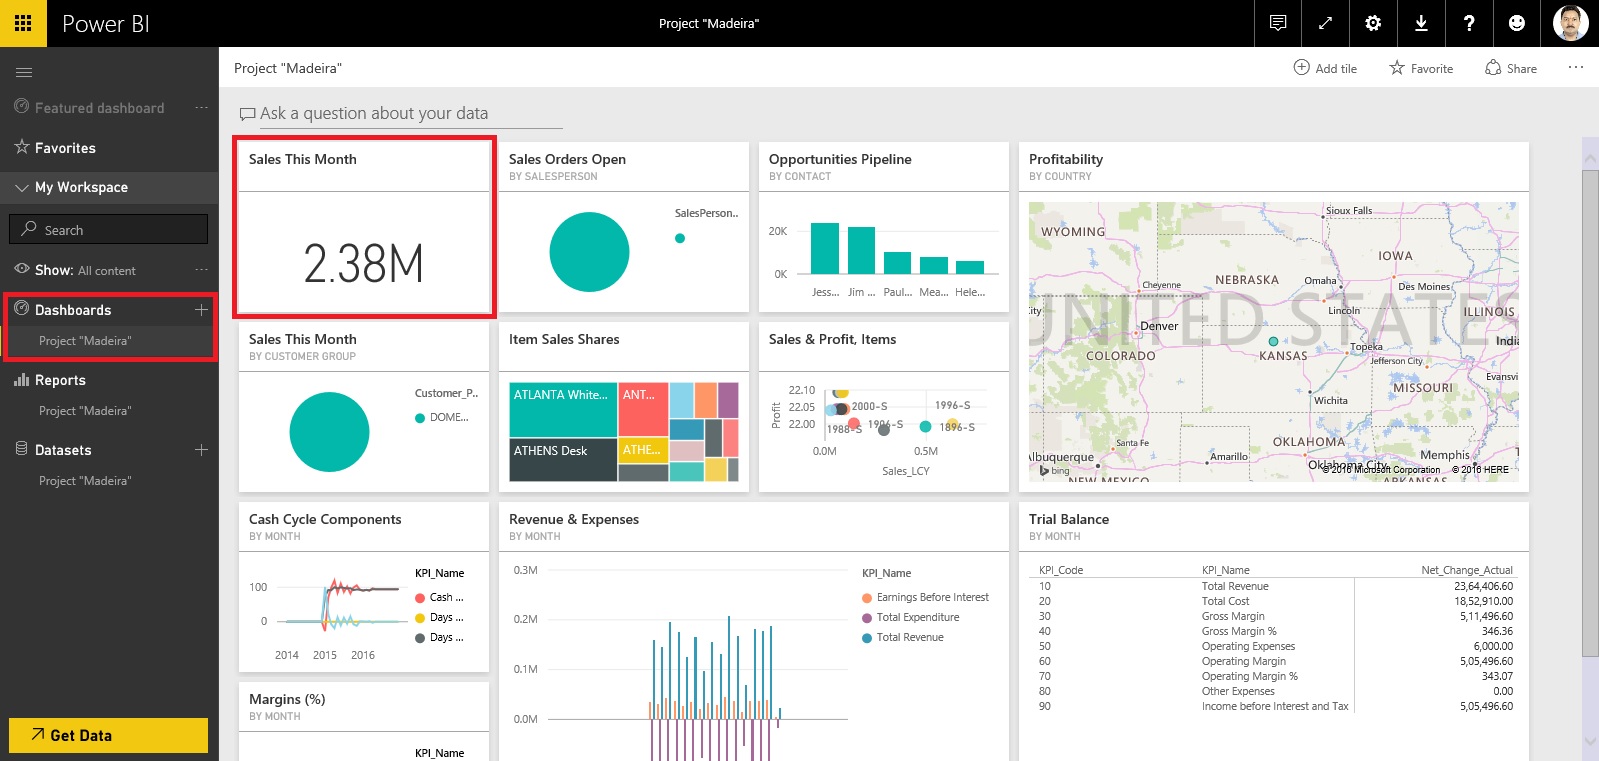
Switch to your Dashboard.
I have one ready to use dashboard from my previous post to show Alert feature I am using the same.
As discussed above it works only for Numeric & Gauges Tiles only, for others you will not get even the Alert option.
Luckily I have one on my Dashboard, if want to learn how to create Numeric Tiles or more details on working with Power BI you can refer to any of my previous posts on Power BI. However you can find here one direct Link to the topic in question.
You see I have selected my Numeric Tile in below screen shot.
How to Set Data Alerts:
From a dashboard tile, select the ellipses.
Select the bell icon to add one or more alerts.
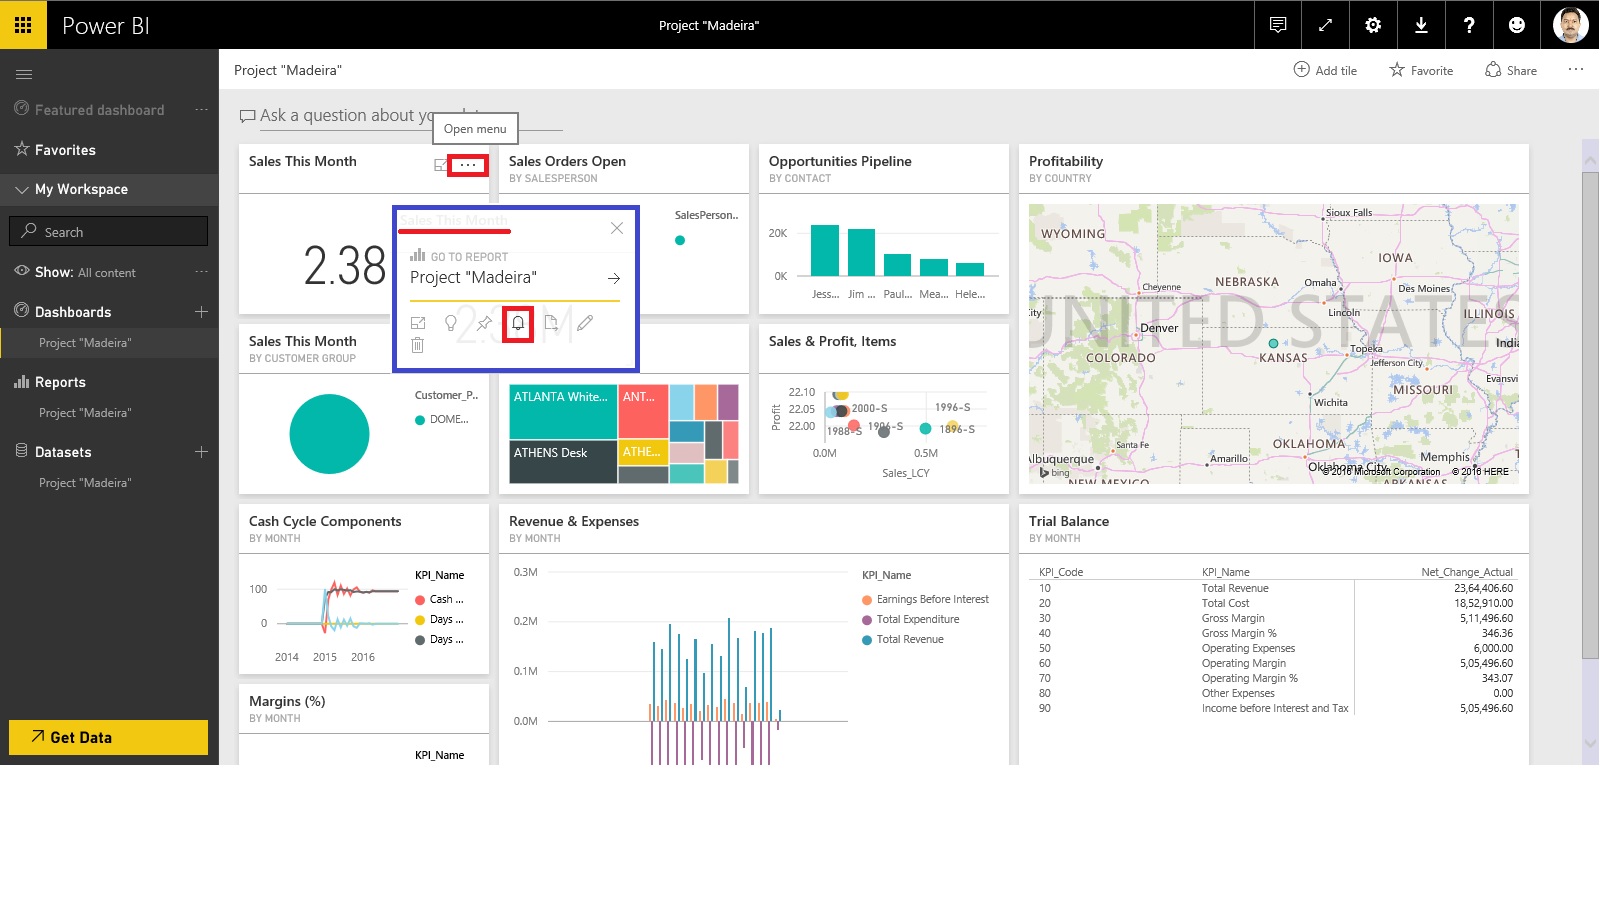
Click on Add Alert Rule.
To start, ensure the Active slider is set to ON, and give your alert a title.
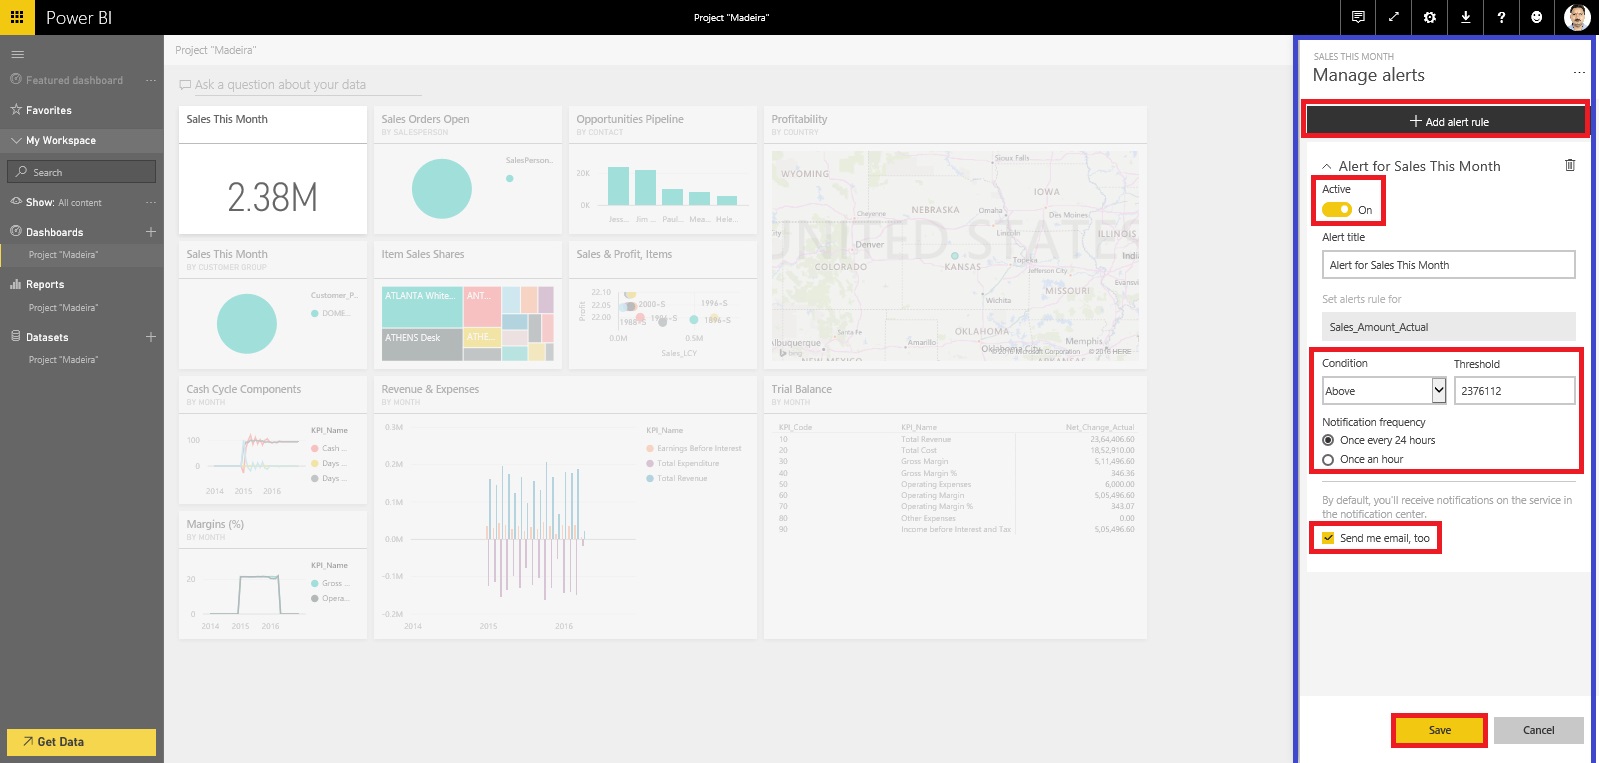
Set your Condition, Threshold, and Notification Frequency also don’t forget to tick on send me mail too.
Click on Save to save your Alert.
Receiving alerts:
When the data being tracked reaches one of the thresholds you've set, several things will happen.
Power BI checks to see if time have lapsed or more than depending on the option you selected since the last alert was sent.
As long as the data is past the threshold, you'll get an alert every hour or every 24 hours depending on option you selected.
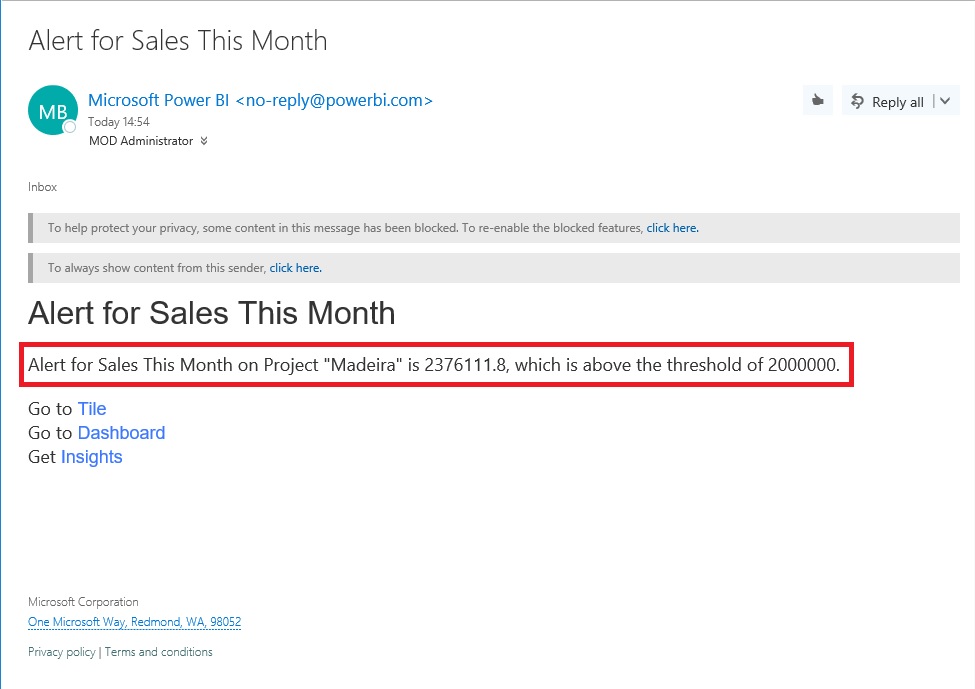
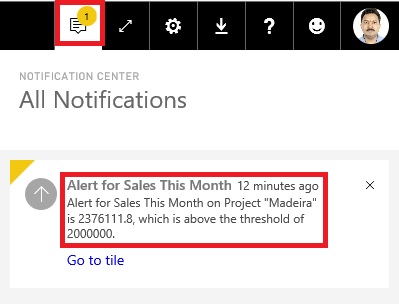
If you've set the alert to send you an email, you'll find something like as shown in below screen, this in your Inbox.
Power BI will add a message to your Notification center and adds a new alert icon to the applicable tile as shown in below screen.
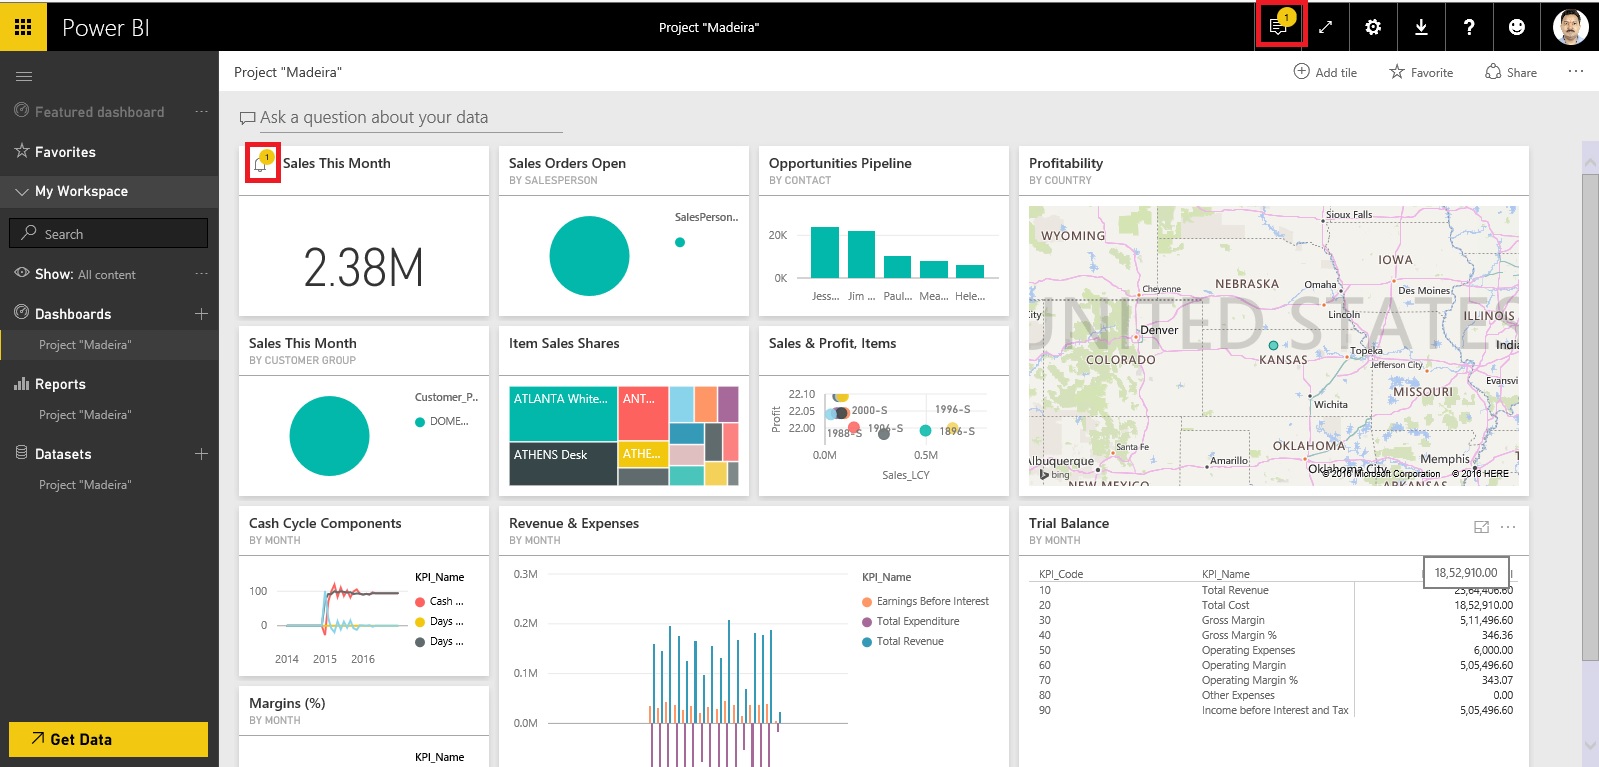
Access to your Notification.
Manage alerts:
There are three ways to manage your alerts:
From the dashboard tile
From the Power BI Settings menu
On an individual tile in the Mobile App
As we have seen above how to create Alerts follow same steps to access Alert Window.
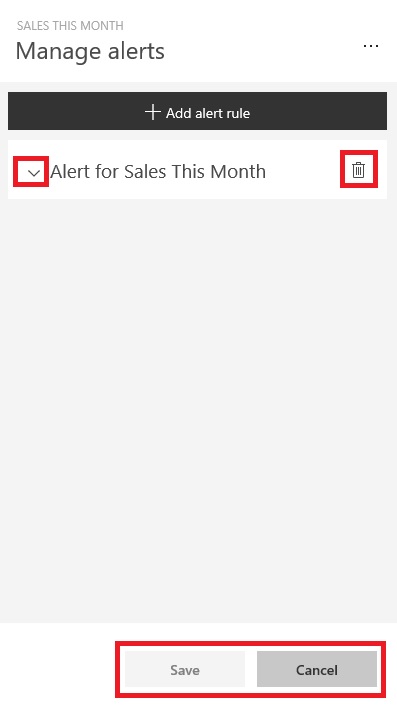
At the Left click on Expand make Necessary Modifications and save.
At the right select the trashcan to delete the Alert.
Select cancel to return to previous window.
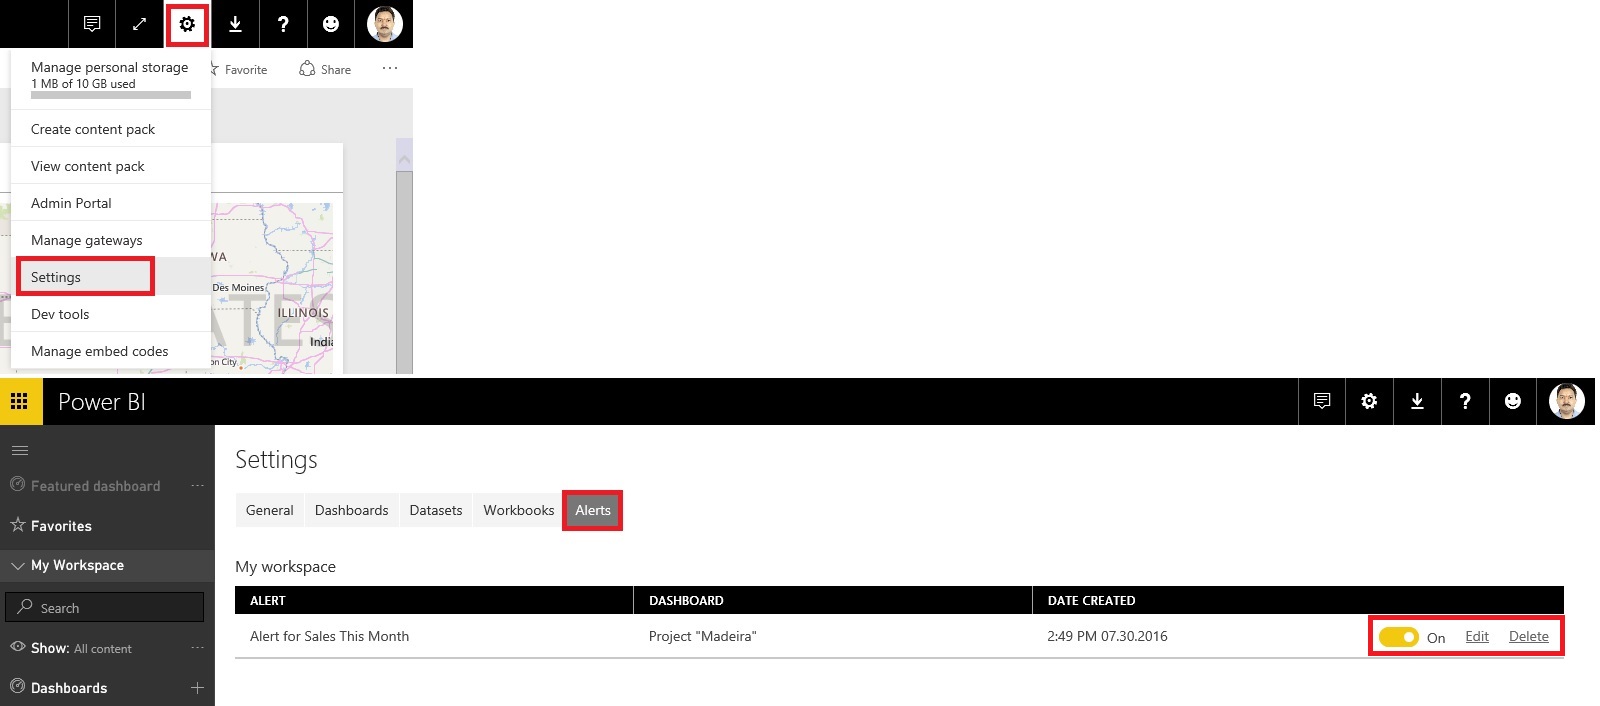
From here you can turn alerts on and off, open the Manage alerts window to make changes, or delete the alert.
That’s all for today.
I will come up with more details in my upcoming posts.
Till then keep exploring and learning.
With data driven alerts in Power BI, you can now get notifications when a metric you care about on your dashboard exceeds a set threshold.
Alert notifications will be sent to you as an email, and appear in your notification center on the web and in mobile apps.
You can set alerts for your numeric tiles featuring cards and gauges only. You have control over how often you want to be notified about your data, and whether you want to receive an email when your data goes beyond the limits you set.
Only you can see the alerts you set, even if you share your dashboard.
Alerts only work on data that is refreshed. When data refreshes, Power BI looks to see if an alert is set for that data. If the data has reached an alert threshold, an alert is triggered.
Alerts only work with numeric data types.
Alerts only work on data that is refreshed. They do not work on static data.
Today we will see how to work with Alert feature in Power BI.
Login to your Power BI using your credentials.
Switch to your Dashboard.
I have one ready to use dashboard from my previous post to show Alert feature I am using the same.
As discussed above it works only for Numeric & Gauges Tiles only, for others you will not get even the Alert option.
Luckily I have one on my Dashboard, if want to learn how to create Numeric Tiles or more details on working with Power BI you can refer to any of my previous posts on Power BI. However you can find here one direct Link to the topic in question.
You see I have selected my Numeric Tile in below screen shot.
How to Set Data Alerts:
From a dashboard tile, select the ellipses.
Select the bell icon to add one or more alerts.
Click on Add Alert Rule.
To start, ensure the Active slider is set to ON, and give your alert a title.
Set your Condition, Threshold, and Notification Frequency also don’t forget to tick on send me mail too.
Click on Save to save your Alert.
Receiving alerts:
When the data being tracked reaches one of the thresholds you've set, several things will happen.
Power BI checks to see if time have lapsed or more than depending on the option you selected since the last alert was sent.
As long as the data is past the threshold, you'll get an alert every hour or every 24 hours depending on option you selected.
If you've set the alert to send you an email, you'll find something like as shown in below screen, this in your Inbox.
Power BI will add a message to your Notification center and adds a new alert icon to the applicable tile as shown in below screen.
Access to your Notification.
Manage alerts:
There are three ways to manage your alerts:
From the dashboard tile
From the Power BI Settings menu
On an individual tile in the Mobile App
As we have seen above how to create Alerts follow same steps to access Alert Window.
At the Left click on Expand make Necessary Modifications and save.
At the right select the trashcan to delete the Alert.
Select cancel to return to previous window.
From here you can turn alerts on and off, open the Manage alerts window to make changes, or delete the alert.
That’s all for today.
I will come up with more details in my upcoming posts.
Till then keep exploring and learning.
Friday, 29 July 2016
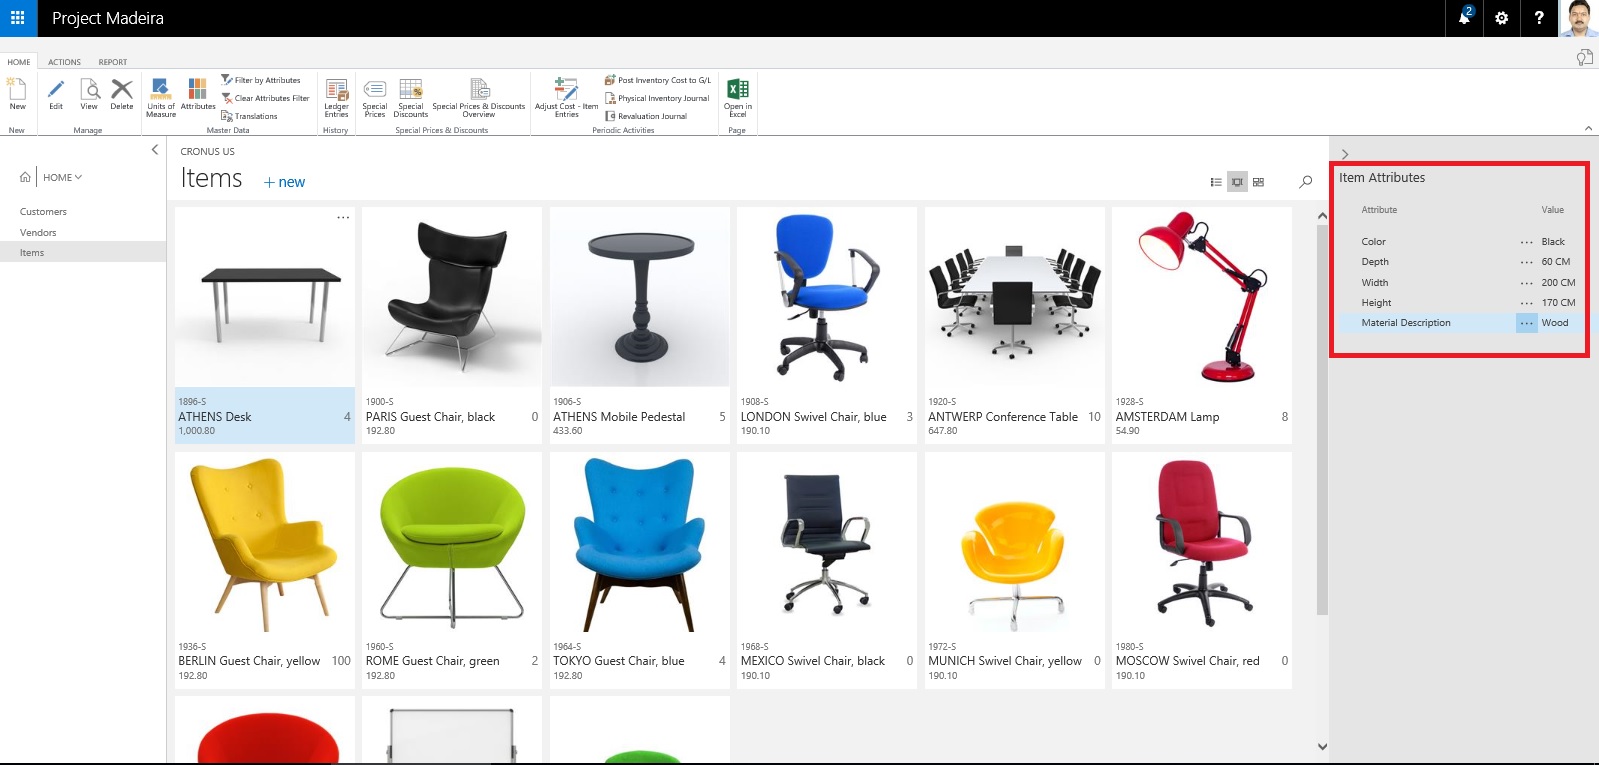
Working with Item Attributes in Madeira
In Madeira you can assign item attribute values of different types to your items, which can then be used when searching for items.
Open your Item List/Card and in the right side of the window Factbox you see Item Attributes.
Today in this post we will see how to define, assign and use it for searching the items.
Either from the List Page or Card Page Select Attributes as shown in below screen shot.
From Home or Action Tab Ribbon.
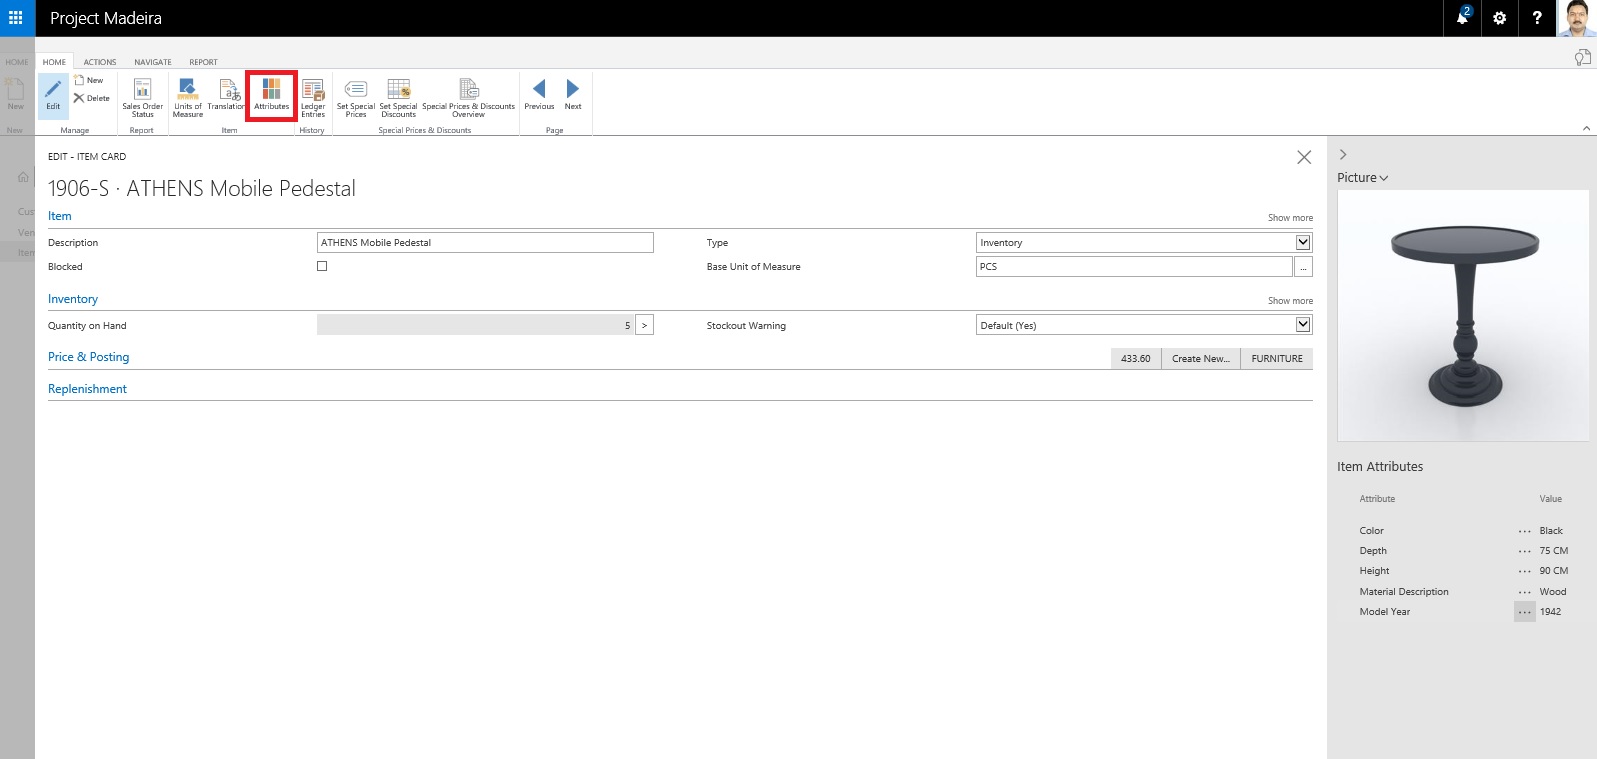
It will show you all the Attributes and their Values assigned to the Item.
You can create New Attribute, Click on +New, a New Line will be inserted to Assign Attribute and its Value.
If you wish to create New Attribute for the Item from the Dropdown List click on +New.
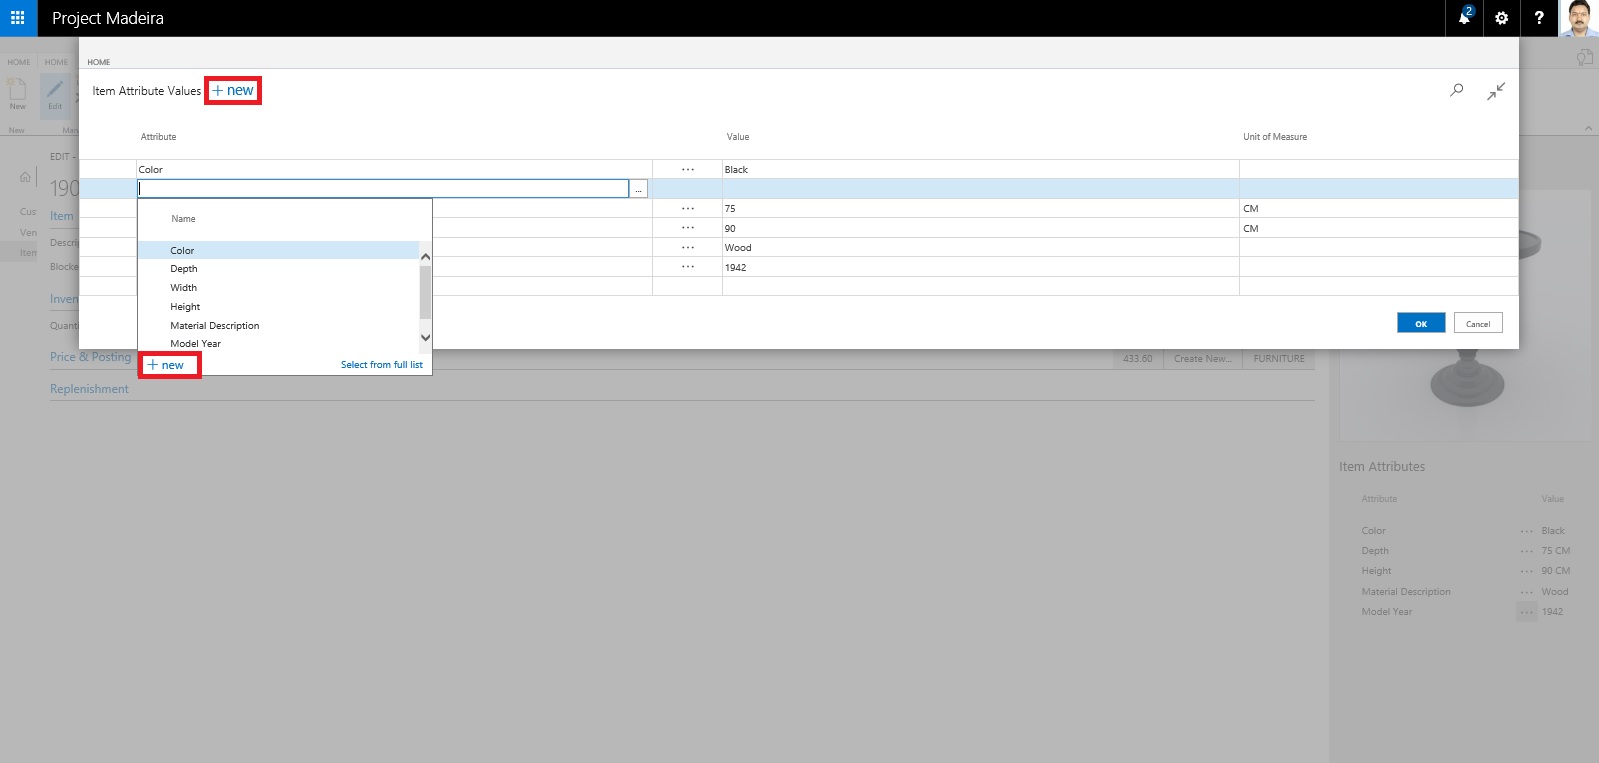
Attribute definition window opens.
Define you New Attribute. Once Attribute is created you need to define available values for the same. In below Screen i have created New Attribute "TopMaterial".
To define applicable values for this Attribute from Ribbon click on Item Attribute Values.

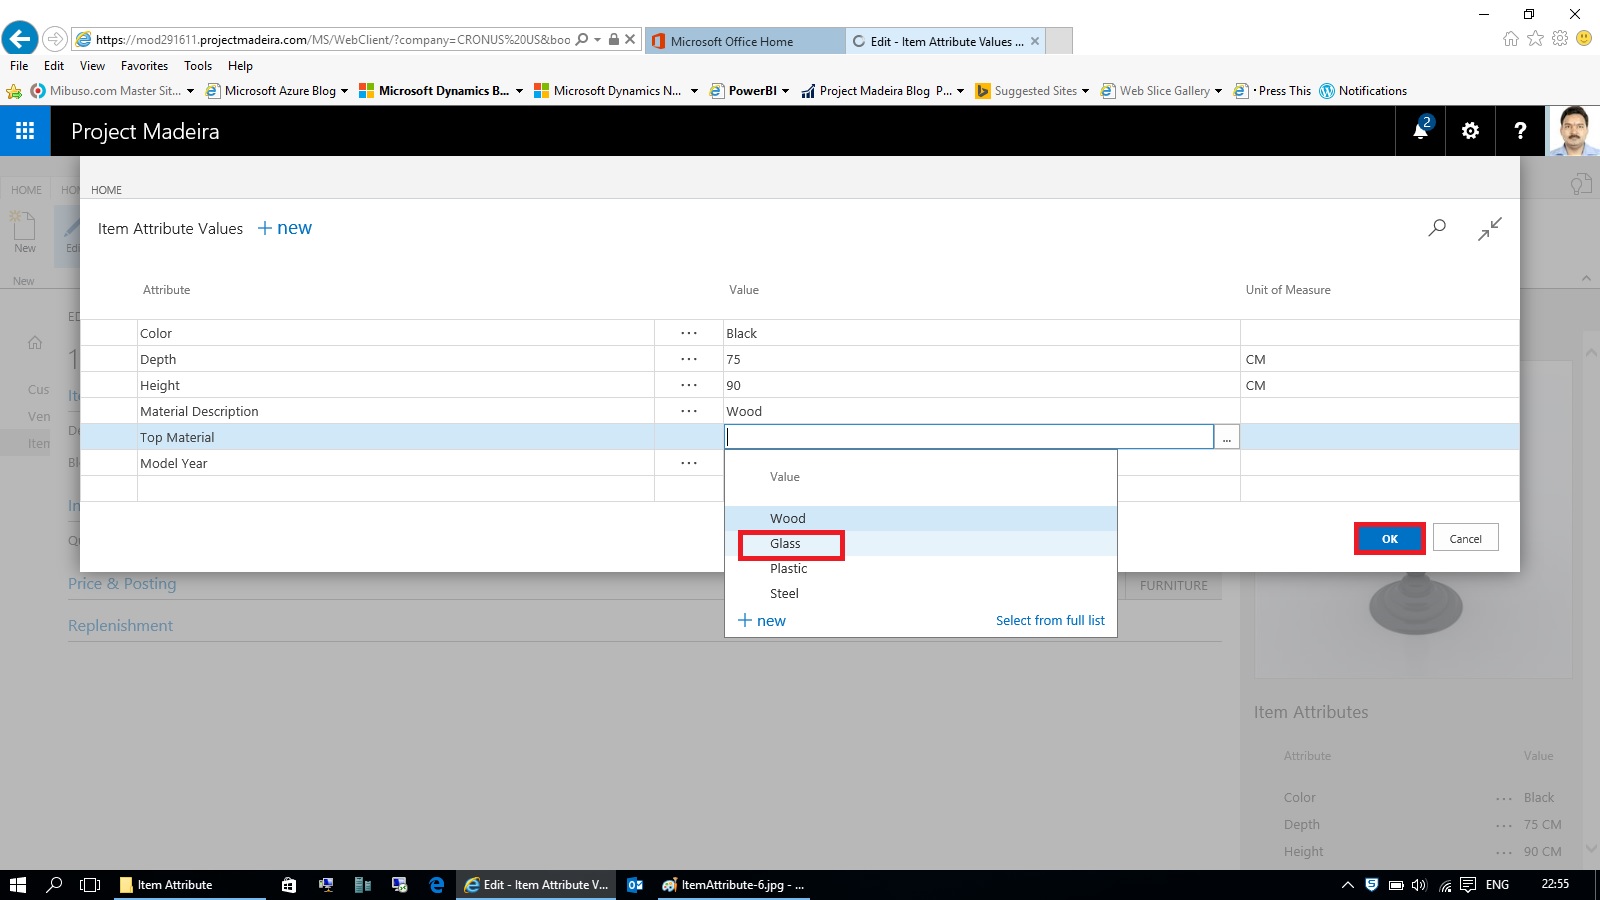
In Value window define all the applicable values and close the window.
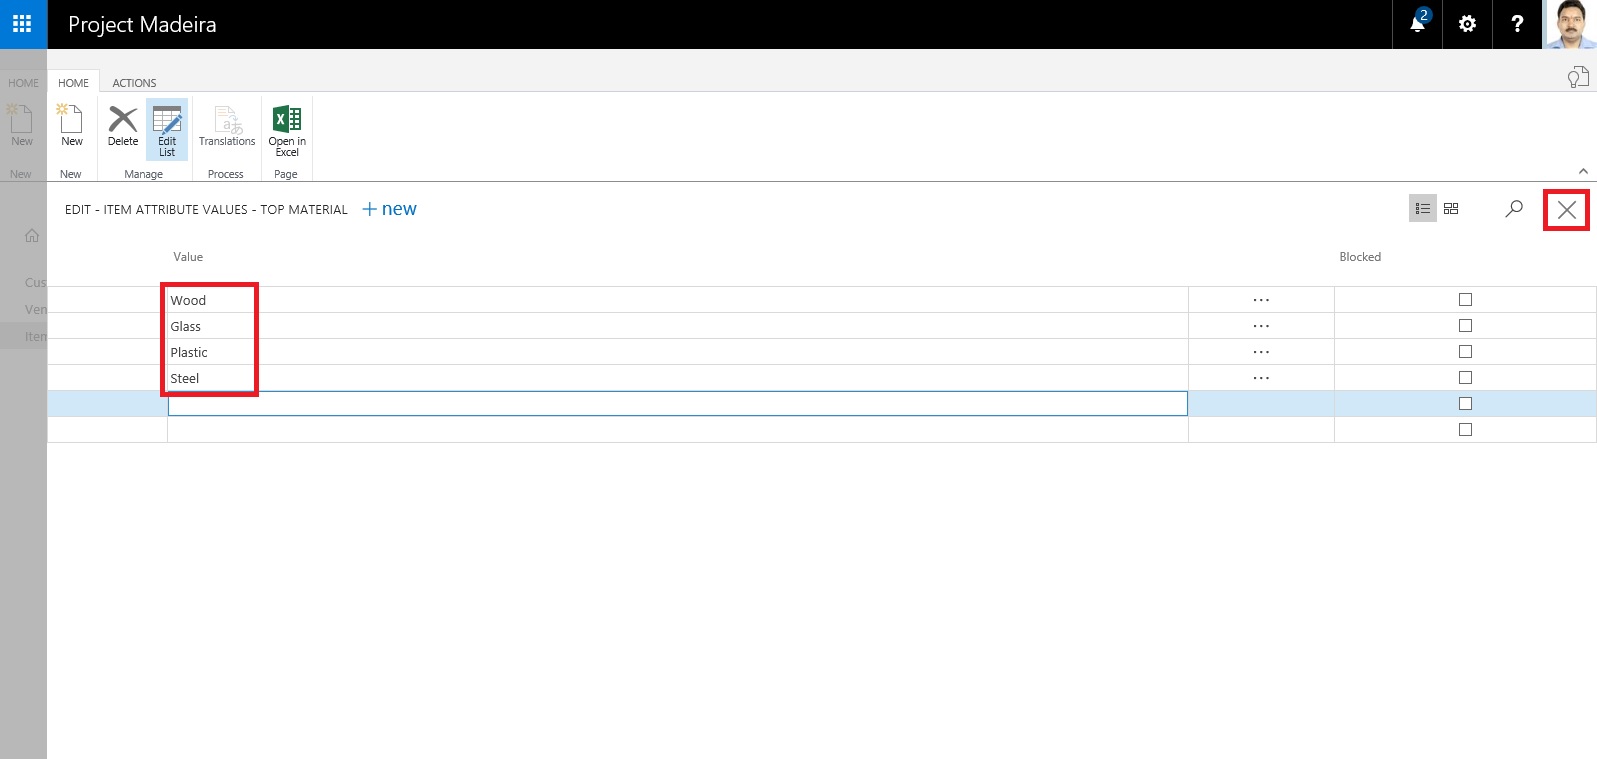
You will be returned to the previous Page and you can see your Attribute and Value defined, just we created in our above steps. Click on OK to return to previous page.
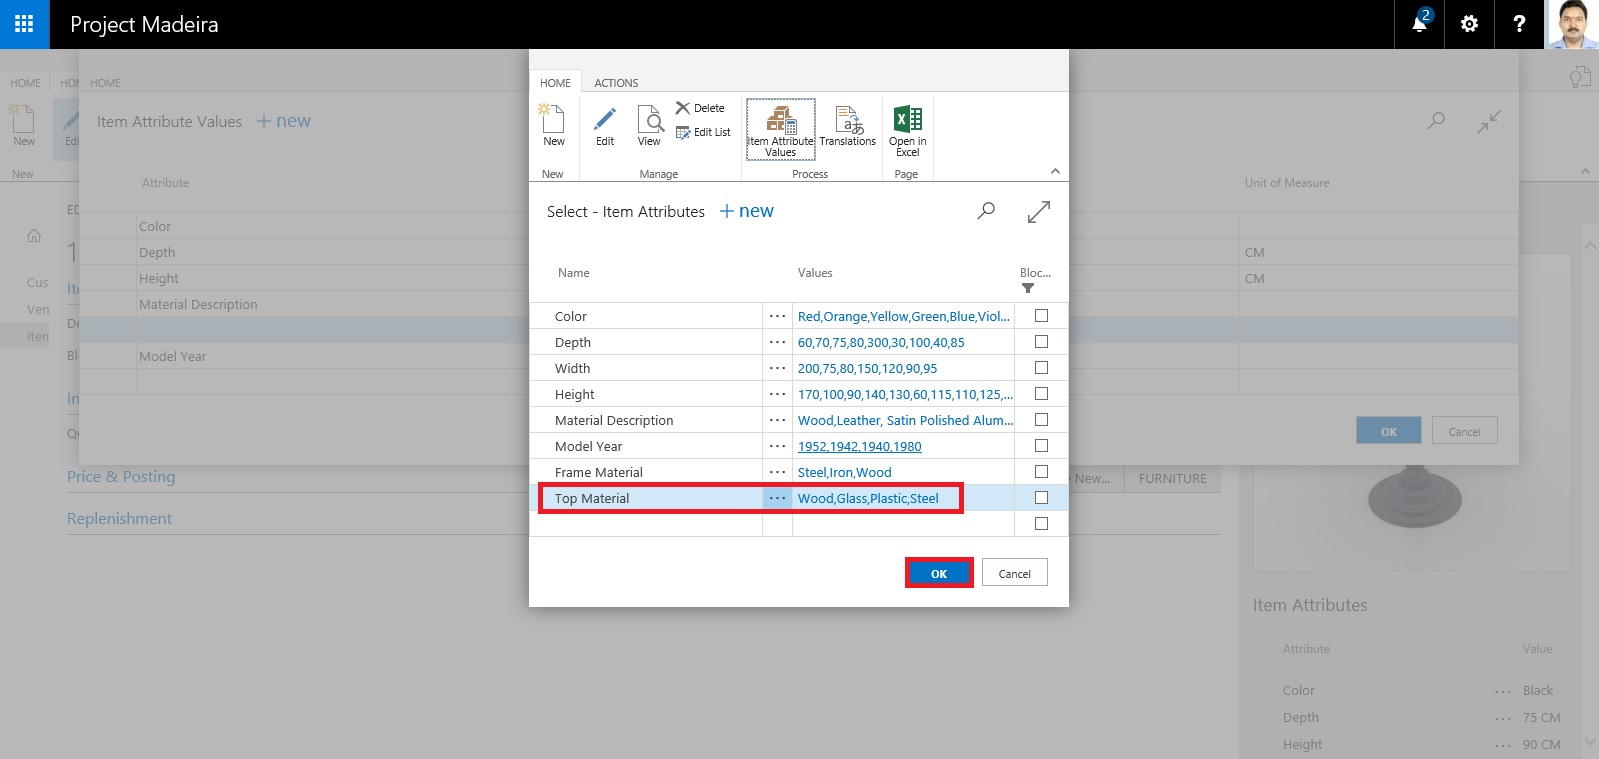
Next we will Assign these Attribute and Values on the Item.
Select the Attribute and Value for the Item as shown in below screen.
After assigning click on OK to close the Page.
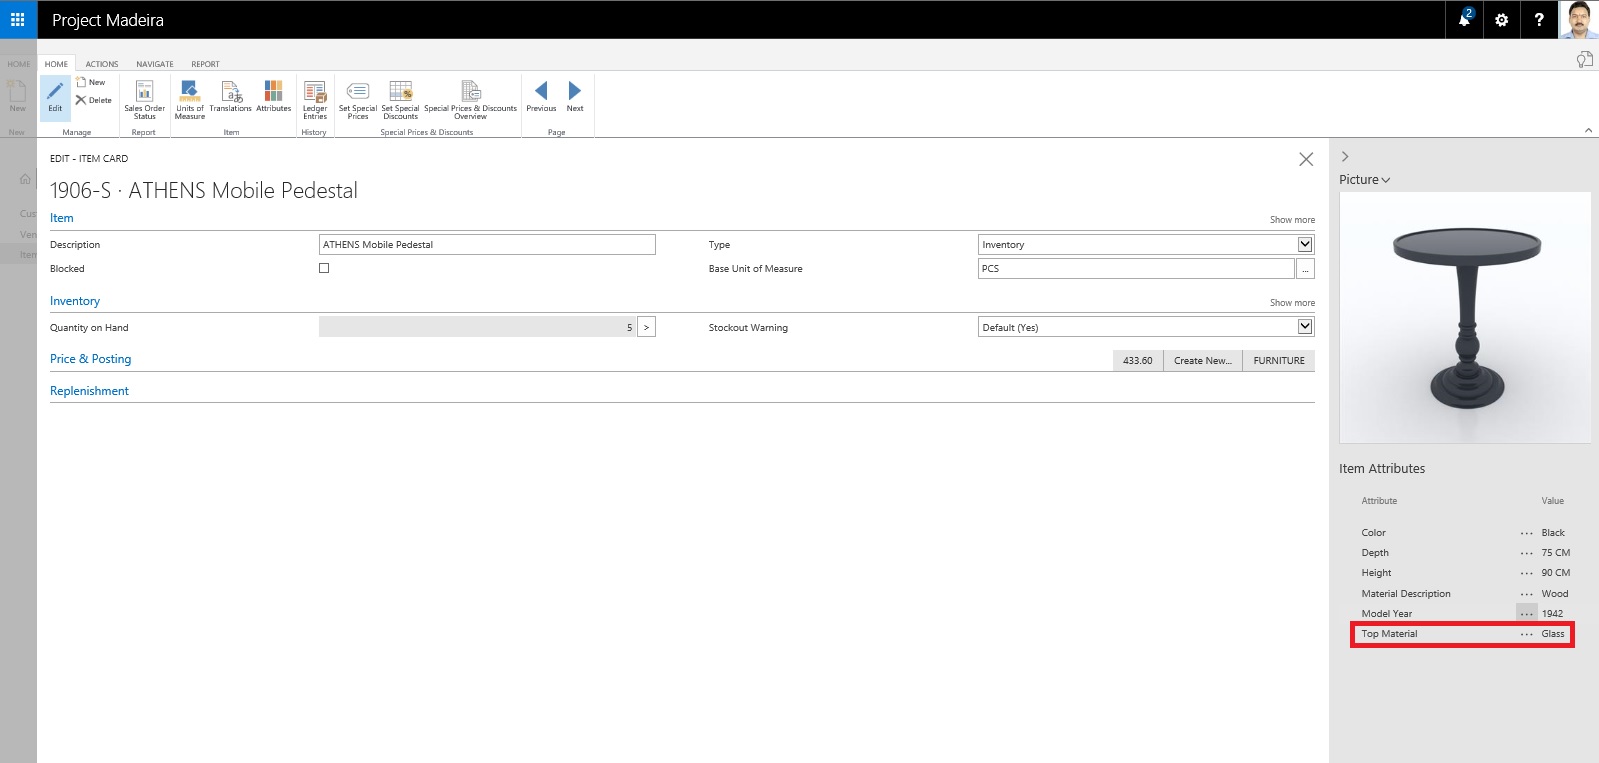
When you return to your Item Card or List Page you will see that your New assigned Attribute and its Value is displayed on Factbox.
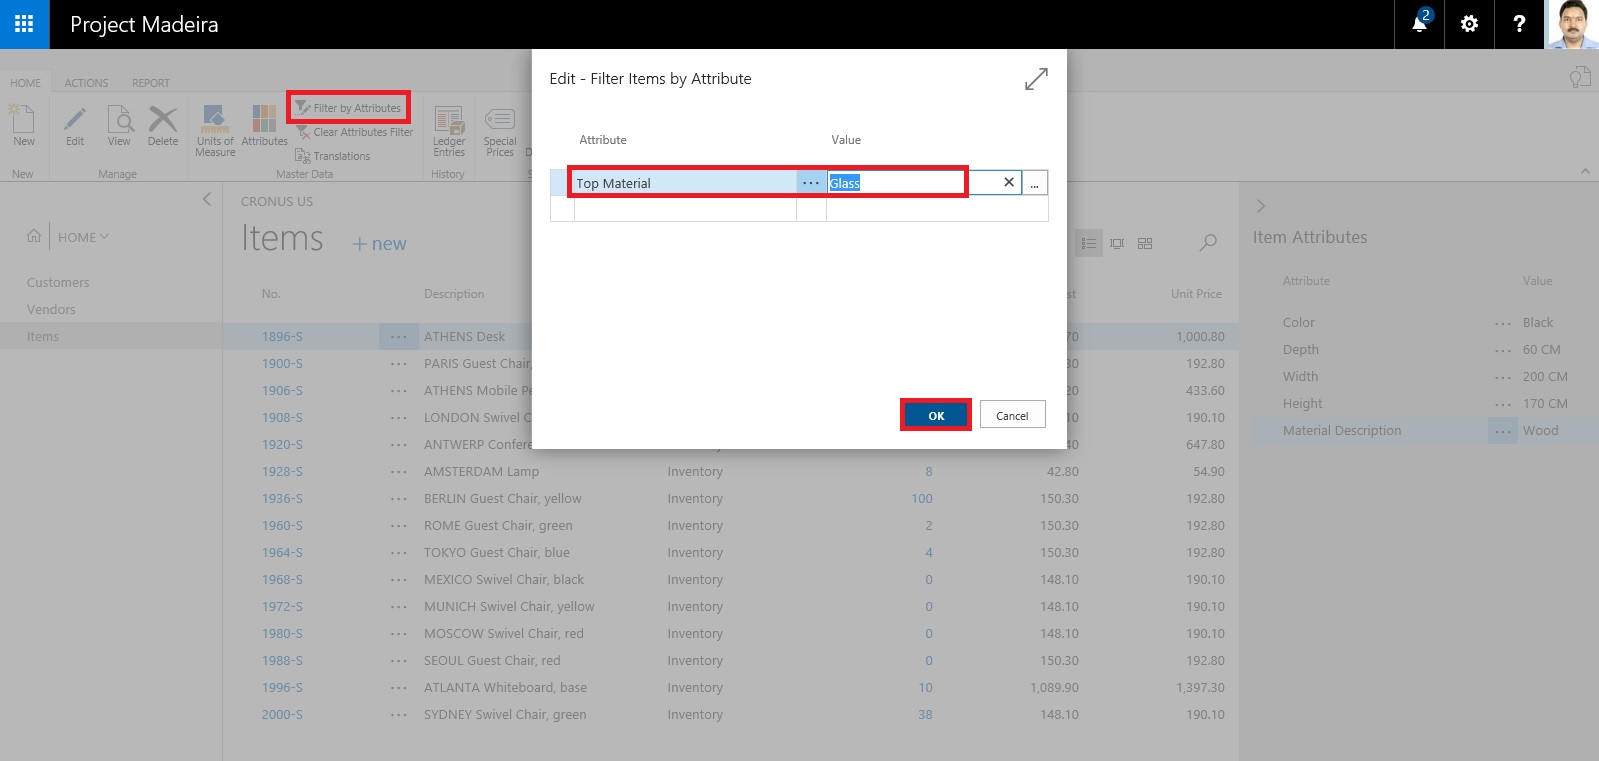
Switch to your Item List Page.
From Ribbon click on Filter on Attribute a Filter window will open.
Select the Attribute and Value for filter that you want to assign.
Click on OK to apply the filter on the page.
Since we have asigned this Attribute and Value on one Item, It will be filtered and all Items satisfying the filter condition will be displayed.
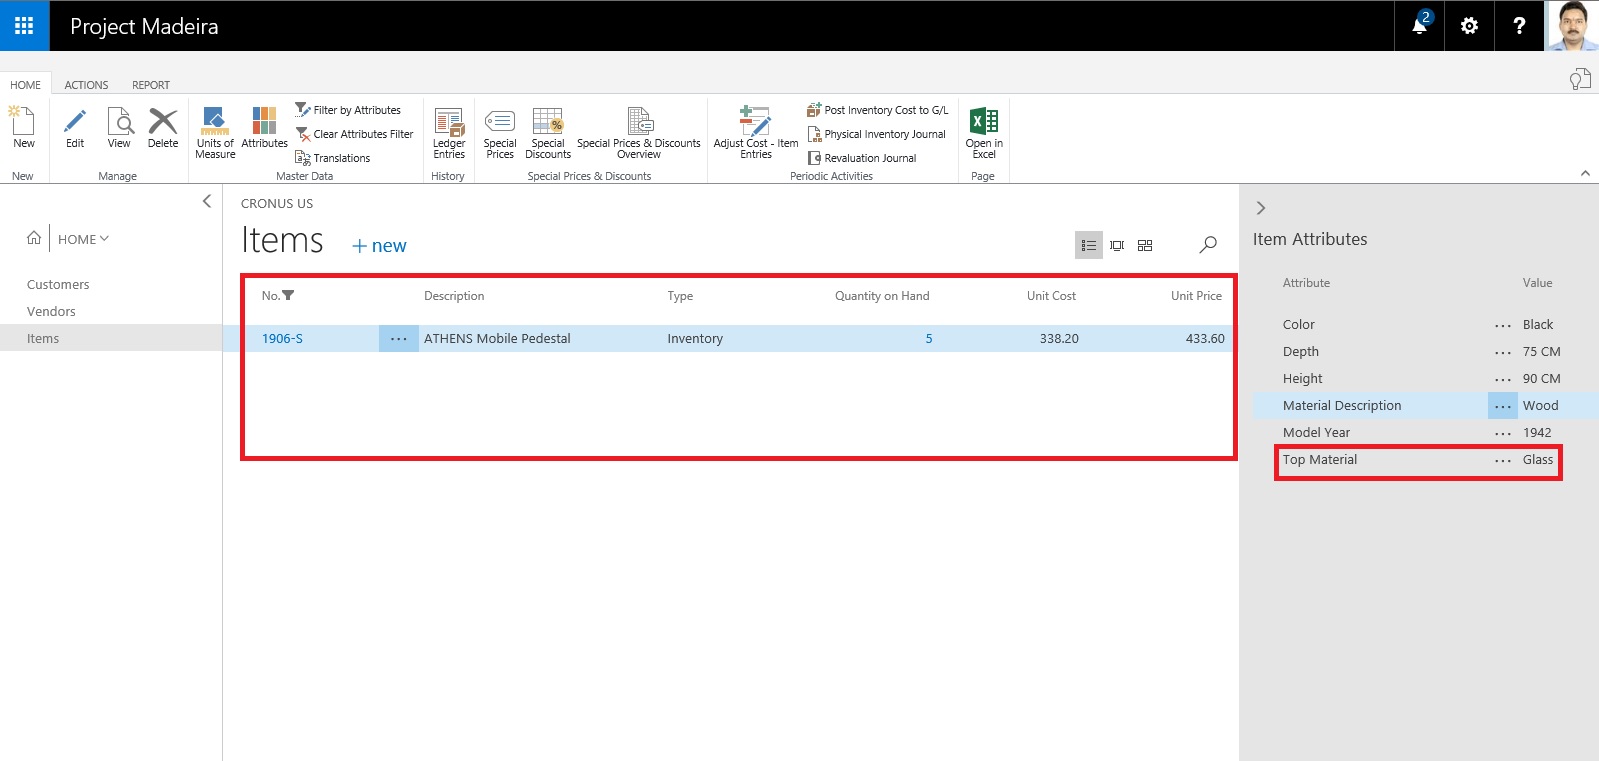
The items in the Items window are filtered by the specified item attribute values.
Thats all for this post.
I will comeup with some more details in my upcoming posts.
Till then keep exploring and learning.
Open your Item List/Card and in the right side of the window Factbox you see Item Attributes.
Today in this post we will see how to define, assign and use it for searching the items.
Either from the List Page or Card Page Select Attributes as shown in below screen shot.
From Home or Action Tab Ribbon.
It will show you all the Attributes and their Values assigned to the Item.
You can create New Attribute, Click on +New, a New Line will be inserted to Assign Attribute and its Value.
If you wish to create New Attribute for the Item from the Dropdown List click on +New.
Attribute definition window opens.
Define you New Attribute. Once Attribute is created you need to define available values for the same. In below Screen i have created New Attribute "TopMaterial".
To define applicable values for this Attribute from Ribbon click on Item Attribute Values.
In Value window define all the applicable values and close the window.
You will be returned to the previous Page and you can see your Attribute and Value defined, just we created in our above steps. Click on OK to return to previous page.
Next we will Assign these Attribute and Values on the Item.
Select the Attribute and Value for the Item as shown in below screen.
After assigning click on OK to close the Page.
When you return to your Item Card or List Page you will see that your New assigned Attribute and its Value is displayed on Factbox.
Switch to your Item List Page.
From Ribbon click on Filter on Attribute a Filter window will open.
Select the Attribute and Value for filter that you want to assign.
Click on OK to apply the filter on the page.
Since we have asigned this Attribute and Value on one Item, It will be filtered and all Items satisfying the filter condition will be displayed.
The items in the Items window are filtered by the specified item attribute values.
Thats all for this post.
I will comeup with some more details in my upcoming posts.
Till then keep exploring and learning.
Subscribe to:
Posts (Atom)