This cumulative update includes all hotfixes and regulatory features that have been released for Microsoft Dynamics NAV 2015, including hotfixes and regulatory features that were released in previous cumulative updates.
Note You must convert the database if you are upgrading to this cumulative update from a cumulative update earlier than cumulative update 9 (build 41779). For more information, see Converting a Database (https://msdn.microsoft.com/en-us/library/dn271650(v=nav.80).aspx) in Help for Microsoft Dynamics NAV.
This cumulative update replaces previously released cumulative updates. You should always install the latest cumulative update.
It may be necessary to update your license after implementing this hotfix to gain access to new objects included in this or a previous cumulative update (this only applies to customer licenses).
For a list of cumulative updates released for Microsoft Dynamics NAV 2015, see released cumulative updates for Microsoft Dynamics NAV 2015 (https://support.microsoft.com/kb/3014609/ ) . Cumulative updates are intended for new and existing customers who are running Microsoft Dynamics NAV 2015.
For more details see below link, Partner/Customer Source required.
https://mbs2.microsoft.com/Knowledgebase/kbdisplay.aspx?scid=kb,en-us,3182130
Showing posts with label 2015. Show all posts
Showing posts with label 2015. Show all posts
Sunday, 7 August 2016
Wednesday, 3 August 2016
Save General Journals as Standard Journal in Navision
Do you Know you can save the General Journal as Standard Journal and retrive edit and post it later.
Many of time we pass entries of same Nature, Like Rent, Salary, Bills etc.. just an example you can decide upon which entries you post frequently and club it as Standard Journal to save your time.
You can create once and retrive it every month or when ever required and Post it in future/later.This can serve you as template for future use.
Let us see how we can use this feature.

Open your General Journal.
Make entries which you do oftenly. Don't put Postng Date & Document No. Complete your all entries.
Next we will save this as Standard Journal for future use.
From Action choose Save as Standard Journal.

Give Code & Name for your Journal Template.
If Amounts are fixed every time you can enter them too and while Save choose Save Amount.
No Let us review the entry that we saved.
From Action Choose Get Standard Journal.
This will display you all Saved Standard General Journals.

Select the required Journal Code and Click on Edit.

This is what is Saved in your Standard Journal.
Let use return to the Standard Journal List.
Select desired/ earlier saved Std. Journal and Click on OK.

Confirmation of Std. Journal retrived and Journals created in General Journal Page.
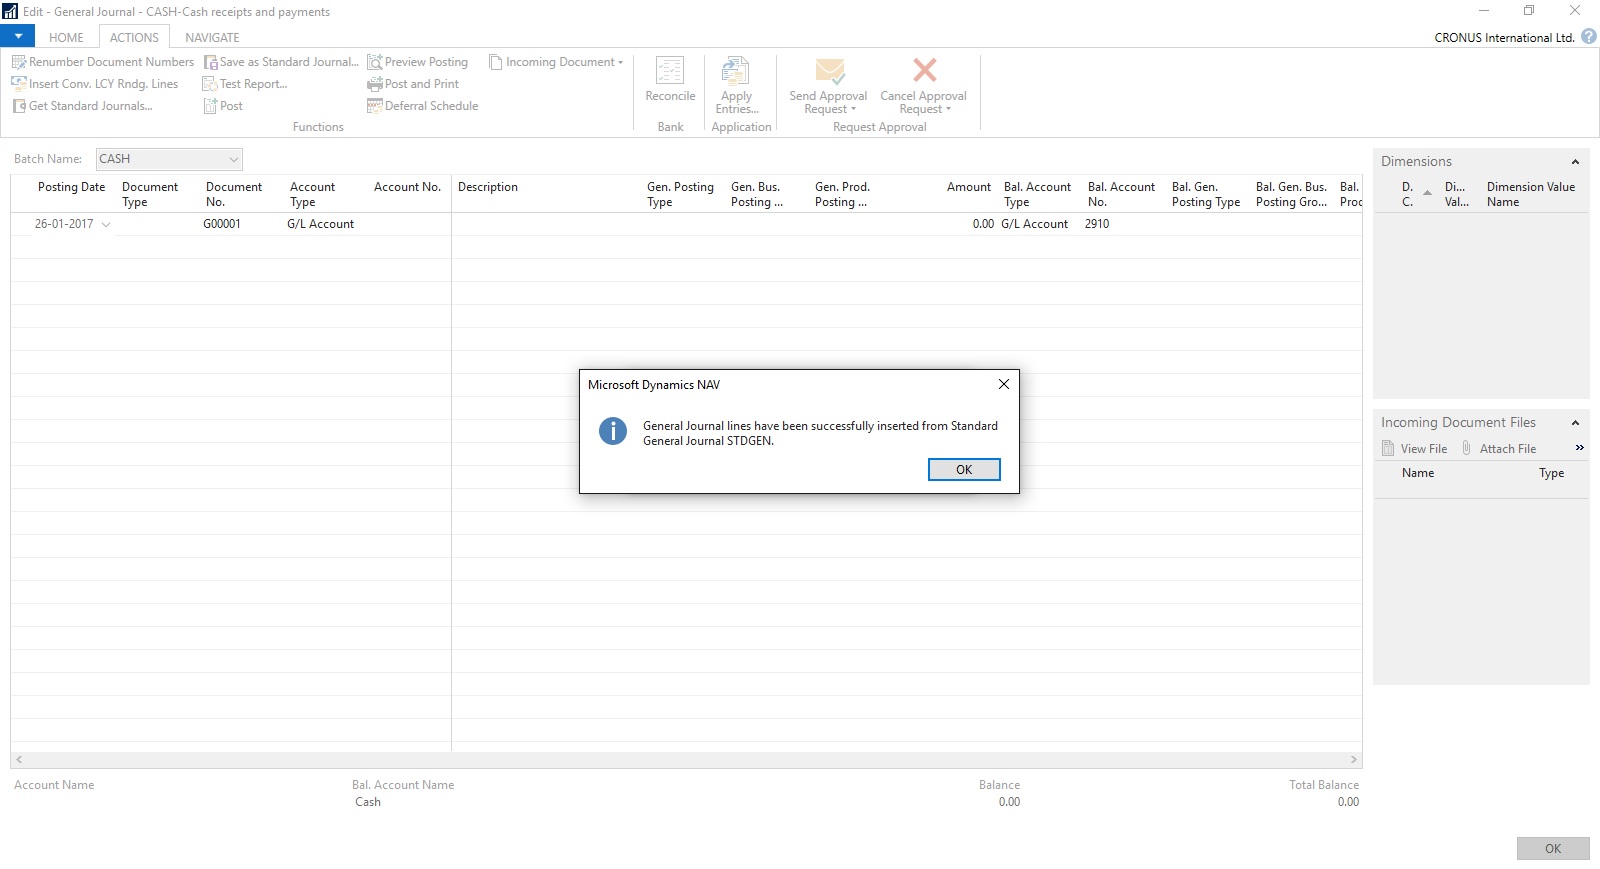
Your General Journal gets populated with values you saved to Std. Journal.
Have you Noticed, Posting Date as your Work Date and Next Document No. from your assigned No. Series is populated Automatically.

Fill the Amount and any other required fields and Post the Journal.
Next time when again you wish to post similar entries just retrive it and continue.
Thats all for todays Post, What you are waiting for give it a try.
I will comeup with more details in my upcoming Posts, till then keep exploring and Learning.
Many of time we pass entries of same Nature, Like Rent, Salary, Bills etc.. just an example you can decide upon which entries you post frequently and club it as Standard Journal to save your time.
You can create once and retrive it every month or when ever required and Post it in future/later.This can serve you as template for future use.
Let us see how we can use this feature.
Open your General Journal.
Make entries which you do oftenly. Don't put Postng Date & Document No. Complete your all entries.
Next we will save this as Standard Journal for future use.
From Action choose Save as Standard Journal.
Give Code & Name for your Journal Template.
If Amounts are fixed every time you can enter them too and while Save choose Save Amount.
No Let us review the entry that we saved.
From Action Choose Get Standard Journal.
This will display you all Saved Standard General Journals.
Select the required Journal Code and Click on Edit.
This is what is Saved in your Standard Journal.
Let use return to the Standard Journal List.
Select desired/ earlier saved Std. Journal and Click on OK.
Confirmation of Std. Journal retrived and Journals created in General Journal Page.
Your General Journal gets populated with values you saved to Std. Journal.
Have you Noticed, Posting Date as your Work Date and Next Document No. from your assigned No. Series is populated Automatically.
Fill the Amount and any other required fields and Post the Journal.
Next time when again you wish to post similar entries just retrive it and continue.
Thats all for todays Post, What you are waiting for give it a try.
I will comeup with more details in my upcoming Posts, till then keep exploring and Learning.
Tuesday, 2 August 2016
Creating Views - to Save Filtered Lists in NAV
Do you Know you can save the Page as View with filters.
Many of time we access to Page and apply same set of Filters to fetch our data. You can save the same for quick retrival of data applying the filters automatically in future access.
You save the Page with Filters as View.
Let us see small example how to achieve it.
First we will open the List Page in my case i am having one customized Customer List.
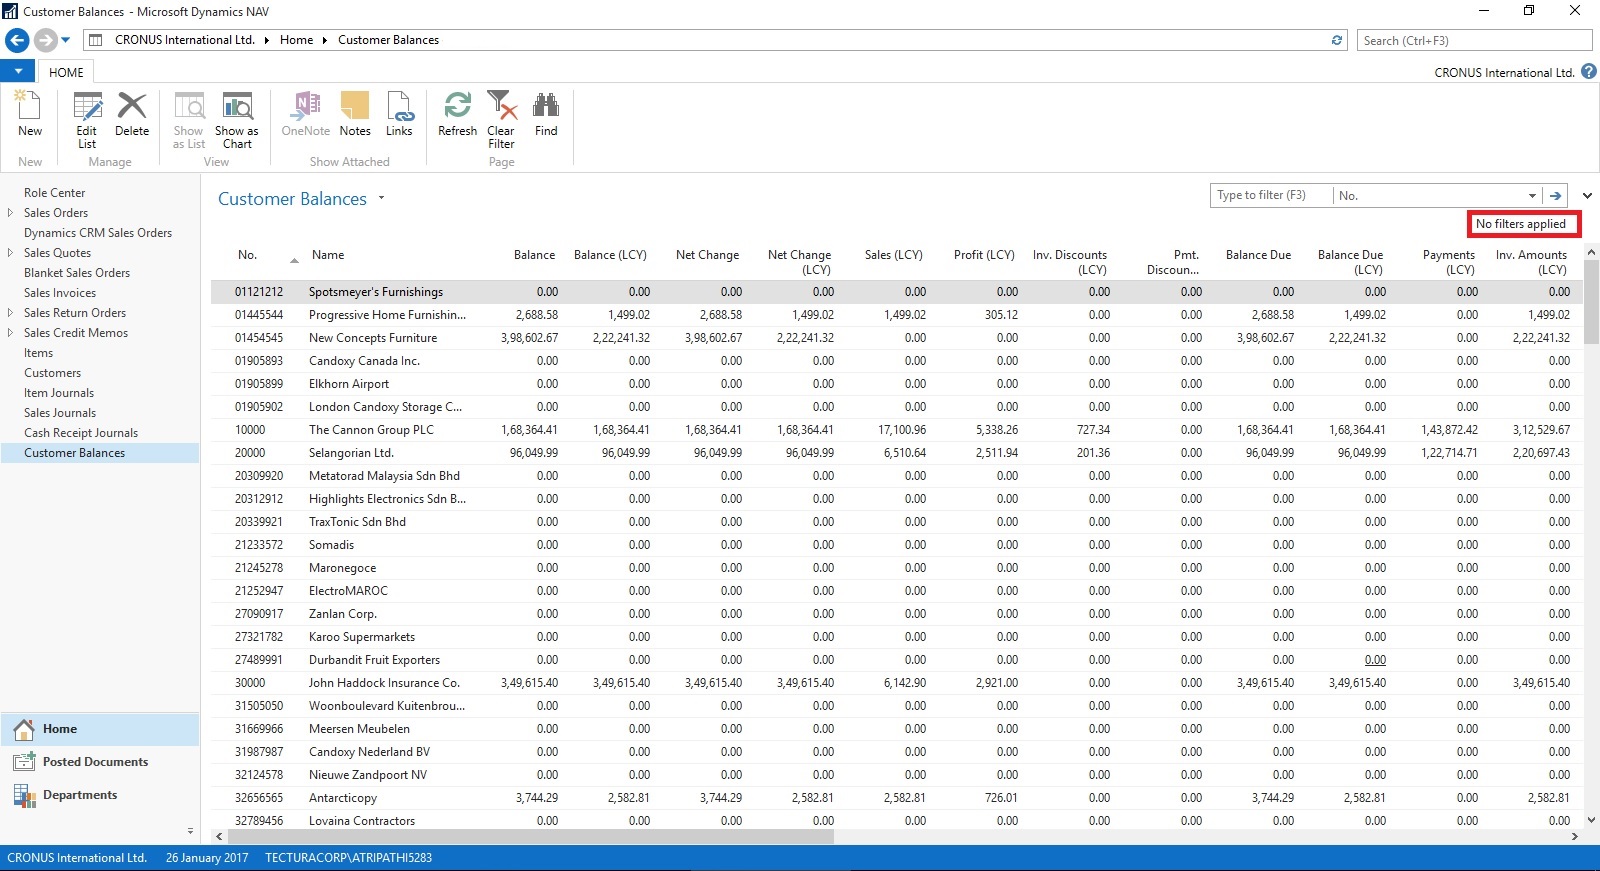
Suppose this is the Page which i use for Balances Retrival each month and on daily basis.
I Enter Filter as Balance > 5000 & Current Month Filter whenever i wish to check balances for my reporting or followup purpose.
For Date Filter i use (-CM..CM) sothat when i open this view next month it takes the appropriate Filter for that month.

Click on the Page Name post applying all the required Filters.
Select Save View as.
Give the Name for the View.
Select the Location to save the View.
On Confirmation respond as Yes.

Your View will be Saved, You can create as much Views as desired using different Filters.

Small and good Feature.
What you are waiting for give it a try.
I will comeup with more information in my upcoming posts, till then keep exploring and learning.
Many of time we access to Page and apply same set of Filters to fetch our data. You can save the same for quick retrival of data applying the filters automatically in future access.
You save the Page with Filters as View.
Let us see small example how to achieve it.
First we will open the List Page in my case i am having one customized Customer List.
Suppose this is the Page which i use for Balances Retrival each month and on daily basis.
I Enter Filter as Balance > 5000 & Current Month Filter whenever i wish to check balances for my reporting or followup purpose.
For Date Filter i use (-CM..CM) sothat when i open this view next month it takes the appropriate Filter for that month.
Click on the Page Name post applying all the required Filters.
Select Save View as.
Give the Name for the View.
Select the Location to save the View.
On Confirmation respond as Yes.
Your View will be Saved, You can create as much Views as desired using different Filters.
Small and good Feature.
What you are waiting for give it a try.
I will comeup with more information in my upcoming posts, till then keep exploring and learning.
Friday, 8 July 2016
Setting different Column Layout for different users
On Community Forum i came across one requirement for opening Page with different column on Page for different users.
Here i have given an demo how can be done, but will require some tweaking to achieve the actual result.
I have copied the Customer List Page and removed extra fields.

I have added one Field above Repeater so that we can decide which format we want to see on screen. User can enter 1/2/or any other value.
I have created two more variables Set1 and Set2 to show/hide fields as per the value entered in SetSelect.
Assigned the Set1 & Set2 to few columns on the Page Fields to Property Visible.
Set1 to Responsibility Center, Location Code & Currency Code.
Set2 to Post Code, Country/Region Code, Phone No. & Fax No.
Added code on OnOpenPage Trigger to select Default page Format when Page is Opened. This code you will modify as per your requirement like check the User and assign the default Value.
Added Code to SetSelect-OnValidate Trigger to select the required format of Page. You need to modify the code as per your requirement.

In this demo if user enter value for SetSelect and you will get different view of same page.
Do some research and design one as per your requirement, this way we need not to create different Pages for different Users. Same Page can serve you different purpose if limited to only different views.
I will come with more information in my upcomming posts.
Till then keep browsing and learning.
Here i have given an demo how can be done, but will require some tweaking to achieve the actual result.
I have copied the Customer List Page and removed extra fields.
I have added one Field above Repeater so that we can decide which format we want to see on screen. User can enter 1/2/or any other value.
I have created two more variables Set1 and Set2 to show/hide fields as per the value entered in SetSelect.
Assigned the Set1 & Set2 to few columns on the Page Fields to Property Visible.
Set1 to Responsibility Center, Location Code & Currency Code.
Set2 to Post Code, Country/Region Code, Phone No. & Fax No.
Added code on OnOpenPage Trigger to select Default page Format when Page is Opened. This code you will modify as per your requirement like check the User and assign the default Value.
Added Code to SetSelect-OnValidate Trigger to select the required format of Page. You need to modify the code as per your requirement.
In this demo if user enter value for SetSelect and you will get different view of same page.
Do some research and design one as per your requirement, this way we need not to create different Pages for different Users. Same Page can serve you different purpose if limited to only different views.
I will come with more information in my upcomming posts.
Till then keep browsing and learning.
Tuesday, 5 July 2016
Cumulative Update 21 for Microsoft Dynamics NAV 2015 - released in July 2016
Cumulative Update 21 includes all application and platform hotfixes and regulatory features that have been released for Microsoft Dynamics NAV 2015.
Note: You must convert the database if you are upgrading to this cumulative update from a cumulative update earlier than Cumulative Update 9 (build 41779). For more information, see Converting a Database in Help for Microsoft Dynamics NAV.
Where to find Cumulative Update 21
You can download the cumulative update from KB 3172546 – Cumulative Update 21 for Microsoft Dynamics NAV 2015 (Build 46293).
Before you install a cumulative update in a production environment, take the following precautions:
For information about how to install the cumulative update, see How to Install a Microsoft Dynamics NAV 2015 Cumulative Update.
For information about how to work around a recent process change, see How to Get Back the ‘Hotfix Directories’ from NAV 2015 Cumulative Update 1.
For a list of all cumulative updates for this version, see Released Cumulative Updates for Microsoft Dynamics NAV 2015.
For more details See this Link : https://blogs.msdn.microsoft.com/nav/2016/07/05/cumulative-update-21-for-microsoft-dynamics-nav-2015-has-been-released/
Note: You must convert the database if you are upgrading to this cumulative update from a cumulative update earlier than Cumulative Update 9 (build 41779). For more information, see Converting a Database in Help for Microsoft Dynamics NAV.
Where to find Cumulative Update 21
You can download the cumulative update from KB 3172546 – Cumulative Update 21 for Microsoft Dynamics NAV 2015 (Build 46293).
Warning
Before you install a cumulative update in a production environment, take the following precautions:
- Test the cumulative update in a non-production environment.
- Make a backup of the system or computer where the cumulative update is to be installed.
Additional Information
For information about how to install the cumulative update, see How to Install a Microsoft Dynamics NAV 2015 Cumulative Update.
For information about how to work around a recent process change, see How to Get Back the ‘Hotfix Directories’ from NAV 2015 Cumulative Update 1.
For a list of all cumulative updates for this version, see Released Cumulative Updates for Microsoft Dynamics NAV 2015.
For more details See this Link : https://blogs.msdn.microsoft.com/nav/2016/07/05/cumulative-update-21-for-microsoft-dynamics-nav-2015-has-been-released/
Friday, 3 June 2016
Cumulative Update 20 for Microsoft Dynamics NAV 2015 released in June 2016
Cumulative Update 20 includes all application and platform hotfixes and regulatory features that have been released for Microsoft Dynamics NAV 2015.
You can download the cumulative update from KB 3166286 – Cumulative Update 20 for Microsoft Dynamics NAV 2015 (Build 46054).
Before you install a cumulative update in a production environment, take the following precautions:
For information about how to install the cumulative update, see How to Install a Microsoft Dynamics NAV 2015 Cumulative Update.
For information about how to work around a recent process change, see How to Get Back the ‘Hotfix Directories’ from NAV 2015 Cumulative Update 1.
For a list of all cumulative updates for this version, see Released Cumulative Updates for Microsoft Dynamics NAV 2015.
Where to find Cumulative Update 20
You can download the cumulative update from KB 3166286 – Cumulative Update 20 for Microsoft Dynamics NAV 2015 (Build 46054).
Warning
Before you install a cumulative update in a production environment, take the following precautions:
- Test the cumulative update in a non-production environment.
- Make a backup of the system or computer where the cumulative update is to be installed.
Additional Information
For information about how to install the cumulative update, see How to Install a Microsoft Dynamics NAV 2015 Cumulative Update.
For information about how to work around a recent process change, see How to Get Back the ‘Hotfix Directories’ from NAV 2015 Cumulative Update 1.
For a list of all cumulative updates for this version, see Released Cumulative Updates for Microsoft Dynamics NAV 2015.
Wednesday, 11 May 2016
Cumulative Update 19 for Microsoft Dynamics NAV 2015 - Released in May 2016
Cumulative Update 19 includes all application and platform hotfixes and regulatory features that have been released for Microsoft Dynamics NAV 2015.
The cumulative update includes hotfixes that apply to all countries and hotfixes specific to the following local versions:
Note: You must convert the database if you are upgrading to this cumulative update from a cumulative update earlier than Cumulative Update 9 (build 41779). For more information, see Converting a Database in Help for Microsoft Dynamics NAV.
Note: To enable customized translation of profiles, a number of actions are now available on the Profile List page. You can export and import resource files to enable translation for one or more profiles. The steps to install and uninstall language modules have also been modified. For more information, see How to: Install Language Modules, How to: Uninstall Language Modules, and How to: Export, Edit, and Import Translated Profile Strings in Help for Microsoft Dynamics NAV.
You can download the cumulative update from KB 3157490 – Cumulative Update 19 for Microsoft Dynamics NAV 2015 (Build 45813).
Before you install a cumulative update in a production environment, take the following precautions:
For information about how to install the cumulative update, see How to Install a Microsoft Dynamics NAV 2015 Cumulative Update.
For information about how to work around a recent process change, see How to Get Back the ‘Hotfix Directories’ from NAV 2015 Cumulative Update 1.
For a list of all cumulative updates for this version, see Released Cumulative Updates for Microsoft Dynamics NAV 2015.
The cumulative update includes hotfixes that apply to all countries and hotfixes specific to the following local versions:
- AU – Australia
- AT – Austria
- BE – Belgium
- CH – Switzerland
- CZ – Czech Republic
- DE – Germany
- DK – Denmark
- ES – Spain
- FI – Finland
- FR – France
- IS – Iceland
- IT – Italy
- NA – North America
- NL – Netherlands
- NO – Norway
- NZ – New Zealand
- RU – Russia
- SE – Sweden
- UK – United Kingdom
Note: You must convert the database if you are upgrading to this cumulative update from a cumulative update earlier than Cumulative Update 9 (build 41779). For more information, see Converting a Database in Help for Microsoft Dynamics NAV.
Note: To enable customized translation of profiles, a number of actions are now available on the Profile List page. You can export and import resource files to enable translation for one or more profiles. The steps to install and uninstall language modules have also been modified. For more information, see How to: Install Language Modules, How to: Uninstall Language Modules, and How to: Export, Edit, and Import Translated Profile Strings in Help for Microsoft Dynamics NAV.
Where to find Cumulative Update 19
You can download the cumulative update from KB 3157490 – Cumulative Update 19 for Microsoft Dynamics NAV 2015 (Build 45813).
Warning
Before you install a cumulative update in a production environment, take the following precautions:
- Test the cumulative update in a non-production environment.
- Make a backup of the system or computer where the cumulative update is to be installed.
Additional Information
For information about how to install the cumulative update, see How to Install a Microsoft Dynamics NAV 2015 Cumulative Update.
For information about how to work around a recent process change, see How to Get Back the ‘Hotfix Directories’ from NAV 2015 Cumulative Update 1.
For a list of all cumulative updates for this version, see Released Cumulative Updates for Microsoft Dynamics NAV 2015.
Monday, 4 April 2016
Cumulative Update 18 for Microsoft Dynamics NAV 2015 released in April
Cumulative Update 18 includes all application and platform hotfixes and regulatory features that have been released for Microsoft Dynamics NAV 2015.
You can download the cumulative update from KB 3151020 – Cumulative Update 18 for Microsoft Dynamics NAV 2015 (Build 45483).
Before you install a cumulative update in a production environment, take the following precautions:
For information about how to install the cumulative update, see How to Install a Microsoft Dynamics NAV 2015 Cumulative Update.
For information about how to work around a recent process change, see How to Get Back the ‘Hotfix Directories’ from NAV 2015 Cumulative Update 1.
For a list of all cumulative updates for this version, see Released Cumulative Updates for Microsoft Dynamics NAV 2015.
Where to find Cumulative Update 18
You can download the cumulative update from KB 3151020 – Cumulative Update 18 for Microsoft Dynamics NAV 2015 (Build 45483).
Warning
Before you install a cumulative update in a production environment, take the following precautions:
- Test the cumulative update in a non-production environment.
- Make a backup of the system or computer where the cumulative update is to be installed.
Additional Information
For information about how to install the cumulative update, see How to Install a Microsoft Dynamics NAV 2015 Cumulative Update.
For information about how to work around a recent process change, see How to Get Back the ‘Hotfix Directories’ from NAV 2015 Cumulative Update 1.
For a list of all cumulative updates for this version, see Released Cumulative Updates for Microsoft Dynamics NAV 2015.
Wednesday, 23 March 2016
Microsoft Power BI – Part – VI
Continuing from my previous post, if you have not seen yet please check it out it will help you continuing with this post.
You can check:
Microsoft Power BI – Part – I
Microsoft Power BI – Part – II
Microsoft Power BI – Part – III
Microsoft Power BI – Part – IV
Microsoft Power BI – Part – V
Today we will discuss how to use Power BI Content Pack:
Few things to keep in mind to get report Generated Successfully.
Point-1 You have required objects for this content pack in your database.
If you are using 2016, you can skip this as these objects are available in 2016. If you are using 2015 or 2013 then export these objects from 2016 and import in your database.
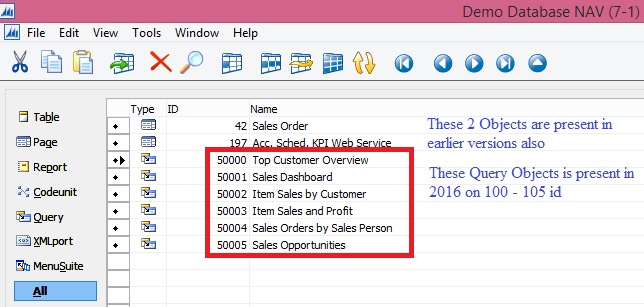
Above Pages will be present in your previous version of database, you need to import the 6 Query objects. These are necessary as these are used as source to fetch data from your data base by this content pack.
Point-2 Web Services need to be published.
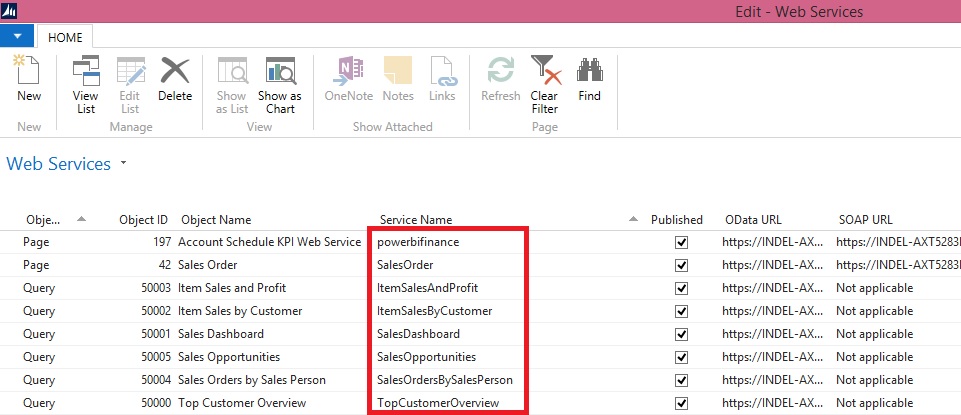
Make sure you use same name for Services as you may get error while connecting and refreshing/ fetching data using this content pack.
Point-3 SSL port and web address is used to access the services.
https is used as this will not work on http.
Self-signed certificate will not work which we use for test purpose for publishing services and testing. It will throw Trusted relationship connection type error. If you have one use the same instead using Self-signed certificate.
No worries, don’t be disappointed. I will give you tip to overcome this requirement just follow as below:
You may remember that in our previous post we installed and used Power BI Gateway, actually we got a Trusted Certificate which we can use for this purpose.

Open IIS Manager on your system.

Select Serve/ Machine in Left Navigation Tree and Select Server Certificates.
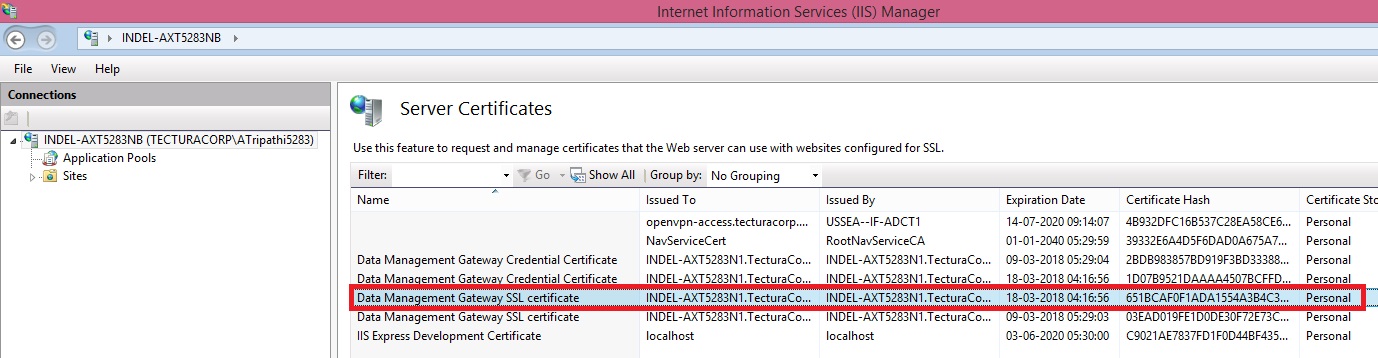
Locate the Data Management Gateway SSL Certificate, this got installed when you installed Gateway. Double click to open the Properties of the certificate.

Switch to Details Tab, Scroll down to find Thumbprint, and Copy the Thumbprint and paste to Notepad finally remove all space leading, trailing and any in between.
It should look like above right bottom corner notepad window no space in Thumbprint signature.
Copy this Value and use as Thumbprint in you Navision Service.
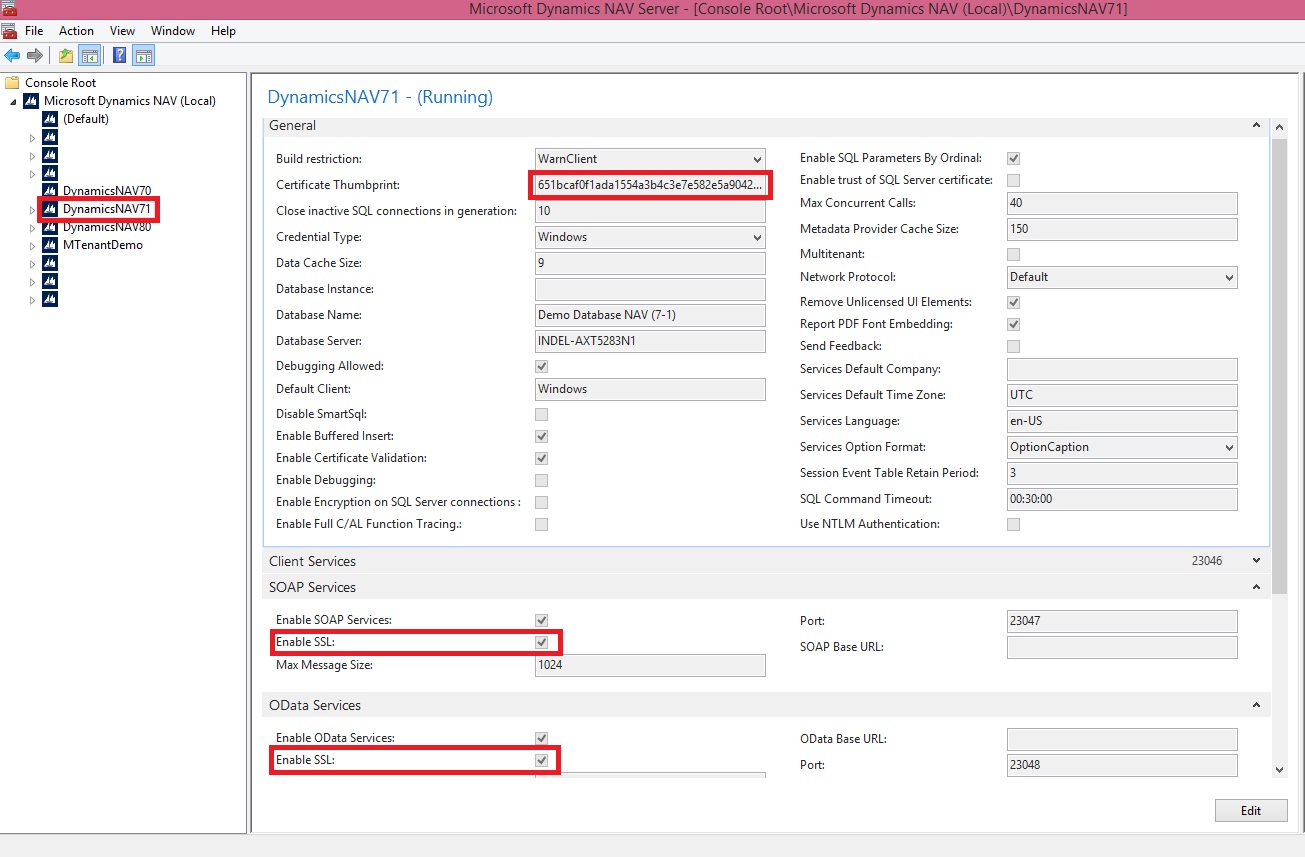
Select Your Service.
Edit.
Paste the Certificate Thumbprint.
Make Sure SSL is Enabled for your OData Services.
Save.
Restart the Service.
We are done with the basic requirements now let us connect using Power BI Miscrosoft Navision Content Pack.
Now Login with your credentials to Power BI.
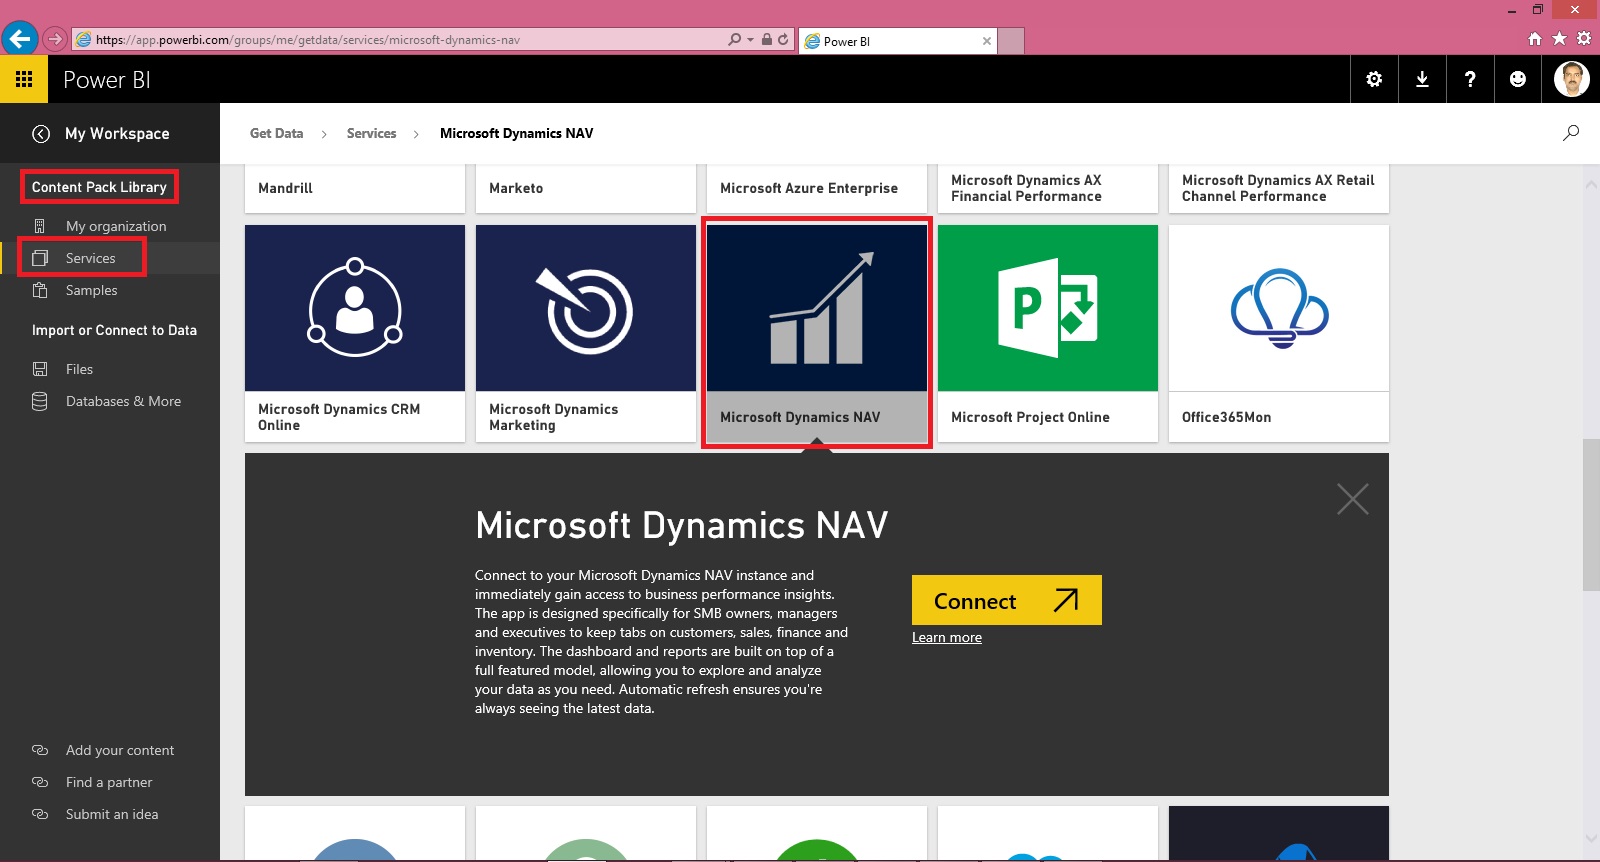
From Left bottom corner Select Get Data.
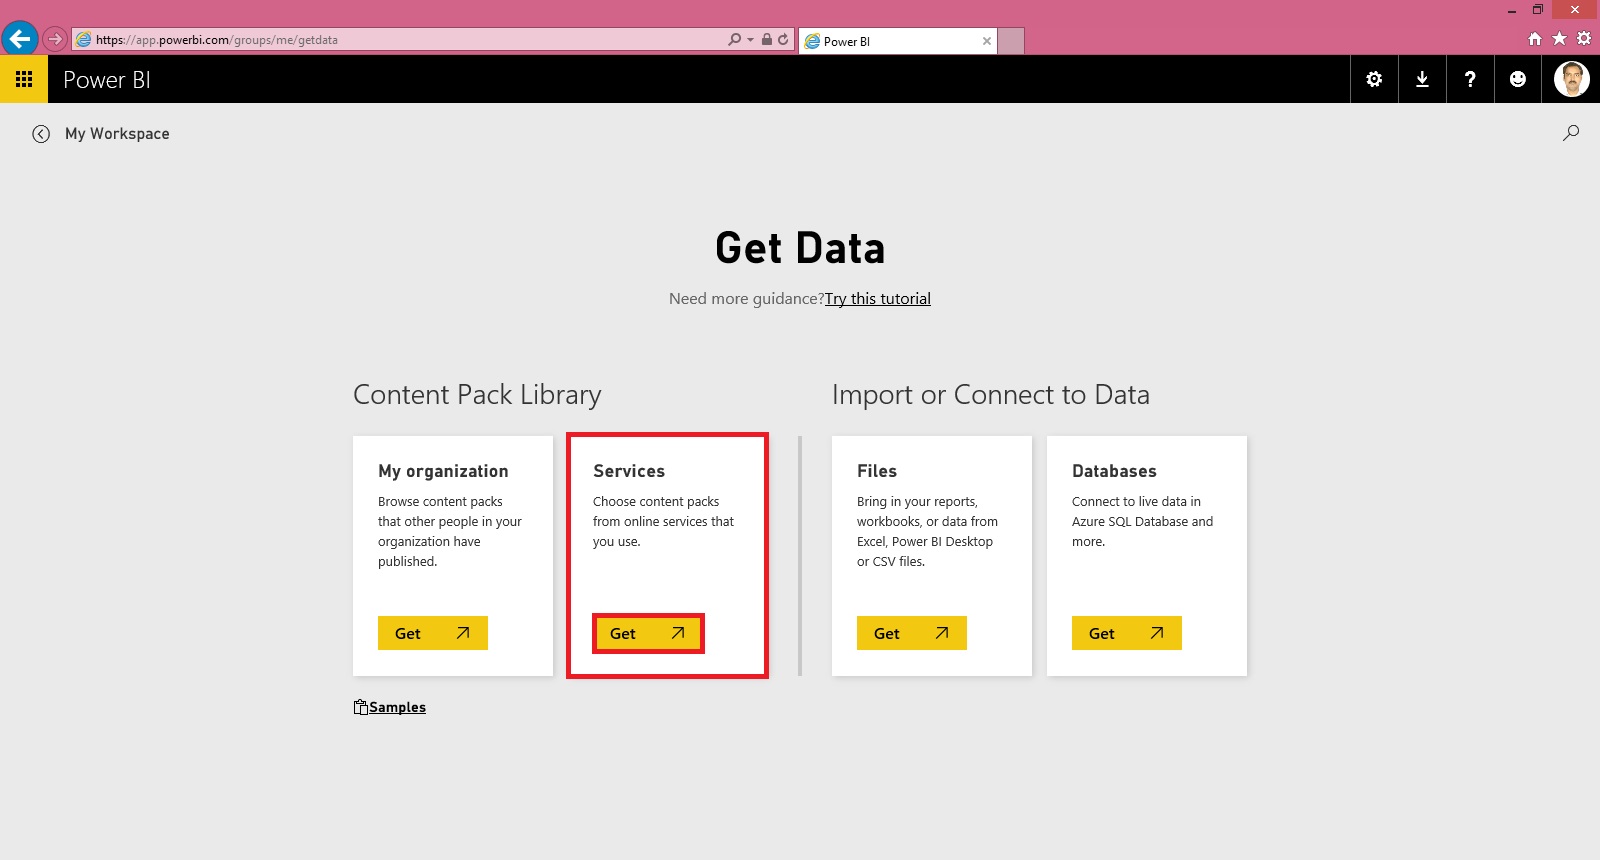
Select Get Data from Services.

Scroll to find Microsoft Dynamics NAV Services and Select Connect.
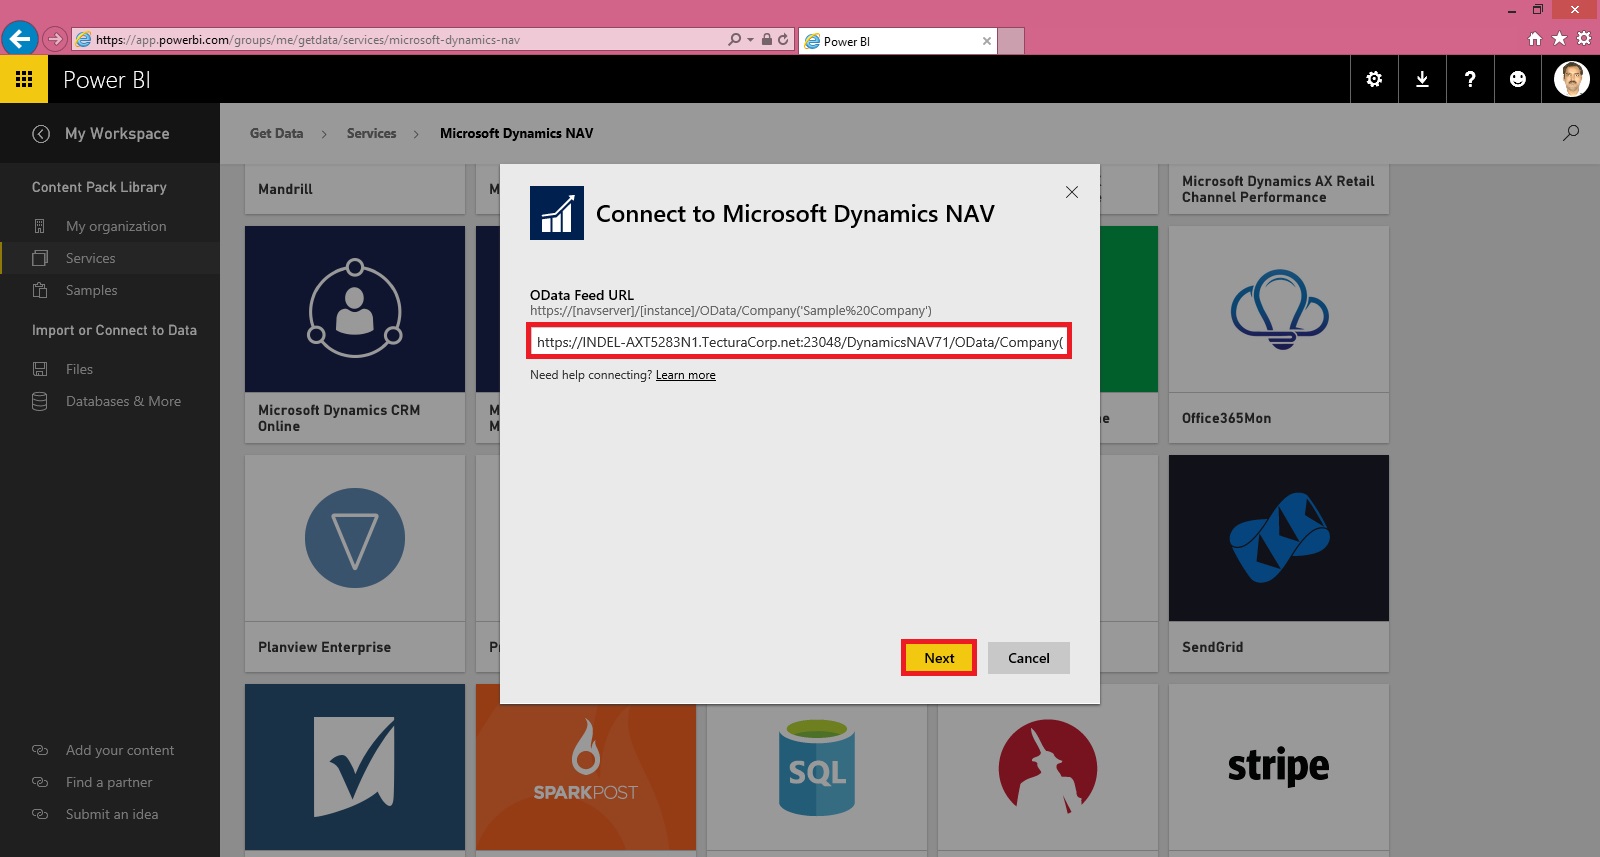
Copy your OData Service URL. Make sure you remove Service name from the URL and trailing ‘/’ after company name from the URL.
Select Next.

Select the Authentication Method and then Sign In.

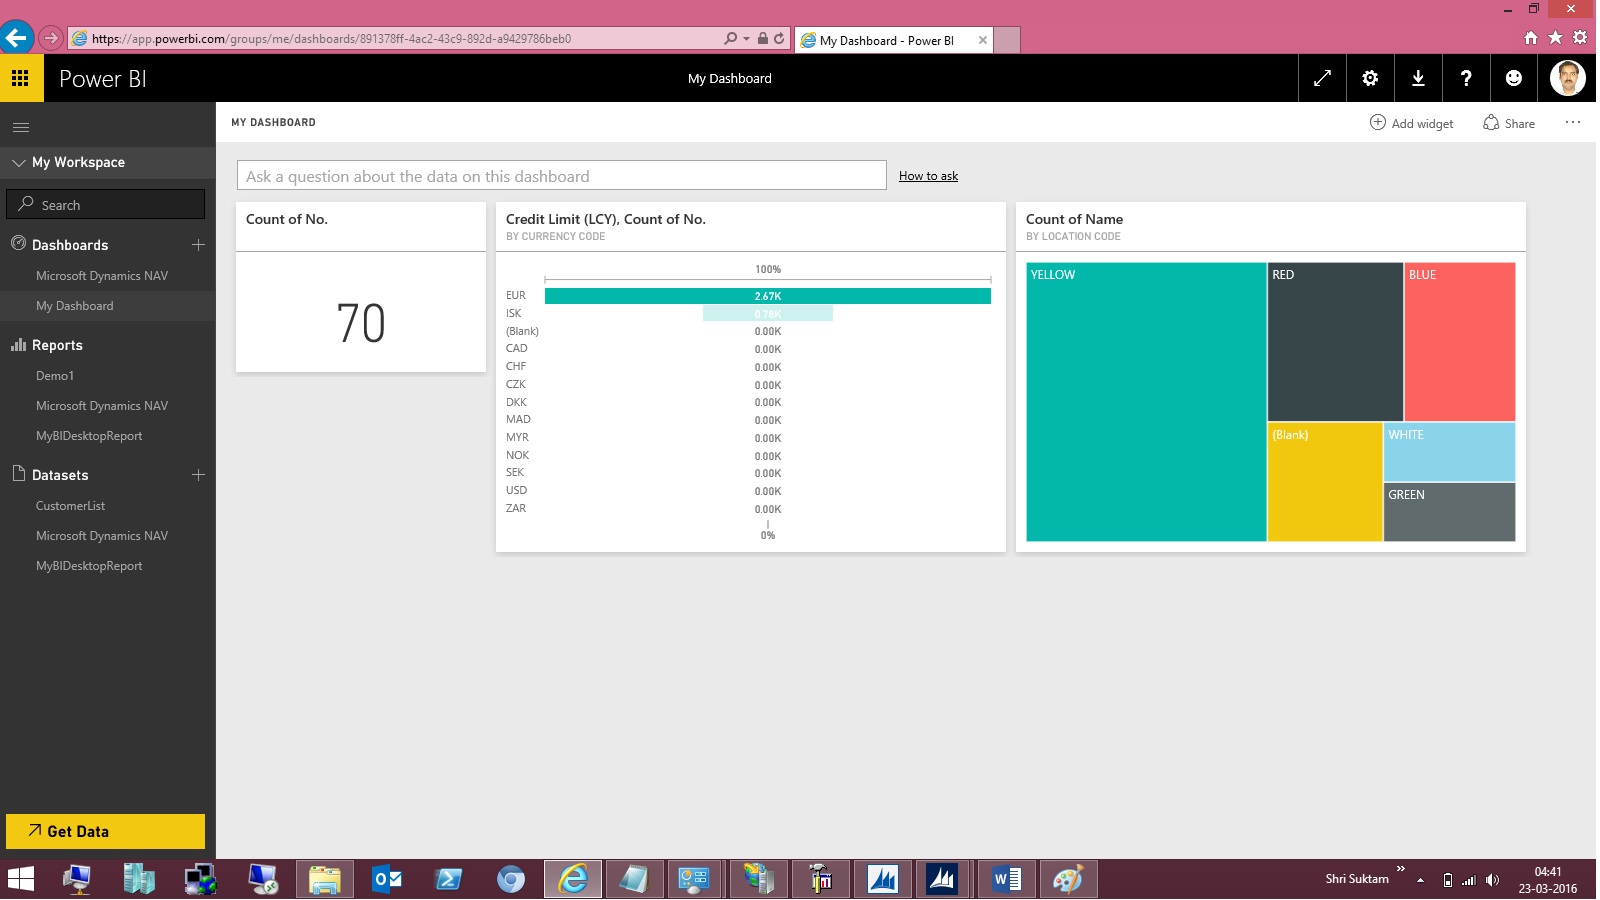
Wait for few minutes you dataset will be loaded.
As a result you will get: Dataset, Report & Dashboard ready for you in few minutes depending upon the data volume and connection speed.

The report and dashboard view will be as per the available data in your database.
Hurray!!!
You are done with your practice session.
This is a Holi Gift for my reader from my side.
I will come up with more features explanation and other Tips & Tricks in my upcoming posts, till then keep practicing and learning from blogs and helps available online.
You can check:
Microsoft Power BI – Part – I
Microsoft Power BI – Part – II
Microsoft Power BI – Part – III
Microsoft Power BI – Part – IV
Microsoft Power BI – Part – V
Today we will discuss how to use Power BI Content Pack:
Few things to keep in mind to get report Generated Successfully.
Point-1 You have required objects for this content pack in your database.
If you are using 2016, you can skip this as these objects are available in 2016. If you are using 2015 or 2013 then export these objects from 2016 and import in your database.
Above Pages will be present in your previous version of database, you need to import the 6 Query objects. These are necessary as these are used as source to fetch data from your data base by this content pack.
Point-2 Web Services need to be published.
Make sure you use same name for Services as you may get error while connecting and refreshing/ fetching data using this content pack.
Point-3 SSL port and web address is used to access the services.
https is used as this will not work on http.
Self-signed certificate will not work which we use for test purpose for publishing services and testing. It will throw Trusted relationship connection type error. If you have one use the same instead using Self-signed certificate.
No worries, don’t be disappointed. I will give you tip to overcome this requirement just follow as below:
You may remember that in our previous post we installed and used Power BI Gateway, actually we got a Trusted Certificate which we can use for this purpose.
Open IIS Manager on your system.
Select Serve/ Machine in Left Navigation Tree and Select Server Certificates.
Locate the Data Management Gateway SSL Certificate, this got installed when you installed Gateway. Double click to open the Properties of the certificate.
Switch to Details Tab, Scroll down to find Thumbprint, and Copy the Thumbprint and paste to Notepad finally remove all space leading, trailing and any in between.
It should look like above right bottom corner notepad window no space in Thumbprint signature.
Copy this Value and use as Thumbprint in you Navision Service.
Select Your Service.
Edit.
Paste the Certificate Thumbprint.
Make Sure SSL is Enabled for your OData Services.
Save.
Restart the Service.
We are done with the basic requirements now let us connect using Power BI Miscrosoft Navision Content Pack.
Now Login with your credentials to Power BI.
From Left bottom corner Select Get Data.
Select Get Data from Services.
Scroll to find Microsoft Dynamics NAV Services and Select Connect.
Copy your OData Service URL. Make sure you remove Service name from the URL and trailing ‘/’ after company name from the URL.
Select Next.
Select the Authentication Method and then Sign In.
Wait for few minutes you dataset will be loaded.
As a result you will get: Dataset, Report & Dashboard ready for you in few minutes depending upon the data volume and connection speed.
The report and dashboard view will be as per the available data in your database.
Hurray!!!
You are done with your practice session.
This is a Holi Gift for my reader from my side.
I will come up with more features explanation and other Tips & Tricks in my upcoming posts, till then keep practicing and learning from blogs and helps available online.
Tuesday, 8 March 2016
Cumulative Update 17 for Microsoft Dynamics NAV 2015 Released in March
Cumulative Update 17 includes all application and platform hotfixes and regulatory features that have been released for Microsoft Dynamics NAV 2015.
You can download the cumulative update from KB 3145854 – Cumulative Update 17 for Microsoft Dynamics NAV 2015 (Build 45244).
For information about how to install the cumulative update, see How to Install a Microsoft Dynamics NAV 2015 Cumulative Update.
For information about how to work around a recent process change, see How to Get Back the ‘Hotfix Directories’ from NAV 2015 Cumulative Update 1.
For a list of all cumulative updates for this version, see Released Cumulative Updates for Microsoft Dynamics NAV 2015.
Where to find Cumulative Update 17
You can download the cumulative update from KB 3145854 – Cumulative Update 17 for Microsoft Dynamics NAV 2015 (Build 45244).
Additional Information
For information about how to install the cumulative update, see How to Install a Microsoft Dynamics NAV 2015 Cumulative Update.
For information about how to work around a recent process change, see How to Get Back the ‘Hotfix Directories’ from NAV 2015 Cumulative Update 1.
For a list of all cumulative updates for this version, see Released Cumulative Updates for Microsoft Dynamics NAV 2015.
Tuesday, 9 February 2016
Cumulative Update 16 for Microsoft Dynamics NAV 2015 has been released on 5th Feb 2016
Cumulative Update 16 includes all application and platform hotfixes and regulatory features that have been released for Microsoft Dynamics NAV 2015.
For information about how to install the cumulative update, see How to Install a Microsoft Dynamics NAV 2015 Cumulative Update.
For information about how to work around a recent process change, see How to Get Back the ‘Hotfix Directories’ from NAV 2015 Cumulative Update 1.
For a list of all cumulative updates for this version, see Released Cumulative Updates for Microsoft Dynamics NAV 2015.
You can check for complete details here : https://blogs.msdn.microsoft.com/nav/2016/02/05/cumulative-update-16-for-microsoft-dynamics-nav-2015-has-been-released/
Additional Information
For information about how to install the cumulative update, see How to Install a Microsoft Dynamics NAV 2015 Cumulative Update.
For information about how to work around a recent process change, see How to Get Back the ‘Hotfix Directories’ from NAV 2015 Cumulative Update 1.
For a list of all cumulative updates for this version, see Released Cumulative Updates for Microsoft Dynamics NAV 2015.
You can check for complete details here : https://blogs.msdn.microsoft.com/nav/2016/02/05/cumulative-update-16-for-microsoft-dynamics-nav-2015-has-been-released/
Tuesday, 29 December 2015
How do I:Set Up Invoice Rounding
One of my reader requested for this topic, since I am too late to respond, don't now if this can help him in any manner. But still may help someone in future. From past 2 months I am too busy in other activities that I am unable to check and respond to mails and also very limited posts.
I would request to keep writing to me when ever I get some spare time will definitely respond in form of posts to your queries.
Here we go...
Please find the Link below for other part of this post for complete answer to the query in sequence posted separately each part of setup: "Please let me know how to setup invoice rounding in Navision 2015, step wise."
I have taken screen shot from Navision 2016 although every thing remains same and equally applicable to Navision 2015.
If you want to automatic invoice rounding to deal with Local regulations or local custom may require the invoice to be rounded in a specific way required.
When an invoice is rounded, an extra line is inserted with the rounding amount and this line is posted additionally with the other invoice lines.
To use automatic invoice rounding, you must follow below steps: explained separately via different posts
- Specify the General ledger accounts to which rounding differences will be posted.
- Set up rules for rounding invoices in local currency and in foreign currency.
- Activate the invoice rounding functionality.
How do I: Enable the Invoice Rounding Function
If you want your sales and purchase invoices are rounded automatically, you will have to activate the invoice rounding function.
To activate the invoice rounding function


You can activate invoice rounding separately for sales and purchase invoices.
To activate the invoice rounding function
- In the Search box, enter Sales & Receivables Setup or Purchases & Payables Setup, and then choose the related link.
- On the General Fast Tab, select the Invoice Rounding check box.
You can activate invoice rounding separately for sales and purchase invoices.
How do I: Set Up Rounding Rules for Foreign Currency
To use the automatic invoice rounding function, you must set up rounding rules.
To set up rounding rules for foreign currency
To set up rounding rules for foreign currency
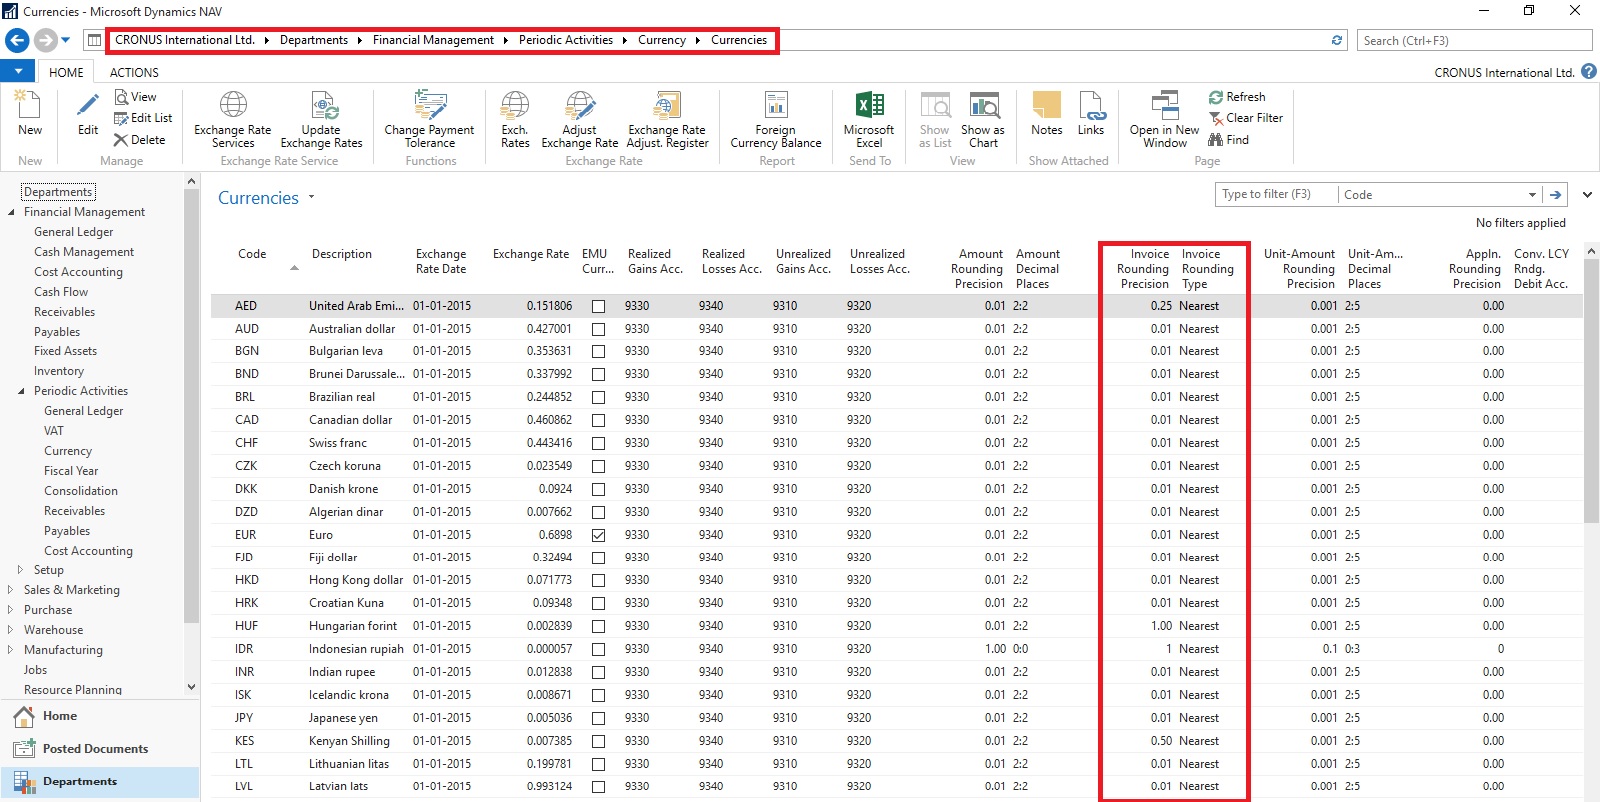
- Open the Currencies
- In the Currencies window, fill in the Invoice Rounding Precision and Invoice Rounding Type For more information on specific field, select the field, and then press F1.
How do I: Set Up Rounding Rules for the LCY
To use the automatic invoice rounding function, you will be required to set up rounding rules.
To set up rounding rules for local currency
You can take help of technical team to add/display fields not visible on the page. These fields are available in Table. For more details about fields you can use F1 help.
To set up rounding rules for local currency
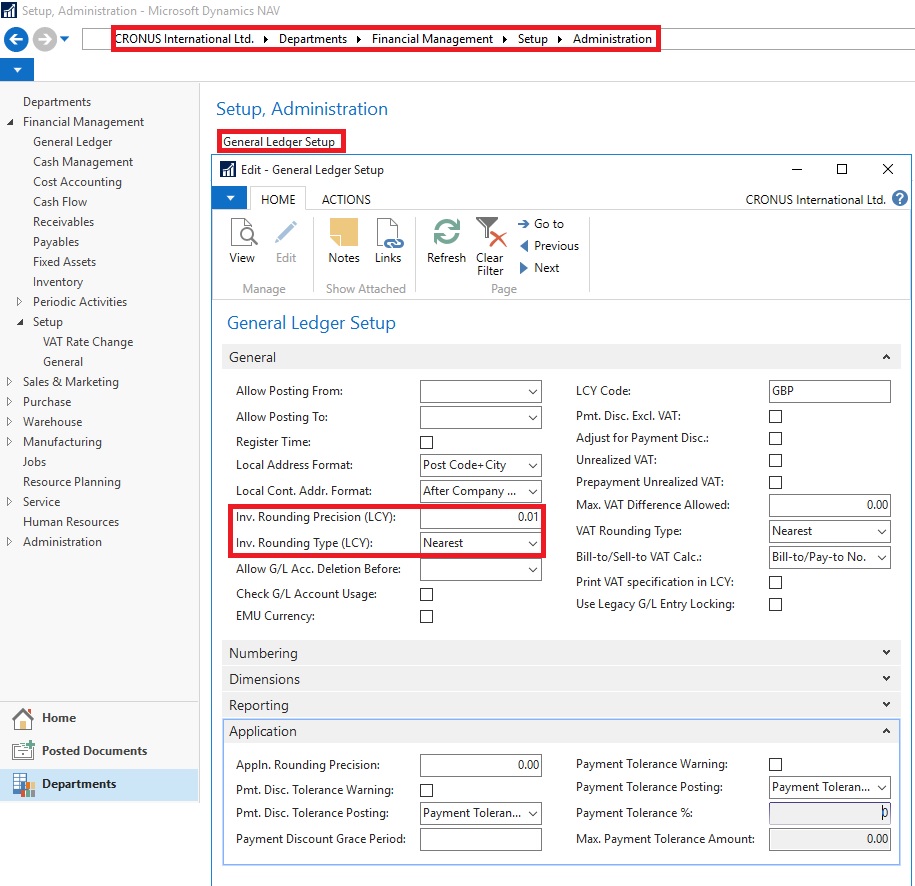
- Open General Ledger Setup
- In the General Ledger Setup window, on the Respective Fast Tab, fill in the Amount Rounding Precision, Unit-Amount Rounding Precision, Rounding Precision (LCY) and Invoice Rounding Type (LCY) fields.
You can take help of technical team to add/display fields not visible on the page. These fields are available in Table. For more details about fields you can use F1 help.
How do I: Set Up General Ledger Accounts for Invoice Rounding Differences
To use the automatic invoice rounding function, you will be required to set up the general ledger account or accounts in which the rounding differences will be posted. Before you can do this, you will be required to set up VAT product posting groups.
To set up general ledger accounts for invoice rounding differences
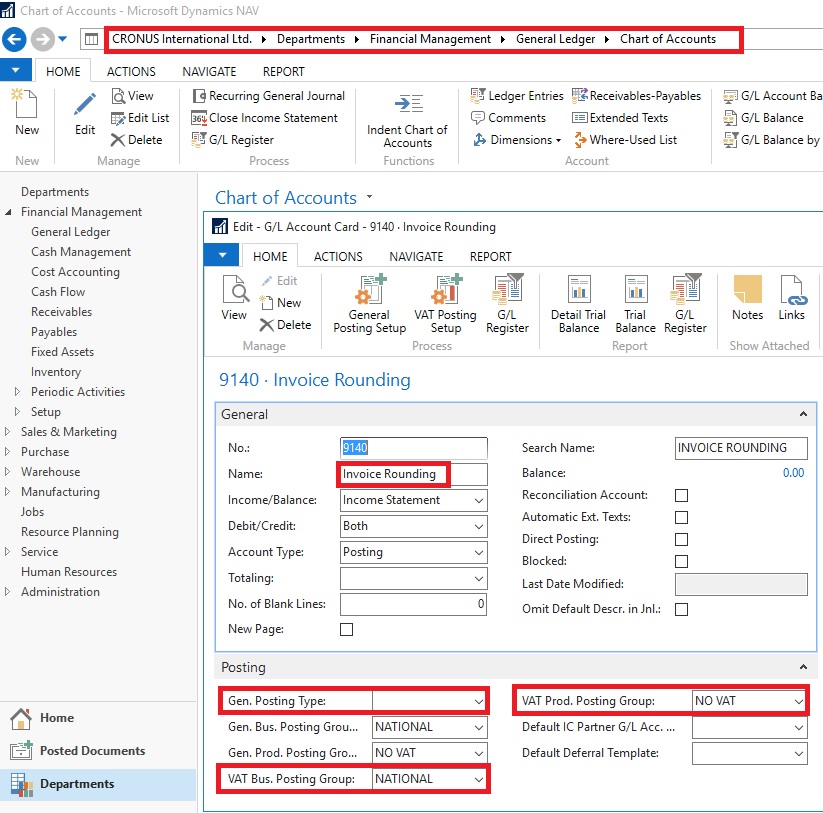
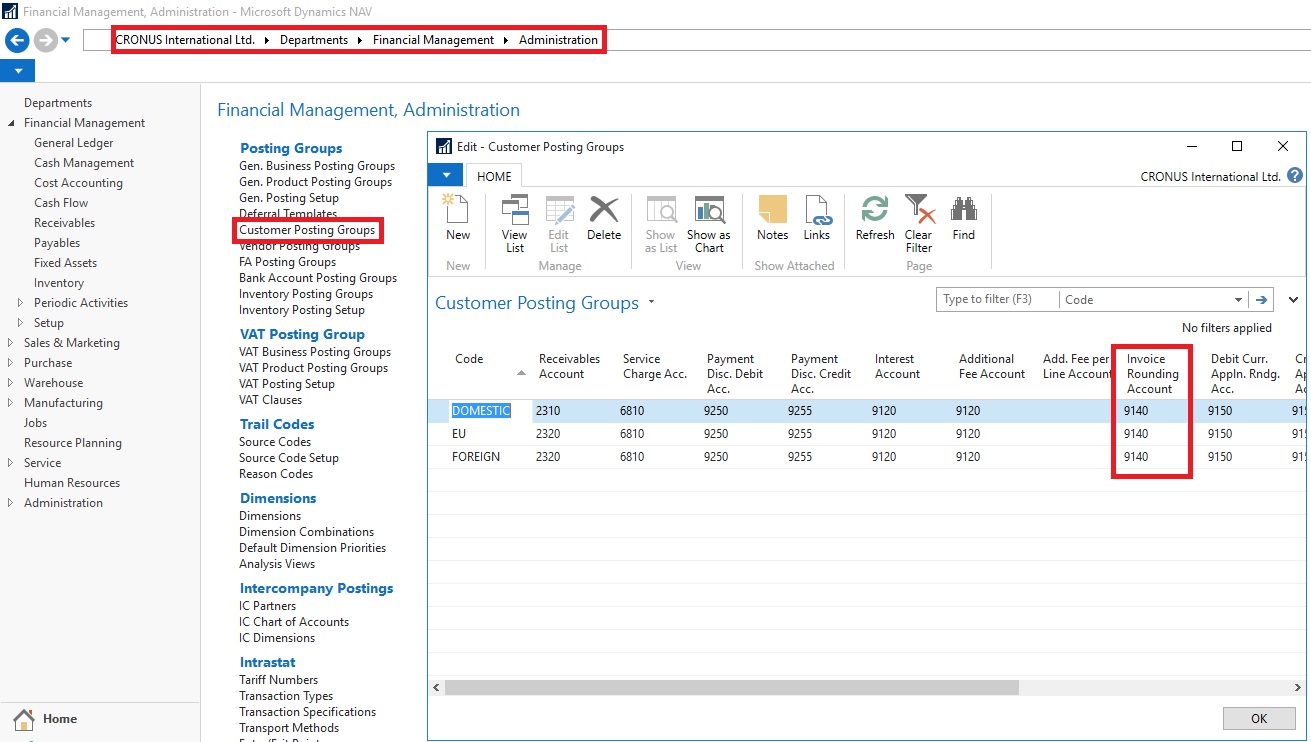
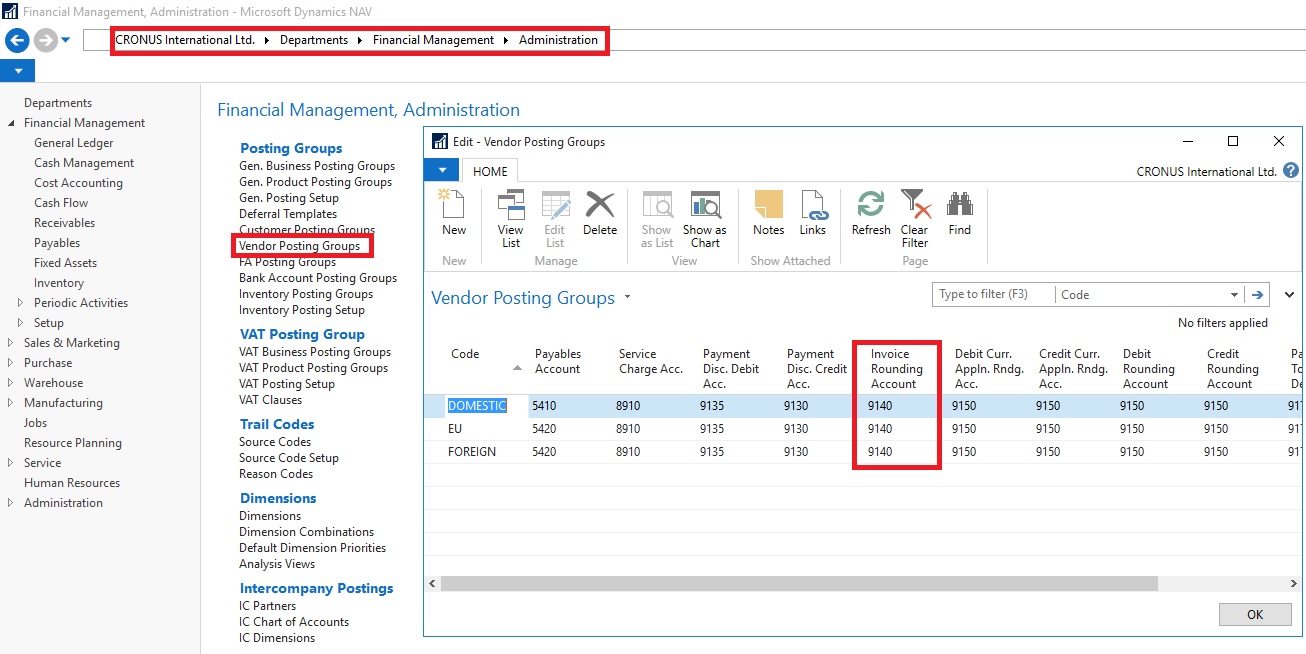
Now you need to assign the invoice rounding account to posting groups in the Customer Posting Groups window and the Vendor Posting Groups window.
To set up general ledger accounts for invoice rounding differences
- Set up the account in the Chart of Accounts window and name it Invoice Rounding or as required name. (I am showing the standard Account defined in Demo Database, you can setup your own as per the requirement)
- In the Posting Type field, select <Blank>.
- Fill in the VAT Bus. Posting Group field or can leave blank.
- Fill in the VAT Prod. Posting Group You may want to set up a new group code that can be used for invoice rounding, if don’t have any existing to be used.
Now you need to assign the invoice rounding account to posting groups in the Customer Posting Groups window and the Vendor Posting Groups window.
Monday, 7 December 2015
Released Cumulative Update 14 for Microsoft Dynamics NAV 2015
Cumulative Update 14 includes all application and platform hotfixes and regulatory features that have been released for Microsoft Dynamics NAV 2015.
The cumulative update is intended mainly for solutions that are experiencing the problems described in the Knowledge Base article linked to below. However, you are advised to always keep your solution updated with the latest cumulative update. If you are in doubt about whether this cumulative update addresses your specific problem, or if you want to confirm whether any special compatibility, installation, or download issues are associated with this cumulative update, support professionals in Customer Support Services are ready to help you.
For more details see Link :- https://blogs.msdn.microsoft.com/nav/2015/12/07/cumulative-update-14-for-microsoft-dynamics-nav-2015-has-been-released/
Note: You must convert the database if you are upgrading to this cumulative update from a cumulative update earlier than Cumulative Update 9 (build 41779). For more information, see Converting a Database in Help for Microsoft Dynamics NAV.
Note: To enable customized translation of profiles, a number of actions are now available on the Profile List page. You can export and import resource files to enable translation for one or more profiles. The steps to install and uninstall language modules have also been modified. For more information, see How to: Install Language Modules, How to: Uninstall Language Modules, and How to: Export, Edit, and Import Translated Profile Strings in Help for Microsoft Dynamics NAV.
You can download the cumulative update from KB 3121037 – Cumulative Update 14 for Microsoft Dynamics NAV 2015 (Build 43887).
For information about how to install the cumulative update, see How to Install a Microsoft Dynamics NAV 2015 Cumulative Update.
For information about how to work around a recent process change, see How to Get Back the ‘Hotfix Directories’ from NAV 2015 Cumulative Update 1.
For a list of all cumulative updates for this version, see Released Cumulative Updates for Microsoft Dynamics NAV 2015.
The cumulative update is intended mainly for solutions that are experiencing the problems described in the Knowledge Base article linked to below. However, you are advised to always keep your solution updated with the latest cumulative update. If you are in doubt about whether this cumulative update addresses your specific problem, or if you want to confirm whether any special compatibility, installation, or download issues are associated with this cumulative update, support professionals in Customer Support Services are ready to help you.
For more details see Link :- https://blogs.msdn.microsoft.com/nav/2015/12/07/cumulative-update-14-for-microsoft-dynamics-nav-2015-has-been-released/
Note: You must convert the database if you are upgrading to this cumulative update from a cumulative update earlier than Cumulative Update 9 (build 41779). For more information, see Converting a Database in Help for Microsoft Dynamics NAV.
Note: To enable customized translation of profiles, a number of actions are now available on the Profile List page. You can export and import resource files to enable translation for one or more profiles. The steps to install and uninstall language modules have also been modified. For more information, see How to: Install Language Modules, How to: Uninstall Language Modules, and How to: Export, Edit, and Import Translated Profile Strings in Help for Microsoft Dynamics NAV.
Where to find Cumulative Update 14
You can download the cumulative update from KB 3121037 – Cumulative Update 14 for Microsoft Dynamics NAV 2015 (Build 43887).
Additional Information
For information about how to install the cumulative update, see How to Install a Microsoft Dynamics NAV 2015 Cumulative Update.
For information about how to work around a recent process change, see How to Get Back the ‘Hotfix Directories’ from NAV 2015 Cumulative Update 1.
For a list of all cumulative updates for this version, see Released Cumulative Updates for Microsoft Dynamics NAV 2015.
Sunday, 1 November 2015
Achievments in Oct 2015
Dear Friends,
Today I am not writing any blog, wanted to share status as usually I do in every month as my first post.
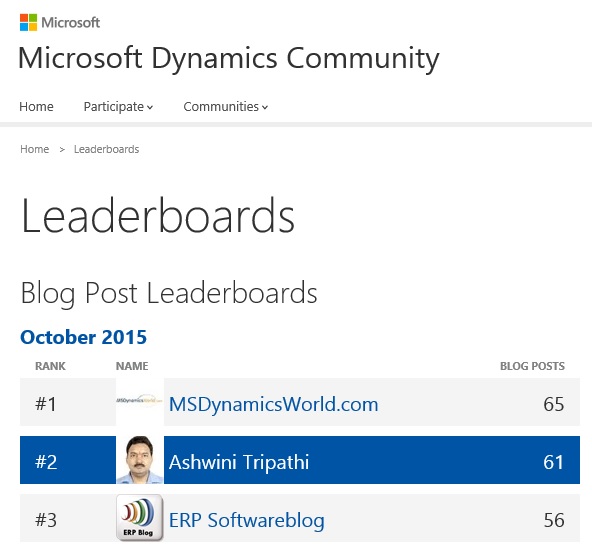
I was awarded with Top 10 Blogger in July month and my Rank was 6, in Aug moved to Rank 3, in Sep slipped to Rank 4 and in this month Oct Ranked to 2.
October was full of excitement as new Version of Navision 2016 was officially released. Lots of new posts from entire blog community was so excited that everyone flooded with new posts on this topic.
I stepped in blogging world 4 months ago, on 27 June 2015 I published my first post.
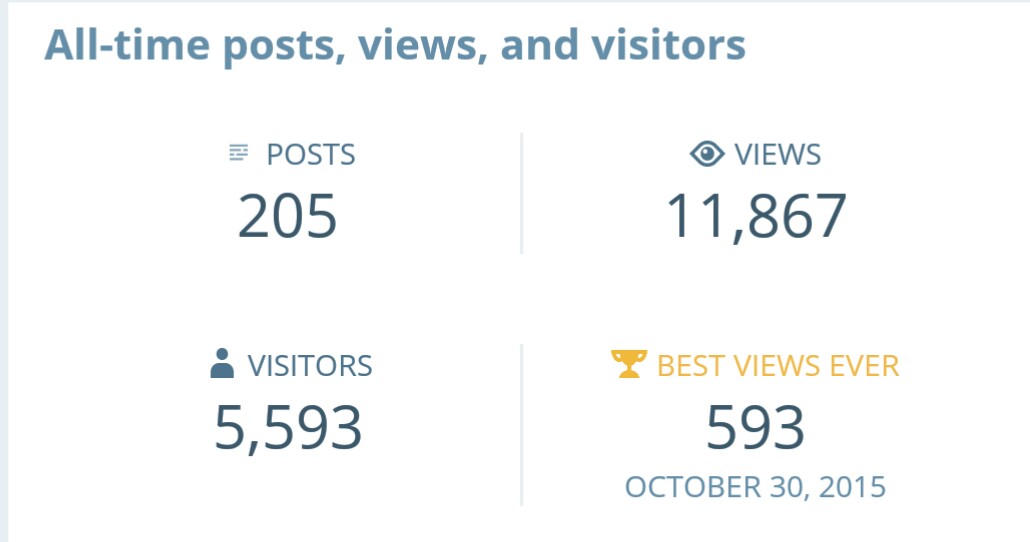
During this period I published almost 205 posts, most of them were more on technical side, Development Tips & Tricks.
Being a technical what I learned in past 10 years want to share with you all.
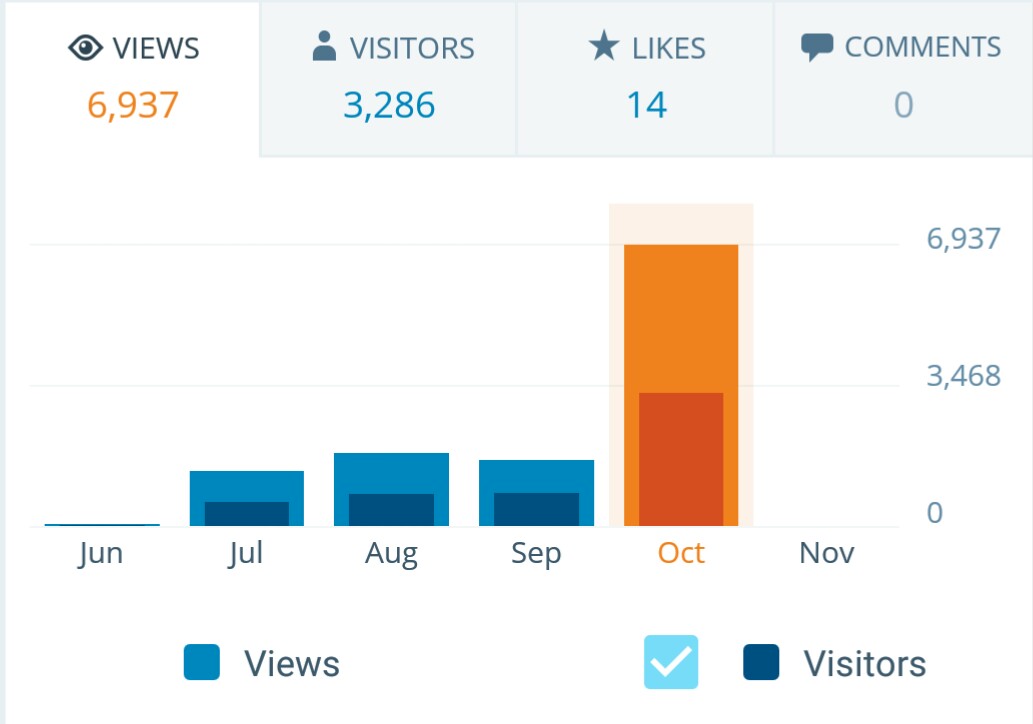
The best thing which happened this month was that my Blog Site crossed 11000 hits almost 12000. Prior to Oct in 3 months total hit was less than alone that it was received itself in this month, Thanks to all of the visitors from bottom of my heart, hope you will keep showering your blessings in future too.
Also my Google+ Page crossed 26000 hits almost 27000.

Stay tuned Follow the blog, Register to Feeds, Like the Facebook Page, Connect with Google + Page, Connect with Dynamics NAV Community, Connect with Twitter and Join on LinkedIn to remain updated about new posts. If you are technical don’t miss to get connected by any medium. I will make sure you keep getting good and useful stuffs.
I have created one Group on LinkedIn also this month started Hike Group , join them so that we can discuss on some good topics where you can participate & are free to express your views and review others view.
Together we can learn from each other, no one is perfect in this world, its never late for learning.
Please participate and suggest topics, which you wish to see on this blog. During this period I received request from many of you and tried to fulfil few requests. Request which yet I have not responded doesn’t mean I am not considering, I will make sure those too get posted at earliest.
After full day hectic schedule hardly I am able to takeout 2 hrs. for this task.
I will keep serving the community on my full strength.
I am speechless how to thank you all showing so much Love and Faith on my Blog.
Seeing your Love and Recognition you all given to me in Oct 2015 month, I am feeling bit emotional today I am not able to stop myself saying below quote

Seeing forward same spirit and love from you all in future too.
It is always good welcoming new ones without losing them who are with you.
See you all via my next post soon.
Today I am not writing any blog, wanted to share status as usually I do in every month as my first post.
I was awarded with Top 10 Blogger in July month and my Rank was 6, in Aug moved to Rank 3, in Sep slipped to Rank 4 and in this month Oct Ranked to 2.
October was full of excitement as new Version of Navision 2016 was officially released. Lots of new posts from entire blog community was so excited that everyone flooded with new posts on this topic.
I stepped in blogging world 4 months ago, on 27 June 2015 I published my first post.
During this period I published almost 205 posts, most of them were more on technical side, Development Tips & Tricks.
Being a technical what I learned in past 10 years want to share with you all.
The best thing which happened this month was that my Blog Site crossed 11000 hits almost 12000. Prior to Oct in 3 months total hit was less than alone that it was received itself in this month, Thanks to all of the visitors from bottom of my heart, hope you will keep showering your blessings in future too.
Also my Google+ Page crossed 26000 hits almost 27000.
Stay tuned Follow the blog, Register to Feeds, Like the Facebook Page, Connect with Google + Page, Connect with Dynamics NAV Community, Connect with Twitter and Join on LinkedIn to remain updated about new posts. If you are technical don’t miss to get connected by any medium. I will make sure you keep getting good and useful stuffs.
I have created one Group on LinkedIn also this month started Hike Group , join them so that we can discuss on some good topics where you can participate & are free to express your views and review others view.
Together we can learn from each other, no one is perfect in this world, its never late for learning.
Please participate and suggest topics, which you wish to see on this blog. During this period I received request from many of you and tried to fulfil few requests. Request which yet I have not responded doesn’t mean I am not considering, I will make sure those too get posted at earliest.
After full day hectic schedule hardly I am able to takeout 2 hrs. for this task.
I will keep serving the community on my full strength.
I am speechless how to thank you all showing so much Love and Faith on my Blog.
Seeing your Love and Recognition you all given to me in Oct 2015 month, I am feeling bit emotional today I am not able to stop myself saying below quote
Seeing forward same spirit and love from you all in future too.
It is always good welcoming new ones without losing them who are with you.
See you all via my next post soon.
Wednesday, 21 October 2015
PowerPivot in Excel 2013
I started the series in End of September and Starting of October on PowerPivot, Power View, PivotTable & Reports but in-between the release of Navision 2016 all the topics got scattered between other posts and I didn’t ended the topic.
Here I present all the posts link at one place which you can use as table of content for easy access and to help if any one wish to start from beginning and learn all the features & Topic on same.
PowerPivot for Excel
Start the Power Pivot in Microsoft Excel add-in
Troubleshooting: Power Pivot Ribbon Disappears
PowerPivot Creating a Data Model in Excel 2013
Adding more tables to the Data Model using Existing Connection – In PowerPivot
Add relationships to Data Model in PowerPivot
How to add Filter for data retrieval in PowerPivot Data model.
Create a calculated column in PowerPivot
Creating My First Report using PowerPivot
Basics of Power Pivot for Excel – 2013
Add Slicers to PivotTables in PowerPivot
Power View in Excel 2013
Import data using copy and paste from Excel sheet or other source for PowerPivot Data Model.
Add Excel Sheet/Table to the PowerPivot Data Model
Add a relationship using Diagram View in Power Pivot
Extend the Data Model using calculated columns
Create a hierarchy in PowerPivot Data Model
Use hierarchies in PivotTables
Create a Power View report
Create a calculated field in PowerPivot
Set field defaults in PowerPivot
Set Table Behaviour in PowerPivot
Set Data Categories for fields in PowerPivot
I will come up with more details once I get some time to explore and find anything which I feel is good to share with the community.
Till then keep Learning, Exploring and Practicing.
Monday, 12 October 2015
Released Cumulative Updates for Microsoft Dynamics NAV 2015
For a list of all cumulative updates for this version, see Released Cumulative Updates for Microsoft Dynamics NAV 2015.
Cumulative Updates for Microsoft Dynamics NAV 2015
Cumulative Updates for Microsoft Dynamics NAV 2015
| Knowledge Base ID | Title | Release date | Build no. | Local versions included |
|---|---|---|---|---|
| 3097767 | Cumulative Update 12 for Microsoft Dynamics NAV 2015 | October, 2015 | 42951 | AT, AU, BE, CH, CZ, DE, DK, ES, FI, FR, IS, IT, NA, NL, NO, NZ, RU, SE, UK |
| 3091812 | Cumulative Update 11 for Microsoft Dynamics NAV 2015 | September, 2015 | 42603 | AT, AU, BE, CH, CZ, DE, DK, ES, FI, FR, IS, IT, NA, NL, NO, NZ, RU, SE, UK |
| 3086434 | Cumulative Update 10 for Microsoft Dynamics NAV 2015 | August, 2015 | 42222 | AT, AU, BE, CH, CZ, DE, DK, ES, FI, FR, IS, IT, NA, NL, NO, NZ, RU, SE, UK |
| 3075726 | Cumulative Update 9 for Microsoft Dynamics NAV 2015 | July, 2015 | 41779 | AT, AU, BE, CH, CZ, DE, DK, ES, FI, FR, IS, IT, NA, NL, NO, NZ, RU, SE, UK |
| 3069272 | Cumulative Update 8 for Microsoft Dynamics NAV 2015 | June, 2015 | 41370 | AT, AU, BE, CH, CZ, DE, DK, ES, FI, FR, IS, IT, NA, NL, NO, NZ, RU, SE, UK |
| 3058000 | Cumulative Update 7 for Microsoft Dynamics NAV 2015 | May, 2015 | 40938 | AT, AU, BE, CH, CZ, DE, DK, ES, FI, FR, IS, IT, NA, NL, NO, NZ, RU, SE, UK |
| 3052226 | Cumulative Update 6 for Microsoft Dynamics NAV 2015 | April, 2015 | 40459 | AT, AU, BE, CH, CZ, DE, DK, ES, FI, FR, IS, IT, NA, NL, NO, NZ, RU, SE, UK |
| 3039824 | Cumulative Update 5 for Microsoft Dynamics NAV 2015 | March, 2015 | 40262 | AT, AU, BE, CH, CZ, DE, DK, ES, FI, FR, IS, IT, NA, NL, NO, NZ, RU, SE, UK |
| 3035986 | Cumulative Update 4 for Microsoft Dynamics NAV 2015 | February, 2015 | 39663 | AT, AU, BE, CH, CZ, DE, DK, ES, FI, FR, IS, IT, NA, NL, NO, NZ, RU, SE, UK |
| 3024901 | Cumulative Update 3 for Microsoft Dynamics NAV 2015 | January, 2015 | 39368 | AT, AU, BE, CH, CZ, DE, DK, ES, FI, FR, IS, IT, NA, NL, NO, NZ, RU, SE, UK |
| 3020885 | Cumulative Update 2 for Microsoft Dynamics NAV 2015 | December, 2014 | 38798 | AT, AU, BE, CH, DE, DK, ES, FI, FR, IS, IT, NA, NL, NO, NZ, RU, SE, UK |
| 3013215 | Cumulative Update 1 for Microsoft Dynamics NAV 2015 | November, 2014 | 38457 | AT, AU, BE, CH, DE, DK, ES, FI, FR, IS, IT, NA, NL, NO, NZ, RU, SE, UK |
Subscribe to:
Posts (Atom)