This cumulative update includes all hotfixes and regulatory features that have been released for Microsoft Dynamics NAV 2016, including hotfixes and regulatory features that were released in previous cumulative updates.
This cumulative update replaces previously released cumulative updates. You should always install the latest cumulative update.
It may be necessary to update your license after implementing this hotfix to gain access to new objects included in this or a previous cumulative update (this only applies to customer licenses).
For a list of cumulative updates released for Microsoft Dynamics NAV 2016, see released cumulative updates for Microsoft Dynamics NAV 2016 (https://support.microsoft.com/kb/3108728/ ) . Cumulative updates are intended for new and existing customers who are running Microsoft Dynamics NAV 2016.
For more details see below link, Partner/Customer Source required.
https://mbs2.microsoft.com/Knowledgebase/kbdisplay.aspx?scid=kb,en-us,3182131
Showing posts with label Nav. Show all posts
Showing posts with label Nav. Show all posts
Sunday, 7 August 2016
Cumulative Update 22 for Microsoft Dynamics NAV 2015 (Build 46580)- Released in Aug 2016
This cumulative update includes all hotfixes and regulatory features that have been released for Microsoft Dynamics NAV 2015, including hotfixes and regulatory features that were released in previous cumulative updates.
Note You must convert the database if you are upgrading to this cumulative update from a cumulative update earlier than cumulative update 9 (build 41779). For more information, see Converting a Database (https://msdn.microsoft.com/en-us/library/dn271650(v=nav.80).aspx) in Help for Microsoft Dynamics NAV.
This cumulative update replaces previously released cumulative updates. You should always install the latest cumulative update.
It may be necessary to update your license after implementing this hotfix to gain access to new objects included in this or a previous cumulative update (this only applies to customer licenses).
For a list of cumulative updates released for Microsoft Dynamics NAV 2015, see released cumulative updates for Microsoft Dynamics NAV 2015 (https://support.microsoft.com/kb/3014609/ ) . Cumulative updates are intended for new and existing customers who are running Microsoft Dynamics NAV 2015.
For more details see below link, Partner/Customer Source required.
https://mbs2.microsoft.com/Knowledgebase/kbdisplay.aspx?scid=kb,en-us,3182130
Cumulative Update 34 for Microsoft Dynamics NAV 2013 R2 (Build 46577)- Released in Aug 2016
This cumulative update includes all hotfixes and regulatory features that have been released for Microsoft Dynamics NAV 2013 R2, including hotfixes and regulatory features that were released in previous cumulative updates.
This Cumulative Update replaces previously released cumulative updates. You should always install the latest cumulative update.
Note Implementing this cumulative update will require a database upgrade.
Licenses versioning
Microsoft Dynamics NAV 2013 R2 cumulative updates and license key versioning:
More details is made available in the October 2014 release of the Microsoft Dynamics Perpetual Licensing Guide.
It may be necessary to update your license after implementing this hotfix to gain access to new objects included in this or a previous cumulative update (this only applies to customer licenses).
For a list of cumulative updates released for Microsoft Dynamics NAV 2013 R2, see released cumulative updates for Microsoft Dynamics NAV 2013 R2 (https://support.microsoft.com/kb/2914930/ ) . For a complete list of all hotfixes released in cumulative updates for Microsoft Dynamics NAV 2013 R2, view the following CustomerSource and PartnerSource pages:
Cumulative updates are intended for new and existing customers who are running Microsoft Dynamics NAV 2013 R2.
For more details see below link Partner/Customer Source required.
https://mbs2.microsoft.com/Knowledgebase/kbdisplay.aspx?scid=kb,en-us,3182128
This Cumulative Update replaces previously released cumulative updates. You should always install the latest cumulative update.
Note Implementing this cumulative update will require a database upgrade.
Licenses versioning
Microsoft Dynamics NAV 2013 R2 cumulative updates and license key versioning:
- Microsoft Dynamics NAV 2013 R2 license keys are backward compatible with Microsoft Dynamics NAV 2013 instances.
- Microsoft Dynamics NAV 2013 license keys may not be used with Microsoft Dynamics NAV 2013 R2 instances. Microsoft Dynamics NAV 2013 license keys will not work with Microsoft Dynamics NAV 2013 R2 CU10 (or later) instances.
- Microsoft Dynamics NAV 2013 and Microsoft Dynamics NAV 2013 R2 license keys are not forward compatible with Microsoft Dynamics NAV 2015 instances.
More details is made available in the October 2014 release of the Microsoft Dynamics Perpetual Licensing Guide.
It may be necessary to update your license after implementing this hotfix to gain access to new objects included in this or a previous cumulative update (this only applies to customer licenses).
For a list of cumulative updates released for Microsoft Dynamics NAV 2013 R2, see released cumulative updates for Microsoft Dynamics NAV 2013 R2 (https://support.microsoft.com/kb/2914930/ ) . For a complete list of all hotfixes released in cumulative updates for Microsoft Dynamics NAV 2013 R2, view the following CustomerSource and PartnerSource pages:
CustomerSource
Overview of Released Application Hotfixes for Microsoft Dynamics NAV 2013 R2 (https://mbs.microsoft.com/customersource/Global/NAV/downloads/hot-fixes/NAV2013R2AppHotfixOverview)
Overview of Released Platform Hotfixes for Microsoft Dynamics NAV 2013 R2 (https://mbs.microsoft.com/customersource/Global/NAV/downloads/hot-fixes/NAV2013R2PlatformHotfixOverview)
PartnerSource
Overview of Released Application Hotfixes for Microsoft Dynamics NAV 2013 R2 (https://mbs.microsoft.com/partnersource/global/deployment/downloads/hot-fixes/NAV2013R2AppHotfixOverview)
Overview of Released Platform Hotfixes for Microsoft Dynamics NAV 2013 R2 (https://mbs.microsoft.com/partnersource/global/deployment/downloads/hot-fixes/NAV2013R2PlatformHotfixOverview)
Cumulative updates are intended for new and existing customers who are running Microsoft Dynamics NAV 2013 R2.
For more details see below link Partner/Customer Source required.
https://mbs2.microsoft.com/Knowledgebase/kbdisplay.aspx?scid=kb,en-us,3182128
Wednesday, 3 August 2016
Save General Journals as Standard Journal in Navision
Do you Know you can save the General Journal as Standard Journal and retrive edit and post it later.
Many of time we pass entries of same Nature, Like Rent, Salary, Bills etc.. just an example you can decide upon which entries you post frequently and club it as Standard Journal to save your time.
You can create once and retrive it every month or when ever required and Post it in future/later.This can serve you as template for future use.
Let us see how we can use this feature.

Open your General Journal.
Make entries which you do oftenly. Don't put Postng Date & Document No. Complete your all entries.
Next we will save this as Standard Journal for future use.
From Action choose Save as Standard Journal.

Give Code & Name for your Journal Template.
If Amounts are fixed every time you can enter them too and while Save choose Save Amount.
No Let us review the entry that we saved.
From Action Choose Get Standard Journal.
This will display you all Saved Standard General Journals.

Select the required Journal Code and Click on Edit.

This is what is Saved in your Standard Journal.
Let use return to the Standard Journal List.
Select desired/ earlier saved Std. Journal and Click on OK.

Confirmation of Std. Journal retrived and Journals created in General Journal Page.
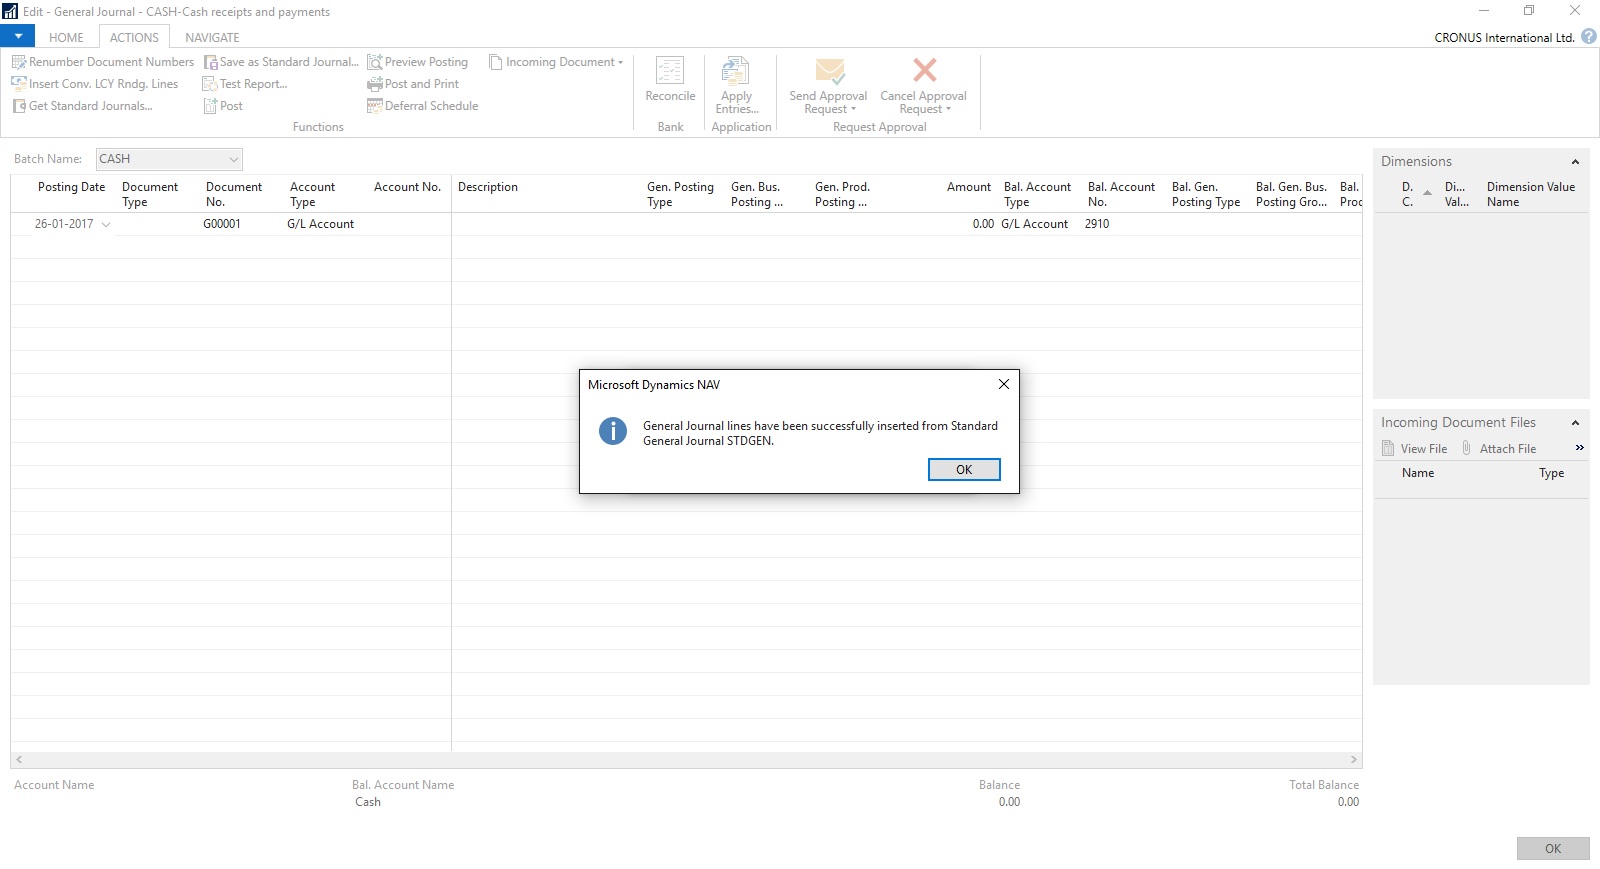
Your General Journal gets populated with values you saved to Std. Journal.
Have you Noticed, Posting Date as your Work Date and Next Document No. from your assigned No. Series is populated Automatically.

Fill the Amount and any other required fields and Post the Journal.
Next time when again you wish to post similar entries just retrive it and continue.
Thats all for todays Post, What you are waiting for give it a try.
I will comeup with more details in my upcoming Posts, till then keep exploring and Learning.
Many of time we pass entries of same Nature, Like Rent, Salary, Bills etc.. just an example you can decide upon which entries you post frequently and club it as Standard Journal to save your time.
You can create once and retrive it every month or when ever required and Post it in future/later.This can serve you as template for future use.
Let us see how we can use this feature.
Open your General Journal.
Make entries which you do oftenly. Don't put Postng Date & Document No. Complete your all entries.
Next we will save this as Standard Journal for future use.
From Action choose Save as Standard Journal.
Give Code & Name for your Journal Template.
If Amounts are fixed every time you can enter them too and while Save choose Save Amount.
No Let us review the entry that we saved.
From Action Choose Get Standard Journal.
This will display you all Saved Standard General Journals.
Select the required Journal Code and Click on Edit.
This is what is Saved in your Standard Journal.
Let use return to the Standard Journal List.
Select desired/ earlier saved Std. Journal and Click on OK.
Confirmation of Std. Journal retrived and Journals created in General Journal Page.
Your General Journal gets populated with values you saved to Std. Journal.
Have you Noticed, Posting Date as your Work Date and Next Document No. from your assigned No. Series is populated Automatically.
Fill the Amount and any other required fields and Post the Journal.
Next time when again you wish to post similar entries just retrive it and continue.
Thats all for todays Post, What you are waiting for give it a try.
I will comeup with more details in my upcoming Posts, till then keep exploring and Learning.
Tuesday, 2 August 2016
Creating Views - to Save Filtered Lists in NAV
Do you Know you can save the Page as View with filters.
Many of time we access to Page and apply same set of Filters to fetch our data. You can save the same for quick retrival of data applying the filters automatically in future access.
You save the Page with Filters as View.
Let us see small example how to achieve it.
First we will open the List Page in my case i am having one customized Customer List.
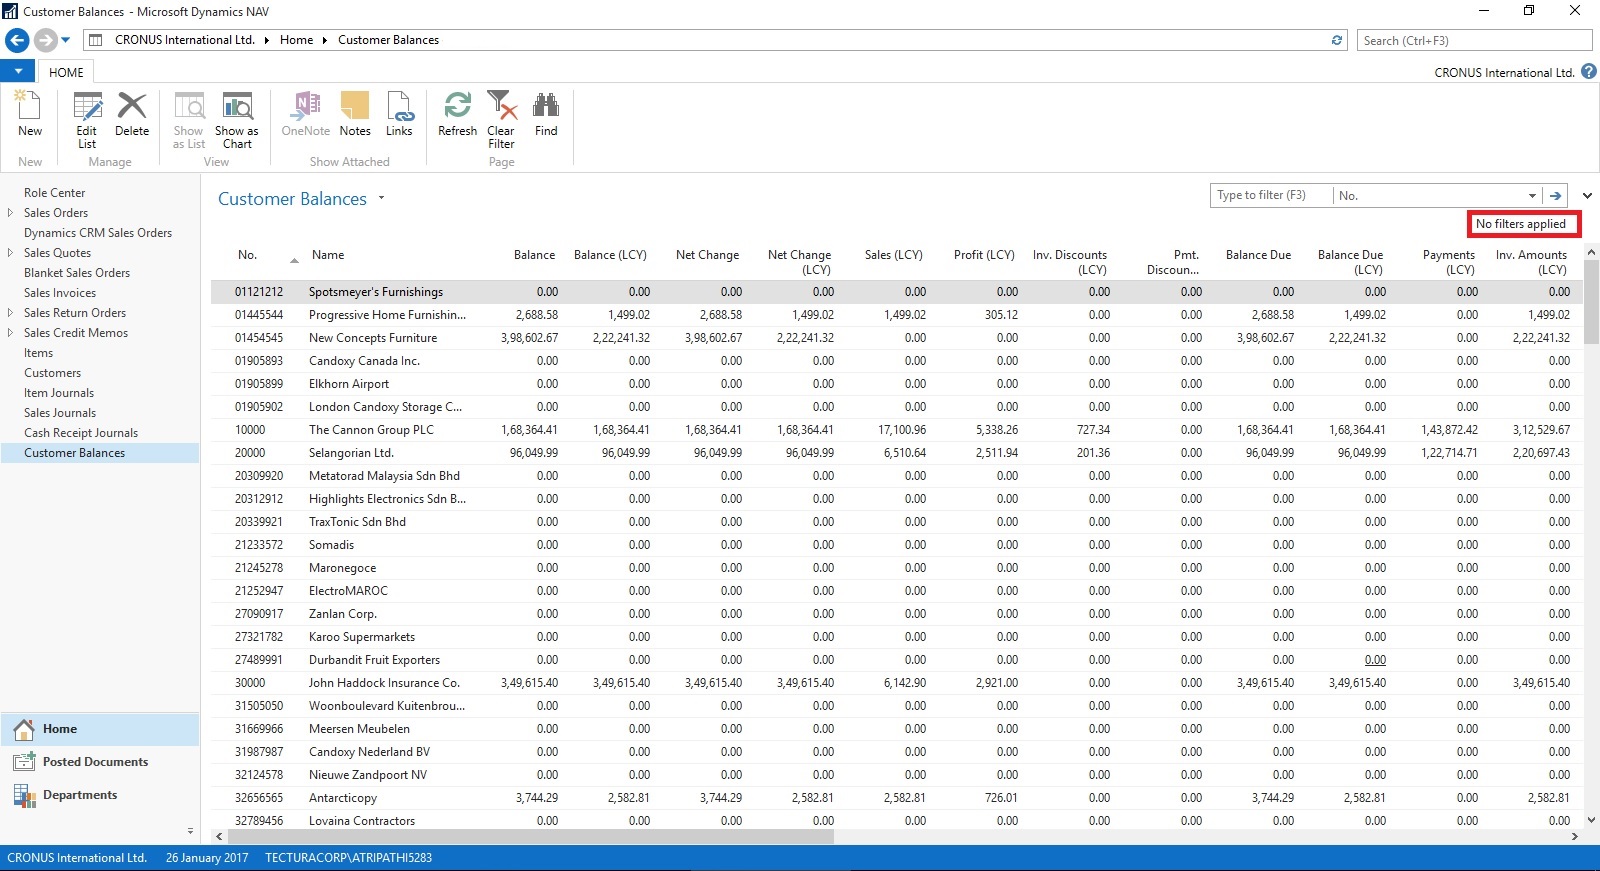
Suppose this is the Page which i use for Balances Retrival each month and on daily basis.
I Enter Filter as Balance > 5000 & Current Month Filter whenever i wish to check balances for my reporting or followup purpose.
For Date Filter i use (-CM..CM) sothat when i open this view next month it takes the appropriate Filter for that month.

Click on the Page Name post applying all the required Filters.
Select Save View as.
Give the Name for the View.
Select the Location to save the View.
On Confirmation respond as Yes.

Your View will be Saved, You can create as much Views as desired using different Filters.

Small and good Feature.
What you are waiting for give it a try.
I will comeup with more information in my upcoming posts, till then keep exploring and learning.
Many of time we access to Page and apply same set of Filters to fetch our data. You can save the same for quick retrival of data applying the filters automatically in future access.
You save the Page with Filters as View.
Let us see small example how to achieve it.
First we will open the List Page in my case i am having one customized Customer List.
Suppose this is the Page which i use for Balances Retrival each month and on daily basis.
I Enter Filter as Balance > 5000 & Current Month Filter whenever i wish to check balances for my reporting or followup purpose.
For Date Filter i use (-CM..CM) sothat when i open this view next month it takes the appropriate Filter for that month.
Click on the Page Name post applying all the required Filters.
Select Save View as.
Give the Name for the View.
Select the Location to save the View.
On Confirmation respond as Yes.
Your View will be Saved, You can create as much Views as desired using different Filters.
Small and good Feature.
What you are waiting for give it a try.
I will comeup with more information in my upcoming posts, till then keep exploring and learning.
Wednesday, 20 July 2016
Open Report Design in Visual Studio from Custom Report Layouts
You may have noticed that when we try to edit Report Layout from Custom Report Layouts Page, it always open in Word or Report Builder no direct option to edit it in Visual Studio.
This requirement leaded to the necessity of the below customization, It can be done other ways also but the easiest way to do it one which i am going to discuss in my today's post. Hope you will like it.

I have provided with the option where user can select the desired Editor either he wants to open it in Report Builder or Visual Studio.
To achieve this i have added one field in Table 9650 - Custom Report Layout with desired options as shown below.

And made this field available in Page Custom Report Layouts - 9650 as shown below.

Now in Codeunit 9652 - Edit RDLC Report Layout I have replaced the code shown in Yellow with the code shown in Red box.


Thats all, what you are waiting for go-ahead and design the reports in your way.
I will come up with more other topics in my upcomming posts, till then keep practicing and learning.
This requirement leaded to the necessity of the below customization, It can be done other ways also but the easiest way to do it one which i am going to discuss in my today's post. Hope you will like it.
I have provided with the option where user can select the desired Editor either he wants to open it in Report Builder or Visual Studio.
To achieve this i have added one field in Table 9650 - Custom Report Layout with desired options as shown below.
And made this field available in Page Custom Report Layouts - 9650 as shown below.
Now in Codeunit 9652 - Edit RDLC Report Layout I have replaced the code shown in Yellow with the code shown in Red box.
Thats all, what you are waiting for go-ahead and design the reports in your way.
I will come up with more other topics in my upcomming posts, till then keep practicing and learning.
Friday, 8 July 2016
Setting different Column Layout for different users
On Community Forum i came across one requirement for opening Page with different column on Page for different users.
Here i have given an demo how can be done, but will require some tweaking to achieve the actual result.
I have copied the Customer List Page and removed extra fields.

I have added one Field above Repeater so that we can decide which format we want to see on screen. User can enter 1/2/or any other value.
I have created two more variables Set1 and Set2 to show/hide fields as per the value entered in SetSelect.
Assigned the Set1 & Set2 to few columns on the Page Fields to Property Visible.
Set1 to Responsibility Center, Location Code & Currency Code.
Set2 to Post Code, Country/Region Code, Phone No. & Fax No.
Added code on OnOpenPage Trigger to select Default page Format when Page is Opened. This code you will modify as per your requirement like check the User and assign the default Value.
Added Code to SetSelect-OnValidate Trigger to select the required format of Page. You need to modify the code as per your requirement.

In this demo if user enter value for SetSelect and you will get different view of same page.
Do some research and design one as per your requirement, this way we need not to create different Pages for different Users. Same Page can serve you different purpose if limited to only different views.
I will come with more information in my upcomming posts.
Till then keep browsing and learning.
Here i have given an demo how can be done, but will require some tweaking to achieve the actual result.
I have copied the Customer List Page and removed extra fields.
I have added one Field above Repeater so that we can decide which format we want to see on screen. User can enter 1/2/or any other value.
I have created two more variables Set1 and Set2 to show/hide fields as per the value entered in SetSelect.
Assigned the Set1 & Set2 to few columns on the Page Fields to Property Visible.
Set1 to Responsibility Center, Location Code & Currency Code.
Set2 to Post Code, Country/Region Code, Phone No. & Fax No.
Added code on OnOpenPage Trigger to select Default page Format when Page is Opened. This code you will modify as per your requirement like check the User and assign the default Value.
Added Code to SetSelect-OnValidate Trigger to select the required format of Page. You need to modify the code as per your requirement.
In this demo if user enter value for SetSelect and you will get different view of same page.
Do some research and design one as per your requirement, this way we need not to create different Pages for different Users. Same Page can serve you different purpose if limited to only different views.
I will come with more information in my upcomming posts.
Till then keep browsing and learning.
Tuesday, 5 July 2016
Cumulative Update 9 for Microsoft Dynamics NAV 2016 - released in July 2016
Cumulative Update 9 includes all application and platform hotfixes and regulatory features that have been released for Microsoft Dynamics NAV 2016.
You can download the cumulative update from KB 3172549 – Cumulative Update 9 for Microsoft Dynamics NAV 2016 (Build 46290).
Before you install a cumulative update in a production environment, take the following precautions:
For information about how to install the cumulative update, see How to Install a Microsoft Dynamics NAV 2016 Cumulative Update.
Note that if you upgrade to this cumulative update from a version older than Microsoft Dynamics NAV 2016 Cumulative Update 6, you must run the development environment with elevated rights (run as administrator).
For a list of all cumulative updates for this version, see Released Cumulative Updates for Microsoft Dynamics NAV 2016.
For more details see Link :https://blogs.msdn.microsoft.com/nav/2016/07/05/cumulative-update-9-for-microsoft-dynamics-nav-2016-has-been-released/
Where to find Cumulative Update 9
You can download the cumulative update from KB 3172549 – Cumulative Update 9 for Microsoft Dynamics NAV 2016 (Build 46290).
Warning
Before you install a cumulative update in a production environment, take the following precautions:
- Test the cumulative update in a non-production environment.
- Make a backup of the system or computer where the cumulative update is to be installed.
Additional Information
For information about how to install the cumulative update, see How to Install a Microsoft Dynamics NAV 2016 Cumulative Update.
Note that if you upgrade to this cumulative update from a version older than Microsoft Dynamics NAV 2016 Cumulative Update 6, you must run the development environment with elevated rights (run as administrator).
For a list of all cumulative updates for this version, see Released Cumulative Updates for Microsoft Dynamics NAV 2016.
For more details see Link :https://blogs.msdn.microsoft.com/nav/2016/07/05/cumulative-update-9-for-microsoft-dynamics-nav-2016-has-been-released/
Cumulative Update 21 for Microsoft Dynamics NAV 2015 - released in July 2016
Cumulative Update 21 includes all application and platform hotfixes and regulatory features that have been released for Microsoft Dynamics NAV 2015.
Note: You must convert the database if you are upgrading to this cumulative update from a cumulative update earlier than Cumulative Update 9 (build 41779). For more information, see Converting a Database in Help for Microsoft Dynamics NAV.
Where to find Cumulative Update 21
You can download the cumulative update from KB 3172546 – Cumulative Update 21 for Microsoft Dynamics NAV 2015 (Build 46293).
Before you install a cumulative update in a production environment, take the following precautions:
For information about how to install the cumulative update, see How to Install a Microsoft Dynamics NAV 2015 Cumulative Update.
For information about how to work around a recent process change, see How to Get Back the ‘Hotfix Directories’ from NAV 2015 Cumulative Update 1.
For a list of all cumulative updates for this version, see Released Cumulative Updates for Microsoft Dynamics NAV 2015.
For more details See this Link : https://blogs.msdn.microsoft.com/nav/2016/07/05/cumulative-update-21-for-microsoft-dynamics-nav-2015-has-been-released/
Note: You must convert the database if you are upgrading to this cumulative update from a cumulative update earlier than Cumulative Update 9 (build 41779). For more information, see Converting a Database in Help for Microsoft Dynamics NAV.
Where to find Cumulative Update 21
You can download the cumulative update from KB 3172546 – Cumulative Update 21 for Microsoft Dynamics NAV 2015 (Build 46293).
Warning
Before you install a cumulative update in a production environment, take the following precautions:
- Test the cumulative update in a non-production environment.
- Make a backup of the system or computer where the cumulative update is to be installed.
Additional Information
For information about how to install the cumulative update, see How to Install a Microsoft Dynamics NAV 2015 Cumulative Update.
For information about how to work around a recent process change, see How to Get Back the ‘Hotfix Directories’ from NAV 2015 Cumulative Update 1.
For a list of all cumulative updates for this version, see Released Cumulative Updates for Microsoft Dynamics NAV 2015.
For more details See this Link : https://blogs.msdn.microsoft.com/nav/2016/07/05/cumulative-update-21-for-microsoft-dynamics-nav-2015-has-been-released/
Cumulative Update 33 for Microsoft Dynamics NAV 2013 R2 - released in July 2016
Cumulative Update 33 includes all application and platform hotfixes and regulatory features that have been released for Microsoft Dynamics NAV 2013 R2.
Note: Implementing this cumulative update will require a database upgrade.
You can download the cumulative update from KB 3172538 – Cumulative Update 33 for Microsoft Dynamics NAV 2013 R2 (Build 46296).
Before you install a cumulative update in a production environment, take the following precautions:
For more information about cumulative updates for this version, see Announcement of update rollups for Microsoft Dynamics NAV 2013 R2.
For a list of all cumulative updates for this version, see Released Cumulative Updates for Microsoft Dynamics NAV 2013 R2.
For a list of all hotfixes included in cumulative updates for this version, see the following CustomerSource and PartnerSource pages:
CustomerSource:
PartnerSource
See this Link for more details : https://blogs.msdn.microsoft.com/nav/2016/07/05/cumulative-update-33-for-microsoft-dynamics-nav-2013-r2-has-been-released/
Note: Implementing this cumulative update will require a database upgrade.
Where to find Cumulative Update 33
You can download the cumulative update from KB 3172538 – Cumulative Update 33 for Microsoft Dynamics NAV 2013 R2 (Build 46296).
Warning
Before you install a cumulative update in a production environment, take the following precautions:
- Test the cumulative update in a non-production environment.
- Make a backup of the system or computer where the cumulative update is to be installed.
Additional Information
For more information about cumulative updates for this version, see Announcement of update rollups for Microsoft Dynamics NAV 2013 R2.
For a list of all cumulative updates for this version, see Released Cumulative Updates for Microsoft Dynamics NAV 2013 R2.
For a list of all hotfixes included in cumulative updates for this version, see the following CustomerSource and PartnerSource pages:
CustomerSource:
- Overview of Released Application Hotfixes for Microsoft Dynamics NAV 2013 R2
- Overview of Released Platform Hotfixes for Microsoft Dynamics NAV 2013 R2
PartnerSource
- Overview of Released Application Hotfixes for Microsoft Dynamics NAV 2013 R2
- Overview of Released Platform Hotfixes for Microsoft Dynamics NAV 2013 R2
See this Link for more details : https://blogs.msdn.microsoft.com/nav/2016/07/05/cumulative-update-33-for-microsoft-dynamics-nav-2013-r2-has-been-released/
Cumulative Update 40 for Microsoft Dynamics NAV 2013 - released in July 2016
Cumulative Update 40 includes all application and platform hotfixes and regulatory features that have been released for Microsoft Dynamics NAV 2013.
You can download the cumulative update from KB 3172331 – Cumulative Update 40 for Microsoft Dynamics NAV 2013 (Build 46292).
Before you install a cumulative update in a production environment, take the following precautions:
For a list of all cumulative updates for this version, see Released Cumulative Updates for Microsoft Dynamics NAV 2013.
For a list of all hotfixes included in cumulative updates for this version, see the following CustomerSource and PartnerSource pages:
CustomerSource:
PartnerSource:
Please See this link for more details :- https://blogs.msdn.microsoft.com/nav/2016/07/05/cumulative-update-40-for-microsoft-dynamics-nav-2013-has-been-released/
Where to find Cumulative Update 40
You can download the cumulative update from KB 3172331 – Cumulative Update 40 for Microsoft Dynamics NAV 2013 (Build 46292).
Warning
Before you install a cumulative update in a production environment, take the following precautions:
- Test the cumulative update in a non-production environment.
- Make a backup of the system or computer where the cumulative update is to be installed.
Additional Information
For a list of all cumulative updates for this version, see Released Cumulative Updates for Microsoft Dynamics NAV 2013.
For a list of all hotfixes included in cumulative updates for this version, see the following CustomerSource and PartnerSource pages:
CustomerSource:
- Overview of Released Application Hotfixes for Microsoft Dynamics NAV 2013
- Overview of Released Platform Hotfixes for Microsoft Dynamics NAV 2013
PartnerSource:
- Overview of Released Application Hotfixes for Microsoft Dynamics NAV 2013
- Overview of Released Platform Hotfixes for Microsoft Dynamics NAV 2013
Please See this link for more details :- https://blogs.msdn.microsoft.com/nav/2016/07/05/cumulative-update-40-for-microsoft-dynamics-nav-2013-has-been-released/
Sunday, 19 June 2016
Create Production Orders for/from Sales Order
One of my reader have requested to demonstrate how he can create Sales Order which is directly associated with Sales Order.
Let us start with creating a Sales Order:
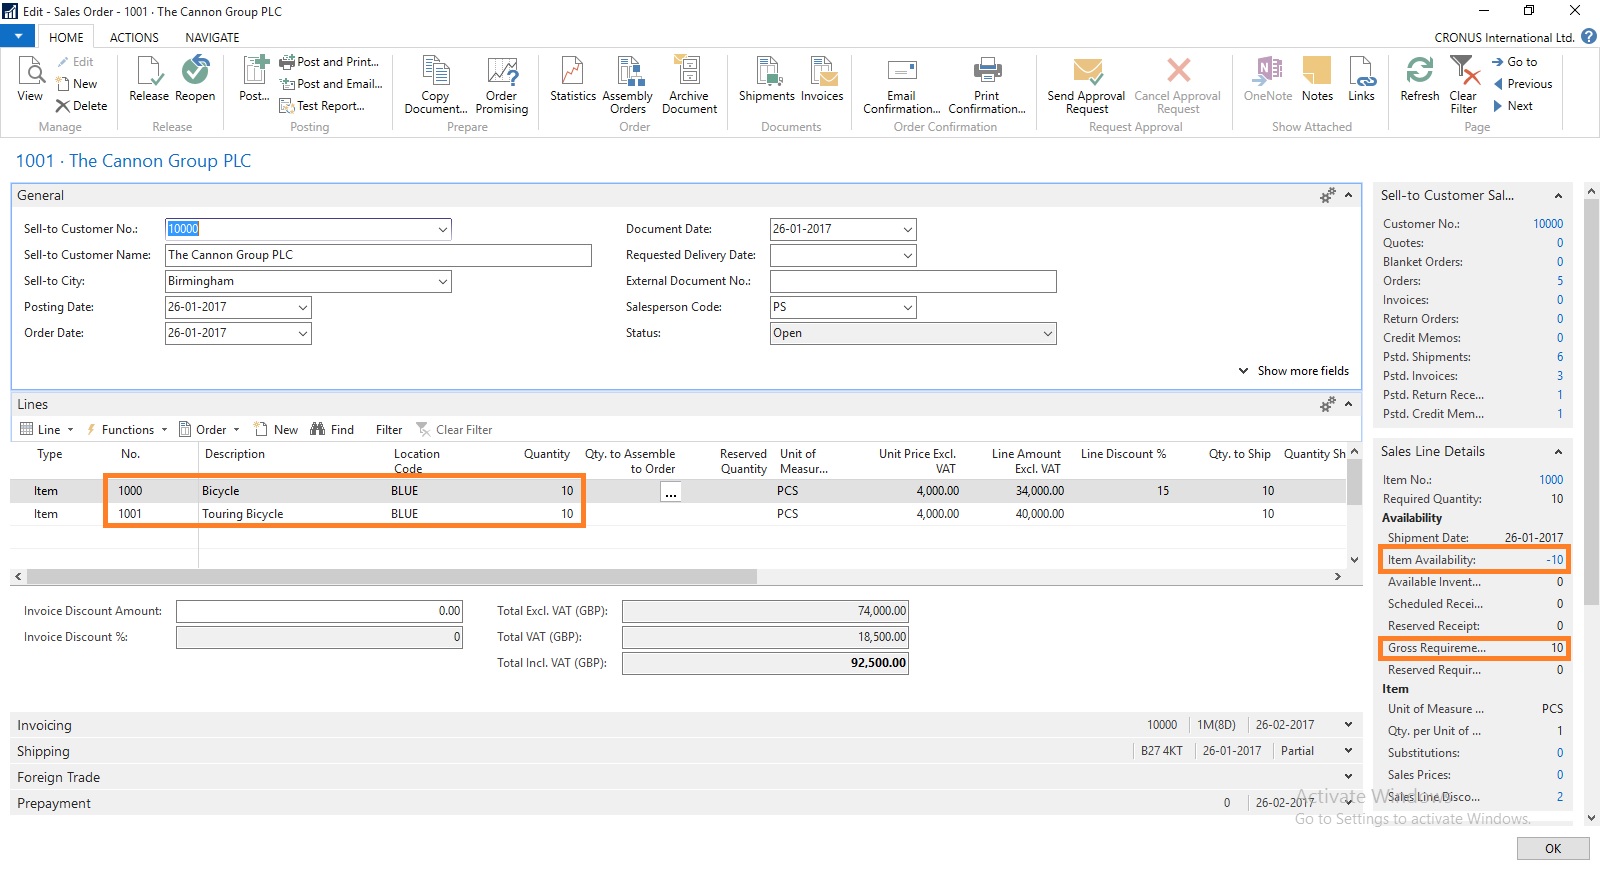
Here you can see we don’t have Available Inventory to fulfil the demand of this Order.
To fulfil the demand we will create Production Order for this Order.
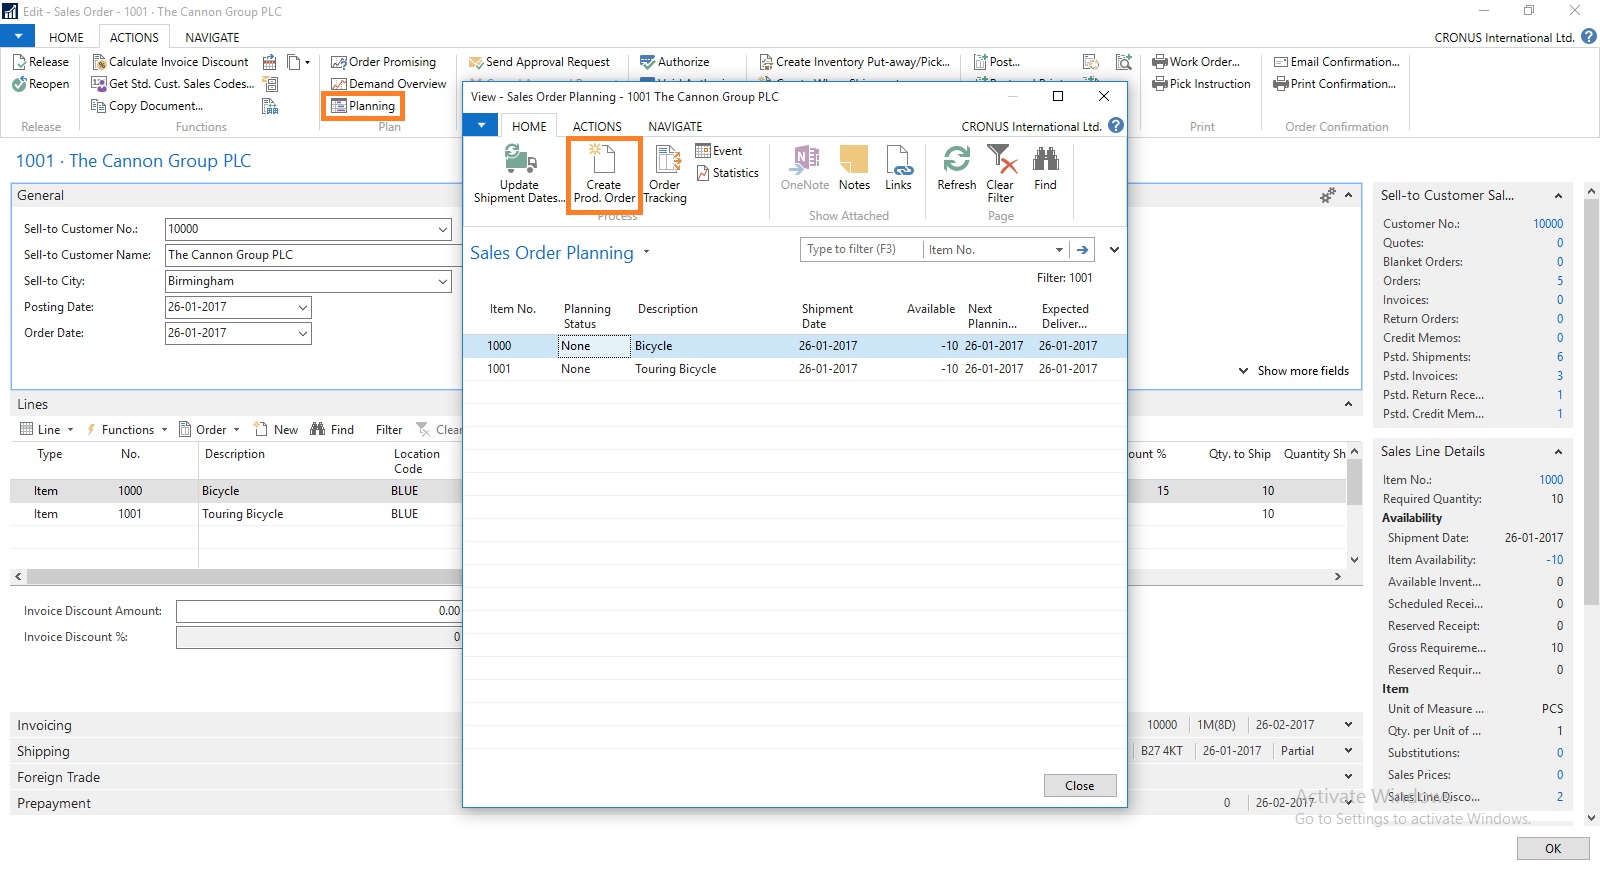
Select Planning from Action TAB on Ribbon.
Sales Order Planning Window Opens, Select Create Production Order.
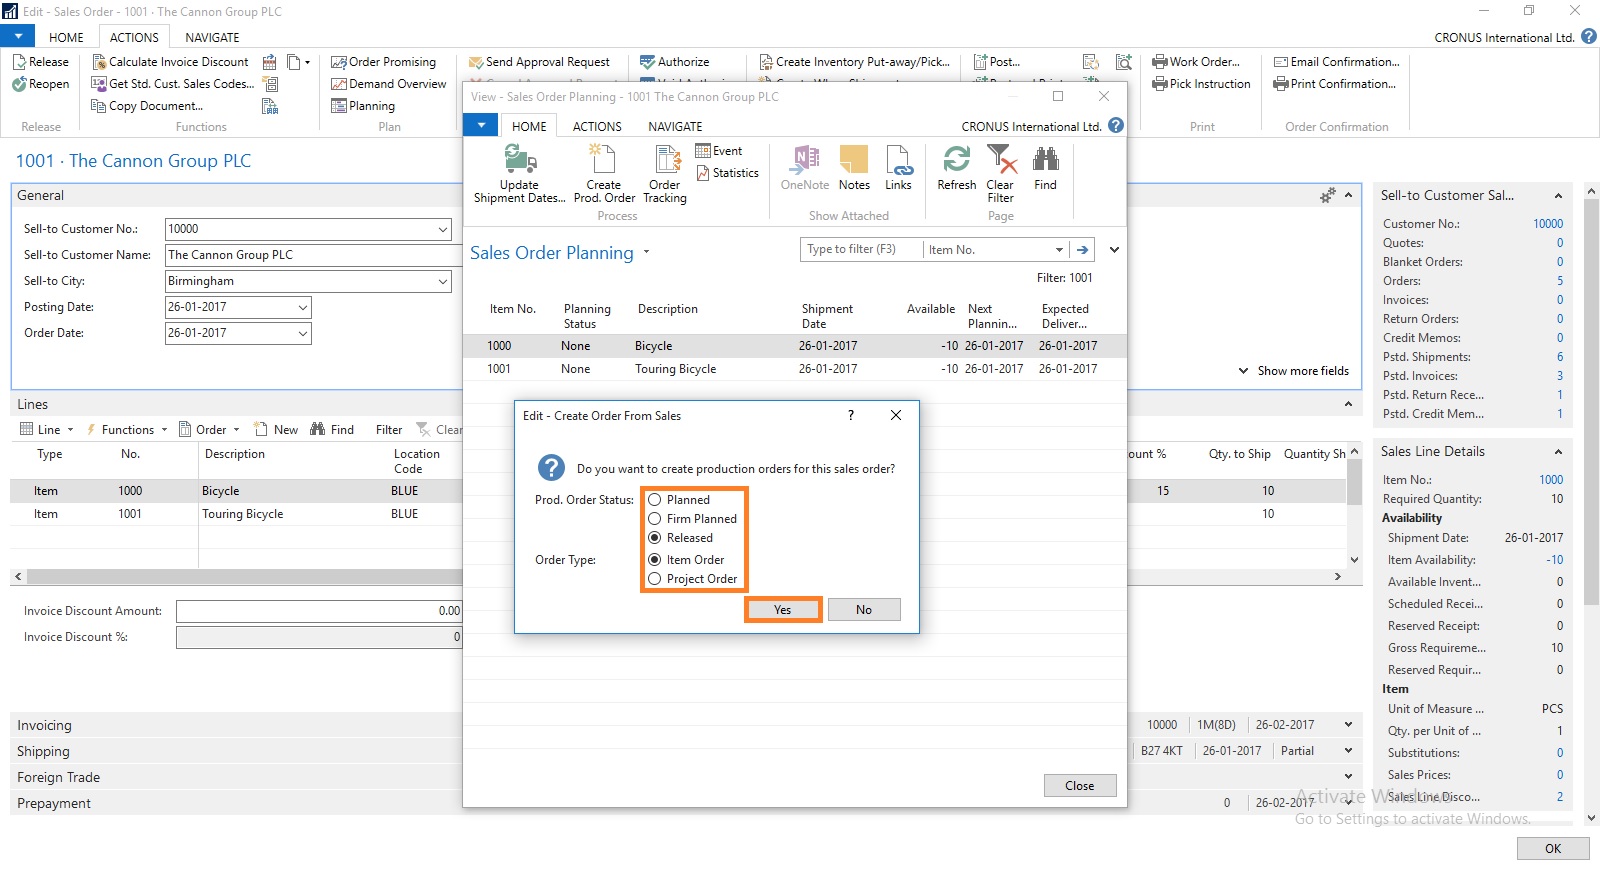
Select the Status for Production Order as desired.
For Order Type you have 2 Options
Select the desired option and respond to Yes.

I have Selected Released & Project Order in my case.
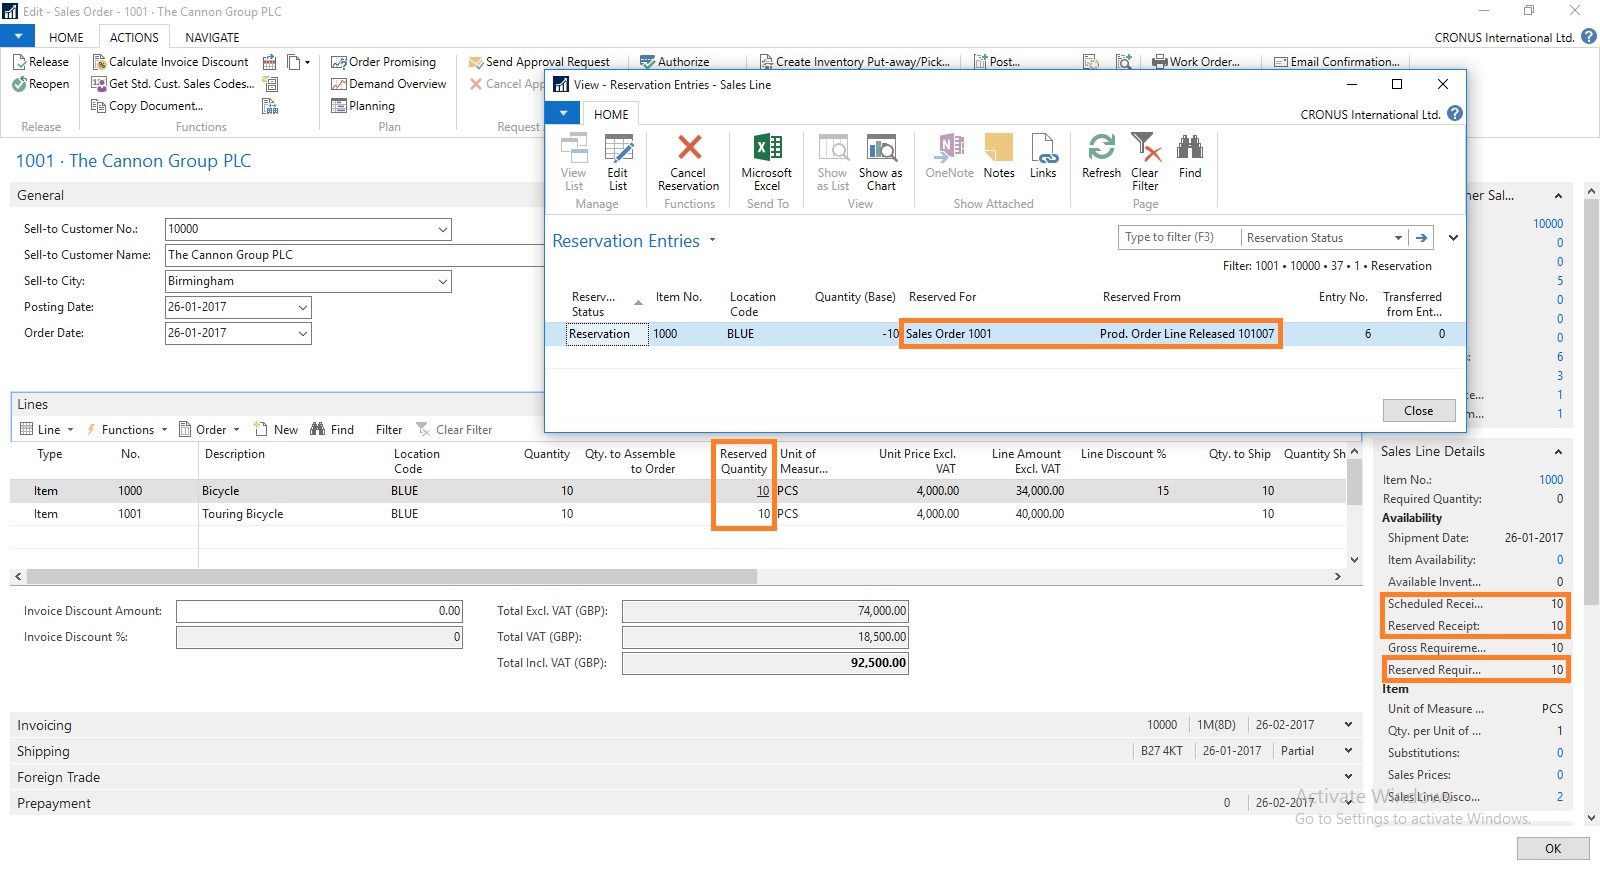
You can check that Quantity to be produced is reserved for this Order.
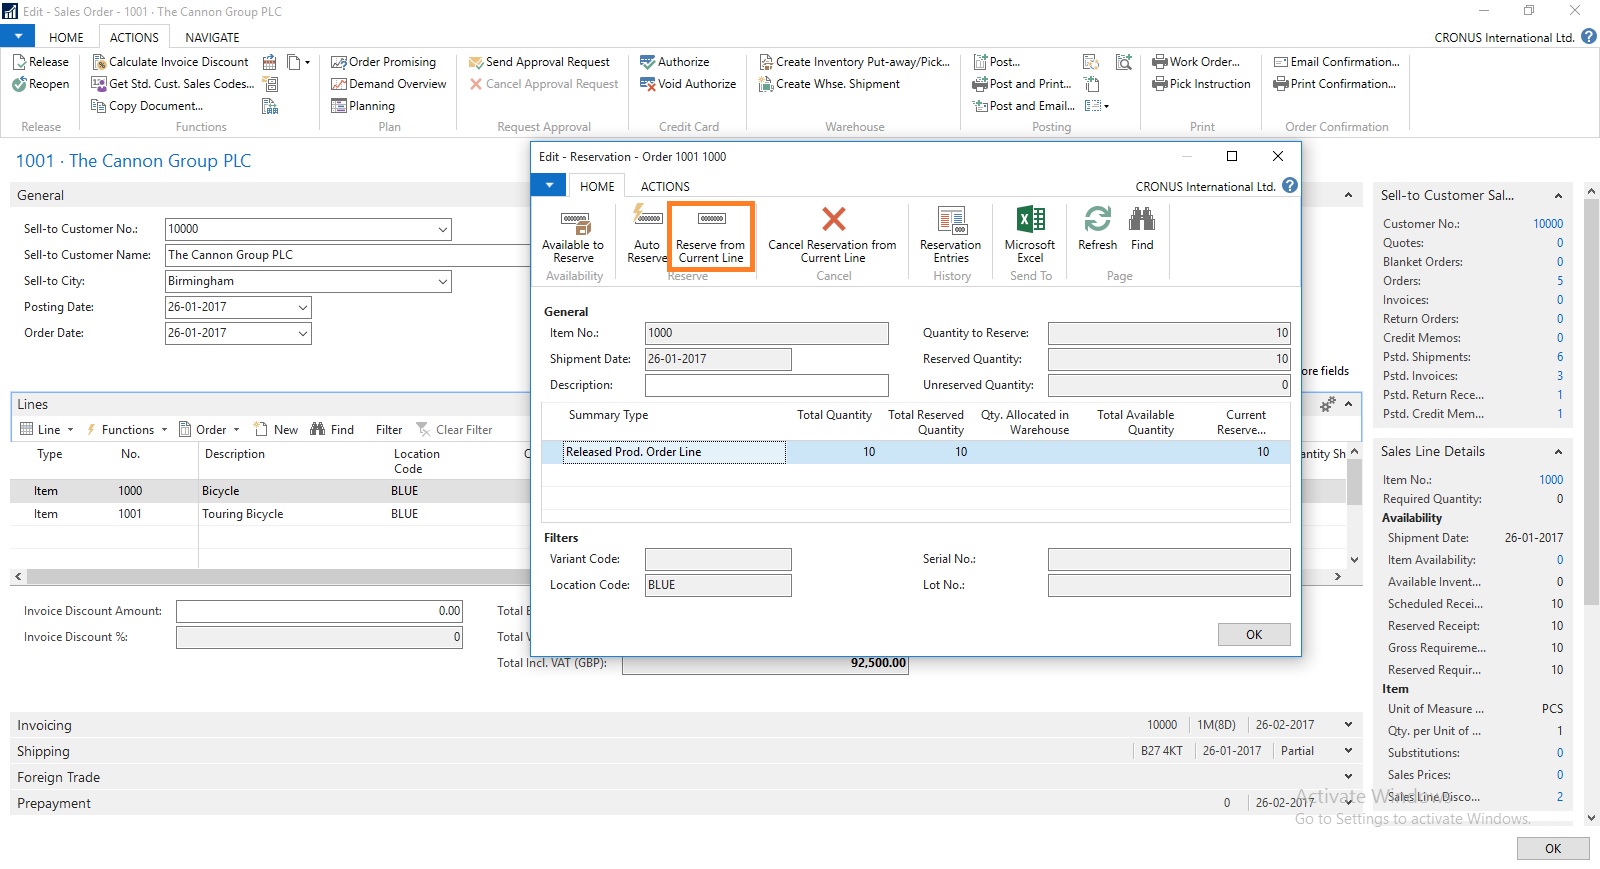
There could be the situation where you may have few Inventory available, in that case you need to reserve the quantity from Function before creating Production Order else all quantity will be created. In other case only short quantity will be a quantity of Production Order.

Select the line from available lines in Item Ledger Entries (e.g. on hand inventory) and by using the ‘Reserve from Current Line’ function you can reserve those against the sales order line. The ‘Reserved Quantity’ then gets updated and you can see the rest in the ‘Unreserved Quantity’ field.
Although in this case entire line is already reserved from the Production Order.
But in case you want to reserve from any available Inventory in hand from Ledger entry.
This was one of the way how you can perform Creating Production Order and Reserving for Sales Order.
We can do the same by another way as below, directly creating Production Order for this Sales Order.
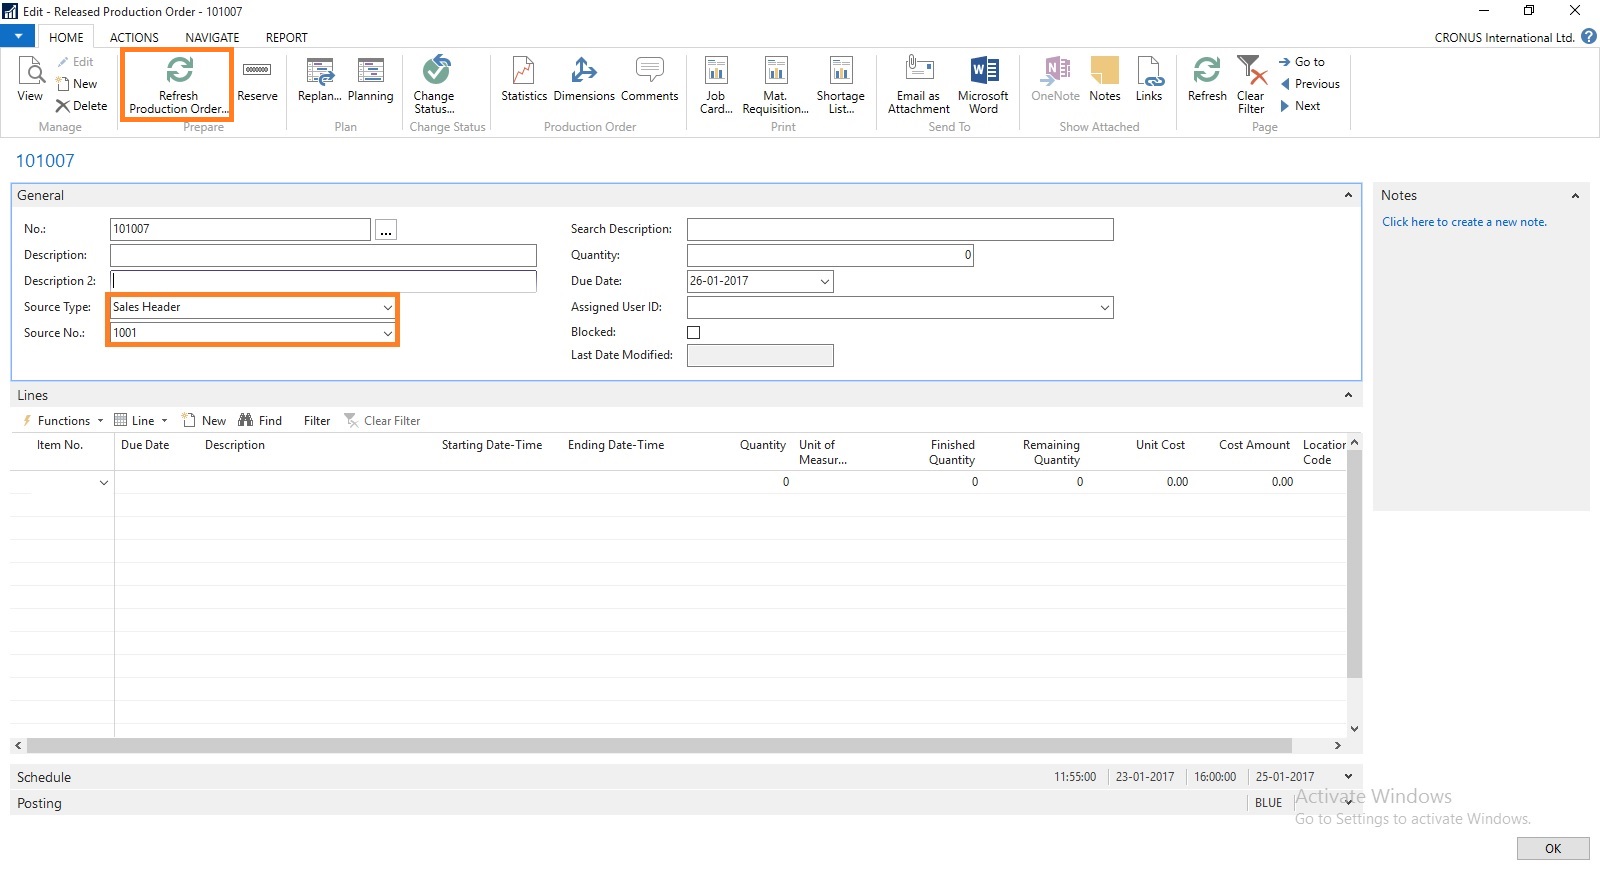
Create a Production Order Select Source Type as Sales Header and Source No as Sales Order No.
Then Refresh the Production Order.


This way we can create and Reserve the Item for required demand.
I will come with more details in my upcoming posts.
Let us start with creating a Sales Order:
Here you can see we don’t have Available Inventory to fulfil the demand of this Order.
To fulfil the demand we will create Production Order for this Order.
Select Planning from Action TAB on Ribbon.
Sales Order Planning Window Opens, Select Create Production Order.
Select the Status for Production Order as desired.
For Order Type you have 2 Options
- Item Order – Production Order is created for each Item on Lines
- Project Order – Single Production order for Entire Order
Select the desired option and respond to Yes.
I have Selected Released & Project Order in my case.
You can check that Quantity to be produced is reserved for this Order.
There could be the situation where you may have few Inventory available, in that case you need to reserve the quantity from Function before creating Production Order else all quantity will be created. In other case only short quantity will be a quantity of Production Order.
Select the line from available lines in Item Ledger Entries (e.g. on hand inventory) and by using the ‘Reserve from Current Line’ function you can reserve those against the sales order line. The ‘Reserved Quantity’ then gets updated and you can see the rest in the ‘Unreserved Quantity’ field.
Although in this case entire line is already reserved from the Production Order.
But in case you want to reserve from any available Inventory in hand from Ledger entry.
This was one of the way how you can perform Creating Production Order and Reserving for Sales Order.
We can do the same by another way as below, directly creating Production Order for this Sales Order.
Create a Production Order Select Source Type as Sales Header and Source No as Sales Order No.
Then Refresh the Production Order.
This way we can create and Reserve the Item for required demand.
I will come with more details in my upcoming posts.
Sunday, 12 June 2016
Basics of Demand, Forecast, MPS & MRP
What is MPS?
MPS term is used for Master Production Schedule. It is used to plan items which have direct demand. Like Sales Order, Service Orders and Forecasts. It is run Weekly based on Orders and forecasts for that period.
What is MRP?
MRP term is used for Material Requirements Planning. It is used to plan items which have dependent demand. Like sub items used to produce FG or are defined in BOM. It is run Daily to expedit parts required to produce the plan.
What is Forecast?
Forecasting allows your company to create "what if" scenarios and efficiently and cost-effectively plan for and meet demand. Accurate forecasting can make a critical difference in customer satisfaction levels with regard to order promising dates and on-time delivery.
The forecasting functionality in the program can be used to create sales or production forecasts, in combination or independently.
What is Demand?
Calculation is done order-by-order, meaning that the order that includes the demand line with the earliest due date or shipment date is considered first, and all other demand lines in that production order, irrespective of their individual due dates or shipment dates, are also calculated for that order. When the calculation is completed, all unfulfilled demand is displayed as planning lines, sorted by the earliest demand date, with the various quantity fields filled in.
Actual demand is calculated from Sales Order, Service Orders, Components Needed, Job Planning Lines.
This demand is compared with the Forcasted demands like defined in Production Forecast.
Regenerative Plan is calculated as per Period, MPS, MRP and other provided parameters.
Lets understand this via a simple Example:
Step-1
Define Forecast for Item A as requirement of 1000 Qty for Jan Month.
Step -2
Run the Regenerative Plan, you will get the Planning for Item A with due date as 1st Jan of 1000 Qty.
Let us see what happens under different demand levels.
Scenario-1
When demand is less than Forecast for the month.
Let us Make a Sales Order for 200 Qty of Item A.
Lets see the impact of this on our Plan.
If we run our Plan 2 lines will be created as below
a) 200 Qty with due date equivalent to Sales Order date
b) 800 Qty with due date as 1st Jan from Forecast
Scenario-2
When demand is equal to Forecast for the month.
Let us Make a Sales Order for 1000 Qty of Item A.
Lets see the impact of this on our Plan.
If we run our Plan 1 line will be created as below
a) 1000 Qty with due date equivalent to Sales Order date
Scenario-3
When demand is greater than Forecast for the month.
Let us Make a Sales Order for 1500 Qty of Item A.
Lets see the impact of this on our Plan.
If we run our Plan 1 line will be created as below
a) 1500 Qty with due date equivalent to Sales Order date
Will comeup with more details in my upcomming posts.
MPS term is used for Master Production Schedule. It is used to plan items which have direct demand. Like Sales Order, Service Orders and Forecasts. It is run Weekly based on Orders and forecasts for that period.
What is MRP?
MRP term is used for Material Requirements Planning. It is used to plan items which have dependent demand. Like sub items used to produce FG or are defined in BOM. It is run Daily to expedit parts required to produce the plan.
What is Forecast?
Forecasting allows your company to create "what if" scenarios and efficiently and cost-effectively plan for and meet demand. Accurate forecasting can make a critical difference in customer satisfaction levels with regard to order promising dates and on-time delivery.
The forecasting functionality in the program can be used to create sales or production forecasts, in combination or independently.
What is Demand?
Calculation is done order-by-order, meaning that the order that includes the demand line with the earliest due date or shipment date is considered first, and all other demand lines in that production order, irrespective of their individual due dates or shipment dates, are also calculated for that order. When the calculation is completed, all unfulfilled demand is displayed as planning lines, sorted by the earliest demand date, with the various quantity fields filled in.
Actual demand is calculated from Sales Order, Service Orders, Components Needed, Job Planning Lines.
This demand is compared with the Forcasted demands like defined in Production Forecast.
Regenerative Plan is calculated as per Period, MPS, MRP and other provided parameters.
Lets understand this via a simple Example:
Step-1
Define Forecast for Item A as requirement of 1000 Qty for Jan Month.
Step -2
Run the Regenerative Plan, you will get the Planning for Item A with due date as 1st Jan of 1000 Qty.
Let us see what happens under different demand levels.
Scenario-1
When demand is less than Forecast for the month.
Let us Make a Sales Order for 200 Qty of Item A.
Lets see the impact of this on our Plan.
Sales demand is for 200 Qty
Forecast demand will be for 800 Qty (1000 - 200)
Actual demand in this case is of 200 Qty
If we run our Plan 2 lines will be created as below
a) 200 Qty with due date equivalent to Sales Order date
b) 800 Qty with due date as 1st Jan from Forecast
If we see our Total demand is still 1000 Qty
Scenario-2
When demand is equal to Forecast for the month.
Let us Make a Sales Order for 1000 Qty of Item A.
Lets see the impact of this on our Plan.
Sales demand is for 1000 Qty
Forecast demand will be for 0 Qty (1000 - 1000)
Actual demand in this case is of 1000 Qty
If we run our Plan 1 line will be created as below
a) 1000 Qty with due date equivalent to Sales Order date
If we see our Total demand is still 1000 Qty
Scenario-3
When demand is greater than Forecast for the month.
Let us Make a Sales Order for 1500 Qty of Item A.
Lets see the impact of this on our Plan.
Sales demand is for 1500 Qty
Forecast demand will be for 0 Qty
Actual demand in this case is of 1500 Qty
If we run our Plan 1 line will be created as below
a) 1500 Qty with due date equivalent to Sales Order date
If we see our Total demand is now 1500 Qty
Will comeup with more details in my upcomming posts.
Saturday, 11 June 2016
How Inventory is Calculated in Navision 2016
Today we will see terms used for Inventory and how Inventory is calculated in Navision.
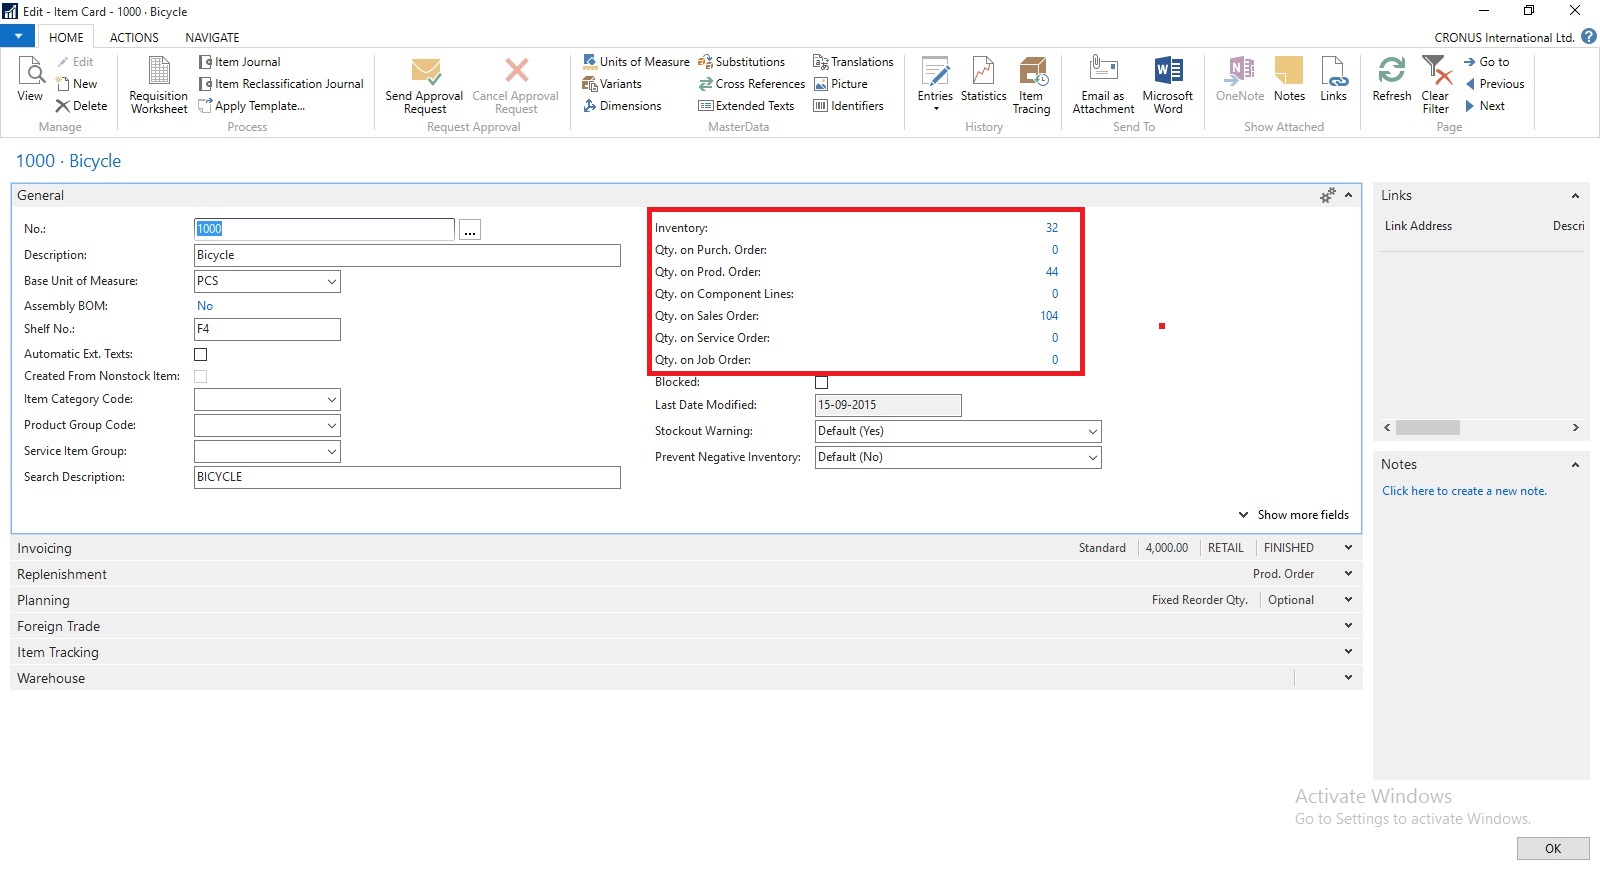
You can find details of Inventory on Item Card itself. Also how much Inventory is available or required at different area in ERP.
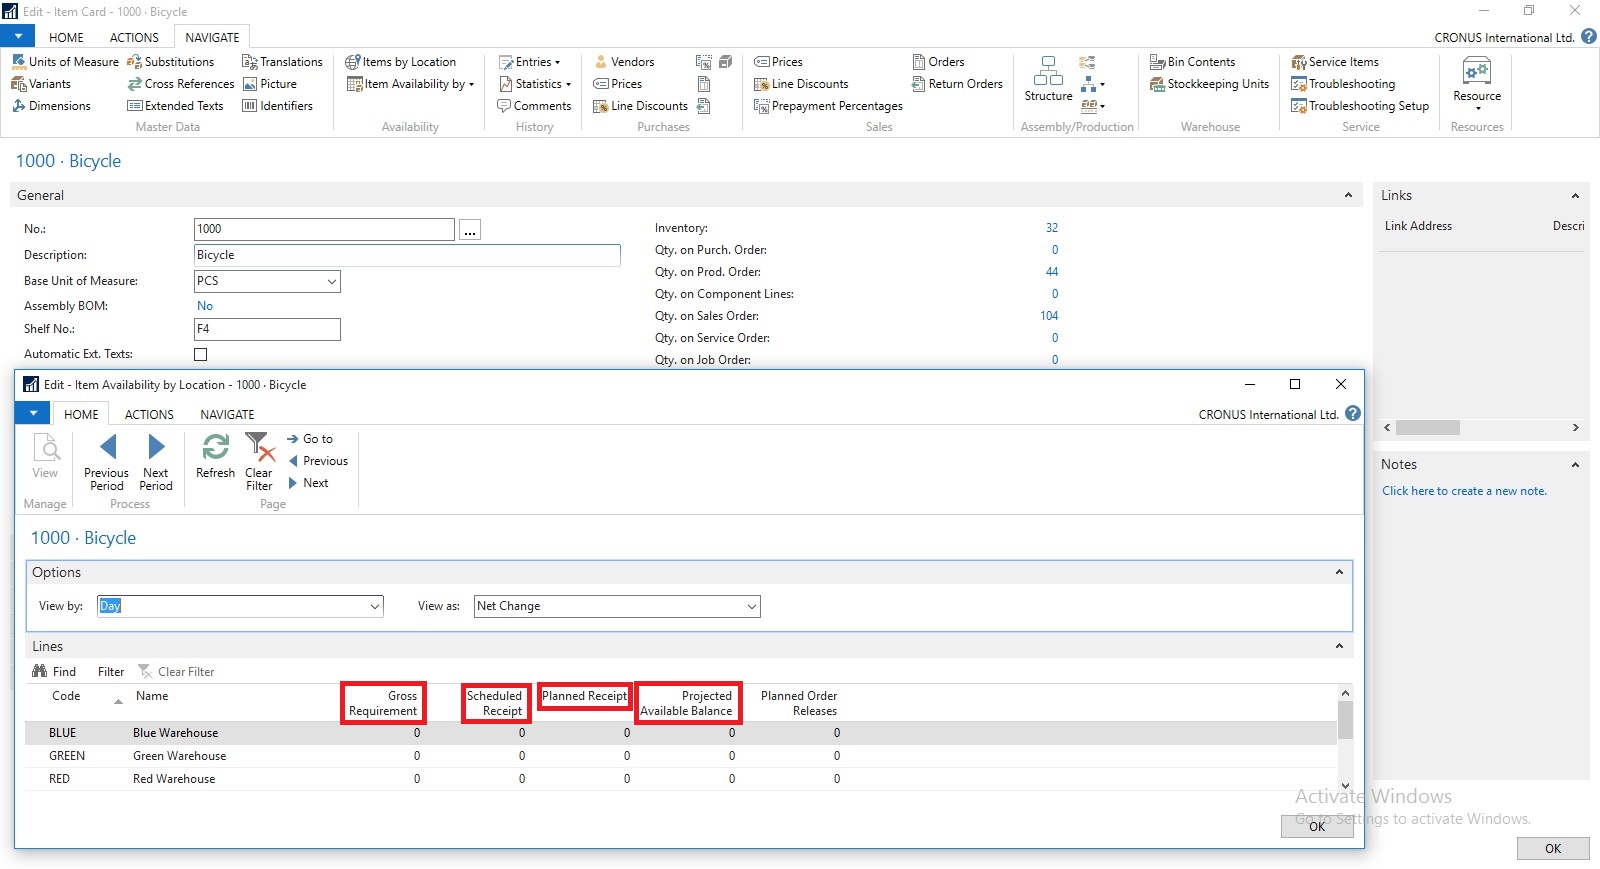
If you open Item Availability by Location you will find in more details. When you drilldown you can find in more details from where these figure comes from.
Scheduled Receipts:
Here all the entries from below area is included:
How Navision calculates?
AvailType::"Scheduled Order Receipt":
BEGIN
InsertEntry(DATABASE::"Purchase Line",Item.FIELDNO("Qty. on Purch. Order"),PurchLine.TABLECAPTION,Item."Qty. on Purch. Order");
InsertEntry(DATABASE::"Prod. Order Line",Item.FIELDNO("FP Order Receipt (Qty.)"),STRSUBSTNO(Text002,ProdOrderLine.TABLECAPTION),Item."FP Order Receipt (Qty.)");
InsertEntry(DATABASE::"Prod. Order Line",Item.FIELDNO("Rel. Order Receipt (Qty.)"),STRSUBSTNO(Text003,ProdOrderLine.TABLECAPTION),Item."Rel. Order Receipt (Qty.)");
InsertEntry(DATABASE::"Transfer Line",Item.FIELDNO("Qty. in Transit"),Item.FIELDCAPTION("Qty. in Transit"),Item."Qty. in Transit");
InsertEntry(DATABASE::"Transfer Line",Item.FIELDNO("Trans. Ord. Receipt (Qty.)"),Item.FIELDCAPTION("Trans. Ord. Receipt (Qty.)"),Item."Trans. Ord. Receipt (Qty.)");
InsertEntry(DATABASE::"Sales Line",0,SalesLine.TABLECAPTION,Item."Qty. on Sales Return");
InsertEntry(DATABASE::"Assembly Header",Item.FIELDNO("Qty. on Assembly Order"),AssemblyHeader.TABLECAPTION,Item."Qty. on Assembly Order");
END;
Planned Receipts:
Here all the entries from below area is included:
How Navision calculates?
AvailType::"Planned Order Receipt":
BEGIN
InsertEntry(DATABASE::"Requisition Line",Item.FIELDNO("Purch. Req. Receipt (Qty.)"),ReqLine.TABLECAPTION,Item."Purch. Req. Receipt (Qty.)");
InsertEntry(DATABASE::"Prod. Order Line",Item.FIELDNO("Planned Order Receipt (Qty.)"),STRSUBSTNO(Text000,ProdOrderLine.TABLECAPTION),Item."Planned Order Receipt (Qty.)");
END;
Gross Requirement:
Here all the entries from below area is included:
How Navision calculates?
AvailType::"Gross Requirement":
BEGIN
InsertEntry(DATABASE::"Sales Line",Item.FIELDNO("Qty. on Sales Order"),SalesLine.TABLECAPTION,Item."Qty. on Sales Order");
InsertEntry(DATABASE::"Service Line",Item.FIELDNO("Qty. on Service Order"),ServLine.TABLECAPTION,Item."Qty. on Service Order");
InsertEntry(DATABASE::"Job Planning Line",Item.FIELDNO("Qty. on Job Order"),JobPlanningLine.TABLECAPTION,Item."Qty. on Job Order");
InsertEntry(DATABASE::"Prod. Order Component",Item.FIELDNO("Scheduled Need (Qty.)"),ProdOrderComp.TABLECAPTION,Item."Scheduled Need (Qty.)");
InsertEntry(DATABASE::"Planning Component",Item.FIELDNO("Planning Issues (Qty.)"),PlanningComponent.TABLECAPTION,Item."Planning Issues (Qty.)");
InsertEntry(DATABASE::"Transfer Line",Item.FIELDNO("Trans. Ord. Shipment (Qty.)"),Item.FIELDCAPTION("Trans. Ord. Shipment (Qty.)"),Item."Trans. Ord. Shipment (Qty.)");
InsertEntry(DATABASE::"Purchase Line",0,PurchLine.TABLECAPTION,Item."Qty. on Purch. Return");
InsertEntry(DATABASE::"Assembly Line",Item.FIELDNO("Qty. on Asm. Component"),AssemblyLine.TABLECAPTION,Item."Qty. on Asm. Component");
END;
Planned Order Releases:
How Navision calculates?
AvailType::"Planned Order Release":
BEGIN
InsertEntry(DATABASE::"Requisition Line",Item.FIELDNO("Purch. Req. Release (Qty.)"),ReqLine.TABLECAPTION,Item."Purch. Req. Release (Qty.)");
InsertEntry(DATABASE::"Prod. Order Line",Item.FIELDNO("Planned Order Release (Qty.)"),STRSUBSTNO(Text001,ProdOrderLine.TABLECAPTION),Item."Planned Order Release (Qty.)");
InsertEntry(DATABASE::"Requisition Line",Item.FIELDNO("Planning Release (Qty.)"),ReqLine.TABLECAPTION,Item."Planning Release (Qty.)");
END;
Finally we can calculate Projected Available Inventory as below formula:
thats all for today, will come with more information in my upcomming posts.
You can find details of Inventory on Item Card itself. Also how much Inventory is available or required at different area in ERP.
If you open Item Availability by Location you will find in more details. When you drilldown you can find in more details from where these figure comes from.
Scheduled Receipts:
Here all the entries from below area is included:
a) Purchase Orders
b) Transfer Orders
c) Firm Planned Production Order
d) Release Production Order
e) Assembly Orders
How Navision calculates?
AvailType::"Scheduled Order Receipt":
BEGIN
InsertEntry(DATABASE::"Purchase Line",Item.FIELDNO("Qty. on Purch. Order"),PurchLine.TABLECAPTION,Item."Qty. on Purch. Order");
InsertEntry(DATABASE::"Prod. Order Line",Item.FIELDNO("FP Order Receipt (Qty.)"),STRSUBSTNO(Text002,ProdOrderLine.TABLECAPTION),Item."FP Order Receipt (Qty.)");
InsertEntry(DATABASE::"Prod. Order Line",Item.FIELDNO("Rel. Order Receipt (Qty.)"),STRSUBSTNO(Text003,ProdOrderLine.TABLECAPTION),Item."Rel. Order Receipt (Qty.)");
InsertEntry(DATABASE::"Transfer Line",Item.FIELDNO("Qty. in Transit"),Item.FIELDCAPTION("Qty. in Transit"),Item."Qty. in Transit");
InsertEntry(DATABASE::"Transfer Line",Item.FIELDNO("Trans. Ord. Receipt (Qty.)"),Item.FIELDCAPTION("Trans. Ord. Receipt (Qty.)"),Item."Trans. Ord. Receipt (Qty.)");
InsertEntry(DATABASE::"Sales Line",0,SalesLine.TABLECAPTION,Item."Qty. on Sales Return");
InsertEntry(DATABASE::"Assembly Header",Item.FIELDNO("Qty. on Assembly Order"),AssemblyHeader.TABLECAPTION,Item."Qty. on Assembly Order");
END;
Planned Receipts:
Here all the entries from below area is included:
a) Planned Production Order
b) Planning Worksheet
c) Requisition Worksheet
How Navision calculates?
AvailType::"Planned Order Receipt":
BEGIN
InsertEntry(DATABASE::"Requisition Line",Item.FIELDNO("Purch. Req. Receipt (Qty.)"),ReqLine.TABLECAPTION,Item."Purch. Req. Receipt (Qty.)");
InsertEntry(DATABASE::"Prod. Order Line",Item.FIELDNO("Planned Order Receipt (Qty.)"),STRSUBSTNO(Text000,ProdOrderLine.TABLECAPTION),Item."Planned Order Receipt (Qty.)");
END;
Gross Requirement:
Here all the entries from below area is included:
a) Sales Order
b) Transfer Order
c) Firm Planned Production Order Components
d) Released Production Order Components
e) Job Planning Lines
f) Service Orders
g) Assembly Orders Components
How Navision calculates?
AvailType::"Gross Requirement":
BEGIN
InsertEntry(DATABASE::"Sales Line",Item.FIELDNO("Qty. on Sales Order"),SalesLine.TABLECAPTION,Item."Qty. on Sales Order");
InsertEntry(DATABASE::"Service Line",Item.FIELDNO("Qty. on Service Order"),ServLine.TABLECAPTION,Item."Qty. on Service Order");
InsertEntry(DATABASE::"Job Planning Line",Item.FIELDNO("Qty. on Job Order"),JobPlanningLine.TABLECAPTION,Item."Qty. on Job Order");
InsertEntry(DATABASE::"Prod. Order Component",Item.FIELDNO("Scheduled Need (Qty.)"),ProdOrderComp.TABLECAPTION,Item."Scheduled Need (Qty.)");
InsertEntry(DATABASE::"Planning Component",Item.FIELDNO("Planning Issues (Qty.)"),PlanningComponent.TABLECAPTION,Item."Planning Issues (Qty.)");
InsertEntry(DATABASE::"Transfer Line",Item.FIELDNO("Trans. Ord. Shipment (Qty.)"),Item.FIELDCAPTION("Trans. Ord. Shipment (Qty.)"),Item."Trans. Ord. Shipment (Qty.)");
InsertEntry(DATABASE::"Purchase Line",0,PurchLine.TABLECAPTION,Item."Qty. on Purch. Return");
InsertEntry(DATABASE::"Assembly Line",Item.FIELDNO("Qty. on Asm. Component"),AssemblyLine.TABLECAPTION,Item."Qty. on Asm. Component");
END;
Planned Order Releases:
How Navision calculates?
AvailType::"Planned Order Release":
BEGIN
InsertEntry(DATABASE::"Requisition Line",Item.FIELDNO("Purch. Req. Release (Qty.)"),ReqLine.TABLECAPTION,Item."Purch. Req. Release (Qty.)");
InsertEntry(DATABASE::"Prod. Order Line",Item.FIELDNO("Planned Order Release (Qty.)"),STRSUBSTNO(Text001,ProdOrderLine.TABLECAPTION),Item."Planned Order Release (Qty.)");
InsertEntry(DATABASE::"Requisition Line",Item.FIELDNO("Planning Release (Qty.)"),ReqLine.TABLECAPTION,Item."Planning Release (Qty.)");
END;
Finally we can calculate Projected Available Inventory as below formula:
Inventory + Scheduled Receipts + Planned Receipts - Gross Requirement
thats all for today, will come with more information in my upcomming posts.
Friday, 3 June 2016
Cumulative Update 8 for Microsoft Dynamics NAV 2016 released in June 2016
Cumulative Update 8 includes all application and platform hotfixes and regulatory features that have been released for Microsoft Dynamics NAV 2016.
You can download the cumulative update from KB 3166287 – Cumulative Update 8 for Microsoft Dynamics NAV 2016 (Build 46045).
Before you install a cumulative update in a production environment, take the following precautions:
For information about how to install the cumulative update, see How to Install a Microsoft Dynamics NAV 2016 Cumulative Update.
For a list of all cumulative updates for this version, see Released Cumulative Updates for Microsoft Dynamics NAV 2016.
Where to find Cumulative Update 8
You can download the cumulative update from KB 3166287 – Cumulative Update 8 for Microsoft Dynamics NAV 2016 (Build 46045).
Warning
Before you install a cumulative update in a production environment, take the following precautions:
- Test the cumulative update in a non-production environment.
- Make a backup of the system or computer where the cumulative update is to be installed.
Additional Information
For information about how to install the cumulative update, see How to Install a Microsoft Dynamics NAV 2016 Cumulative Update.
For a list of all cumulative updates for this version, see Released Cumulative Updates for Microsoft Dynamics NAV 2016.
Cumulative Update 20 for Microsoft Dynamics NAV 2015 released in June 2016
Cumulative Update 20 includes all application and platform hotfixes and regulatory features that have been released for Microsoft Dynamics NAV 2015.
You can download the cumulative update from KB 3166286 – Cumulative Update 20 for Microsoft Dynamics NAV 2015 (Build 46054).
Before you install a cumulative update in a production environment, take the following precautions:
For information about how to install the cumulative update, see How to Install a Microsoft Dynamics NAV 2015 Cumulative Update.
For information about how to work around a recent process change, see How to Get Back the ‘Hotfix Directories’ from NAV 2015 Cumulative Update 1.
For a list of all cumulative updates for this version, see Released Cumulative Updates for Microsoft Dynamics NAV 2015.
Where to find Cumulative Update 20
You can download the cumulative update from KB 3166286 – Cumulative Update 20 for Microsoft Dynamics NAV 2015 (Build 46054).
Warning
Before you install a cumulative update in a production environment, take the following precautions:
- Test the cumulative update in a non-production environment.
- Make a backup of the system or computer where the cumulative update is to be installed.
Additional Information
For information about how to install the cumulative update, see How to Install a Microsoft Dynamics NAV 2015 Cumulative Update.
For information about how to work around a recent process change, see How to Get Back the ‘Hotfix Directories’ from NAV 2015 Cumulative Update 1.
For a list of all cumulative updates for this version, see Released Cumulative Updates for Microsoft Dynamics NAV 2015.
Cumulative Update 32 for Microsoft Dynamics NAV 2013 R2 released in June 2016
Cumulative Update 32 includes all application and platform hotfixes and regulatory features that have been released for Microsoft Dynamics NAV 2013 R2.
You can download the cumulative update from KB 3166278 – Cumulative Update 32 for Microsoft Dynamics NAV 2013 R2 (Build 46057).
Before you install a cumulative update in a production environment, take the following precautions:
For more information about cumulative updates for this version, see Announcement of update rollups for Microsoft Dynamics NAV 2013 R2.
For a list of all cumulative updates for this version, see Released Cumulative Updates for Microsoft Dynamics NAV 2013 R2.
For a list of all hotfixes included in cumulative updates for this version, see the following CustomerSource and PartnerSource pages:
CustomerSource:
PartnerSource
Where to find Cumulative Update 32
You can download the cumulative update from KB 3166278 – Cumulative Update 32 for Microsoft Dynamics NAV 2013 R2 (Build 46057).
Warning
Before you install a cumulative update in a production environment, take the following precautions:
- Test the cumulative update in a non-production environment.
- Make a backup of the system or computer where the cumulative update is to be installed.
Additional Information
For more information about cumulative updates for this version, see Announcement of update rollups for Microsoft Dynamics NAV 2013 R2.
For a list of all cumulative updates for this version, see Released Cumulative Updates for Microsoft Dynamics NAV 2013 R2.
For a list of all hotfixes included in cumulative updates for this version, see the following CustomerSource and PartnerSource pages:
CustomerSource:
- Overview of Released Application Hotfixes for Microsoft Dynamics NAV 2013 R2
- Overview of Released Platform Hotfixes for Microsoft Dynamics NAV 2013 R2
PartnerSource
Cumulative Update 39 for Microsoft Dynamics NAV 2013 released in June 2016
Cumulative Update 39 includes all application and platform hotfixes and regulatory features that have been released for Microsoft Dynamics NAV 2013.
You can download the cumulative update from KB 3166277 – Cumulative Update 39 for Microsoft Dynamics NAV 2013 (Build 46056).
Before you install a cumulative update in a production environment, take the following precautions:
For a list of all cumulative updates for this version, see Released Cumulative Updates for Microsoft Dynamics NAV 2013.
For a list of all hotfixes included in cumulative updates for this version, see the following CustomerSource and PartnerSource pages:
CustomerSource:
PartnerSource:
Where to find Cumulative Update 39
You can download the cumulative update from KB 3166277 – Cumulative Update 39 for Microsoft Dynamics NAV 2013 (Build 46056).
Warning
Before you install a cumulative update in a production environment, take the following precautions:
- Test the cumulative update in a non-production environment.
- Make a backup of the system or computer where the cumulative update is to be installed.
Additional Information
For a list of all cumulative updates for this version, see Released Cumulative Updates for Microsoft Dynamics NAV 2013.
For a list of all hotfixes included in cumulative updates for this version, see the following CustomerSource and PartnerSource pages:
CustomerSource:
- Overview of Released Application Hotfixes for Microsoft Dynamics NAV 2013
- Overview of Released Platform Hotfixes for Microsoft Dynamics NAV 2013
PartnerSource:
- Overview of Released Application Hotfixes for Microsoft Dynamics NAV 2013
- Overview of Released Platform Hotfixes for Microsoft Dynamics NAV 2013
Saturday, 28 May 2016
Krishi Kalyan Cess Feature for Microsoft Dynamics NAV 2013 R2 for India Released
Government has introduced a new Cess called 'Krishi Kalyan Cess (KKC)' in Finance Act 2016 which will take effect from 01-Jun-2016. It is imposed on all taxable Services at the rate of 0.5%. KKC is not a Cess on Service Tax but it is a tax on taxable services in addition to Service tax. It would be calculated in the same way as Service Tax is being calculated.
IN7.1_TFS167310 - Krishi Kalyan Cess [9.04 MB - EXE]
Before this update can be installed, the following prerequisites are required:
Microsoft Dynamics ® NAV 2013 R2 India
Pre-requisites
The following fields are added to Service Tax Setup , setup values given below
For detailed information you can check this Link.
Download
IN7.1_TFS167310 - Krishi Kalyan Cess [9.04 MB - EXE]
Installation
Before this update can be installed, the following prerequisites are required:
Microsoft Dynamics ® NAV 2013 R2 India
Pre-requisites
- NAV 2013 R2 RTM Database (Version 7.10.35473)
- Import below Hotfixes sequentially
| No. | TFSID | Fixes Description |
| 1 | TFS353595 | TDS Zero Percent |
| 2 | TFS354411 | FVU 3.9-4.1 and TDS Zero Pct |
| 3 | HF377555 | GL Inconsistency |
| 4 | TFS160375 | Swachh Bharat Cess |
License Requirement
No new objects have been added through this update. Licensing refresh is not required.
Setup
The following fields are added to Service Tax Setup , setup values given below
| S. No | Field Description | Value |
| 1. | KK Cess % | 0.5 |
| 2. | KK Cess Payable Account | Balance Sheet Account under Liabilities and Account Type = Posting |
| 3. | KK Cess Payable Interim | Balance Sheet Account under Liabilities and Account Type = Posting |
| 4. | KK Cess Receivable Interim Account | Balance Sheet Account under Assets and Account Type = Posting |
| 5. | KK Cess Receivable Account | Balance Sheet Account under Assets and Account Type = Posting |
| 6. | KK Cess Expense Account | Income Statement Account and Account Type = Posting |
For detailed information you can check this Link.
Setup Send Documents by Email in Madeira
To enable emails from within Project "Madeira", start the Set Up Email assisted setup on the Home page. We have already seen this in our previous post, you can find it here.
To offer your customers to pay for sales electronically using a payment service, such as PayPal, you can also have the PayPal information and hyperlink inserted in the email body. We have already covered this in our previous post, you can find it here.
From all supported documents, you initiate emailing by choosing the Send action, on posted documents, or the Post and Send action, on non-posted documents.
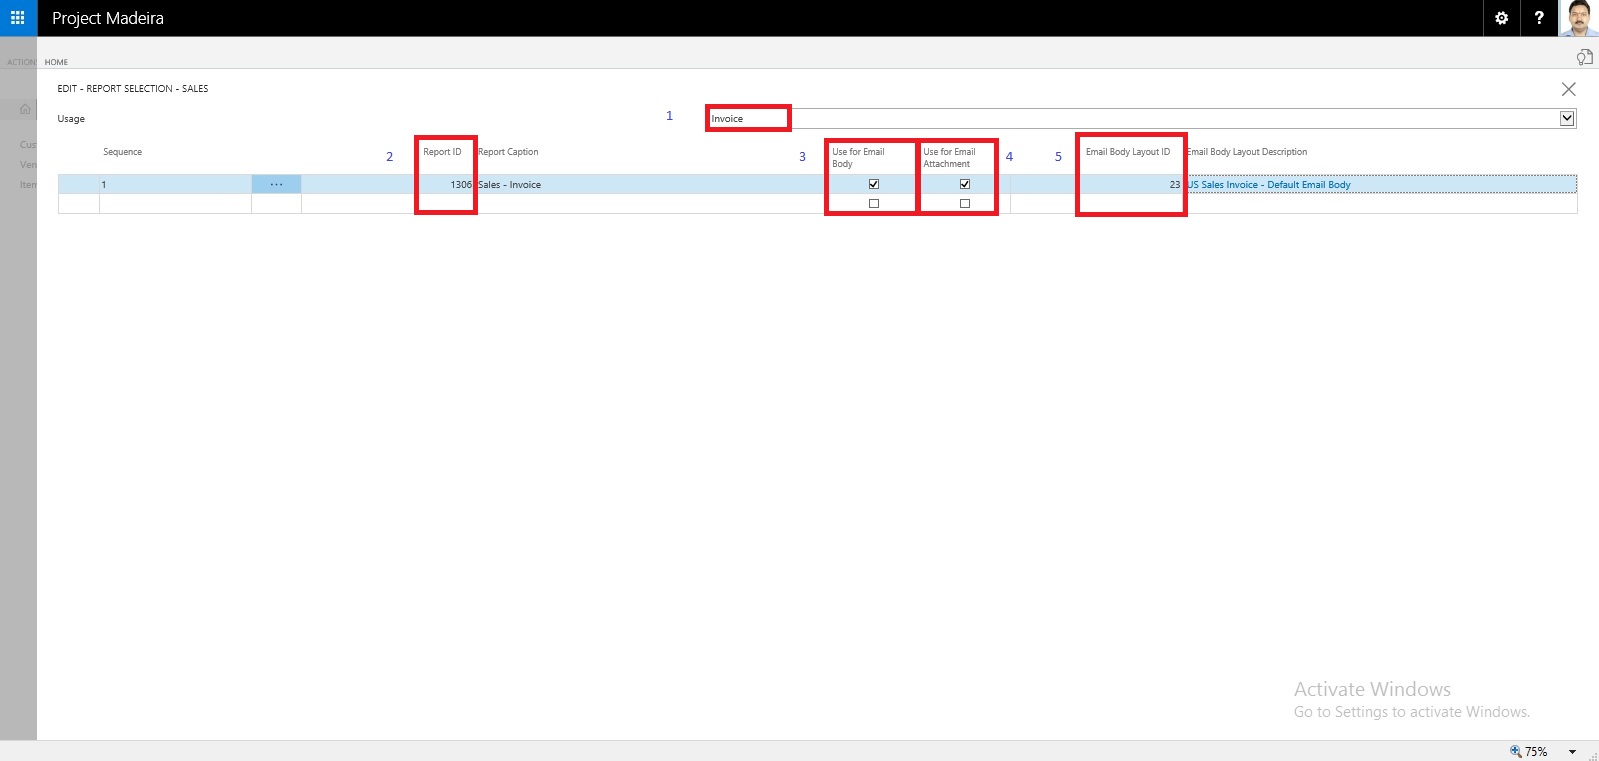
Let us Setup document-specific email body for sales invoices.
From the search page find Report Selections Sales:

Fill the Value as shown in below screen in same sequence.
If you want to offer customers to pay for sales electronically, you can set up the related payment service, such as PayPal, and then have the PayPal information and hyperlink inserted in the email body as well. We have already covered this in our previous post, you can find it here.
Will come up with more details & feature explaination in my upcomming posts.
To offer your customers to pay for sales electronically using a payment service, such as PayPal, you can also have the PayPal information and hyperlink inserted in the email body. We have already covered this in our previous post, you can find it here.
From all supported documents, you initiate emailing by choosing the Send action, on posted documents, or the Post and Send action, on non-posted documents.
Let us Setup document-specific email body for sales invoices.
From the search page find Report Selections Sales:
Fill the Value as shown in below screen in same sequence.
If you want to offer customers to pay for sales electronically, you can set up the related payment service, such as PayPal, and then have the PayPal information and hyperlink inserted in the email body as well. We have already covered this in our previous post, you can find it here.
Will come up with more details & feature explaination in my upcomming posts.
Subscribe to:
Posts (Atom)