Most awaited finally released Dynamics NAV 2016 In. Find download link.
Customer / Partner login required.
https://mbs.microsoft.com/partnersource/northamerica/deployment/downloads/product-releases/msdnav2016download
Saturday, 30 April 2016
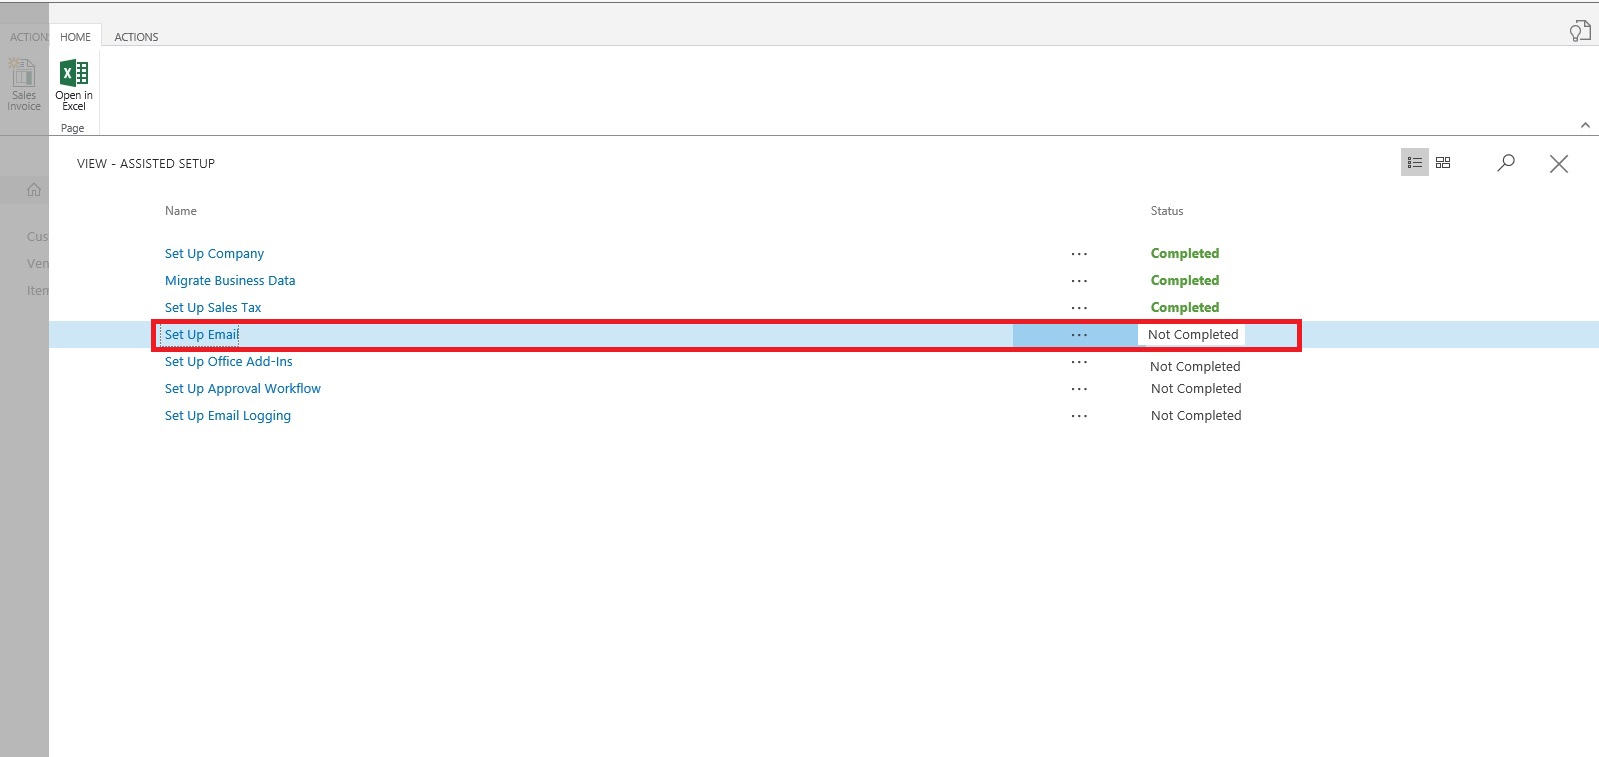
Assisted Setup (Office Add-Ins) in Madeira
In this post we will discuss about how to setup Office Add-Ins.
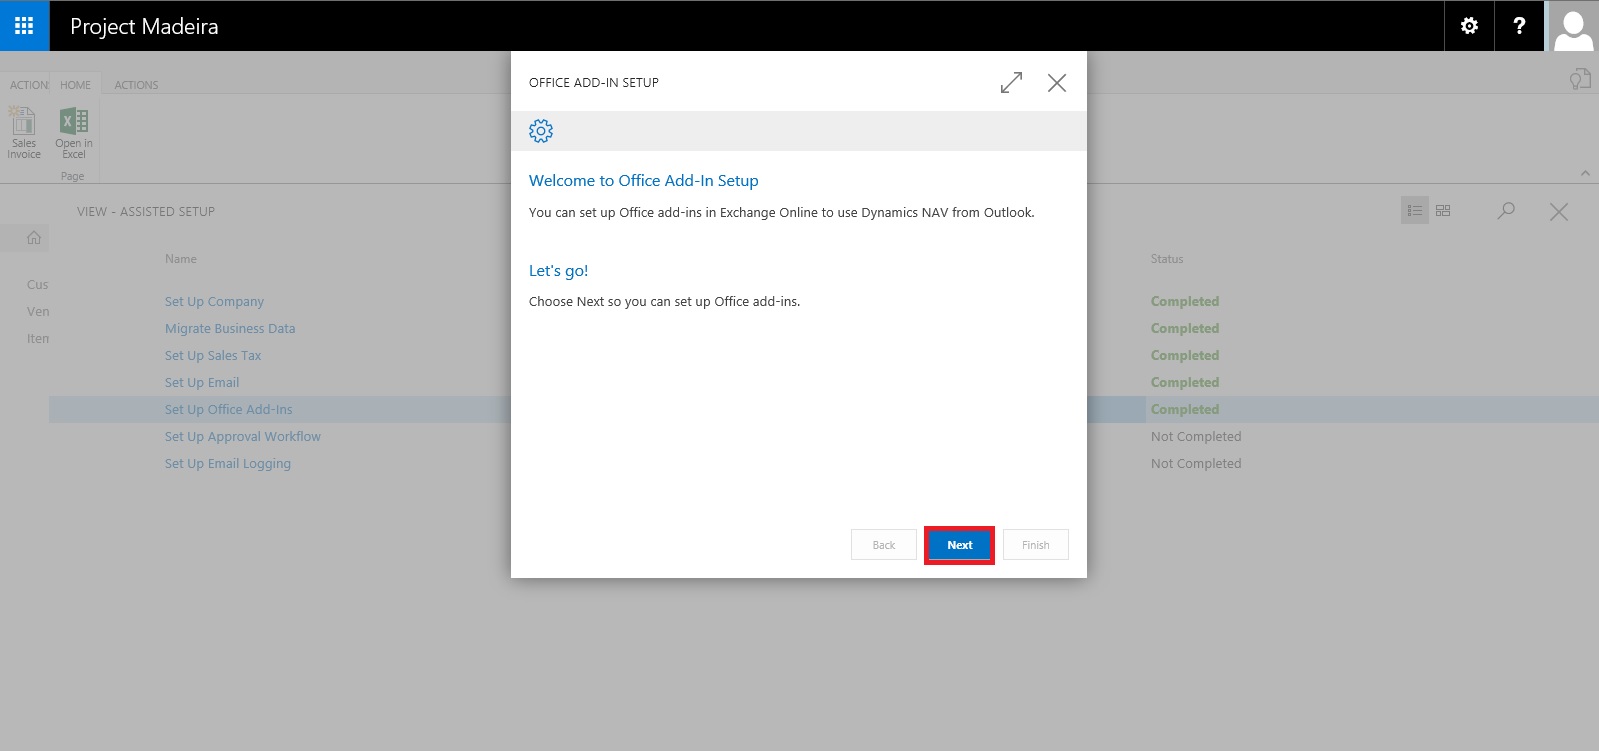
Select Assisted Setup & Tasks from the ribbon of Action Tab.

Select Setup Office Add-Ins from the list.

Click on Next Button on Welcome Screen.
Select Setup for (Organization or you only) and click on Next Button.

Enter your E-mail id and Password, click on Next to continue with next step.

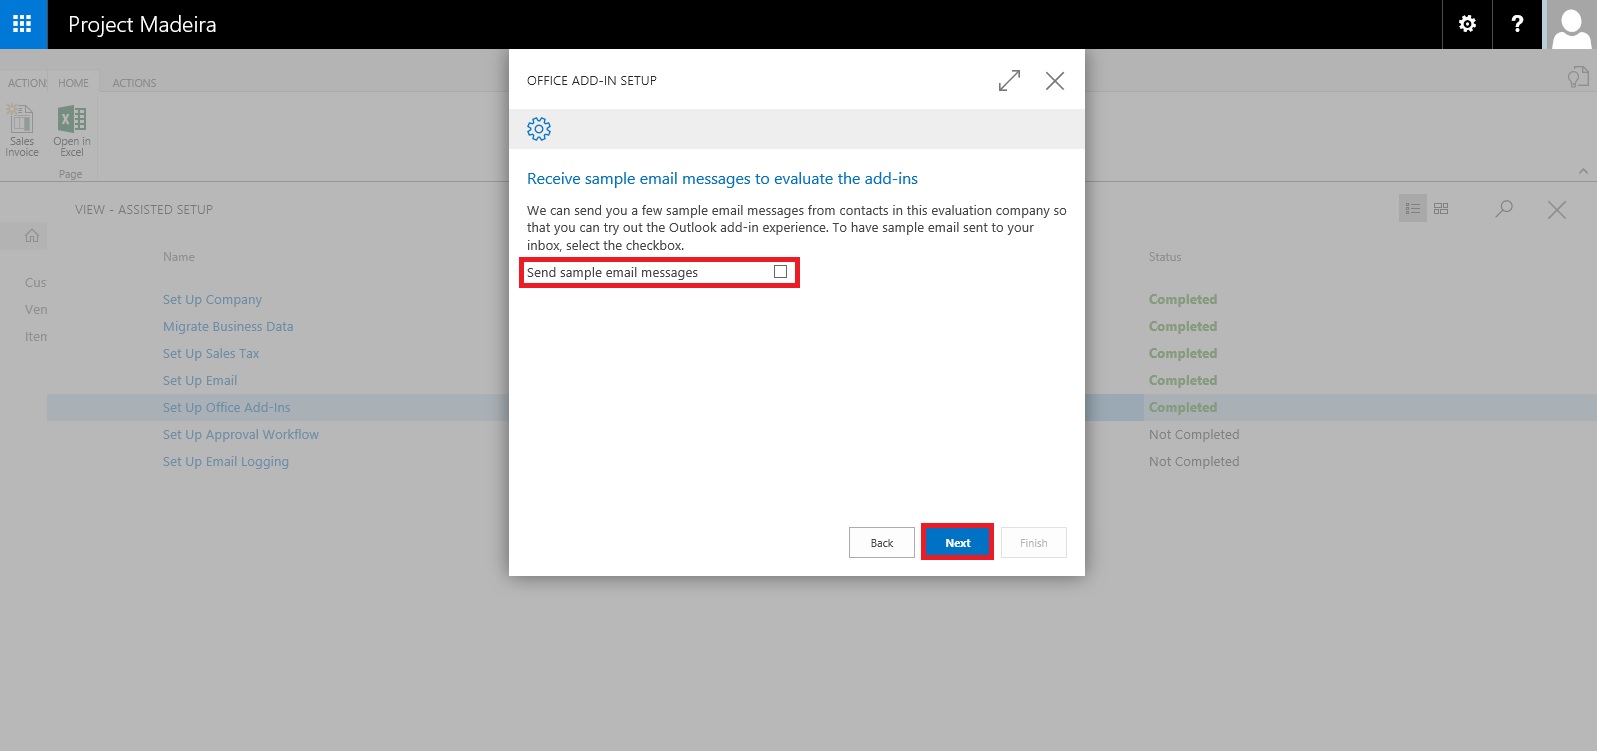
If you wish to receive few sample mails in your Mail box click on the check box or leave it blank, click on Next Button.
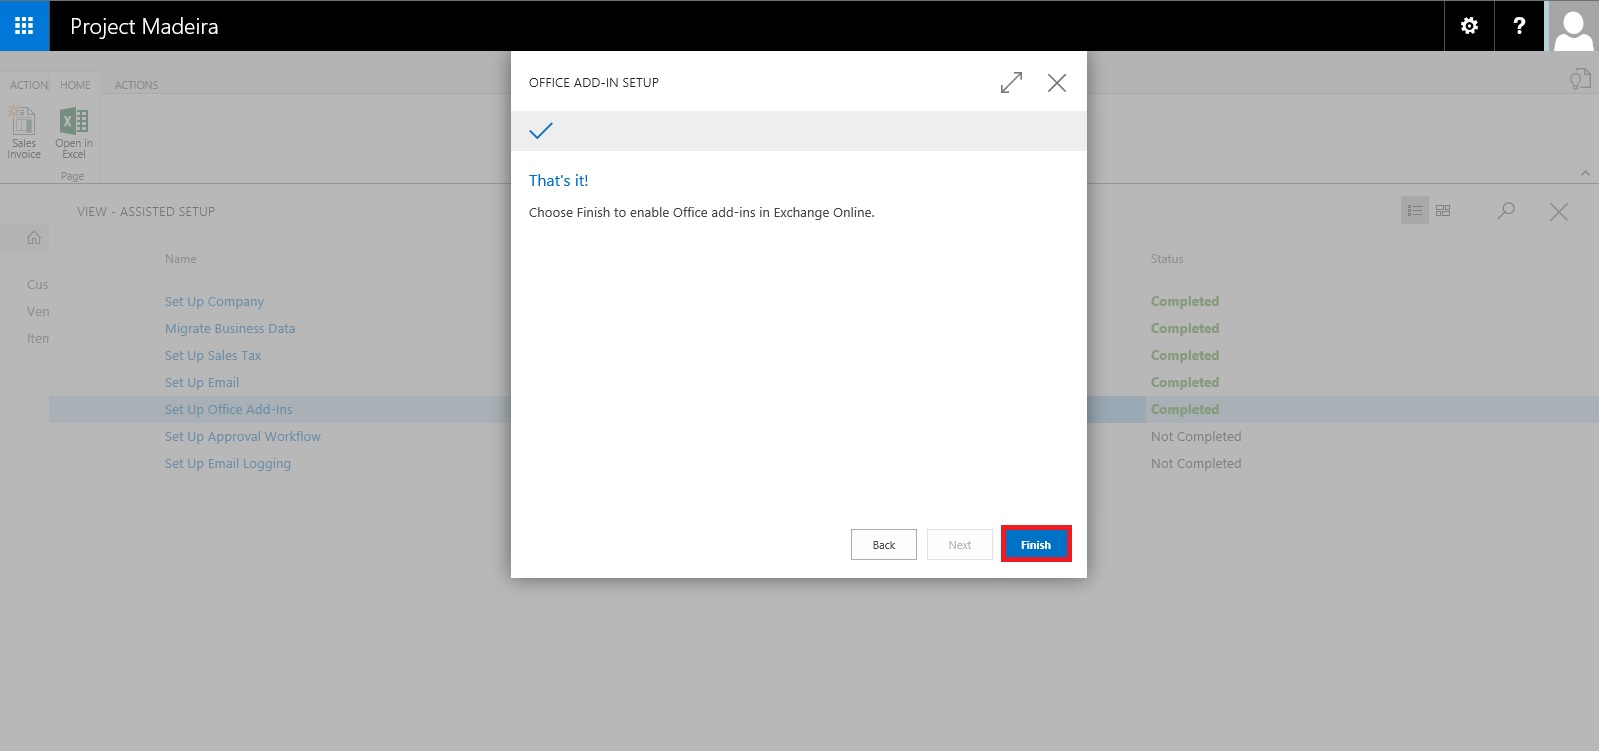
That's it. click on Finish to complete the setup.

That's all for this post.
Will come with more details in my upcoming posts.
Till then keep exploring & learning.
Select Assisted Setup & Tasks from the ribbon of Action Tab.
Select Setup Office Add-Ins from the list.
Click on Next Button on Welcome Screen.
Select Setup for (Organization or you only) and click on Next Button.
Enter your E-mail id and Password, click on Next to continue with next step.
If you wish to receive few sample mails in your Mail box click on the check box or leave it blank, click on Next Button.
That's it. click on Finish to complete the setup.
That's all for this post.
Will come with more details in my upcoming posts.
Till then keep exploring & learning.
Assisted Setup (Email) in Madeira
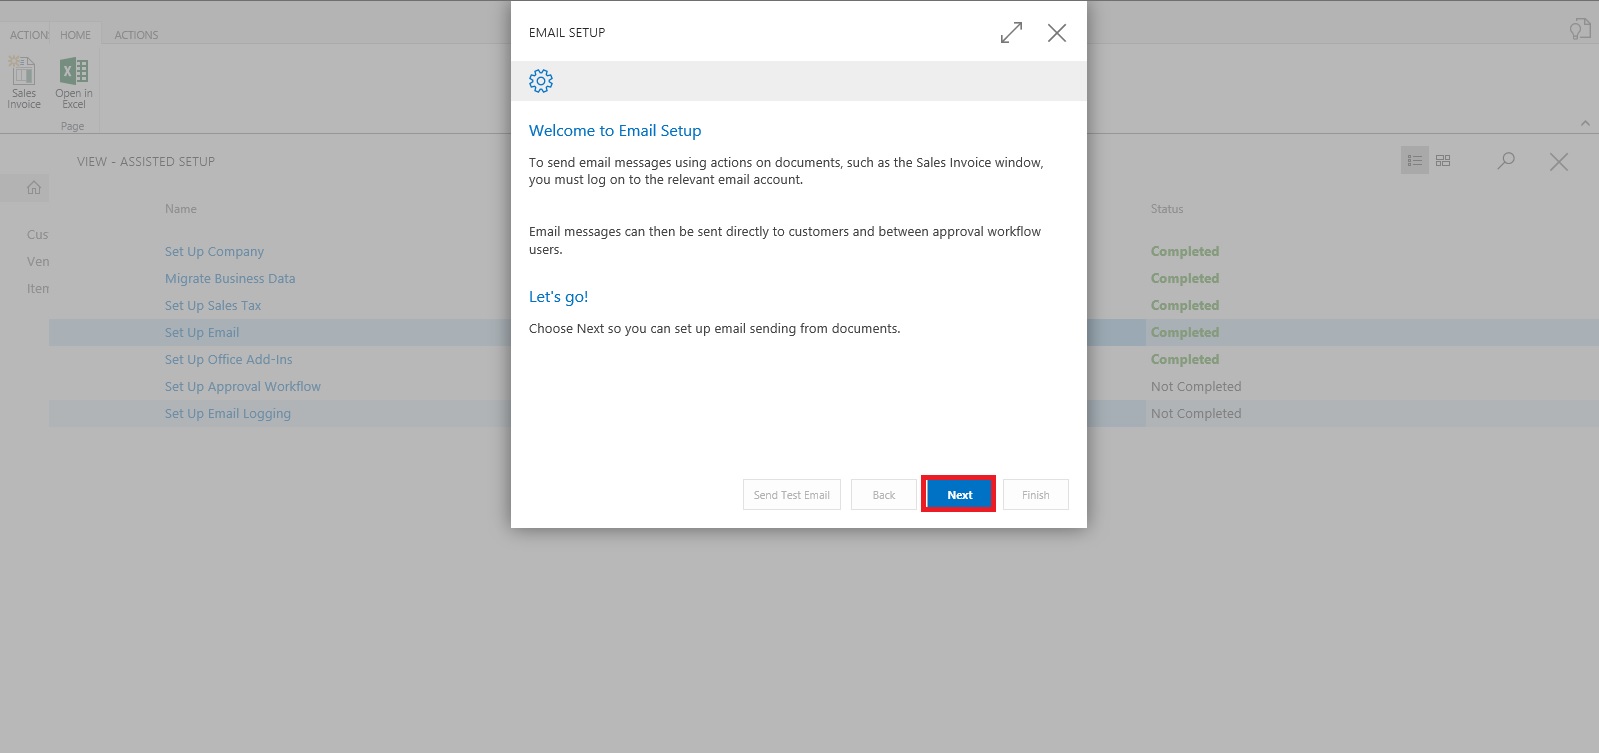
In this post we will discuss how to setup Email.
Its very easy and single user intervention required.

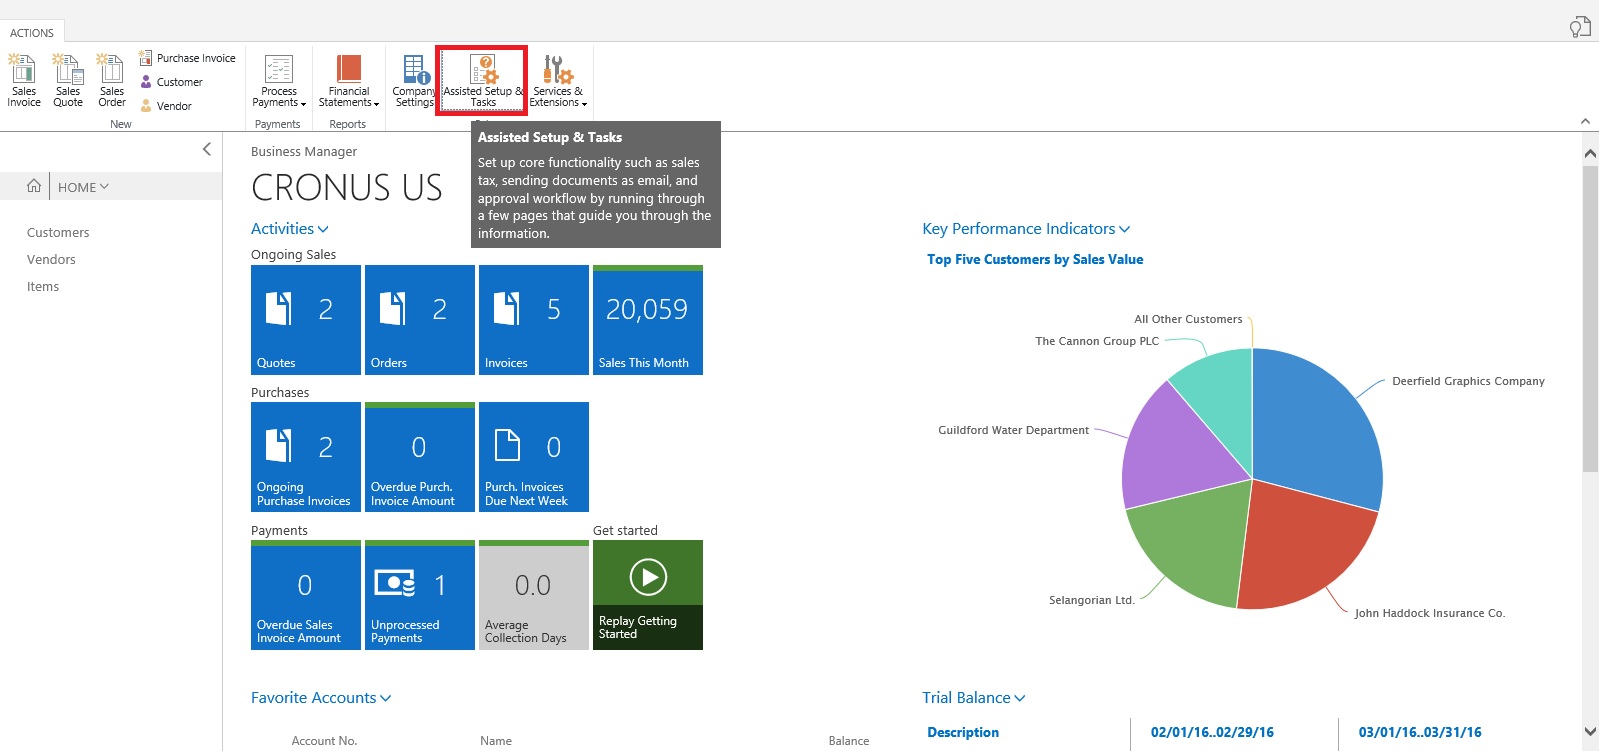
From Action Tab click on Assisted Setup & Task from the ribbon.
On Welcome screen click on Next Button.
Select the Email Provider and click on Next to continue.
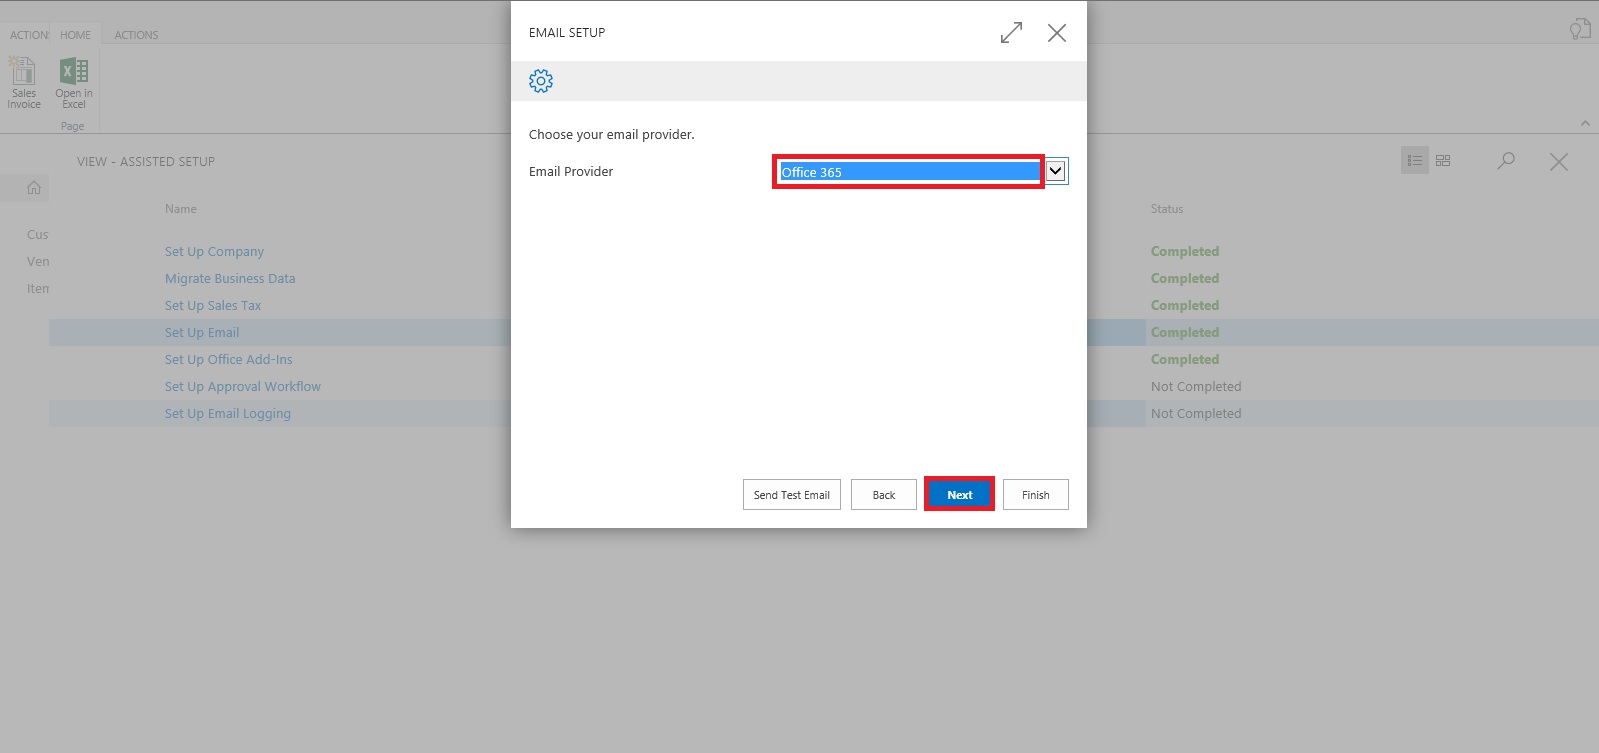
Enter your Email id and password, click on Next Button.

That's it, click on Finish.


Just required to enter Email id and password, setup is done.
Will come with other option in my next post.
Till then keep exploring and learning.
Its very easy and single user intervention required.
From Action Tab click on Assisted Setup & Task from the ribbon.
On Welcome screen click on Next Button.
Select the Email Provider and click on Next to continue.
Enter your Email id and password, click on Next Button.
That's it, click on Finish.
Just required to enter Email id and password, setup is done.
Will come with other option in my next post.
Till then keep exploring and learning.
Assisted Setup (Sales Tax) – in Madeira
Today we will see how Sales Tax setup is done in Madeira. Since preview is limited to US so many of the information may not apply or some different options will be available for other countries.
Whatsoever may be in final release we will see at that time when finally it will be released. Lets look what is available in this preview.
Login to Madeira using your credentials.
From Action Tab on landing/ Role Center Page on Ribbon click on Assisted Setup & Task.
List with available options page is opened.
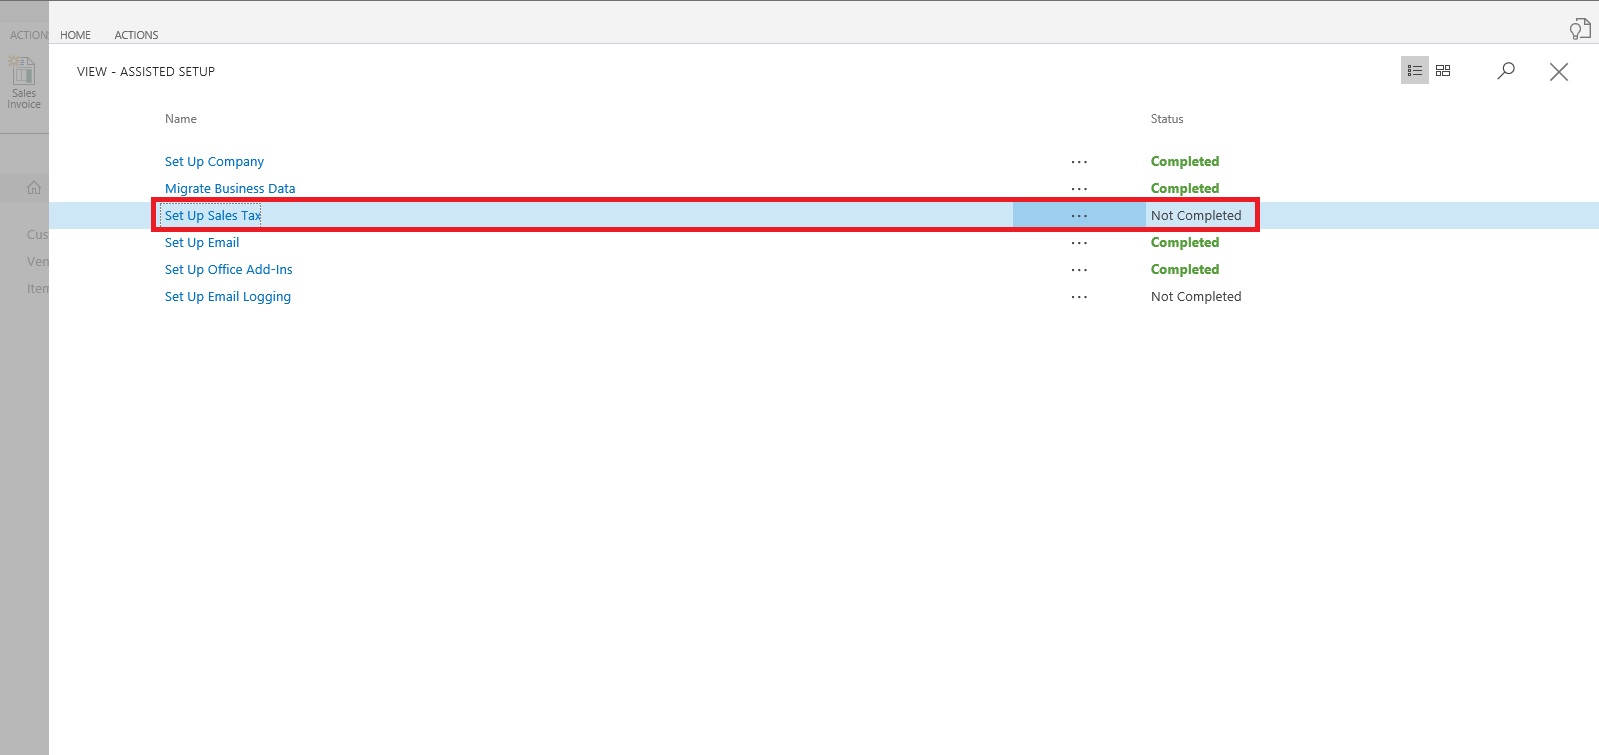
Select Setup Sales Tax to continue.
Welcome Screen appears click on Next Button.
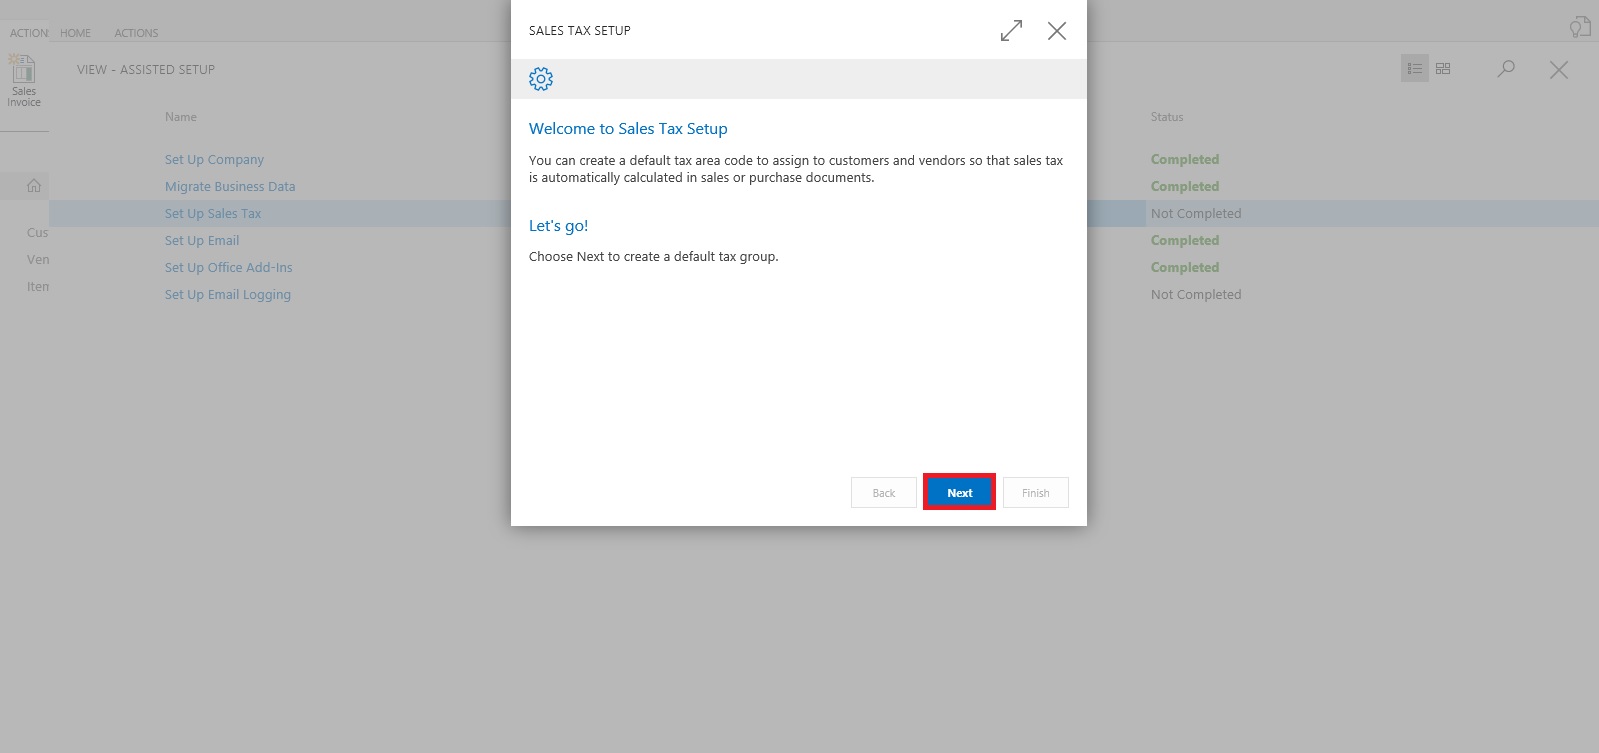
Default tax group is created and you can start with other setup, click on Next.

We are only talking about Tax since this preview is only for US so options relevant to them only available.
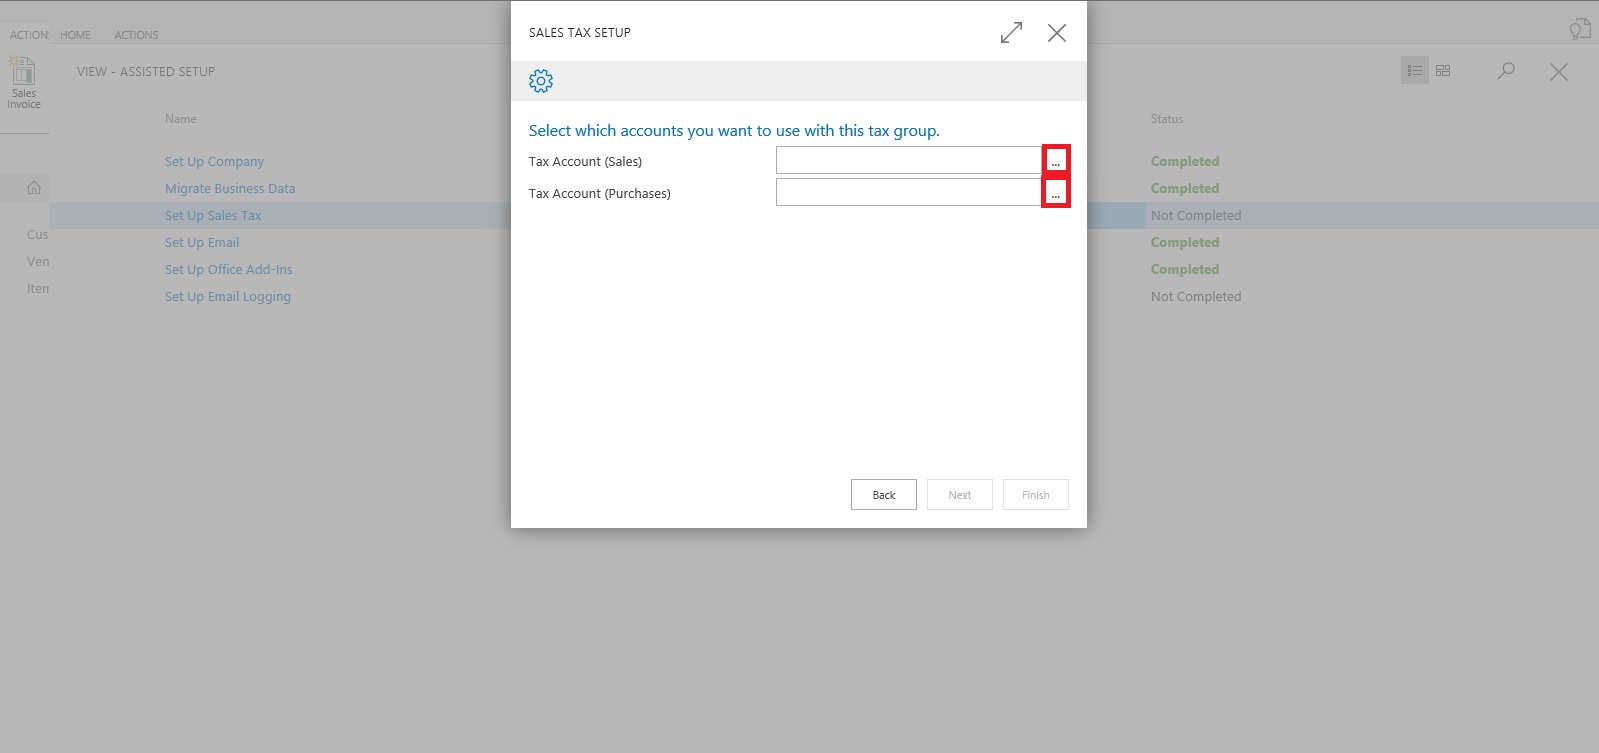
Select the Account for Tax Account (Sales & Purchase) using the Assist button which lists you the Available Accounts in COA.
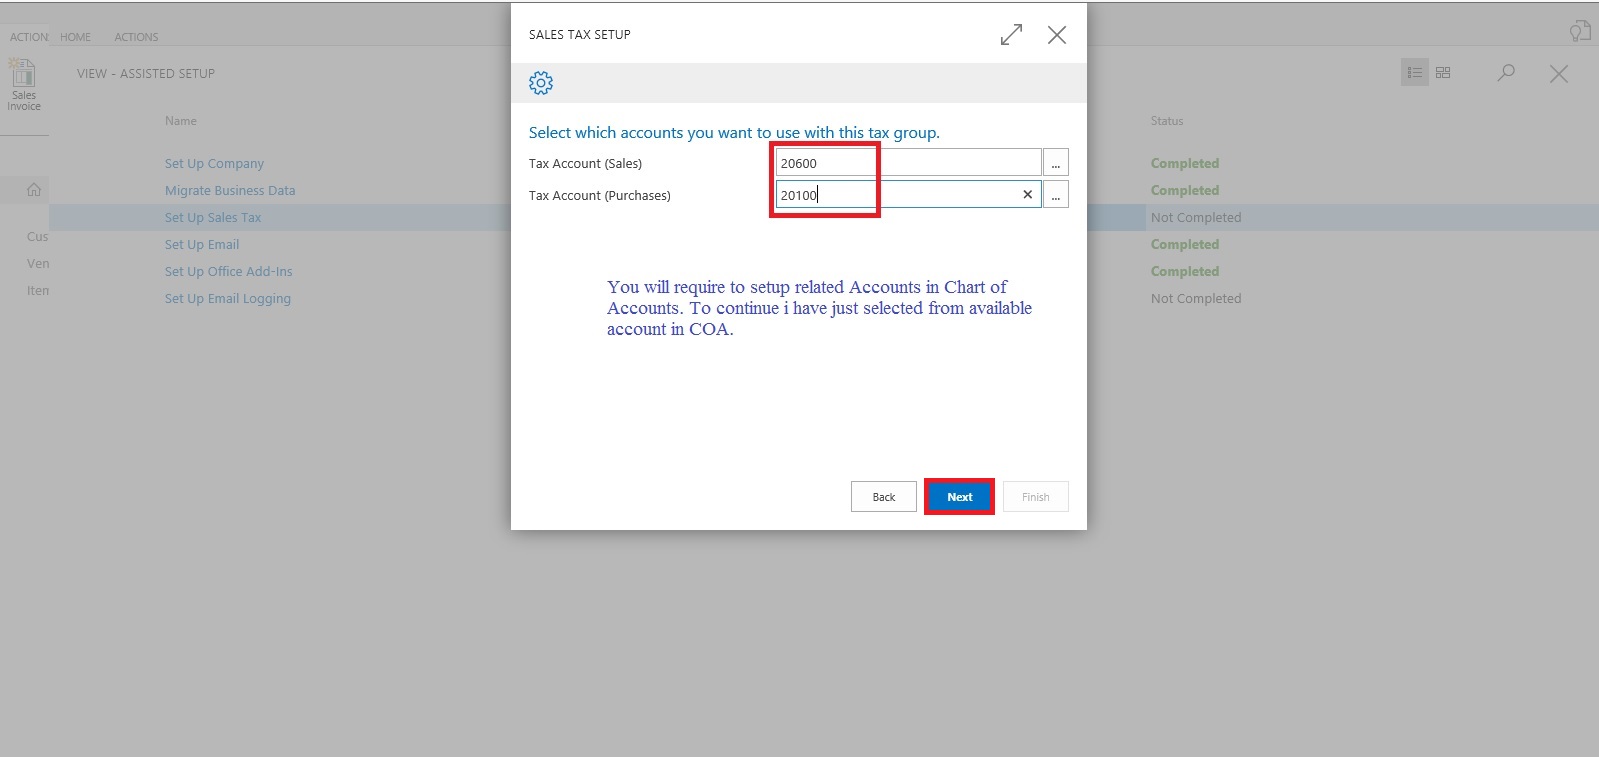
Next City, Country & State related information need to be filled, and then click Next Button to proceed.

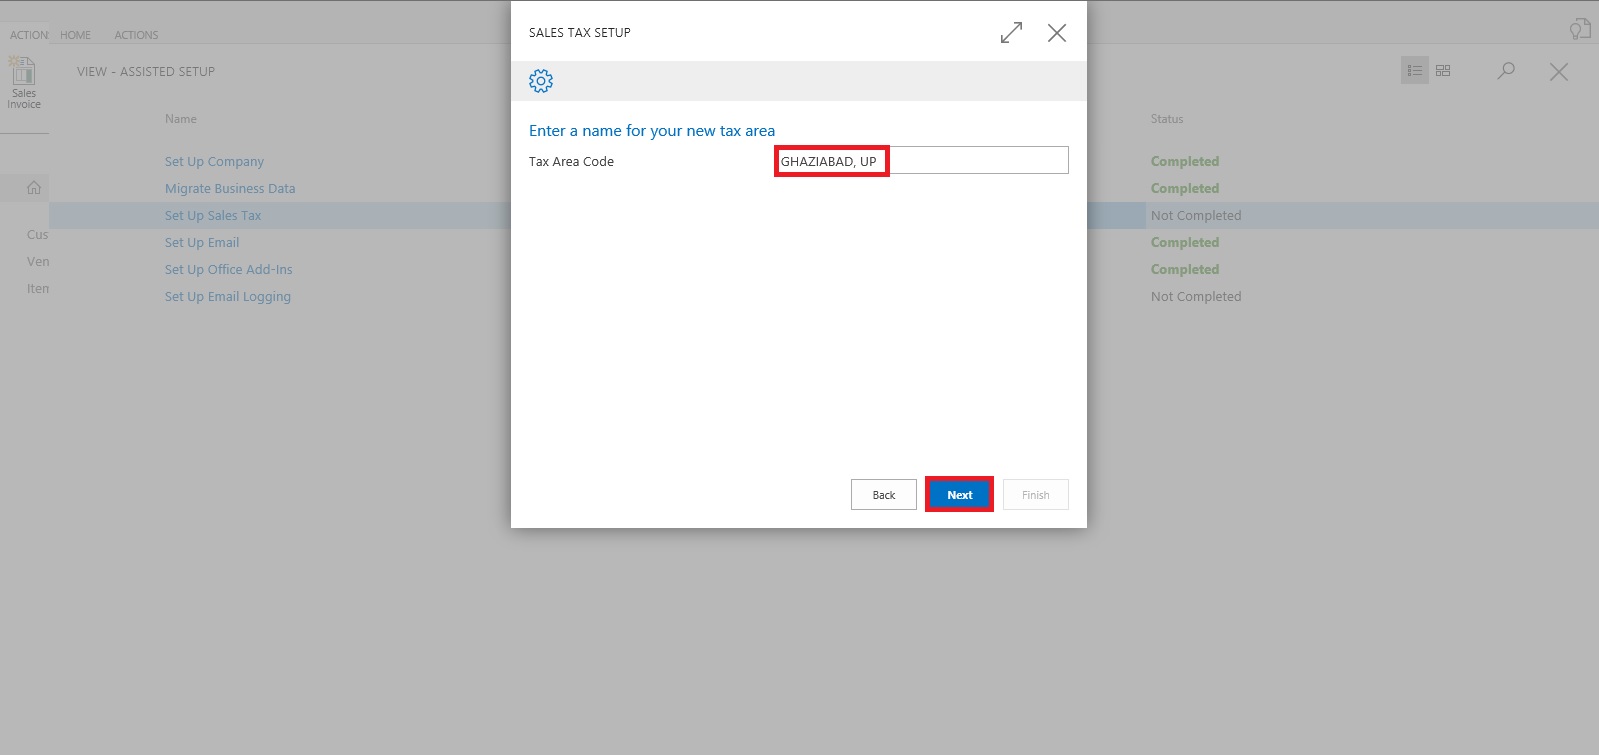
Depending upon Information provided in Previous Screen it suggests Tax Area Code, click on Next Button to continue.
We are done with Setup now we will assign this to Customer, Vendor and Company.
Click on Next to continue.
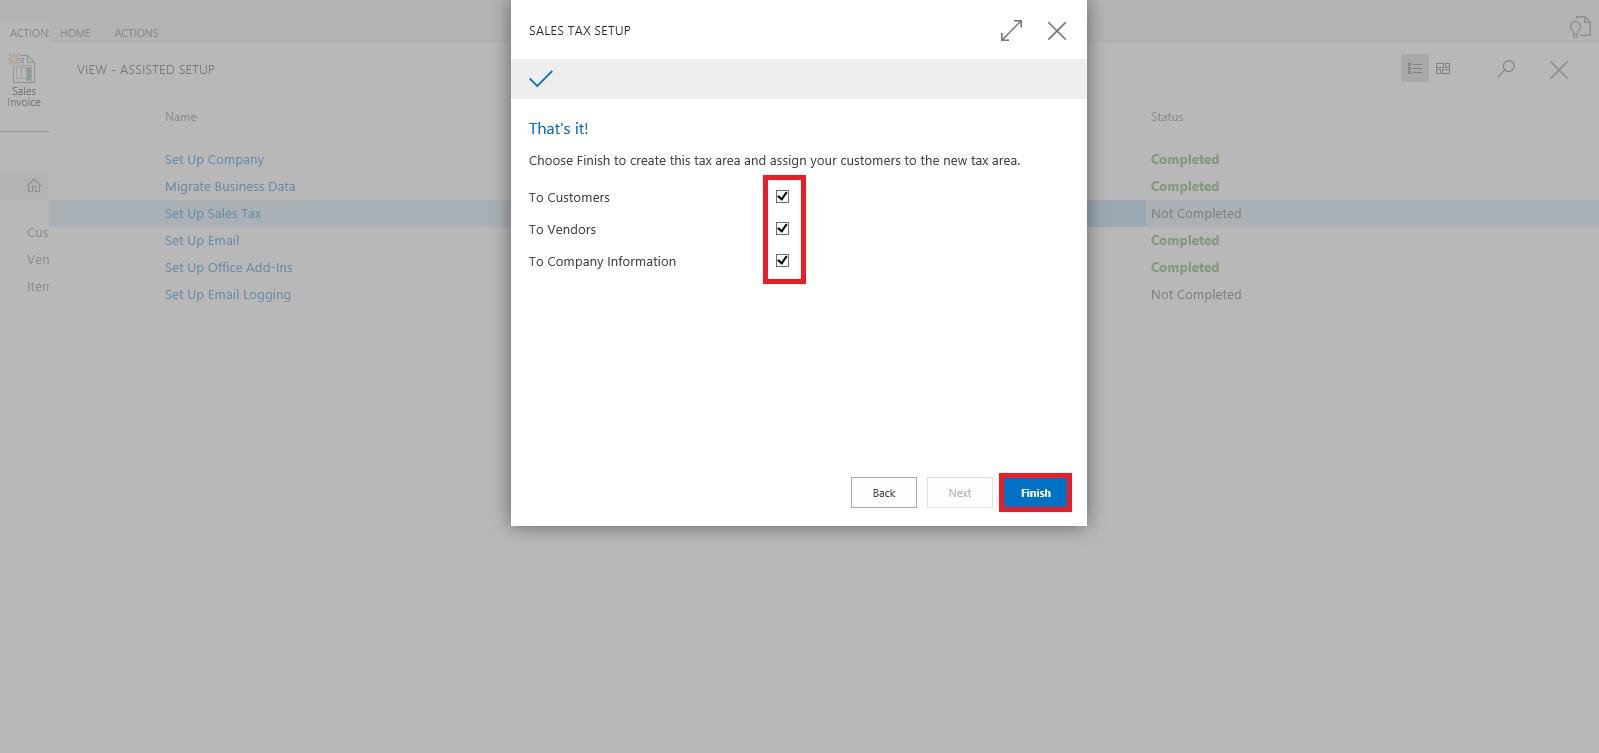
You can Assign the Tax Information to Customer as per entering simple query.
We can assign or we can leave this activity for later.
We have option to schedule a reminder for this activity. Click on Schedule to continue.
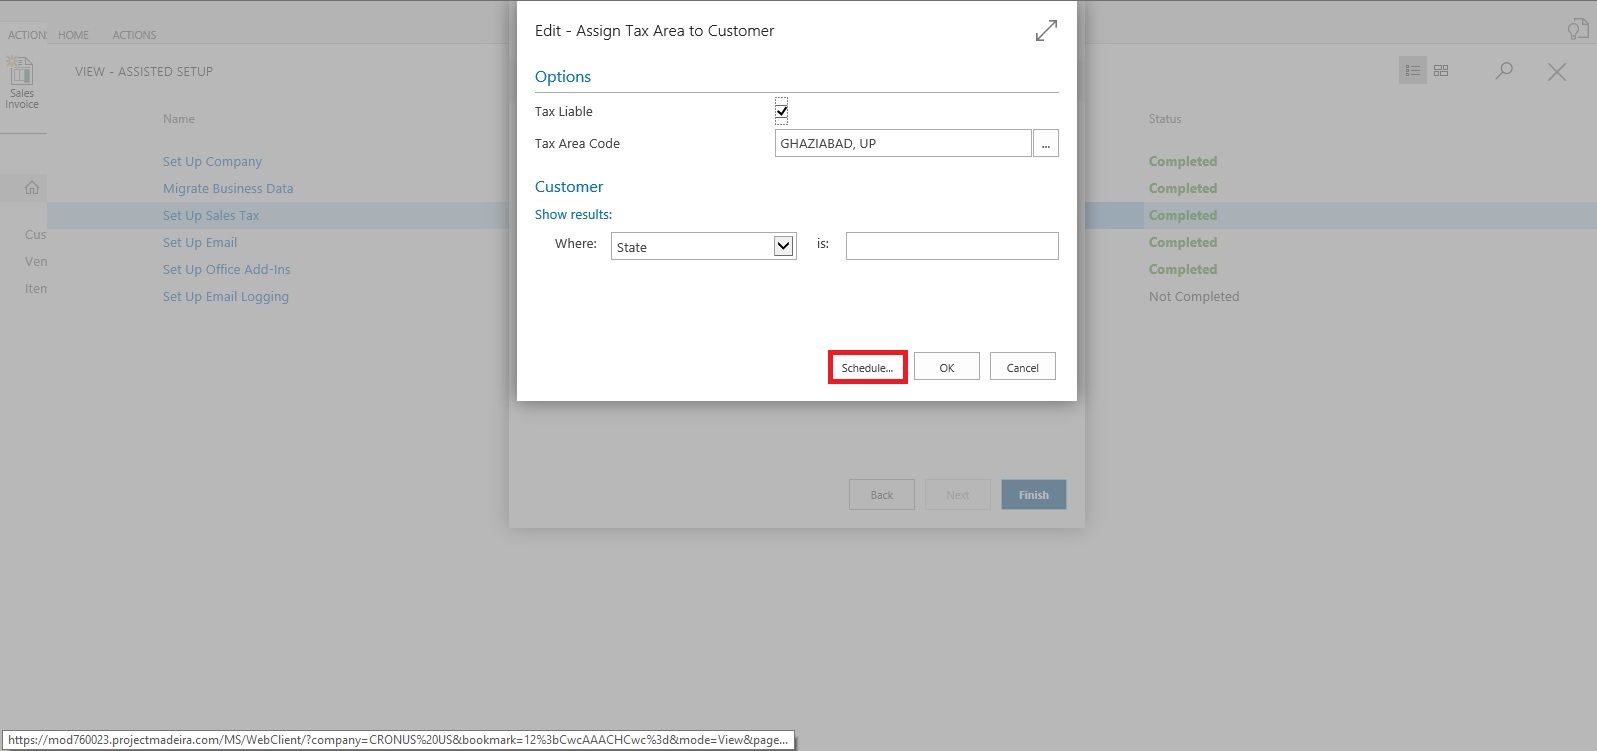
Enter the Date and Time for Start & Expiry of this reminder.
This will setup a Job for this and keep reminding you so that you have track of, that this activity is still pending and need to be completed.
Once done choose OK Button to continue.

You can see this in Jobs Entry Page.

Similarly you can do for Vendor too.
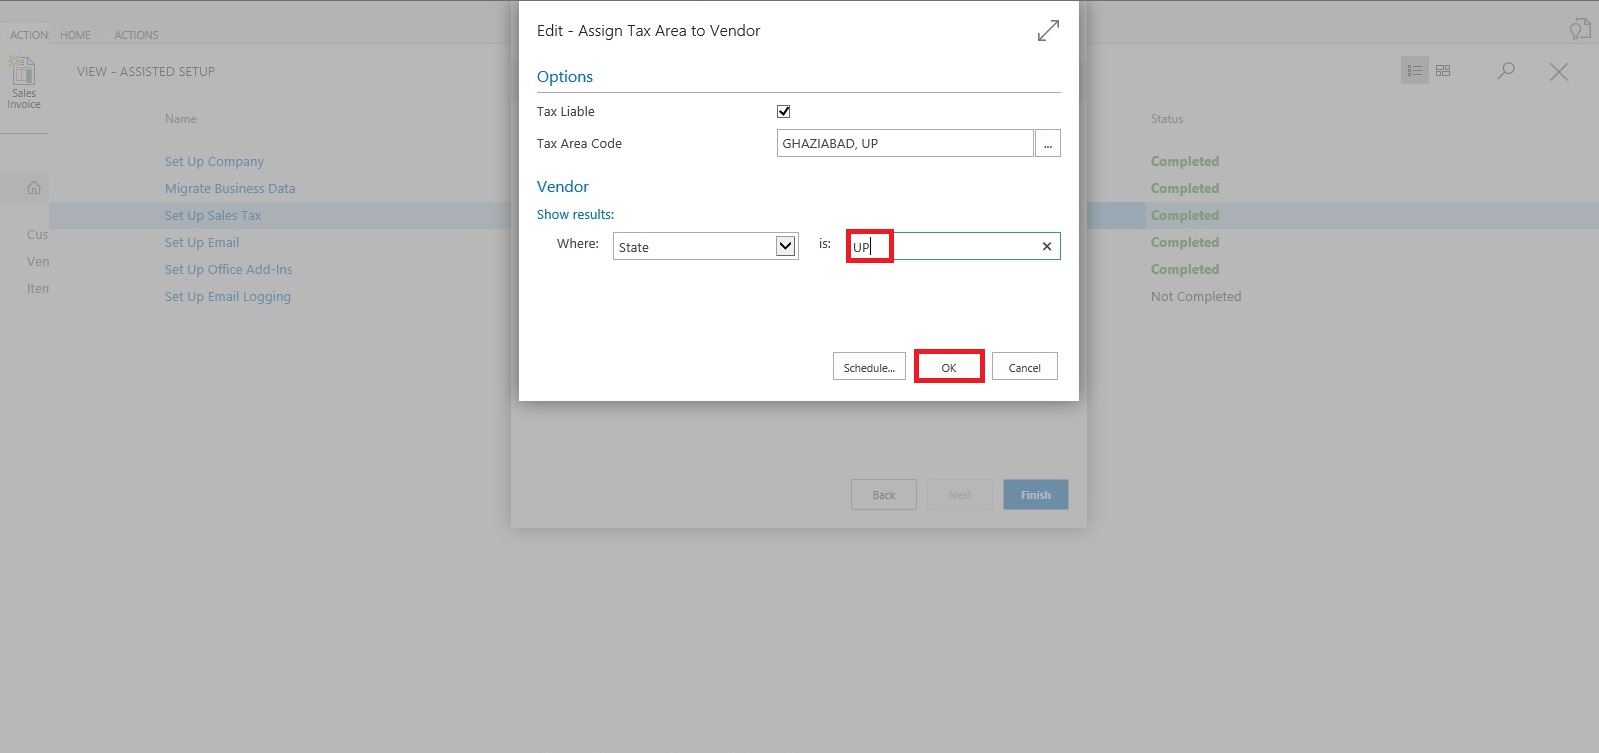
For company it will be applicable if you selected, so no separate screen for same for query based assignment.
Select OK to Continue.

We are done with our Tax Setup for Company, Customer & Vendor.
That’s all for today, will come up with more information in my next post.
Till then keep exploring and learning.
Whatsoever may be in final release we will see at that time when finally it will be released. Lets look what is available in this preview.
Login to Madeira using your credentials.
From Action Tab on landing/ Role Center Page on Ribbon click on Assisted Setup & Task.
List with available options page is opened.
Select Setup Sales Tax to continue.
Welcome Screen appears click on Next Button.
Default tax group is created and you can start with other setup, click on Next.
We are only talking about Tax since this preview is only for US so options relevant to them only available.
Select the Account for Tax Account (Sales & Purchase) using the Assist button which lists you the Available Accounts in COA.
Next City, Country & State related information need to be filled, and then click Next Button to proceed.
Depending upon Information provided in Previous Screen it suggests Tax Area Code, click on Next Button to continue.
We are done with Setup now we will assign this to Customer, Vendor and Company.
Click on Next to continue.
You can Assign the Tax Information to Customer as per entering simple query.
We can assign or we can leave this activity for later.
We have option to schedule a reminder for this activity. Click on Schedule to continue.
Enter the Date and Time for Start & Expiry of this reminder.
This will setup a Job for this and keep reminding you so that you have track of, that this activity is still pending and need to be completed.
Once done choose OK Button to continue.
You can see this in Jobs Entry Page.
Similarly you can do for Vendor too.
For company it will be applicable if you selected, so no separate screen for same for query based assignment.
Select OK to Continue.
We are done with our Tax Setup for Company, Customer & Vendor.
That’s all for today, will come up with more information in my next post.
Till then keep exploring and learning.
Exposing & Consuming the Web service from & inside Navision – Part-4
Continuing from my previous post. Find the link to access the same in case you missed it.
Exposing & Consuming the Web service from & inside Navision – Part-1
Exposing & Consuming the Web service from & inside Navision – Part-2
Exposing & Consuming the Web service from & inside Navision – Part-3
Step 5: Create a Codeunit to test Retrieve the data using above DLL and Send data in XML Format using another Web Service exposed in Dot Net.
How to create WCF Service Application using C#, Publishing it and creating DLL Class Library is out of scope of this document. You may require to take help from guy who are comfortable in .Net technology.
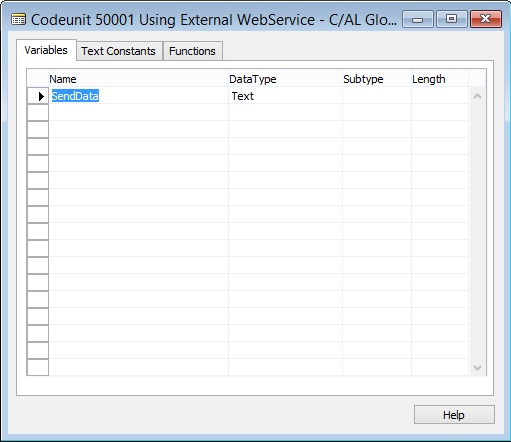
Let’s start with new codeunit, select the available ID in your database and suitable name to save this codeunit.
We will define a Global variable to hold the data we receive from Navision Web Service and pass to Web Service exposed outside Navision.
Create a Function to Read/Export the data using Navision Web Service.
Variables defined to the function is also shown in below screen.
We will add the code similar to below. Description provided along with the code in below screenshot.

Create a Function to Send Exported data from above function to the Web Service created outside the Navision. Web Service created in DotNet.
Here too we are using DLL file of the Outside Exposed Web Service.
Variables defined to the function is also shown in below screen.
We will add the code similar to below. Description provided along with the code in below screenshot.
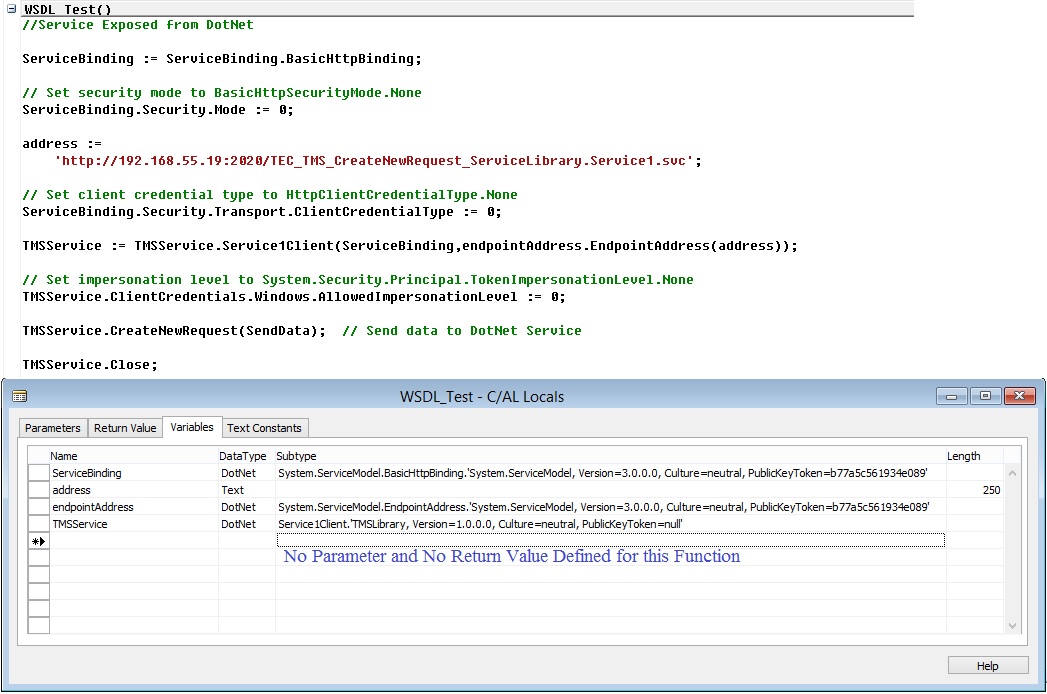
Now we have our both function ready.
One which Export data consuming the Navision Published Web Service and then read the data in BigText Variable and finally converted to Text variable.
Second one will send data consuming the Web Service Exposed outside Navision created in DotNet.
Let us test our process if it works as desired.
We will call above both function.
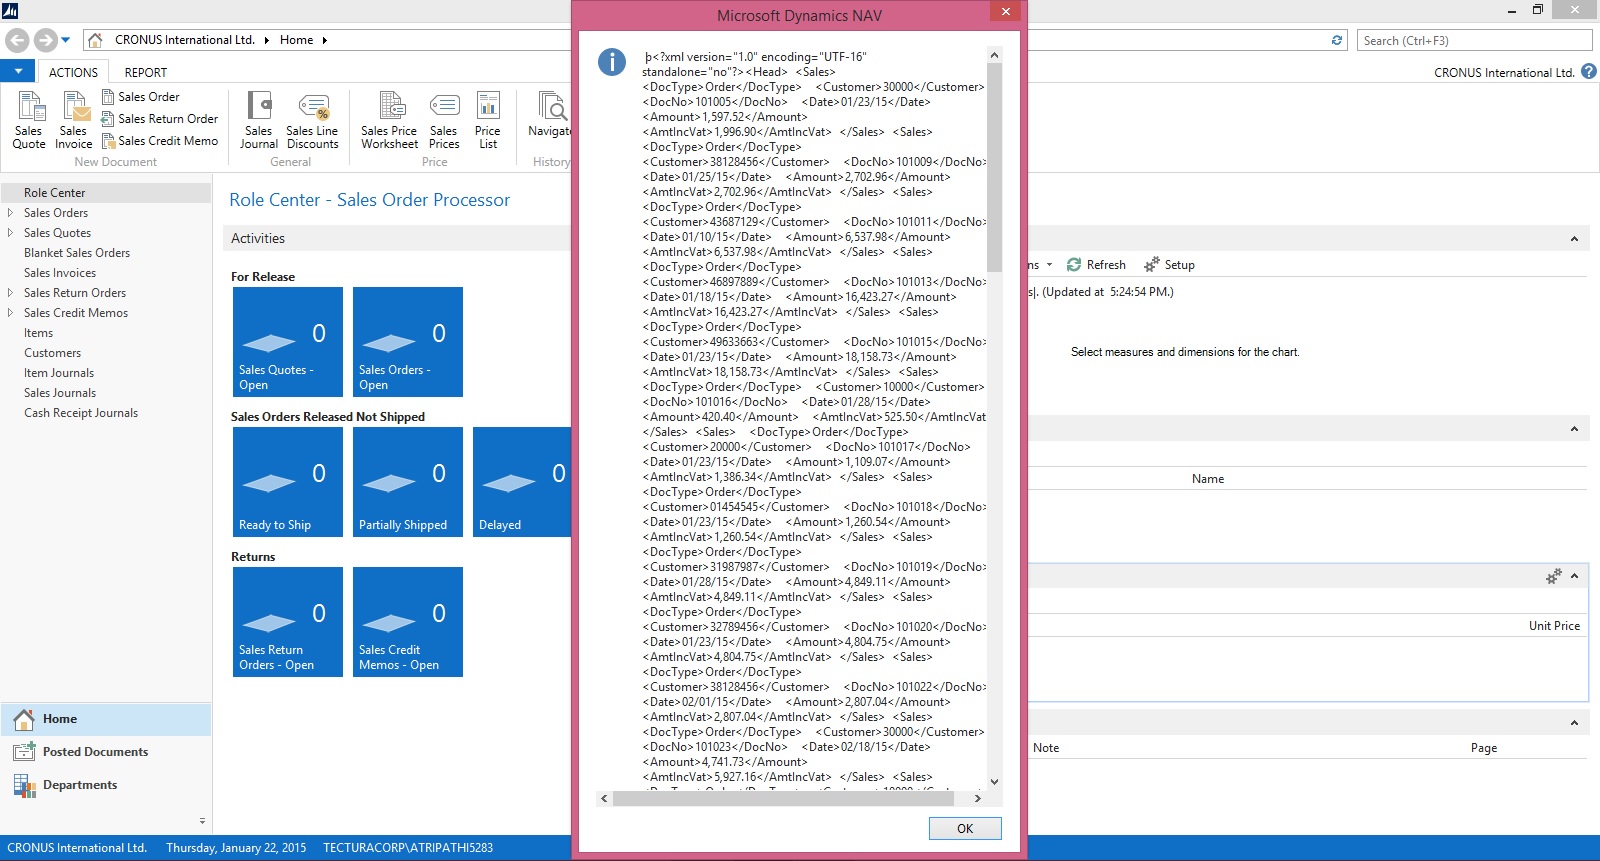
When we call First Web Service as a result we get the XML format file data in my Global defined Text Variable.
We will review the data which we are going to send to Second Web Service on Screen for which we are simply calling the Message.
Finally we will send the data to the Second Web Service, the content of XML file stored in our Global Variable.
Code we use is as below shown screenshot.

Save the codeunit and execute, as we have written our test code in Run trigger so we can directly run this codeunit.
The output will be as shown in below screenshots.
Until this step our Data is Exported and data is loaded in Global defined Text variable.
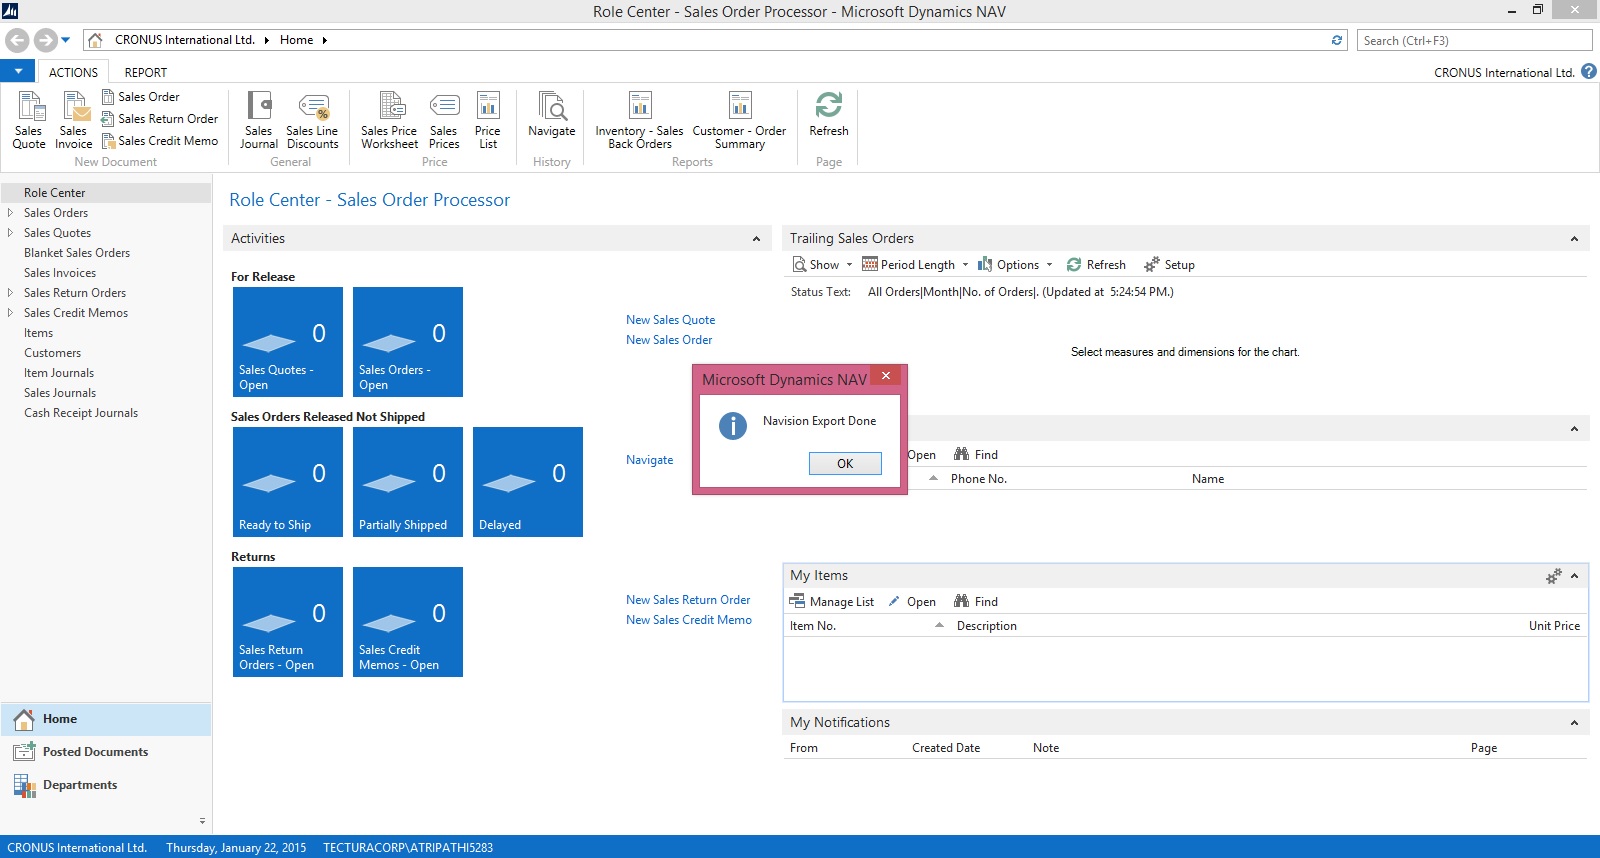
Here the content of Text variable is shown in Message window, which we can verify the data which we are going to send to the external Web Service.
As a final step we are sending this content to the External Web Service Exposed using DotNet.

Verify the data received at the DotNet side. You can program the Second Web Service as save the content on disk as file or perform any processing like inserting those data in some other table or displayed on screen.
That’s it for this series.
I will be posting couple of more posts on Web Services soon.
Since this was in response of request from one of my reader so I stick to the requirement.
In my other post I will show some different flavour of using the same.
Till then keep exploring and learning.
Will be back with other posts soon.
Exposing & Consuming the Web service from & inside Navision – Part-1
Exposing & Consuming the Web service from & inside Navision – Part-2
Exposing & Consuming the Web service from & inside Navision – Part-3
Step 5: Create a Codeunit to test Retrieve the data using above DLL and Send data in XML Format using another Web Service exposed in Dot Net.
How to create WCF Service Application using C#, Publishing it and creating DLL Class Library is out of scope of this document. You may require to take help from guy who are comfortable in .Net technology.
Let’s start with new codeunit, select the available ID in your database and suitable name to save this codeunit.
We will define a Global variable to hold the data we receive from Navision Web Service and pass to Web Service exposed outside Navision.
Create a Function to Read/Export the data using Navision Web Service.
Variables defined to the function is also shown in below screen.
We will add the code similar to below. Description provided along with the code in below screenshot.
Create a Function to Send Exported data from above function to the Web Service created outside the Navision. Web Service created in DotNet.
Here too we are using DLL file of the Outside Exposed Web Service.
Variables defined to the function is also shown in below screen.
We will add the code similar to below. Description provided along with the code in below screenshot.
Now we have our both function ready.
One which Export data consuming the Navision Published Web Service and then read the data in BigText Variable and finally converted to Text variable.
Second one will send data consuming the Web Service Exposed outside Navision created in DotNet.
Let us test our process if it works as desired.
We will call above both function.
When we call First Web Service as a result we get the XML format file data in my Global defined Text Variable.
We will review the data which we are going to send to Second Web Service on Screen for which we are simply calling the Message.
Finally we will send the data to the Second Web Service, the content of XML file stored in our Global Variable.
Code we use is as below shown screenshot.
Save the codeunit and execute, as we have written our test code in Run trigger so we can directly run this codeunit.
The output will be as shown in below screenshots.
Until this step our Data is Exported and data is loaded in Global defined Text variable.
Here the content of Text variable is shown in Message window, which we can verify the data which we are going to send to the external Web Service.
As a final step we are sending this content to the External Web Service Exposed using DotNet.
Verify the data received at the DotNet side. You can program the Second Web Service as save the content on disk as file or perform any processing like inserting those data in some other table or displayed on screen.
That’s it for this series.
I will be posting couple of more posts on Web Services soon.
Since this was in response of request from one of my reader so I stick to the requirement.
In my other post I will show some different flavour of using the same.
Till then keep exploring and learning.
Will be back with other posts soon.
Thursday, 28 April 2016
Exposing & Consuming the Web service from & inside Navision – Part-3
Continuing from my previous post. Find the link to access the same in case you missed it.
Exposing & Consuming the Web service from & inside Navision – Part-1
Exposing & Consuming the Web service from & inside Navision – Part-2
Step 4: Create a DLL to use as Add-in to consume the Web Service itself in Navision.
We will start with Class Library Project in Visual Studio.
It’s very simple with few steps to follow, and we will be done with our requirement.
Enter Name and select the path for your project solution folder. In my case I am saving my project to the default location of Visual Studio. And I am naming my project as XMLData.

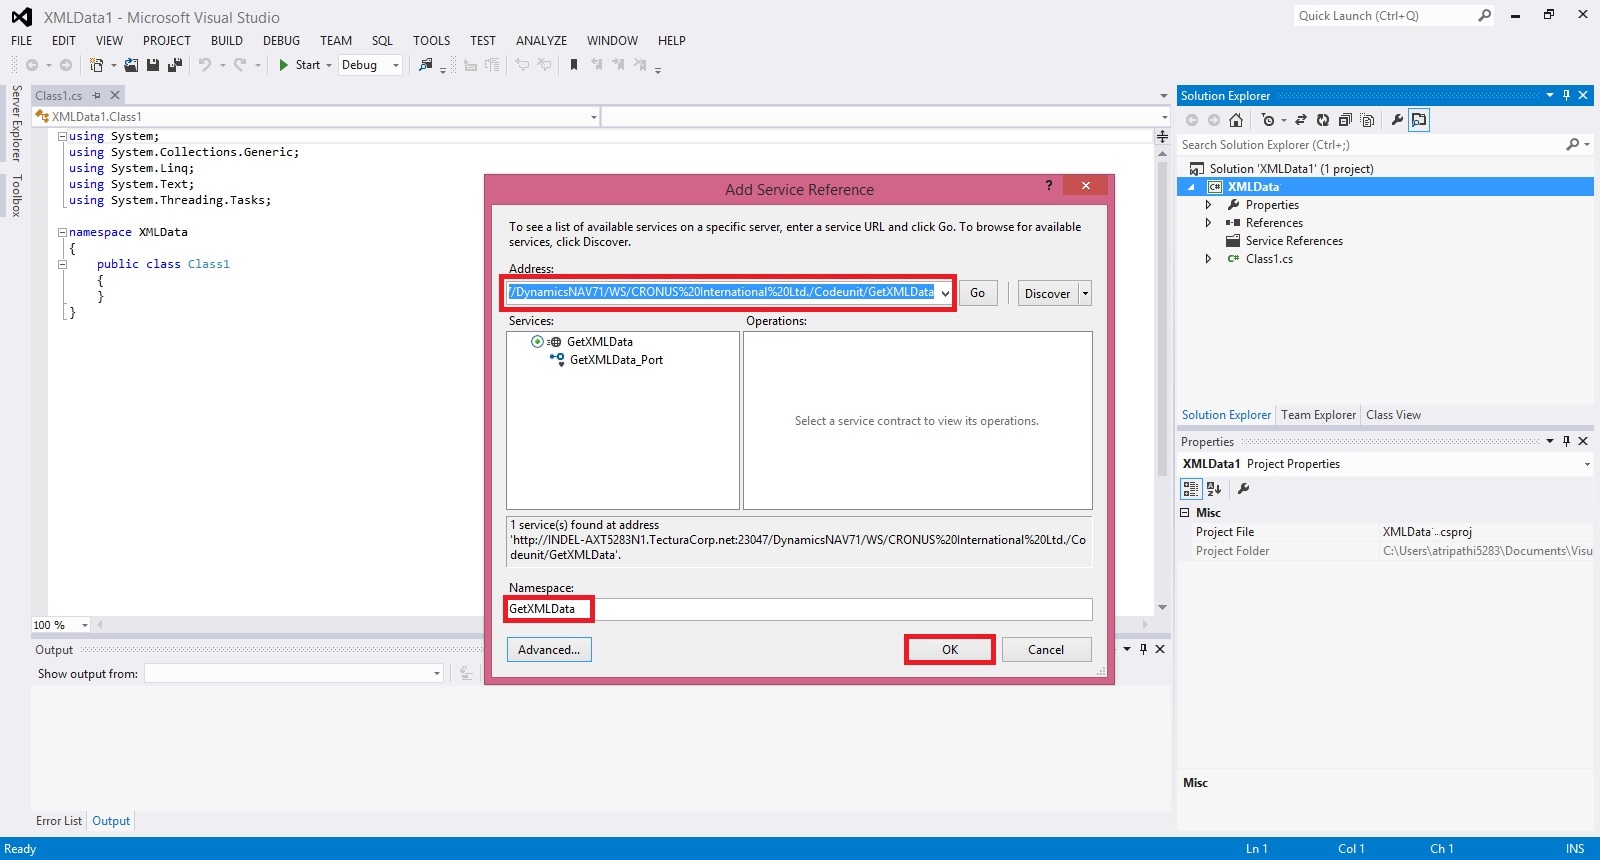
Right click on the project folder and Add Service reference to the project.

Enter your Web Service URL and click on GO.
Once your Service is listed, enter the Reference Namespace. And click on OK to add the Service Reference to the project.
Click on app.config in Solution browser to open.
Verify your code similar to below.

Build your Project to obtain the .dll file.
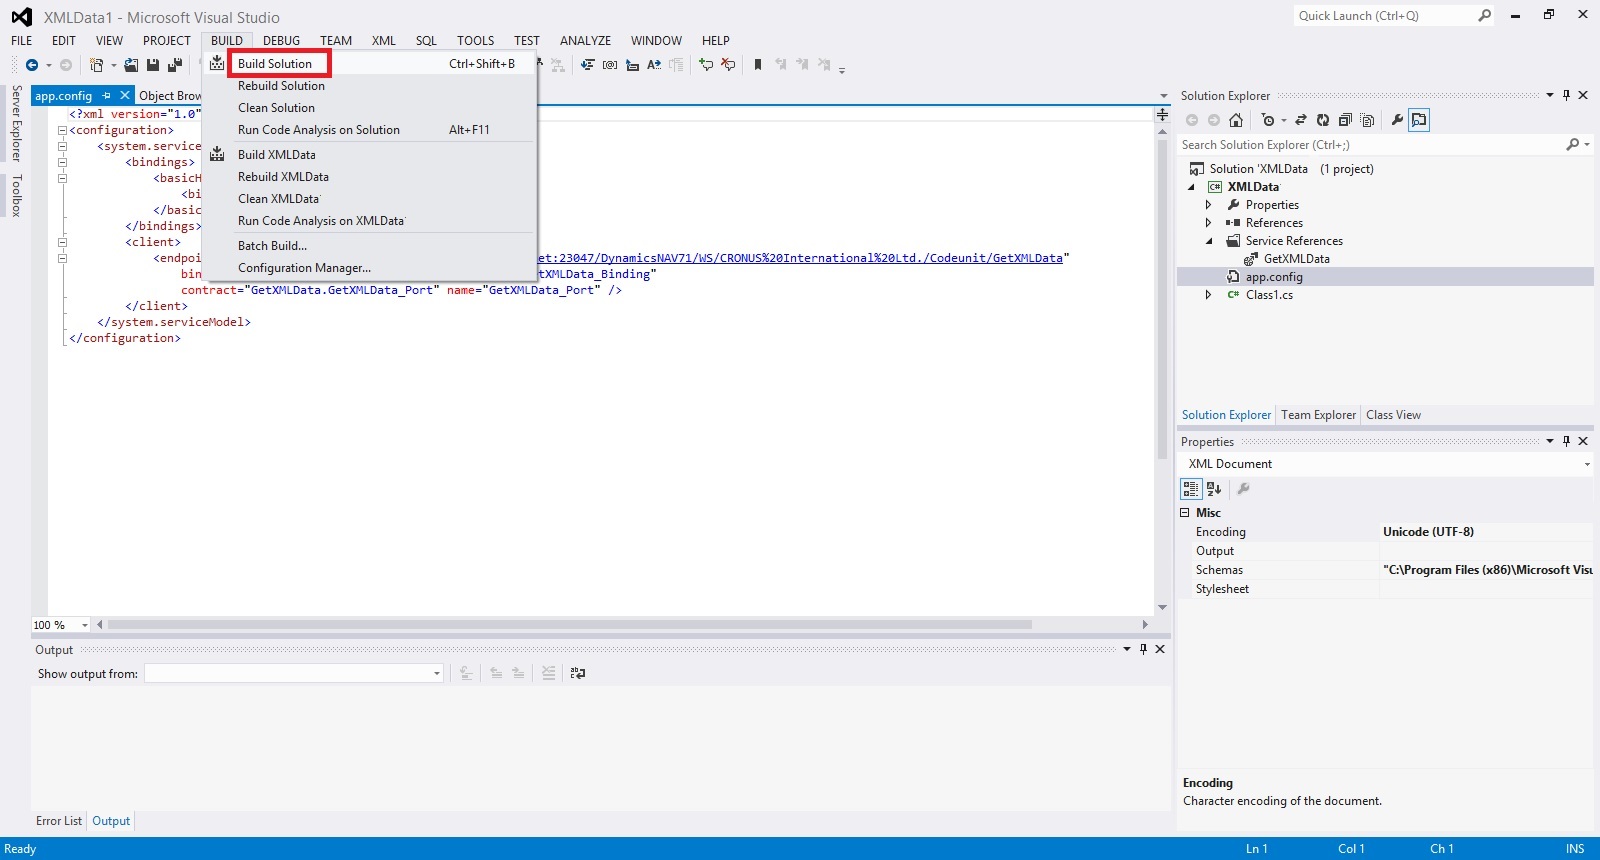
Below screen shows we have no errors and the .dll file is created successfully.

Locate the .dll file in your Project folder similar to path shown below. Copy your dll file.
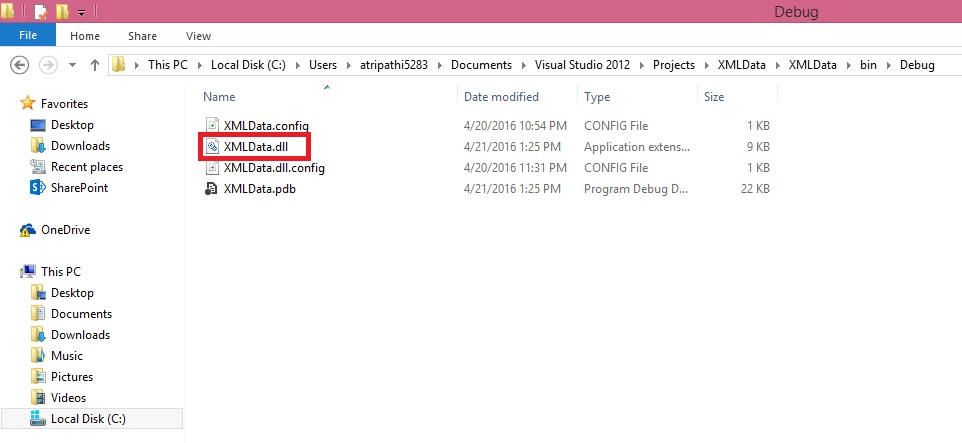
Create a folder and paste your .dll file to Service & RTC folder, as shown in below screen.

We are ready with the Add-in, which we will use in our next post to consume our service with the help of this dll, and call the method to obtain our file for further processing.
That’s all for this post, I will be back with next post in series soon.
Till then keep practicing.
To be Continued....
Wednesday, 27 April 2016
Microsoft Power BI – My Organization Content Pack Library
Continuing from my previous post. Today we will discuss about Content Pack Library (My Organization) in Power BI.
In case you have missed my previous posts here I present the link to all previous posts below:
Microsoft Power BI – Part – I
Introduction to Power BI and Creating Report from Excel Data, Local Files.
Microsoft Power BI – Part – II
Introduction to few Features of Power BI
Microsoft Power BI – Part – III
Power BI Desktop, Creating Dataset & Reports from In Premise Database installation
Microsoft Power BI – Part – IV
Power BI Gateway usage
Microsoft Power BI – Part – V
Scheduling Refresh of Dataset & Report created using In Premise Database
Microsoft Power BI – Part – VI
Power BI Content Pack
Microsoft Power BI – Part – VII
Power BI Mobile App
Microsoft Power BI – Part – VIII
Power BI Content Pack
Microsoft Power BI – Part – IX
Power BI Publisher for Excel
Microsoft Power BI – Part – X
Analyse in Excel (preview)
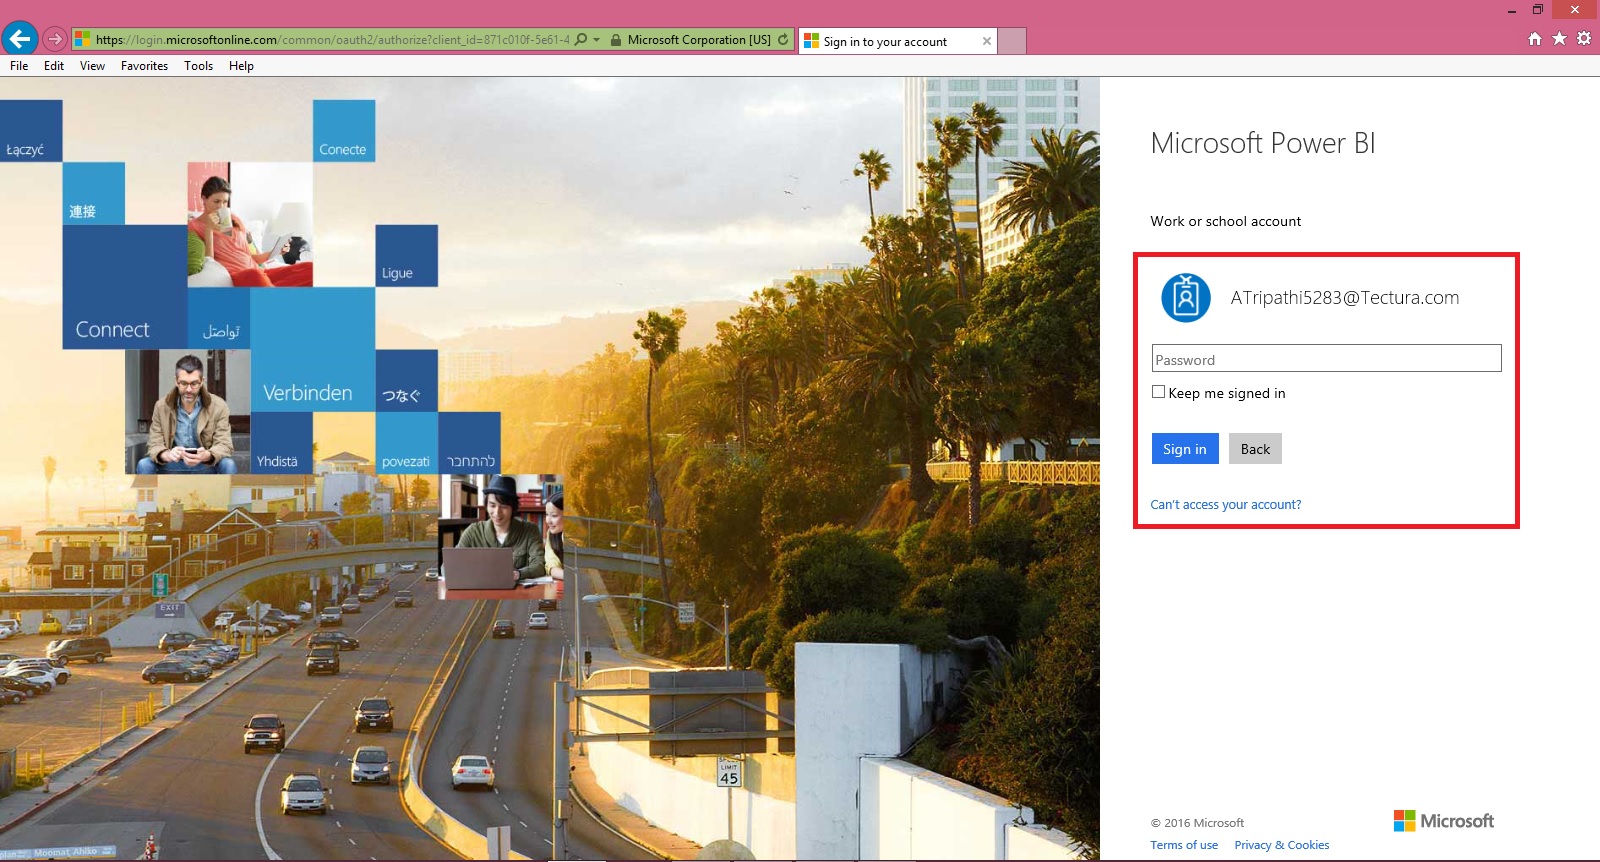
Login to Power BI using your credentials.
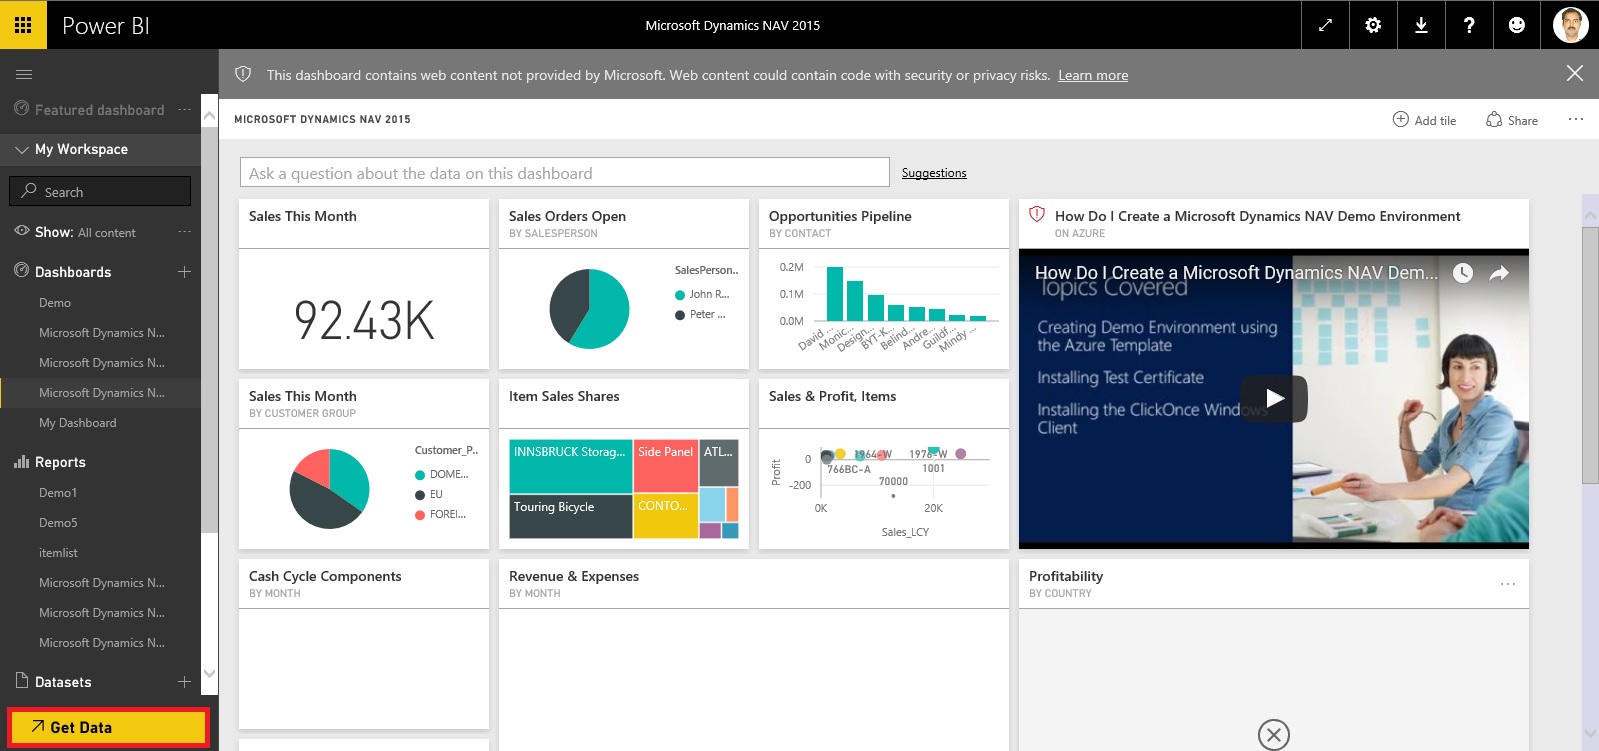
Select Get Data.
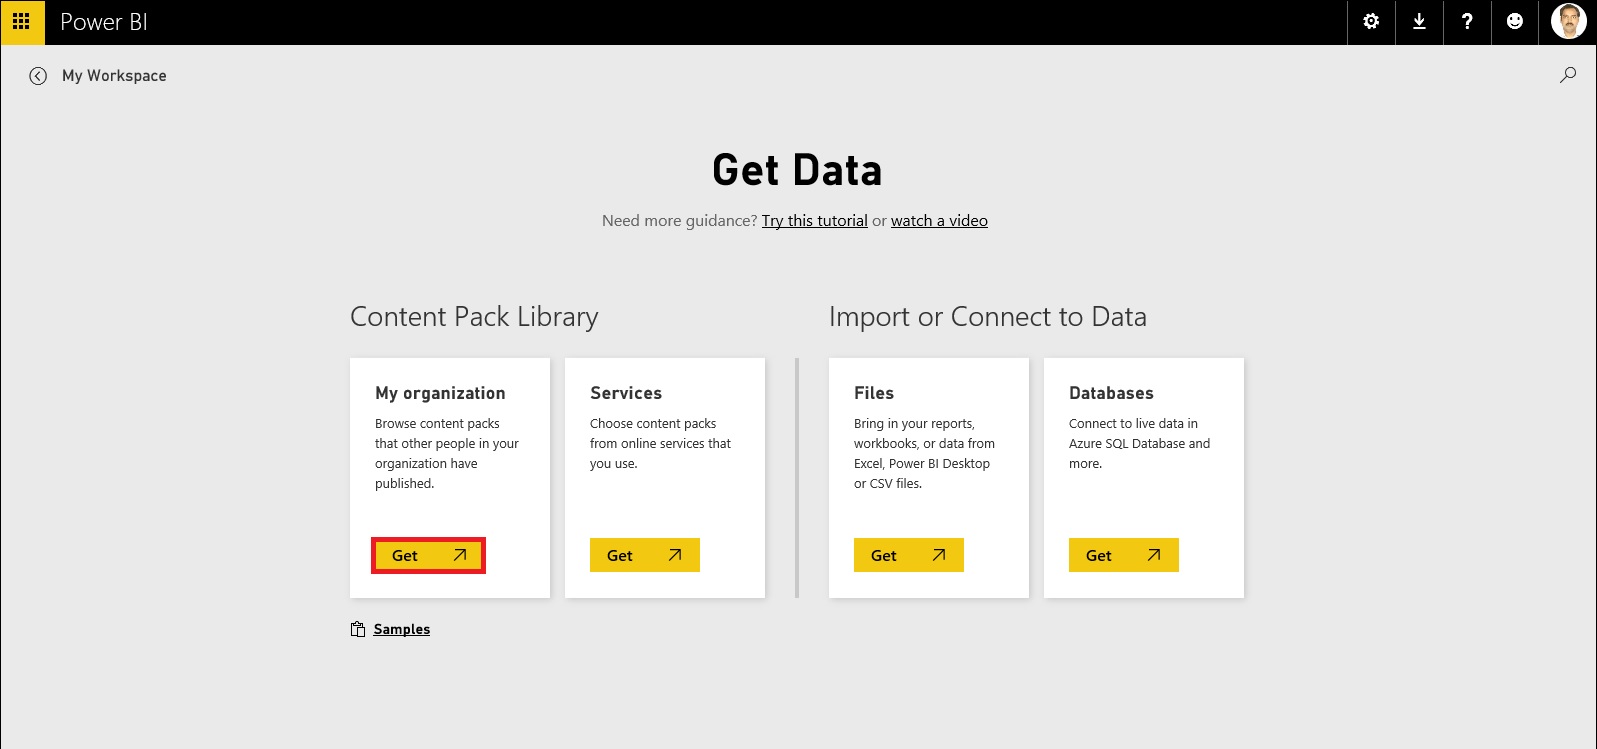
From Content Pack Library section select Get Data under My Organization.
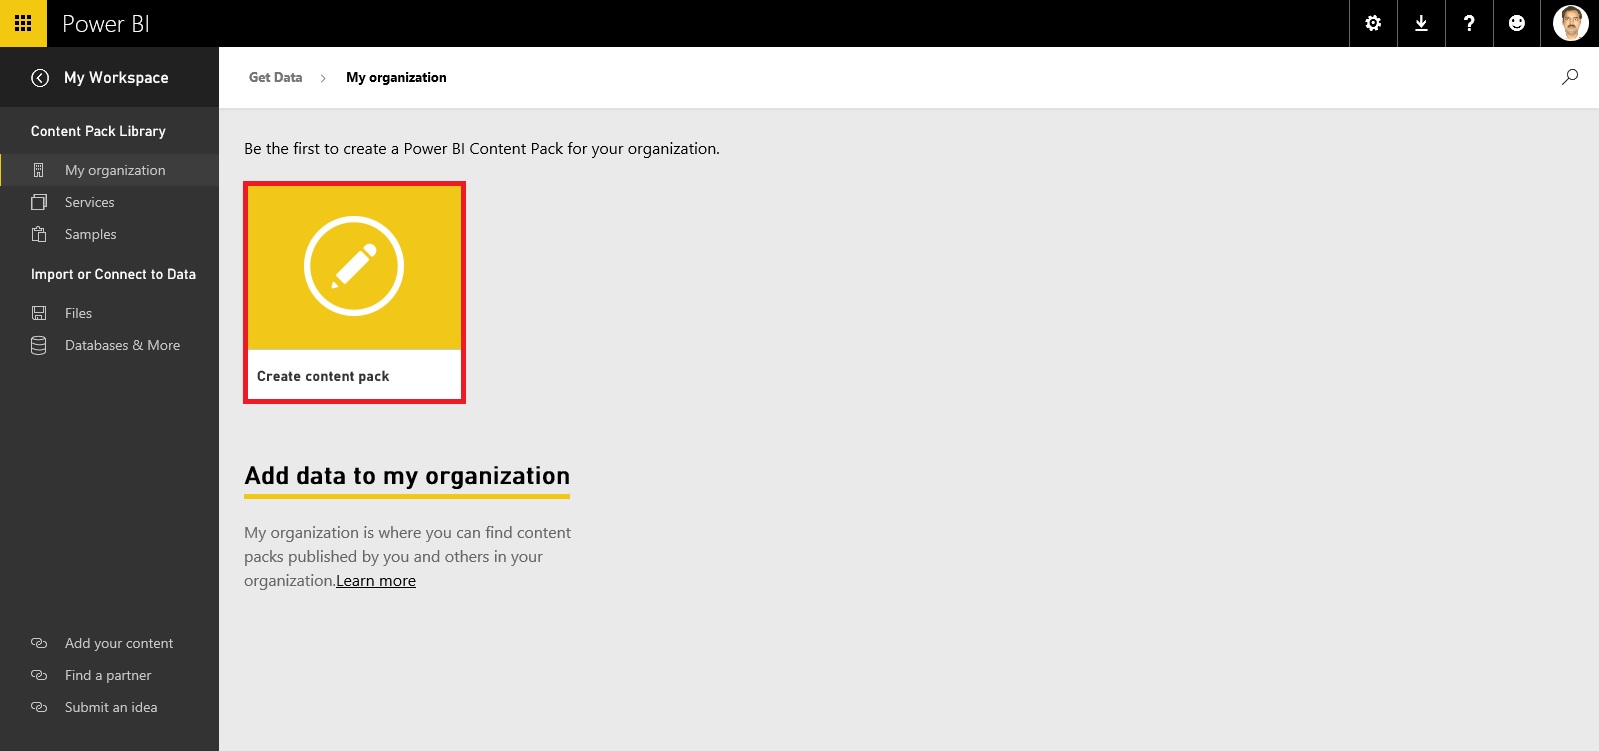
Select Create content pack.
This is the part where majority of work to be performed.
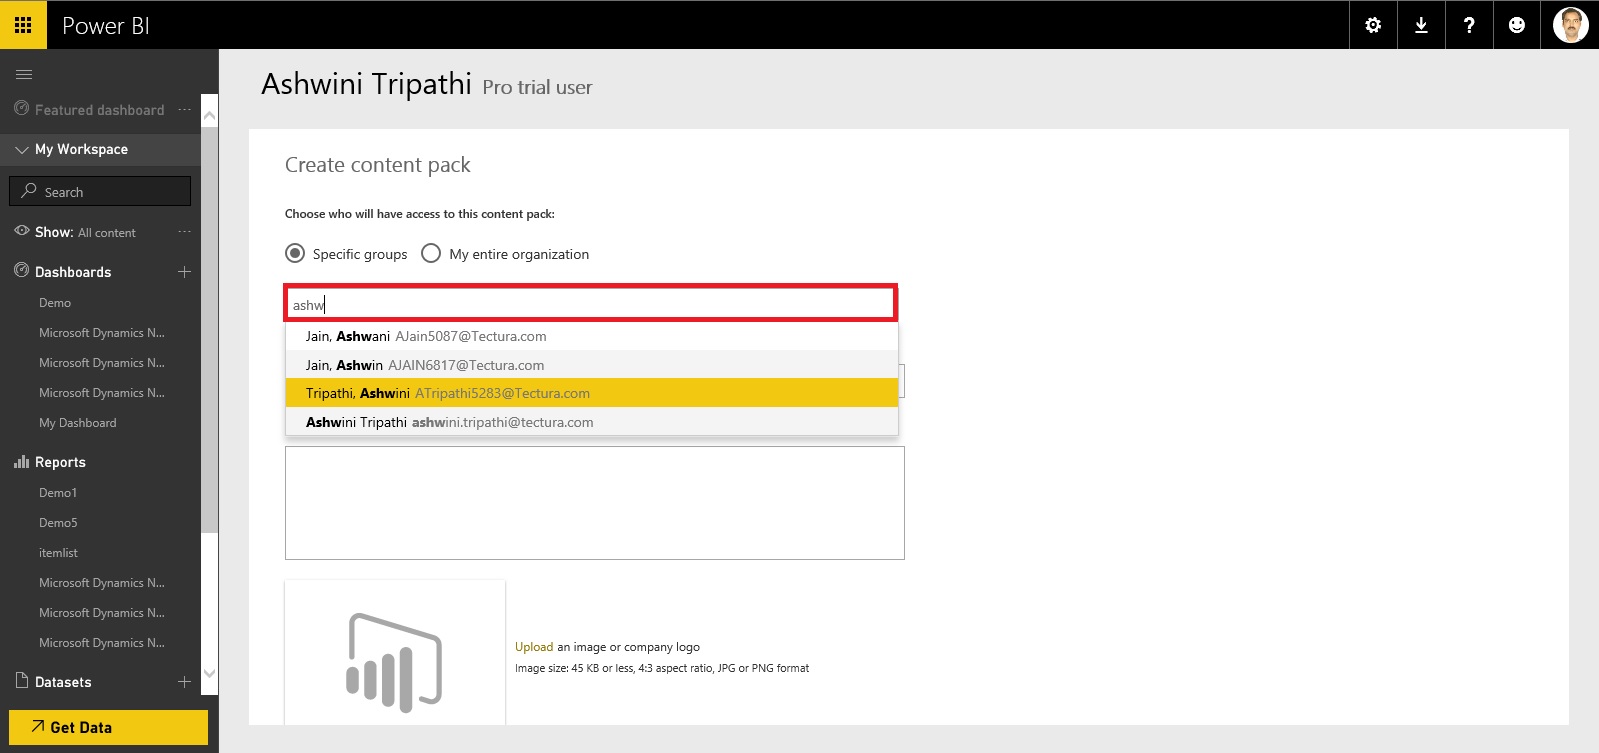
In First Section – Choose who will have access to this content pack
You have 2 option
Select the Group or Users if you go with first option.
In Second Section – Provide Title for you Content Pack
In Third Section – Provide detailed Description for your content pack.
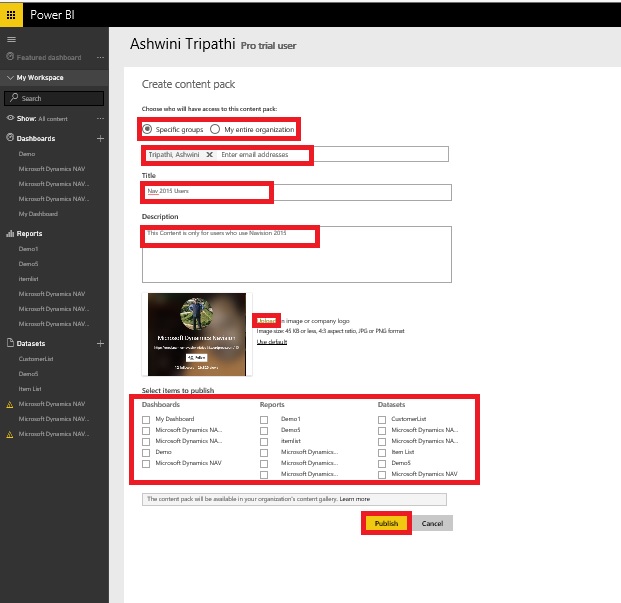
In Fourth Section – You can select Image for your content pack.
Finally in Fifth Section you will define what all content you want to share for the user using this content pack.
Here all available contents are divided under 3 sections (Dashboards, Reports & Datasets).
When you select Dashboard all included Reports and Dataset will be shared by default.
When you select Reports all included Datasets will be shared by default.
When you select Dataset only that will be shared.
You can select combination as you desire.
I will provide write up why we will select selective contents to share with case study, in my future post some time other.
Once you are done with all above step you are good to Publish the Content Pack.
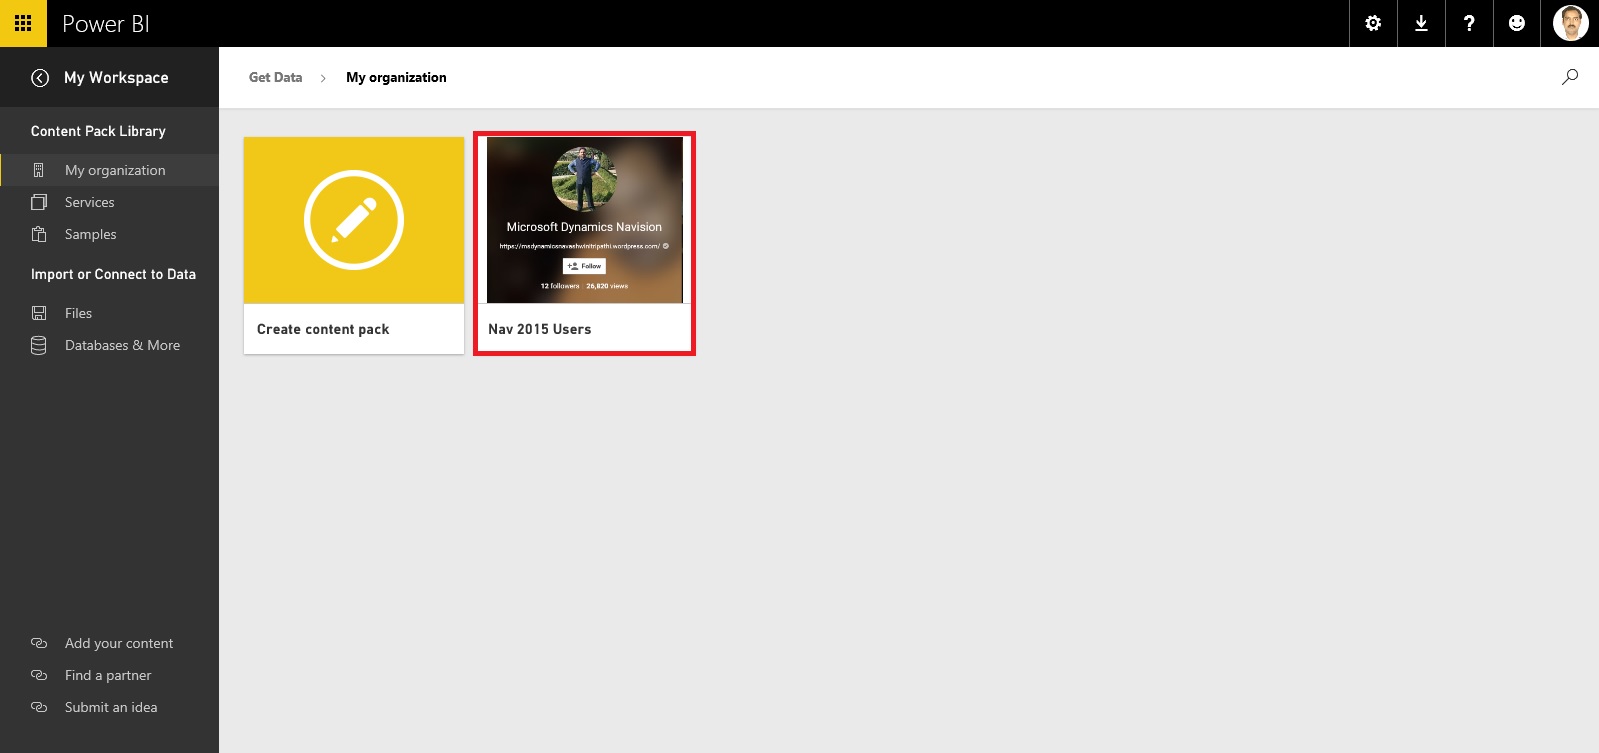
If we revisit the Get Data option again for My Organization, we can view our Published Content Pack which we shared with others.
User can customize as per his need and Share with others in form of New Content Pack or as-it-is depends.
Good Example will be we have one Content Pack for My Organization which include all modules Dashboard, Reports and Datasets.
My IT will create Module wise Content Pack (Finance, Sales, Purchase, Warehouse, Manufacturing etc…) and share these content packs with concern department Heads. Further each Heads will create sub-content pack and share with their team with information which is related to them and so on.
That’s all for today, will come up with more information in my future posts.
Till then keep exploring and learning.
In case you have missed my previous posts here I present the link to all previous posts below:
Microsoft Power BI – Part – I
Introduction to Power BI and Creating Report from Excel Data, Local Files.
Microsoft Power BI – Part – II
Introduction to few Features of Power BI
Microsoft Power BI – Part – III
Power BI Desktop, Creating Dataset & Reports from In Premise Database installation
Microsoft Power BI – Part – IV
Power BI Gateway usage
Microsoft Power BI – Part – V
Scheduling Refresh of Dataset & Report created using In Premise Database
Microsoft Power BI – Part – VI
Power BI Content Pack
Microsoft Power BI – Part – VII
Power BI Mobile App
Microsoft Power BI – Part – VIII
Power BI Content Pack
Microsoft Power BI – Part – IX
Power BI Publisher for Excel
Microsoft Power BI – Part – X
Analyse in Excel (preview)
Login to Power BI using your credentials.
Select Get Data.
From Content Pack Library section select Get Data under My Organization.
Select Create content pack.
This is the part where majority of work to be performed.
In First Section – Choose who will have access to this content pack
You have 2 option
- You can share with specific users or Groups, since your AD is in sync with your in premise AD you can select them.
- You can share with your entire Organization.
Select the Group or Users if you go with first option.
In Second Section – Provide Title for you Content Pack
In Third Section – Provide detailed Description for your content pack.
In Fourth Section – You can select Image for your content pack.
Finally in Fifth Section you will define what all content you want to share for the user using this content pack.
Here all available contents are divided under 3 sections (Dashboards, Reports & Datasets).
When you select Dashboard all included Reports and Dataset will be shared by default.
When you select Reports all included Datasets will be shared by default.
When you select Dataset only that will be shared.
You can select combination as you desire.
I will provide write up why we will select selective contents to share with case study, in my future post some time other.
Once you are done with all above step you are good to Publish the Content Pack.
If we revisit the Get Data option again for My Organization, we can view our Published Content Pack which we shared with others.
User can customize as per his need and Share with others in form of New Content Pack or as-it-is depends.
Good Example will be we have one Content Pack for My Organization which include all modules Dashboard, Reports and Datasets.
My IT will create Module wise Content Pack (Finance, Sales, Purchase, Warehouse, Manufacturing etc…) and share these content packs with concern department Heads. Further each Heads will create sub-content pack and share with their team with information which is related to them and so on.
That’s all for today, will come up with more information in my future posts.
Till then keep exploring and learning.
Subscribe to:
Posts (Atom)