This is where Power BI and Jet Enterprise really shine – they have the ability to understand NAV because they have little bundles of interpretation packs that can interpret NAV for you!
Checkout more via below shared link :-
http://www.catapulterp.com/plug-and-play-power-bi-and-jet-enterprise-in-nav-2016/
Tuesday, 31 May 2016
Sunday, 29 May 2016
Multilanguage across Conflicting Text Encoding Formats
For more details please see my earlier posts:
Managing Multilanguage support in Navision Overview
How do I translate my ResX Files?
Working with Partner Translation Toolkit
To support users with translated strings across conflicting text encoding formats, you must save the translations to a text file in UTF-8 text encoding format.
This converts the file to Unicode, which Microsoft Dynamics NAV Development Environment cannot import. Instead, you add the files to a dedicated Translations folder on the Microsoft Dynamics NAV Server computer.
The default location of this folder is
When you have more than one service instance, there is a Translations folder for each service instance, such as
Microsoft Dynamics NAV Server adds any strings in text files that you place in the relevant Translations folder to the metadata for Microsoft Dynamics NAV.
To add translated strings for a conflicting text encoding format:
In the development environment, export the strings for the objects that you want to translate.
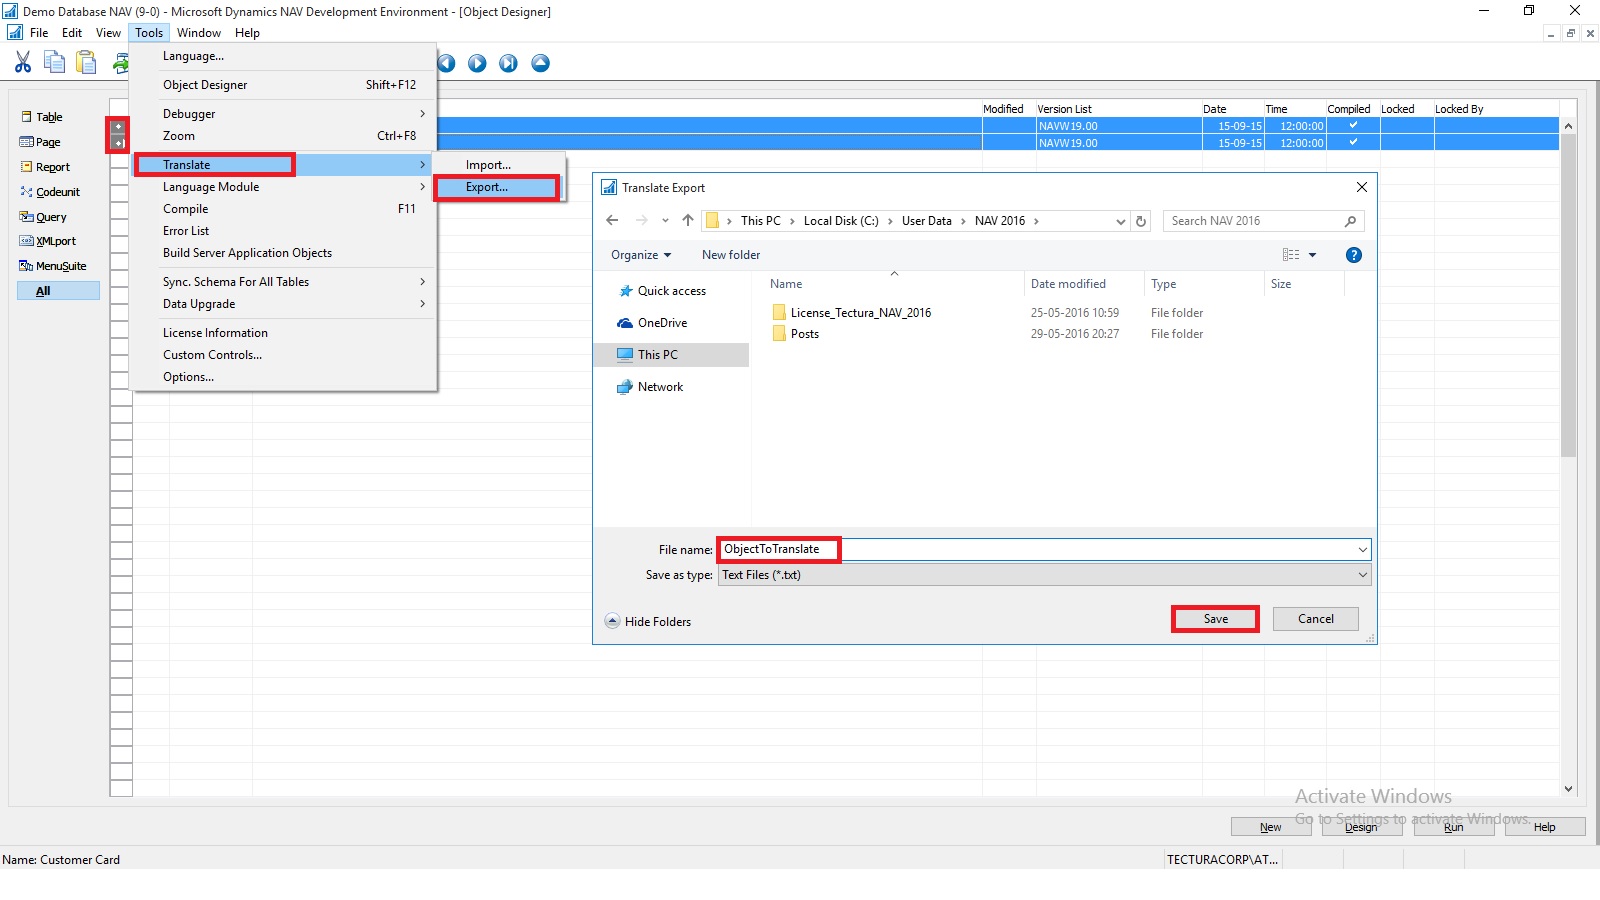
Select the Objects you wish to add translation, Export and save as text file.
Translate the strings in the resulting text file into desired Language by using your preferred translation process.
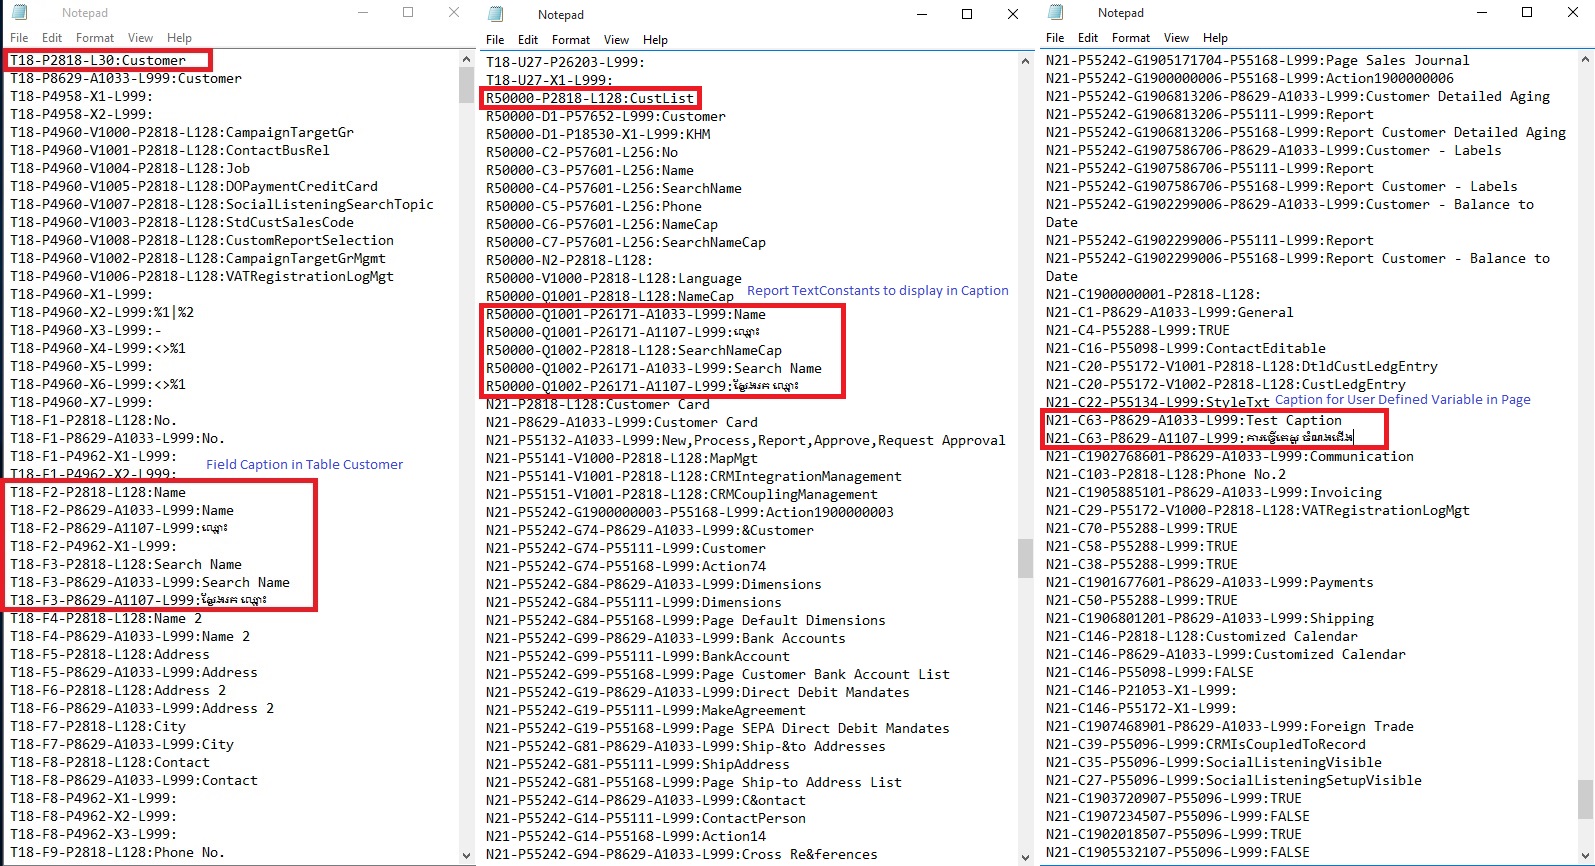
I have translated following Captions in Khmer language:
When translations are complete, save the translated strings into a text file in the UTF-8 text encoding format. The extension of the file must be .txt.
It is recommend that you remove the other Language strings from the Unicode file before you copy it to the Microsoft Dynamics NAV Server computer.
Microsoft Dynamics NAV Server queries the Translations folder for updated strings, and for performance reasons the folder should only contain strings that you cannot import into the development environment because of conflicting codepages.
Copy the UTF-8 file to the equivalent of
on the Microsoft Dynamics NAV Server computer.
When you have more than one service instance, there is a Translations folder for each service instance, such as
Restart the Microsoft Dynamics NAV Server instance.
Microsoft Dynamics NAV Server adds the translated strings in the file to the metadata store for the Microsoft Dynamics NAV deployment.
Now Users of this Microsoft Dynamics NAV Server session can now change the user interface language from English to required Language.
The metadata store is updated whenever you add new strings to the Translations folder and then restart the Microsoft Dynamics NAV Server service instance. Cached strings are not deleted from the metadata store when you restart the service instance.
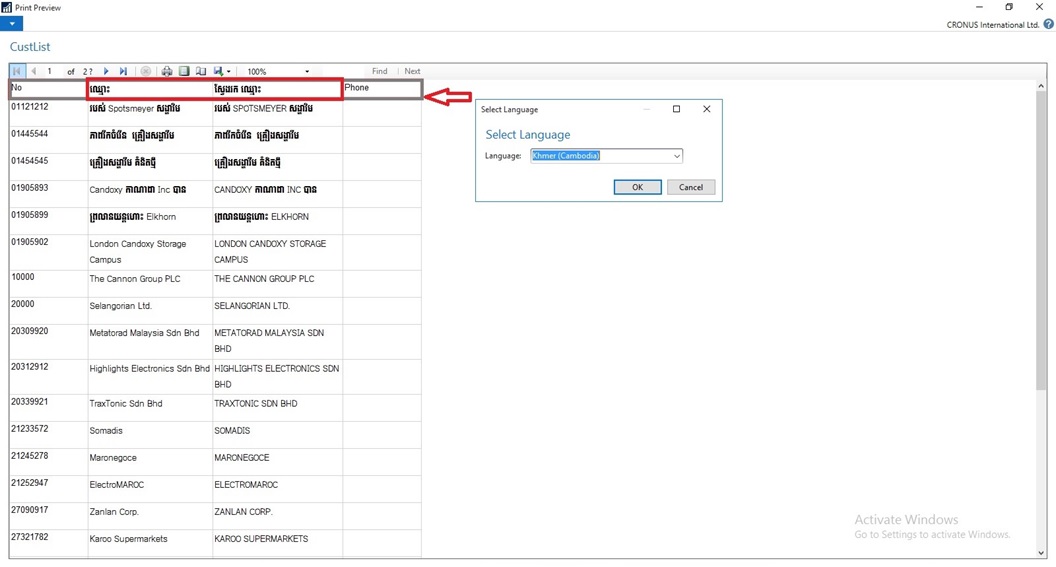
Let us see the effect of this translation. Let’s run the RTC to see the net effect of same.
[A] Customer List in English However Data Stored in Khmer Language

B] Two Captions Changed in Khmer Language for Name & Search Name

[C] Customer Card in English Language. Selected Captions are changed in Khmer Language
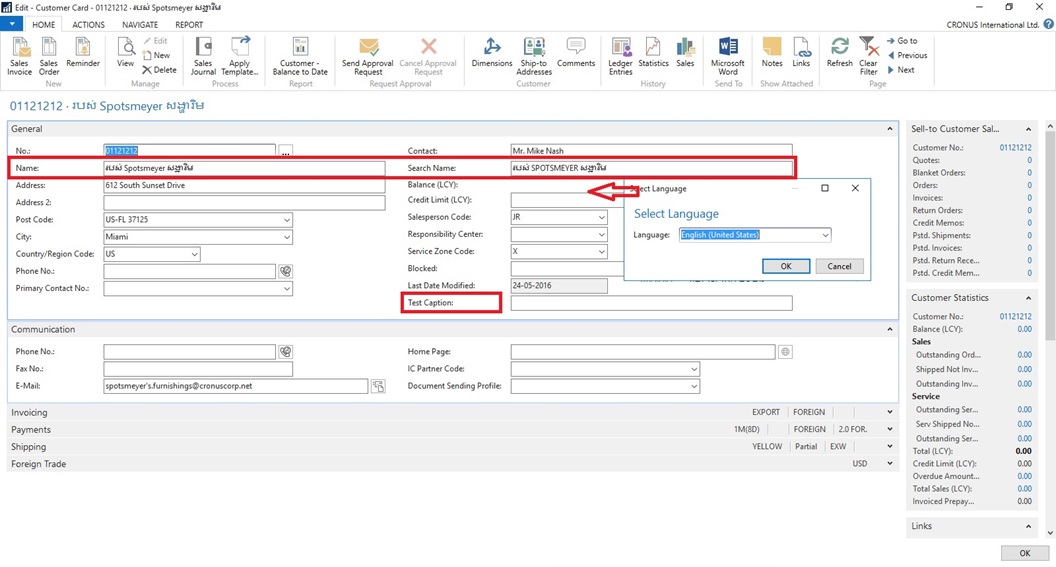
[D] Caption Changed for Name & Search Name to Support Khmer Language also for Field not available in Table the Test Caption

[E] Report Caption in English Language however data in Khmer Language
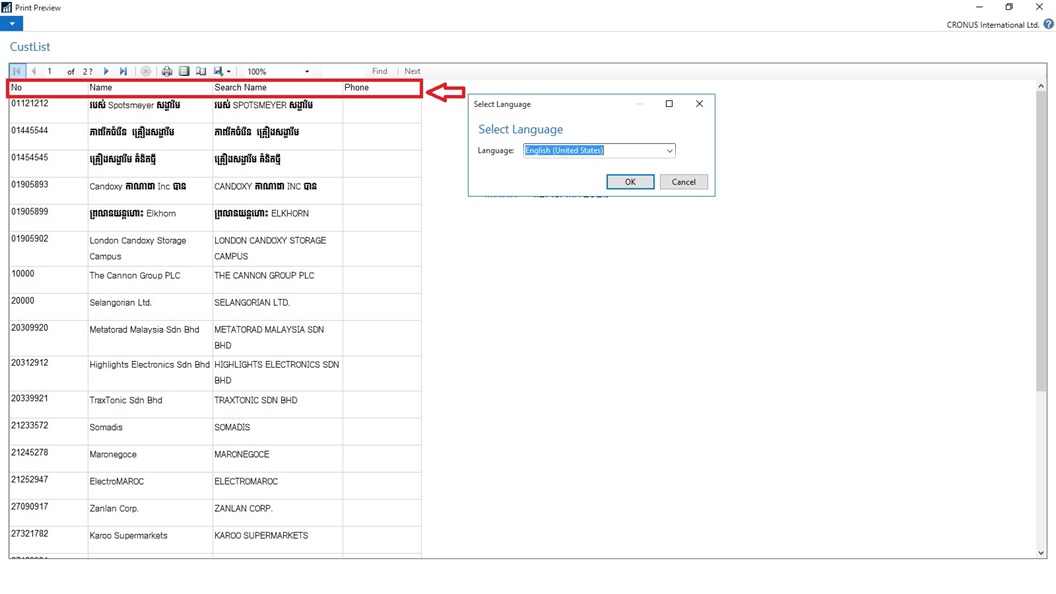
[F] Report Caption Changed to Khmer Language for Name & Search Name
You can manage Languages using above trick for translate strings across conflicting text encoding formats.
Will comeup with more details in my upcomming posts.
Managing Multilanguage support in Navision Overview
How do I translate my ResX Files?
Working with Partner Translation Toolkit
To support users with translated strings across conflicting text encoding formats, you must save the translations to a text file in UTF-8 text encoding format.
This converts the file to Unicode, which Microsoft Dynamics NAV Development Environment cannot import. Instead, you add the files to a dedicated Translations folder on the Microsoft Dynamics NAV Server computer.
The default location of this folder is
C:\Program Files\Microsoft Dynamics NAV\90\Service\Translations.
When you have more than one service instance, there is a Translations folder for each service instance, such as
C:\Program Files\Microsoft Dynamics NAV\90\Service\Instances\MyInstance\Translations.
Microsoft Dynamics NAV Server adds any strings in text files that you place in the relevant Translations folder to the metadata for Microsoft Dynamics NAV.
To add translated strings for a conflicting text encoding format:
In the development environment, export the strings for the objects that you want to translate.
Select the Objects you wish to add translation, Export and save as text file.
Translate the strings in the resulting text file into desired Language by using your preferred translation process.
I have translated following Captions in Khmer language:
- For Field Name & Search Name in Table Customer (18)
- TextConstant in Report CustList (50000) to display Caption for Name & Search Name
- Caption for User defined variable in Page Customer Card (21)
When translations are complete, save the translated strings into a text file in the UTF-8 text encoding format. The extension of the file must be .txt.
It is recommend that you remove the other Language strings from the Unicode file before you copy it to the Microsoft Dynamics NAV Server computer.
Microsoft Dynamics NAV Server queries the Translations folder for updated strings, and for performance reasons the folder should only contain strings that you cannot import into the development environment because of conflicting codepages.
Copy the UTF-8 file to the equivalent of
C:\Program Files\Microsoft Dynamics NAV\90\Service\Translations
on the Microsoft Dynamics NAV Server computer.
When you have more than one service instance, there is a Translations folder for each service instance, such as
C:\Program Files\Microsoft Dynamics NAV\90\Service\Instances\MyInstance\Translations.
Restart the Microsoft Dynamics NAV Server instance.
Microsoft Dynamics NAV Server adds the translated strings in the file to the metadata store for the Microsoft Dynamics NAV deployment.
Now Users of this Microsoft Dynamics NAV Server session can now change the user interface language from English to required Language.
The metadata store is updated whenever you add new strings to the Translations folder and then restart the Microsoft Dynamics NAV Server service instance. Cached strings are not deleted from the metadata store when you restart the service instance.
Let us see the effect of this translation. Let’s run the RTC to see the net effect of same.
[A] Customer List in English However Data Stored in Khmer Language
B] Two Captions Changed in Khmer Language for Name & Search Name
[C] Customer Card in English Language. Selected Captions are changed in Khmer Language
[D] Caption Changed for Name & Search Name to Support Khmer Language also for Field not available in Table the Test Caption
[E] Report Caption in English Language however data in Khmer Language
[F] Report Caption Changed to Khmer Language for Name & Search Name
You can manage Languages using above trick for translate strings across conflicting text encoding formats.
Will comeup with more details in my upcomming posts.
Saturday, 28 May 2016
Customers with Enterprise Agreement who already have SQL Server Licenses, can use them on Azure Virtual Machines
Now Microsoft Enterprise Agreement customers can bring existing licenses to run SQL Server on Azure Virtual Machines. Since the launch of Azure Virtual Machines, customers can already run SQL Server on Azure Virtual Machines through several existing SQL Server images available in the Azure Gallery, or bring their own images to Azure.
These images and capabilities will continue to be supported so customers can continue to take advantage of pay per use licensing for SQL Server on Azure Virtual Machines.
Starting this week, customers with Enterprise Agreement who already have SQL Server Licenses, can use them on Azure Virtual Machines with Microsoft-certified (BYOL) gallery images. These images will not charge for SQL Server licensing, just for compute cost.
For more details see the Link.
Krishi Kalyan Cess Feature for Microsoft Dynamics NAV 2013 R2 for India Released
Government has introduced a new Cess called 'Krishi Kalyan Cess (KKC)' in Finance Act 2016 which will take effect from 01-Jun-2016. It is imposed on all taxable Services at the rate of 0.5%. KKC is not a Cess on Service Tax but it is a tax on taxable services in addition to Service tax. It would be calculated in the same way as Service Tax is being calculated.
IN7.1_TFS167310 - Krishi Kalyan Cess [9.04 MB - EXE]
Before this update can be installed, the following prerequisites are required:
Microsoft Dynamics ® NAV 2013 R2 India
Pre-requisites
The following fields are added to Service Tax Setup , setup values given below
For detailed information you can check this Link.
Download
IN7.1_TFS167310 - Krishi Kalyan Cess [9.04 MB - EXE]
Installation
Before this update can be installed, the following prerequisites are required:
Microsoft Dynamics ® NAV 2013 R2 India
Pre-requisites
- NAV 2013 R2 RTM Database (Version 7.10.35473)
- Import below Hotfixes sequentially
| No. | TFSID | Fixes Description |
| 1 | TFS353595 | TDS Zero Percent |
| 2 | TFS354411 | FVU 3.9-4.1 and TDS Zero Pct |
| 3 | HF377555 | GL Inconsistency |
| 4 | TFS160375 | Swachh Bharat Cess |
License Requirement
No new objects have been added through this update. Licensing refresh is not required.
Setup
The following fields are added to Service Tax Setup , setup values given below
| S. No | Field Description | Value |
| 1. | KK Cess % | 0.5 |
| 2. | KK Cess Payable Account | Balance Sheet Account under Liabilities and Account Type = Posting |
| 3. | KK Cess Payable Interim | Balance Sheet Account under Liabilities and Account Type = Posting |
| 4. | KK Cess Receivable Interim Account | Balance Sheet Account under Assets and Account Type = Posting |
| 5. | KK Cess Receivable Account | Balance Sheet Account under Assets and Account Type = Posting |
| 6. | KK Cess Expense Account | Income Statement Account and Account Type = Posting |
For detailed information you can check this Link.
Setup Send Documents by Email in Madeira
To enable emails from within Project "Madeira", start the Set Up Email assisted setup on the Home page. We have already seen this in our previous post, you can find it here.
To offer your customers to pay for sales electronically using a payment service, such as PayPal, you can also have the PayPal information and hyperlink inserted in the email body. We have already covered this in our previous post, you can find it here.
From all supported documents, you initiate emailing by choosing the Send action, on posted documents, or the Post and Send action, on non-posted documents.
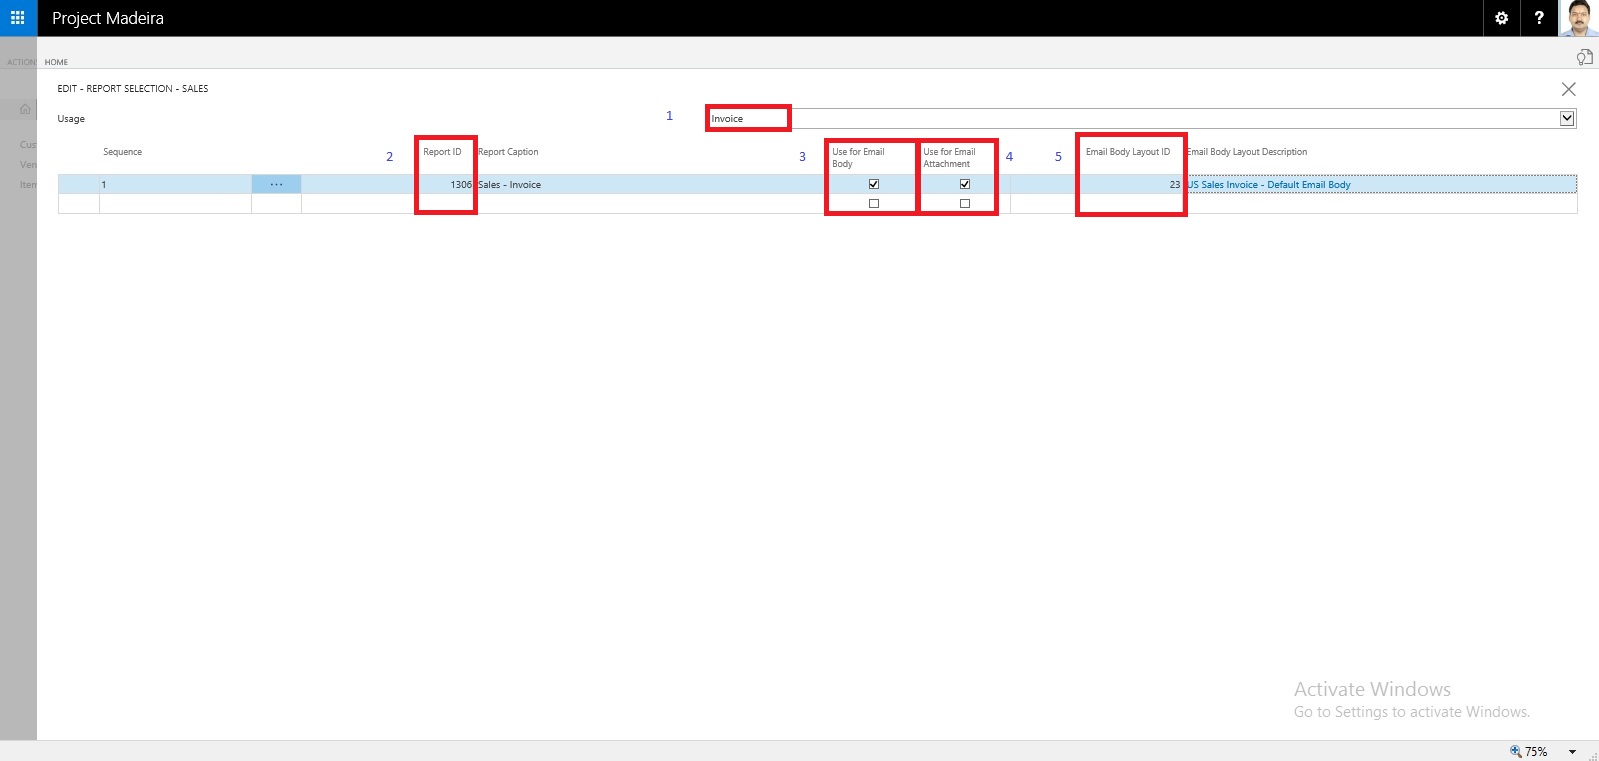
Let us Setup document-specific email body for sales invoices.
From the search page find Report Selections Sales:

Fill the Value as shown in below screen in same sequence.
If you want to offer customers to pay for sales electronically, you can set up the related payment service, such as PayPal, and then have the PayPal information and hyperlink inserted in the email body as well. We have already covered this in our previous post, you can find it here.
Will come up with more details & feature explaination in my upcomming posts.
To offer your customers to pay for sales electronically using a payment service, such as PayPal, you can also have the PayPal information and hyperlink inserted in the email body. We have already covered this in our previous post, you can find it here.
From all supported documents, you initiate emailing by choosing the Send action, on posted documents, or the Post and Send action, on non-posted documents.
Let us Setup document-specific email body for sales invoices.
From the search page find Report Selections Sales:
Fill the Value as shown in below screen in same sequence.
If you want to offer customers to pay for sales electronically, you can set up the related payment service, such as PayPal, and then have the PayPal information and hyperlink inserted in the email body as well. We have already covered this in our previous post, you can find it here.
Will come up with more details & feature explaination in my upcomming posts.
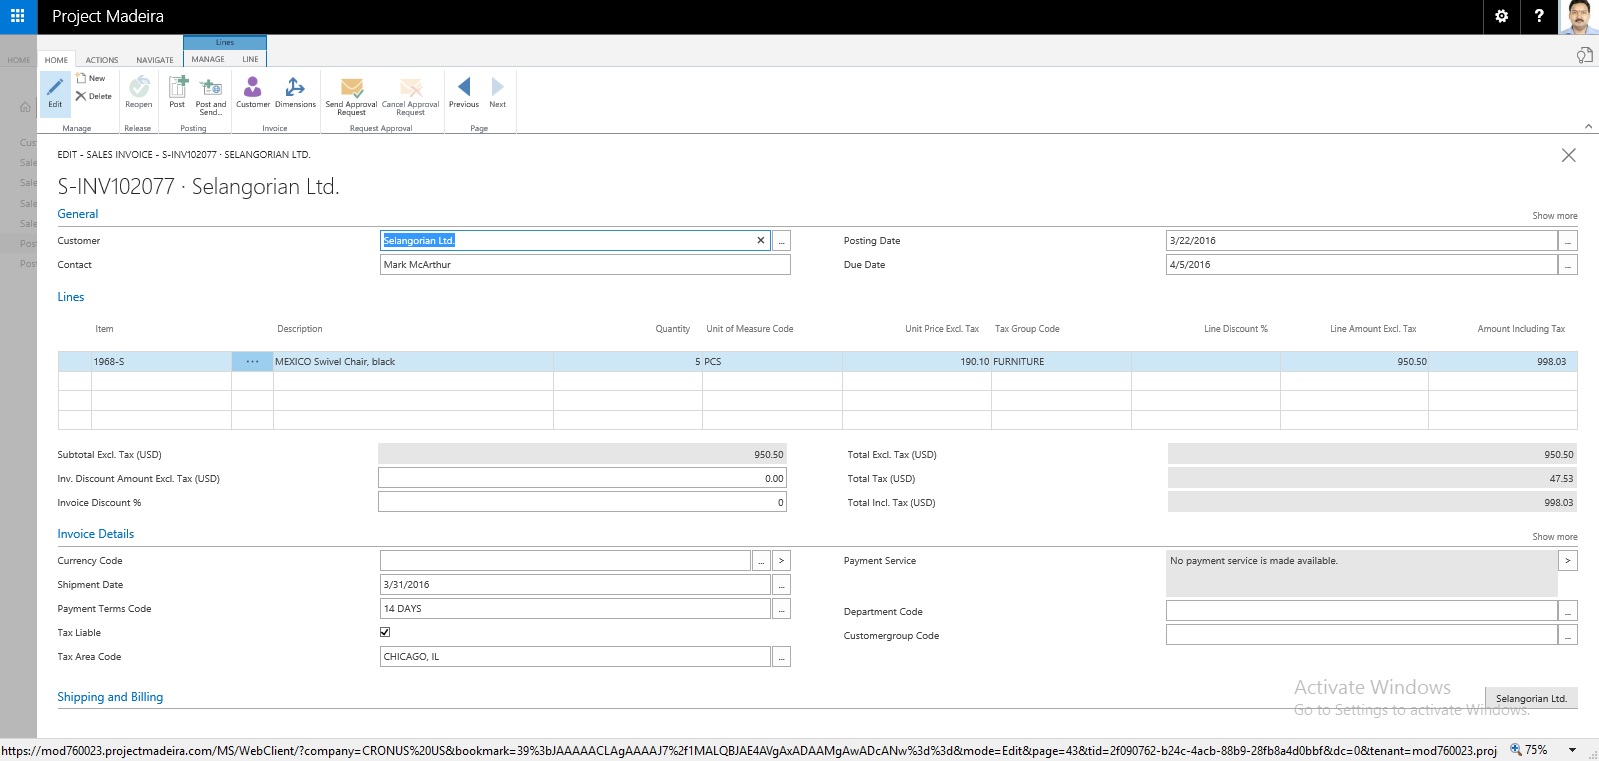
How do I process Sales Return? – In Maderia
We have seen in our previous post the feature where if a posted sales invoice has not yet been paid, then you can use the Correct or Cancel functions on the posted sales invoice to automatically reverse the involved transactions.
There could be the situation where customer wants partial refund or return of sales.
You can create the Credit Memo from the Posted Sales Invoice, which will create the Credit Memo for you and leave to you to modify and post the credit memo.
Most fields on the sales credit memo header are filled with the information from the posted sales invoice. You can edit all the fields, with new information that reflects the return agreement.
You can apply the Customer Entries via selecting the line with the posted sales document that you want to apply the sales credit memo to.
The posted sales documents that you applied the credit memo to are now reversed, and a refund payment can be created for the customer.
The sales credit memo is removed and replaced with a new document in the list of posted sales credit memos.
Let us see how we can achieve this in Madeira.
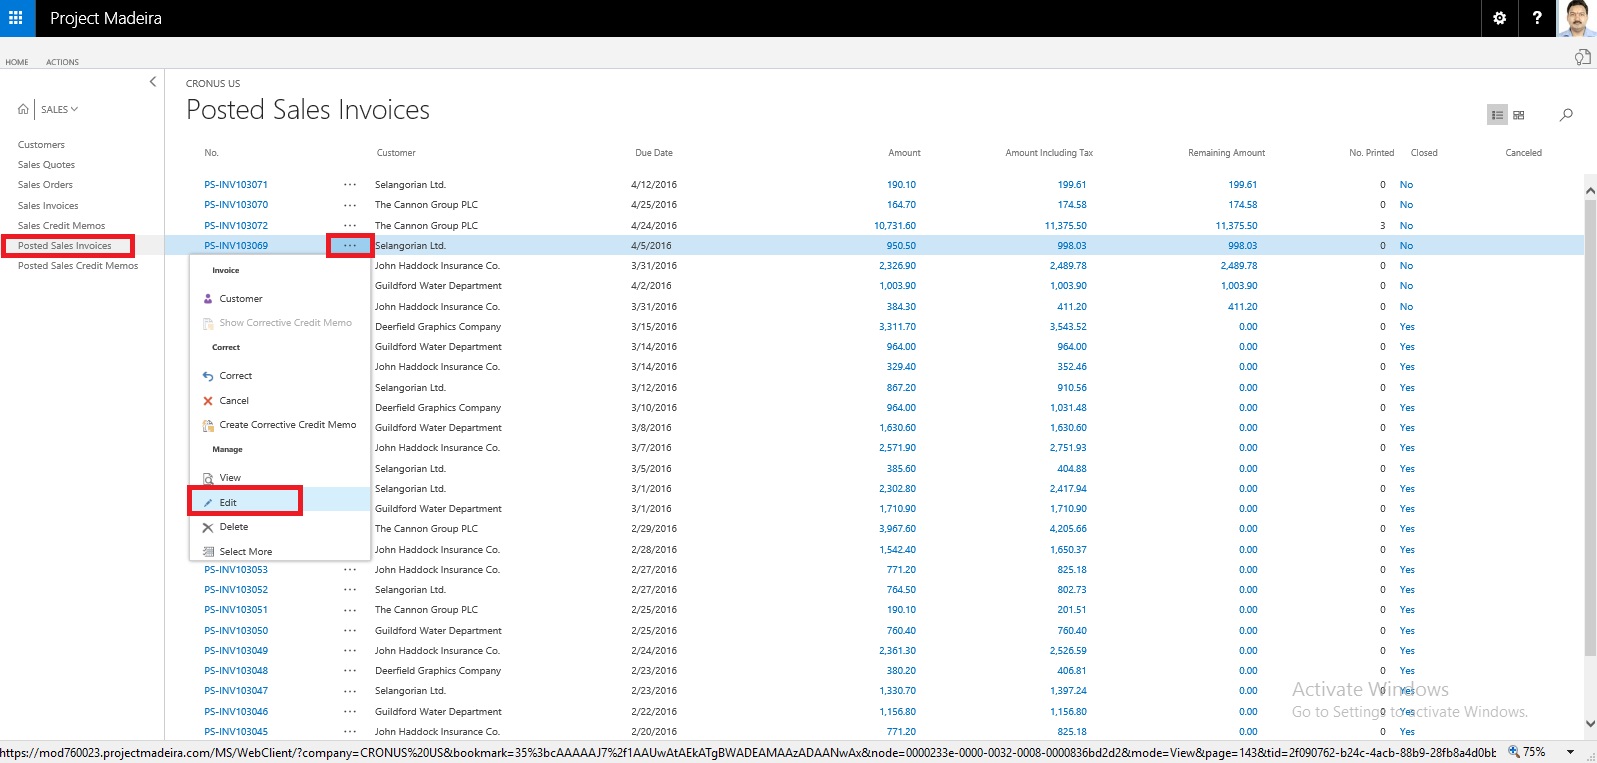
Select the Sales Invoice and open it for action.

Select Create Corrective Credit Memo.
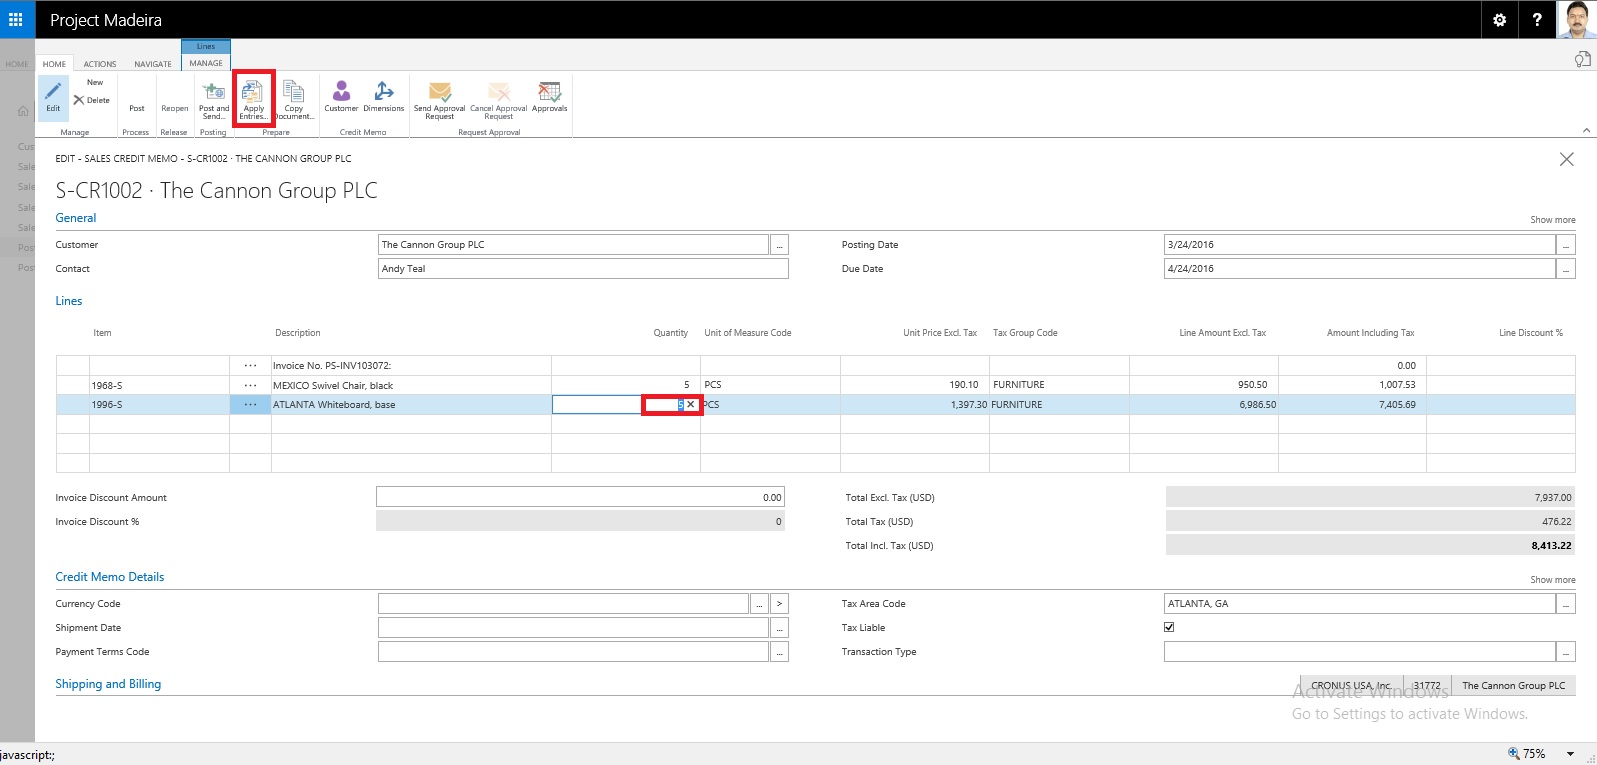
Perform the required correction and choose Apply Entries.
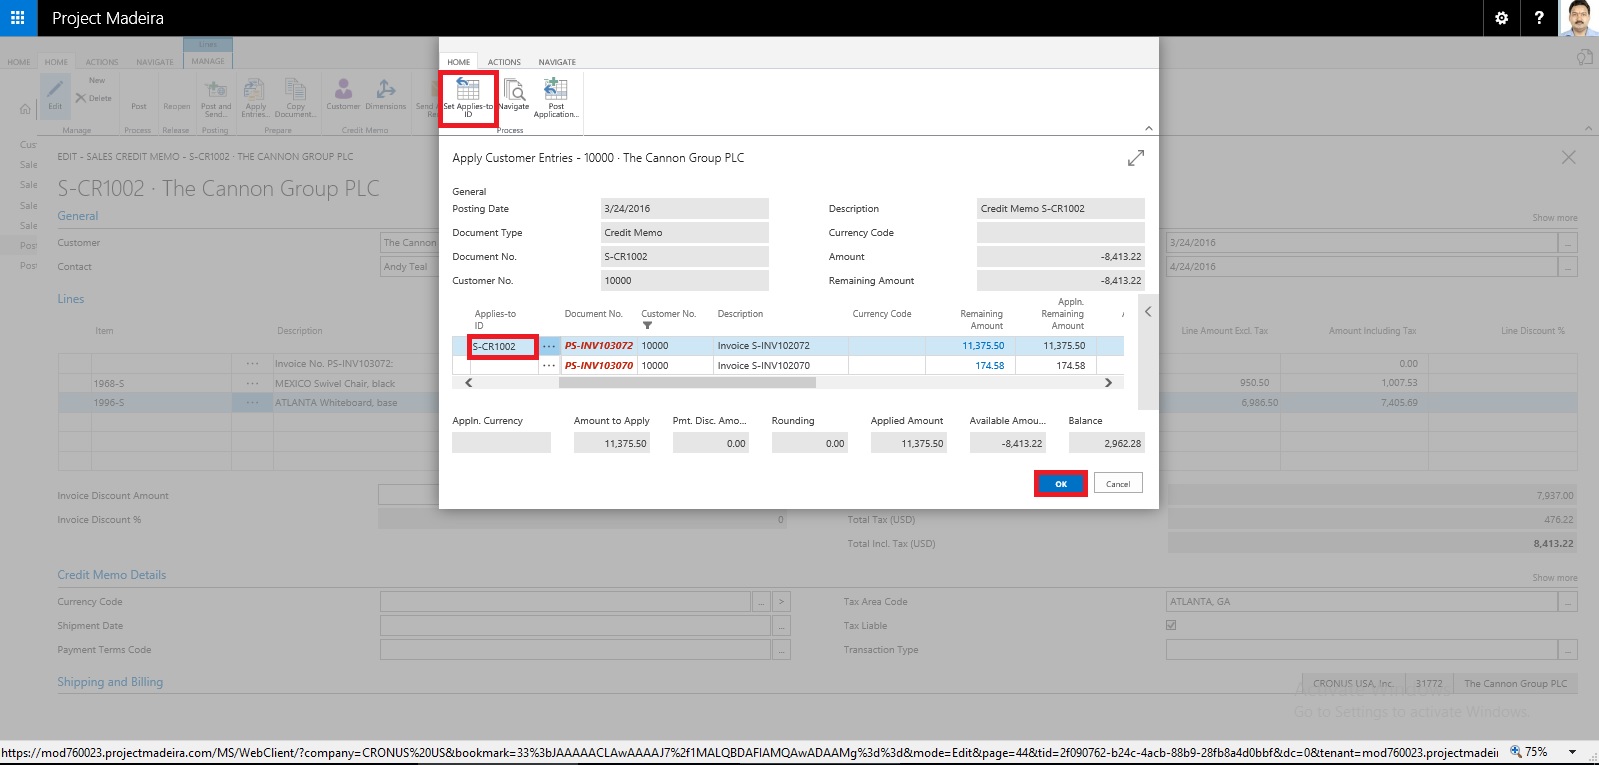
Select the document to which you want this Credit Memo to be adjusted.
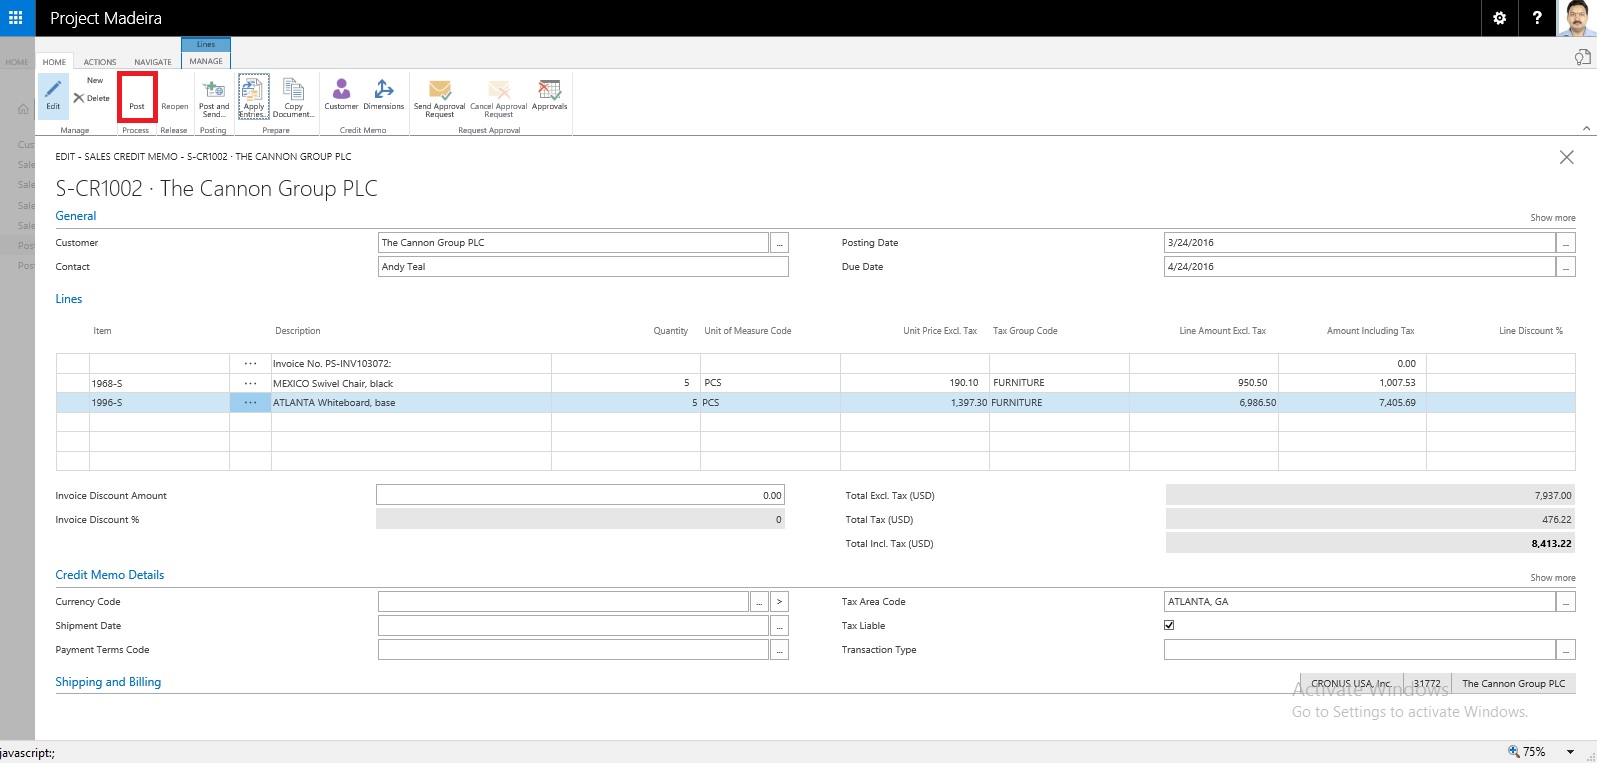
Once Application is done, Post the Credit Memo.
Respond to Yes to post the Credit Memo.
Respond to Yes to Open the posted Credit Memo.
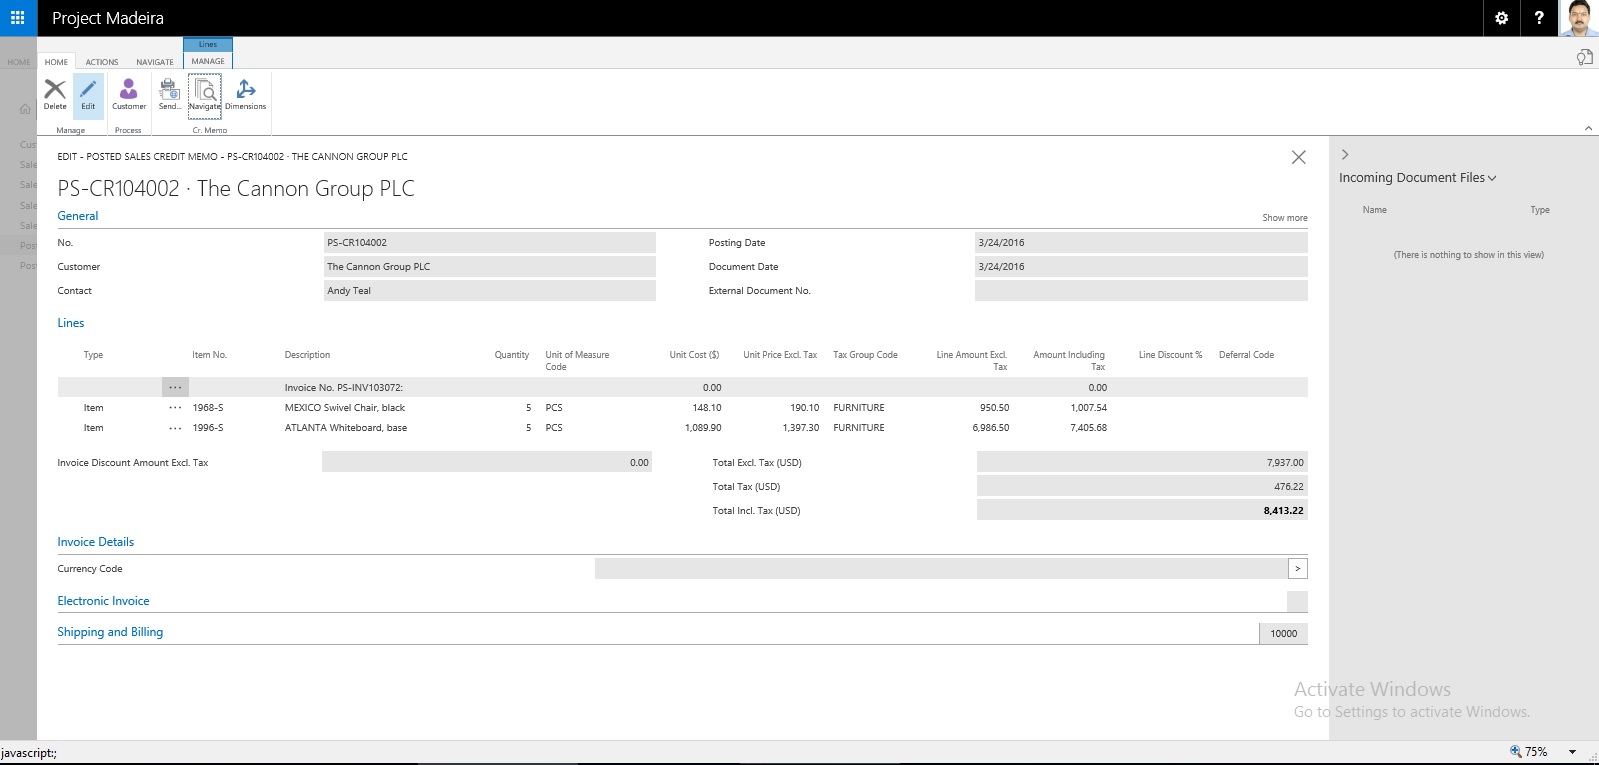
This is the posted Credit Memo for the Invoice.
Let us check the Ledger for this Customer:

Here you can see the net effect of the Credit Memo on Invoice.
Thats all for this post will come up with more features and details in my upcomming posts.
There could be the situation where customer wants partial refund or return of sales.
You can create the Credit Memo from the Posted Sales Invoice, which will create the Credit Memo for you and leave to you to modify and post the credit memo.
Most fields on the sales credit memo header are filled with the information from the posted sales invoice. You can edit all the fields, with new information that reflects the return agreement.
You can apply the Customer Entries via selecting the line with the posted sales document that you want to apply the sales credit memo to.
The posted sales documents that you applied the credit memo to are now reversed, and a refund payment can be created for the customer.
The sales credit memo is removed and replaced with a new document in the list of posted sales credit memos.
Let us see how we can achieve this in Madeira.
Select the Sales Invoice and open it for action.
Select Create Corrective Credit Memo.
Perform the required correction and choose Apply Entries.
Select the document to which you want this Credit Memo to be adjusted.
Once Application is done, Post the Credit Memo.
Respond to Yes to post the Credit Memo.
Respond to Yes to Open the posted Credit Memo.
This is the posted Credit Memo for the Invoice.
Let us check the Ledger for this Customer:
Here you can see the net effect of the Credit Memo on Invoice.
Thats all for this post will come up with more features and details in my upcomming posts.
Correct or Cancel Unpaid Sales Invoices – in Madeira
Sometimes Invoices are posted in mistake or customer demands changes in invoice after posting.
Once the payment is initiated, partially or fully paid correction or cancellation is not allowed from Posted Sales Invoice itself. In such case you need to follow traditional way of doing so by passing Sales Credit Memo to Cancel the Sale and reimburse to customer manually.
What happens when you select Correct Action?
The Posted Invoice for which you say correct that invoice gets cancelled and new Sales Invoice with same information is created.
Naturally to maintain the integrity of data new Sales Invoice is created with new Document No.
A Sales Credit Memo for previous Invoice is created to void the effect of initial posted Sales Invoice.
The Canceled and Paid is marked on initial posted Sales Invoice document.
What happens when you select Cancel Action?
The Posted Invoice for which you say correct that invoice gets cancelled.
A Sales Credit Memo for previous Invoice is created to void the effect of initial posted Sales Invoice.
The Canceled and Paid is marked on initial posted Sales Invoice document.
Important Points:-
If the Canceled check box is selected, then you cannot correct or cancel the posted sales invoice because it has already been corrected or canceled.
Once the payment is initiated, partially or fully paid correction or cancellation is not allowed from Posted Sales Invoice itself.
Let us see how it works in Madeira:-
Login with your credentials to Madeira project.

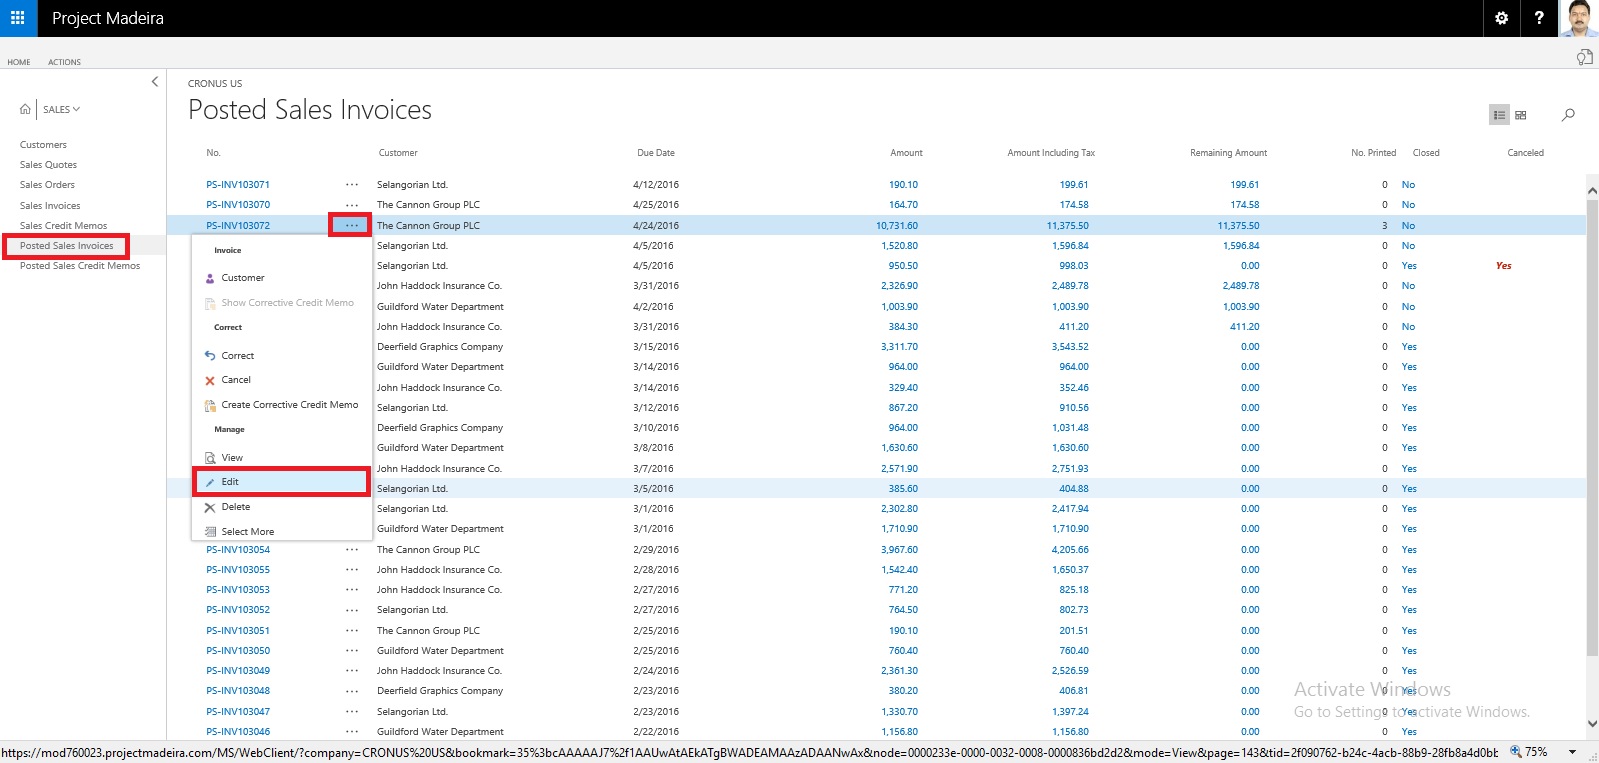
From the Navigation Bar choose Sales.
Select Posted Sales Invoice. And choose to open the posted Sales Invoice.

Select Correct to Modify the Invoice.

Select Yes to continue with the process.
Make the required modification to the Invoice and post it.

Select Yes to continue with posting.

Select Yes to continue.

This is new modified Invoice that got posted.
Let us move to the original Invoice which we corrected.

Select Show Corrective Credit Memo.

This is the Credit Memo posted against the Invoice which we corrected.

You can see the Closed and Canceled is Marked to TRUE.
Once the payment is initiated, partially or fully paid correction or cancellation is not allowed from Posted Sales Invoice itself. In such case you need to follow traditional way of doing so by passing Sales Credit Memo to Cancel the Sale and reimburse to customer manually.
What happens when you select Correct Action?
The Posted Invoice for which you say correct that invoice gets cancelled and new Sales Invoice with same information is created.
Naturally to maintain the integrity of data new Sales Invoice is created with new Document No.
A Sales Credit Memo for previous Invoice is created to void the effect of initial posted Sales Invoice.
The Canceled and Paid is marked on initial posted Sales Invoice document.
What happens when you select Cancel Action?
The Posted Invoice for which you say correct that invoice gets cancelled.
A Sales Credit Memo for previous Invoice is created to void the effect of initial posted Sales Invoice.
The Canceled and Paid is marked on initial posted Sales Invoice document.
Important Points:-
If the Canceled check box is selected, then you cannot correct or cancel the posted sales invoice because it has already been corrected or canceled.
Once the payment is initiated, partially or fully paid correction or cancellation is not allowed from Posted Sales Invoice itself.
Let us see how it works in Madeira:-
Login with your credentials to Madeira project.
From the Navigation Bar choose Sales.
Select Posted Sales Invoice. And choose to open the posted Sales Invoice.
Select Correct to Modify the Invoice.
Select Yes to continue with the process.
Make the required modification to the Invoice and post it.
Select Yes to continue with posting.
Select Yes to continue.
This is new modified Invoice that got posted.
Let us move to the original Invoice which we corrected.
Select Show Corrective Credit Memo.
This is the Credit Memo posted against the Invoice which we corrected.
You can see the Closed and Canceled is Marked to TRUE.
Working with Partner Translation Toolkit
In my earlier post I have given the overview of Managing Multilanguage support in Navision continuing from same today I will discuss about how to create Language Module for the Languages not available from Microsoft.
Although still we will not be having direct support for all Languages but using this process you can create one.
To be very fair it will not be easy task for all Languages but for few it could help you much to get you work done with little ease.
See few helpful links which will help you getting done your task:-
Platform strings maintained in managed assemblies and fin.stx and fin.etx files
Configuring Microsoft Dynamics NAV Help Server
To work with Partner Translation Toolkit you will require below, make sure you have all before you start with using this Tool:
Visual Studio:
If you don’t have make sure you install the latest version of the same.
WiX Toolset:
You will require the WiX Toolset to start with you can download from here. Install WiX Toolset version 3.8 or 3.9
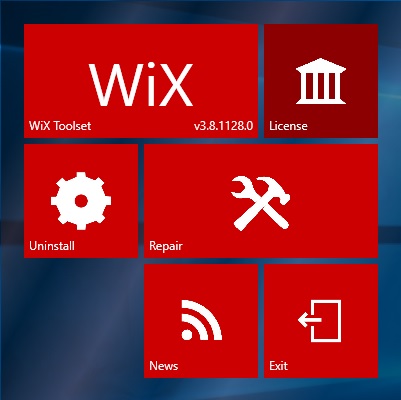
Install the WiX Toolset according to the instructions. In my case it is already installed on my system so getting option for Uninstall.
Building the project you require that you have the WiX Toolset version 3.8 or 3.9 installed on the computer.
Microsoft Translator for ResX:
See my previous post for more details here.
Azure Data Market account / Microsoft Translator data service:
See my previous post for more details here.
Steps to get ready for Translation tool:
See my previous post for more details here.
Let’s start with building our project:
Step -1:
Run the “Microsoft.MCSUK.RESXTranslator.exe” Tool
See my previous post for more details here.
Step -2:
Run the “Visual Studio” with opening project solution PartnerTranslations.sln
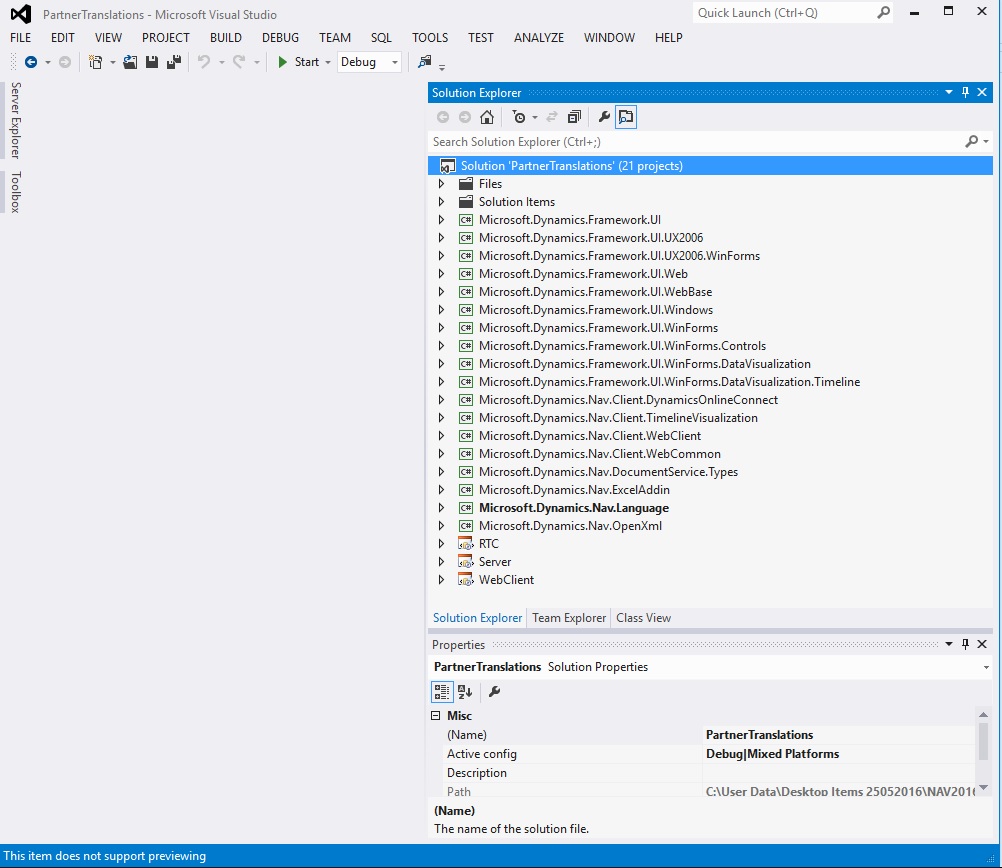
You will see all the projects discussed above is having their own folder in this solution.
Add your all the translated resx files obtained in Step-1 post Translation to respective projects.

Right click on the project folder and choose Add and then Existing Item.
Select the resx file which we translated in Step-1.
In my case I select “Common.Language.Lang.hi-IN.resx”
Similarly you will add these translated files to your all other projects. Be cautious few may have 2-3 files add them all.

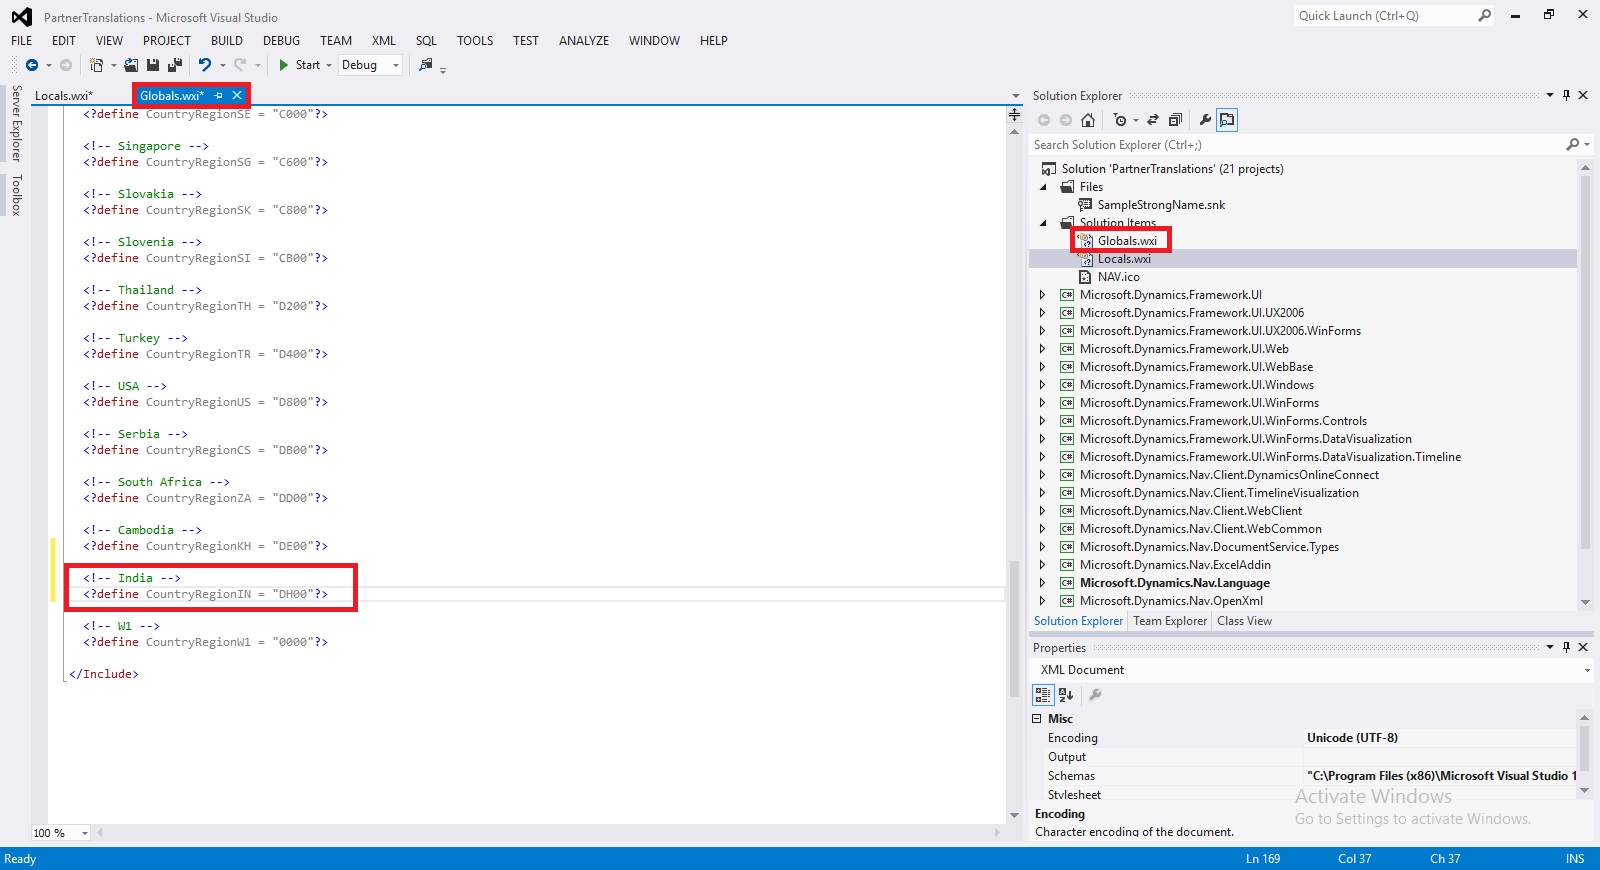
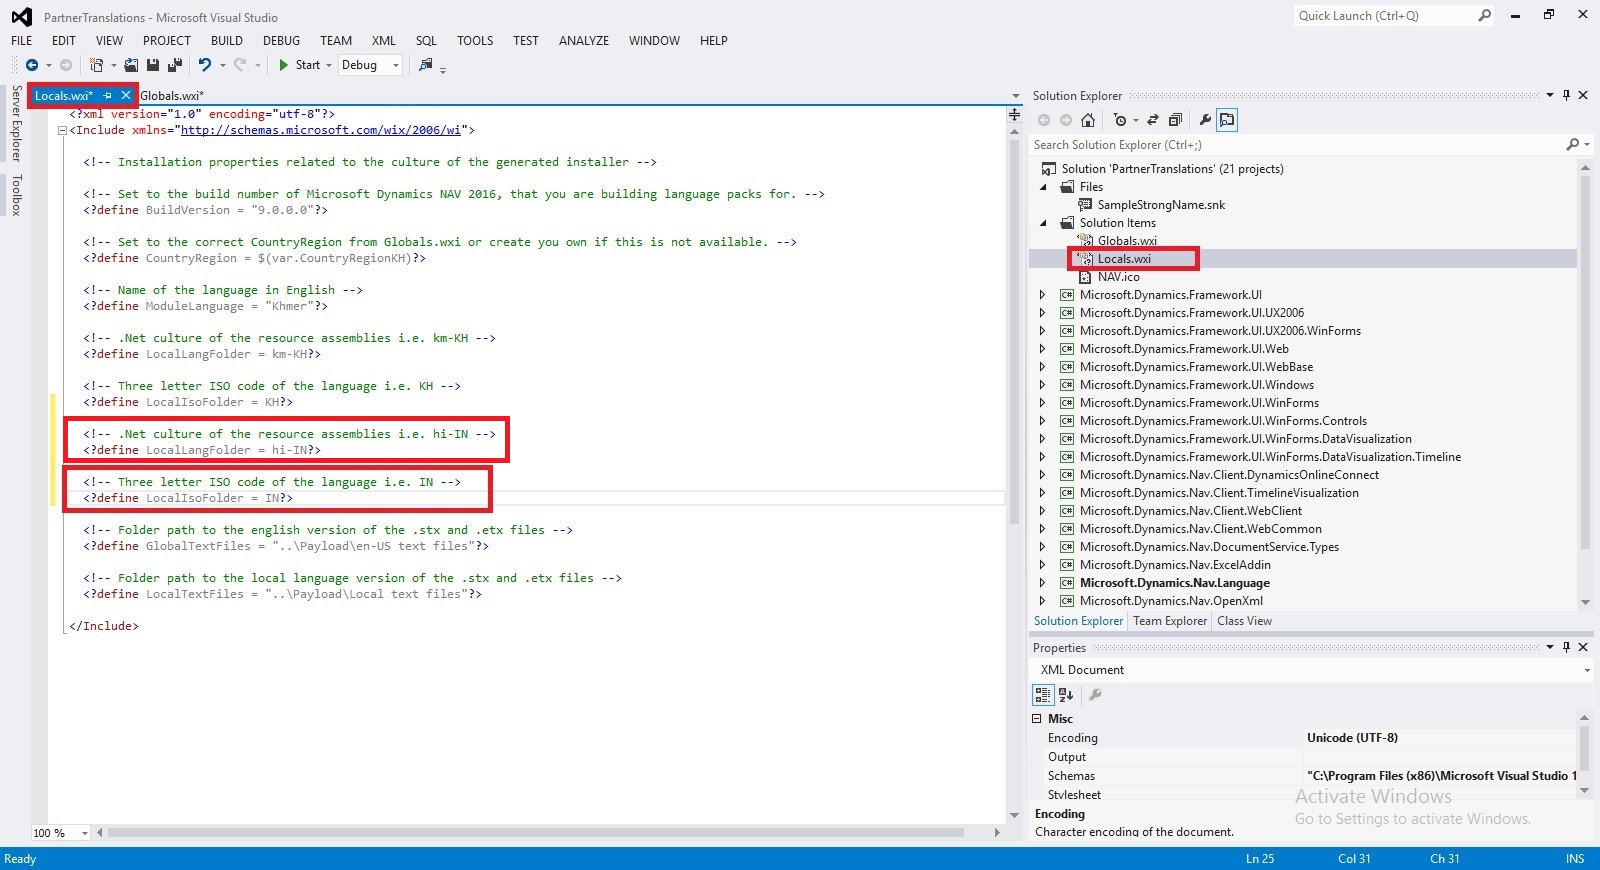
The properties of the installation determine which folders are created during the installation of the language packs and what files are placed in the folders. The properties can be found in the Locals.wxi file located in the root directory of the translation kit. Open the Locals.wxi file and change the following properties:
• CountryRegionCode, to one of the country/region codes in Globals.wxi or create a new.
• ModuleLanguage, to the language of your choice.
• LocalLangFolder, to the .Net culture of the satellite assemblies.
• LocalIsoFolder, to the three letter ISO code for your language.
Step -3:
Build the project PartnerTranslations.sln
To build the PartnerTranslation solution from inside Visual Studio, choose Build Solution from the Build menu. This will pick up all translated artifacts, and create three installer files (.msi):
Step-4:
Copy your Language Module Files and install on desired Server & Client

Install – Add your language pack to the W1 version
If have not already done so, install the W1 version of Microsoft Dynamics NAV 2016 from the product media.
Install the new language Pack
Next, install the new language pack on the same computer. To do this, select and click each of the three .msi files listed below, one after the other. The order is not significant:
Each installer quickly shows a dialog, which disappears when the installer has completed.
The language pack is now installed, but you must make some final configuration.
I will comeup with more details in my next posts.
Although still we will not be having direct support for all Languages but using this process you can create one.
To be very fair it will not be easy task for all Languages but for few it could help you much to get you work done with little ease.
See few helpful links which will help you getting done your task:-
Platform strings maintained in managed assemblies and fin.stx and fin.etx files
Configuring Microsoft Dynamics NAV Help Server
To work with Partner Translation Toolkit you will require below, make sure you have all before you start with using this Tool:
- Visual Studio
- WiX Toolset
- Microsoft Translator for ResX
- Azure Data Market account
- Microsoft Translator data service subscribed
- Your NAV License File
- Finally your efforts
Visual Studio:
If you don’t have make sure you install the latest version of the same.
WiX Toolset:
You will require the WiX Toolset to start with you can download from here. Install WiX Toolset version 3.8 or 3.9
Install the WiX Toolset according to the instructions. In my case it is already installed on my system so getting option for Uninstall.
Building the project you require that you have the WiX Toolset version 3.8 or 3.9 installed on the computer.
Microsoft Translator for ResX:
See my previous post for more details here.
Azure Data Market account / Microsoft Translator data service:
See my previous post for more details here.
Steps to get ready for Translation tool:
See my previous post for more details here.
Let’s start with building our project:
Step -1:
Run the “Microsoft.MCSUK.RESXTranslator.exe” Tool
See my previous post for more details here.
Step -2:
Run the “Visual Studio” with opening project solution PartnerTranslations.sln
You will see all the projects discussed above is having their own folder in this solution.
Add your all the translated resx files obtained in Step-1 post Translation to respective projects.
Right click on the project folder and choose Add and then Existing Item.
Select the resx file which we translated in Step-1.
In my case I select “Common.Language.Lang.hi-IN.resx”
Similarly you will add these translated files to your all other projects. Be cautious few may have 2-3 files add them all.
The properties of the installation determine which folders are created during the installation of the language packs and what files are placed in the folders. The properties can be found in the Locals.wxi file located in the root directory of the translation kit. Open the Locals.wxi file and change the following properties:
• CountryRegionCode, to one of the country/region codes in Globals.wxi or create a new.
• ModuleLanguage, to the language of your choice.
• LocalLangFolder, to the .Net culture of the satellite assemblies.
• LocalIsoFolder, to the three letter ISO code for your language.
Step -3:
Build the project PartnerTranslations.sln
To build the PartnerTranslation solution from inside Visual Studio, choose Build Solution from the Build menu. This will pick up all translated artifacts, and create three installer files (.msi):
- Server.msi – Located in the Server\Bin\Debug folder.
- RTC.msi – Located in the RTC\Bin\Debug folder.
- WebClient.msi – Located in the WebClient\Bin\Debug folder.
Step-4:
Copy your Language Module Files and install on desired Server & Client
Install – Add your language pack to the W1 version
If have not already done so, install the W1 version of Microsoft Dynamics NAV 2016 from the product media.
Install the new language Pack
Next, install the new language pack on the same computer. To do this, select and click each of the three .msi files listed below, one after the other. The order is not significant:
- Server\Bin\Debug\Server.msi
- RTC\Bin\Debug\RTC.msi
- WebClient\Bin\Debug\WebClient.msi
Each installer quickly shows a dialog, which disappears when the installer has completed.
The language pack is now installed, but you must make some final configuration.
I will comeup with more details in my next posts.
How do I translate my ResX Files?
In my earlier post I have given the overview of Managing Multilanguage support in Navision continuing from same today I will discuss about how to translate the resx files for the Languages not available from Microsoft.
Microsoft Translator for ResX:
To translate resx file you require to download Microsoft Translator for ResX you can use this link to download.
This will help you to translate your required .resx files
Azure Data Market account / Microsoft Translator data service:
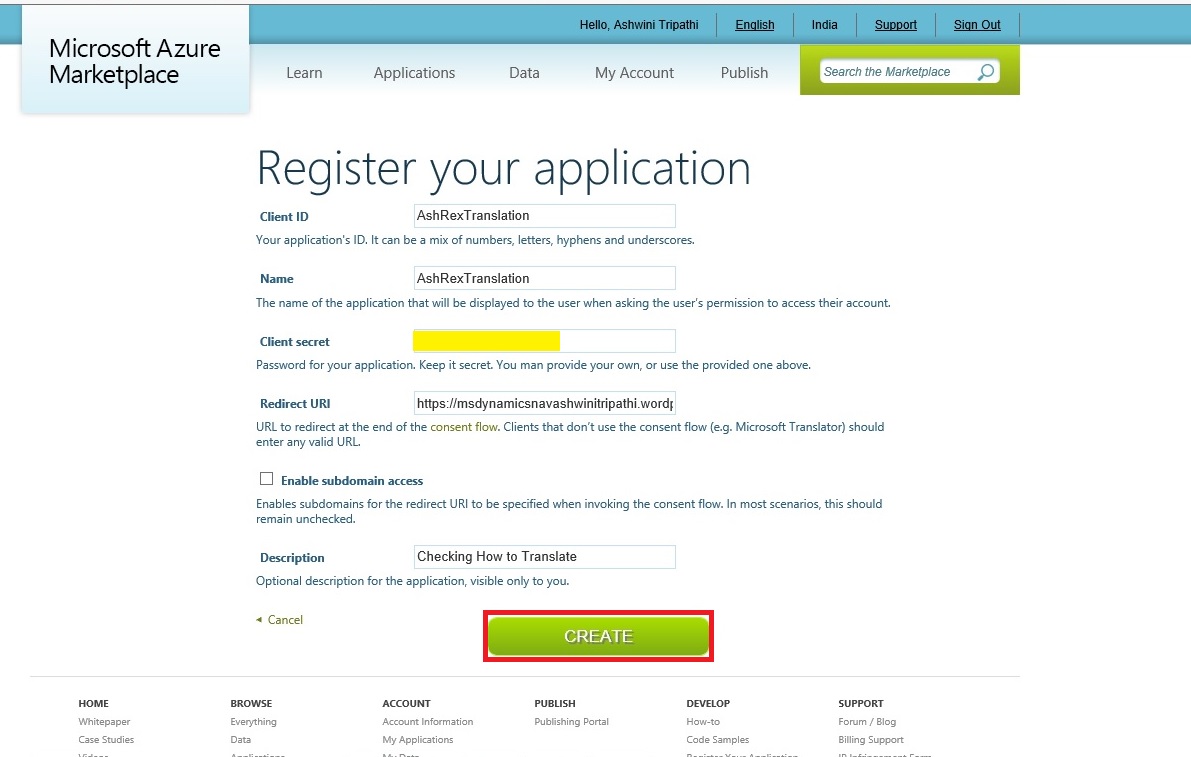
You will need an Azure Data Market account, subscribe to Microsoft Translator data service and a register a developer application in order to use the tool.
You can start setting this up here: https://datamarket.azure.com/developer/applications/
Microsoft Translator is a service on the Windows Azure Marketplace that translates text between many languages. This is a billed service that comes with many different pricing plans. For example, one plan allows the translation of 2,000,000 characters per month for free.
Steps to get ready for Translation tool:
Make sure you note your Client ID and Client Secret, you will need this if you wish to Translate Resx files using Microsoft Translator Service.
If you remember I have shared the link from where you can download Translation Tool. You will require Customer/Partner Source.
Download the Translation Tool (NAV2016PartnerTranslationsToolkit) and extract the zip file.
Scan the extracted Folder here few important files which will help identifying purpose of these files:
Each project contains the platform resource files (.resx) for all languages shipped by Microsoft.
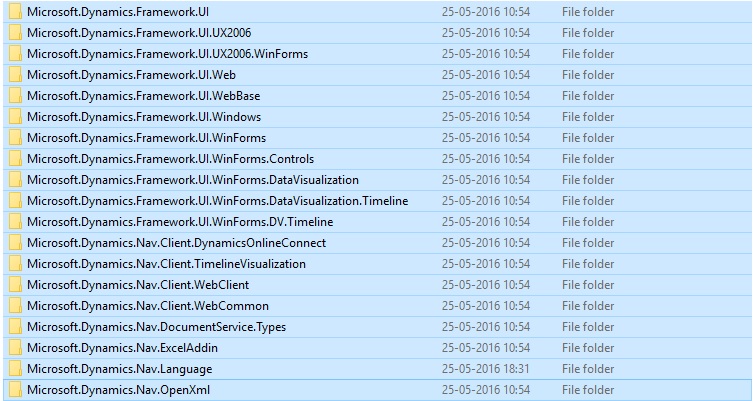
The Visual Studio solution file, PartnerTranslations.sln, contains a project for each of the platform assemblies that contain translatable resources. In order to create a custom translation, you add the respective resource files with custom translations to the respective project.
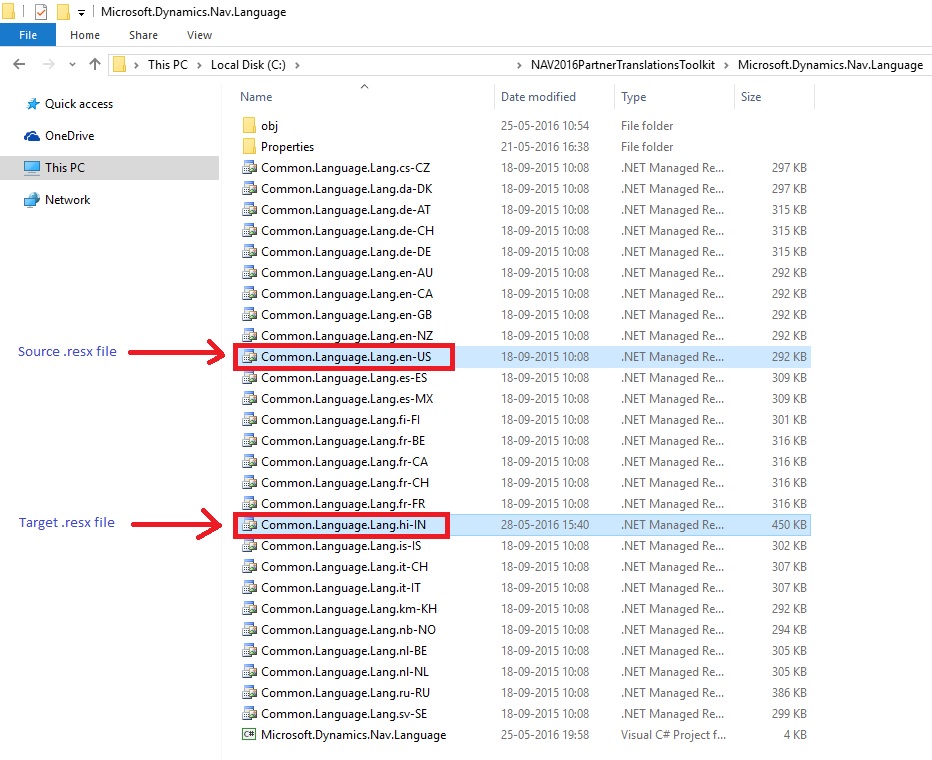
Let us see the directory structure of “NAV2016PartnerTranslationsToolkit\Microsoft.Dynamics.Nav.Language” similar structure is for other projects too.
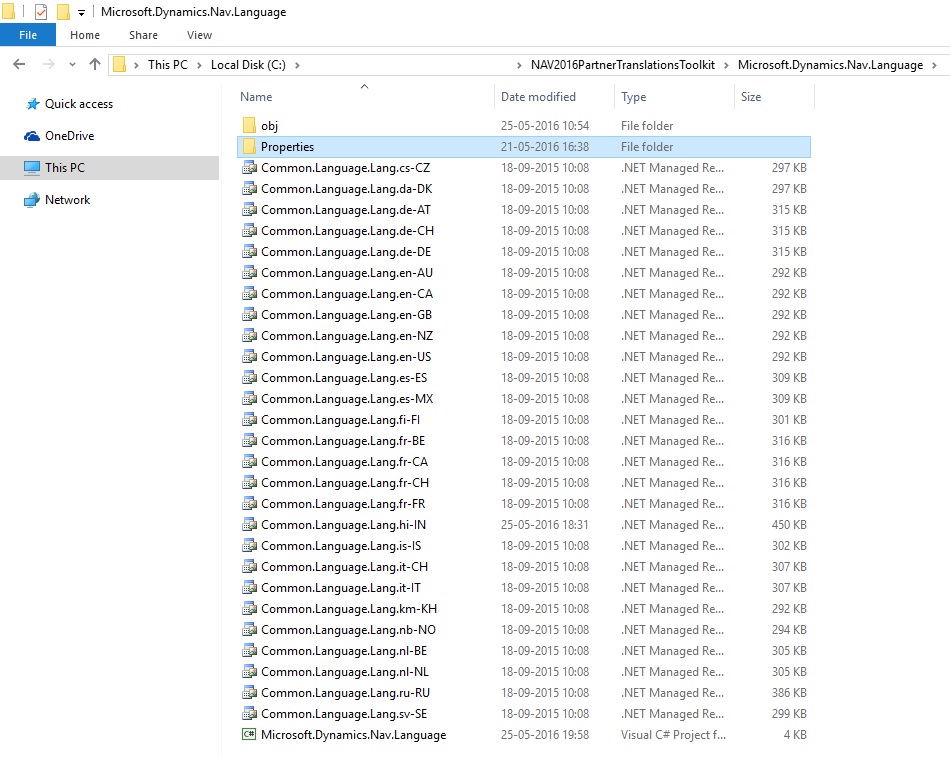
For detailed help you can refer to “NAV 2016 Creating Custom Platform Translations.pdf” file.
Let’s start with translating our resx files:
Run the “Microsoft.MCSUK.RESXTranslator.exe” Tool
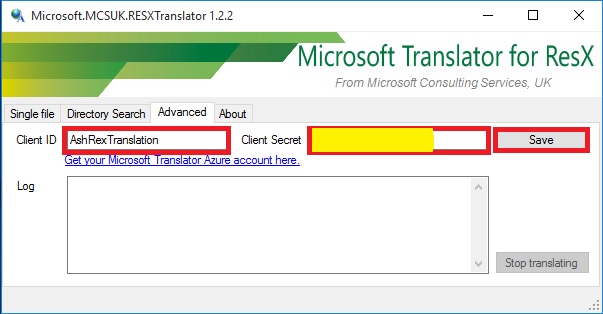
Switch to Advanced Tab.
Enter the Client ID and Client Secret obtained in above step when we registered the Application.
Click on Save.
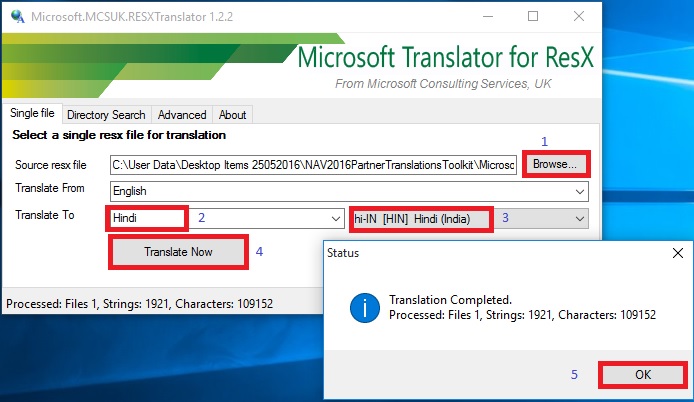
Switch to Single File Tab.
Browse the .resx file for source language in my case if have selected “Common.Language.Lang.en-US.resx”
Translate To choose desired language available from the drop down. In my case I have selected “Hindi”.
Select the Language 3 char code in my case I have selected “hi-IN [HIN] Hindi (India)”
Click on Translate Now.
Once resx file is translated you will get the summary of result, click ok to return.
Similarly you translate the rex files for each projects listed above.
Post this step you are ready with all of you resx file translated to desired language.
Microsoft Translator for ResX:
To translate resx file you require to download Microsoft Translator for ResX you can use this link to download.
This will help you to translate your required .resx files
Azure Data Market account / Microsoft Translator data service:
You will need an Azure Data Market account, subscribe to Microsoft Translator data service and a register a developer application in order to use the tool.
You can start setting this up here: https://datamarket.azure.com/developer/applications/
Microsoft Translator is a service on the Windows Azure Marketplace that translates text between many languages. This is a billed service that comes with many different pricing plans. For example, one plan allows the translation of 2,000,000 characters per month for free.
Steps to get ready for Translation tool:
- Get an account on the Azure Data Market with your Microsoft Live ID.
- Login into the Azure Data Market (ADM).
- Subscribe to the Microsoft Translator Service
- Create an application on top of this service in order to use the service in the ResX Translator tool.
- Go the developer application registration
- Choose the Register button to create a new application.
- Enter your information and choose the Create button.
Make sure you note your Client ID and Client Secret, you will need this if you wish to Translate Resx files using Microsoft Translator Service.
If you remember I have shared the link from where you can download Translation Tool. You will require Customer/Partner Source.
Download the Translation Tool (NAV2016PartnerTranslationsToolkit) and extract the zip file.
Scan the extracted Folder here few important files which will help identifying purpose of these files:
- Microsoft.MCSUK.RESXTranslator.exe
- Microsoft.MCSUK.RESXTranslator.exe.xml
- NAV 2016 Creating Custom Platform Translations.pdf
- PartnerTranslations.sln
Each project contains the platform resource files (.resx) for all languages shipped by Microsoft.
The Visual Studio solution file, PartnerTranslations.sln, contains a project for each of the platform assemblies that contain translatable resources. In order to create a custom translation, you add the respective resource files with custom translations to the respective project.
Let us see the directory structure of “NAV2016PartnerTranslationsToolkit\Microsoft.Dynamics.Nav.Language” similar structure is for other projects too.
For detailed help you can refer to “NAV 2016 Creating Custom Platform Translations.pdf” file.
Let’s start with translating our resx files:
Run the “Microsoft.MCSUK.RESXTranslator.exe” Tool
Switch to Advanced Tab.
Enter the Client ID and Client Secret obtained in above step when we registered the Application.
Click on Save.
Switch to Single File Tab.
Browse the .resx file for source language in my case if have selected “Common.Language.Lang.en-US.resx”
Translate To choose desired language available from the drop down. In my case I have selected “Hindi”.
Select the Language 3 char code in my case I have selected “hi-IN [HIN] Hindi (India)”
Click on Translate Now.
Once resx file is translated you will get the summary of result, click ok to return.
Similarly you translate the rex files for each projects listed above.
Post this step you are ready with all of you resx file translated to desired language.
Friday, 27 May 2016
Managing Multilanguage support in Navision Overview

Microsoft Dynamics NAV is Multilanguage enabled, which means that you can display the user interface (UI) in different languages.
A Multilanguage version of Microsoft Dynamics NAV is not the same as a localized version.
- A localized version is a version that is adapted to a local market. All text that is displayed to the user is translated into the local language, and all functional areas are adapted to the requirements of the local market.
- A Multilanguage version is a localized version that you can run in different languages, but all local functionality remains the same.
Language Module:
To be able to run a localized version in multiple languages, you must install language modules.
Language Module contains translated text strings of Logs & error reporting for:
- Translated strings for the UI in the Microsoft Dynamics NAV Windows client.
- Translated strings for the database.
- Translated strings for Microsoft Dynamics NAV Server, such as for logs and error reporting.
- Translated strings for the Microsoft Office Outlook Add-in for Microsoft Dynamics NAV.
- Translated strings for charts on Role Centers in the Microsoft Dynamics NAV Windows client.
- Localized versions of the client Help.
Language Modules are Binary Files which can’t be changed by any external tools for this you will require Partner Translation Tool Project and Visual Studio.
You can install language modules so that you can view text in the user interface in different languages.
Once you have installed a language module, you can select that language on the Select Language page in the UI to change the language of all text that is displayed in the UI in captions for text boxes, on command buttons, in menus, and so on.
Imp: When you change the language of Microsoft Dynamics NAV, you are not changing the language of the data that is stored in Microsoft Dynamics NAV. Changing the text that is stored as application data is not part of the language modules.
When you install a language module, a subdirectory for the language is created in the Microsoft Dynamics NAV directory structure. The .stx, .etx, .chm, and .hh files for each language are automatically installed in the subdirectory. The name of the subdirectory is the three-letter language code (Abbreviated Name) that is used by Windows for the particular language.
You can use this link to access NAV 2016 downloads for Available - Product, Translation Tool & Language Modules. https://mbs.microsoft.com/customersource/Global/NAV/downloads/product-releases/msdnav2016download
There are 3 main parts for creating translations that works in Dynamics NAV.
- Translate the platform by translating the resource file for each DLL file.
- Translate all the captions by adding a new language into captionML in each object
- Localize development environment by translating .stx and .etx files. These 2 files have to be sent to the Microsoft regional office and sealed by Microsoft. (Only required if you want the Development Environment to be in Unsupported Language as well)
Common available resources for supported/available Language Module.
To work with Language Modules what else you required to know about: You can check below links on MSDN.
- Windows Language Virtual Table
- How to: Install Language Modules
- How to: Add Translated Strings By Importing and Exporting Multilanguage Files
- How to: Add Translated Strings By Using the Multilanguage Editor
- How to: Uninstall Language Modules
- How to: Delete Translated Strings
- Multilanguage Development
- Viewing the Application in Different Languages
Translated User Interface Strings:
In Microsoft Dynamics NAV, the user interface includes the following types of translatable user interface strings:
Captions for application objects, such as pages, tables, reports, option fields, icons, menus, and so on, that are defined in the CaptionML property for an object. Text messages that are defined in the development environment, such as text constants and error messages that are defined in the C/AL Globals window or the C/AL Locals window.
Text messages and strings that are defined in Microsoft Dynamics NAV Server and Microsoft Dynamics NAV Windows client.
To add a language to the text messages that are defined in the resource files for Microsoft Dynamics NAV Server and Microsoft Dynamics NAV Windows client, special tools are required.
You can manage translations by using text files. In the development environment, you can export all strings for the specified objects to a text file, translate the strings in a translation tool of your choice, and then import the new translations. Then, when you compile the updated objects, the new translations are available to users in the Microsoft Dynamics NAV Windows client.
Multilanguage across Conflicting Text Encoding Formats:
To support users with translated strings across conflicting text encoding formats, you must save the translations to a text file in UTF-8 text encoding format.
This converts the file to Unicode, which Microsoft Dynamics NAV Development Environment cannot import. Instead, you add the files to a dedicated Translations folder on the Microsoft Dynamics NAV Server computer.
The default location of this folder is:
C:\Program Files\Microsoft Dynamics NAV\90\Service\Translations.
When you have more than one service instance, there is a Translations folder for each service instance, such as:
C:\Program Files\Microsoft Dynamics NAV\90\Service\Instances\MyInstance\Translations.
Microsoft Dynamics NAV Server adds any strings in text files that you place in the relevant Translations folder to the metadata for Microsoft Dynamics NAV.
To add translated strings for a conflicting text encoding format:
In the development environment, export the strings for the objects that you want to translate.
Translate the strings in the resulting text file into desired Language by using your preferred translation process.
When translations are complete, save the translated strings into a text file in the UTF-8 text encoding format. The extension of the file must be .txt.
It is recommend that you remove the other Language strings from the Unicode file before you copy it to the Microsoft Dynamics NAV Server computer.
Microsoft Dynamics NAV Server queries the Translations folder for updated strings, and for performance reasons the folder should only contain strings that you cannot import into the development environment because of conflicting codepages.
Copy the UTF-8 file to the Microsoft Dynamics NAV Server computer.
C:\Program Files\Microsoft Dynamics NAV\90\Service\Translations
When you have more than one service instance, there is a Translations folder for each service instance, such as:
C:\Program Files\Microsoft Dynamics NAV\90\Service\Instances\MyInstance\Translations.
Restart the Microsoft Dynamics NAV Server instance.
Microsoft Dynamics NAV Server adds the translated strings in the file to the metadata store for the Microsoft Dynamics NAV deployment.
Now Users of this Microsoft Dynamics NAV Server session can now change the user interface language from English to required Language.
The metadata store is updated whenever you add new strings to the Translations folder and then restart the Microsoft Dynamics NAV Server service instance. Cached strings are not deleted from the metadata store when you restart the service instance.
I will comeup with more details in my upcomming post soon.
Wednesday, 18 May 2016
How Do I : Setup or Adjust Item Cost in Madeira
In this post we will see how we can Setup Adjust Cost and how to Run Manually Item Cost Adjust Batch or Schedule the same.
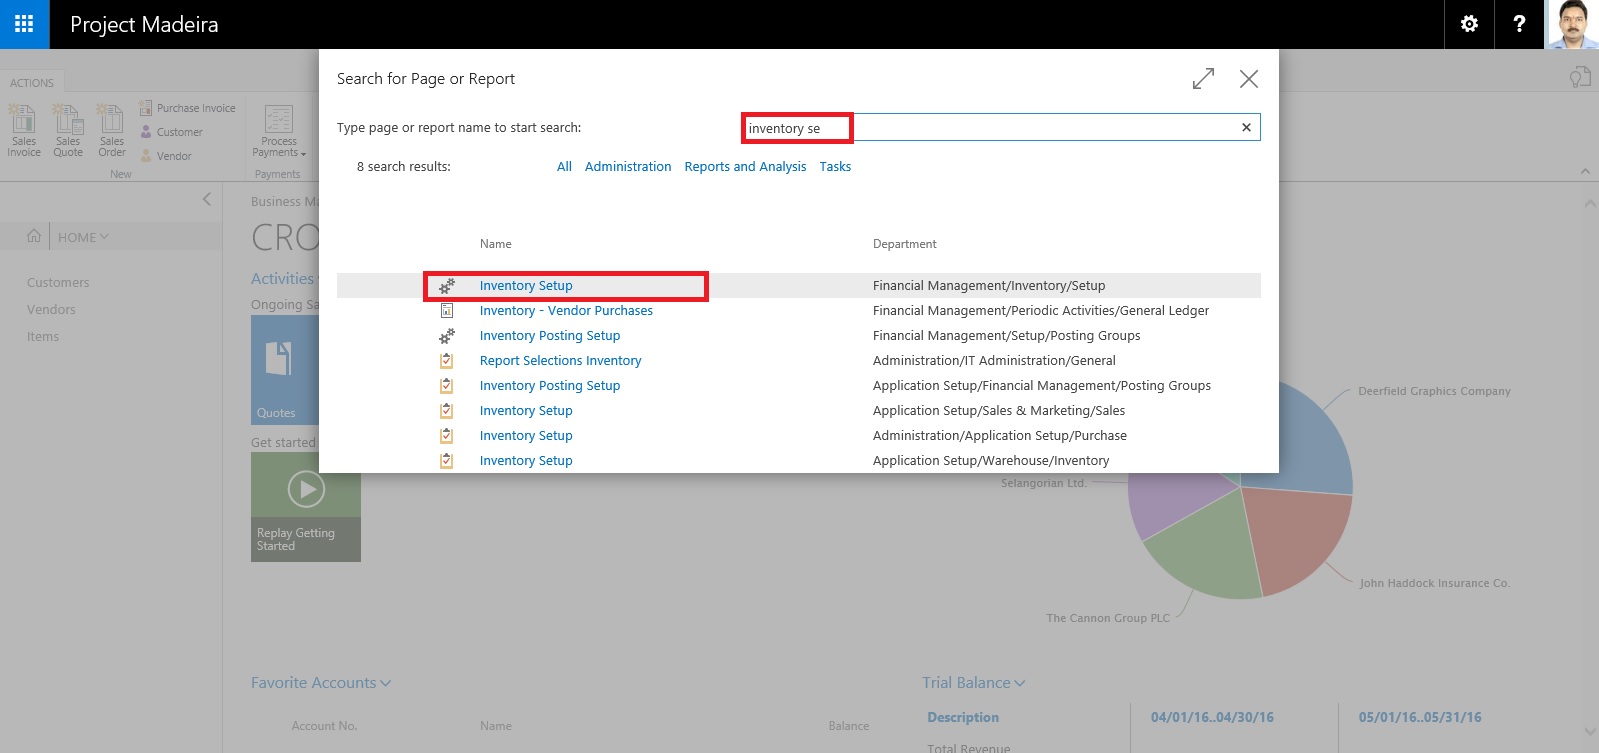
Search the Page Inventory Setup using Search Page in Right top corner of your screen.
Search for Inventory Setup Page.
Make Sure Automatic Cost Posting is Setup as required.
Also Setup frequency of Automatic Cost Adjustment.
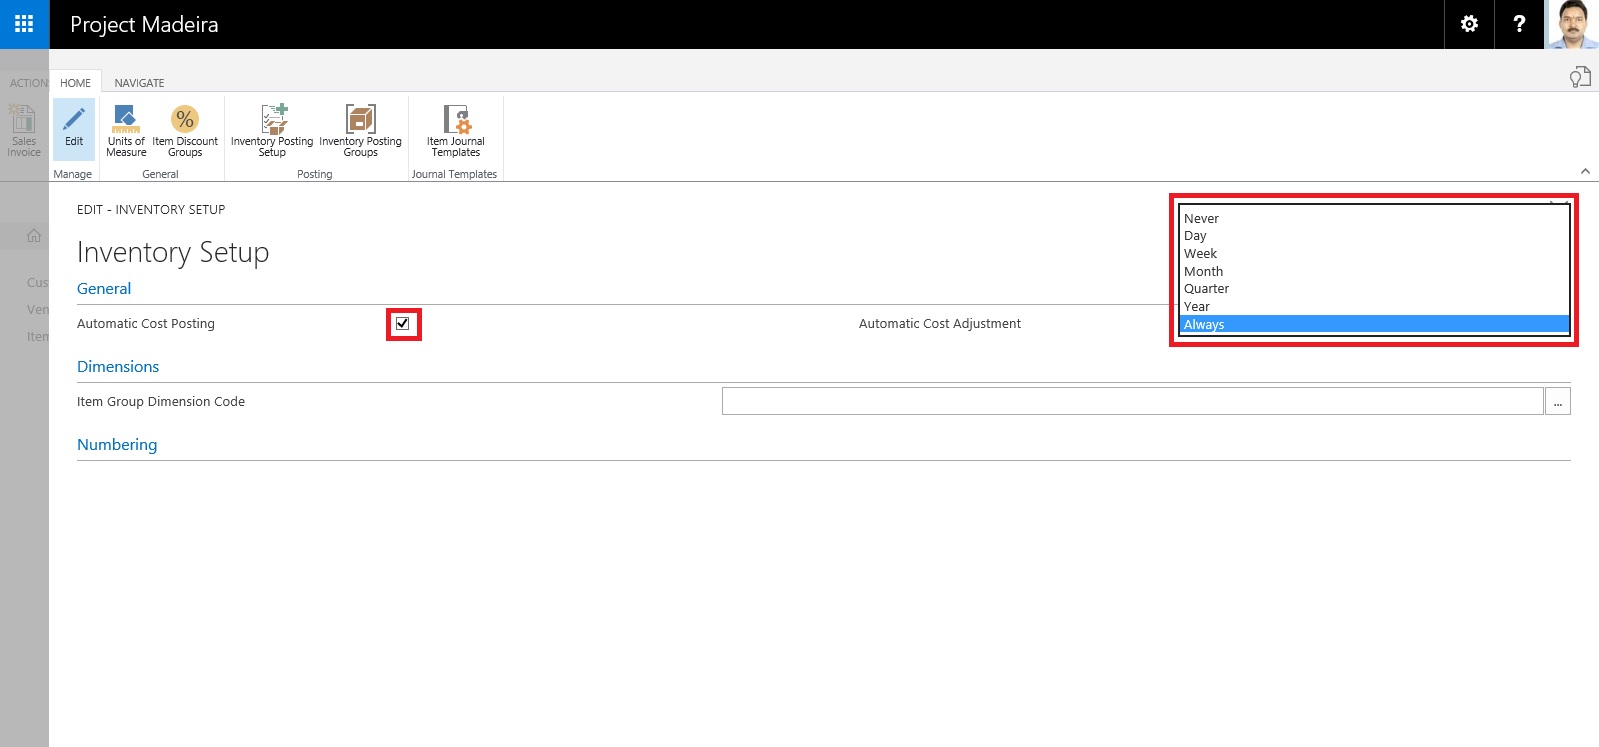
| Option | Behavior |
| Never | Costs are not adjusted when posting |
| Day | Costs are adjusted if posting occurs within one day from the work date |
| Week | Costs are adjusted if posting occurs within one week from the work date |
| Month | Costs are adjusted if posting occurs within one month from the work date |
| Quarter | Costs are adjusted if posting occurs within one quarter from the work date |
| Year | Costs are adjusted if posting occurs within one year from the work date |
| Always | Costs are always adjusted when posting, irrespective of the posting date |
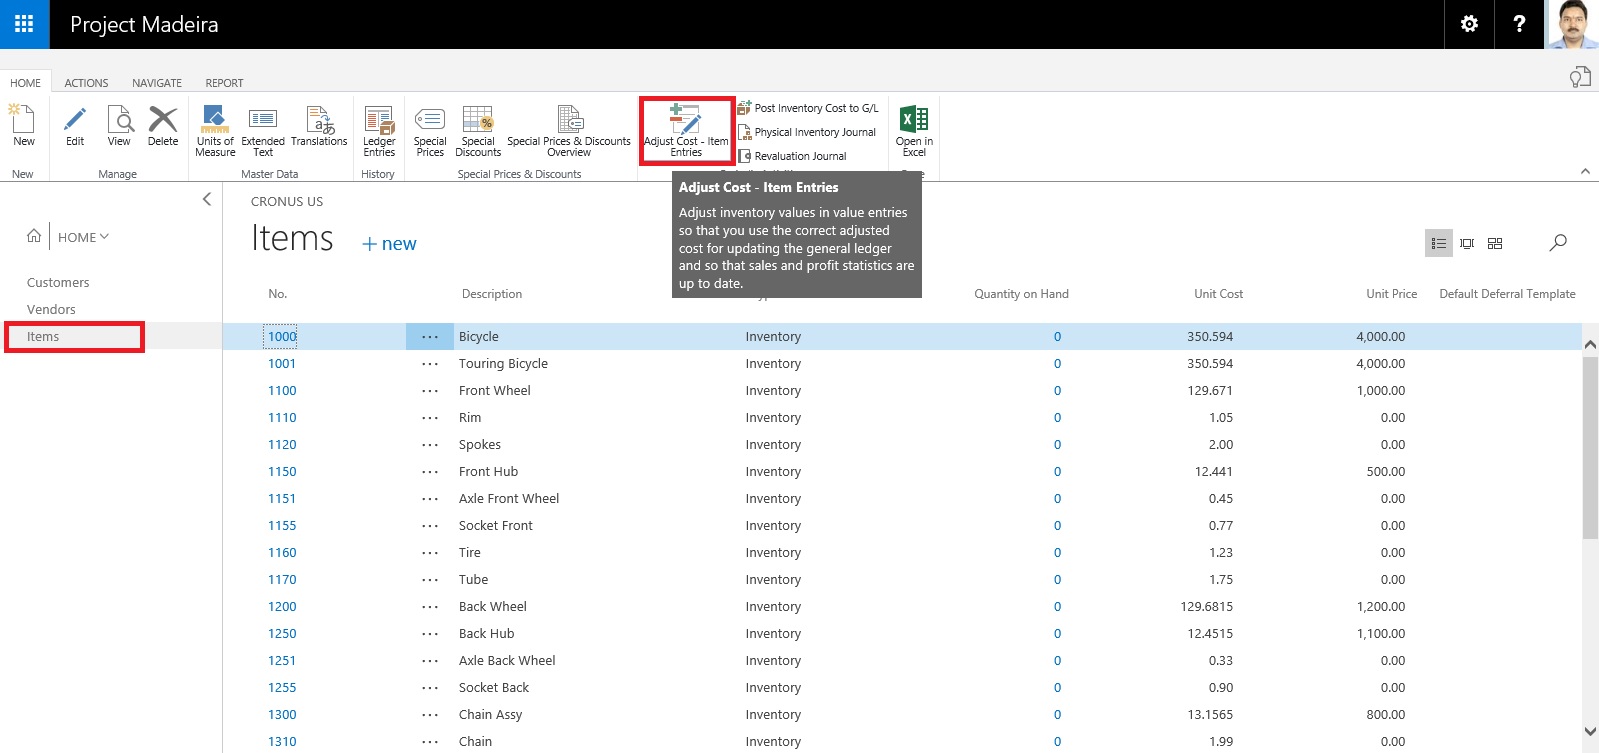
Now we will Run the Adjust cost Item Entries Batch.
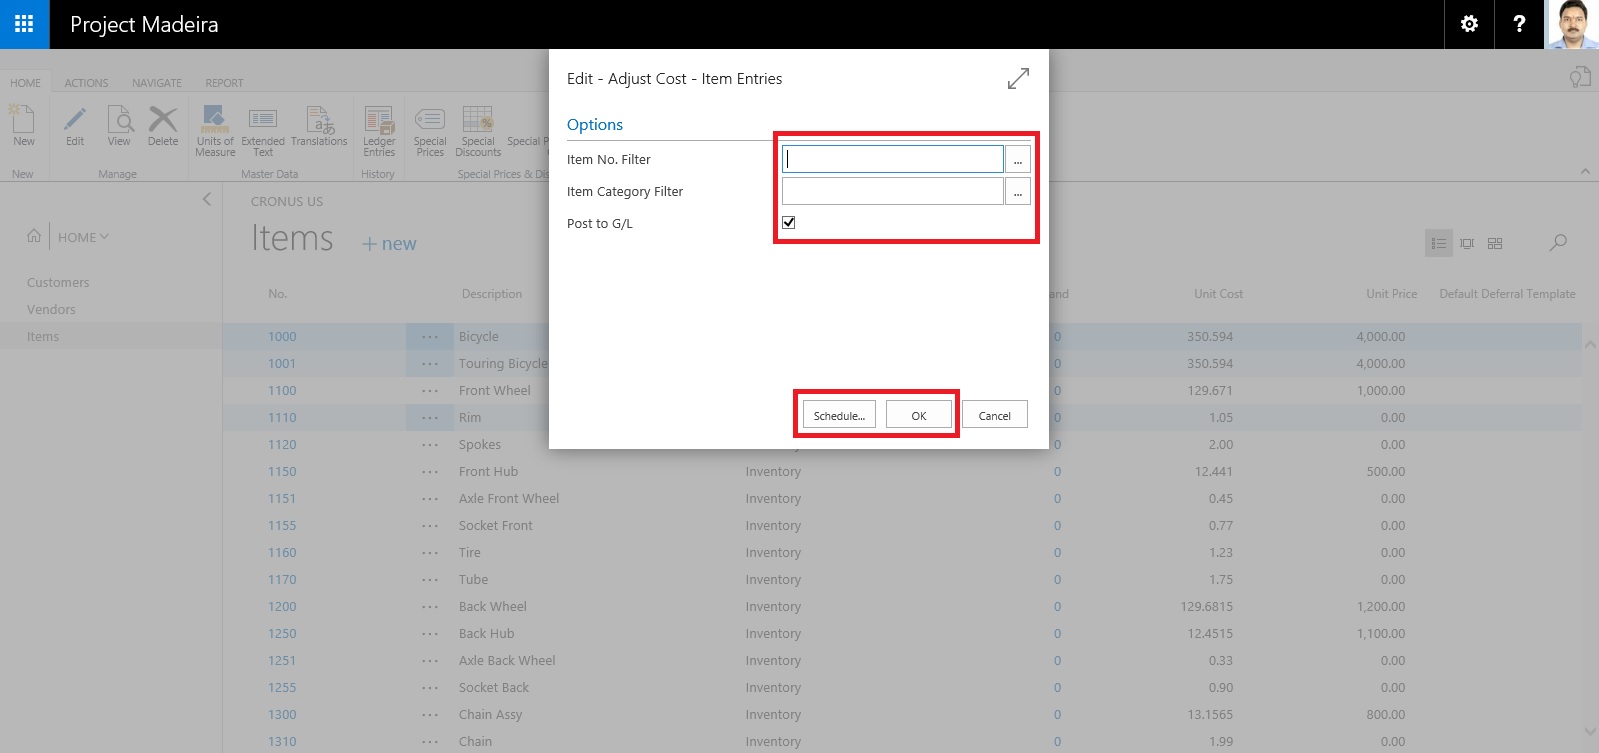
Apply the desired filter for Item or Category as desired.
Next you can run Immediately or can schedule for later execution.
If you require Immediately choose OK.
If you wish to schedule for Later Run choose Schedule.
Enter your Date & Time and click OK.

To check the status of the Scheduled Run, Search and open the Page Job Queue Log Entries.

You can find the Status of your Scheduled Job for Adjust Cost Entries.

It's easy na.
I will come up with more details in my upcoming posts.
Till then keep Exploring & Learning.
Subscribe to:
Posts (Atom)