Showing posts with label General. Show all posts

Wednesday, 3 August 2016

Save General Journals as Standard Journal in Navision

Do you Know you can save the General Journal as Standard Journal and retrive edit and post it later.

Many of time we pass entries of same Nature, Like Rent, Salary, Bills etc.. just an example you can decide upon which entries you post frequently and club it as Standard Journal to save your time.

You can create once and retrive it every month or when ever required and Post it in future/later.This can serve you as template for future use.

Let us see how we can use this feature.

StdGen-1

Open your General Journal.

Make entries which you do oftenly. Don't put Postng Date & Document No. Complete your all entries.

Next we will save this as Standard Journal for future use.

From Action choose Save as Standard Journal.

StdGen-2

Give Code & Name for your Journal Template.

If Amounts are fixed every time you can enter them too and while Save choose Save Amount.

No Let us review the entry that we saved.

From Action Choose Get Standard Journal.

This will display you all Saved Standard General Journals.

StdGen-3

Select the required Journal Code and Click on Edit.

StdGen-4

This is what is Saved in your Standard Journal.

Let use return to the Standard Journal List.

Select desired/ earlier saved Std. Journal and Click on OK.

StdGen-5

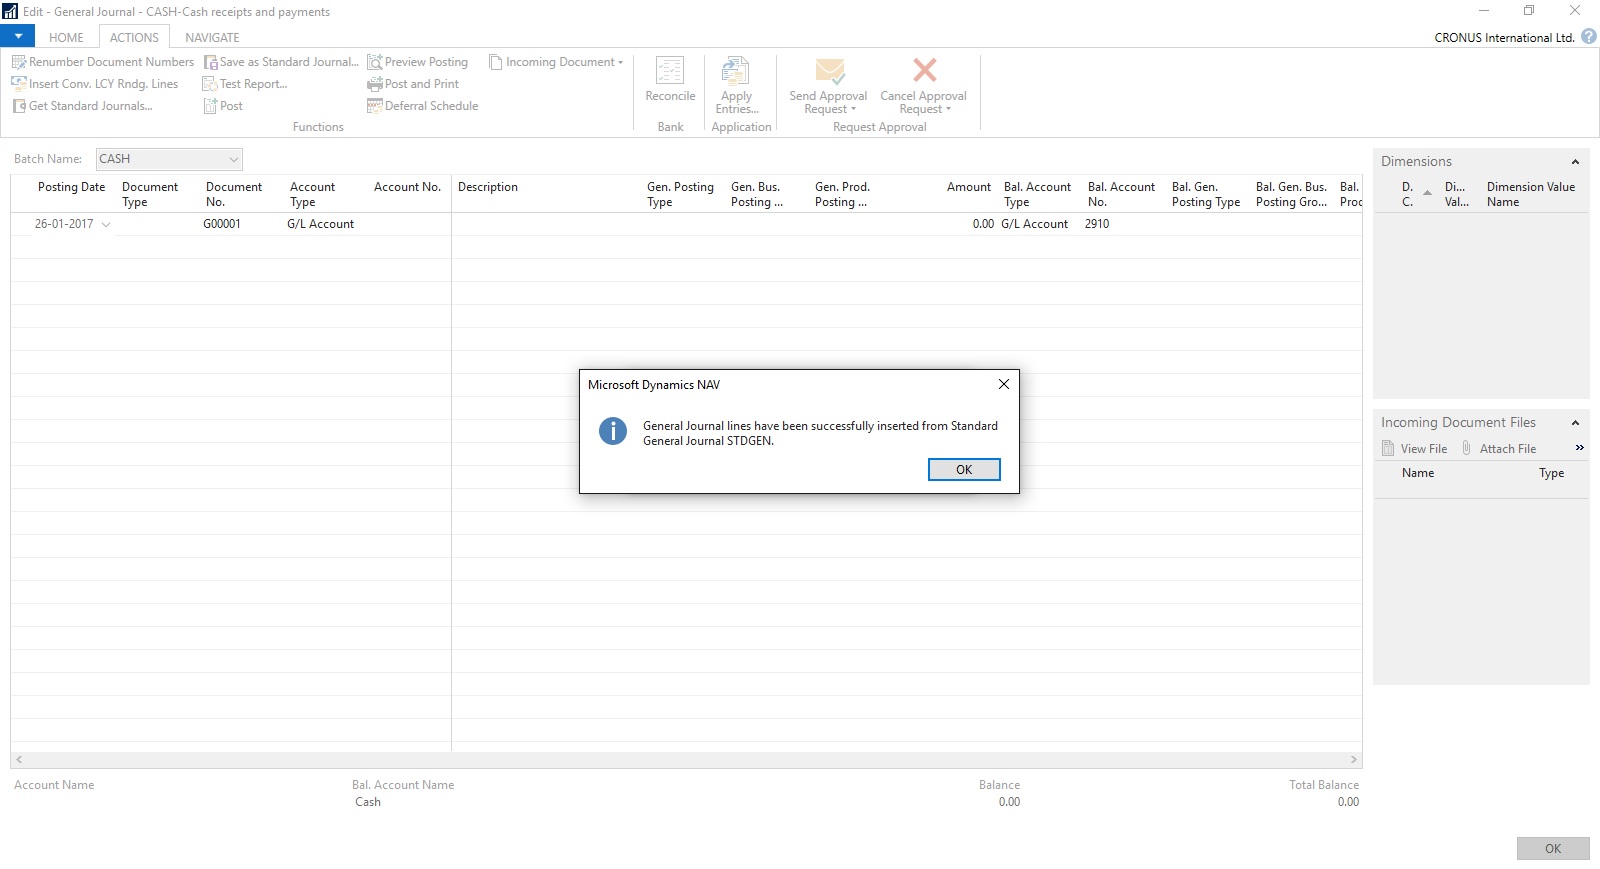
Confirmation of Std. Journal retrived and Journals created in General Journal Page.
StdGen-6

Your General Journal gets populated with values you saved to Std. Journal.

Have you Noticed, Posting Date as your Work Date and Next Document No. from your assigned No. Series is populated Automatically.

StdGen-7

Fill the Amount and any other required fields and Post the Journal.

Next time when again you wish to post similar entries just retrive it and continue.

Thats all for todays Post, What you are waiting for give it a try.

I will comeup with more details in my upcoming Posts, till then keep exploring and Learning.


Tuesday, 29 December 2015

How do I: Set Up General Ledger Accounts for Invoice Rounding Differences

To use the automatic invoice rounding function, you will be required to set up the general ledger account or accounts in which the rounding differences will be posted. Before you can do this, you will be required to set up VAT product posting groups.

To set up general ledger accounts for invoice rounding differences

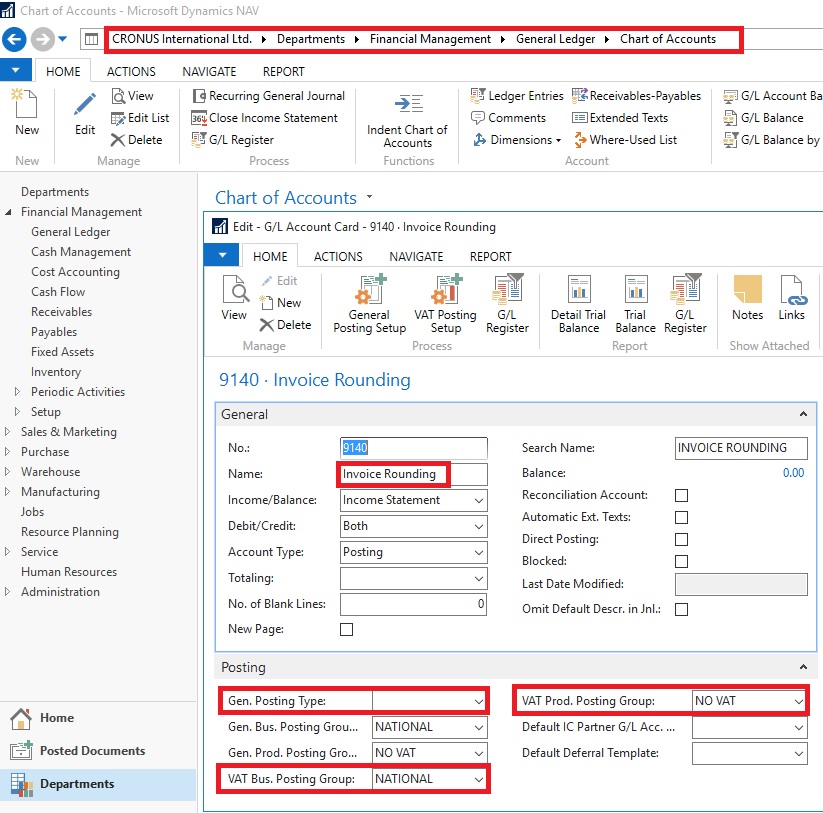
  1. Set up the account in the Chart of Accounts window and name it Invoice Rounding or as required name. (I am showing the standard Account defined in Demo Database, you can setup your own as per the requirement)

  2. In the Posting Type field, select <Blank>.

  3. Fill in the VAT Bus. Posting Group field or can leave blank.

  4. Fill in the VAT Prod. Posting Group You may want to set up a new group code that can be used for invoice rounding, if don’t have any existing to be used.


InvoiceRounding-1

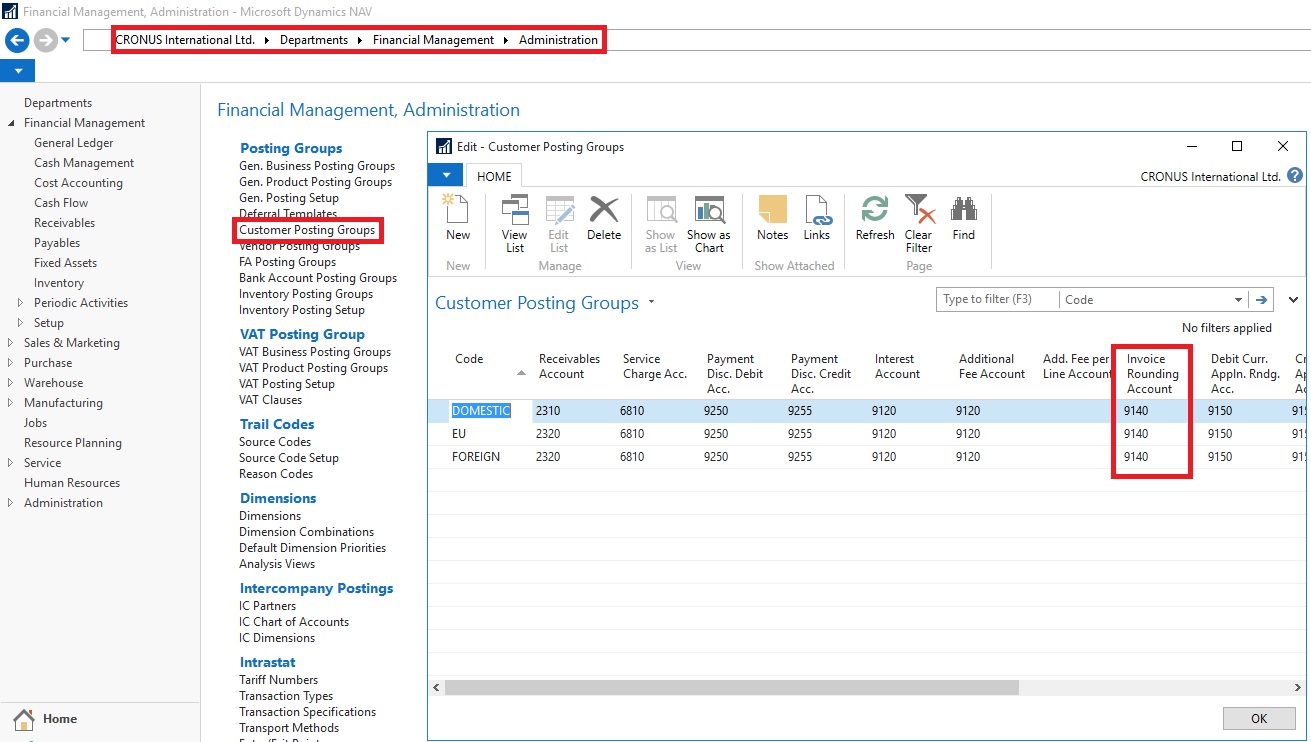
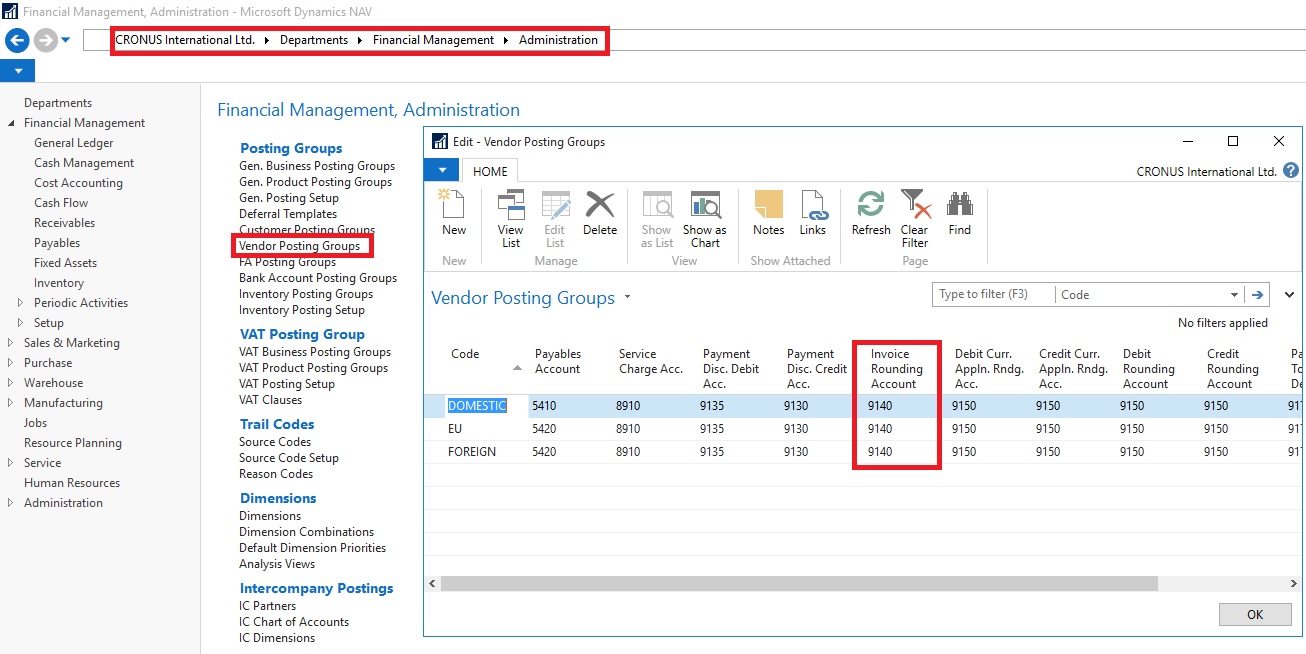
Now you need to assign the invoice rounding account to posting groups in the Customer Posting Groups window and the Vendor Posting Groups window.

InvoiceRounding-6

InvoiceRounding-7

Sunday, 29 November 2015

Accounts in the General Ledger

To reconcile inventory and capacity ledger entries with the general ledger, the related value entries are posted to different accounts in the general ledger.

From the Inventory Ledger

The below table shows the relationship between different types of inventory value entries and the accounts and balancing accounts in the general ledger.


Value entry General ledger accounts
Item ledger entry typeValue entry typeVariance typeExpected costAccountBalancing account
PurchaseDirect CostYesInventory (Interim)Invt. Accrual Acc. (Interim)
Direct CostNoInventoryDirect Cost Applied
Indirect CostNoInventoryOverhead Applied
VariancePurchaseNoInventoryPurchase Variance
RevaluationNoInventoryInventory Adjmt.
RoundingNoInventoryInventory Adjmt.
SaleDirect CostYesInventory (Interim)COGS (Interim)
Direct CostNoInventoryCOGS
RevaluationNoInventoryInventory Adjmt.
RoundingNoInventoryInventory Adjmt.
Positive Adjmt.,Negative Adjmt., TransferDirect CostNoInventoryInventory Adjmt.
RevaluationNoInventoryInventory Adjmt.
RoundingNoInventoryInventory Adjmt.
(Production) ConsumptionDirect CostNoInventoryWIP
RevaluationNoInventoryInventory Adjmt.
RoundingNoInventoryInventory Adjmt.
Assembly ConsumptionDirect CostNoInventoryInventory Adjmt.
Direct CostNoDirect Cost AppliedInventory Adjmt.
Indirect CostNoOverhead AppliedInventory Adjmt.
(Production) OutputDirect CostYesInventory (Interim)WIP
Direct CostNoInventoryWIP
Indirect CostNoInventoryOverhead Applied
VarianceMaterialNoInventoryMaterial Variance
VarianceCapacityNoInventoryCapacity Variance
VarianceSubcontractedNoInventorySubcontracted Variance
VarianceCapacity OverheadNoInventoryCap. Overhead Variance
VarianceManufacturing OverheadNoInventoryMfg. Overhead Variance
RevaluationNoInventoryInventory Adjmt.
RoundingNoInventoryInventory Adjmt.
Assembly OutputDirect CostNoInventoryInventory Adjmt.
RevaluationNoInventoryInventory Adjmt.
Indirect CostNoInventoryOverhead Applied
VarianceMaterialNoInventoryMaterial Variance
VarianceCapacityNoInventoryCapacity Variance
VarianceCapacity OverheadNoInventoryCap. Overhead Variance
VarianceManufacturing OverheadNoInventoryMfg. Overhead Variance
RoundingNoInventoryInventory Adjmt.

From the Capacity Ledger

The below table shows the relationship between different types of capacity value entries and the accounts and balancing accounts in the general ledger. Capacity ledger entries represent labor time consumed in assembly or production work.


Value entry General ledger accounts
Work typeCapacity ledger entry typeValue entry typeAccountBalancing account
AssemblyResourceDirect CostDirect Cost AppliedInventory Adjmt.
AssemblyResourceIndirect CostOverhead AppliedInventory Adjmt.
ProductionMachine Center/Work CenterDirect CostWIP AccountDirect Cost Applied
ProductionMachine Center/Work CenterIndirect CostWIP AccountOverhead Applied

Assembly Costs are Always Actual

As shown in the table above, assembly postings are not represented in interim accounts. This is because the concept of work in process (WIP) does not apply in assembly output posting, unlike in production output posting. Assembly costs are only posted as actual cost, never as expected cost.

Calculating the Amount to Post to the General Ledger

The following fields in the Value Entry table are used to calculate the expected cost amount that is posted to the general ledger:

  • Cost Amount (Actual)

  • Cost Posted to G/L

  • Cost Amount (Expected)

  • Expected Cost Posted to G/L


The following table shows how the amounts to post to the general ledger are calculated for the two different cost types.


Cost type Calculation
Actual CostCost Amount (Actual) Cost Posted to G/L
Expected CostCost Amount (Expected) Expected Cost Posted to G/L


Friday, 14 August 2015

General Troubleshooting Tips

Record Locked by Another User
If you have ended Microsoft Dynamics NAV in busy mode, and then restarted Microsoft Dynamics NAV, you may experience the following error message: “Record locked by another user”. This is caused by a lock on data in a job that is still running on the server.

To release this lock, you must either shut down the SQL server manually, or restart the Microsoft Dynamics NAV Server session using the Microsoft Dynamics NAV Server Administration tool.

Sorting Actions in System Groups

In the Microsoft Dynamics NAV Windows client, you cannot order actions in system groups in the Home tab.

Remove all actions from the group, apply changes, and then add the actions again. This will ensure that metadata is created for all actions and that they can be sorted as you want.

Removing Promoted Actions in Home Tab

In Microsoft Dynamics NAV removing a promoted action in the Home tab, and then re-adding it in the same session will cause duplication of the action.

Remove the action, apply changes, add the action again, and then apply changes. Or, remove the action, add it again in same session, and then apply changes. Remove duplicate instances and apply changes.

Compression Option in IIS

Users may experience slow mobile client responses especially noticeable when they are running with a slow network connection. The reason for the mobile client running slowly can be that the dynamic compression is not enabled on the IIS server.

Configure HTTP compression of dynamic content to use bandwidth more efficiently. Enabling dynamic compression always gives you more efficient use of bandwidth, but if your server's processor utilization is already very high, the CPU load imposed by dynamic compression might make your site perform more slowly.

You can perform this procedure by using the user interface (UI), by running Appcmd.exe commands in a command-line window, by editing configuration files directly, or by writing WMI scripts.


  1. Open IIS Manager and navigate to the level you want to manage.


  2. In Features View, double-click Compression.


  3. On the Compression page, select the box next to Enable dynamic content compression.


  4. Click Apply in the Actions


The File that You Are Trying to Use Is Too Large

If you are trying to upload a large image file that is larger than 4 MB in size, such as a high-resolution photo, Microsoft Dynamics NAV will give you an error message saying that the file you are trying to upload is too large. This behavior can be changed by modifying the IIS configuration to support large file uploads.

The IIS administrator should make the following changes in the Internet Information Services (IIS) Manager.

  1. Launch the IIS Manager.

  2. In the left pane of the IIS Manager, select the Microsoft Dynamics NAV web site, and choose Request Filtering.

  3. In the Actions pane of the Request Filtering window, choose Edit Feature Settings.

  4. Set the field Maximum allowed content length (Bytes) to an appropriate value, such as 100000000 and choose the OK button.

  5. In the left pane of the IIS Manager, select the Microsoft Dynamics NAV web site, and choose Configuration Editor.

  6. In the Configuration Editor, make sure that the From field is set to Microsoft Dynamics NAV 2013 R2 Web Client Web.config

  7. Set the Section field to system.web/httpRuntime and now a number of properties will appear.

  8. Set maxRequestLength to an appropriate value, such as 100000 (kilobytes) and choose the Apply action on the right.

  9. Close the IIS Manager.


The new settings should take effect immediately without refreshing the IIS or the site.