See how a robust business intelligence solution can help you leverage technology in order to gain new visibility on your business that will enable profitable, data-driven decisions on a daily basis.
Video-1
http://jetreports.wistia.com/medias/bkl74oqz8r?embedType=async&videoWidth=640
Video-2
http://jetreports.wistia.com/medias/yoa1upnb80?embedType=async&videoWidth=640
Showing posts with label the. Show all posts
Showing posts with label the. Show all posts
Thursday, 30 June 2016

Finding the Right Business Intelligence Solution for your Company
Get answers to the most commonly asked questions around what to look for in a business intelligence solution and provider, including implementation expectations, important features to look for (that you probably didn’t know you need), and different options for report and dashboard distribution.
Watch Video here :
http://jetreports.wistia.com/medias/p4gkz27iw1?embedType=async&videoWidth=640
Watch Video here :
http://jetreports.wistia.com/medias/p4gkz27iw1?embedType=async&videoWidth=640
Sunday, 29 November 2015
Accounts in the General Ledger
To reconcile inventory and capacity ledger entries with the general ledger, the related value entries are posted to different accounts in the general ledger.
From the Inventory Ledger
The below table shows the relationship between different types of inventory value entries and the accounts and balancing accounts in the general ledger.
From the Capacity Ledger
The below table shows the relationship between different types of capacity value entries and the accounts and balancing accounts in the general ledger. Capacity ledger entries represent labor time consumed in assembly or production work.
Assembly Costs are Always Actual
As shown in the table above, assembly postings are not represented in interim accounts. This is because the concept of work in process (WIP) does not apply in assembly output posting, unlike in production output posting. Assembly costs are only posted as actual cost, never as expected cost.
Calculating the Amount to Post to the General Ledger
The following fields in the Value Entry table are used to calculate the expected cost amount that is posted to the general ledger:
The following table shows how the amounts to post to the general ledger are calculated for the two different cost types.
From the Inventory Ledger
The below table shows the relationship between different types of inventory value entries and the accounts and balancing accounts in the general ledger.
| Value entry | General ledger accounts | |||||
| Item ledger entry type | Value entry type | Variance type | Expected cost | Account | Balancing account | |
| Purchase | Direct Cost | Yes | Inventory (Interim) | Invt. Accrual Acc. (Interim) | ||
| Direct Cost | No | Inventory | Direct Cost Applied | |||
| Indirect Cost | No | Inventory | Overhead Applied | |||
| Variance | Purchase | No | Inventory | Purchase Variance | ||
| Revaluation | No | Inventory | Inventory Adjmt. | |||
| Rounding | No | Inventory | Inventory Adjmt. | |||
| Sale | Direct Cost | Yes | Inventory (Interim) | COGS (Interim) | ||
| Direct Cost | No | Inventory | COGS | |||
| Revaluation | No | Inventory | Inventory Adjmt. | |||
| Rounding | No | Inventory | Inventory Adjmt. | |||
| Positive Adjmt.,Negative Adjmt., Transfer | Direct Cost | No | Inventory | Inventory Adjmt. | ||
| Revaluation | No | Inventory | Inventory Adjmt. | |||
| Rounding | No | Inventory | Inventory Adjmt. | |||
| (Production) Consumption | Direct Cost | No | Inventory | WIP | ||
| Revaluation | No | Inventory | Inventory Adjmt. | |||
| Rounding | No | Inventory | Inventory Adjmt. | |||
| Assembly Consumption | Direct Cost | No | Inventory | Inventory Adjmt. | ||
| Direct Cost | No | Direct Cost Applied | Inventory Adjmt. | |||
| Indirect Cost | No | Overhead Applied | Inventory Adjmt. | |||
| (Production) Output | Direct Cost | Yes | Inventory (Interim) | WIP | ||
| Direct Cost | No | Inventory | WIP | |||
| Indirect Cost | No | Inventory | Overhead Applied | |||
| Variance | Material | No | Inventory | Material Variance | ||
| Variance | Capacity | No | Inventory | Capacity Variance | ||
| Variance | Subcontracted | No | Inventory | Subcontracted Variance | ||
| Variance | Capacity Overhead | No | Inventory | Cap. Overhead Variance | ||
| Variance | Manufacturing Overhead | No | Inventory | Mfg. Overhead Variance | ||
| Revaluation | No | Inventory | Inventory Adjmt. | |||
| Rounding | No | Inventory | Inventory Adjmt. | |||
| Assembly Output | Direct Cost | No | Inventory | Inventory Adjmt. | ||
| Revaluation | No | Inventory | Inventory Adjmt. | |||
| Indirect Cost | No | Inventory | Overhead Applied | |||
| Variance | Material | No | Inventory | Material Variance | ||
| Variance | Capacity | No | Inventory | Capacity Variance | ||
| Variance | Capacity Overhead | No | Inventory | Cap. Overhead Variance | ||
| Variance | Manufacturing Overhead | No | Inventory | Mfg. Overhead Variance | ||
| Rounding | No | Inventory | Inventory Adjmt. | |||
From the Capacity Ledger
The below table shows the relationship between different types of capacity value entries and the accounts and balancing accounts in the general ledger. Capacity ledger entries represent labor time consumed in assembly or production work.
| Value entry | General ledger accounts | |||
| Work type | Capacity ledger entry type | Value entry type | Account | Balancing account |
| Assembly | Resource | Direct Cost | Direct Cost Applied | Inventory Adjmt. |
| Assembly | Resource | Indirect Cost | Overhead Applied | Inventory Adjmt. |
| Production | Machine Center/Work Center | Direct Cost | WIP Account | Direct Cost Applied |
| Production | Machine Center/Work Center | Indirect Cost | WIP Account | Overhead Applied |
Assembly Costs are Always Actual
As shown in the table above, assembly postings are not represented in interim accounts. This is because the concept of work in process (WIP) does not apply in assembly output posting, unlike in production output posting. Assembly costs are only posted as actual cost, never as expected cost.
Calculating the Amount to Post to the General Ledger
The following fields in the Value Entry table are used to calculate the expected cost amount that is posted to the general ledger:
- Cost Amount (Actual)
- Cost Posted to G/L
- Cost Amount (Expected)
- Expected Cost Posted to G/L
The following table shows how the amounts to post to the general ledger are calculated for the two different cost types.
| Cost type | Calculation |
| Actual Cost | Cost Amount (Actual) –Cost Posted to G/L |
| Expected Cost | Cost Amount (Expected) – Expected Cost Posted to G/L |
Tuesday, 3 November 2015
Configuring SSL to Secure the Connection to Microsoft Dynamics NAV Web Client
It is always recommend that you secure Microsoft Dynamics NAV data that is transmitted over the Internet by enabling Secure Sockets Layer (SSL) on the connection to Microsoft Dynamics NAV Web client.
Enabling SSL on a website requires that an SSL certificate is installed on the web server. An SSL certificate is a small file that the web server uses to prove its identity and establish a trusted connection with the browser that is trying to access Microsoft Dynamics NAV Web client.
When a browser connects to the Microsoft Dynamics NAV Web client, the web server replies by sending its certificate to the browser. This certificate contains the web server's public encryption key and the name of the authority that granted the certificate. The browser verifies the certificate using the authority's public key.
Note You can configure SSL for the Microsoft Dynamics NAV Web client when you install the Microsoft Dynamics NAV Web Server components.
Obtaining an SSL Certificate
In a production environment, you should obtain an SSL certificate from a certification authority. Some large organizations may have their own certification authorities, and other organizations can request a certificate from a third-party organization. In a test environment or development environment, you can create your own self-signed certificate.
To create a self-signed SSL certificate
Open Internet Information Services (IIS) Manager, on the Start menu, choose Administrative Tools, and then choose Internet Information Service (IIS) Manager.


The new certificate appears on the Server Certificate page.

Adding an HTTPS Binding That Uses the Certificate on the Microsoft Dynamics NAV Web Client Site
After you get the certificate, you add a binding to the https protocol on the website. When you add the binding, you associate it with the certificate.
To add an https binding with the certificate to the website
By default, the site has the name Microsoft Dynamics NAV 2016 Web Client.


You can use the default port 443 or change it to another port. If you change it to another port, you will have to provide the port number in the URL when you try to open the client.

Redirecting HTTP to HTTPS (Optional)
To ensure that users always access the site that is secured with SSL, you can automatically redirect HTTP requests to HTTPS. This means that users do not have to explicitly include https in the URL in the browser.
For example, the nonsecure URL of the Microsoft Dynamics NAV Web client could be
The secure URL could be
If a user types
the browser automatically redirects to
There are different ways to redirect HTTP requests to HTTPS.
The following procedure describes how to redirect HTTP requests to HTTPS by installing the Microsoft Application Request Routing for IIS 7 and modifying the web.config file for the Microsoft Dynamics NAV Web client.
To redirect HTTP to HTTPS
The web.config file is located in the physical path of the web application on IIS. By default, the path is
For example, the folder for the default Microsoft Dynamics NAV Web client application is
Enabling SSL on a website requires that an SSL certificate is installed on the web server. An SSL certificate is a small file that the web server uses to prove its identity and establish a trusted connection with the browser that is trying to access Microsoft Dynamics NAV Web client.
When a browser connects to the Microsoft Dynamics NAV Web client, the web server replies by sending its certificate to the browser. This certificate contains the web server's public encryption key and the name of the authority that granted the certificate. The browser verifies the certificate using the authority's public key.
Note You can configure SSL for the Microsoft Dynamics NAV Web client when you install the Microsoft Dynamics NAV Web Server components.
Obtaining an SSL Certificate
In a production environment, you should obtain an SSL certificate from a certification authority. Some large organizations may have their own certification authorities, and other organizations can request a certificate from a third-party organization. In a test environment or development environment, you can create your own self-signed certificate.
To create a self-signed SSL certificate
Open Internet Information Services (IIS) Manager, on the Start menu, choose Administrative Tools, and then choose Internet Information Service (IIS) Manager.
- In the Connections pane, choose the top-level node for the server.
- On the Home page, under IIS, choose Server Certificates, and then in the Actions pane, choose Open Feature.
- On the Server Certificates page, choose Create Self-Signed Certificate.
- In the Specify Friendly Name dialog box, type a brief name for the certificate, and then choose the OK button.
The new certificate appears on the Server Certificate page.
Adding an HTTPS Binding That Uses the Certificate on the Microsoft Dynamics NAV Web Client Site
After you get the certificate, you add a binding to the https protocol on the website. When you add the binding, you associate it with the certificate.
To add an https binding with the certificate to the website
- Open Internet Information Services (IIS) Manager.
- In the Connections pane, expand the Sites node, and then choose the Microsoft Dynamics NAV Web client site to which you want to add the binding.
By default, the site has the name Microsoft Dynamics NAV 2016 Web Client.
- In the Actions pane, choose Bindings.
- In the Site Bindings dialog box, choose Add.
- In the Add Site Binding dialog box, set the Type field to https.
You can use the default port 443 or change it to another port. If you change it to another port, you will have to provide the port number in the URL when you try to open the client.
- Set the SSL certificate field to the certificate that you obtained or created for the site.
- Choose the OK button, and then choose the Close button.
Redirecting HTTP to HTTPS (Optional)
To ensure that users always access the site that is secured with SSL, you can automatically redirect HTTP requests to HTTPS. This means that users do not have to explicitly include https in the URL in the browser.
For example, the nonsecure URL of the Microsoft Dynamics NAV Web client could be
http://mywebclient:8080/DynamicsNAV90/WebClient
The secure URL could be
https://MyWebclient:443/DynamicsNAV90/WebClient
If a user types
http://MyWebclient:8080/DynamicsNAV90/WebClient,
the browser automatically redirects to
https://MyWebclient:443/DynamicsNAV90/WebClient
There are different ways to redirect HTTP requests to HTTPS.
The following procedure describes how to redirect HTTP requests to HTTPS by installing the Microsoft Application Request Routing for IIS 7 and modifying the web.config file for the Microsoft Dynamics NAV Web client.
To redirect HTTP to HTTPS
- Download and install Microsoft Application Request Routing for IIS. You can use one of the following links:
- Microsoft Application Request Routing Version 2 for IIS 7 (x64)
- Microsoft Application Request Routing Version 2 for IIS 7 (x86)
- On the computer that is running Microsoft Dynamics NAV Web Server components, open the web.config file for the web server instance for Microsoft Dynamics NAV Web client. Use a text editor, such as Notepad.
The web.config file is located in the physical path of the web application on IIS. By default, the path is
%systemroot%\inetpub\wwwroot\[VirtualDirectoryName]\WebClient.
For example, the folder for the default Microsoft Dynamics NAV Web client application is
%systemroot%\inetpub\wwwroot\DynamicsNAV90\WebClient.
- In the <system.webServer> element, add the following elements.
<rewrite>
<rules>
<rule name="Redirect to HTTPS">
<match url="(.*)" />
<conditions>
<add input="{HTTPS}" pattern="off" ignoreCase="true" />
</conditions>
<action type="Redirect" url="https://{SERVER_NAME}/{R:1}" redirectType="SeeOther" />
</rule>
</rules>
</rewrite>
- Save the web.config file.
Friday, 23 October 2015
Upgrading the Data in Navision 2016
Continuing from my earlier post Upgrading the Application Code in Microsoft Dynamics NAV 2016
At end of previous post we have imported the objects and compiled also resolved any conflicts and compilation error. In the same process we have got the list of objects which were having destructive table schema, means the objects which will be having the changes due to which we could lose some data. Scan the objects and if we wish to save those data then we will be requiring Data Upgrade codeunits to handle any such situation.
How to create you can refer to my earlier post Data Upgrade – in Navision 2015 this it still valid for 2016.
Now we have all the upgraded application objects and Data Upgrade codeunits if any required for the upgrade. So we are good to go with Upgrading Data for Old database.
We will follow below steps to continue, make sure you have followed the process for preparation/ converting of database as discussed in my earlier post Upgrade in Microsoft Dynamics NAV 2016
Import the application objects to the converted database
In the development environment, import all the application objects that you extracted in previous step as in my earlier post discussed above in the Microsoft Dynamics NAV 2016 database. This includes the FOB file that contains all the Microsoft Dynamics NAV 2016 objects from the application code upgrade and upgrade toolkit objects if any.
When you import the FOB file, if you experience metadata conflicts, use the Import Worksheet to handle these conflicts.
Finally, on the dialog box for selecting the schema synchronization, set the Synchronize Schema option to Later.

If the upgrade toolkit objects are stored in a separate FOB file, then import the upgrade toolkit FOB file after the application objects are imported.
Run the schema synchronization to synchronize the new tables
To publish the data schema changes of the newly imported tables to the SQL tables, run the Sync. Schema For All Tables – With Validation option from the development environment.

If you are confident that any loss of data you are ok with same you can choose Force option which will drop the data for deleted fields, else use Upgrade Codeunit prepared for same as discussed above.
Or alternatively run the Sync-NavTenant cmdlet from the Microsoft Dynamics NAV 2016 Administration Shell.

Note this command runs in Administration Shell not in Development Shell as we used in our previous post.
Run the data upgrade process
A data upgrade runs the upgrade toolkit objects, such as upgrade codeunits and upgrade tables, to migrate business data from the old table structure to the new table structure. You can start the data upgrade from the Microsoft Dynamics NAV Development Environment.


Ooops………….
Or Alternatively Microsoft Dynamics NAV 2016 Administration Shell.
In the last phase of data upgrade, all companies will be initialized by running codeunit 2 Company Initialization. This is done automatically.
If you want to skip company initialization, then use the Start- NavDataUpgrade cmdlet and set the SkipCompanyIntitialization parameter.
Syntax:
Parameters
-ContinueOnError
Specifies whether the Microsoft Dynamics NAV Server instance continues to execute other upgrade functions when an error occurs while executing an upgrade function.
If you do not set this parameter, then when an error occurs, the Microsoft Dynamics NAV Server instance will suspend the data upgrade process. It will cancel the execution of upgrade functions currently in progress and roll back any changes that were applied. Completed functions will not be rolled back.
The process remains in suspended state until you take one of the following actions:
- Fix the problems in the upgrade functions that failed, and then resume the process by using the Resume-NAVDataUpgrade cmdlet. You should not add new upgrade functions at this time because they will be ignored when you resume the process.
- Stop the data upgrade process by using the Stop-NAVDataUpgrade cmdlet. Stopping the process will not roll back changes made by upgrade functions that have already been executed.
If you set this parameter, then when an error occurs, the Microsoft Dynamics NAV Server instance will continue executing other upgrade functions. At the end of the process, you can use the Get-NAVDataUpgrade cmdlet to see the list of failed upgrade functions. Changes that were applied by completed functions will not be rolled back.
When upgrading a large database, you should increase the SQL Command Timeout setting for the Microsoft Dynamics NAV Server instance that connects to the database to avoid timeouts during schema synchronization. The default setting is 30 minutes
-ServerInstance<String>
Specifies the Microsoft Dynamics NAV Server instance that the application database and the tenant database are mounted against, such as DynamicsNAV90.
You must include the name within single quotation marks.
-Tenant<TenantId>
Specifies the ID of the tenant that you want to synchronize with the application, such as Tenant1.
This parameter is required unless the specified service instance is not configured to run multiple tenants.
-Force
Forces the command to run without asking for user confirmation.
-FunctionExecutionMode<FunctionExecutionModeValue>
Specifies whether the Microsoft Dynamics NAV Server instance executes upgrade functions in series or parallel.
-Confirm
Prompts you for confirmation before running the cmdlet.
-WhatIf
Shows what would happen if the cmdlet runs. The cmdlet is not run.
Few Examples of Usage:
[1] PS C:\> Start-NAVDataUpgrade -ServerInstance DynamicsNAV90 –Force
[2] PS C:\> Start-NAVDataUpgrade -ServerInstance DynamicsNAV90 -ContinueOnError –Force
[3] PS C:\> Start-NAVDataUpgrade -ServerInstance DynamicsNAV90 -FunctionExecutionMode Serial –Force

Ooops………….
Now what to do?
To learn how to Create Data Upgrade Codeunits you can see my earlier posts:
Data Upgrade Codeunit in Navision 2015 – Part -1
Data Upgrade Codeunit in Navision 2015 – Part -2
These posts are still valid for 2016, you can follow to get you task done at this step resolution to above error.
To resolve above issue I have followed the instruction as suggested in error message, but in real scenario you will definitely will be having such codeunits. Since I have taken the 2013-R2 Std. Database I am having this issue. I have created on Upgrade codeunit with an empty upgrade function as below:

Let us run the above process again.

This time I was able to complete the process successfully.
Delete the upgrade objects
At this point, you have upgraded the database to Microsoft Dynamics NAV 2016. Now, you can delete the upgrade codeunits and upgrade table objects that you imported in above step.
When you delete tables, on the Delete dialog box, set the Synchronize Schema option to Force.
Import upgraded permission sets and permissions by using the Roles and Permissions XMLports
You import the permission sets and permissions XML files according to the following procedure.
To import the permission sets and permissions
In Object Designer, run page 9802 Permission Sets, and then delete the permission sets.
In the request page for the XMLport, in the Direction field, choose Import, choose the OK button, and then specify the permission sets XML file.
In the request page for the XMLport, in the Direction field, choose Import, choose the OK button, and then specify the permissions XML file.
Set the language of the customer database
In the development environment, choose Tools, choose Language, and then select the language of the original customer database.
Add new control add-ins
The database is now fully upgraded and is ready for use. However, you may want to add the new client control add-ins that are included in Microsoft Dynamics NAV 2016. These are not added by the upgrade process. The following client control add-ins are available from the Microsoft Dynamics NAV product media:
You can add control add-ins in the Control Add-ins window in the Microsoft Dynamics NAV Windows client.
I will come up with more details on this topic in my upcoming posts.
At end of previous post we have imported the objects and compiled also resolved any conflicts and compilation error. In the same process we have got the list of objects which were having destructive table schema, means the objects which will be having the changes due to which we could lose some data. Scan the objects and if we wish to save those data then we will be requiring Data Upgrade codeunits to handle any such situation.
How to create you can refer to my earlier post Data Upgrade – in Navision 2015 this it still valid for 2016.
Now we have all the upgraded application objects and Data Upgrade codeunits if any required for the upgrade. So we are good to go with Upgrading Data for Old database.
We will follow below steps to continue, make sure you have followed the process for preparation/ converting of database as discussed in my earlier post Upgrade in Microsoft Dynamics NAV 2016
Import the application objects to the converted database
In the development environment, import all the application objects that you extracted in previous step as in my earlier post discussed above in the Microsoft Dynamics NAV 2016 database. This includes the FOB file that contains all the Microsoft Dynamics NAV 2016 objects from the application code upgrade and upgrade toolkit objects if any.
When you import the FOB file, if you experience metadata conflicts, use the Import Worksheet to handle these conflicts.
Finally, on the dialog box for selecting the schema synchronization, set the Synchronize Schema option to Later.
If the upgrade toolkit objects are stored in a separate FOB file, then import the upgrade toolkit FOB file after the application objects are imported.
Run the schema synchronization to synchronize the new tables
To publish the data schema changes of the newly imported tables to the SQL tables, run the Sync. Schema For All Tables – With Validation option from the development environment.
If you are confident that any loss of data you are ok with same you can choose Force option which will drop the data for deleted fields, else use Upgrade Codeunit prepared for same as discussed above.
Or alternatively run the Sync-NavTenant cmdlet from the Microsoft Dynamics NAV 2016 Administration Shell.
Sync-NAVTenant –ServerInstance UpgradedDBfrom2013R2 (My Server Instance Name)
Note this command runs in Administration Shell not in Development Shell as we used in our previous post.
Run the data upgrade process
A data upgrade runs the upgrade toolkit objects, such as upgrade codeunits and upgrade tables, to migrate business data from the old table structure to the new table structure. You can start the data upgrade from the Microsoft Dynamics NAV Development Environment.
Ooops………….
Or Alternatively Microsoft Dynamics NAV 2016 Administration Shell.
In the last phase of data upgrade, all companies will be initialized by running codeunit 2 Company Initialization. This is done automatically.
If you want to skip company initialization, then use the Start- NavDataUpgrade cmdlet and set the SkipCompanyIntitialization parameter.
Syntax:
Start-NAVDataUpgrade [-ServerInstance] <String> [[-Tenant] <TenantId> ] [[-FunctionExecutionMode] <FunctionExecutionModeValue> ] [[-ContinueOnError]] [-Force] [-Confirm] [-WhatIf] [ <CommonParameters>]
Parameters
-ContinueOnError
Specifies whether the Microsoft Dynamics NAV Server instance continues to execute other upgrade functions when an error occurs while executing an upgrade function.
If you do not set this parameter, then when an error occurs, the Microsoft Dynamics NAV Server instance will suspend the data upgrade process. It will cancel the execution of upgrade functions currently in progress and roll back any changes that were applied. Completed functions will not be rolled back.
The process remains in suspended state until you take one of the following actions:
- Fix the problems in the upgrade functions that failed, and then resume the process by using the Resume-NAVDataUpgrade cmdlet. You should not add new upgrade functions at this time because they will be ignored when you resume the process.
- Stop the data upgrade process by using the Stop-NAVDataUpgrade cmdlet. Stopping the process will not roll back changes made by upgrade functions that have already been executed.
If you set this parameter, then when an error occurs, the Microsoft Dynamics NAV Server instance will continue executing other upgrade functions. At the end of the process, you can use the Get-NAVDataUpgrade cmdlet to see the list of failed upgrade functions. Changes that were applied by completed functions will not be rolled back.
When upgrading a large database, you should increase the SQL Command Timeout setting for the Microsoft Dynamics NAV Server instance that connects to the database to avoid timeouts during schema synchronization. The default setting is 30 minutes
-ServerInstance<String>
Specifies the Microsoft Dynamics NAV Server instance that the application database and the tenant database are mounted against, such as DynamicsNAV90.
You must include the name within single quotation marks.
-Tenant<TenantId>
Specifies the ID of the tenant that you want to synchronize with the application, such as Tenant1.
This parameter is required unless the specified service instance is not configured to run multiple tenants.
-Force
Forces the command to run without asking for user confirmation.
-FunctionExecutionMode<FunctionExecutionModeValue>
Specifies whether the Microsoft Dynamics NAV Server instance executes upgrade functions in series or parallel.
-Confirm
Prompts you for confirmation before running the cmdlet.
-WhatIf
Shows what would happen if the cmdlet runs. The cmdlet is not run.
Few Examples of Usage:
[1] PS C:\> Start-NAVDataUpgrade -ServerInstance DynamicsNAV90 –Force
[2] PS C:\> Start-NAVDataUpgrade -ServerInstance DynamicsNAV90 -ContinueOnError –Force
[3] PS C:\> Start-NAVDataUpgrade -ServerInstance DynamicsNAV90 -FunctionExecutionMode Serial –Force
Start-NAVDataUpgrade -ServerInstance UpgradedDBfrom2013R2 –Force
Ooops………….
Now what to do?
To learn how to Create Data Upgrade Codeunits you can see my earlier posts:
Data Upgrade Codeunit in Navision 2015 – Part -1
Data Upgrade Codeunit in Navision 2015 – Part -2
These posts are still valid for 2016, you can follow to get you task done at this step resolution to above error.
To resolve above issue I have followed the instruction as suggested in error message, but in real scenario you will definitely will be having such codeunits. Since I have taken the 2013-R2 Std. Database I am having this issue. I have created on Upgrade codeunit with an empty upgrade function as below:
Let us run the above process again.
This time I was able to complete the process successfully.
Delete the upgrade objects
At this point, you have upgraded the database to Microsoft Dynamics NAV 2016. Now, you can delete the upgrade codeunits and upgrade table objects that you imported in above step.
When you delete tables, on the Delete dialog box, set the Synchronize Schema option to Force.
Import upgraded permission sets and permissions by using the Roles and Permissions XMLports
You import the permission sets and permissions XML files according to the following procedure.
To import the permission sets and permissions
- Delete all permission sets in the database except the SUPER permission set.
In Object Designer, run page 9802 Permission Sets, and then delete the permission sets.
- Run XMLport 9171 Import/Export Permission Sets to import the permission sets XML file,
In the request page for the XMLport, in the Direction field, choose Import, choose the OK button, and then specify the permission sets XML file.
- Run XMLport 9172 Import/Export Permissions to import the permission XML file.
In the request page for the XMLport, in the Direction field, choose Import, choose the OK button, and then specify the permissions XML file.
Set the language of the customer database
In the development environment, choose Tools, choose Language, and then select the language of the original customer database.
Add new control add-ins
The database is now fully upgraded and is ready for use. However, you may want to add the new client control add-ins that are included in Microsoft Dynamics NAV 2016. These are not added by the upgrade process. The following client control add-ins are available from the Microsoft Dynamics NAV product media:
- Microsoft.Dynamics.Nav.Client.BusinessChart
- Microsoft.Dynamics.Nav.Client.PageReady
- Microsoft.Dynamics.Nav.Client.PingPong
- Microsoft.Dynamics.Nav.Client.VideoPlayer
- Microsoft.Dynamics.Nav.Client.SocialListening
You can add control add-ins in the Control Add-ins window in the Microsoft Dynamics NAV Windows client.
I will come up with more details on this topic in my upcoming posts.
Wednesday, 21 October 2015
Upgrading the Application Code in Microsoft Dynamics NAV 2016
Continuing from my earlier post Upgrade in Microsoft Dynamics NAV 2016
No doubt typically, customers want all the customizations that have been implemented in their existing Microsoft Dynamics NAV databases to be migrated to their new Microsoft Dynamics NAV 2016 databases.
Depending on the version of Microsoft Dynamics NAV that a database is being upgraded from, the amount of code changes between the two versions is large or small.
To upgrade the application code, you must merge code from different versions of the application. This merge process is known as a code upgrade or application upgrade.
You must upgrade the application before you upgrade the data.
Application Upgrade Overview
You must analyze and process code changes by comparing and evaluating three separate versions of the Microsoft Dynamics NAV database:
When you merge the application objects from these three versions, you can import the result into a new Microsoft Dynamics NAV 2016 database that then contains the upgraded application.
At the end of the process, you export the merged Microsoft Dynamics NAV 2016 objects from this database to a .fob file that you will use during the data upgrade.
The following list describes the main steps of upgrading the application code:
To begin, create five folders on the computer and name them as follows:
In my example, the UpgradeDemo folder on the C drive contains five folders: ORIGINAL, MODIFIED, TARGET, DELTA, and RESULT. The DELTA and RESULT folders are empty. The ORIGINAL, MODIFIED, and TARGET folders contains one or more text files that contain application objects.
Preparing the Text Files
The Microsoft Dynamics NAV cmdlets take text files as input. You must prepare three sets of text files that contain application objects as describes in the list above. You can export application objects to text files from the development environment, or by running the ExportObjects command. The following list describes the main steps of preparing the text files that you must provide as input for the application merge process.

Optionally, you can use the Split-NAVApplicationObjectFile cmdlet to split each text file into separate text files for each application object. This can make it easier to keep track of the process. The end result at this stage is three folders with one or more text files that contain the three sets of application objects that you want to merge.
To compare two sets of application objects


This generates a number of DELTA files that describe the difference between ORIGINAL and MODIFIED. You can open the DELTA files in text editors such as Notepad. The following example illustrates how a DELTA file identifies the difference between ORIGINAL and MODIFIED.

Let us understand how the changes are reported when we compare the objects.


You can apply those differences to TARGET by using the Update-NAVApplicationObject cmdlet.
To apply DELTA files to application objects
In this example, the folder structure is the same as described above procedure. You can now run the cmdlet.


This merges the difference between ORIGINAL and MODIFIED with the target solution and puts the resulting solution in the RESULT folder.
You can now import the merged objects into a Microsoft Dynamics NAV database.
Merging Versions
Alternatively to above process you can merge the three sets of application objects to create the application for the new database.
You can use the Merge-NAVApplicationObject cmdlet to merge the three sets of application objects.
The following example illustrates the type of command that you can run.


Depending on the number of objects that you are merging and the number of differences found, this can take a few seconds, a few minutes, or longer.
The RESULT folder will contain a text file for each application object. The result of the merge is shown when the cmdlet completes, including a description of any application objects with conflicting code.

These conflicts are stored in .CONFLICT files in the RESULT folder. You can import all objects in the RESULT folder into the new Microsoft Dynamics NAV 2016 database, or you can analyze the conflicts before you import the objects.
Handling Conflicts
Depending on the application that you are upgrading, you can choose to analyze the conflicting code before you import the merged objects into the development environment.
The conflicts are shown in the merged text files but are also identified in .CONFLICT files in the RESULT folder. Subfolders then contain copies of the source files from the versions that have conflicting code.

You can analyze the conflicts in any tool, make the relevant changes, and then run the merge operation again. Alternatively, you can import the merged files into the development environment, and resolve the conflicts there.
Importing and Compiling Merged Objects
After you have completed the merge, import the new custom version into the new Microsoft Dynamics NAV 2016 database, and then compile all objects. You must resolve any compilation errors before you can continue.
The text files with the merged application objects include successfully merged code, and code that is partially merged. You can import the partially merged objects into the Microsoft Dynamics NAV 2016 development environment and resolve the conflicts there.
You can use Import-NAVApplicationObject, that runs the ImportObjects command.
This means that you can run a command such as the following:

First we will join the many text files into a single file using above command and as a result we get all-merged.txt file which we will import in database using below command.
Now we import objects obtained from previous step into an existing, empty database.

When you compile the objects, an error is thrown for each code conflict, and you can use the tools that are available in the development environment to resolve the conflicts.
You now have a new database with a fully upgraded application.
Exporting All Objects
Now, you must export all objects to an objects.fob file so that you can import them when performing the data upgrade. The export must include customized objects, upgraded reports, and all other Microsoft Dynamics NAV 2016 objects.
However you are free to do object merge and upgrade as you do earlier, here I concentrated using Dynamics Navision 2016 Development Shell. As this is the new way also much faster than what we used to do earlier.
We can use this in identifying the Objects under different categories like Modified, having conflicts and New Objects which can help in estimating also and planning the action in advance.
I will come up with further step and more details in my upcoming posts.
No doubt typically, customers want all the customizations that have been implemented in their existing Microsoft Dynamics NAV databases to be migrated to their new Microsoft Dynamics NAV 2016 databases.
Depending on the version of Microsoft Dynamics NAV that a database is being upgraded from, the amount of code changes between the two versions is large or small.
To upgrade the application code, you must merge code from different versions of the application. This merge process is known as a code upgrade or application upgrade.
You must upgrade the application before you upgrade the data.
Application Upgrade Overview
You must analyze and process code changes by comparing and evaluating three separate versions of the Microsoft Dynamics NAV database:
| Version | Description |
| Original version | This is the baseline version of the solution that you want to upgrade, such as the original release of Microsoft Dynamics NAV 2013. |
| Modified version | This is the version that you want to upgrade, such as a customer's database with customizations and add-on solutions. |
| Target version | This is the target of the merge process that you want to upgrade your application to, such as the standard version of the Microsoft Dynamics NAV 2016 database. |
When you merge the application objects from these three versions, you can import the result into a new Microsoft Dynamics NAV 2016 database that then contains the upgraded application.
At the end of the process, you export the merged Microsoft Dynamics NAV 2016 objects from this database to a .fob file that you will use during the data upgrade.
The following list describes the main steps of upgrading the application code:
- Prepare the application object text files.
- Merge versions.
- Resolve conflicts
- Import and compile the merged application objects.
- Export all objects.
To begin, create five folders on the computer and name them as follows:
In my example, the UpgradeDemo folder on the C drive contains five folders: ORIGINAL, MODIFIED, TARGET, DELTA, and RESULT. The DELTA and RESULT folders are empty. The ORIGINAL, MODIFIED, and TARGET folders contains one or more text files that contain application objects.
Preparing the Text Files
The Microsoft Dynamics NAV cmdlets take text files as input. You must prepare three sets of text files that contain application objects as describes in the list above. You can export application objects to text files from the development environment, or by running the ExportObjects command. The following list describes the main steps of preparing the text files that you must provide as input for the application merge process.
- First, export all application objects from the original version, such as the original Microsoft Dynamics NAV 2013 R2 database. Do not export system tables. Name the file OldBaseVersion.txt, and then save the file in the ORIGINAL folder that you created earlier. For example, the Microsoft.Dynamics.Nav.Model.Tools.psd1 module includes a function, Export-NAVApplicationObject, that runs the ExportObjects command. This means that you can run a command such as the following:
Export-NAVApplicationObject –DatabaseServer MyServer –DatabaseName "Demo Database NAV (7-1)" –Path C:\Upgrade\ORIGINAL\OldBaseVersion.txt
- Next, export all relevant application objects from the modified version, such as the customized Microsoft Dynamics NAV 2013 database. Do not export system tables. Name the file OldCustomVersion.txt, and then save the file in the MODIFIED folder that you created earlier.
- Finally, export all application objects from the new base version, such as the original Microsoft Dynamics NAV 2016 database. Do not export system tables. Name the file NewBaseVersion.txt, and then save the file in the TARGET folder that you created earlier.
Optionally, you can use the Split-NAVApplicationObjectFile cmdlet to split each text file into separate text files for each application object. This can make it easier to keep track of the process. The end result at this stage is three folders with one or more text files that contain the three sets of application objects that you want to merge.
To compare two sets of application objects
- Open the Microsoft Dynamics NAV 2016 Development Shell in administrator mode.
- Navigate to the location of your folders by typing a command such as the following:
cd c:\UserData\UpgradeDemo (in my case)
- To run the cmdlet to compare all application objects in the ORIGINAL folder to the application objects in the MODIFIED folder, type the following command:
Compare-NAVApplicationObject -OriginalPath 'C:\UserData\Upgrade Demo\Original' -ModifiedPath 'C:\UserData\Upgrade Demo\Modified' -DeltaPath 'C:\UserData\Upgrade Demo\Delta'
This generates a number of DELTA files that describe the difference between ORIGINAL and MODIFIED. You can open the DELTA files in text editors such as Notepad. The following example illustrates how a DELTA file identifies the difference between ORIGINAL and MODIFIED.
Let us understand how the changes are reported when we compare the objects.
You can apply those differences to TARGET by using the Update-NAVApplicationObject cmdlet.
To apply DELTA files to application objects
- Open the Microsoft Dynamics NAV 2016 Development Shell in administrator mode.
- Navigate to the location of your folders by typing a command such as the following:
cd c:\UserData\UpgradeDemo (in my case)
In this example, the folder structure is the same as described above procedure. You can now run the cmdlet.
- To run the cmdlet to apply the differences that are stored in the DELTA folder to the application objects in the TARGET folder, type the following command:
Update-NAVApplicationObject –DeltaPath 'C:\UserData\Upgrade Demo\Delta' -TargetPath 'C:\UserData\Upgrade Demo\Target' -ResultPath 'C:\UserData\Upgrade Demo\Result'
This merges the difference between ORIGINAL and MODIFIED with the target solution and puts the resulting solution in the RESULT folder.
You can now import the merged objects into a Microsoft Dynamics NAV database.
Merging Versions
Alternatively to above process you can merge the three sets of application objects to create the application for the new database.
You can use the Merge-NAVApplicationObject cmdlet to merge the three sets of application objects.
The following example illustrates the type of command that you can run.
Merge-NAVApplicationObject -OriginalPath 'C:\UserData\Upgrade Demo\Original' -TargetPath 'C:\UserData\Upgrade Demo\Target' -ModifiedPath 'C:\UserData\Upgrade Demo\Modified' -ResultPath 'C:\UserData\Upgrade Demo\Result'
Depending on the number of objects that you are merging and the number of differences found, this can take a few seconds, a few minutes, or longer.
The RESULT folder will contain a text file for each application object. The result of the merge is shown when the cmdlet completes, including a description of any application objects with conflicting code.
These conflicts are stored in .CONFLICT files in the RESULT folder. You can import all objects in the RESULT folder into the new Microsoft Dynamics NAV 2016 database, or you can analyze the conflicts before you import the objects.
Handling Conflicts
Depending on the application that you are upgrading, you can choose to analyze the conflicting code before you import the merged objects into the development environment.
The conflicts are shown in the merged text files but are also identified in .CONFLICT files in the RESULT folder. Subfolders then contain copies of the source files from the versions that have conflicting code.
You can analyze the conflicts in any tool, make the relevant changes, and then run the merge operation again. Alternatively, you can import the merged files into the development environment, and resolve the conflicts there.
Importing and Compiling Merged Objects
After you have completed the merge, import the new custom version into the new Microsoft Dynamics NAV 2016 database, and then compile all objects. You must resolve any compilation errors before you can continue.
The text files with the merged application objects include successfully merged code, and code that is partially merged. You can import the partially merged objects into the Microsoft Dynamics NAV 2016 development environment and resolve the conflicts there.
You can use Import-NAVApplicationObject, that runs the ImportObjects command.
This means that you can run a command such as the following:
Join-NAVApplicationObjectFile -Source 'C:\UserData\Upgrade Demo\Result\*.txt' -Destination 'C:\UserData\Upgrade Demo\FinalMergedObjects\all-merged.txt'
First we will join the many text files into a single file using above command and as a result we get all-merged.txt file which we will import in database using below command.
Import-NAVApplicationObject –DatabaseServer MyServer –DatabaseName "My Upgraded App" –Path C:\Upgrade\all-merged.txt
Now we import objects obtained from previous step into an existing, empty database.
When you compile the objects, an error is thrown for each code conflict, and you can use the tools that are available in the development environment to resolve the conflicts.
You now have a new database with a fully upgraded application.
Exporting All Objects
Now, you must export all objects to an objects.fob file so that you can import them when performing the data upgrade. The export must include customized objects, upgraded reports, and all other Microsoft Dynamics NAV 2016 objects.
This completes the upgrade of the application code. Next, you must upgrade the data in the database.
However you are free to do object merge and upgrade as you do earlier, here I concentrated using Dynamics Navision 2016 Development Shell. As this is the new way also much faster than what we used to do earlier.
We can use this in identifying the Objects under different categories like Modified, having conflicts and New Objects which can help in estimating also and planning the action in advance.
I will come up with further step and more details in my upcoming posts.
Sunday, 4 October 2015
Extend the Data Model using calculated columns
Recall from my previous post Add a relationship using Diagram View in Power Pivot
Which I have left with below note. I will be continuing from where I left my previous post.
It’s nice when the data in your Data Model has all the fields necessary to create relationships, and mash up data to visualize in Power View or PivotTables. But tables aren’t always so cooperative, so in today’s post will describe how to create a new column, using DAX that can be used to create a relationship between tables.
Open the Olympics Excel sheet which we used in our previous post.

Delete the column EditionID from sheet Medals & Hosts Table/Sheet.

After deleting the Column EditionID from Table/Sheet Select Update All in Ribbon from PowerPivot Tab. This will update the column in Data Model.
Since we are going to learn creating relationship on calculated fields.
In Hosts, we can create a unique calculated column by combining the Edition field (the year of the Olympics event) and the Season field (Summer or Winter). In the Medals table there is also an Edition field and a Season field, so if we create a calculated column in each of those tables that combines the Edition and Season fields, we can establish a relationship between Hosts and Medals. The following screen shows the Hosts table, with its Edition and Season fields selected

Select the Hosts table in Power Pivot. Adjacent to the existing columns is an empty column titled Add Column. Power Pivot provides that column as a placeholder. There are many ways to add a new column to a table in Power Pivot, one of which is to simply select the empty column that has the title Add Column.
In the formula bar, type the following DAX formula. The CONCATENATE function combines two or more fields into one. As you type, AutoComplete helps you type the fully qualified names of columns and tables, and lists the functions that are available. Use tab to select AutoComplete suggestions. You can also just click the column while typing your formula, and Power Pivot inserts the column name into your formula.
When you finish building the formula, press Enter to accept it.
Values are populated for all the rows in the calculated column. If you scroll down through the table, you see that each row is unique – so we’ve successfully created a field that uniquely identifies each row in the Hosts table. Such fields are called a primary key.
Let’s rename the calculated column to EditionID. You can rename any column by double-clicking it, or by right-clicking the column and choosing Rename Column. When completed, the Hosts table in Power Pivot looks like the following screen.

Next let’s create a calculated column in Medals that matches the format of the EditionID column we created in Hosts, so we can create a relationship between them.
When you created a new column, Power Pivot added another placeholder column called Add Column. Next we want to create the EditionID calculated column, so select Add Column. In the formula bar, type the following DAX formula and press Enter.
Rename the column by double-clicking CalculatedColumn1 and typing EditionID.

Next let’s use the calculated columns we created to establish a relationship between Hosts and Medals.
In the Power Pivot window, select Home > View > Diagram View from the ribbon.
Drag the EditionID column in Medals to the EditionID column in Hosts. Power Pivot creates a relationship between the tables based on the EditionID column, and draws a line between the two columns, indicating the relationship.

Now you can see the relationship between Host & Medal table is established on calculated field EditionID in both the tables.
Stay tuned for more details on this topic. I will come up with next step in this series in my upcoming post.
Till then keep learning & practicing.
Which I have left with below note. I will be continuing from where I left my previous post.
It’s nice when the data in your Data Model has all the fields necessary to create relationships, and mash up data to visualize in Power View or PivotTables. But tables aren’t always so cooperative, so in today’s post will describe how to create a new column, using DAX that can be used to create a relationship between tables.
Open the Olympics Excel sheet which we used in our previous post.
Delete the column EditionID from sheet Medals & Hosts Table/Sheet.
After deleting the Column EditionID from Table/Sheet Select Update All in Ribbon from PowerPivot Tab. This will update the column in Data Model.
Since we are going to learn creating relationship on calculated fields.
In Hosts, we can create a unique calculated column by combining the Edition field (the year of the Olympics event) and the Season field (Summer or Winter). In the Medals table there is also an Edition field and a Season field, so if we create a calculated column in each of those tables that combines the Edition and Season fields, we can establish a relationship between Hosts and Medals. The following screen shows the Hosts table, with its Edition and Season fields selected
Select the Hosts table in Power Pivot. Adjacent to the existing columns is an empty column titled Add Column. Power Pivot provides that column as a placeholder. There are many ways to add a new column to a table in Power Pivot, one of which is to simply select the empty column that has the title Add Column.
In the formula bar, type the following DAX formula. The CONCATENATE function combines two or more fields into one. As you type, AutoComplete helps you type the fully qualified names of columns and tables, and lists the functions that are available. Use tab to select AutoComplete suggestions. You can also just click the column while typing your formula, and Power Pivot inserts the column name into your formula.
=CONCATENATE([Edition],[Season])
When you finish building the formula, press Enter to accept it.
Values are populated for all the rows in the calculated column. If you scroll down through the table, you see that each row is unique – so we’ve successfully created a field that uniquely identifies each row in the Hosts table. Such fields are called a primary key.
Let’s rename the calculated column to EditionID. You can rename any column by double-clicking it, or by right-clicking the column and choosing Rename Column. When completed, the Hosts table in Power Pivot looks like the following screen.
Next let’s create a calculated column in Medals that matches the format of the EditionID column we created in Hosts, so we can create a relationship between them.
When you created a new column, Power Pivot added another placeholder column called Add Column. Next we want to create the EditionID calculated column, so select Add Column. In the formula bar, type the following DAX formula and press Enter.
=CONCATENATE([Year],[Season])
Rename the column by double-clicking CalculatedColumn1 and typing EditionID.
Next let’s use the calculated columns we created to establish a relationship between Hosts and Medals.
In the Power Pivot window, select Home > View > Diagram View from the ribbon.
Drag the EditionID column in Medals to the EditionID column in Hosts. Power Pivot creates a relationship between the tables based on the EditionID column, and draws a line between the two columns, indicating the relationship.
Now you can see the relationship between Host & Medal table is established on calculated field EditionID in both the tables.
Stay tuned for more details on this topic. I will come up with next step in this series in my upcoming post.
Till then keep learning & practicing.
Saturday, 3 October 2015
Add Excel Sheet/Table to the PowerPivot Data Model
Download the Excel file from the link provided in previous post.
Import data using copy and paste from Excel sheet or other source for PowerPivot Data Model.
Open the Workbook:
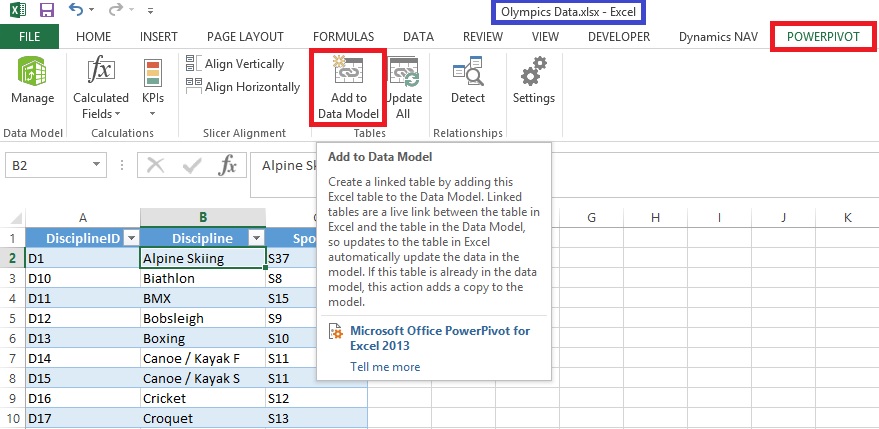
Select sheet one by one and Add to Data model of PowerPivot.

Make sure all Table/Sheet is added to Data Model of PowerPivot.
I have create a sample Excel File for you which you can down load from the Shared Path using link: http://1drv.ms/1GpZFd4
This file have couple of sheets having data related to Olympics which I have compiled from MS Office support site.
You can find the link on the Menu of my blogsite too to access the shared files.
I will be using this file for couple of walkthrough in my upcoming posts.
Import data using copy and paste from Excel sheet or other source for PowerPivot Data Model.
Open the Workbook:
Select sheet one by one and Add to Data model of PowerPivot.
Make sure all Table/Sheet is added to Data Model of PowerPivot.
I have create a sample Excel File for you which you can down load from the Shared Path using link: http://1drv.ms/1GpZFd4
This file have couple of sheets having data related to Olympics which I have compiled from MS Office support site.
You can find the link on the Menu of my blogsite too to access the shared files.
I will be using this file for couple of walkthrough in my upcoming posts.
Wednesday, 30 September 2015
Start the Power Pivot in Microsoft Excel add-in
Power Pivot in Microsoft Excel 2013 is an add-in you can use to perform powerful data analysis in Excel. The add-in is built into Excel, but by default, it's not enabled. Here’s how you enable Power Pivot before using it for the first time.
In the Manage box, click COM Add-ins> Go


The ribbon now has a Power Pivot tab

- Go to File > Options > Add-Ins.
In the Manage box, click COM Add-ins> Go
- Check the Microsoft Office Power Pivot in Microsoft Excel 2013 box, and then click OK. If you have other versions of the Power Pivot add-in installed, those versions are also listed in the COM Add-ins list. Be sure to select the Power Pivot add-in for Excel.
The ribbon now has a Power Pivot tab
Sunday, 27 September 2015
How to Use the Jet Report Scheduler
Overview
The Jet Scheduler is a powerful tool that allows users to schedule reports to be automatically run by the Windows Task Scheduler. The user can also control where the output file is saved to, if the report should be emailed once it has been generated, and the output format of the report.
Creating a New Scheduled Task
To set up a scheduled report, open the report in Excel, click the Jet ribbon, and click the Schedule button.
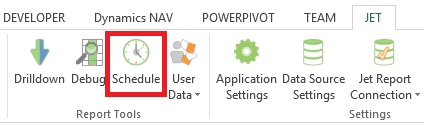
Click the New Task... button to schedule a new task.
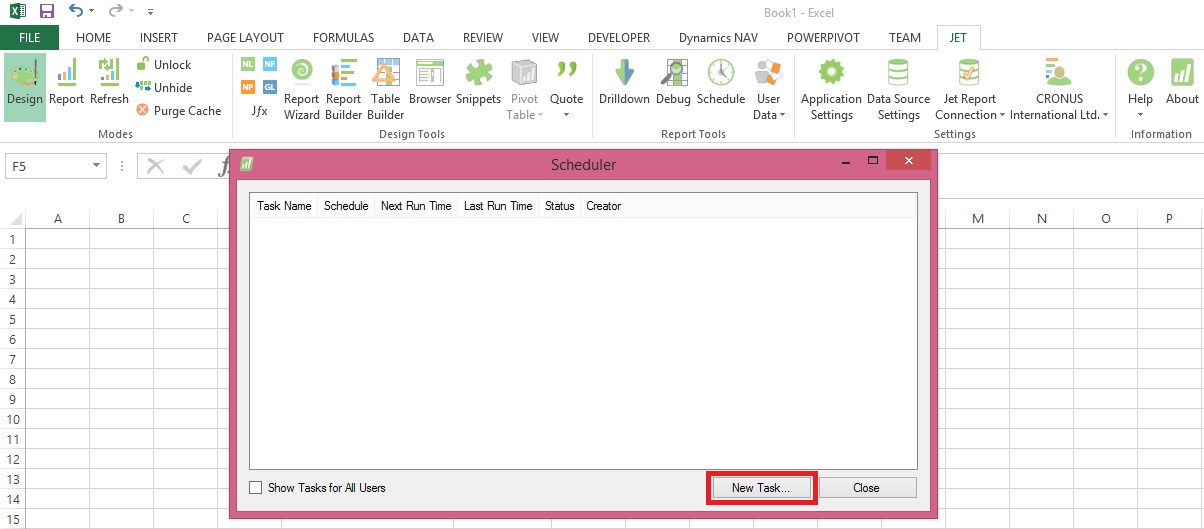
The Scheduled Task window will now appear.
Reports Tab
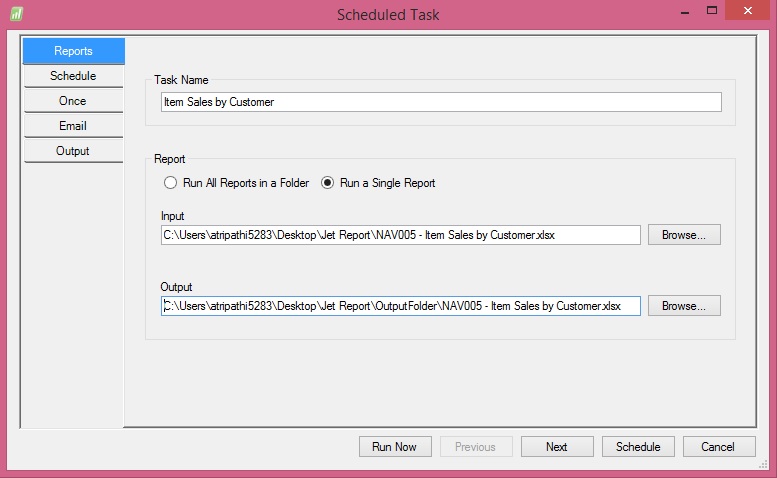
The Reports tab contains general information about the scheduled task.
Schedule Tab
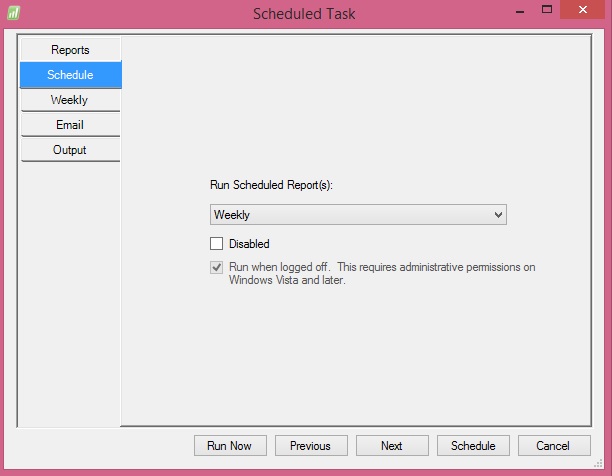
This tab will define the frequency of how often the report will be run as well as if the task is currently disabled and if the report should be run when the user is logged off.
The available options for the frequency are:
Frequency Tab
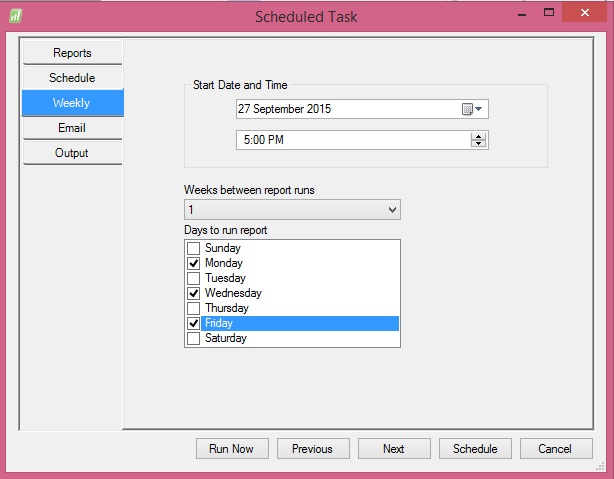
The name of this tab will change depending on the frequency specified on the Schedule tab.
In the screenshot above a Weekly frequency has been specified.
Email Tab
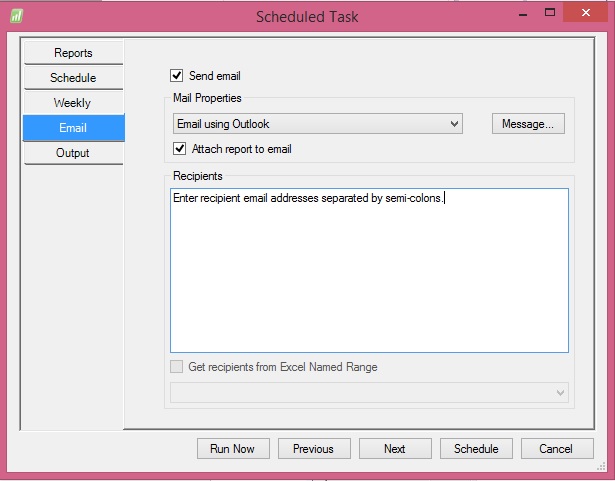
The Email tab allows the user to define who the report will be sent to if emailing is desired.
Output Tab
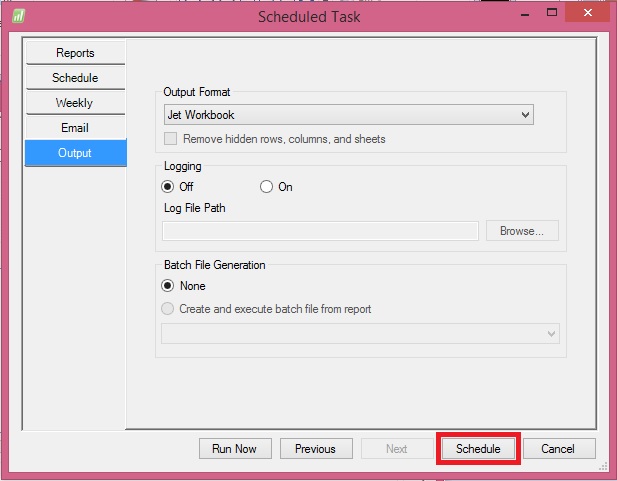
The Output tab allows the user to define how the file should be saved once it is finished running. This tab also enabled the user to turn on logging to troubleshoot errors with the Scheduler process as well as use Batch File Generation for the reports.
Remain tuned for more details, I will come up with more details and features in my upcoming posts.
The Jet Scheduler is a powerful tool that allows users to schedule reports to be automatically run by the Windows Task Scheduler. The user can also control where the output file is saved to, if the report should be emailed once it has been generated, and the output format of the report.
Creating a New Scheduled Task
To set up a scheduled report, open the report in Excel, click the Jet ribbon, and click the Schedule button.
Click the New Task... button to schedule a new task.
The Scheduled Task window will now appear.
Reports Tab
The Reports tab contains general information about the scheduled task.
- Task Name: This represents the name of the task as it will appear in the Scheduled Task window to the user.
- Run All Reports in a Folder: This button will enable the user to schedule all Jet Reports in a full to be run
- Run a Single Report: This button will enable the user to schedule a single Jet Report to be run
- Input: This represents the folder and file name of the report that will be run
- Output: This represents the folder and file name of where the finished report will be saved
Schedule Tab
This tab will define the frequency of how often the report will be run as well as if the task is currently disabled and if the report should be run when the user is logged off.
The available options for the frequency are:
- Once: The report will only be run one time
- Daily: The report will be run every day (it is possible to set on the next tab the number of days to wait between runs)
- Weekly: The report will be run every week (it is possible to set on the next tab the days of the week for the report to be run on)
- Monthly: The report will be run every month (it is possible to set on the next tab the months for the report to run on and the days of the month for the report to be run on)
- When Idle: The report will run every time that the computer goes into idle mode
- At Startup: The report will be run each time that the computer is turned on
- At Logon: The report will be run each time that the user logs on to the computer
Frequency Tab
The name of this tab will change depending on the frequency specified on the Schedule tab.
In the screenshot above a Weekly frequency has been specified.
- Start Date and Time: This represents the first date that the report will run and the time that it will run for this and subsequent schedules
- Weeks between report runs: This specifies how many weeks the Scheduler will wait between report runs before running the report again
- Days to run report: This represents the days of the week that the report is scheduled to run on
Email Tab
The Email tab allows the user to define who the report will be sent to if emailing is desired.
- Send email: If this box is checked it will enable the report to be emailed to recipients
- Mail properties: This dropdown will allow the user to specify whether the report will be emailed using Outlook or a generic SMTP protocol. SMTP must be configured in the Jet Essentials Application Settings in order for it to be used.
- Message: This allows the user to specify a custom subject or body to be sent as part of the email
- Attach report to email: If this box is checked the report will be attached to the email. If the box is unchecked the report will not be attached. This can be used as a type of notification when used in conjunction with the subject and body of the email to allow a user to know that the report has been run
- Recipients: Email addresses will be specified here for all recipients of the report. Email addresses should be separated by a semi-colon.
- Get recipients from Excel Named Range: It is possible to also define the email addresses in the report itself and then assign an Excel named range to the cell(s). If there are named ranges in the report then they will appear in the dropdown below the checkbox. The Output tab allows the user to define how the file should be saved once it is finished running. This tab also enabled the user to turn on logging to troubleshoot errors with the Scheduler process as well as use Batch File Generation for the reports.
Output Tab
The Output tab allows the user to define how the file should be saved once it is finished running. This tab also enabled the user to turn on logging to troubleshoot errors with the Scheduler process as well as use Batch File Generation for the reports.
- Output Format: This dropdown list will allow the user to define the format of the finished report. The available options are:
- Jet Workbook: This will save the report as a normal Excel file with all Jet Reports functions still in the report
- Values Only Workbook: This will save the report as an Excel file with all Jet Reports functions removed. The recipient would not be able to refresh the report as it will be a static Excel file
- Web Page: This will save the report as a HTML file with a single sheet. This should be used when there is a single sheet in the report
- Web Page by Sheet: This will save the report as a HTML file with multiple sheets embedded in it. This should be used when there are multiple sheets in a report
- PDF: This will save the report as a PDF file (if your version of Excel supports that ability - Excel 2007 and higher)
Remain tuned for more details, I will come up with more details and features in my upcoming posts.
Friday, 4 September 2015
Customize the Report layout using Jet Express for Word
Click Edit Layout to customize this layout

The Jet Express for Word action panel may automatically open when this word file is opened.
If not, select the Jet Ribbon
Click on the Design icon
This presents a tree hierarchy of the fields from the selected report.

Click on the icons on the hierarchy to expand or contract the lists.
The Search field makes it easy to find the fields you need.
Labels – NAV reports which were created by Jet Reports include a section for Labels. These fields are the descriptions of the fields themselves.
If you have multiple languages in your NAV instance, these labels can be helpful for creating multi-language documents.
Other Groupings – NAV reports which were created by Jet Reports include sections for Company, Customer, etc. These fields include the values of the fields.
The user can select from fields including Header or Lines in the hierarchy and insert an item, typically into a table in the Word document.

To add a field select the desired location in the Word document and double-click on the field.
Alternatively, you can select the field and click on the Insert button in the Jet Express for Word action panel.
To Add a picture to a document, right-click on the item and select Insert Picture

The Lines fields are also inserted as text and can be replicated by a Right-click, and choosing “Insert Repeater”.
Repeating items (such as Sales lines on a Sales order) can be added to a document.

Best practice for this is to create a table in Word that is two rows high.
The first row contains the Labels of the fields that you wish to include.
The second row contains the values of the fields.
Select the entire second row- include the area just to the right of the last column.
Right-click on the item in the hierarchy that you want to repeat and select Insert
To delete an item, click on it, and then click on its Title.

When you click on the Title it will change color.
Then press the Delete Button on your keyboard.
Note: It’s important to select the Title when deleting to avoid any leftover data.
When you have completed your changes Save your Word document

This will return you to NAV and prompt you to import the report layout changes.

Click Yes
You can Run Report to review your changes.

Here is the output for the report below.

We are done with customization of the report using Jet Reports.
I will come up with more details in my upcoming posts.
The Jet Express for Word action panel may automatically open when this word file is opened.
If not, select the Jet Ribbon
Click on the Design icon
This presents a tree hierarchy of the fields from the selected report.
Click on the icons on the hierarchy to expand or contract the lists.
The Search field makes it easy to find the fields you need.
Labels – NAV reports which were created by Jet Reports include a section for Labels. These fields are the descriptions of the fields themselves.
If you have multiple languages in your NAV instance, these labels can be helpful for creating multi-language documents.
Other Groupings – NAV reports which were created by Jet Reports include sections for Company, Customer, etc. These fields include the values of the fields.
The user can select from fields including Header or Lines in the hierarchy and insert an item, typically into a table in the Word document.
To add a field select the desired location in the Word document and double-click on the field.
Alternatively, you can select the field and click on the Insert button in the Jet Express for Word action panel.
To Add a picture to a document, right-click on the item and select Insert Picture
The Lines fields are also inserted as text and can be replicated by a Right-click, and choosing “Insert Repeater”.
Repeating items (such as Sales lines on a Sales order) can be added to a document.
Best practice for this is to create a table in Word that is two rows high.
The first row contains the Labels of the fields that you wish to include.
The second row contains the values of the fields.
Select the entire second row- include the area just to the right of the last column.
Right-click on the item in the hierarchy that you want to repeat and select Insert
To delete an item, click on it, and then click on its Title.
When you click on the Title it will change color.
Then press the Delete Button on your keyboard.
Note: It’s important to select the Title when deleting to avoid any leftover data.
When you have completed your changes Save your Word document
This will return you to NAV and prompt you to import the report layout changes.
Click Yes
You can Run Report to review your changes.
Here is the output for the report below.
We are done with customization of the report using Jet Reports.
I will come up with more details in my upcoming posts.
Subscribe to:
Posts (Atom)