Showing posts with label Online. Show all posts

Thursday, 21 July 2016

How to Setup Online Bank Feeds in Madeira

You need to be sure : The default company, CRONUS, that launches when you first log in to Project “Madeira” does not have electronic bank feeds enabled. To tryout this feature you must switch to trial Company "My Company".

In Project “Madeira” you can connect to most of the online banks and download electronic bank feeds for use in bank reconciliation, avoiding tedious, manual reconciliation, reducing errors, and ensuring that your data is refreshed on a frequent basis.

When you log into MyCompany for the first time, a Company Setup wizard will guide you through setting up the basic company information, including using a bank feed service.

Dont forget to select "Use Bank Feed Service" in Company Setup Page to enable this Service.

You can Manage Bank Accounts & Feeds from Bank Account List Page.

BankStatementService-1

If you enable "Use Bank Feed Service" in Company Setup Page, a new section displays in the ribbon as shown in above screenshot with actions so that you can create a new bank account in Project “Madeira” based on the online bank feed, link already existing bank accounts to online bank feeds, unlinking online bank account feeds, or set up automatic download of feeds on a regular schedule.

When you reconcile bank accounts, you can download bank feeds on demand, as well as process automatically downloaded feeds if you have set up already.

In the Payment Reconcilliation Journal, you can import bank statements based on your bank feeds, and Project “Maderia“ will automatically suggest how payments are applied to ledger entries. You can change the application before you post.

Alternatively, you can import bank statements to the Bank Account Reconcilliation window and reconcile the statements with your ledger entries there.

I will come up with more details in my upcoming posts, till then keep practicing and Learning.


Tuesday, 7 July 2015

OFFICE 365 INTEGRATION IN NAV 2015 – Word/Excel/SharePoint

If you have signed up for Office 365, Microsoft Dynamics NAV can use this service to open and save documents. For example, when you export a report to Excel and save it on Office 365, Microsoft Dynamics NAV can use Excel Online that your Office 365 account uses to open the document.

Before you can use Office 365 and SharePoint Online with Microsoft Dynamics NAV, you must configure the service in Microsoft Dynamics NAV.

If you want to use the same folder to store temporary files for all users, you must specify a shared user account. Otherwise, each user's temporary files are stored in their personal document repository on the SharePoint site.

Let us first understand the details before we start with Setup for SharePoint Shared Folder.

Your IT can help you configuring and assigning suitable rights to access. Although you can explore and help yourself. Since we are concentrating on Navision so we will not go in details for Share point.

Just to make understand I will be only covering top level information.

In this example I assume you already have up and running site for Document Sharing in SharePoint 2013 – 365 Online.

Here I am logging in to Office 365 – Online registered by me for demo purpose. You can register for free trial to explore the same in more details.

SharePoint-1

My Opening screen looks as one below.

SharePoint-2

I select SharePoint Site to continue. Below is my SharePoint Opening screen. I will select my site which I have created for this demo and file sharing with other users in my organization.

SharePoint-3

Let us understand different parts which will help configuring our Online Document Storage Configuration in Navision 2015.

SharePoint-4

Here I am in my Folder at Lower level where all my files will be stored and shared with my other colleges.

SharePoint-5

Open “Online Document Storage Configuration” from path shown in below screen.

SharePoint-6


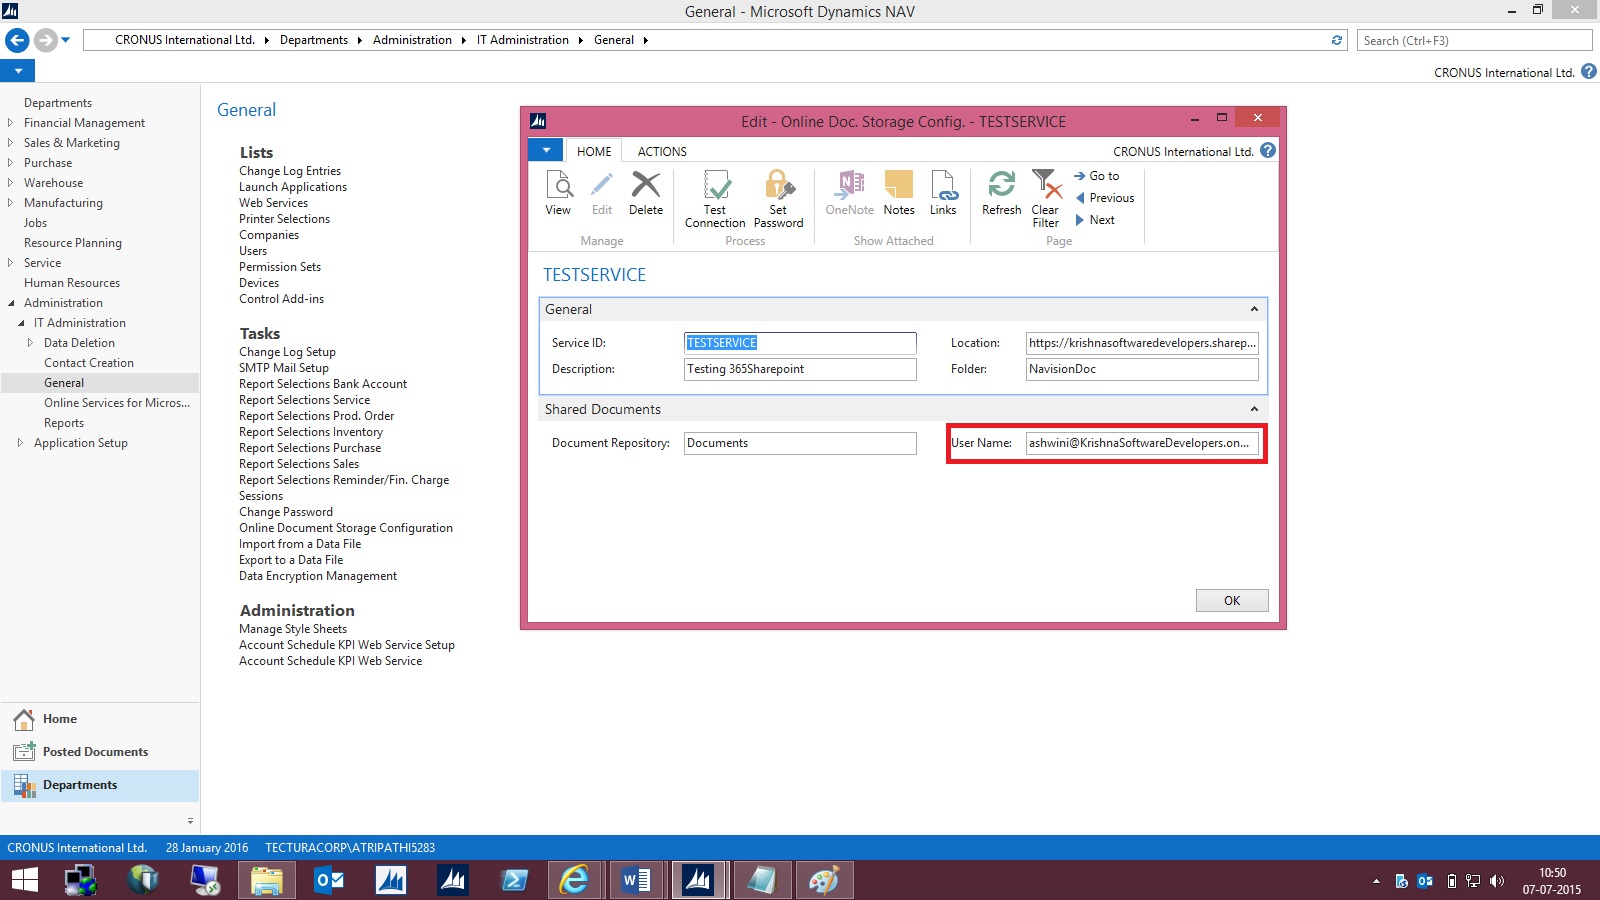
Specify the Service Name of your choice or use Default provided by the System.


Fill the Location to your SharePoint site: Specifies the unified resource indicator (URI) for your site on SharePoint Online, such as [https://krishnasoftwaredevelopers.sharepoint.com/MS_Nav_Documents] in my case I will use this.


Fill the Folder field which specifies the folder in the document repository for this document service that you want documents to be stored in.


This field is required. If you have not already created a subfolder in your document repository, you must create one now, and then specify it in the Folder field.


The Document Repository field includes the top-level folder in the document repository that your document service provides. The Folder field specifies a subfolder so that you can keep business documents and drafts separate from pictures and other shared documents.


For example, if the Document Repository field is set to [Documents], the Folder field can be set to [NavisionDoc] as per my example discussed above.


When a user exports data to Excel, for example, Microsoft Dynamics NAV saves the temporary file at the location that is specified in the Document Repository and Folder fields, such as


[https://krishnasoftwaredevelopers.sharepoint.com/MS_Nav_Documents/Documents/NavisionDoc]


Fill Document Repository field: Specifies the name of the document library, such as [Document]


Fill User Name field: Specifies the account that Microsoft Dynamics NAV Server must use to log on to the document service.


I would recommend that you specify a different user name than the administrative account. This helps reduce the risk of users accessing administrative settings, for example. For example, if your user name as an administrator is Administrator@KrishnaSoftwareDevelopers.onmicrosoft.com,


then the user name for Microsoft Dynamics NAV Server can be Nav@KrishnaSoftwareDevelopers.onmicrosoft.com or any of the regular user names that you have created.

SharePoint-7


On the Actions tab, in the General group, choose Set Password.


In the window that appears, specify and confirm the password for the account    that you specified in the User Name field. Choose the OK button.


When you have set up the service, you can test whether that configuration is valid.


SharePoint-8


On the Actions tab, in the General group, choose Test Connection.


A message displays the result of the test.


SharePoint-9


The above message confirms we can now save documents on our SharePoint.


Let us check a sample as below:
Open the Document and Execute the report available.
While Running the Report I specify I want to Print with Microsoft Word.


SharePoint-10


Document will be generated and opened in Word - Office - 365. Temp file name is given to the file. Close the File as it is auto Saved by Office 365 Word Application.


SharePoint-11


Browse to your SharePoint Folder configured above, you will see the Word file is now available in this Folder.


SharePoint-12


Right Click on Name of the File and Rename with some meaning full Name as shown below.


SharePoint-13


Give the Name to the File and press Save Button.


SharePoint-14


Here is the File after Rename.


SharePoint-15


This way when ever you Print your document from Navision in Word or Excel it will get saved in this Folder.


By setting appropriate access rights you can share the files between you colleges in your Organization.

 Please check SharePoint stuffs with you admin or appropriate authority in your organization.

Saturday, 4 July 2015

SMTP Setup errors while setting Office 365

Normally we see below Errors while configuring our SMTP in Navision.

Error-1

Check that your User Setup is having valid e-mail id.

Error-2

If you are using Domain make sure you are accessible to your domain. If you are outside you office make sure you are connected using your VPN.

Error-3

OFFICE 365 INTEGRATION IN NAV 2015 - Exchange Online

NEW SMTP EMAIL FLOW IN NAV.

Open SMTP Mail Setup Page, Refer below screen for path.

Office Integration-1

Click on action Apply Office 365 Server Settings.

The fields SMTP Server, SMTP Server Port and Authentication fields will be filled up automatically

Fill the User ID and Password fields based on the existing account in Office 365. You can contact your Network Admin for details.

Office Integration-2

Click "Test Email Setup" action

Office Integration-3

Office Integration-4

If everything is configured properly in Office 365 and NAV 2015 then you will get below successful message.

Office Integration-5

And below mail will be sent to Office 365 account.

Office Integration-6

After this step if we try to run action Email Confirmation from Sales Order

Office Integration-7

Then a dialog box will be opened showing from address as office 365 account.

Office Integration-8

Press OK button to send an email to required address. Edit required information.

If Edit in Outlook is checked it will open in Outlook App. You can change further mail content and recipient details before sending the mail.

Office Integration-9

Click Send to send mail from your Outbox.

Below screen shot shows that mail is sent from Office 365 account

Office Integration-10