Showing posts with label Madeira. Show all posts

Friday, 29 July 2016

Working with Item Attributes in Madeira

In Madeira you can assign item attribute values of different types to your items, which can then be used when searching for items.

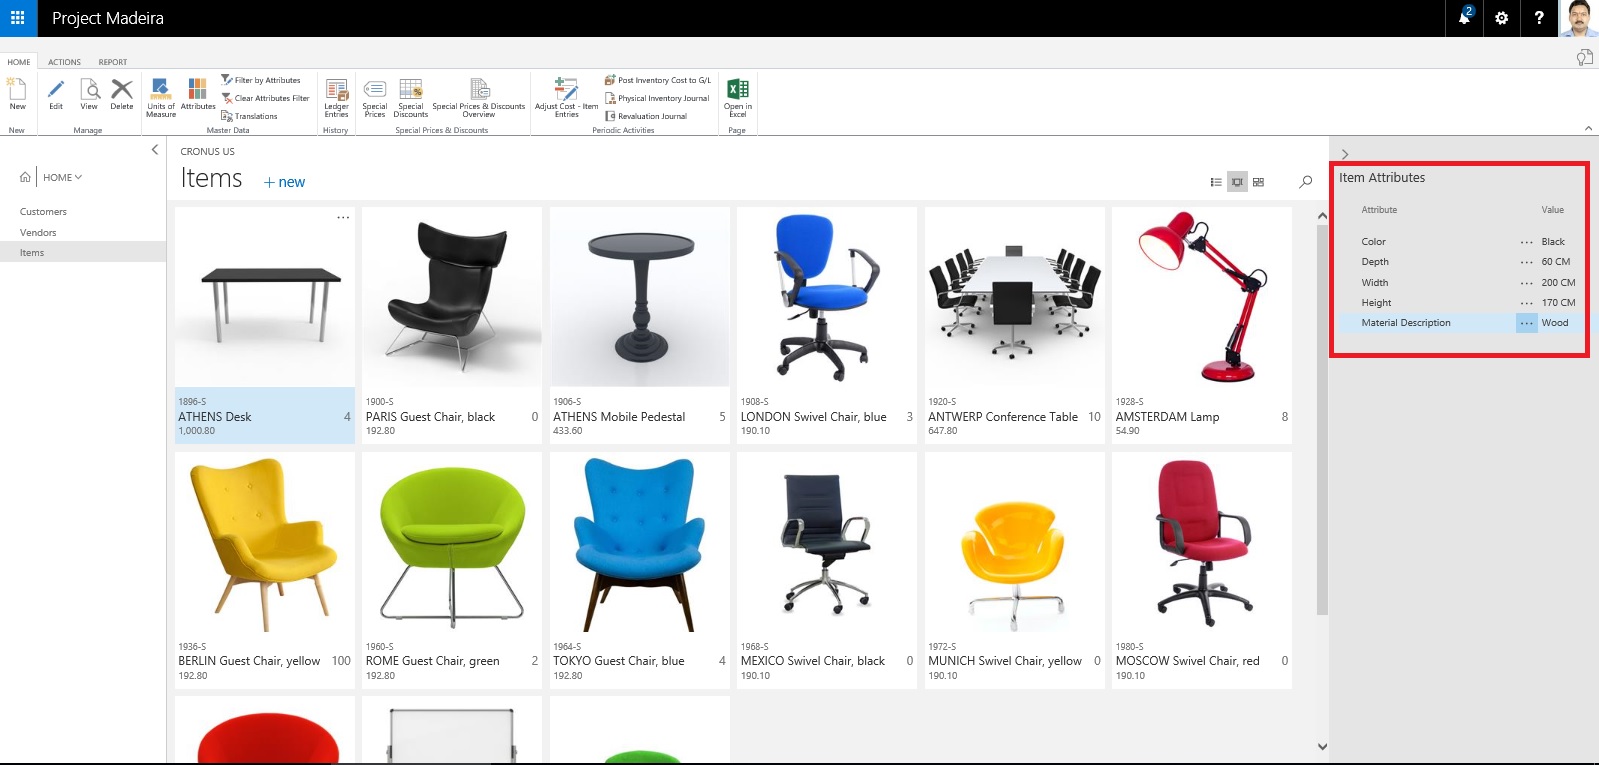
Open your Item List/Card and in the right side of the window Factbox you see Item Attributes.

Today in this post we will see how to define, assign and use it for searching the items.

ItemAttribute-1

Either from the List Page or Card Page Select Attributes as shown in below screen shot.

From Home or Action Tab Ribbon.

ItemAttribute-2

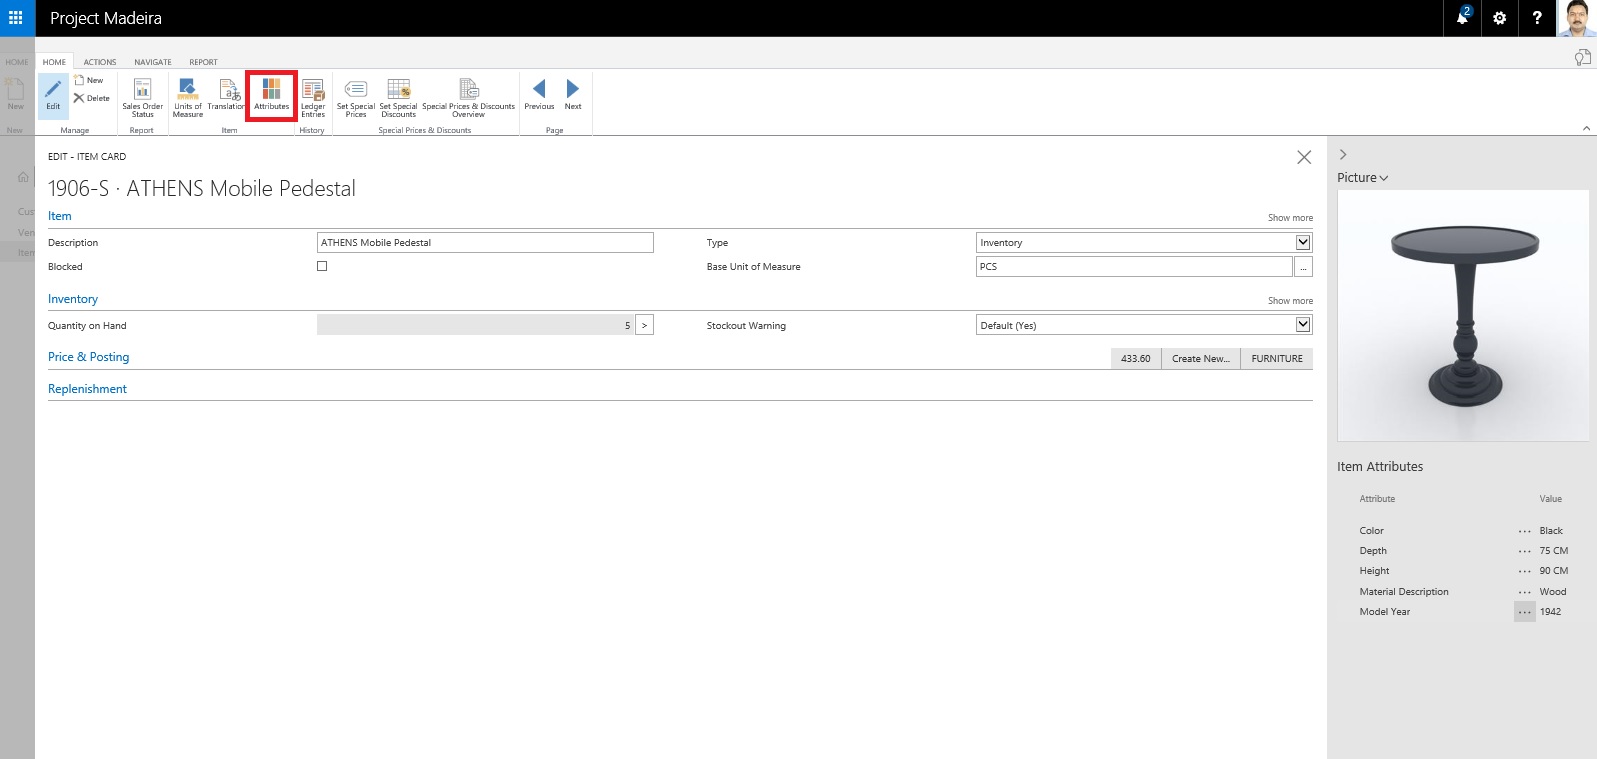
It will show you all the Attributes and their Values assigned to the Item.

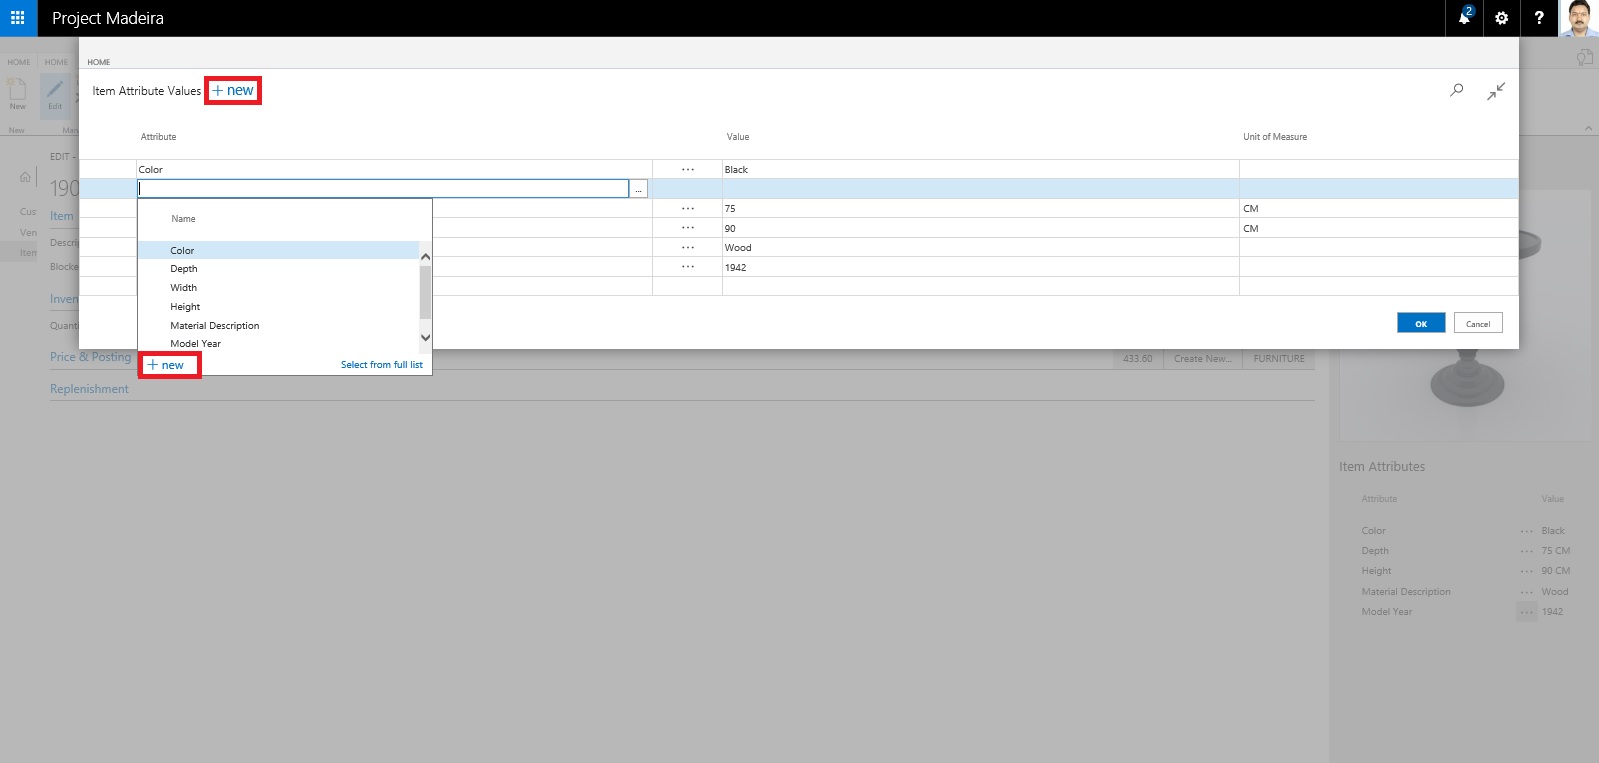
You can create New Attribute, Click on +New, a New Line will be inserted to Assign Attribute and its Value.

If you wish to create New Attribute for the Item from the Dropdown List click on +New.

ItemAttribute-3

Attribute definition window opens.

Define you New Attribute. Once Attribute is created you need to define available values for the same. In below Screen i have created New Attribute "TopMaterial".

To define applicable values for this Attribute from Ribbon click on Item Attribute Values.

ItemAttribute-4

In Value window define all the applicable values and close the window.

ItemAttribute-5

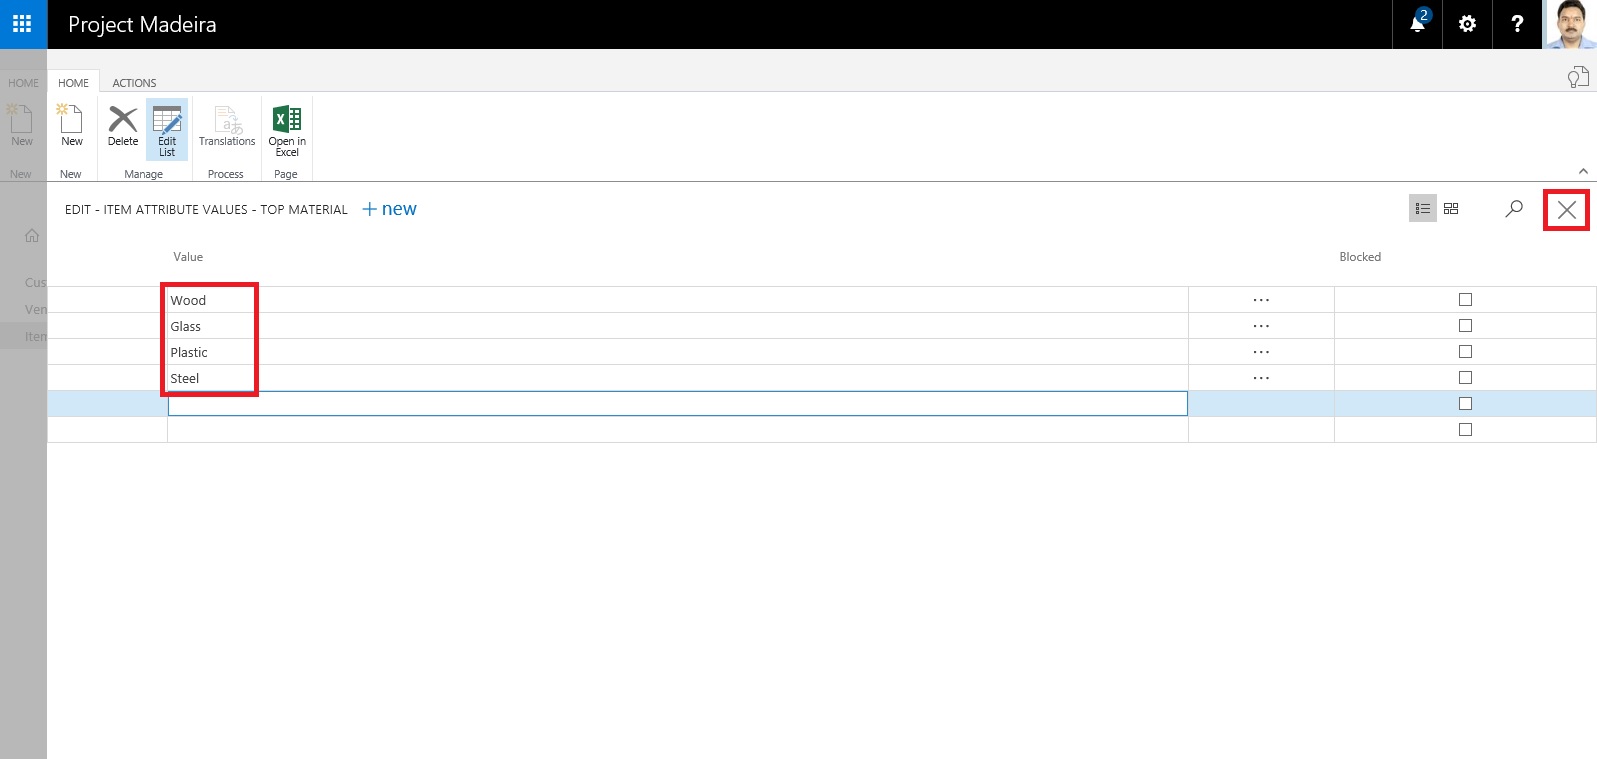
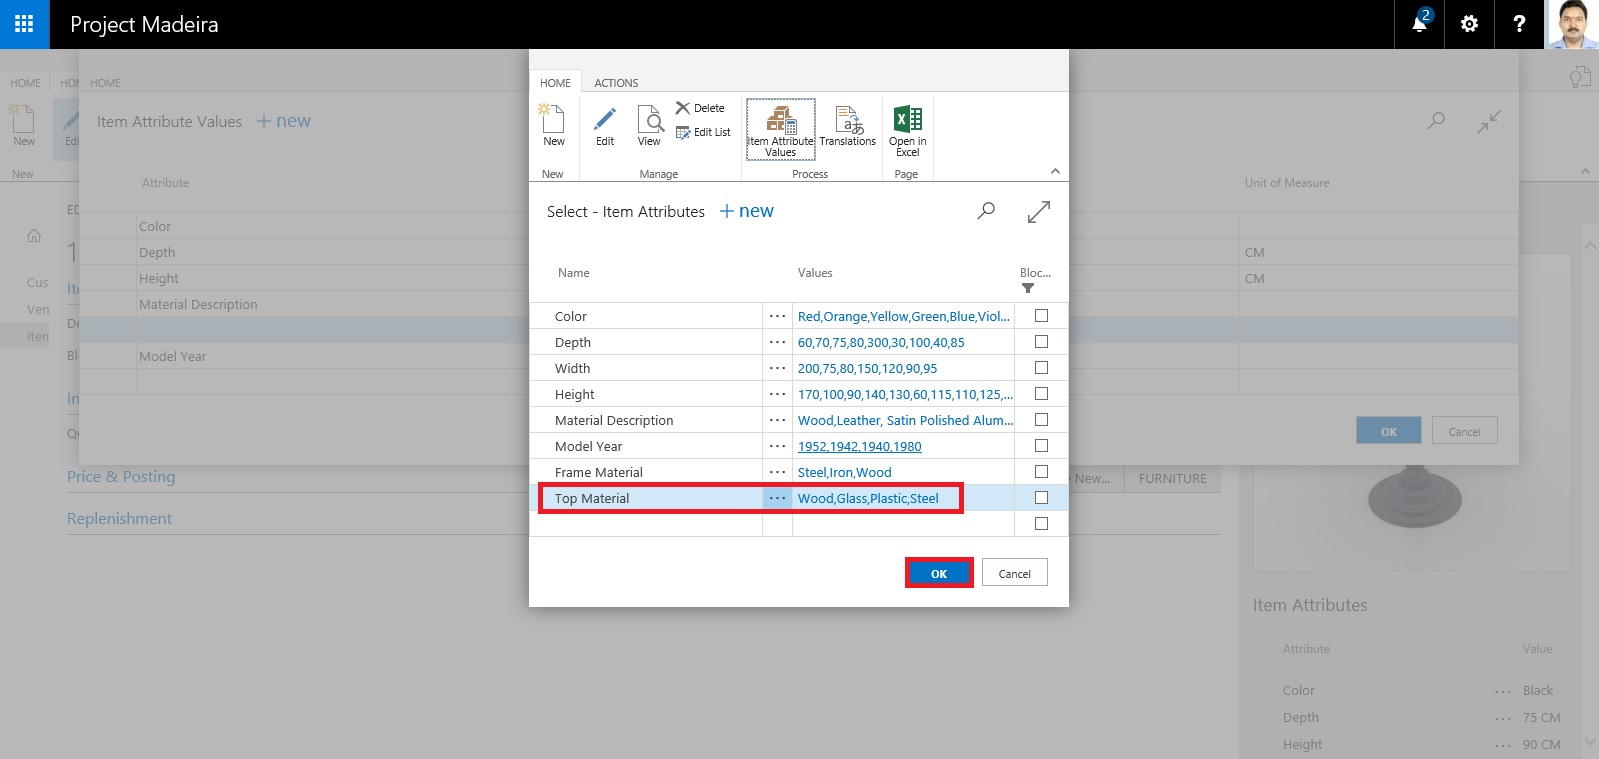
You will be returned to the previous Page and you can see your Attribute and Value defined, just we created in our above steps. Click on OK to return to previous page.

ItemAttribute-6

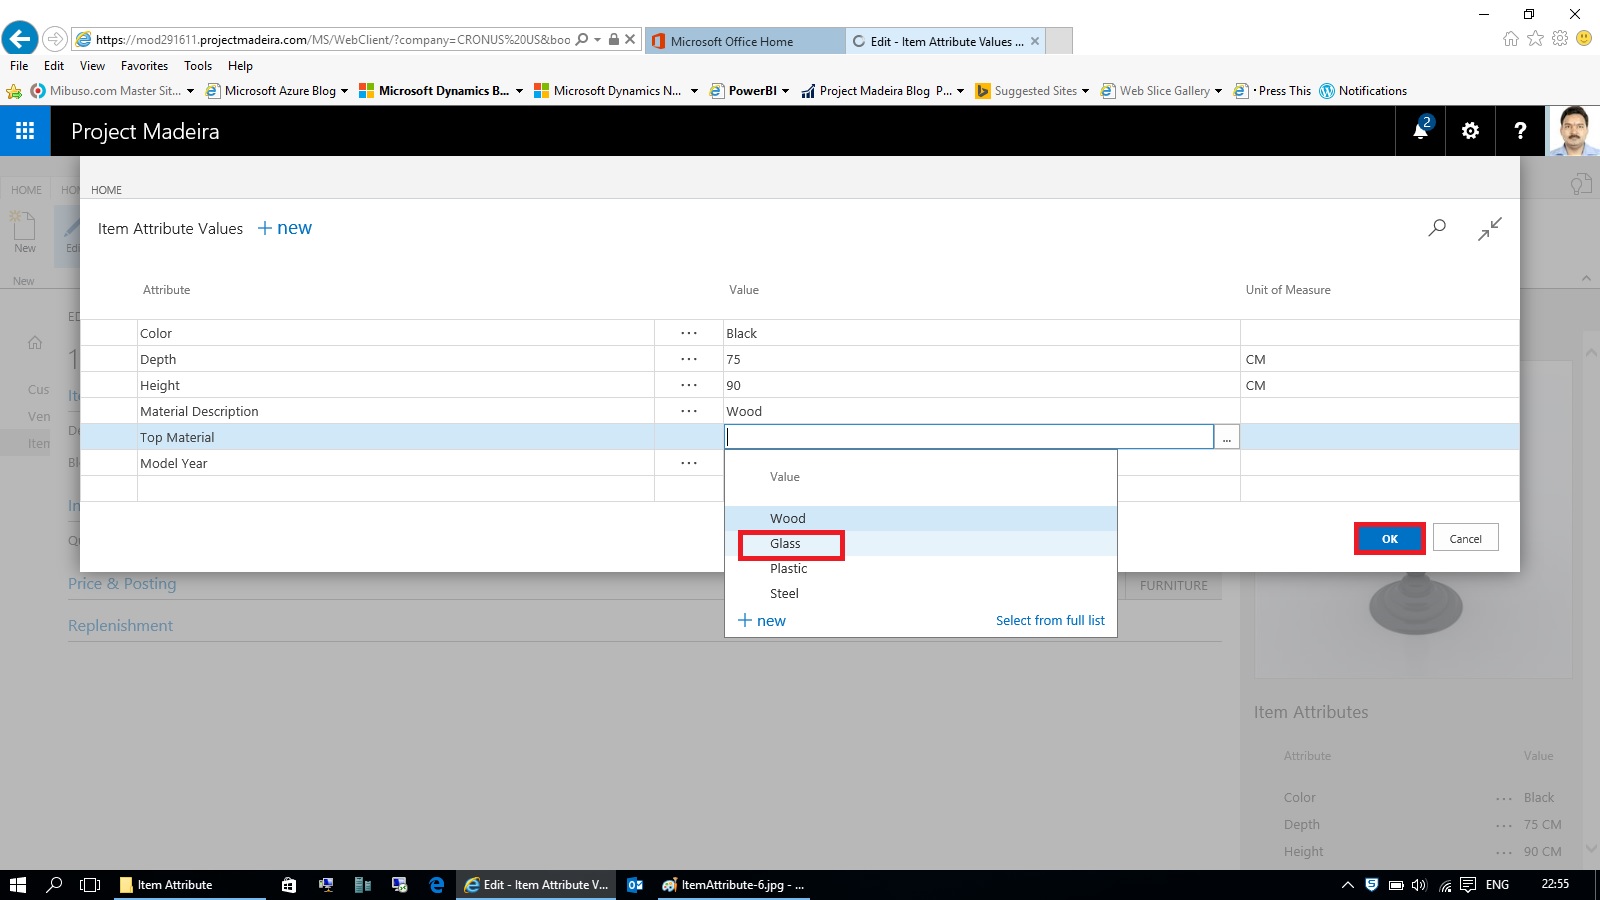
Next we will Assign these Attribute and Values on the Item.

Select the Attribute and Value for the Item as shown in below screen.

After assigning click on OK to close the Page.

ItemAttribute-7

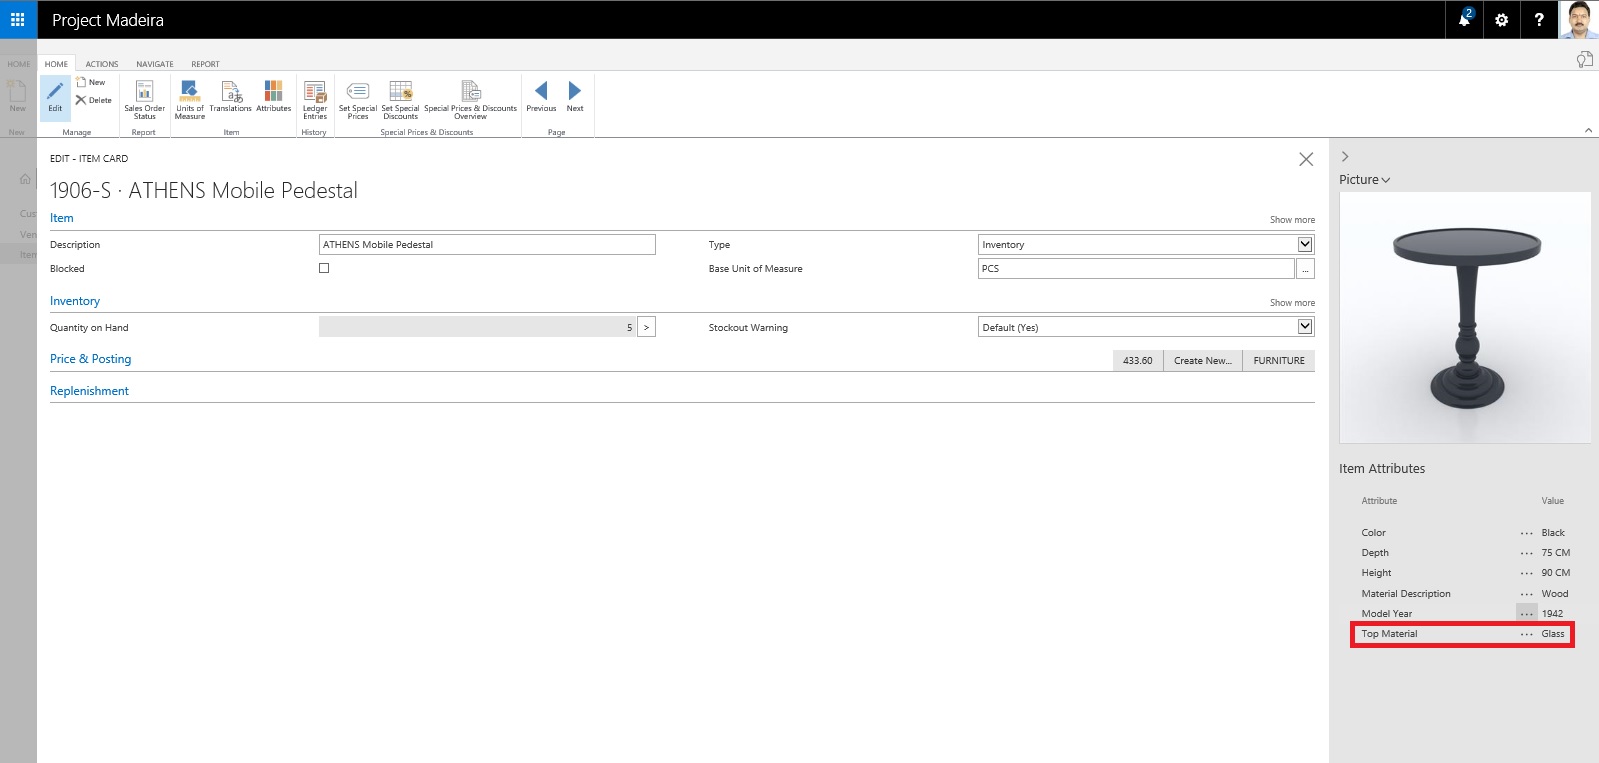
When you return to your Item Card or List Page you will see that your New assigned Attribute and its Value is displayed on Factbox.

ItemAttribute-8

Switch to your Item List Page.

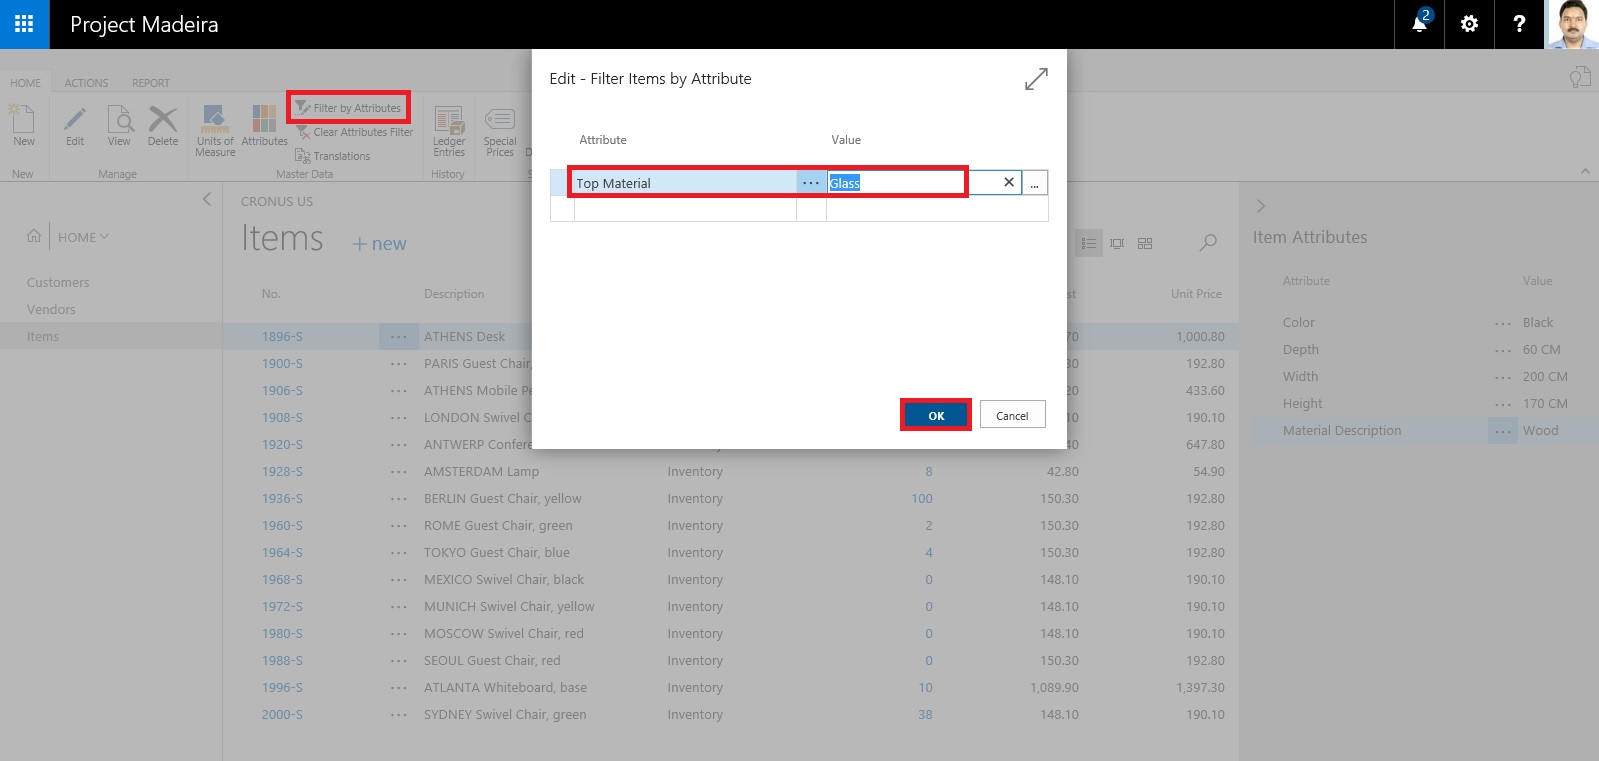
From Ribbon click on Filter on Attribute a Filter window will open.

Select the Attribute and Value for filter that you want to assign.

Click on OK to apply the filter on the page.

ItemAttribute-9

Since we have asigned this Attribute and Value on one Item, It will be filtered and all Items satisfying the filter condition will be displayed.

ItemAttribute-10

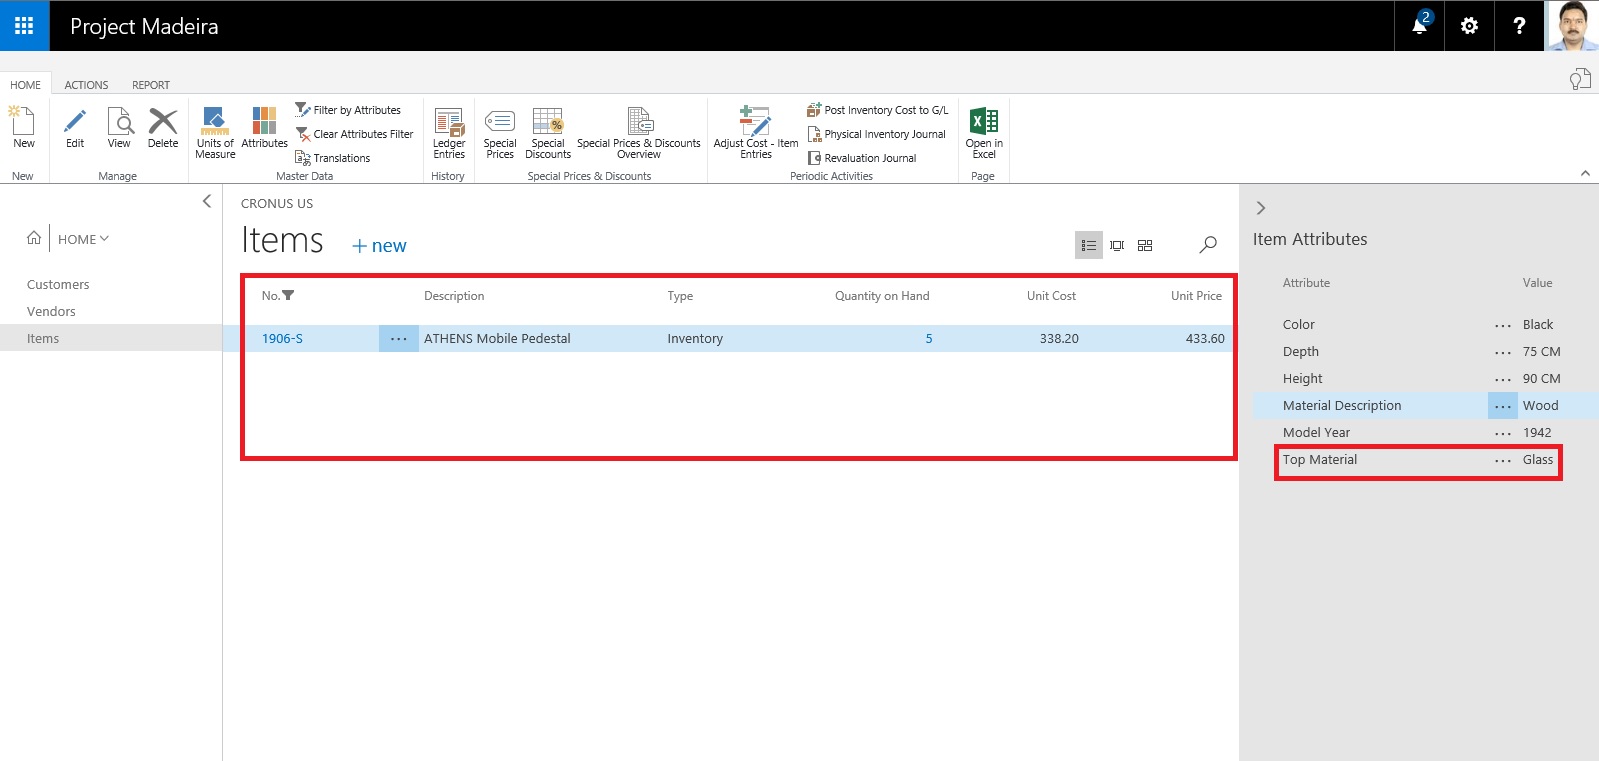
The items in the Items window are filtered by the specified item attribute values.

Thats all for this post.

I will comeup with some more details in my upcoming posts.

Till then keep exploring and learning.


Tuesday, 26 July 2016

Working with Project "Madeira" Content Pack for Power BI

In today's post we will see how to use Power BI Content Pack for Madeira.

The content pack is preconfigured to work with sales data and financial data from the demonstration company that you get when you sign up for the Project "Madeira" preview.

To see your Project "Madeira" data in Power BI, you must have the following:

  • Access to Project "Madeira".

  • Access to Power BI.


Before we start with connecting we will collect few information that we will require while connecting the Power BI to fetch data from Madeira.
User Name

Web Service Acess Key

Note down both value, if you don't have Web Service Access Key Generate one and set appropriate Expiration date or Set Never Expire as shown below.

PowerBi_Madeira-1

Next open the Web Service Page.

Make sure all selected Web Service is running as in below screen.

The data is extracted from your Project "Madeira" company using web services to read live data. In Project "Madeira", the Web Services window lists the web services that have been set up for you, including the following that are consumed by the content pack in Power BI:

  • ItemSalesAndProfit

  • ItemSalesByCustomer

  • powerbifinance

  • SalesDashboard

  • SalesOpportunities

  • SalesOrdersBySalesPerson

  • TopCustomerOverview


Note: If you change the name of any of these web services, the data will not show up in Power BI.

Note your URL of OData. Edit it to follow the format one shown in below screen.

PowerBi_Madeira-2

Now we have all our required information.

Open Power BI site and Get Data from Services as shown in below screen.

PowerBi_Madeira-3

Select Project "Madeira" Content Pack and click on Get.

PowerBi_Madeira-4

Enter the URL of Web Service we get in above step.

PowerBi_Madeira-5

Select Next.

Select Authentication method as Basic.

In User Name enter your user name as obtained in above step.

For Password ented the Web Service Access Key as obtained in above step.

PowerBi_Madeira-6

Choose Sign In.

After few minutes/seconds churning you will be ready with your first Dashboard from Madeira.

PowerBi_Madeira-7

Troubleshooting


"Parameter validation failed, please make sure all parameters are valid"
If you see this error after you enter your Project “Madeira” URL, make sure the following requirements are satisfied:

  • The URL follows exactly this pattern:

    https://mod291611.projectmadeira.com:7048/MS/OData/Company('CRONUS%20US')

  • Delete any text after the company name in parenthesis

  • Make sure there are no trailing forward slash at the end of the URL.

  • Make sure that it is a secure connection as indicated by the URL starting with https.


"Login failed"
If you get a "login failed" error when you log in to the dashboard, using your Project “Madeira” credentials, then this can be caused by one of the following issues:

  • The account you are using does not have permissions to read the Project “Madeira” data from your account.

    Verify your user account in Project "Madeira", and make sure that you have used the right web service access key as the password, and then try again.

  • The Project "Madeira" instance that you are trying to connect to does not have a valid SSL certificate. In this case you'll see a more detailed error message ("unable to establish trusted SSL relationship").

    Note: Self-signed certificates are not supported.


"Oops"
If you see an "Oops" error dialog after you pass the authentication dialog, this is most frequently caused by a problem connecting to the data for the content pack.

  • Verify that the URL follows the pattern that was specified earlier:

    https://mod291611.projectmadeira.com:7048/MS/OData/Company('CRONUS%20US')

  • A common mistake is to specify the full URL for a specific web service:

    https://mod291611.projectmadeira.com:7048/MS/OData/Company('CRONUS%20US')/powerbifinance

  • Or you might have forgotten to specify the company name:

    https://mod291611.projectmadeira.com:7048/MS/OData/


Thats all for today's post.

I will comeup with more details in my upcomming posts.

Til then keep exploring and learning.


Thursday, 21 July 2016

How to Setup Online Bank Feeds in Madeira

You need to be sure : The default company, CRONUS, that launches when you first log in to Project “Madeira” does not have electronic bank feeds enabled. To tryout this feature you must switch to trial Company "My Company".

In Project “Madeira” you can connect to most of the online banks and download electronic bank feeds for use in bank reconciliation, avoiding tedious, manual reconciliation, reducing errors, and ensuring that your data is refreshed on a frequent basis.

When you log into MyCompany for the first time, a Company Setup wizard will guide you through setting up the basic company information, including using a bank feed service.

Dont forget to select "Use Bank Feed Service" in Company Setup Page to enable this Service.

You can Manage Bank Accounts & Feeds from Bank Account List Page.

BankStatementService-1

If you enable "Use Bank Feed Service" in Company Setup Page, a new section displays in the ribbon as shown in above screenshot with actions so that you can create a new bank account in Project “Madeira” based on the online bank feed, link already existing bank accounts to online bank feeds, unlinking online bank account feeds, or set up automatic download of feeds on a regular schedule.

When you reconcile bank accounts, you can download bank feeds on demand, as well as process automatically downloaded feeds if you have set up already.

In the Payment Reconcilliation Journal, you can import bank statements based on your bank feeds, and Project “Maderia“ will automatically suggest how payments are applied to ledger entries. You can change the application before you post.

Alternatively, you can import bank statements to the Bank Account Reconcilliation window and reconcile the statements with your ledger entries there.

I will come up with more details in my upcoming posts, till then keep practicing and Learning.


Saturday, 28 May 2016

Setup Send Documents by Email in Madeira

To enable emails from within Project "Madeira", start the Set Up Email assisted setup on the Home page. We have already seen this in our previous post, you can find it here.

To offer your customers to pay for sales electronically using a payment service, such as PayPal, you can also have the PayPal information and hyperlink inserted in the email body. We have already covered this in our previous post, you can find it here.

From all supported documents, you initiate emailing by choosing the Send action, on posted documents, or the Post and Send action, on non-posted documents.

Let us Setup document-specific email body for sales invoices.

From the search page find Report Selections Sales:

SetupEmail-10

Fill the Value as shown in below screen in same sequence.

SetupEmail-11

If you want to offer customers to pay for sales electronically, you can set up the related payment service, such as PayPal, and then have the PayPal information and hyperlink inserted in the email body as well. We have already covered this in our previous post, you can find it here.

Will come up with more details & feature explaination in my upcomming posts.


How do I process Sales Return? – In Maderia

We have seen in our previous post the feature where if a posted sales invoice has not yet been paid, then you can use the Correct or Cancel functions on the posted sales invoice to automatically reverse the involved transactions.

There could be the situation where customer wants partial refund or return of sales.

You can create the Credit Memo from the Posted Sales Invoice, which will create the Credit Memo for you and leave to you to modify and post the credit memo.

Most fields on the sales credit memo header are filled with the information from the posted sales invoice. You can edit all the fields, with new information that reflects the return agreement.

You can apply the Customer Entries via selecting the line with the posted sales document that you want to apply the sales credit memo to.

The posted sales documents that you applied the credit memo to are now reversed, and a refund payment can be created for the customer.

The sales credit memo is removed and replaced with a new document in the list of posted sales credit memos.

Let us see how we can achieve this in Madeira.


CorrectCancelSalesInvoice-12

Select the Sales Invoice and open it for action.

CorrectCancelSalesInvoice-13

Select Create Corrective Credit Memo.

CorrectCancelSalesInvoice-14

Perform the required correction and choose Apply Entries.

CorrectCancelSalesInvoice-15

Select the document to which you want this Credit Memo to be adjusted.

CorrectCancelSalesInvoice-16

Once Application is done, Post the Credit Memo.

Respond to Yes to post the Credit Memo.

Respond to Yes to Open the posted Credit Memo.

CorrectCancelSalesInvoice-17

This is the posted Credit Memo for the Invoice.

Let us check the Ledger for this Customer:

CorrectCancelSalesInvoice-18

Here you can see the net effect of the Credit Memo on Invoice.

Thats all for this post will come up with more features and details in my upcomming posts.


Correct or Cancel Unpaid Sales Invoices – in Madeira

Sometimes Invoices are posted in mistake or customer demands changes in invoice after posting.

Once the payment is initiated, partially or fully paid correction or cancellation is not allowed from Posted Sales Invoice itself. In such case you need to follow traditional way of doing so by passing Sales Credit Memo to Cancel the Sale and reimburse to customer manually.


What happens when you select Correct Action?

The Posted Invoice for which you say correct that invoice gets cancelled and new Sales Invoice with same information is created.

Naturally to maintain the integrity of data new Sales Invoice is created with new Document No.

A Sales Credit Memo for previous Invoice is created to void the effect of initial posted Sales Invoice.

The Canceled and Paid is marked on initial posted Sales Invoice document.


What happens when you select Cancel Action?

The Posted Invoice for which you say correct that invoice gets cancelled.

A Sales Credit Memo for previous Invoice is created to void the effect of initial posted Sales Invoice.

The Canceled and Paid is marked on initial posted Sales Invoice document.


Important Points:-

If the Canceled check box is selected, then you cannot correct or cancel the posted sales invoice because it has already been corrected or canceled.

Once the payment is initiated, partially or fully paid correction or cancellation is not allowed from Posted Sales Invoice itself.


Let us see how it works in Madeira:-

Login with your credentials to Madeira project.


CorrectCancelSalesInvoice-1

From the Navigation Bar choose Sales.

CorrectCancelSalesInvoice-2

Select Posted Sales Invoice. And choose to open the posted Sales Invoice.

CorrectCancelSalesInvoice-3

Select Correct to Modify the Invoice.

CorrectCancelSalesInvoice-4

Select Yes to continue with the process.

CorrectCancelSalesInvoice-5

Make the required modification to the Invoice and post it.

CorrectCancelSalesInvoice-6

Select Yes to continue with posting.

CorrectCancelSalesInvoice-7

Select Yes to continue.

CorrectCancelSalesInvoice-8

This is new modified Invoice that got posted.

Let us move to the original Invoice which we corrected.

CorrectCancelSalesInvoice-9

Select Show Corrective Credit Memo.

CorrectCancelSalesInvoice-10

This is the Credit Memo posted against the Invoice which we corrected.

CorrectCancelSalesInvoice-11

You can see the Closed and Canceled is Marked to TRUE.


Wednesday, 18 May 2016

How Do I : Setup or Adjust Item Cost in Madeira


In this post we will see how we can Setup Adjust Cost and how to Run Manually Item Cost Adjust Batch or Schedule the same.

ItemCost-1

Search the Page Inventory Setup using Search Page in Right top corner of your screen.

Search for Inventory Setup Page.

ItemCost-2

Make Sure Automatic Cost Posting is Setup as required.

Also Setup frequency of Automatic Cost Adjustment.

ItemCost-3


OptionBehavior
NeverCosts are not adjusted when posting
DayCosts are adjusted if posting occurs within one day from the work date
WeekCosts are adjusted if posting occurs within one week from the work date
MonthCosts are adjusted if posting occurs within one month from the work date
QuarterCosts are adjusted if posting occurs within one quarter from the work date
YearCosts are adjusted if posting occurs within one year from the work date
AlwaysCosts are always adjusted when posting, irrespective of the posting date

Now we will Run the Adjust cost Item Entries Batch.
ItemCost-4

Apply the desired filter for Item or Category as desired.

Next you can run Immediately or can schedule for later execution.

If you require Immediately choose OK.

If you wish to schedule for Later Run choose Schedule.

ItemCost-5

Enter your Date & Time and click OK.

ItemCost-6

To check the status of the Scheduled Run, Search and open the Page Job Queue Log Entries.

ItemCost-7

You can find the Status of your Scheduled Job for Adjust Cost Entries.

ItemCost-8

It's easy na.

I will come up with more details in my upcoming posts.

Till then keep Exploring & Learning.


How do I : Adjust Inventory in Madeira

Do you know, it is very easy to Adjust Inventory in Madeira.

Let us see how this action can be done.

Start with Login to Madeira using your credentials.

InvAdj-1

From Landing page, choose Item from Navigation Bar in Left.

InvAdj-2


From the list of Item choose Edit or View to access the Card of selected Item.

InvAdj-3

Now from action choose Adjust Inventory.

InvAdj-4

Enter your New Inventory Value. Like in Below screen I want to Add 50 more Inventory.

I Enter 150 including Existing Inventory in System.

InvAdj-5

Select OK.

Inventory now increases by 50 adding 100 to existing inventory making total of 150 available inventory.

InvAdj-6

We are done with our task, Adjusting Inventory.

I will come with more details in my upcoming posts.

Till then keep exploring and learning.