Showing posts with label Root. Show all posts

Friday, 7 August 2015

How to create a certificate revocation list for the root certification authority

To start with this exercise you need to first create certificate, if not yet created refer to previous post.

Previous Step Link- How to create a root CA and a private key file by using the makecert.exe utility

Let’s start with this exercise:

  • On the computer running Microsoft Dynamics NAV Server, create a temporary folder to use when you work with certificates.

  • Open the command prompt as follows:


    • If you have Visual Studio installed on your computer, choose Start, choose All Programs, choose Microsoft Visual Studio 2012, choose Visual Studio Tools, and then right-click Visual Studio Command Prompt and choose Run as Administrator.

    • If you have the Windows SDK installed on your computer, choose Start, choose All Programs, choose Microsoft Windows SDK, and then right-click Windows SDK Command Prompt (2010) (or CMD Shell) and choose Run as Administrator.


  • At the command prompt, locate the temporary directory.

  • At the command prompt, type the following command:


makecert -crl -n "CN=RootNavServiceCA" -r -sv RootNavServiceCA.pvk RootNavServiceCA.crl


  • When you are prompted, enter the password that you used to create the root CA.


Certificate-9
The RootNavServiceCA.crl certificate revocation file is saved in your temporary folder.
Certificate-10
Now we will install the certificate revocation list on the computer running Microsoft Dynamics NAV Server

  • In the Certificates snap-in, in the left pane of MMC, expand the Certificates (Local Computer) node.

  • Expand the Trusted Root Certification Authorities node, right-click the Certificates subfolder, select All Tasks, and then choose Import.

  • In the Certificate Import Wizard, on the Welcome page, choose Next.

  • On the File to Import page, choose Browse.

  • In the File Type field, select Certificate Revocation List (*.crl).

  • Browse to the location of the RootNavServiceCA.crl file, select the file, and then choose Open.

  • On the File to Import page, choose Next.

  • On the Certificate Store page, accept the default selection, and then choose Next.

  • On the Completing the Certificate Import Wizard page, choose Finish.


Certificate-11

  • Select the Trusted Root Certificate Authorities node, and then refresh the snap-in.


A Certificate Revocation List folder that contains the RootNavServiceCA.crl file has been created.
Certificate-12
In next step we will now create and install a test certificate on computer running Microsoft Dynamics NAV Server.

Next Step Link- How to create and install a test certificate for the Microsoft Dynamics NAV Server computer

How to create a root CA and a private key file by using the makecert.exe utility

We will follow below step to create a certificate for Microsoft Dynamics Server. Then we will implement the same for login from WAN to access Navision using Windows and Web Clients.

  • On the computer running Microsoft Dynamics NAV Server, create a temporary folder to use when you work with certificates.

  • Open the command prompt as follows:


    • If you have Visual Studio installed on your computer, choose Start, choose All Programs, choose Microsoft Visual Studio 2012, choose Visual Studio Tools, and then right-click Visual Studio Command Prompt and choose Run as Administrator.

    • If you have the Windows SDK installed on your computer, choose Start, choose All Programs, choose Microsoft Windows SDK, and then right-click Windows SDK Command Prompt (2010) (or CMD Shell) and choose Run as Administrator.


  • At the command prompt, locate the temporary directory.

  • Type the following command.


makecert -n "CN=RootNavServiceCA" -r -sv RootNavServiceCA.pvk RootNavServiceCA.cer

Certificate-4

  • When you are prompted, enter a password.


    • You need this password to create the service certificate.


  • The RootNavServiceCA.cer certificate file and the RootNavServiceCA.pvk private key are saved in your temporary folder.


Certificate-5

Now we will use the Certificates snap-in to install the root CA on the computer running Microsoft Dynamics NAV Server

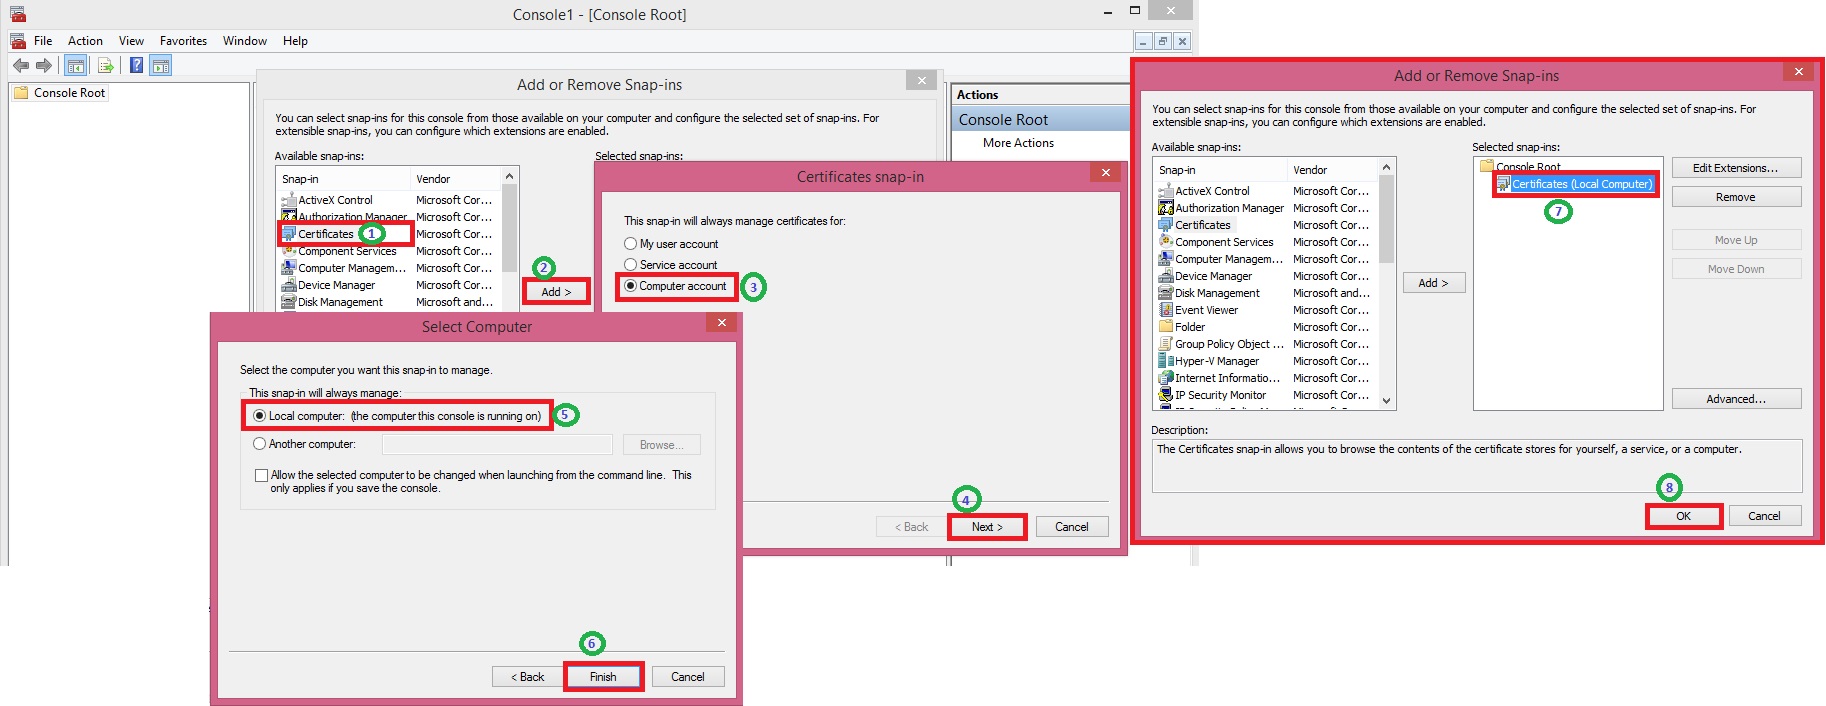
  • Start the Certificates snap-in for MMC on the computer running Microsoft Dynamics NAV Server, and then add the Certificates snap-in.

  • In the Certificates snap-in dialog box, choose Computer account, and then choose Next.

  • In the Select Computer pane, choose Local computer: (the computer this console is running on), and then choose Finish.

  • Choose OK to close the Add or Remove Snap-ins dialog box.

  • In the left pane of MMC, expand the Certificates (Local Computer) node.


Certificate-2

Certificate-3

  • Expand the Trusted Root Certification Authorities node, right-click the Certificates subfolder, select All Tasks, and then choose Import.


Certificate-6

  • In the Certificate Import Wizard, on the Welcome page, choose Next.

  • On the File to Import page, choose Browse.

  • Browse to the location of the RootNavServiceCA.cer certificate file, select the file, and then choose Open.

  • On the File to Import page, choose Next.

  • On the Certificate Store page, accept the default selection, and then choose Next.

  • On the Completing the Certificate Import Wizard page, choose Finish.


Certificate-7

The RootNavServiceCA certificate is now visible in the list of trusted root CAs.

Certificate-8

In next step we will now create a certificate revocation list for the root certification authority and then install the certificate revocation list on the computer running Microsoft Dynamics NAV Server.

A certificate revocation list is required because WCF applications check the revocation list when validating certificates.

Next Step Link- How to create a certificate revocation list for the root certification authority