Showing posts with label How. Show all posts

Wednesday, 29 June 2016

An Introduction to PowerShell – basics and how to define Variables

PowerShell is built into Windows, so there is no requirement of separate fee or licensing cost. In addition, different server products come with their own Power Shells, too, which expands the capability to do things you want using PowerShell.

For demo purpose I am using Windows PowerShell ISE.

PS-1

An introduction to scripts

Scripts in PowerShell are basically just text files with the special filename extension of ps1.

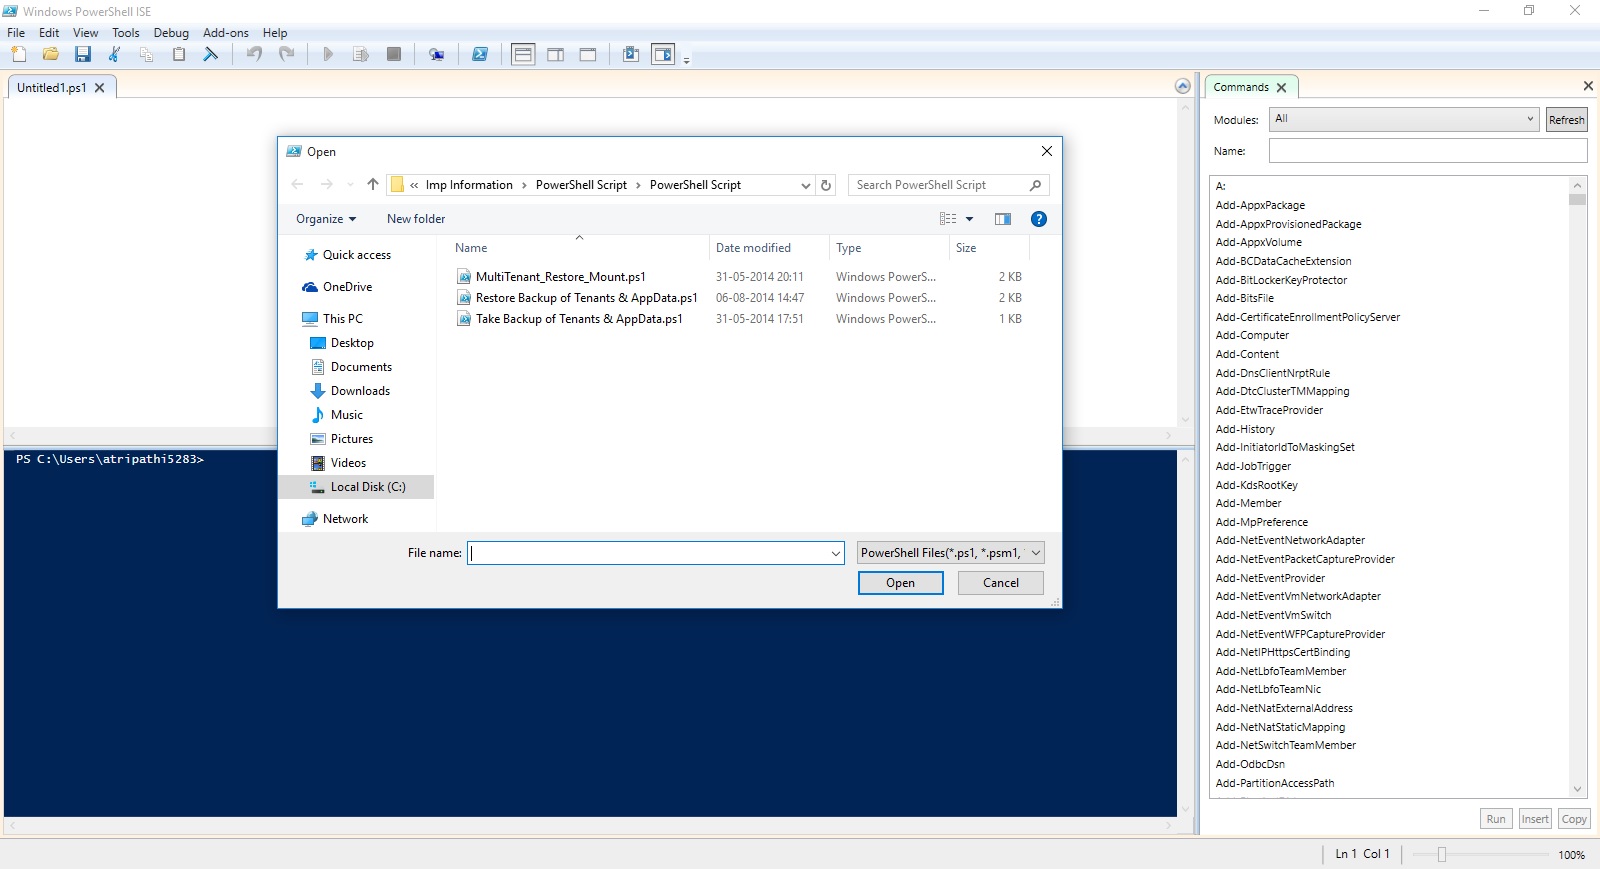
To create a script, you enter a series of PowerShell commands in a sequence in a new Notepad file or any text editor you like, and then save that file with extension as .ps1, where name of your file is a friendly description of your script with no spaces.
 

PS-2

How do I run my scripts?

To run a PowerShell script that you already have, you enter in a PowerShell window either:

The full path (folder and file name) of the script, like so: c:\powershell\myscript.ps1

Or

If your script is in the current directory the console is looking at, use a period and then a backslash, like this: .\myscrip.ps1

Other than this, there is nothing special needed for creating a script in PowerShell. You can simply add the commands you like.
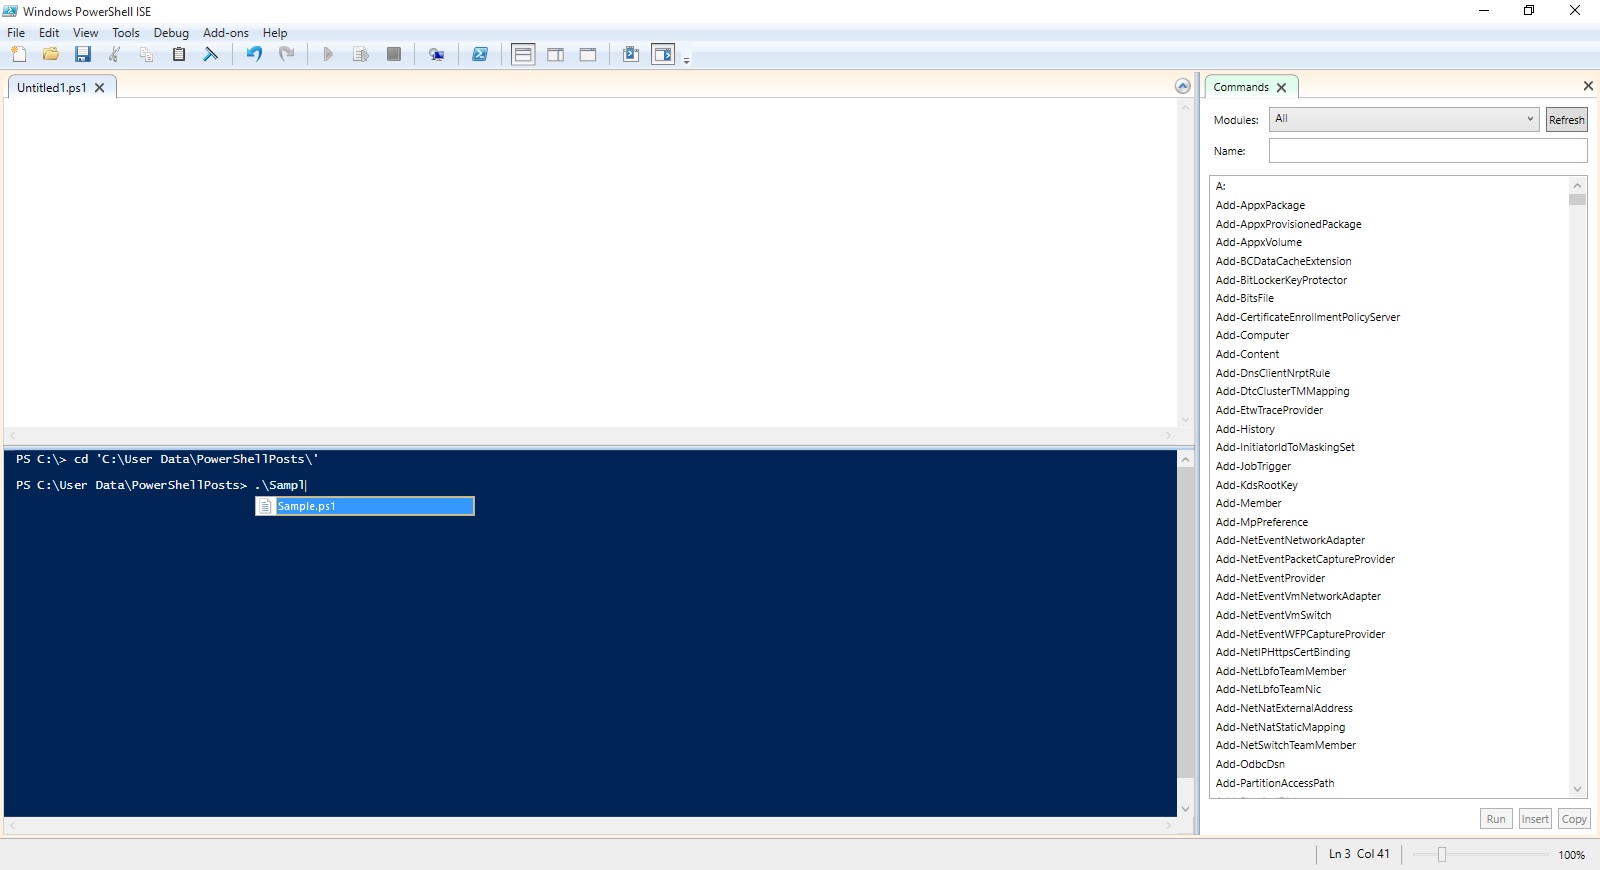
 

PS-3

How do I define Variables?

In PowerShell, variables always have a dollar sign ($) prefixed before them.

Let us declare few variables right now:

$name = 'Ashwini'

$anynumber = 111074

$location = 'Ghaziabad'

$listofnumbers = 15,20,35,40


PS-4

If I want to define a variable with text as its value, I will require to add a single quote on either side of the text value.

Let’s say we want to find out the total number of cmdlets available on the system, we can use:

(get-command).count
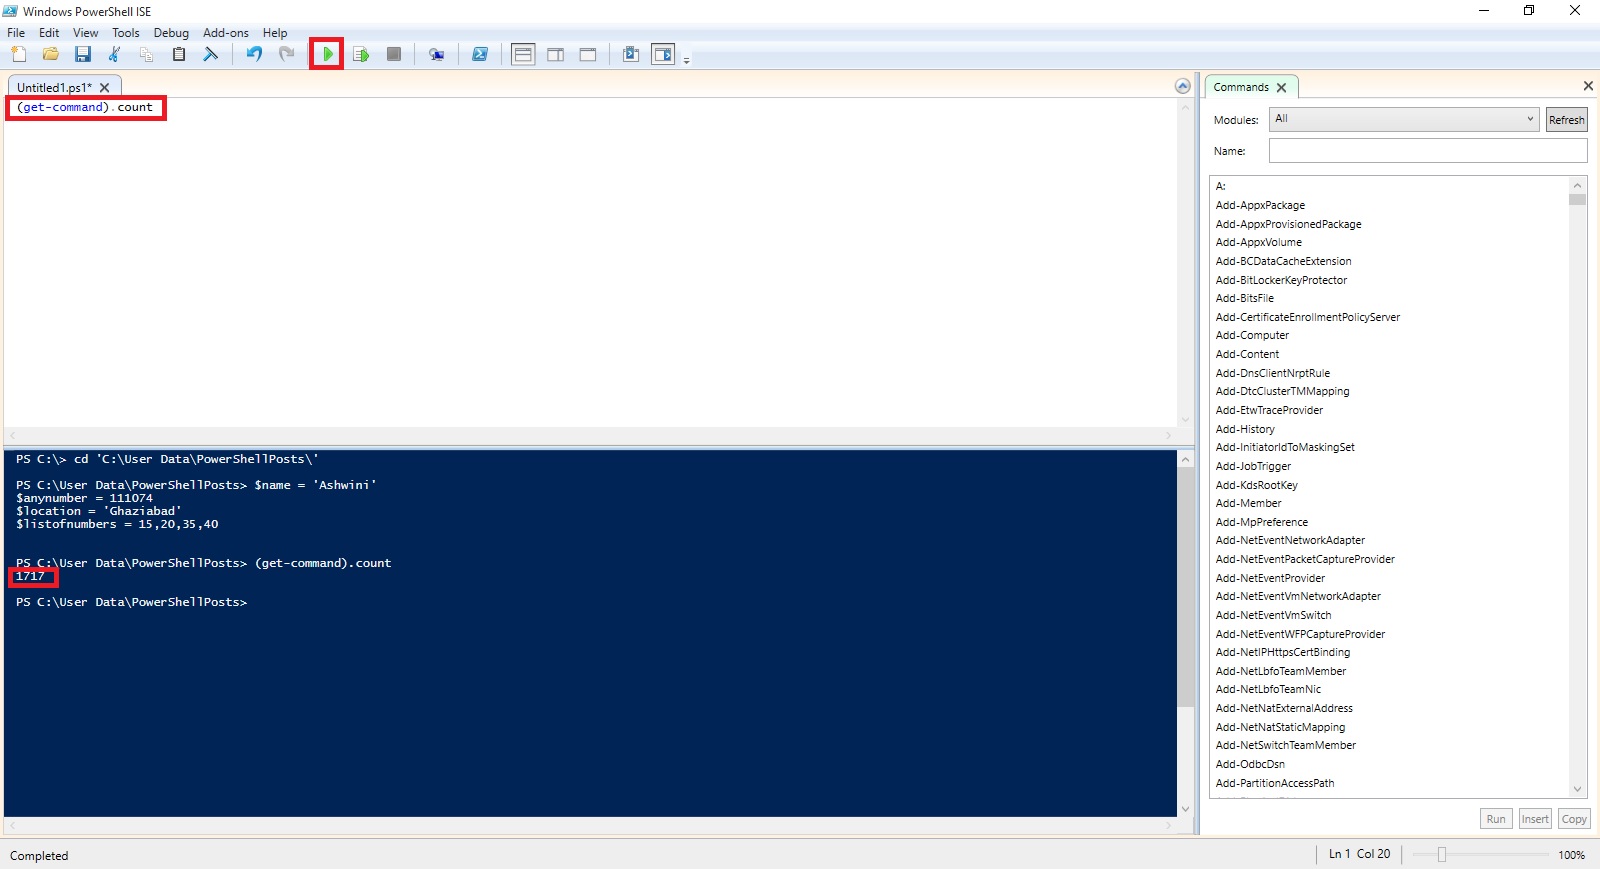
 

PS-5

Let's declare a variable to store that count in. We’ll call it

$numbersofcmdlets

We will store output in this variable of the (get-command).count .

$numbersofcmdlets = (get-command).count

Now we can use this variable as part of something else.

For a simple example, let's look at the Write-Host cmdlet, which simply writes text to the screen of the machine hosting the PowerShell session. Write-Host has a lots of capabilities, but in its simplest form, you can just say:

Write-Host "Dynamics Nav Blog Site by Ashwini Tripathi"

You can integrate variables with Write-Host. You just call them with the dollar sign notation and work them right into your text.

For example, I can say:

Write-Host "There are $numbersofcmdlets commands available for use on this system."
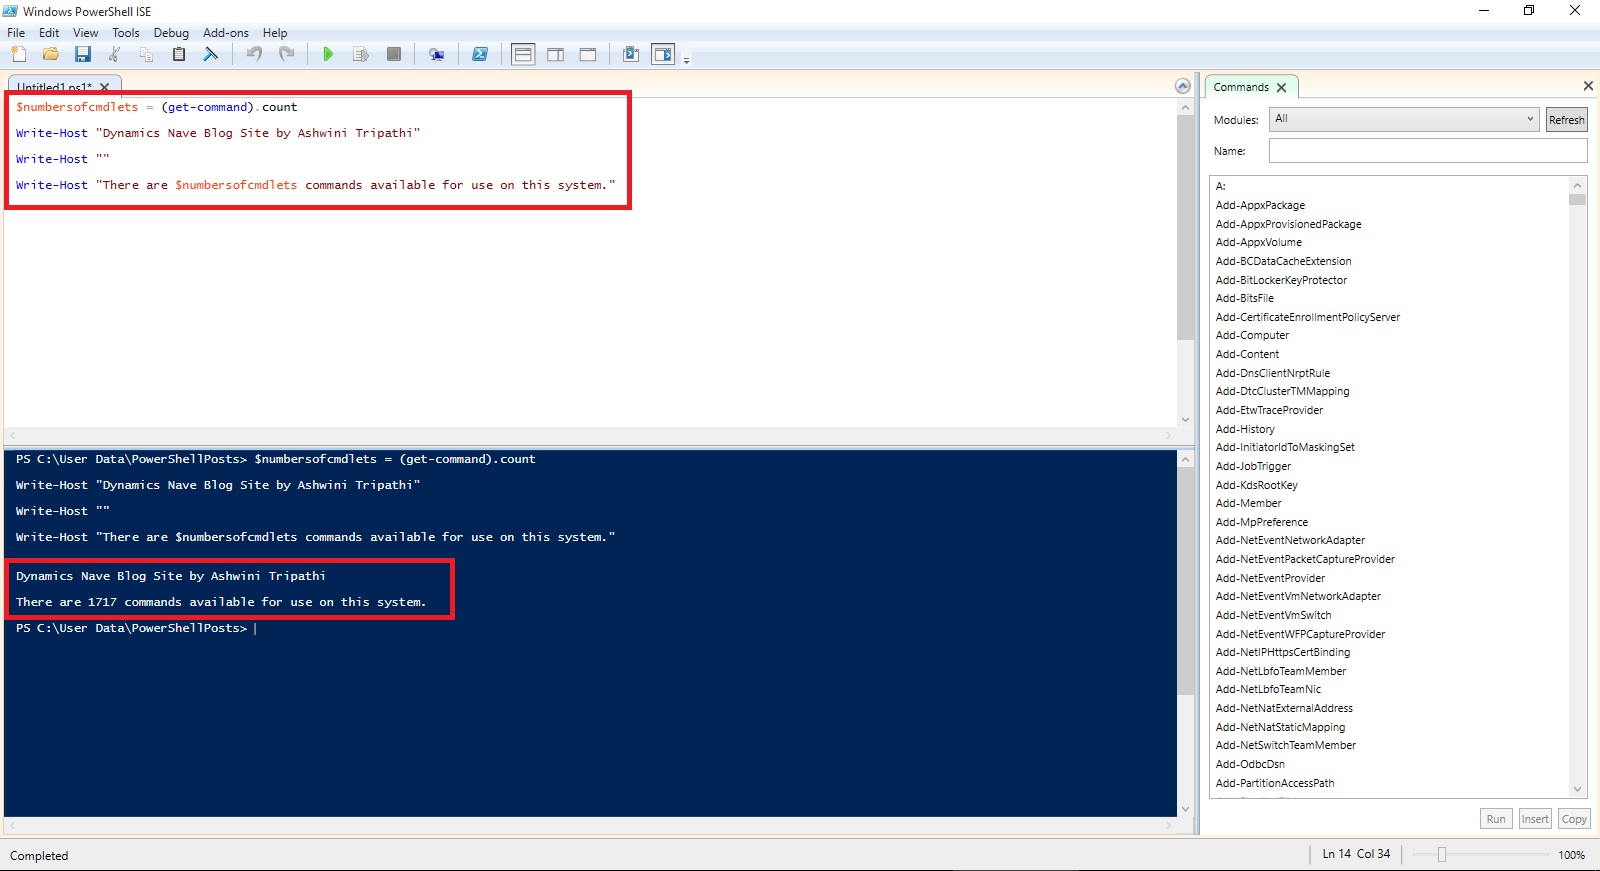
 

PS-6

I will come up with more stuffs in my upcoming posts. 

Till then keep practicing and stay tuned for more details.


Saturday, 11 June 2016

How Inventory is Calculated in Navision 2016

Today we will see terms used for Inventory and how Inventory is calculated in Navision.

InvProj-1

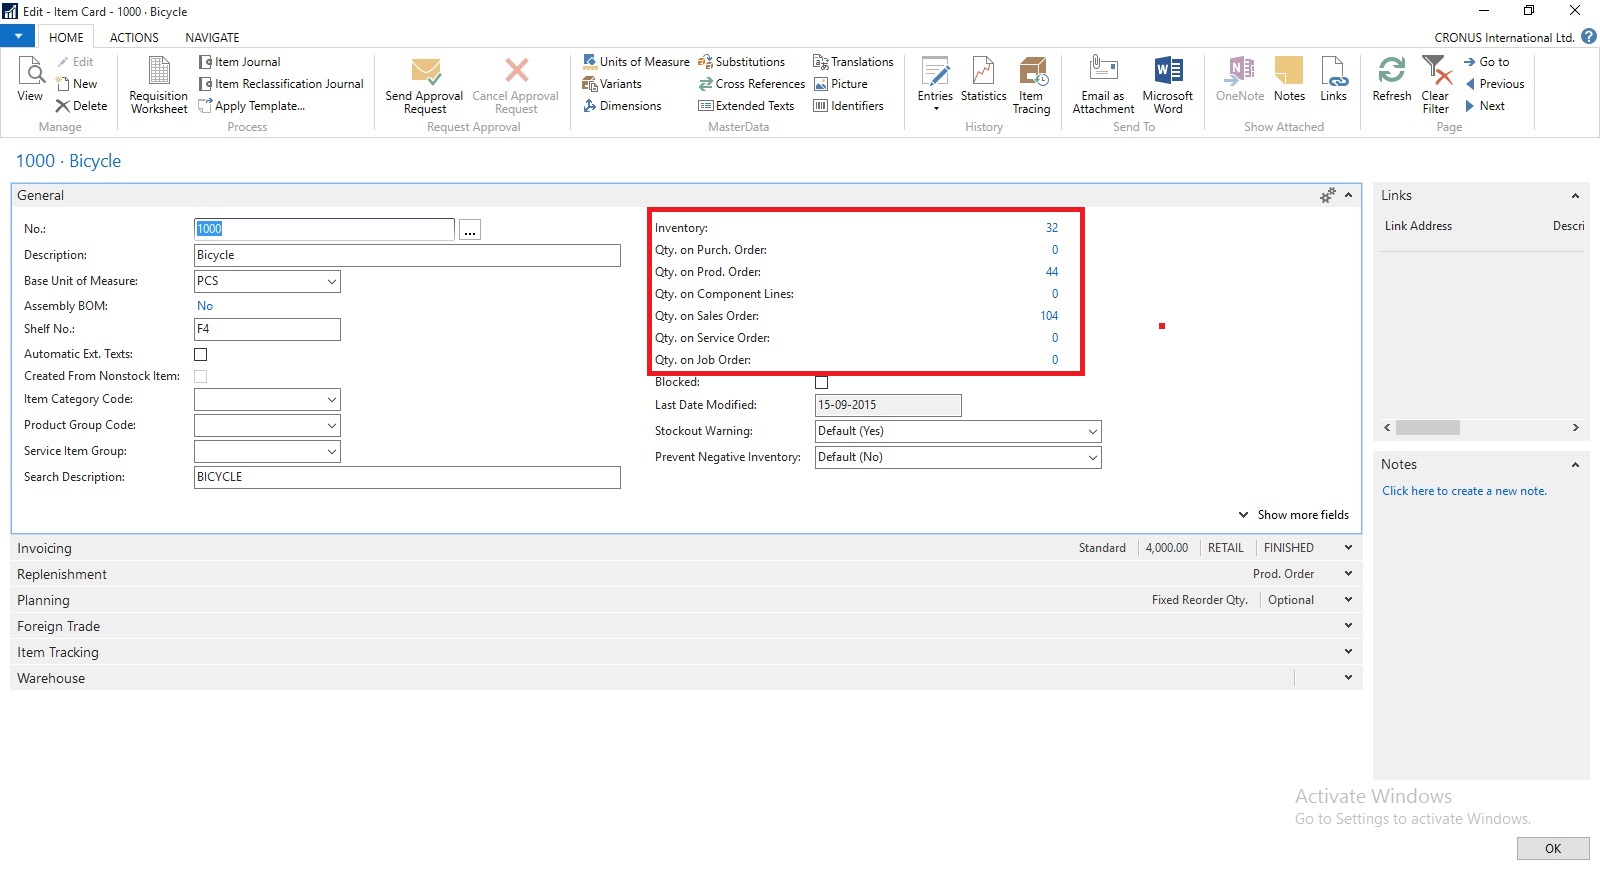
You can find details of Inventory on Item Card itself. Also how much Inventory is available or required at different area in ERP.

InvProj-2

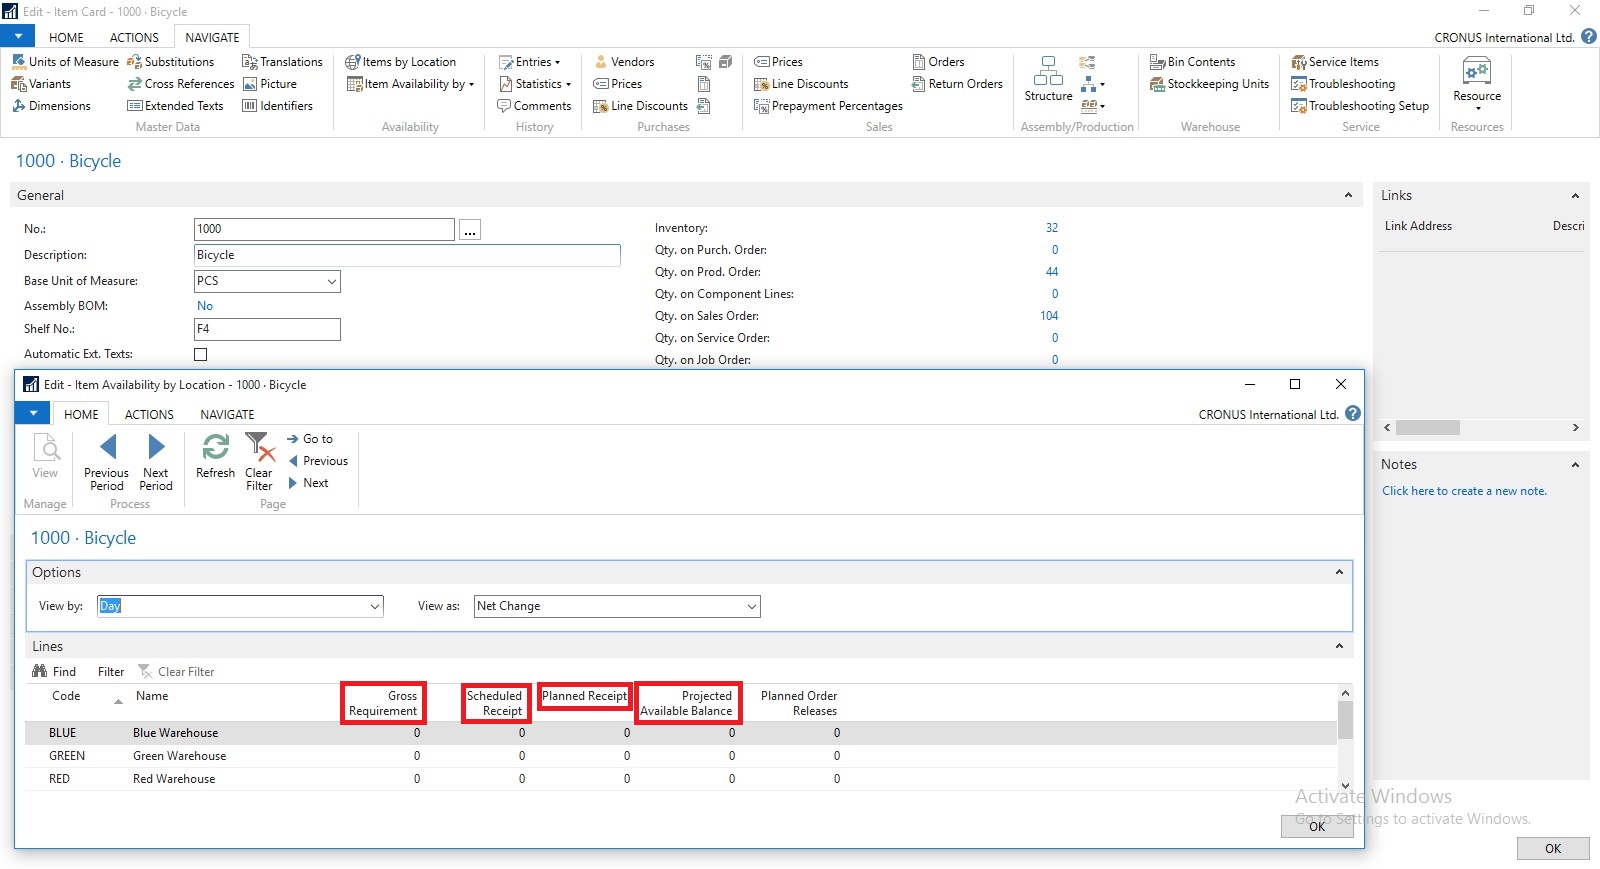
If you open Item Availability by Location you will find in more details. When you drilldown you can find in more details from where these figure comes from.

Scheduled Receipts:

Here all the entries from below area is included:
a) Purchase Orders

b) Transfer Orders

c) Firm Planned Production Order

d) Release Production Order

e) Assembly Orders

How Navision calculates?

AvailType::"Scheduled Order Receipt":
BEGIN
InsertEntry(DATABASE::"Purchase Line",Item.FIELDNO("Qty. on Purch. Order"),PurchLine.TABLECAPTION,Item."Qty. on Purch. Order");
InsertEntry(DATABASE::"Prod. Order Line",Item.FIELDNO("FP Order Receipt (Qty.)"),STRSUBSTNO(Text002,ProdOrderLine.TABLECAPTION),Item."FP Order Receipt (Qty.)");
InsertEntry(DATABASE::"Prod. Order Line",Item.FIELDNO("Rel. Order Receipt (Qty.)"),STRSUBSTNO(Text003,ProdOrderLine.TABLECAPTION),Item."Rel. Order Receipt (Qty.)");
InsertEntry(DATABASE::"Transfer Line",Item.FIELDNO("Qty. in Transit"),Item.FIELDCAPTION("Qty. in Transit"),Item."Qty. in Transit");
InsertEntry(DATABASE::"Transfer Line",Item.FIELDNO("Trans. Ord. Receipt (Qty.)"),Item.FIELDCAPTION("Trans. Ord. Receipt (Qty.)"),Item."Trans. Ord. Receipt (Qty.)");
InsertEntry(DATABASE::"Sales Line",0,SalesLine.TABLECAPTION,Item."Qty. on Sales Return");
InsertEntry(DATABASE::"Assembly Header",Item.FIELDNO("Qty. on Assembly Order"),AssemblyHeader.TABLECAPTION,Item."Qty. on Assembly Order");
END;

Planned Receipts:

Here all the entries from below area is included:
a) Planned Production Order

b) Planning Worksheet

c) Requisition Worksheet

How Navision calculates?

AvailType::"Planned Order Receipt":
BEGIN
InsertEntry(DATABASE::"Requisition Line",Item.FIELDNO("Purch. Req. Receipt (Qty.)"),ReqLine.TABLECAPTION,Item."Purch. Req. Receipt (Qty.)");
InsertEntry(DATABASE::"Prod. Order Line",Item.FIELDNO("Planned Order Receipt (Qty.)"),STRSUBSTNO(Text000,ProdOrderLine.TABLECAPTION),Item."Planned Order Receipt (Qty.)");
END;

Gross Requirement:

Here all the entries from below area is included:
a) Sales Order

b) Transfer Order

c) Firm Planned Production Order Components

d) Released Production Order Components

e) Job Planning Lines

f) Service Orders

g) Assembly Orders Components

How Navision calculates?

AvailType::"Gross Requirement":
BEGIN
InsertEntry(DATABASE::"Sales Line",Item.FIELDNO("Qty. on Sales Order"),SalesLine.TABLECAPTION,Item."Qty. on Sales Order");
InsertEntry(DATABASE::"Service Line",Item.FIELDNO("Qty. on Service Order"),ServLine.TABLECAPTION,Item."Qty. on Service Order");
InsertEntry(DATABASE::"Job Planning Line",Item.FIELDNO("Qty. on Job Order"),JobPlanningLine.TABLECAPTION,Item."Qty. on Job Order");
InsertEntry(DATABASE::"Prod. Order Component",Item.FIELDNO("Scheduled Need (Qty.)"),ProdOrderComp.TABLECAPTION,Item."Scheduled Need (Qty.)");
InsertEntry(DATABASE::"Planning Component",Item.FIELDNO("Planning Issues (Qty.)"),PlanningComponent.TABLECAPTION,Item."Planning Issues (Qty.)");
InsertEntry(DATABASE::"Transfer Line",Item.FIELDNO("Trans. Ord. Shipment (Qty.)"),Item.FIELDCAPTION("Trans. Ord. Shipment (Qty.)"),Item."Trans. Ord. Shipment (Qty.)");
InsertEntry(DATABASE::"Purchase Line",0,PurchLine.TABLECAPTION,Item."Qty. on Purch. Return");
InsertEntry(DATABASE::"Assembly Line",Item.FIELDNO("Qty. on Asm. Component"),AssemblyLine.TABLECAPTION,Item."Qty. on Asm. Component");
END;

Planned Order Releases:

How Navision calculates?

AvailType::"Planned Order Release":
BEGIN
InsertEntry(DATABASE::"Requisition Line",Item.FIELDNO("Purch. Req. Release (Qty.)"),ReqLine.TABLECAPTION,Item."Purch. Req. Release (Qty.)");
InsertEntry(DATABASE::"Prod. Order Line",Item.FIELDNO("Planned Order Release (Qty.)"),STRSUBSTNO(Text001,ProdOrderLine.TABLECAPTION),Item."Planned Order Release (Qty.)");
InsertEntry(DATABASE::"Requisition Line",Item.FIELDNO("Planning Release (Qty.)"),ReqLine.TABLECAPTION,Item."Planning Release (Qty.)");
END;

Finally we can calculate Projected Available Inventory as below formula:
Inventory + Scheduled Receipts + Planned Receipts - Gross Requirement

thats all for today, will come with more information in my upcomming posts.


Saturday, 28 May 2016

How do I process Sales Return? – In Maderia

We have seen in our previous post the feature where if a posted sales invoice has not yet been paid, then you can use the Correct or Cancel functions on the posted sales invoice to automatically reverse the involved transactions.

There could be the situation where customer wants partial refund or return of sales.

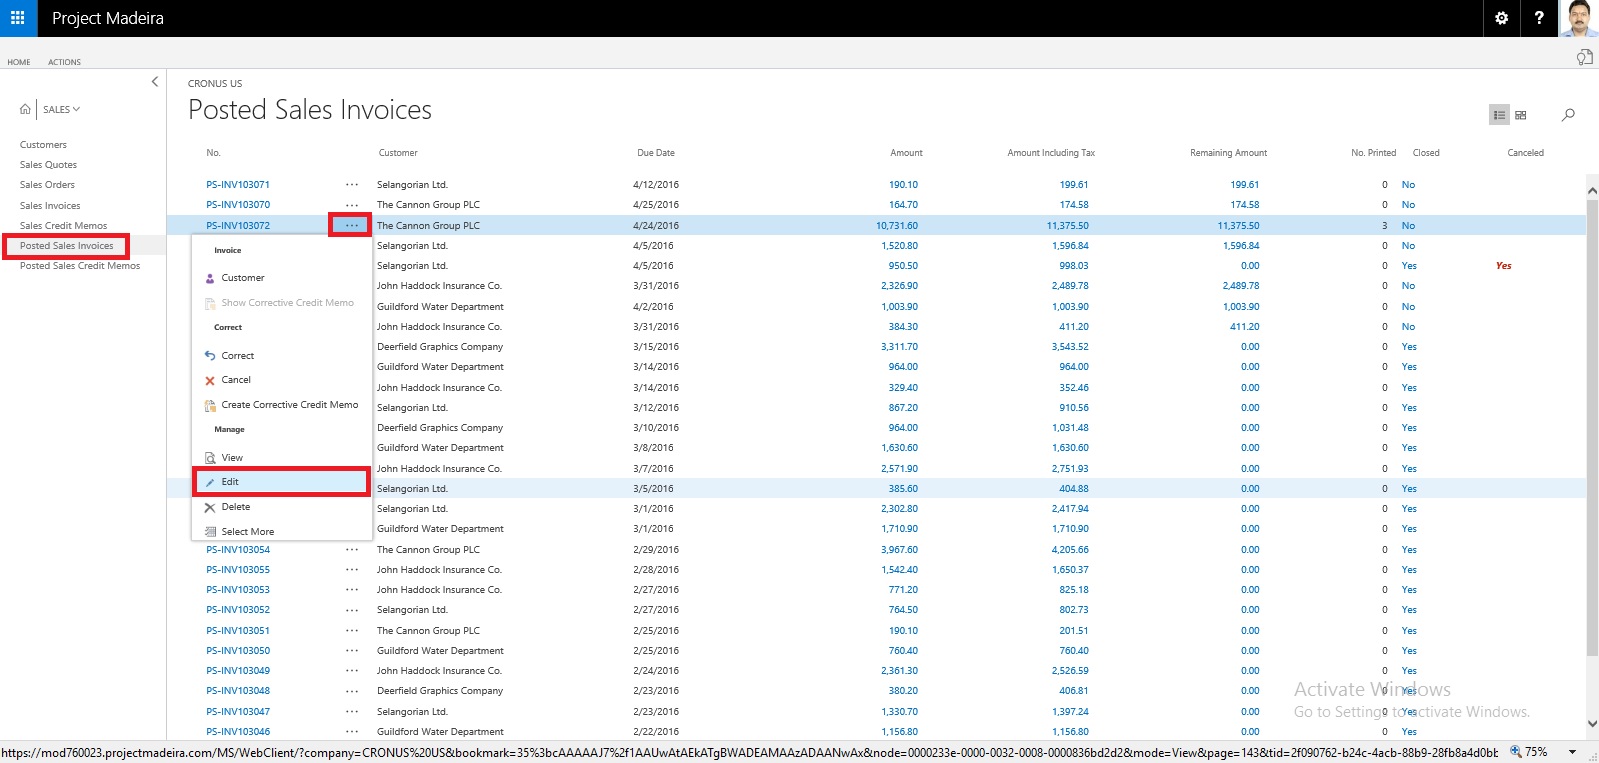
You can create the Credit Memo from the Posted Sales Invoice, which will create the Credit Memo for you and leave to you to modify and post the credit memo.

Most fields on the sales credit memo header are filled with the information from the posted sales invoice. You can edit all the fields, with new information that reflects the return agreement.

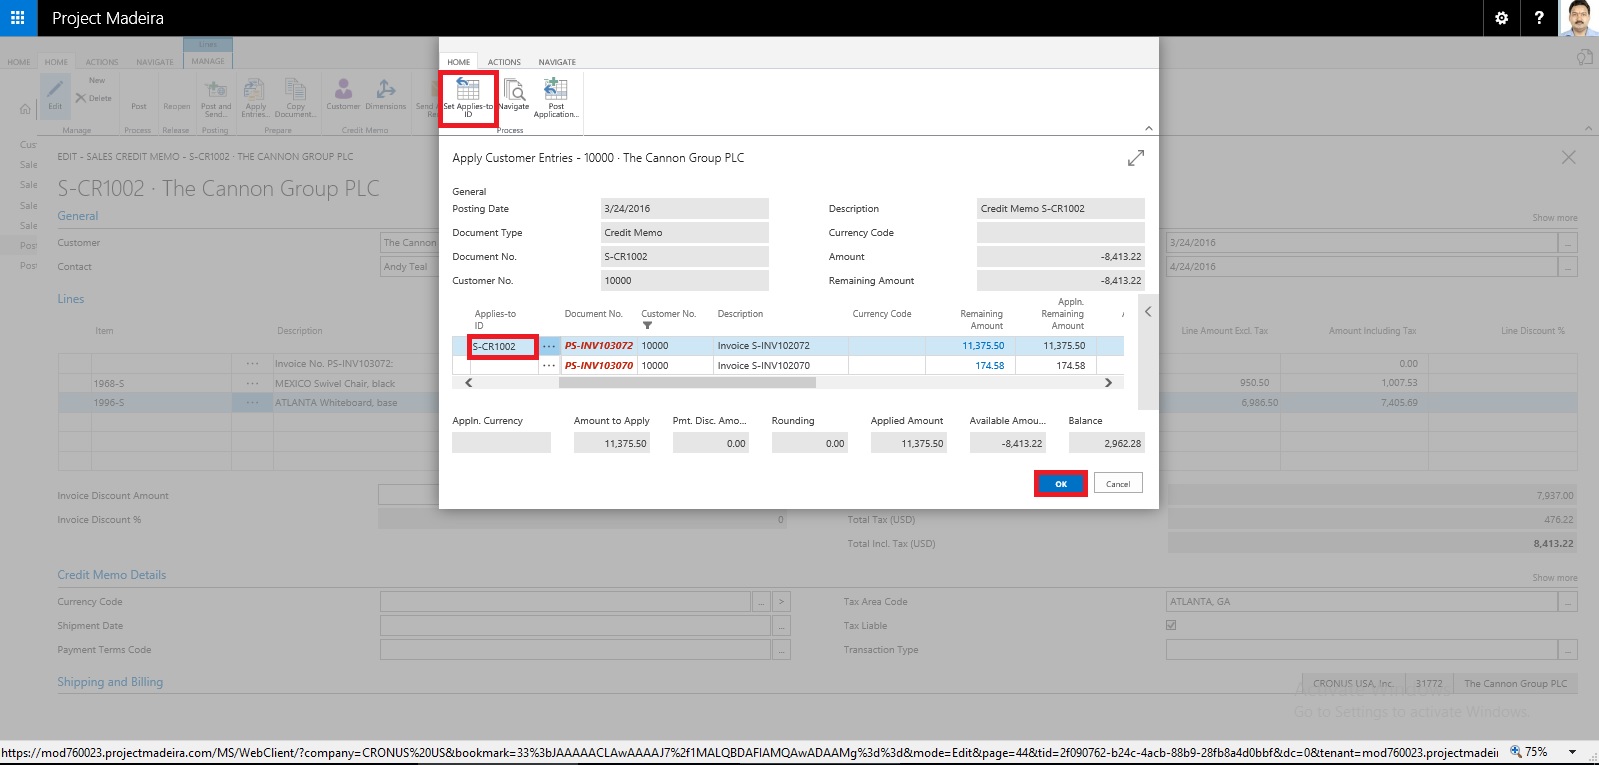
You can apply the Customer Entries via selecting the line with the posted sales document that you want to apply the sales credit memo to.

The posted sales documents that you applied the credit memo to are now reversed, and a refund payment can be created for the customer.

The sales credit memo is removed and replaced with a new document in the list of posted sales credit memos.

Let us see how we can achieve this in Madeira.


CorrectCancelSalesInvoice-12

Select the Sales Invoice and open it for action.

CorrectCancelSalesInvoice-13

Select Create Corrective Credit Memo.

CorrectCancelSalesInvoice-14

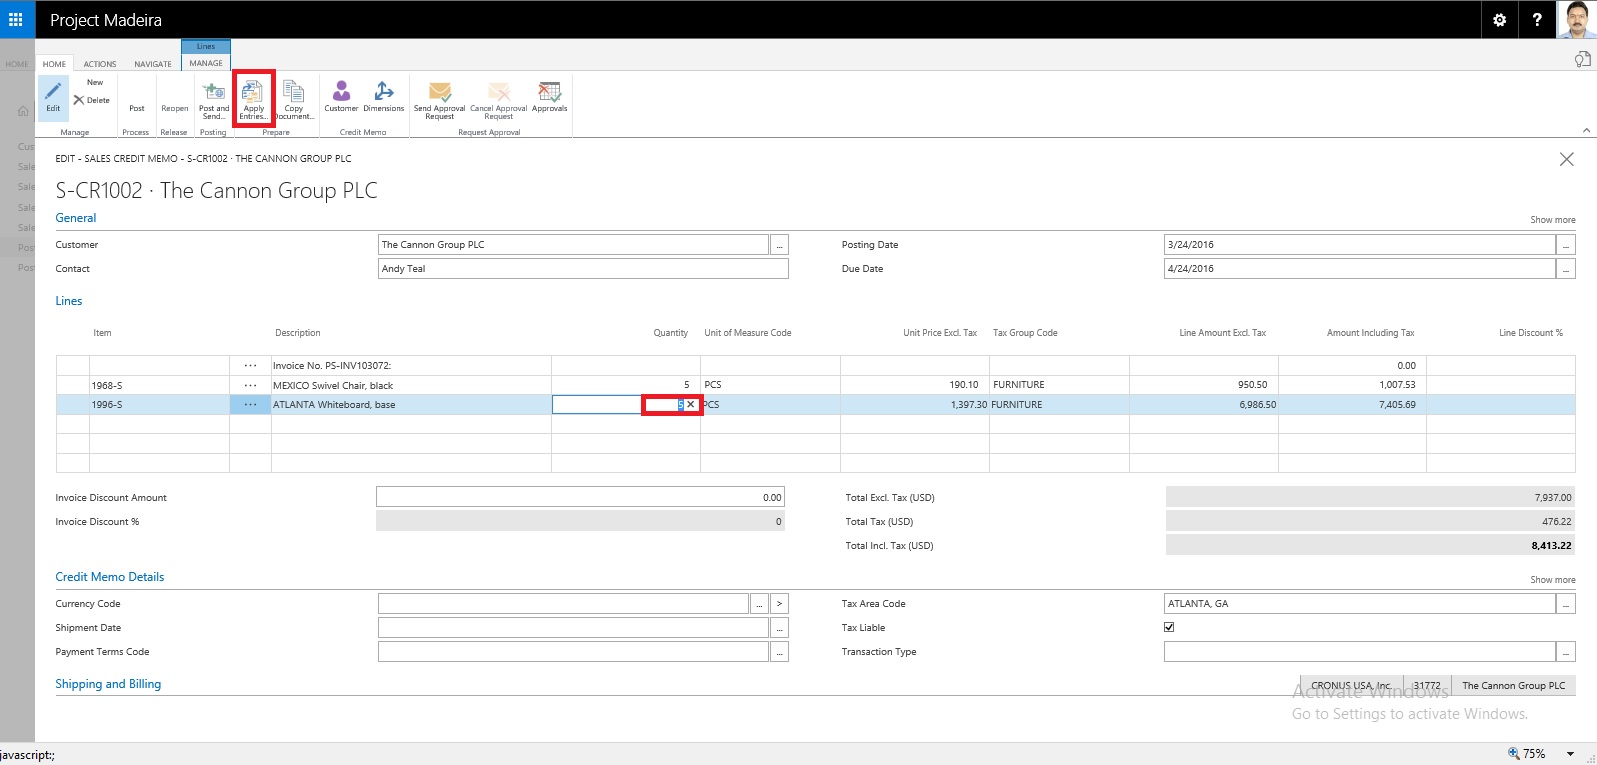
Perform the required correction and choose Apply Entries.

CorrectCancelSalesInvoice-15

Select the document to which you want this Credit Memo to be adjusted.

CorrectCancelSalesInvoice-16

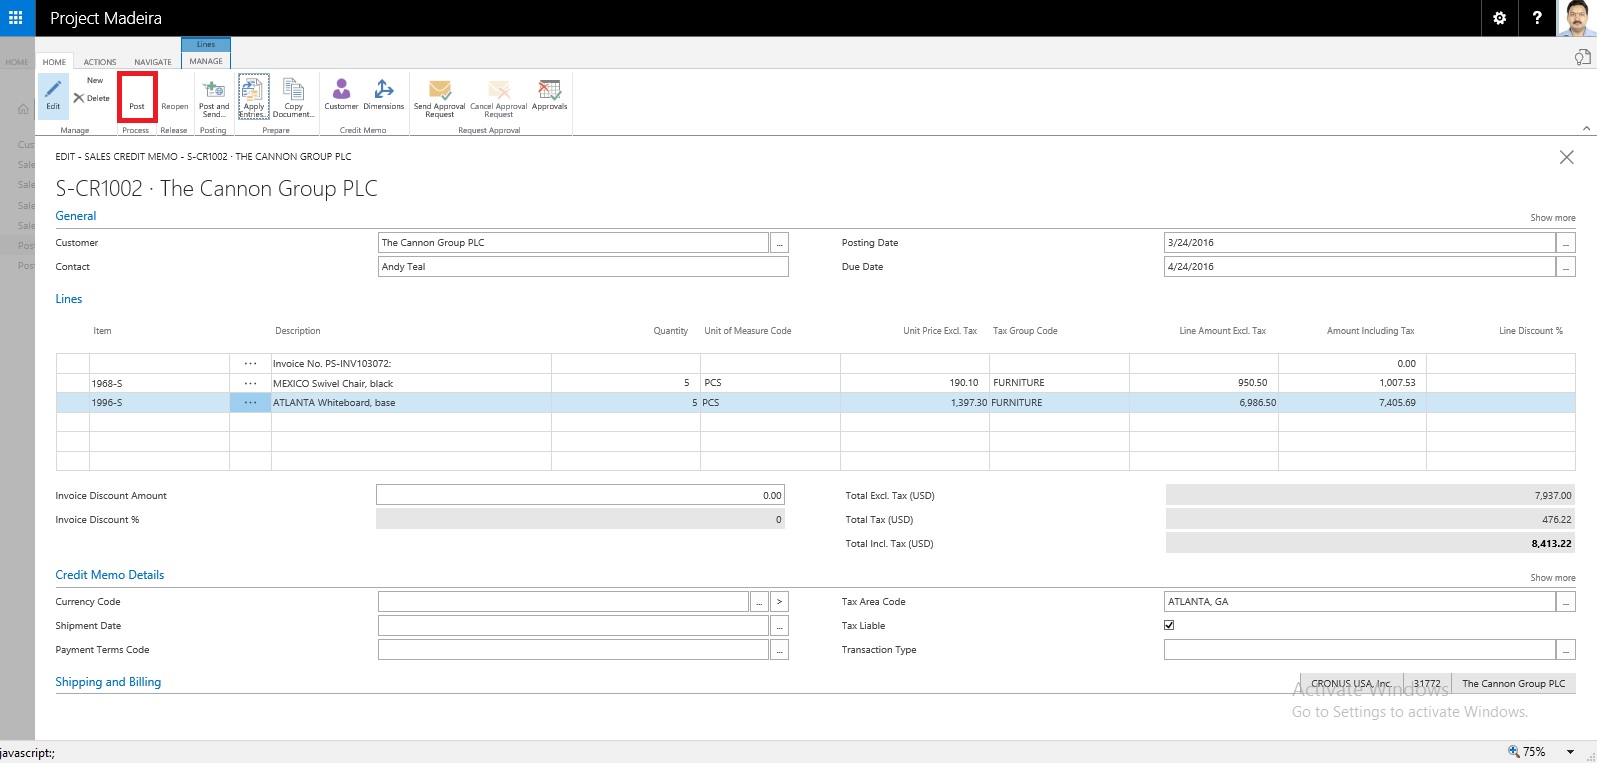
Once Application is done, Post the Credit Memo.

Respond to Yes to post the Credit Memo.

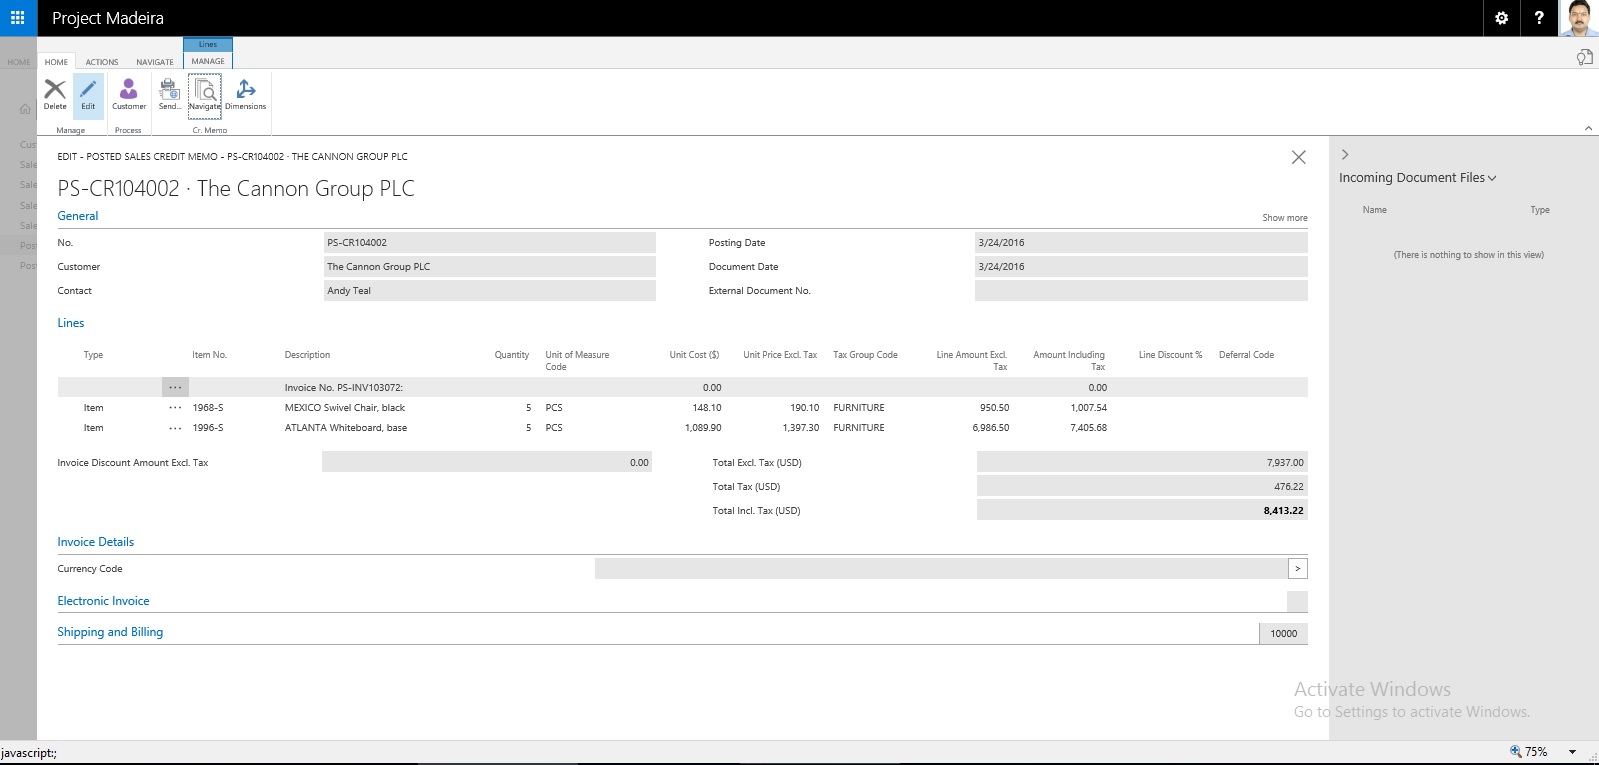
Respond to Yes to Open the posted Credit Memo.

CorrectCancelSalesInvoice-17

This is the posted Credit Memo for the Invoice.

Let us check the Ledger for this Customer:

CorrectCancelSalesInvoice-18

Here you can see the net effect of the Credit Memo on Invoice.

Thats all for this post will come up with more features and details in my upcomming posts.


Wednesday, 18 May 2016

How Do I : Setup or Adjust Item Cost in Madeira


In this post we will see how we can Setup Adjust Cost and how to Run Manually Item Cost Adjust Batch or Schedule the same.

ItemCost-1

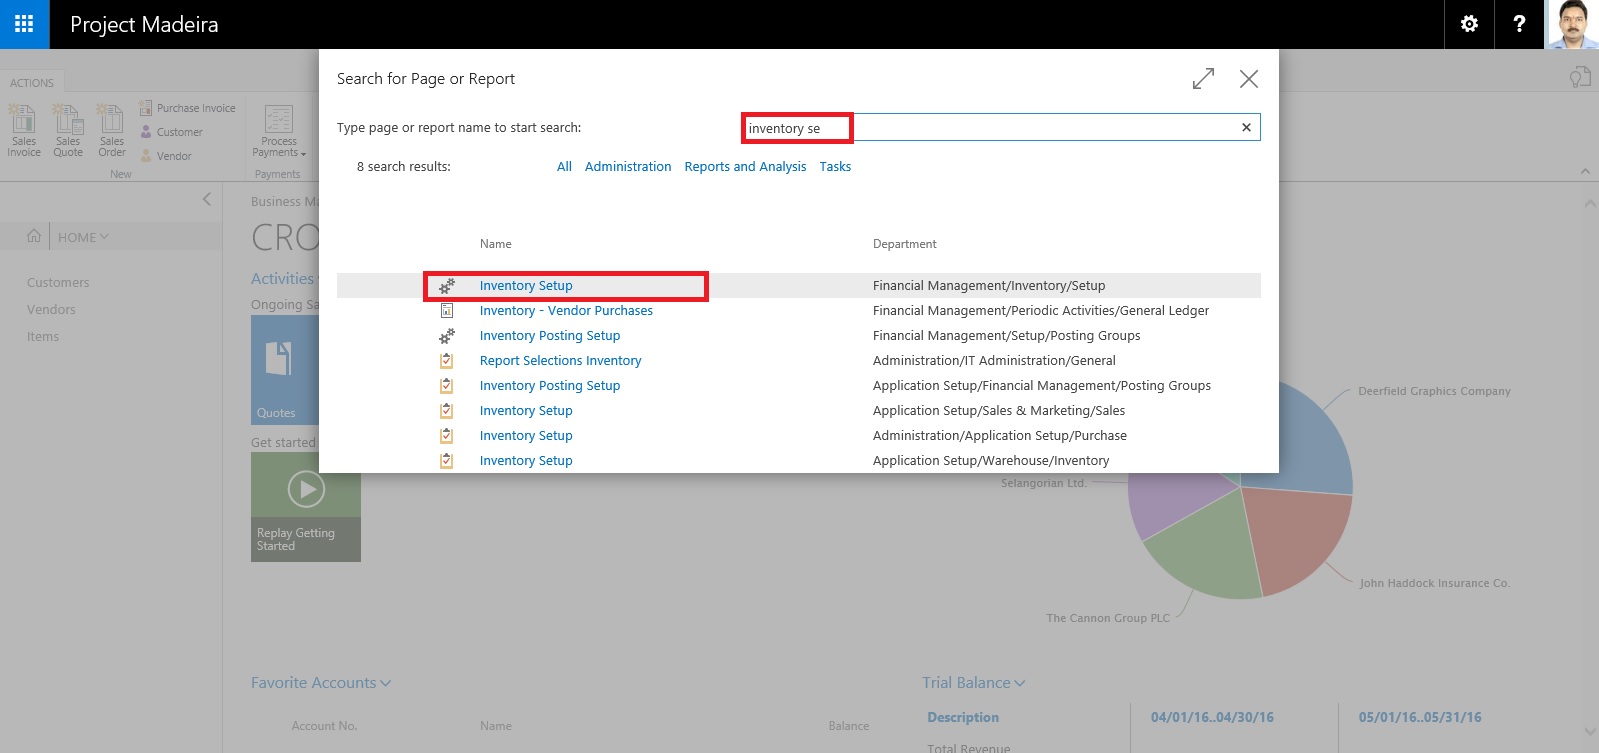
Search the Page Inventory Setup using Search Page in Right top corner of your screen.

Search for Inventory Setup Page.

ItemCost-2

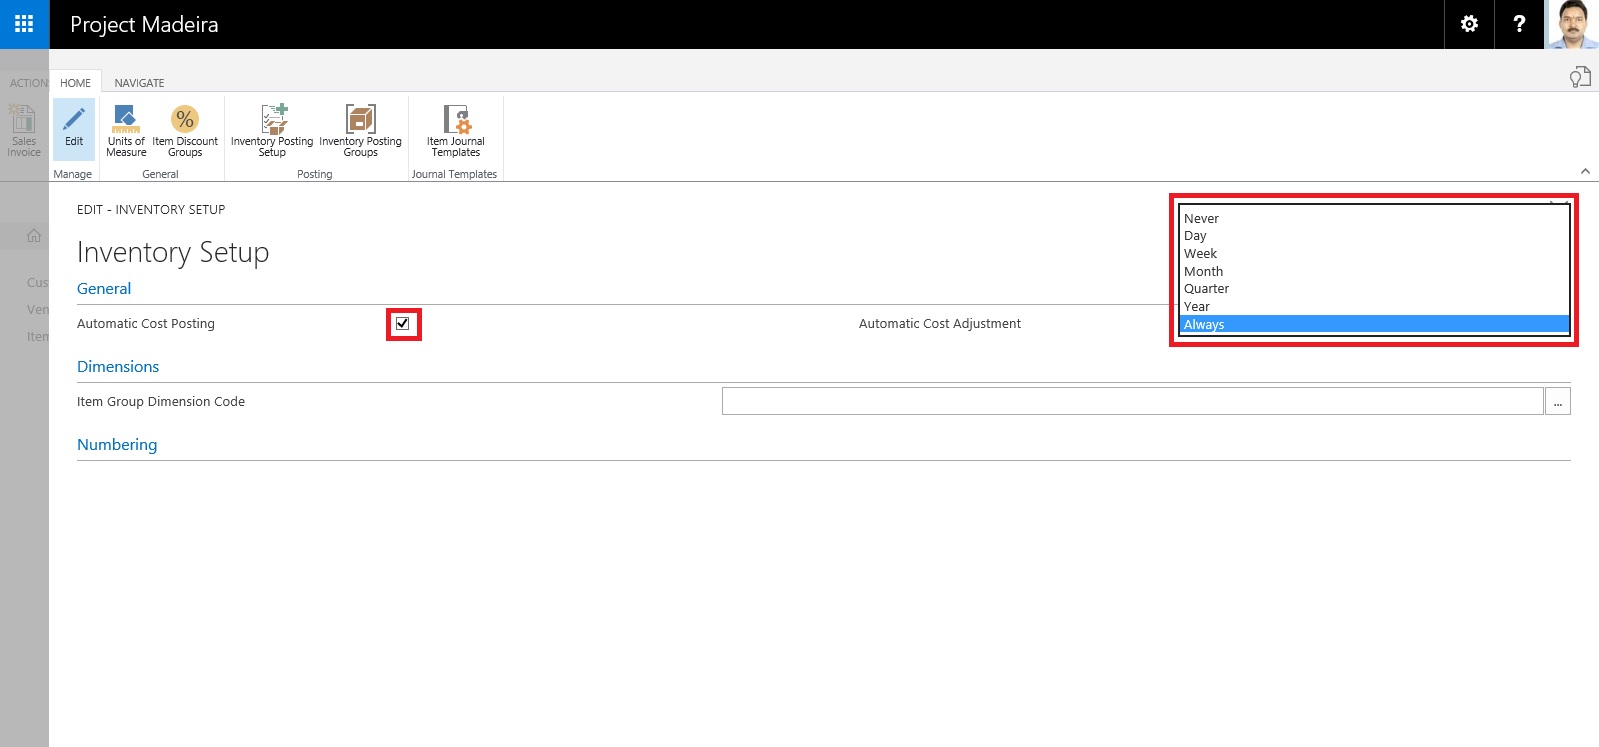
Make Sure Automatic Cost Posting is Setup as required.

Also Setup frequency of Automatic Cost Adjustment.

ItemCost-3


OptionBehavior
NeverCosts are not adjusted when posting
DayCosts are adjusted if posting occurs within one day from the work date
WeekCosts are adjusted if posting occurs within one week from the work date
MonthCosts are adjusted if posting occurs within one month from the work date
QuarterCosts are adjusted if posting occurs within one quarter from the work date
YearCosts are adjusted if posting occurs within one year from the work date
AlwaysCosts are always adjusted when posting, irrespective of the posting date

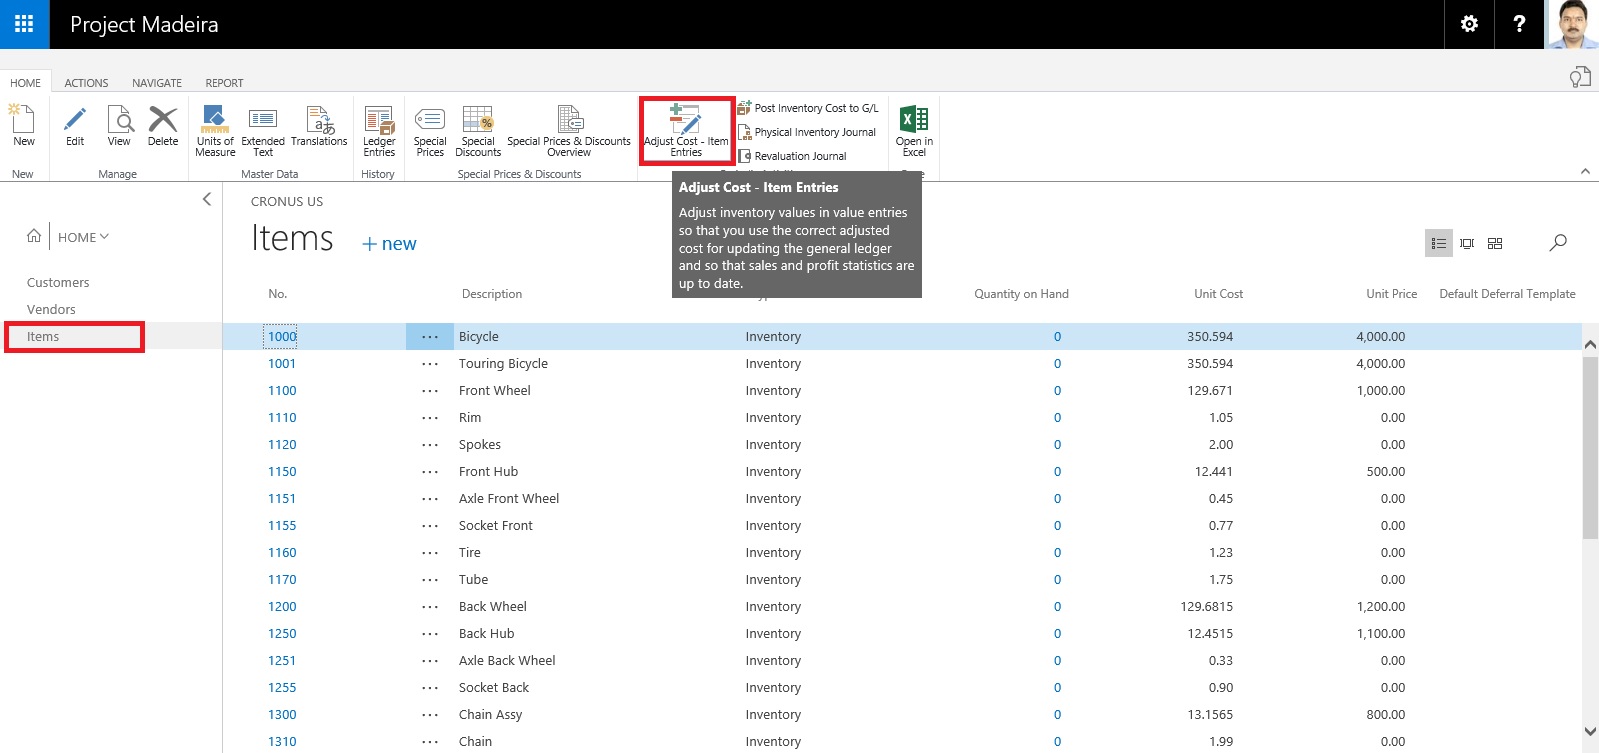
Now we will Run the Adjust cost Item Entries Batch.
ItemCost-4

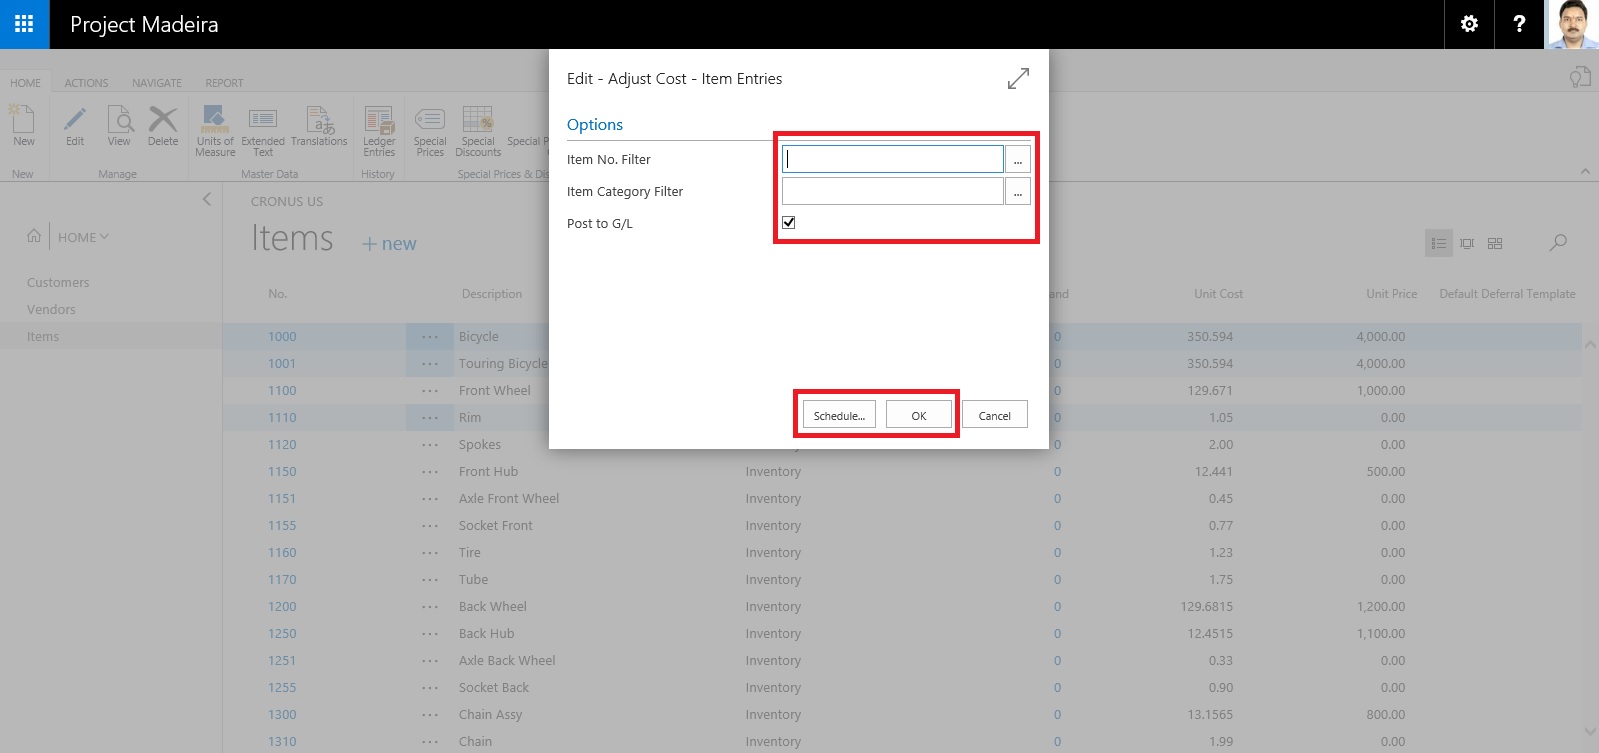
Apply the desired filter for Item or Category as desired.

Next you can run Immediately or can schedule for later execution.

If you require Immediately choose OK.

If you wish to schedule for Later Run choose Schedule.

ItemCost-5

Enter your Date & Time and click OK.

ItemCost-6

To check the status of the Scheduled Run, Search and open the Page Job Queue Log Entries.

ItemCost-7

You can find the Status of your Scheduled Job for Adjust Cost Entries.

ItemCost-8

It's easy na.

I will come up with more details in my upcoming posts.

Till then keep Exploring & Learning.


How do I : Adjust Inventory in Madeira

Do you know, it is very easy to Adjust Inventory in Madeira.

Let us see how this action can be done.

Start with Login to Madeira using your credentials.

InvAdj-1

From Landing page, choose Item from Navigation Bar in Left.

InvAdj-2


From the list of Item choose Edit or View to access the Card of selected Item.

InvAdj-3

Now from action choose Adjust Inventory.

InvAdj-4

Enter your New Inventory Value. Like in Below screen I want to Add 50 more Inventory.

I Enter 150 including Existing Inventory in System.

InvAdj-5

Select OK.

Inventory now increases by 50 adding 100 to existing inventory making total of 150 available inventory.

InvAdj-6

We are done with our task, Adjusting Inventory.

I will come with more details in my upcoming posts.

Till then keep exploring and learning.


Monday, 18 April 2016

How to add Video Tile on Power BI Dashboard

Previously, a Video Tile released by BI supports YouTube videos. Video tiles allow you to customize your dashboard and add a bit of personal look.

Now the video tile supports Vimeo videos too.

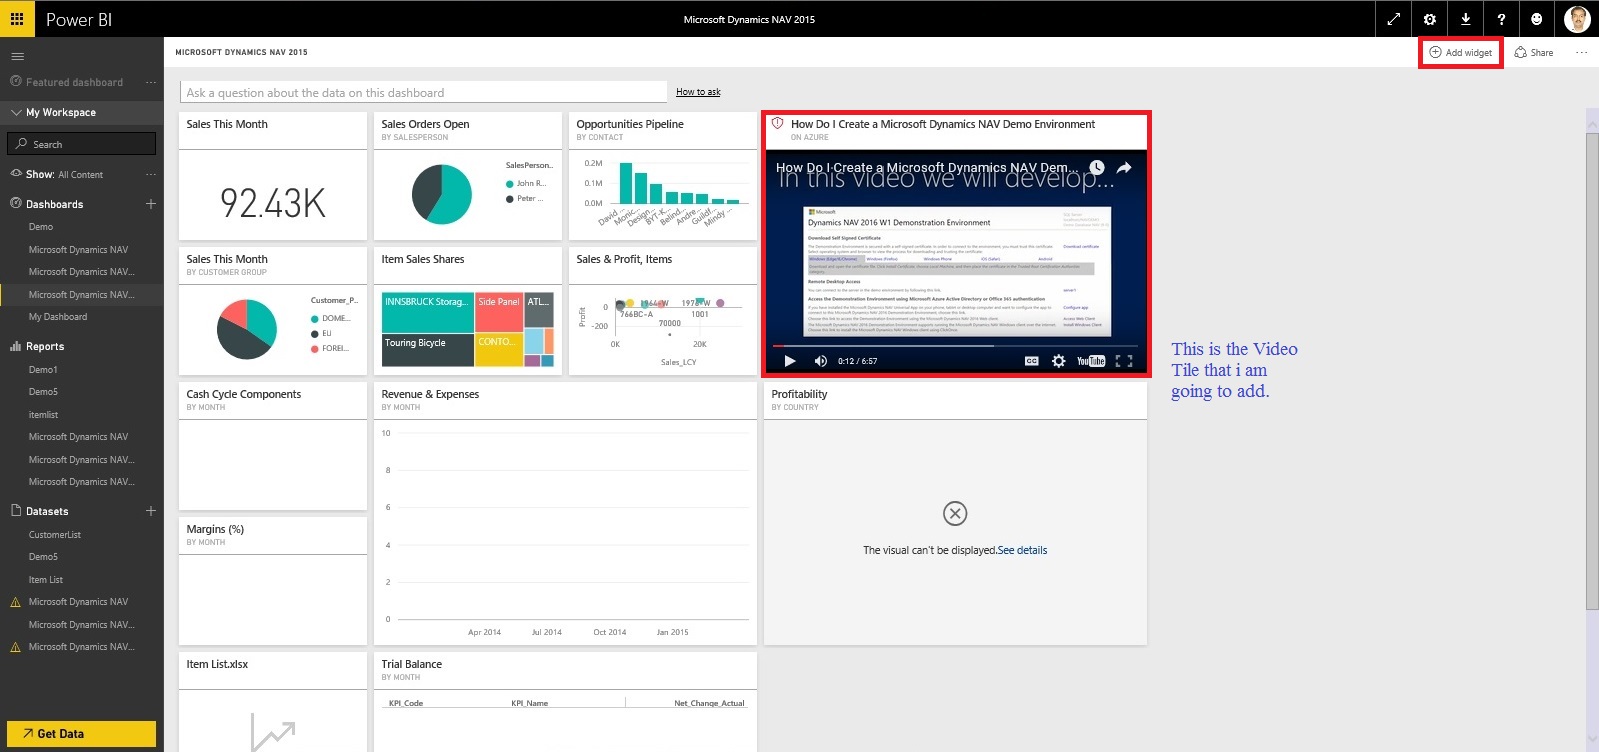
Add a video tile by selecting Add widget from the top right of the dashboard.

PBI Video - 1

Select Video from Add Tile window.

PBI Video - 2

Press Next Button.

PBI Video - 3

Provide your Title and Subtitle for the Video Tile.

Provide your YouTube or Vimeo video URL.

If required provide custom Link and other properties.

Select Apply to complete your action.

Vimeo URLs come in several different formats this supports most, but not all of these formats. In case your URL doesn’t works try for next format.

I have posted several posts related to Power BI, you can find them using below Links.

Microsoft Power BI – Part – I

Introduction to Power BI and Creating Report from Excel Data, Local Files.

Microsoft Power BI – Part – II

Introduction to few Features of Power BI

Microsoft Power BI – Part – III

Power BI Desktop, Creating Dataset & Reports from In Premise Database installation

Microsoft Power BI – Part – IV

Power BI Gateway usage

Microsoft Power BI – Part – V

Scheduling Refresh of Dataset & Report created using In Premise Database

Microsoft Power BI – Part – VI

Power BI Content Pack

Microsoft Power BI – Part – VII

Power BI Mobile App

Microsoft Power BI – Part – VIII

Power BI Content Pack

Microsoft Power BI – Part – IX

Power BI Publisher for Excel

Microsoft Power BI – Part – X

Analyse in Excel (preview)


Thursday, 14 January 2016

How do I: Develop an Extension

You can build extension packages that add functionality to a Microsoft Dynamics NAV deployment.

For Overview, please see my earlier posts Introducing Extensions in Microsoft Dynamics NAV 2016

Like any common functionality you want to roll out to different locations of a same company maintaining Object Set Globally for their Navision deployment.

You can perform conventional Export object and send to different locations, where they import these objects in their databases. Another option is through Extensions. Specially very helpful in Tenant model deployment.

But do the limitations apply as we discussed in my earlier post:

[A] Which Object types you can Include & Restrictions applicable to C/AL code in Extension Packages

[B] Which Properties are Restricted in Extension Packages

Unlike the familiar development and deployment of Microsoft Dynamics NAV functionality, building an extension relies on the exported version of an application to .TXT files.

You can export the application from the development environment, use the development environment commands, or use the Windows PowerShell cmdlet that is available in the Microsoft Dynamics NAV 2016 Development Shell,
Export-NAVApplicationObject.

MS recommend that you create a folder structure that can be leveraged by the cmdlets that you use when you build the extension package. That structure should contain folders for the ORIGINAL object files, MODIFIED object files, and DELTA files. These names match those used as parameters in the application merge utilities.

Recall from my earlier post where we deled with Upgrading the Application Code in Microsoft Dynamics NAV 2016

We used folder structure for placing the objects before we performed action:
“In my example, the UpgradeDemo folder on the C drive contains five folders: ORIGINAL, MODIFIED, TARGET, DELTA, and RESULT. The DELTA and RESULT folders are empty. The ORIGINAL, MODIFIED, and TARGET folders contains one or more text files that contain application objects.”

Similar structure we will be using for creating package. You can follow same for easy reference or you can use your convenient naming convention and structure.

I will come back on this in my future post, what exactly structure I will be using for my walkthrough on Extension.

You can refer to cmdlets we discussed earlier for upgrade and extensions which will be used in rest of the parts of this and upcoming posts while dealing with Extensions.

[A] Helpful PowerShell Commands which you can use for Upgrade Process in Navision 2016

[B] Few Helpful PowerShell Commands which you can use for Upgrade Process in Navision 2016 – Part 2

[C] Useful Windows PowerShell cmdlets for managing Extensions in Dynamics Navision 2016


5 Steps To create an extension


  1. Establish the BASE as TXT files.


  • The foundation for your extension is the exported .txt files of the objects you are modifying.

  • You can export just the objects that you want to modify, or you can export the entire Microsoft Dynamics NAV application.

  • In the Microsoft Dynamics NAV 2016 Development Shell, the Export-NAVApplicationObject cmdlet can automate this process or you can use the export functionality in the development environment.

  • The following example uses this cmdlet to export objects to establish the base for the planned modifications.


Export-NAVApplicationObject -Path ORIGINAL -DatabaseName MyDatabase -DatabaseServer MyDatabaseServer


  • Objects must be exported as .TXT files. You cannot build an extension based on a .FOB file.

  • If you use a source control system, you may want to pull the base .TXT files from there.


  1. Create functionality in the development environment.


  • Use the development environment as usual to create new objects or modify ones to the extent your license allows you.

  • Also don’t forget to reference limitations with Extensions Property and Objects which you can include in Extensions, see above provided link for more details.

  • Keep in mind the following rules as discussed earlier:


  • DO NOT make C/AL code modifications

  • DO use subscribing to events to execute code.

  • DO NOT create new or modified XMLPorts, Queries, or Report.

  • DO NOT change restricted page and table properties.


  • In order to get an easy upgrade experience for your extensions, you cannot modify code the way you do in the traditional customization process.

  • Instead, you extend Microsoft Dynamics NAV functionality by subscribing to programming events that are raised either explicitly in code, or implicitly by the platform.

  • Test your application with the extension added.


  1. Export your changed and added application objects to .TXT files.


  • Export all objects that you added or modified to .TXT files.

  • Use the same export cmdlet from step 1 or manually export within the development environment.

  • They must also be exported as .TXT files and should be placed in a separate directory so that the packaging process can be pointed at them.


Export-NAVApplicationObject -Path MODIFIED -DatabaseName MyDatabase -DatabaseServer MyDatabaseServer


  1. Create DELTA files using the Microsoft Dynamics NAV 2016 Development Shell cmdlets.


  • Extension packages are based on application object deltas. Again, you use the application merge utilities in the Microsoft Dynamics NAV 2016 Development Shell to distil the changes in the form of application object differences that are stored in DELTA files.

  • Creating an extension uses many of the same concepts and tools as you know from application object deltas. You use the Compare-NAVApplicationObject cmdlet to create these delta files.


Compare-NAVApplicationObject -OriginalPath ORIGINAL -ModifiedPath MODIFIED -DeltaPath DELTA

Your delta files must be one-to-one with the objects you have added or modified. You cannot include a single merged delta file. If you output your export file as a single file use the Split-NAVAppplicationObjectFile cmdlet to create the individual files.

  1. Build the extension package.


I will come up with more details in my upcoming posts on this topic.

Sunday, 27 September 2015

How to Use the Jet Report Scheduler

Overview

The Jet Scheduler is a powerful tool that allows users to schedule reports to be automatically run by the Windows Task Scheduler. The user can also control where the output file is saved to, if the report should be emailed once it has been generated, and the output format of the report.

Creating a New Scheduled Task

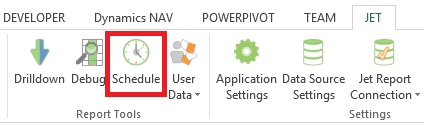
To set up a scheduled report, open the report in Excel, click the Jet ribbon, and click the Schedule button.

JetSchedule-1

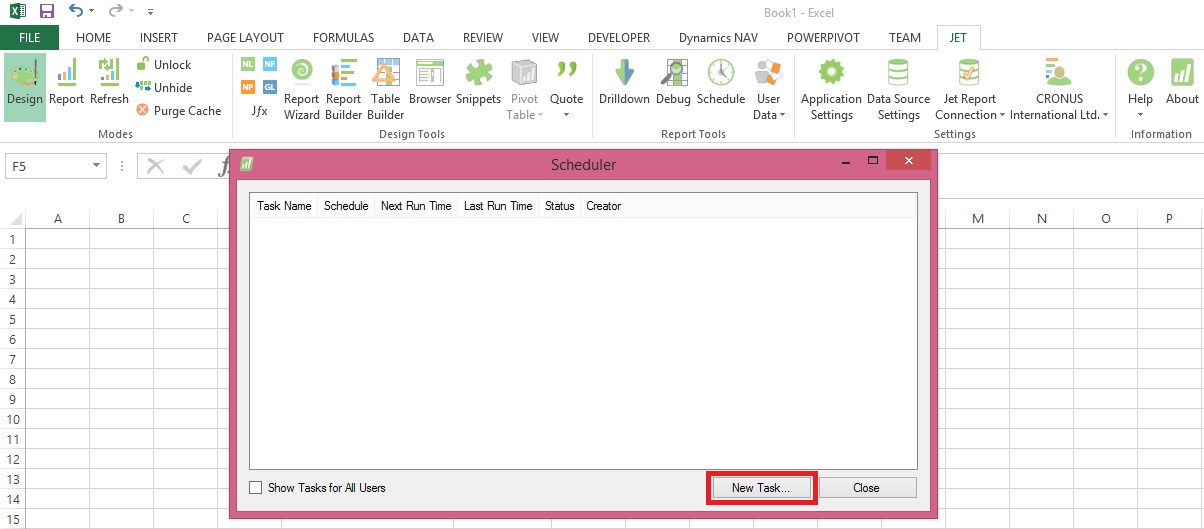
Click the New Task... button to schedule a new task.

JetSchedule-2

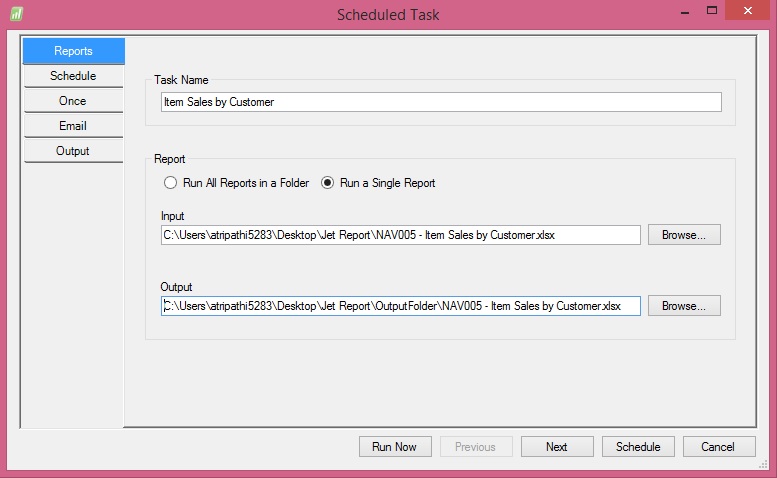
The Scheduled Task window will now appear.

Reports Tab

JetSchedule-3

The Reports tab contains general information about the scheduled task.

  • Task Name: This represents the name of the task as it will appear in the Scheduled Task window to the user.

  • Run All Reports in a Folder: This button will enable the user to schedule all Jet Reports in a full to be run

  • Run a Single Report: This button will enable the user to schedule a single Jet Report to be run

  • Input: This represents the folder and file name of the report that will be run

  • Output: This represents the folder and file name of where the finished report will be saved


Schedule Tab

JetSchedule-4

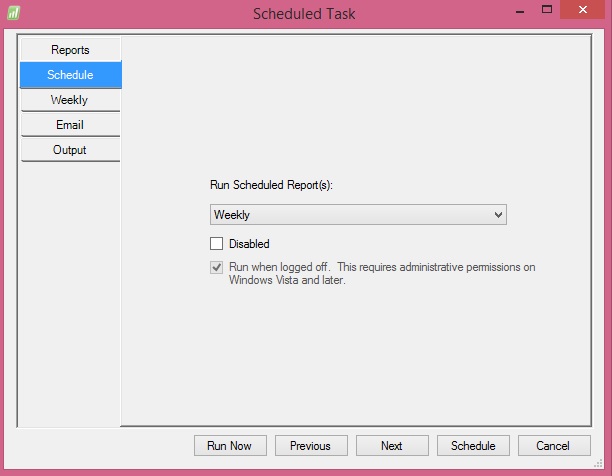
This tab will define the frequency of how often the report will be run as well as if the task is currently disabled and if the report should be run when the user is logged off.

The available options for the frequency are:

  • Once: The report will only be run one time

  • Daily: The report will be run every day (it is possible to set on the next tab the number of days to wait between runs)

  • Weekly: The report will be run every week (it is possible to set on the next tab the days of the week for the report to be run on)

  • Monthly: The report will be run every month (it is possible to set on the next tab the months for the report to run on and the days of the month for the report to be run on)

  • When Idle: The report will run every time that the computer goes into idle mode

  • At Startup: The report will be run each time that the computer is turned on

  • At Logon: The report will be run each time that the user logs on to the computer


Frequency Tab

JetSchedule-5

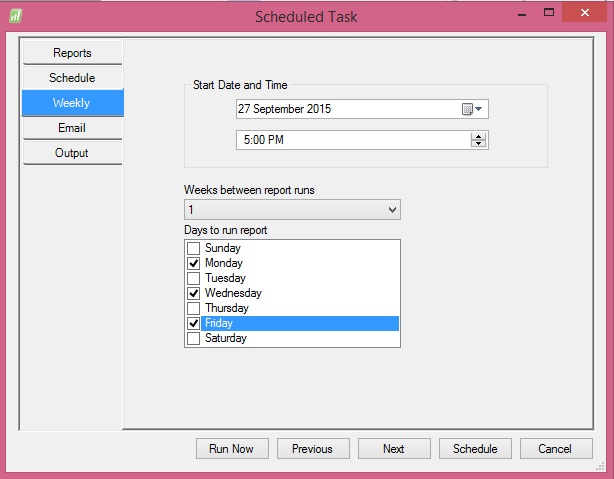
The name of this tab will change depending on the frequency specified on the Schedule tab.

In the screenshot above a Weekly frequency has been specified.

  • Start Date and Time: This represents the first date that the report will run and the time that it will run for this and subsequent schedules

  • Weeks between report runs: This specifies how many weeks the Scheduler will wait between report runs before running the report again

  • Days to run report: This represents the days of the week that the report is scheduled to run on


Email Tab
JetSchedule-6
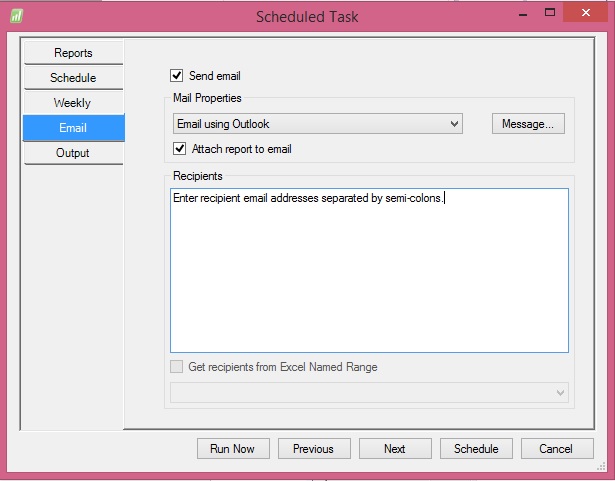
The Email tab allows the user to define who the report will be sent to if emailing is desired.

  • Send email: If this box is checked it will enable the report to be emailed to recipients

  • Mail properties: This dropdown will allow the user to specify whether the report will be emailed using Outlook or a generic SMTP protocol. SMTP must be configured in the Jet Essentials Application Settings in order for it to be used.

  • Message: This allows the user to specify a custom subject or body to be sent as part of the email

  • Attach report to email: If this box is checked the report will be attached to the email. If the box is unchecked the report will not be attached. This can be used as a type of notification when used in conjunction with the subject and body of the email to allow a user to know that the report has been run

  • Recipients: Email addresses will be specified here for all recipients of the report. Email addresses should be separated by a semi-colon.

  • Get recipients from Excel Named Range: It is possible to also define the email addresses in the report itself and then assign an Excel named range to the cell(s). If there are named ranges in the report then they will appear in the dropdown below the checkbox. The Output tab allows the user to define how the file should be saved once it is finished running. This tab also enabled the user to turn on logging to troubleshoot errors with the Scheduler process as well as use Batch File Generation for the reports.


Output Tab
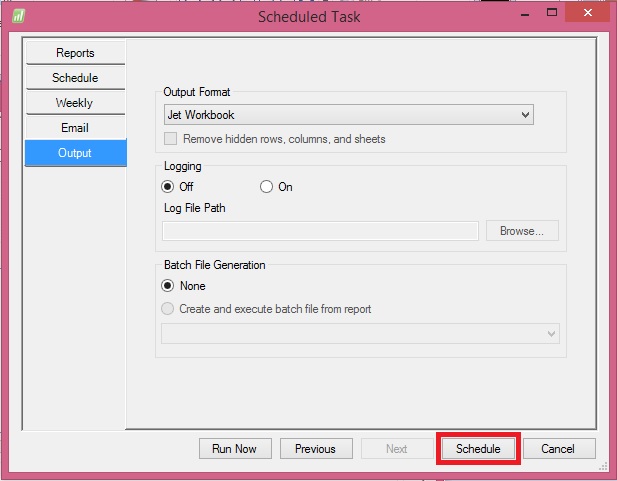
The Output tab allows the user to define how the file should be saved once it is finished running. This tab also enabled the user to turn on logging to troubleshoot errors with the Scheduler process as well as use Batch File Generation for the reports.

JetSchedule-7

  • Output Format: This dropdown list will allow the user to define the format of the finished report. The available options are:

    • Jet Workbook: This will save the report as a normal Excel file with all Jet Reports functions still in the report

    • Values Only Workbook: This will save the report as an Excel file with all Jet Reports functions removed. The recipient would not be able to refresh the report as it will be a static Excel file

    • Web Page: This will save the report as a HTML file with a single sheet. This should be used when there is a single sheet in the report

    • Web Page by Sheet: This will save the report as a HTML file with multiple sheets embedded in it. This should be used when there are multiple sheets in a report

    • PDF: This will save the report as a PDF file (if your version of Excel supports that ability - Excel 2007 and higher)


Remain tuned for more details, I will come up with more details and features in my upcoming posts.

Saturday, 29 August 2015

How to: Test the ADCS Connection

The following procedure demonstrates how to use Windows Services and Telnet to test your Automated Data Capture System connection.

Before you can begin, you must install the ADCS component as part of a customized installation of Microsoft Dynamics NAV. For more information, see my earlier post Installing ADCS

To configure and start the Microsoft Dynamics NAV VT100 Plugin service

From the Windows Start menu, in the Start Search box, enter services.msc, and then press the Enter key. The Services window opens.

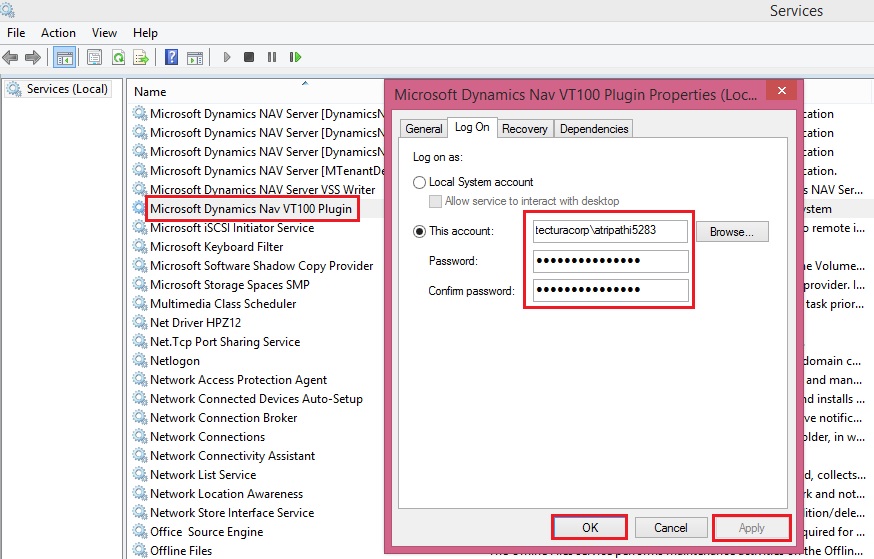
Right-click the Microsoft Dynamics NAV VT100Plugin service, and then choose Properties.

To specify the user account that the service can use to log on, choose the Log On tab.
ADCS-11
To specify an account, choose This account, choose Browse, and then specify a user account in the Select User dialog box. When you are finished, choose the OK button. The format is as follows:

<Domain>\<Windows User ID>

Note: To complete testing, you must also add the same user to Microsoft Dynamics NAV, with an appropriate permission set.

Type the password for the user account in Password and in Confirm password, and then choose the OK button.

On the General tab, choose Start.

To verify that the service is running

Start the Windows Event Viewer. From the Windows Start menu, in the Start Search box, enter eventvwr.msc, and then press the Enter key.

In the Windows Logs console tree, choose Application, and then locate event information for the Microsoft Dynamics NAV VT100 Plugin.
ADCS-12
Testing Your Connection

In the following procedure, you will open a terminal connection and use HyperTerminal to simulate using handheld devices. HyperTerminal is a program that you can use to connect to other computers, Telnet sites, bulletin board systems (BBSs), online services, and host computers. HyperTerminal connections are made using a modem, a null modem cable (used to emulate modem communication), or an Ethernet connection.

Note: HyperTerminal is no longer included with Windows. You can usually find a free downloadable version on the Internet.

To test your ADCS connection

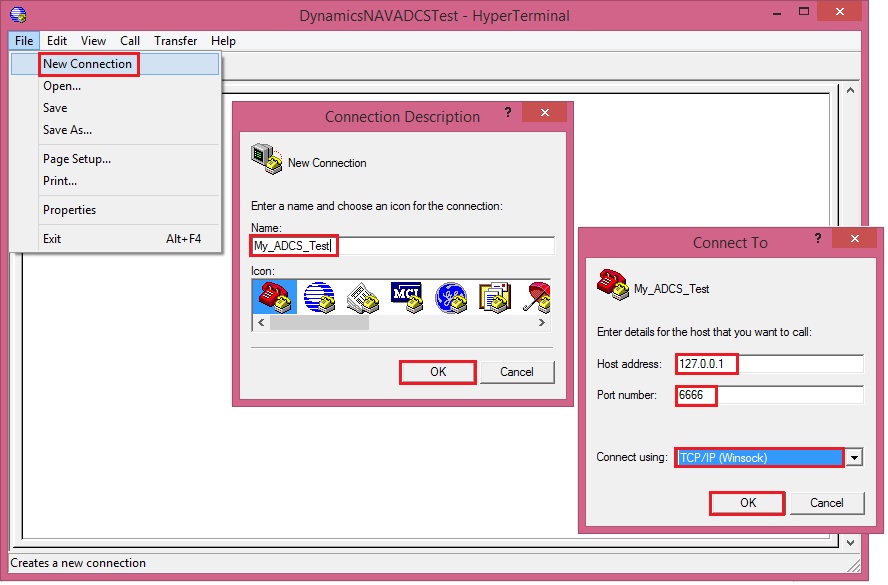
Start your HyperTerminal application.

Enter a name for the connection. Choose the OK button.

In the Connect Using list, select TCP/IP (Winsock).

The following table describes the details of a local installation on one machine.


DetailDescriptionExample
Host AddressIP address of the machine that is running the VT100 Plug-in service.localhost
Port NumberPort number that the VT100 Plug-in is listening on.6666

Choose the OK button. The HyperTerminal window opens.
ADCS-13
Enter a user ID and password. Press Enter after every step.
ADCS-14
Select a warehouse activity option. For example, enter 1 in the Choose field if you want to simulate working with pick documents.
ADCS-15
You can review the data about warehouse picks in Microsoft Dynamics NAV. For example, you can use the data in the CRONUS International Ltd. demonstration database to send information from and to Microsoft Dynamics NAV.

Note: To see the interaction between Microsoft Dynamics NAV and ADCS, in CRONUS International Ltd., you can use warehouse activities that are located in the White warehouse. It is preconfigured to use ADCS.

How to: Configure ADCS Options

Before you can work with Automated Data Capture Systems (ADCS), you have to configure Microsoft Dynamics NAV by modifying the VT100Plugin configuration file.

Important: Modification of the configuration file should only be performed by a system administrator.

To modify and update the ADCS configuration file for the terminal listener

Locate and open the NavisionVT100Plugin.exe.config configuration file. It is typically located in the following location: C:\Program Files (x86)\Microsoft Dynamics NAV\80\Automated Data Capture System.
ADCS-9
For the Terminal element, update the attributes in the configuration file using attributes as described in the following table. You specify the attribute values in quotation marks.


AttributeDescription
listenIPRequired. IP address that specifies where to listen for terminal connections.
listenPortRequired. Positive integer that specifies the port number to listen for terminal connections.
stylesheetRequired. Path to transformation style sheet, which transforms warehouse functions to terminal keycodes. Two style sheets are provided with the ADCS installation.
screenLinesOptional. Positive integer that specifies the number of screen lines. The default is 5.
screenWidthOptional. Positive integer that specifies the screen width. The default is 30.
codePageOptional. Positive integer that specifies the codepage. The default is the system codepage defined in HKey_Local_Machine\SYSTEM\CurrentControlSet\Control\Nls\CodePage\ACP.
terminalTimeoutOptional. Positive integer that specifies the terminal time-out in milliseconds. The default is 65000 and cannot be fewer than 6000.
debugDirectoryOptional. Output directory for debug data.

For the Endpoints element, update the attributes in the configuration file and modify an endpoint to support your processes. You can also add more endpoints. The following table provides some options.


AttributeDescription
defaultTypeOptional. defaultType is an attribute of the Endpoints element. It specifies what type of endpoint to use when no type is specified, if you want to customize it. The default is the NavEndpoint type.
nameRequired. Endpoint name. The name must be unique.
urlRequired. Endpoint URL address.

Note: This attribute does not have to be included if the clientEndpointName attribute is specified.
typeOptional. Fully qualified name of a non-default endpoint.
clientEndpointNameOptional. Windows Communications Foundation client endpoint configuration name. If specified, a WCF configuration with the specified name must exist.

The following example describes the XML for a Terminal element and the Endpoints element. It adds one endpoint for Microsoft Dynamics NAV.

In my case the config file will be as below:
ADCS-10
======================================================================

<?xml version="1.0"?>

<configuration>

<configSections>

<section name="VT100" type="Microsoft.Dynamics.Nav.Adcs.Configuration.VT100ConfigurationSection, Microsoft.Dynamics.Nav.VT100Plugin"/>

</configSections>

<VT100>

<Warehouse>

<Endpoints>

<add name="NavWSEndpoint" url="http://indel-axt5283n1.tecturacorp.net:8047/DynamicsNAV80/WS/CRONUS%20International%20Ltd./Codeunit/ADCS"/>

<!-- Azure deployment example: -->

<!--<add name="NavWSEndpoint" url="https://CloudService:7047/DynamicsNAV/WS/CRONUS%20International%20Ltd/Codeunit/ADCS" UserName="NavUser" Password="NavUserPassword" />-->

</Endpoints>

</Warehouse>

<Terminal listenPort="6666" listenIP="127.0.0.1" stylesheet="VT100_W2k_and_OtherClients.xsl"/>

</VT100>

<startup><supportedRuntime version="v4.0" sku=".NETFramework,Version=v4.5"/></startup></configuration>

=============================================================================

Security

By default, the NavEndpoint uses the security settings that you have specified for web services generally. You can configure additional security by changing the configuration of Microsoft Dynamics NAV Server and matching that configuration in the VT100Plugin configuration service.

How to: Enable Web Services for ADCS

To use Automated Data Capture System, you must enable the ADCS web service.

To enable and publish the ADCS web service

Start the RoleTailored client.

In the Search box, enter Web Services, and then choose the related link.

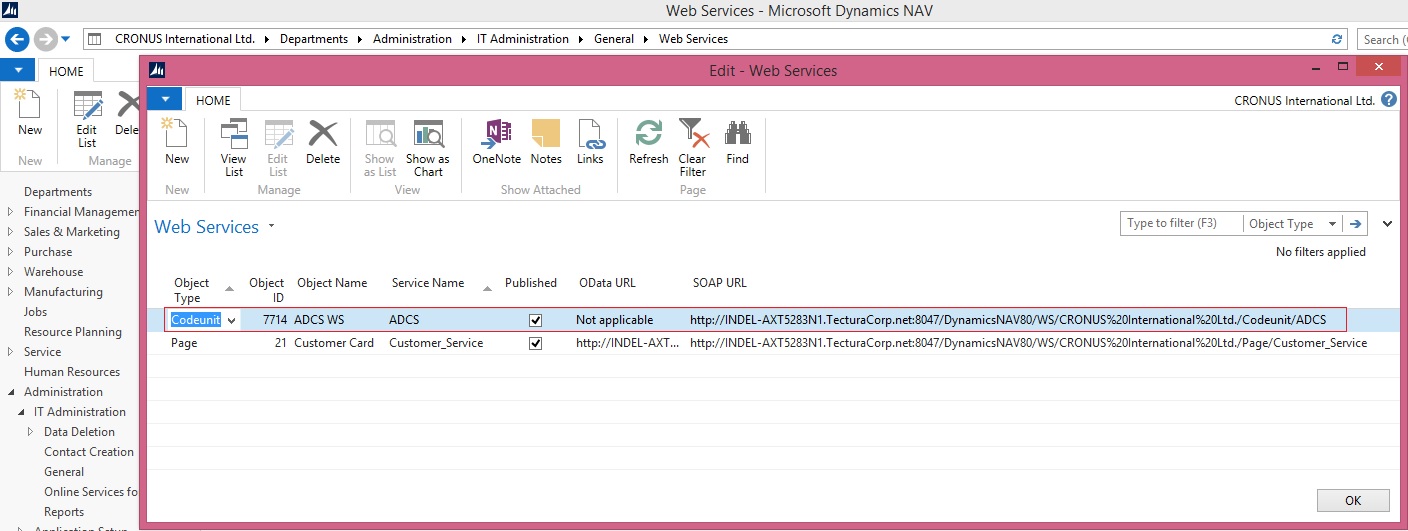
On the Home tab, choose New.

In the Web Services window, enter the following information on a new line:


FieldValue
Object TypeCodeunit
Object ID7714
Service NameADCS

Important: It is required that you name the service ADCS.

Select the Published check box.

Choose the OK button.
ADCS-7
To verify that the web service has been published
In a web browser window, enter a URL in the following format: http://<web services path>/Services. The following example demonstrates the results.

In my case:
http://indel-axt5283n1.tecturacorp.net:8047/DynamicsNAV80/WS/Services

You see the following XML information if the ADCS web service is published.
ADCS-8
To verify that the codeunit is performing as expected, enter a URL in the following format: http://<web services path>/Codeunit/<Service Name>.

http://indel-axt5283n1.tecturacorp.net:8047/DynamicsNAV80/WS/CRONUS%20International%20Ltd./Codeunit/ADCS

Information about the ADCS web service is displayed.

How to: Add Users for ADCS

You can add any user as a user of an Automated Data Capture System (ADCS). When you do this, the user must also provide a password. Optionally, you can also provide a connection that identifies the ADCS user as a warehouse employee. The ADCS user password can be different from the Windows logon password of the user.

To add an ADCS user

In the Search box, enter ADCS Users, and then choose the related link.

On the Home tab, choose New to add a new user.

In the Name field, enter a name for the user. The name cannot contain more than 20 characters, including spaces.

In the Password field, enter a password. The password is masked.
ADCS-5
To indicate that a warehouse employee is an ADCS user

In the Search box, enter Warehouse Employees, and then choose the related link.

If needed, add a new warehouse employee

On the Home tab, in the Manage group, choose Edit List.

Select a warehouse employee from the list. In the ADCS User field, choose the drop-down arrow, and then select the name of an ADCS user from the list.

Note : The default warehouse for the employee should be one that uses ADCS
ADCS-6