Showing posts with label File. Show all posts

Sunday, 29 November 2015

Page Metadata Delta Field / Read BLOB data and Export into a File

User Metadata Table

Stores the personalization of metadata. The content can be viewed by exporting the BLOB. When troubleshooting, you can delete a user’s personalization for a specific page by modifying the data in this table.

Page Metadata Delta Field in User Metadata Table

An XML BLOB that contains the deltas or changes for the personalization. This can be exported and viewed.

In Navision tables we can create BLOB fields to store large amount of data. It is not possible to read the data in the BLOB fields directly.

Below I show an Example how to achieve this, you can adjust the code accordingly for other table fields.

How to get this done, Write below Codeunit:

Define below variables:

UserMetaData-1

Write below function:

UserMetaData-2

You can adjust above code accordingly to read to BLOB fields from other tables and fields.


Friday, 7 August 2015

How to create a root CA and a private key file by using the makecert.exe utility

We will follow below step to create a certificate for Microsoft Dynamics Server. Then we will implement the same for login from WAN to access Navision using Windows and Web Clients.

  • On the computer running Microsoft Dynamics NAV Server, create a temporary folder to use when you work with certificates.

  • Open the command prompt as follows:


    • If you have Visual Studio installed on your computer, choose Start, choose All Programs, choose Microsoft Visual Studio 2012, choose Visual Studio Tools, and then right-click Visual Studio Command Prompt and choose Run as Administrator.

    • If you have the Windows SDK installed on your computer, choose Start, choose All Programs, choose Microsoft Windows SDK, and then right-click Windows SDK Command Prompt (2010) (or CMD Shell) and choose Run as Administrator.


  • At the command prompt, locate the temporary directory.

  • Type the following command.


makecert -n "CN=RootNavServiceCA" -r -sv RootNavServiceCA.pvk RootNavServiceCA.cer

Certificate-4

  • When you are prompted, enter a password.


    • You need this password to create the service certificate.


  • The RootNavServiceCA.cer certificate file and the RootNavServiceCA.pvk private key are saved in your temporary folder.


Certificate-5

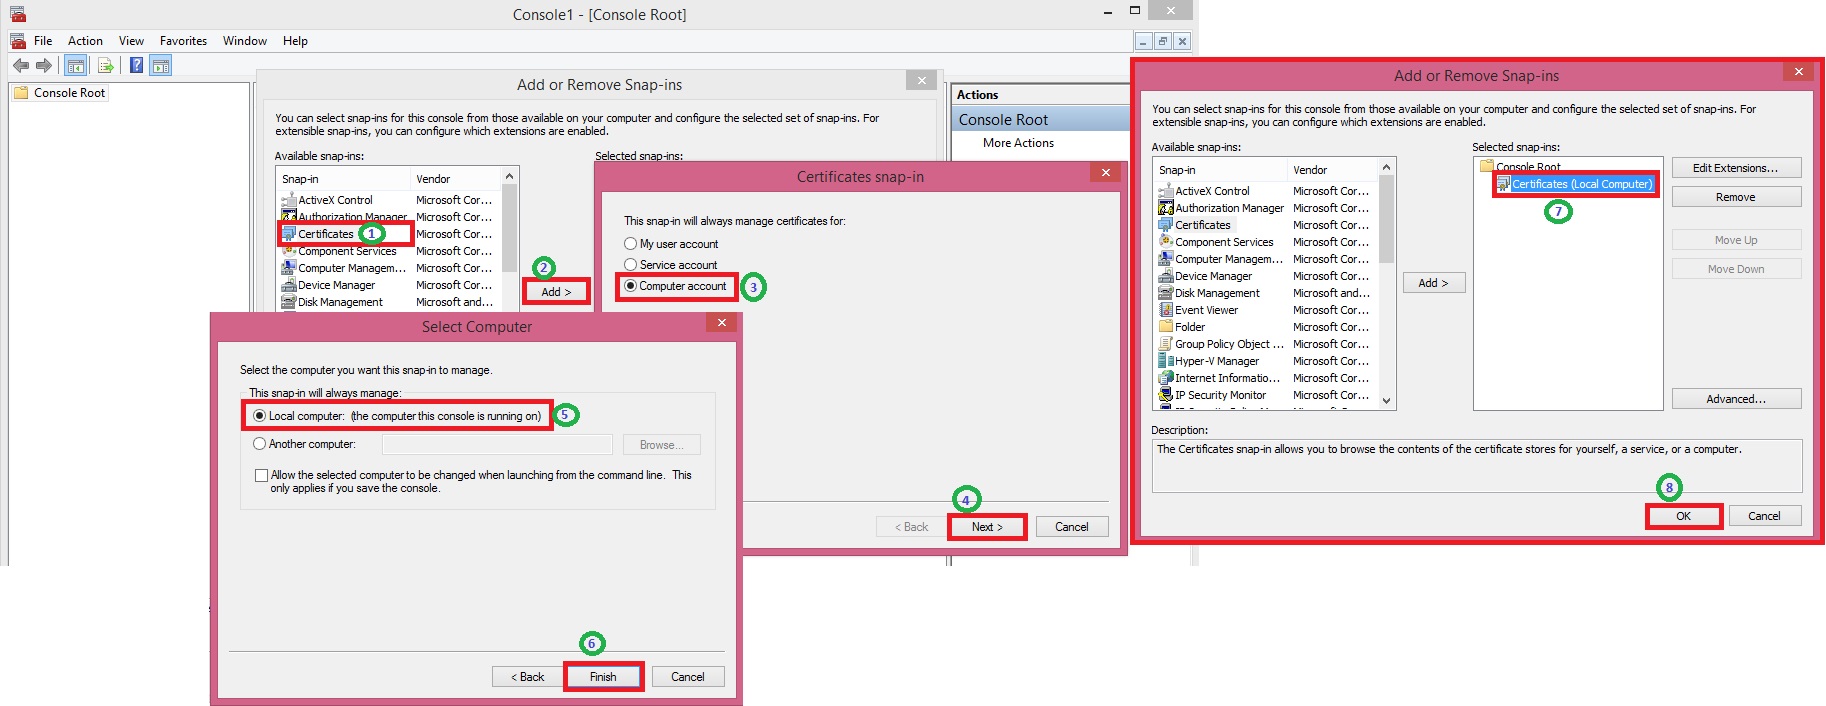
Now we will use the Certificates snap-in to install the root CA on the computer running Microsoft Dynamics NAV Server

  • Start the Certificates snap-in for MMC on the computer running Microsoft Dynamics NAV Server, and then add the Certificates snap-in.

  • In the Certificates snap-in dialog box, choose Computer account, and then choose Next.

  • In the Select Computer pane, choose Local computer: (the computer this console is running on), and then choose Finish.

  • Choose OK to close the Add or Remove Snap-ins dialog box.

  • In the left pane of MMC, expand the Certificates (Local Computer) node.


Certificate-2

Certificate-3

  • Expand the Trusted Root Certification Authorities node, right-click the Certificates subfolder, select All Tasks, and then choose Import.


Certificate-6

  • In the Certificate Import Wizard, on the Welcome page, choose Next.

  • On the File to Import page, choose Browse.

  • Browse to the location of the RootNavServiceCA.cer certificate file, select the file, and then choose Open.

  • On the File to Import page, choose Next.

  • On the Certificate Store page, accept the default selection, and then choose Next.

  • On the Completing the Certificate Import Wizard page, choose Finish.


Certificate-7

The RootNavServiceCA certificate is now visible in the list of trusted root CAs.

Certificate-8

In next step we will now create a certificate revocation list for the root certification authority and then install the certificate revocation list on the computer running Microsoft Dynamics NAV Server.

A certificate revocation list is required because WCF applications check the revocation list when validating certificates.

Next Step Link- How to create a certificate revocation list for the root certification authority

Friday, 31 July 2015

Creating File Attachment to Mail for Report

We generally get requirements from clients to send report output as attachment to the mail.

In Microsoft Dynamics Navision 2015 this feature is available at most of the places, but we can design for other earlier versions too.

Long-time back I was having this requirement from one of my client, those days I scanned lots of website and tried lots of method. This one I found compact and easy to use. Their after whenever I get similar requirements I prefer using this.

Today I wish to share the same with others, as I have used it in my several implementations and found it working perfect and tested with several clients.

Let’s see this, it could help someone getting his work done in easy way and can save lots of time from hit and try with several methods.

First step, I will create a function which will help us generating the file on Service tier and down load to local temporary folder, so that we can easily access and attach to our mail.

Let’s give it a meaningful name like: DownloadToClientFileName

I will define two parameters for this Function as below:


VarNameDataTypeSubtypeLength
NoServerFileNameText250
NoToFileText250

I will define Return Value of Function as: Text of Length 250

I will define Local Variables for Function as below:


NameDataTypeSubtypeLength
ClientFileNameText250
objScriptAutomation'Microsoft Script Control 1.0'.ScriptControl
CRText1

Now we will write Code for the Function as below:
ClientFileName := ToFile;

IF NOT DOWNLOAD(ServerFileName, '', '<TEMP>','', ClientFileName) THEN

EXIT('');

IF CREATE(objScript,TRUE,TRUE) THEN

BEGIN

CR := ' '; CR[1] := 13;

objScript.Language := 'VBScript';

objScript.AddCode(

'function RenameTempFile(fromFile, toFile)'+CR+

'set fso = createobject("Scripting.FileSystemObject")'+CR+

'set x = createobject("Scriptlet.TypeLib")'+CR+

'path = fso.getparentfoldername(fromFile)'+CR+

'toPath = path+"\"+left(x.GUID,38)'+CR+

'fso.CreateFolder toPath'+CR+

'fso.MoveFile fromFile, toPath+"\"+toFile'+CR+

'RenameTempFile = toPath'+CR+

'end function');

ClientFileName := objScript.Eval('RenameTempFile("'+ClientFileName+'","'+ToFile+'")');

ClientFileName := ClientFileName+'\'+ToFile;

END;

EXIT(ClientFileName);

Second Step, I will write code to call this function to attach the file to Mail and send using SMTP as below:
//SMTP is an Variable of Codeunit SMTP Mail

SMTP.CreateMessage(SenderName,SenderAddress,Recipient,Subject,Body,TRUE);

//SenderName,SenderAddress,Recipent is an email addresses

SMTP.AppendBody(Body);

CLEAR(MailReport);

//MailReport is Variable for Report of which output we want to use as attachment.

//Name & ToFile is Text type variable of Length 250

Name := STRSUBSTNO('Estimate No. %1.pdf', SalesHeader.”No.”);

//Creating File Name

ToFile := Name;

FileName := TEMPORARYPATH + ToFile;

//We are using temporarypath OS Variable to get the path for file

MailReport.SetMailFilters(SalesHeader);

MailReport.SAVEASPDF(FileName);

ToFile := DownloadToClientFileName(FileName, ToFile);

SMTP.AddAttachment(ToFile);

FILE.ERASE(FileName);

SMTP.Send;

Now you can create a template function and use where ever require.