Friday, 23 October 2015

Upgrading the Data in Navision 2016

Continuing from my earlier post Upgrading the Application Code in Microsoft Dynamics NAV 2016

At end of previous post we have imported the objects and compiled also resolved any conflicts and compilation error. In the same process we have got the list of objects which were having destructive table schema, means the objects which will be having the changes due to which we could lose some data. Scan the objects and if we wish to save those data then we will be requiring Data Upgrade codeunits to handle any such situation.

How to create you can refer to my earlier post Data Upgrade – in Navision 2015 this it still valid for 2016.

Now we have all the upgraded application objects and Data Upgrade codeunits if any required for the upgrade. So we are good to go with Upgrading Data for Old database.

We will follow below steps to continue, make sure you have followed the process for preparation/ converting of database as discussed in my earlier post Upgrade in Microsoft Dynamics NAV 2016

Import the application objects to the converted database

In the development environment, import all the application objects that you extracted in previous step as in my earlier post discussed above in the Microsoft Dynamics NAV 2016 database. This includes the FOB file that contains all the Microsoft Dynamics NAV 2016 objects from the application code upgrade and upgrade toolkit objects if any.

When you import the FOB file, if you experience metadata conflicts, use the Import Worksheet to handle these conflicts.

Finally, on the dialog box for selecting the schema synchronization, set the Synchronize Schema option to Later.
Upgrade2016-29

If the upgrade toolkit objects are stored in a separate FOB file, then import the upgrade toolkit FOB file after the application objects are imported.


Run the schema synchronization to synchronize the new tables

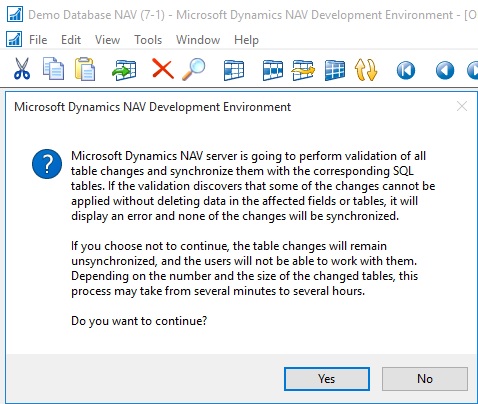
To publish the data schema changes of the newly imported tables to the SQL tables, run the Sync. Schema For All Tables – With Validation option from the development environment.
Upgrade2016-30

If you are confident that any loss of data you are ok with same you can choose Force option which will drop the data for deleted fields, else use Upgrade Codeunit prepared for same as discussed above.

Or alternatively run the Sync-NavTenant cmdlet from the Microsoft Dynamics NAV 2016 Administration Shell.
Sync-NAVTenant –ServerInstance UpgradedDBfrom2013R2 (My Server Instance Name)

Upgrade2016-31

Note this command runs in Administration Shell not in Development Shell as we used in our previous post.

Run the data upgrade process

A data upgrade runs the upgrade toolkit objects, such as upgrade codeunits and upgrade tables, to migrate business data from the old table structure to the new table structure. You can start the data upgrade from the Microsoft Dynamics NAV Development Environment.
Upgrade2016-32

Upgrade2016-33

Upgrade2016-34

Upgrade2016-35

Ooops………….

Or Alternatively Microsoft Dynamics NAV 2016 Administration Shell.

In the last phase of data upgrade, all companies will be initialized by running codeunit 2 Company Initialization. This is done automatically.

If you want to skip company initialization, then use the Start- NavDataUpgrade cmdlet and set the SkipCompanyIntitialization parameter.

Syntax:
Start-NAVDataUpgrade [-ServerInstance] <String> [[-Tenant] <TenantId> ] [[-FunctionExecutionMode] <FunctionExecutionModeValue> ] [[-ContinueOnError]] [-Force] [-Confirm] [-WhatIf] [ <CommonParameters>]

Parameters
-ContinueOnError

Specifies whether the Microsoft Dynamics NAV Server instance continues to execute other upgrade functions when an error occurs while executing an upgrade function.

If you do not set this parameter, then when an error occurs, the Microsoft Dynamics NAV Server instance will suspend the data upgrade process. It will cancel the execution of upgrade functions currently in progress and roll back any changes that were applied. Completed functions will not be rolled back.

The process remains in suspended state until you take one of the following actions:

- Fix the problems in the upgrade functions that failed, and then resume the process by using the Resume-NAVDataUpgrade cmdlet. You should not add new upgrade functions at this time because they will be ignored when you resume the process.

- Stop the data upgrade process by using the Stop-NAVDataUpgrade cmdlet. Stopping the process will not roll back changes made by upgrade functions that have already been executed.

If you set this parameter, then when an error occurs, the Microsoft Dynamics NAV Server instance will continue executing other upgrade functions. At the end of the process, you can use the Get-NAVDataUpgrade cmdlet to see the list of failed upgrade functions. Changes that were applied by completed functions will not be rolled back.

When upgrading a large database, you should increase the SQL Command Timeout setting for the Microsoft Dynamics NAV Server instance that connects to the database to avoid timeouts during schema synchronization. The default setting is 30 minutes

-ServerInstance<String>

Specifies the Microsoft Dynamics NAV Server instance that the application database and the tenant database are mounted against, such as DynamicsNAV90.

You must include the name within single quotation marks.

-Tenant<TenantId>

Specifies the ID of the tenant that you want to synchronize with the application, such as Tenant1.

This parameter is required unless the specified service instance is not configured to run multiple tenants.

-Force

Forces the command to run without asking for user confirmation.
-FunctionExecutionMode<FunctionExecutionModeValue>
Specifies whether the Microsoft Dynamics NAV Server instance executes upgrade functions in series or parallel.
-Confirm
Prompts you for confirmation before running the cmdlet.

-WhatIf

Shows what would happen if the cmdlet runs. The cmdlet is not run.

Few Examples of Usage:

[1] PS C:\> Start-NAVDataUpgrade -ServerInstance DynamicsNAV90 –Force

[2] PS C:\> Start-NAVDataUpgrade -ServerInstance DynamicsNAV90 -ContinueOnError –Force

[3] PS C:\> Start-NAVDataUpgrade -ServerInstance DynamicsNAV90 -FunctionExecutionMode Serial –Force
Upgrade2016-36
Start-NAVDataUpgrade -ServerInstance UpgradedDBfrom2013R2 –Force

Ooops………….

Now what to do?

To learn how to Create Data Upgrade Codeunits you can see my earlier posts:

Data Upgrade Codeunit in Navision 2015 – Part -1

Data Upgrade Codeunit in Navision 2015 – Part -2

These posts are still valid for 2016, you can follow to get you task done at this step resolution to above error.

To resolve above issue I have followed the instruction as suggested in error message, but in real scenario you will definitely will be having such codeunits. Since I have taken the 2013-R2 Std. Database I am having this issue. I have created on Upgrade codeunit with an empty upgrade function as below:
Upgrade2016-37

Let us run the above process again.
Upgrade2016-38

This time I was able to complete the process successfully.

Delete the upgrade objects

At this point, you have upgraded the database to Microsoft Dynamics NAV 2016. Now, you can delete the upgrade codeunits and upgrade table objects that you imported in above step.

When you delete tables, on the Delete dialog box, set the Synchronize Schema option to Force.

Import upgraded permission sets and permissions by using the Roles and Permissions XMLports

You import the permission sets and permissions XML files according to the following procedure.

To import the permission sets and permissions

  • Delete all permission sets in the database except the SUPER permission set.


In Object Designer, run page 9802 Permission Sets, and then delete the permission sets.

  • Run XMLport 9171 Import/Export Permission Sets to import the permission sets XML file,


In the request page for the XMLport, in the Direction field, choose Import, choose the OK button, and then specify the permission sets XML file.

  • Run XMLport 9172 Import/Export Permissions to import the permission XML file.


In the request page for the XMLport, in the Direction field, choose Import, choose the OK button, and then specify the permissions XML file.

Set the language of the customer database

In the development environment, choose Tools, choose Language, and then select the language of the original customer database.

Add new control add-ins

The database is now fully upgraded and is ready for use. However, you may want to add the new client control add-ins that are included in Microsoft Dynamics NAV 2016. These are not added by the upgrade process. The following client control add-ins are available from the Microsoft Dynamics NAV product media:

  • Microsoft.Dynamics.Nav.Client.BusinessChart

  • Microsoft.Dynamics.Nav.Client.PageReady

  • Microsoft.Dynamics.Nav.Client.PingPong

  • Microsoft.Dynamics.Nav.Client.VideoPlayer

  • Microsoft.Dynamics.Nav.Client.SocialListening


You can add control add-ins in the Control Add-ins window in the Microsoft Dynamics NAV Windows client.

I will come up with more details on this topic in my upcoming posts.

Thursday, 22 October 2015

Announcing the Microsoft Dynamics NAV Universal App (Dynamics NAV v2.0)

Maybe you’re already familiar with Dynamics NAV on your tablet. Well, things just got even more flexible. You can now experience the power and simplicity of the Microsoft Dynamics NAV Universal App on your preferred iOS, Android or Windows device – be it phone, phablet, tablet, laptop, or desktop – it’s all up to you. Switch to your favorite device on the go, during meetings, in the office, at home on the couch using the same app, accessing your Dynamics NAV business data from everywhere.

For more details see below link :-

https://blogs.msdn.microsoft.com/nav/2015/10/22/announcing-the-microsoft-dynamics-nav-universal-app-dynamics-nav-v2-0/

Wednesday, 21 October 2015

PowerPivot in Excel 2013

I started the series in End of September and Starting of October on PowerPivot, Power View, PivotTable & Reports but in-between the release of Navision 2016 all the topics got scattered between other posts and I didn’t ended the topic.

Here I present all the posts link at one place which you can use as table of content for easy access and to help if any one wish to start from beginning and learn all the features & Topic on same.

PowerPivot for Excel

Start the Power Pivot in Microsoft Excel add-in

Troubleshooting: Power Pivot Ribbon Disappears

PowerPivot Creating a Data Model in Excel 2013

Adding more tables to the Data Model using Existing Connection – In PowerPivot

Add relationships to Data Model in PowerPivot

How to add Filter for data retrieval in PowerPivot Data model.

Create a calculated column in PowerPivot

Creating My First Report using PowerPivot

Basics of Power Pivot for Excel – 2013

Add Slicers to PivotTables in PowerPivot

Power View in Excel 2013

Import data using copy and paste from Excel sheet or other source for PowerPivot Data Model.

Add Excel Sheet/Table to the PowerPivot Data Model

Add a relationship using Diagram View in Power Pivot

Extend the Data Model using calculated columns

Create a hierarchy in PowerPivot Data Model

Use hierarchies in PivotTables

Create a Power View report

Create a calculated field in PowerPivot

Set field defaults in PowerPivot

Set Table Behaviour in PowerPivot

Set Data Categories for fields in PowerPivot

I will come up with more details once I get some time to explore and find anything which I feel is good to share with the community.

Till then keep Learning, Exploring and Practicing.

Upgrading the Application Code in Microsoft Dynamics NAV 2016

Continuing from my earlier post Upgrade in Microsoft Dynamics NAV 2016

No doubt typically, customers want all the customizations that have been implemented in their existing Microsoft Dynamics NAV databases to be migrated to their new Microsoft Dynamics NAV 2016 databases.

Depending on the version of Microsoft Dynamics NAV that a database is being upgraded from, the amount of code changes between the two versions is large or small.

To upgrade the application code, you must merge code from different versions of the application. This merge process is known as a code upgrade or application upgrade.

You must upgrade the application before you upgrade the data.

Application Upgrade Overview

You must analyze and process code changes by comparing and evaluating three separate versions of the Microsoft Dynamics NAV database:


Version Description
Original versionThis is the baseline version of the solution that you want to upgrade, such as the original release of Microsoft Dynamics NAV 2013.
Modified versionThis is the version that you want to upgrade, such as a customer's database with customizations and add-on solutions.
Target versionThis is the target of the merge process that you want to upgrade your application to, such as the standard version of the Microsoft Dynamics NAV 2016 database.

When you merge the application objects from these three versions, you can import the result into a new Microsoft Dynamics NAV 2016 database that then contains the upgraded application.

At the end of the process, you export the merged Microsoft Dynamics NAV 2016 objects from this database to a .fob file that you will use during the data upgrade.

The following list describes the main steps of upgrading the application code:

  • Prepare the application object text files.

  • Merge versions.

  • Resolve conflicts

  • Import and compile the merged application objects.

  • Export all objects.


To begin, create five folders on the computer and name them as follows:

In my example, the UpgradeDemo folder on the C drive contains five folders: ORIGINAL, MODIFIED, TARGET, DELTA, and RESULT. The DELTA and RESULT folders are empty. The ORIGINAL, MODIFIED, and TARGET folders contains one or more text files that contain application objects.

Preparing the Text Files

The Microsoft Dynamics NAV cmdlets take text files as input. You must prepare three sets of text files that contain application objects as describes in the list above. You can export application objects to text files from the development environment, or by running the ExportObjects command. The following list describes the main steps of preparing the text files that you must provide as input for the application merge process.
Upgrade2016-15

  • First, export all application objects from the original version, such as the original Microsoft Dynamics NAV 2013 R2 database. Do not export system tables. Name the file OldBaseVersion.txt, and then save the file in the ORIGINAL folder that you created earlier. For example, the Microsoft.Dynamics.Nav.Model.Tools.psd1 module includes a function, Export-NAVApplicationObject, that runs the ExportObjects command. This means that you can run a command such as the following:


Export-NAVApplicationObject –DatabaseServer MyServer –DatabaseName "Demo Database NAV (7-1)" –Path C:\Upgrade\ORIGINAL\OldBaseVersion.txt


  • Next, export all relevant application objects from the modified version, such as the customized Microsoft Dynamics NAV 2013 database. Do not export system tables. Name the file OldCustomVersion.txt, and then save the file in the MODIFIED folder that you created earlier.

  • Finally, export all application objects from the new base version, such as the original Microsoft Dynamics NAV 2016 database. Do not export system tables. Name the file NewBaseVersion.txt, and then save the file in the TARGET folder that you created earlier.


Optionally, you can use the Split-NAVApplicationObjectFile cmdlet to split each text file into separate text files for each application object. This can make it easier to keep track of the process. The end result at this stage is three folders with one or more text files that contain the three sets of application objects that you want to merge.

To compare two sets of application objects

  • Open the Microsoft Dynamics NAV 2016 Development Shell in administrator mode.

  • Navigate to the location of your folders by typing a command such as the following:


cd c:\UserData\UpgradeDemo  (in my case)


  • To run the cmdlet to compare all application objects in the ORIGINAL folder to the application objects in the MODIFIED folder, type the following command:


Compare-NAVApplicationObject -OriginalPath 'C:\UserData\Upgrade Demo\Original' -ModifiedPath 'C:\UserData\Upgrade Demo\Modified' -DeltaPath 'C:\UserData\Upgrade Demo\Delta'

Upgrade2016-16

Upgrade2016-17
This generates a number of DELTA files that describe the difference between ORIGINAL and MODIFIED. You can open the DELTA files in text editors such as Notepad. The following example illustrates how a DELTA file identifies the difference between ORIGINAL and MODIFIED.
Upgrade2016-18
Let us understand how the changes are reported when we compare the objects.
Upgrade2016-19

Upgrade2016-20

You can apply those differences to TARGET by using the Update-NAVApplicationObject cmdlet.

To apply DELTA files to application objects

  • Open the Microsoft Dynamics NAV 2016 Development Shell in administrator mode.

  • Navigate to the location of your folders by typing a command such as the following:


cd c:\UserData\UpgradeDemo  (in my case)

In this example, the folder structure is the same as described above procedure. You can now run the cmdlet.

  • To run the cmdlet to apply the differences that are stored in the DELTA folder to the application objects in the TARGET folder, type the following command:


Update-NAVApplicationObject –DeltaPath 'C:\UserData\Upgrade Demo\Delta' -TargetPath 'C:\UserData\Upgrade Demo\Target' -ResultPath 'C:\UserData\Upgrade Demo\Result'

Upgrade2016-21

Upgrade2016-22

This merges the difference between ORIGINAL and MODIFIED with the target solution and puts the resulting solution in the RESULT folder.

You can now import the merged objects into a Microsoft Dynamics NAV database.

Merging Versions

Alternatively to above process you can merge the three sets of application objects to create the application for the new database.

You can use the Merge-NAVApplicationObject cmdlet to merge the three sets of application objects.

The following example illustrates the type of command that you can run.
Merge-NAVApplicationObject -OriginalPath 'C:\UserData\Upgrade Demo\Original' -TargetPath 'C:\UserData\Upgrade Demo\Target' -ModifiedPath 'C:\UserData\Upgrade Demo\Modified' -ResultPath 'C:\UserData\Upgrade Demo\Result'

Upgrade2016-23

Upgrade2016-24

Depending on the number of objects that you are merging and the number of differences found, this can take a few seconds, a few minutes, or longer.

The RESULT folder will contain a text file for each application object. The result of the merge is shown when the cmdlet completes, including a description of any application objects with conflicting code.
Upgrade2016-25

These conflicts are stored in .CONFLICT files in the RESULT folder. You can import all objects in the RESULT folder into the new Microsoft Dynamics NAV 2016 database, or you can analyze the conflicts before you import the objects.

Handling Conflicts

Depending on the application that you are upgrading, you can choose to analyze the conflicting code before you import the merged objects into the development environment.

The conflicts are shown in the merged text files but are also identified in .CONFLICT files in the RESULT folder. Subfolders then contain copies of the source files from the versions that have conflicting code.
Upgrade2016-26

You can analyze the conflicts in any tool, make the relevant changes, and then run the merge operation again. Alternatively, you can import the merged files into the development environment, and resolve the conflicts there.

Importing and Compiling Merged Objects

After you have completed the merge, import the new custom version into the new Microsoft Dynamics NAV 2016 database, and then compile all objects. You must resolve any compilation errors before you can continue.

The text files with the merged application objects include successfully merged code, and code that is partially merged. You can import the partially merged objects into the Microsoft Dynamics NAV 2016 development environment and resolve the conflicts there.

You can use Import-NAVApplicationObject, that runs the ImportObjects command.

This means that you can run a command such as the following:
Join-NAVApplicationObjectFile -Source 'C:\UserData\Upgrade Demo\Result\*.txt' -Destination 'C:\UserData\Upgrade Demo\FinalMergedObjects\all-merged.txt'

Upgrade2016-27

First we will join the many text files into a single file using above command and as a result we get all-merged.txt file which we will import in database using below command.
Import-NAVApplicationObject –DatabaseServer MyServer –DatabaseName "My Upgraded App" –Path C:\Upgrade\all-merged.txt

Now we import objects obtained from previous step into an existing, empty database.
Upgrade2016-28
When you compile the objects, an error is thrown for each code conflict, and you can use the tools that are available in the development environment to resolve the conflicts.

You now have a new database with a fully upgraded application.

Exporting All Objects

Now, you must export all objects to an objects.fob file so that you can import them when performing the data upgrade. The export must include customized objects, upgraded reports, and all other Microsoft Dynamics NAV 2016 objects.
This completes the upgrade of the application code. Next, you must upgrade the data in the database.

However you are free to do object merge and upgrade as you do earlier, here I concentrated using Dynamics Navision 2016 Development Shell. As this is the new way also much faster than what we used to do earlier.

We can use this in identifying the Objects under different categories like Modified, having conflicts and New Objects which can help in estimating also and planning the action in advance.

I will come up with further step and more details in my upcoming posts.

Tuesday, 20 October 2015

Upgrade in Microsoft Dynamics NAV 2016

Upgrade Considerations Preparing for Upgrade in Microsoft Dynamics NAV 2016

If your solution includes variables where the name is now used by a standard C/AL function or statement such as REGISTERTABLECONNECTION or FOREACH, you must change the variables before you upgrade to Microsoft Dynamics NAV 2016. Alternatively, you can enclose the variable names in quotation marks.

If you are upgrading a solution that depends on functionality that is deprecated or changed in the default version of Microsoft Dynamics NAV 2016, you must verify that the upgrade codeunits migrate data correctly. From 2013-R2 not yet reported any under this category.

When you introduce changes to the database schema in Microsoft Dynamics NAV 2016, Microsoft Dynamics NAV will check if these changes are destructive or not. If the database check indicates that the change may lead to data deletion, such as if you are dropping a table column so that the contents of that column will be deleted, this is considered a destructive change. You will be prompted to handle the situation using upgrade codeunits. You can check out my earlier post on this topic here. Data Upgrade – in Navision 2015 it still valid for 2016, I will come up with any specific differences in my upcoming post later.

If a company name includes a special character, an error may display during the upgrade. In this context, special characters include the: [ ~ @ # $ % & * ( ) . ! % - + / = ? ]. If you are going to upgrade a database where one or more company name includes a special character, it is recommend that you rename the company before you start the upgrade process. After the upgrade is successfully finished, you can rename the company again.

Versions later than Microsoft Dynamics NAV 2013 R2 require that all columns in all system tables are in English. As a result, if you try to open a database with non-English system tables in Microsoft Dynamics NAV 2013 R2 or later, an error displays, saying that one or more columns do not exist. Make sure that all objects where compiled in a development environment with the right .ETX and .STX files. You can verify that you are running in the correct environment with English (US) as the base language by opening the ndo$dbproperty table in SQL Server Management Studio. In the Identifiers column, the word Object must be written exactly as shown here.

Converting a Database in Microsoft Dynamics NAV 2016

Before you start, make sure that you have applied the changes that are described in KB 2804640

Code corrections for some Microsoft Dynamics NAV 2013 reports to prevent compilation errors with Report Viewer 2012 when upgrading to later versions of Microsoft Dynamics NAV. Your will require to use partner login to access the hotfix. Click here for the Link.

You can choose to convert the old database and not upgrade your application. However, it is recommend that you upgrade the application objects as well so that your solution includes important application fixes and new functionality that is introduced in Microsoft Dynamics NAV 2016.

Upgrading the application will also reduce the amount of merging required to upgrade to the next major version of Microsoft Dynamics NAV, bringing you to the latest version of the product faster.

Preparing the Old Database for Conversion

  • Make a copy of the old database or create full database backup.


I have copied the database (Navision 2013/R2) and attached to the SQL for this operation:
Upgrade2016-1

  • Clear all Microsoft Dynamics NAV Server instance records from the dbo.Server Instance table in the database on SQL Server.


Upgrade2016-2

You can do this by using SQL Server Management Studio to open and clear the table.

  • Open the development environment that matches the Microsoft Dynamics NAV version of the old database, and then connect to the old database.

  • In Object Designer, make sure that no objects are locked.


If any objects are locked, the conversion process will not update the database version number. As a result, the conversion will not complete.

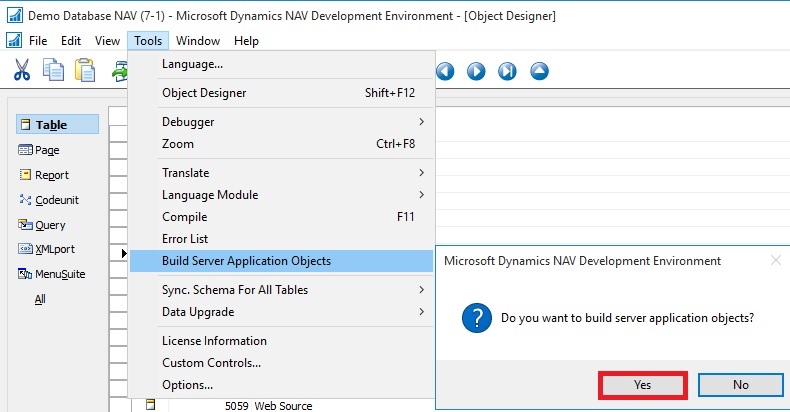
  • On the Tools menu, choose Build Server Application Objects, and then choose the Yes button.


  • If any errors occur, they are shown in the Error List window. Make sure that you address all compilation errors before you continue.

  • Upload the Microsoft Dynamics NAV 2016 Partner license to the database


The license that you upload must be a developer license. During the conversion, the development environment will convert the report objects that are stored in the old database to the RDL 2012 format.

  • If you are converting a Microsoft Dynamics NAV 2013 R2 or Microsoft Dynamics NAV 2015 database, then run the Sync-NavTenant cmdlet from the Microsoft Dynamics NAV 2013 R2 or Microsoft Dynamics NAV 2015 Administration Shell to synchronize the database schema changes.


Converting the Old Database

Next, we will convert the old database so that it can be used in Microsoft Dynamics NAV 2016.

Before you start the following procedure, you can choose to uninstall Microsoft Dynamics NAV 2013, Microsoft Dynamics NAV 2013 R2, or Microsoft Dynamics NAV 2015. When you uninstall Microsoft Dynamics NAV 2013, Microsoft Dynamics NAV 2013 R2, or Microsoft Dynamics NAV 2015, the database is still attached to the instance of SQL Server, which you can verify using SQL Server Management Studio.

To convert the database

  • Install Microsoft Dynamics NAV 2016.

  • Open the Microsoft Dynamics NAV 2016 development environment, and then connect to the database that you prepared in the previous task.

  • In the dialog box that appears, read the instructions carefully because this action cannot be reversed. When you are ready, choose the OK button, and then choose the OK button to confirm that you want to convert the database.


Upgrade2016-3

Microsoft Dynamics NAV will now convert the database. This includes an upgrade of system tables, and an upgrade of all reports to support Report Viewer 2012.

  • When you are notified that the conversion was successful, choose the OK button.


Upgrade2016-4

Upgrade2016-5

  • Connect a Microsoft Dynamics NAV 2016 Server instance to the converted database.


You use the Microsoft Dynamics NAV Server Administration tool to connect a Microsoft Dynamics NAV Server instance to the converted database.
Upgrade2016-6

In addition, you must add the service account that is used by the Microsoft Dynamics NAV Server instance as a member of the db_owner role in the Microsoft Dynamics NAV database on SQL Server.

It is also possible to script these steps in SQL Server Management Studio:
USE [master]

GO

CREATE LOGIN [domain\accountname] FROM WINDOWS

CREATE USER [domain\accountname] FOR LOGIN [domain\accountname]

GRANT SELECT ON [master].[dbo].[$ndo$srvproperty] TO [domain\accountname]

GO

USE [Microsoft Dynamics NAV Database]

GO

CREATE USER [domain\accountname] FOR LOGIN [domain\accountname]

ALTER ROLE [db_owner] ADD MEMBER [domain\accountname]

GRANT VIEW DATABASE STATE TO [domain\accountname]

You can check more details from my earlier post Provisioning the Microsoft Dynamics NAV Server Account.

  • Run the development environment as an administrator, and then set the development environment to use the Microsoft Dynamics NAV Server instance that connects to the database.


Upgrade2016-7

  • Run the schema synchronization to complete the database conversion.


You can run the schema synchronization from the Microsoft Dynamics NAV Development Environment or Microsoft Dynamics NAV 2016 Administration Shell.
Upgrade2016-8

From the development environment:

Open development environment as an administrator. On the Tools menu, choose Sync. Schema For All Tables, and then choose With Validation and follow the schema synchronization instructions.
Upgrade2016-9

Upgrade2016-10

From the Microsoft Dynamics NAV 2016 Administration Shell:

Open the Microsoft Dynamics NAV 2016 Administration Shell as an administrator, and then run Sync-NavTenant cmdlet as follows:
Sync-NavTenant –ServerInstance <ServerInstanceName>

Replace <ServerInstanceName> with the name of the Microsoft Dynamics NAV Server instance that is connected to the database

  • If the database references any assemblies (such as client control add-ins) that are not included on the Microsoft Dynamics NAV 2016 installation media (DVD), then add the assemblies to the Add-ins folder on Microsoft Dynamics NAV Server or Microsoft Dynamics NAV Windows client computers.


For the Microsoft Dynamics NAV Windows client, the default path is C:\Program Files (x86)\Microsoft Dynamics NAV\90\RoleTailored Client\Add-ins folder.

For Microsoft Dynamics NAV Server, the default path is the C:\Program Files\Microsoft Dynamics NAV\90\Service\Add-ins folder

In the development environment, on the Tools menu, choose Build Server Application Objects, and then, in the dialog box, choose the Yes button.
Upgrade2016-14

  • Fix compilation errors.


You can find all objects which did not compile in the Object Designer window, by setting a field filter on the Compiled field.

  • Upload the customer license to the converted database.


You have now completed the conversion of the Microsoft Dynamics NAV 2013, Microsoft Dynamics NAV 2013 R2, or Microsoft Dynamics NAV 2015 database to be accessed from Microsoft Dynamics NAV 2016. To test the converted database, you can connect it to the Microsoft Dynamics NAV 2016 Server instance that by Microsoft Dynamics NAV clients, and then open a client.

You may encounter some login issues to resolve it here are the few tips:

Delete the user login details as we do in earlier versions when RTC was introduced to access any database using SQL Query as below :
USE [Demo Database NAV (7-1)]  (use your database name)
GO

delete from [dbo].[User]

delete from [dbo].[Access Control]

delete from [dbo].[User Property]

delete from [dbo].[Page Data Personalization]

delete from [dbo].[User Default Style Sheet]

delete from [dbo].[User Metadata]

delete from [dbo].[User Personalization]

After this if you get error stating you don't have permission to codeunit ApplicationManagement give permission in SQL to the Login running the service as below:

Upgrade2016-12

Upgrade2016-13

Next, upgrade the application code to Microsoft Dynamics NAV 2016.

I will come up with more details in my upcoming posts.