Showing posts with label Creating. Show all posts

Monday, 9 May 2016

Creating Virtual Machine on Azure

Continuing from my previous post.

In previous post we saw how to register for Free Azure Portal Account, if you missed you can find the link here.

Today we will see how to create Virtual Machine for Dynamics Navision 2016 pre Loaded.

Lets start creating one for our future posts practice.

Open the page : https://azure.microsoft.com/en-us/free/ and follow onscreen Instruction to login to your account.

Login using the account credentials you used for registering on Azure Portal.

Azure-5

Upon signing you will be landed to your dashboard on Portal.

You can see we don't have any resource on Portal yet.

Azure-6

Lets start creating one.

Click on New from Top right corner.

Choose Virtual Machine.

Enter "Microsoft Dynamics NAV 2016" in the search box, it will list available Virtual Machine images.

Select the one available Virtual Machine for commissioning.

I have choose this because we will get preinstalled NAV 2016 which will save our time.

Azure-7

Select Deployment Model, I have choose Classic and click on Create.

Azure-8

Next we will enter  Host Name, User Name, Password, other things you adjust as per your need. Click on Create.

Note your User Name & Password you will require this to login to the Server.

Azure-9

Give some time to get created and up your Server.

In the mean time you can explore other things till your Server is up and running for you.

Once it is made available, you can start login and explore your newly created Server.

Where to find my Server?

From the Navigation Bar choose Virtual Machine (classic).

It will list you all Virtual Machines created by you.

Select your Virtual Machine in my case it is NavDemo.

You can find the Server Name and IP of your Virtual Machine.

Azure-10

I am using my IP to login to my Server.

Open your Remote Desktop Connection and enter your IP.

The User Name & Password as we created in previous step.

Azure-11

Here I am Login to my Server.

Azure-12

You can see that Dynamics NAV 2016 is already available with my Server.

Azure-13

That's all for today, we will see more in my upcoming posts.

Till then keep exploring & Learning.


Wednesday, 30 September 2015

Creating My First Report using PowerPivot

In my earlier posts we have created the Data model for Analysis.

If you missed them you can follow below links to refresh all information.

PowerPivot for Excel

PowerPivot Creating a Data Model in Excel 2013

Adding more tables to the Data Model using Existing Connection – In PowerPivot

Add relationships to Data Model in PowerPivot

How to add Filter for data retrieval in PowerPivot Data model.

Create a calculated column in PowerPivot

We have learned basic actions, let’s create our first Report.

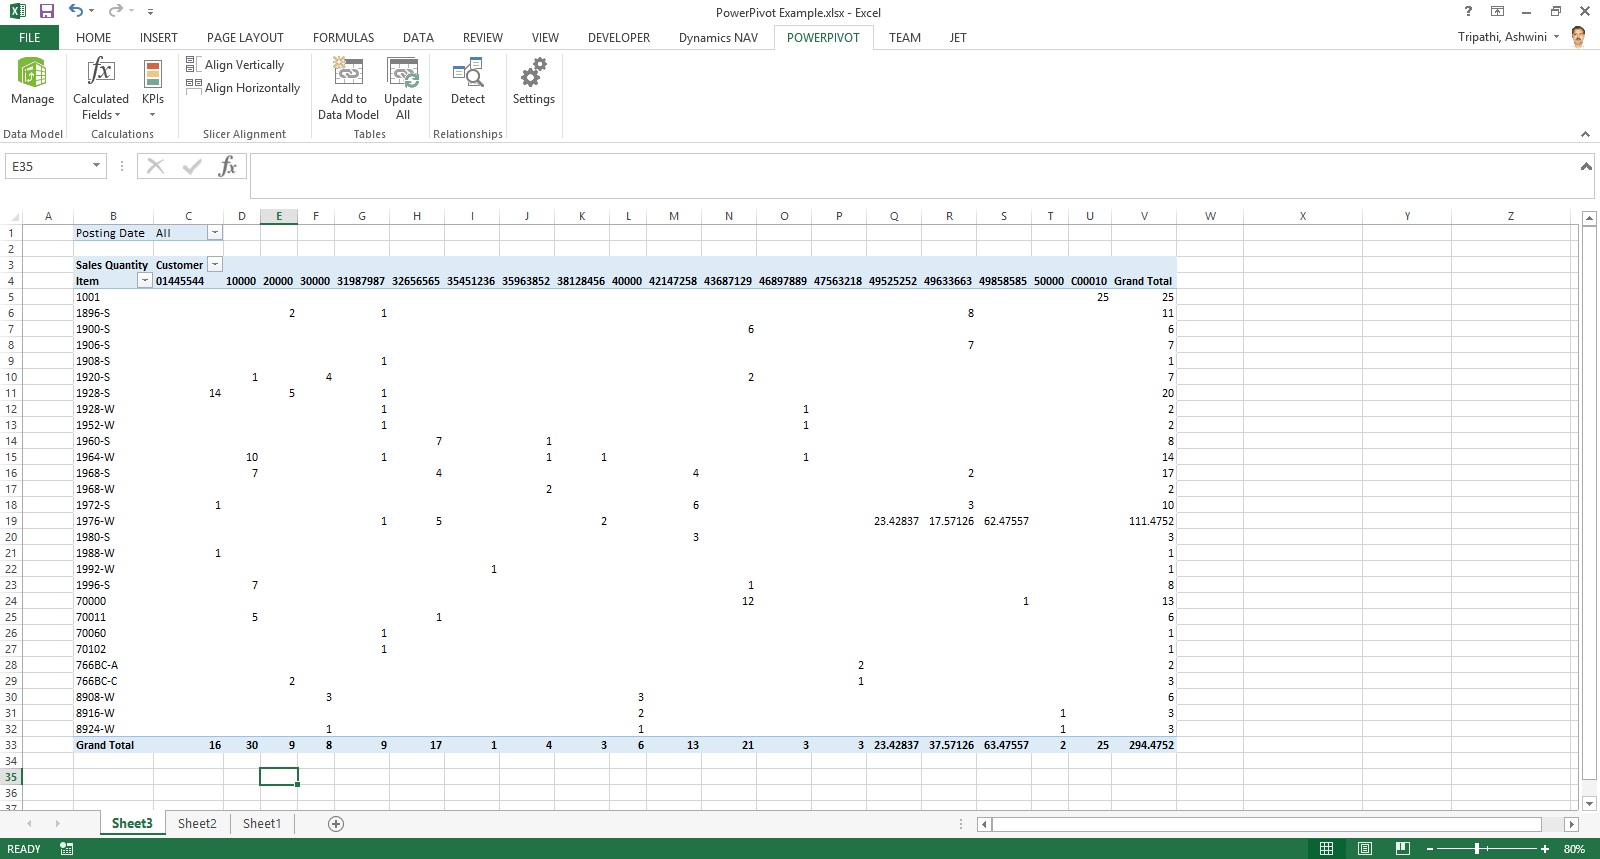
I will be creating Pivot Matrix Customer Vs Item Sales.

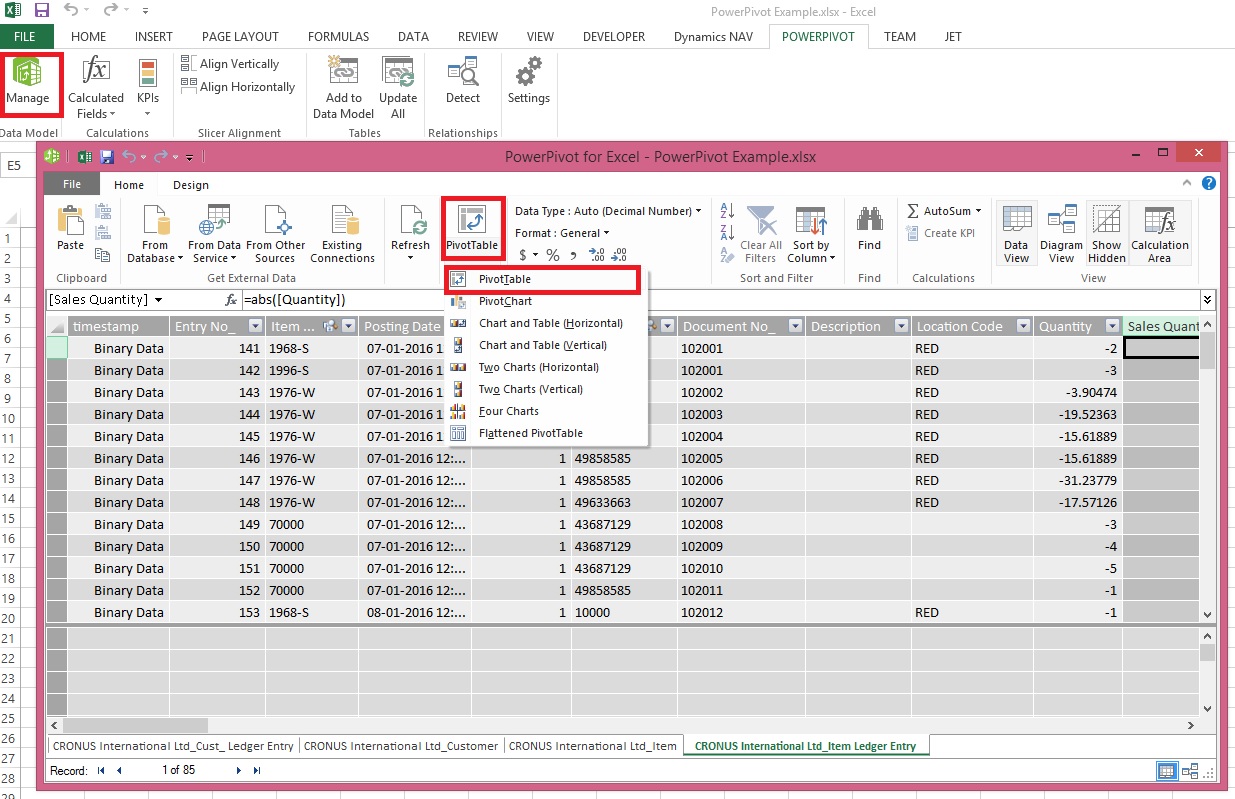
Open the Excel in which we created our Data model and imported our table data.
PowerPivot-21
Select PivotTable From Ribbon under Home Tab.
PowerPivot-22

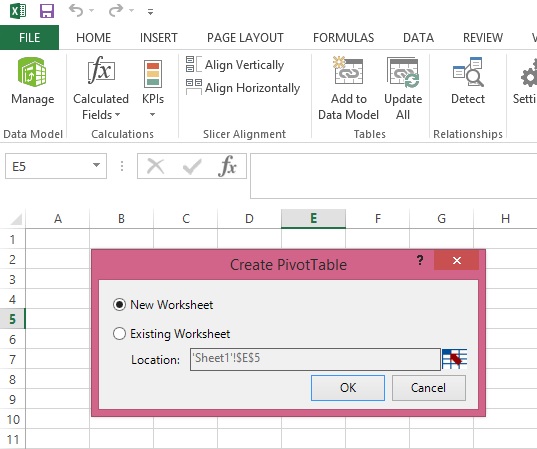
Select New Worksheet or Existing Worksheet as per the case.
PowerPivot-23
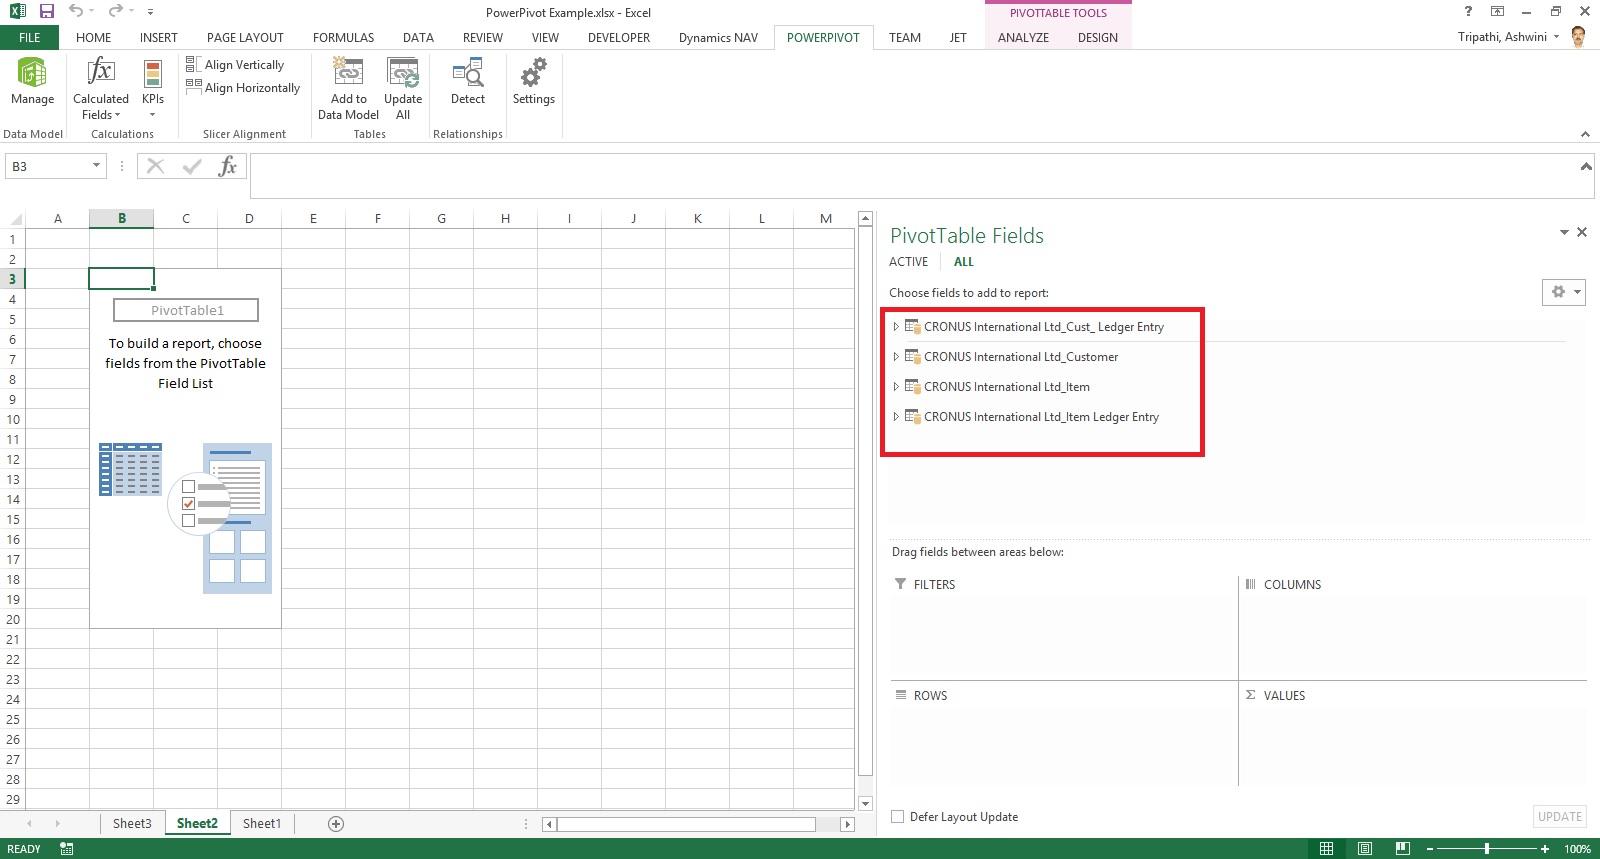
You will see a Pivot is inserted, in right side you will find all the tables available in the Data model of this Worksheet.
PowerPivot-24

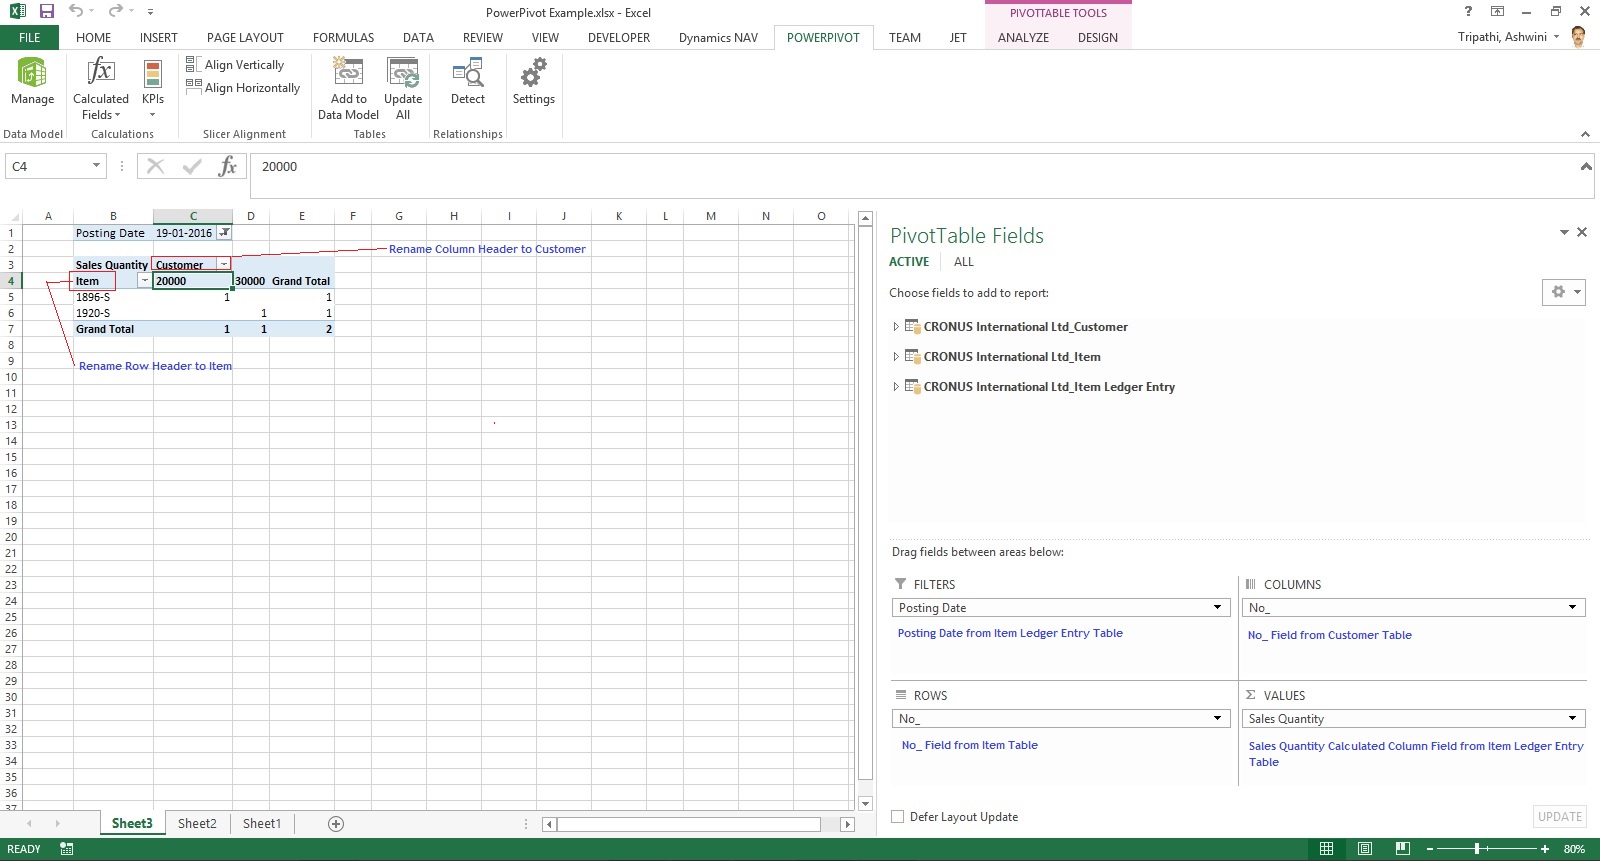
Design the Pivot as above screenshot.
The output of this report will be as below if executed without Date Filter.
PowerPivot-25
I will come up with more details and features of PowerPivot in my upcoming posts. Till then keep practicing and stay tuned for more details on this topic.

Tuesday, 29 September 2015

PowerPivot Creating a Data Model in Excel 2013

Before you can create a PivotTable, you'll need some data. Let's get some data from the Navision database.

In Excel, open a blank workbook.

PowerPivot-1

PowerPivot-2

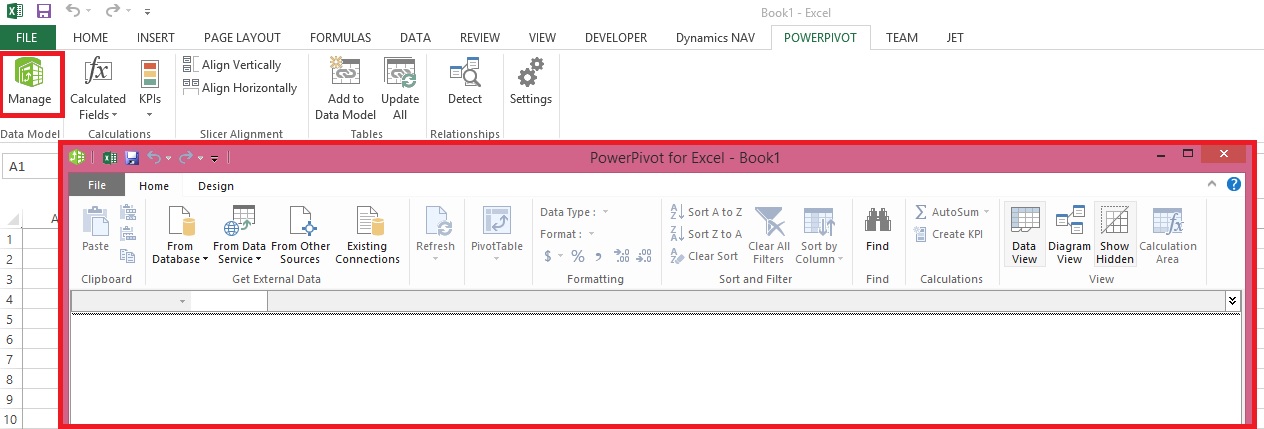
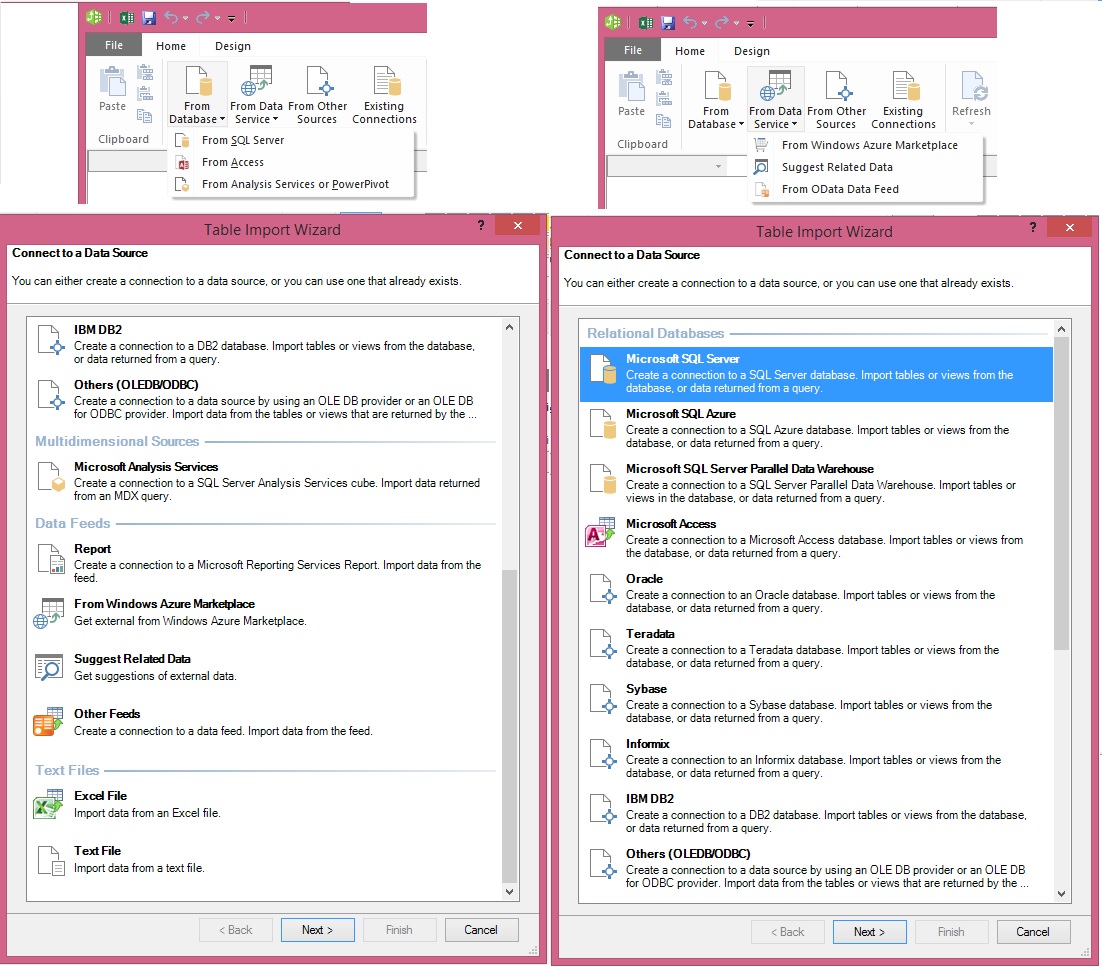
You have several options for getting data from no of sources.

Recall from my earlier post where we accessed data using web service in Excel.

Viewing Page Data in Excel Using PowerPivot (OData)

Let us see what other options are available to us.
PowerPivot-3

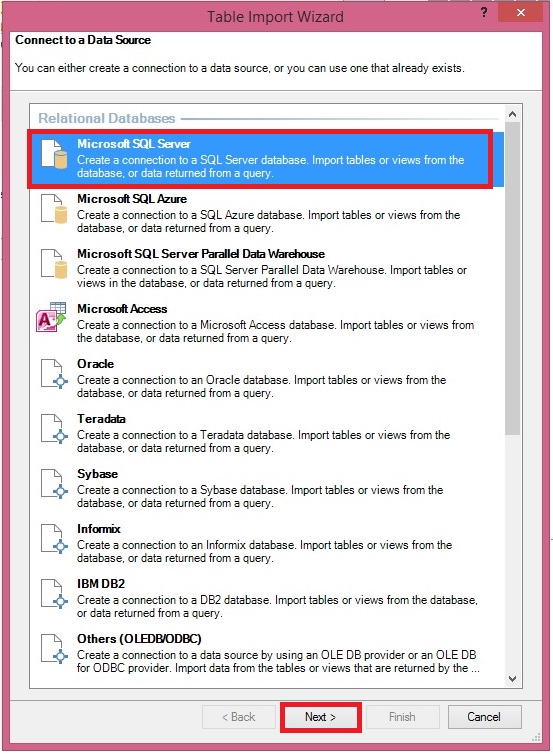
In today’s Example I will be connecting with SQL but will access Navision 2015 Database.

Follow the Steps below:
PowerPivot-4

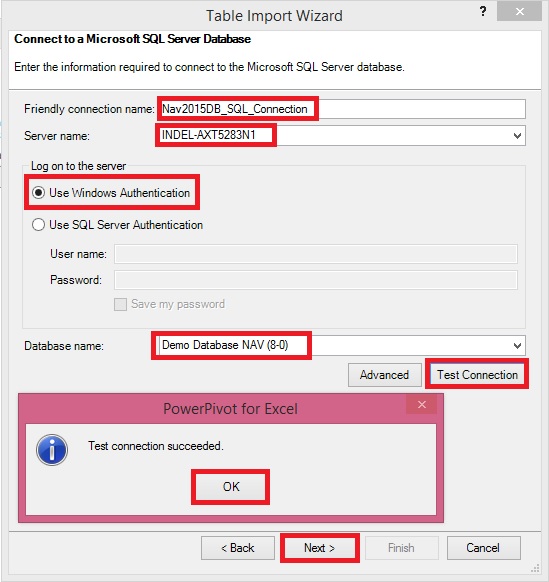
Give meaningful name to your connection in my case I have used Nav2015DB_SQL_Connection.

Select the SQL Server to which you wish to connect in my case I have used INDEL-AXT5283N1, basically this is the SQL Server installed on my Laptop.
PowerPivot-5

Specify the Login method, I am using Windows Authentication, if required you can use SQL Server Authentication. In later case you will have to specify your User Name & Password.

Select the Database to Connect, I have selected Demo Database NAV (8-0) Std. Database for Navision 2015.

Click the Test Connection button, If everything is ok you will get Connection Succeed Message, as shown in above screen shot.

Press Next for next step.
PowerPivot-6

In this screen you have option to either import data from Tables and Views or you can Write Query to fetch data for import.

In my case for this example I am importing data from tables.

Select option – Select from a list of tables and views to choose the data to import and Press Next for next step.
PowerPivot-7

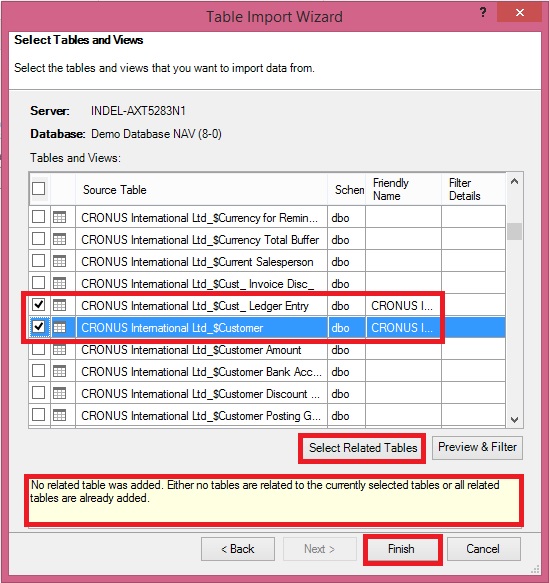
I have Selected two Tables Cust. Ledger Entry & Customer.

Select Related Tables button ensure to select if any other tables related to this Table.

In my case not applicable. Click Finish to add data to the Data Model/ Import the data of these two tables.
PowerPivot-8
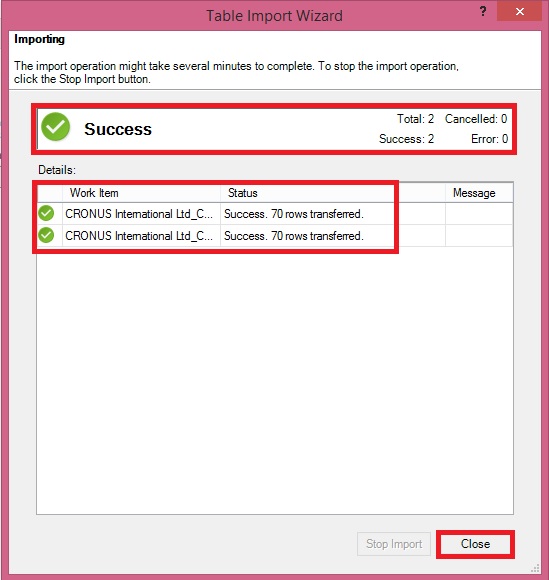
Select Close to return to Data Sheet imported after this operation.
PowerPivot-9
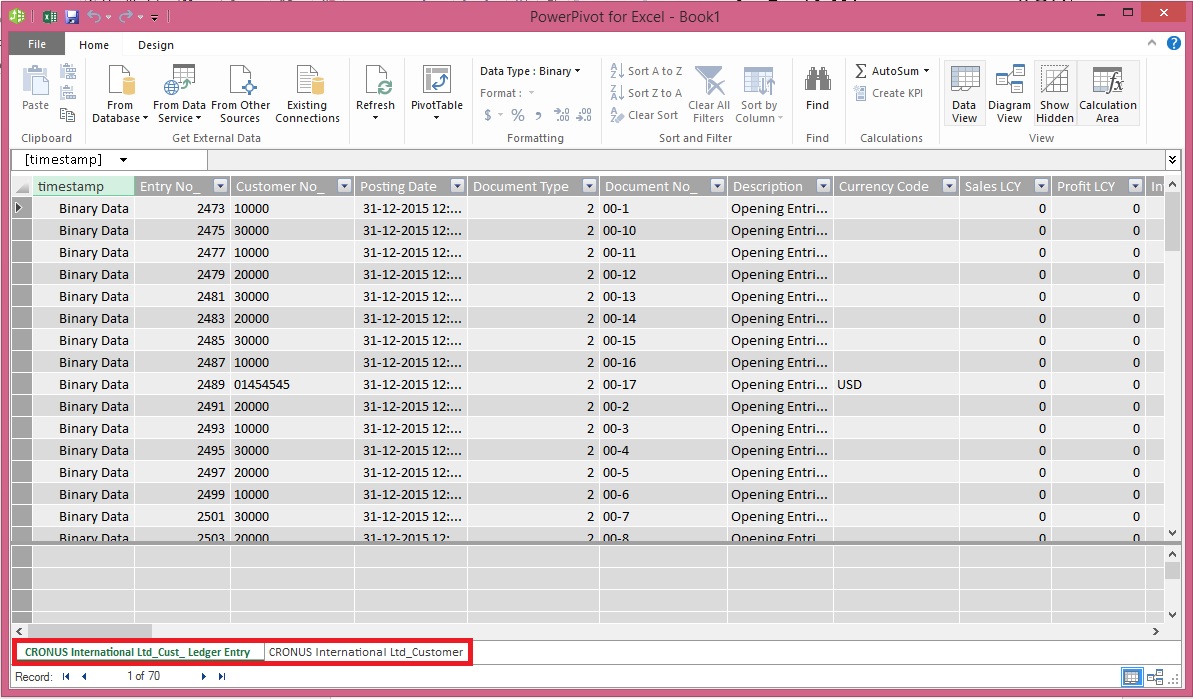
Here you see your Data for these two tables have been imported in two sheets.

What happened?

You might not have realized it yet, but you’ve just created a data model. It's created automatically when you import or work with multiple tables simultaneously in the same PivotTable report. The model is mostly transparent in Excel, but you can view and modify it directly using the Power Pivot add-in. In Excel, the presence of a data model is evident when you see a collection of tables in the PivotTable Fields list. There are several ways to create a model.

I will come up with more details in my next post.

Sunday, 27 September 2015

Other options for creating Report in Jet

Jet Report

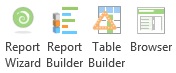
Report Wizard

An entire report can be created from a single table using the Report Wizard. The Report Wizard allows data to be grouped, filtered, sorted, subtotaled, and formated.


Report Builder

The Report Builder creates reports based on Jet Data Views.  Jet Data Views define table relationships, available fields, field captions, and table captions for a particular reporting area, such as sales, inventory, payroll, etc.  Jet Data Views can be created using the Data View Creator.

Before Using the Report Builder

Before you use the Report Builder you will need to import or create data views and categories.

A set of data views for Dynamics NAV can be found on Jet Web Site you can access the same from here. You can also click on the Download Data Views link within the Report Builder.

After downloading the file, you should open the .zip folder and extract the data view category (.jdc) file.

Importing Data Views and Categories

To import data views and categories, go to the Data Source Settings and select File -> Import -> Data View Categories.


Table Builder

An entire report can be created from a single or more table using the Report Wizard. The Table Wizard allows data to be grouped, filtered, sorted, subtotaled, and formated.


Browser

Provides browsing window to Select Tables and Fields, using which you can directly create an NL/ NF Function with their parameters and arguments.


This way I reach to end of my Jet Report Introduction Series. In future I will keep adding more details.


Friday, 25 September 2015

Creating Simple List Report in Excel Using Jet Reports Part-2

In my previous post we saw how to create simple report in excel using Jet Report.

If not seen please refer it before you continue with this post, here is the link for same:

Creating Simple List Report in Excel Using Jet Reports Part-1

Using NL Lookup Part-1

Here we will start from where we left in previous post.

We will add one more sheet in Report we created in our previous post, and name it is as Option, where we will define all of our Filters.

Our Option sheet will look as below:
JetSimpleReport-7
Here we have created 3 Filters Customer No., Credit Limit LCY & Balance LCY.

Next Step will be to apply this Filter provided by user at runtime to the Report.

Return to your Report Sheet and edit the NL Function used to retrieve Rows from Customer as below:
JetSimpleReport-8
(*) in filter denotes all, in other words no Filter.

Now let see the Filter Sheet how it behaves when we run the report.

When we run the report first Report option is shown, where we will give our Filters:
JetSimpleReport-9

Here I am giving below filters:
Customer No. Filter                         *              Include All Customers

Credit Limit (LCY) Filter                  0              All rows with Credit Limit as Zero

Balance (LCY) Filter                      >0             All rows with Balance value greater than Zero

The output of the report should be as below:

JetSimpleReport-10

Stay tuned for more details in my future posts.

I will explain more about commands, filters, functions, lookup etc.…

Creating Simple List Report in Excel Using Jet Reports Part-1

Dear friends I will discuss today simple report creating in Jet Reports.

I will take a simple example for creating Customer List showing the Credit Limit & Balances.

We will be using two basic Functions of Jet Reports NL & NF.

Then we will add few more features in my next post on this report.

Let’s Start Step wise Step:

Step 1: Add NL Function to retrieve Records from Customer Table.
JetSimpleReport-1
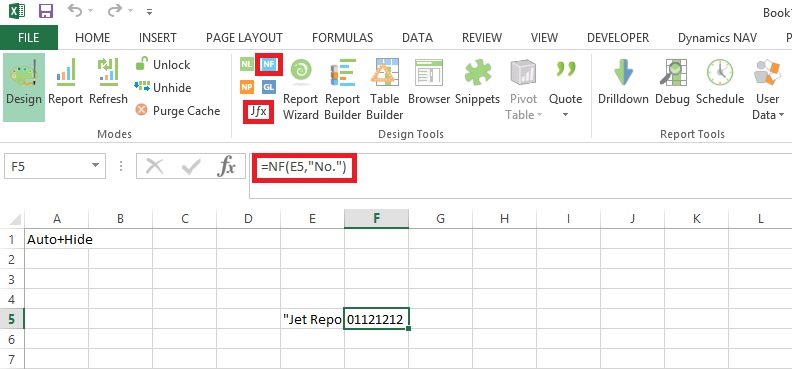
I have Add NL Function in Cell E5 as shown above, if want to add using Jfx – NL place a Cursor in E5 and press NL from Jfx Group of functions and fill as below:
JetSimpleReport-2

Step 2: Add Fields which you wish to include in your Report using NF Jfx Function.

I am adding No. field from Customer Table.

Here we have already created the connection to Customer Table in previous Step. This will retrieve all Fields and Records from the Customer Table.

Using NF function I am selecting the Fields of which we want to show/include value in our Report.

I have add the Function in Excel as shown below:
JetSimpleReport-3
I have Add NF Function in Cell F5 as shown above, if want to add using Jfx – NF place a Cursor in F5 and press NF from Jfx Group of functions and fill as below:
JetSimpleReport-4

Step 3: Following Step 2 add all other Fields.

The Excel should look as below:
JetSimpleReport-5

I have Added fields No., Name, Credit Limit (LCY), Balance (LCY).

I have also added Heading for these fields, and applied general Excel Formatting.
The Column E with NL function, I have Hide from the Report Output as the information is having no relevance showing to User.
Now we are god to see the output of our Report Created above. Output format of this report will be as below:
JetSimpleReport-6

Stay tuned to have more updates in my upcoming posts.

Thursday, 24 September 2015

Creating My First Report Using Jet Reports

Today I will discuss, how to create reports in Excel using Jet Reports.

Below links will be helpful to refresh what I have shared till now:

Installing Jet Express for Excel – Navision 2015

Installing and Publishing the Jet Business Objects on the Microsoft Dynamics Server

Publishing the Jet Data Source Codeunit to the Web Service

Enable SOAP Services and identify connection parameters

Configuring a Data Source in Jet Express

Using Jet Report NL Function

Using Jet Report NF Function

Using Link in Jet Reports

We will be using NL Functions.

Also we will introduce few Arguments for NL Function.

Below Table describes the same:


ParameterArgumentDescription
What
"Link"Returns a string value that can be used as a filter in another NL function
"LinkField"Returns a string used to retrieve a field from a link table in an NL(Table) function.
"Table"Creates an Excel table object based on the field values returned. Leaving the Field argument blank returns all fields. Use a Field Cache to return multiple fields.
FilterField
"Headers="Overrides field headers with the array of headers specified by the Filter argument. For use with an NL(Table) or NL(Lookup) function.
"TableName="Specifies the name to use for the Excel table object created by NL(Table) with the name in the Filter parameter. Use this to refer to the table by name from a Pivot table.
"Filters="Specifies a set of filters for the query with an array of filters specified by the Filter argument.
"InclusiveLink="Links the primary table to the one specified by the Filter argument for the purpose of retrieving data.
"IncludeDuplicates="When the value of the Filter argument is TRUE, specifies that all matching records from the source data will be included in the NL(Table) results.

We will design below report to see how Jet Report is designed.
FirstJetReport-1

Below describes the Formulas need to be inserted in respective cells.

Make sure you add ‘=’ in front of Formulas as defined in Data Type Column.


Cell ReferenceFormulaData Type
F10NL("Link","Item",,"No.","=Item No.")Formula
G10NL("Link","Customer",,"No.","=Source No.")Formula
F11Entry No.Text
G11Document No.Text
H11Posting DateText
I11Item No.Text
J11Item – DescriptionText
K11Gen. Prod. Posting GroupText
L11Customer No.Text
M11Customer   NameText
N11Item Ledger Entry QuantityText
F12Entry No.Field Names
G12Document No.Field Names
H12Posting DateField Names
I12Item No.Field Names
J12NL("LinkField","Item","Description")Formula
K12NL("LinkField","Item","Gen. Prod. Posting Group")Formula
L12Source No.Field Names
M12NL("LinkField","Customer","Name")Formula
N12Item Ledger Entry QuantityField Names
E13NL("Table","Value Entry",$F$12:$N$12,"Headers=",$F$11:$N$11,

"TableName=","ValueEntry","Filters=",$C$5:$D$8,"InclusiveLink=",$F$10,

"InclusiveLink=Value Entry",$G$10,"IncludeDuplicates=","True")
Formula

Although you can directly key in the text for NL commands and functions as formula. Below I show the Function Wizards for better understanding and how to use the same. All marked as Formula in above Table.

For Rest marked as Text or Field Names, you can key them directly in respective cells.
FirstJetReport-2
FirstJetReport-3
FirstJetReport-4
FirstJetReport-5
FirstJetReport-6
FirstJetReport-7

The output of Report will as below:
FirstJetReport-8

Stay tuned for upcoming posts for more detailed information.

I understand above example is bit complex I will come up with more simple and basic reports for beginners in my upcoming posts.

Friday, 21 August 2015

Creating the Multitenant Environment

Before you start I will recommend to go through my earlier post on Multitenancy Concept & Overview here.

To start with the below steps you will require 2 Accounts preferably Domain Accounts:

  • An Account for running MS Dynamics Navision Service

  • An Administrator account for Database & RTC


How to setup these accounts and what permissions are required for these accounts I would recommend to go through my earlier post on Provisioning the Microsoft Dynamics NAV Server Account here.

Add both the above account to Navision Database with Super permission.

In order to create a multitenant environment (here for Demo Database NAV (8-0)), the following steps need to be done:

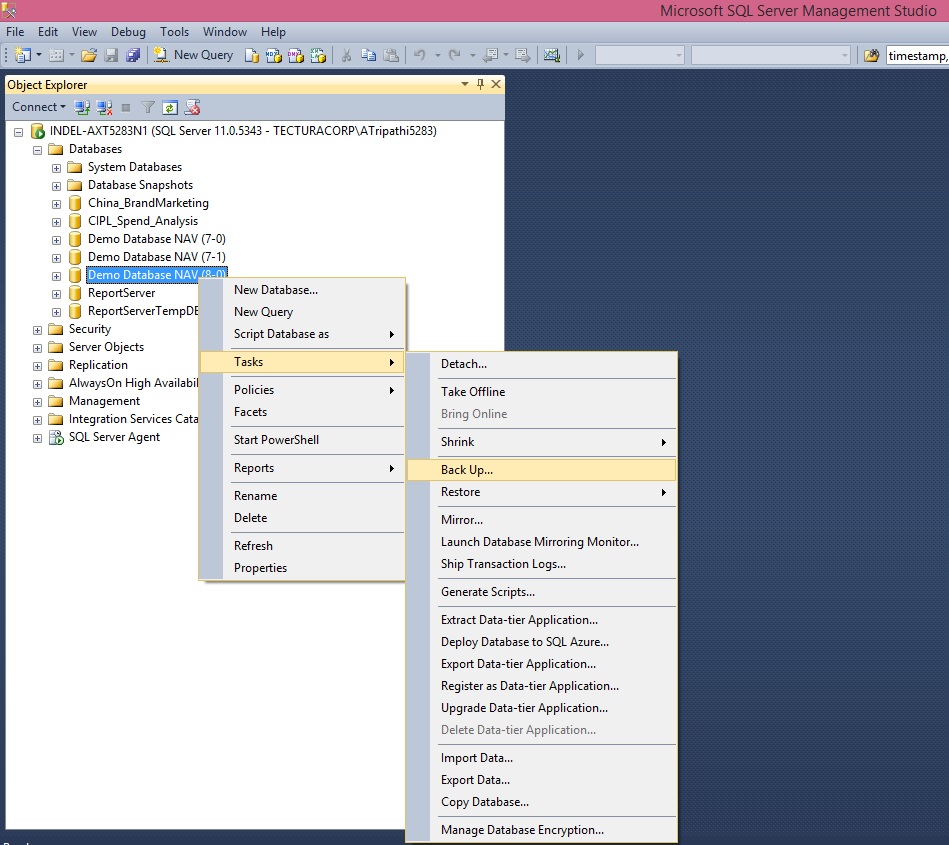
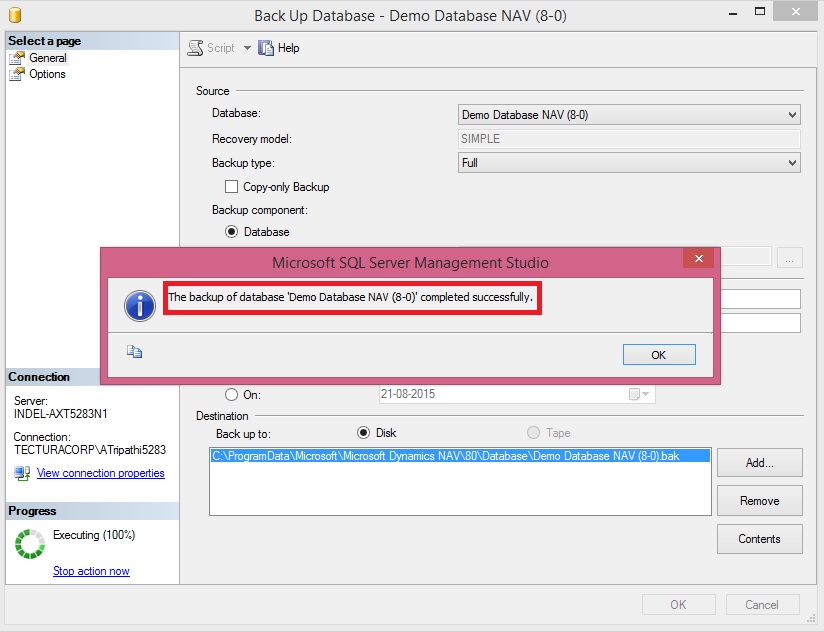
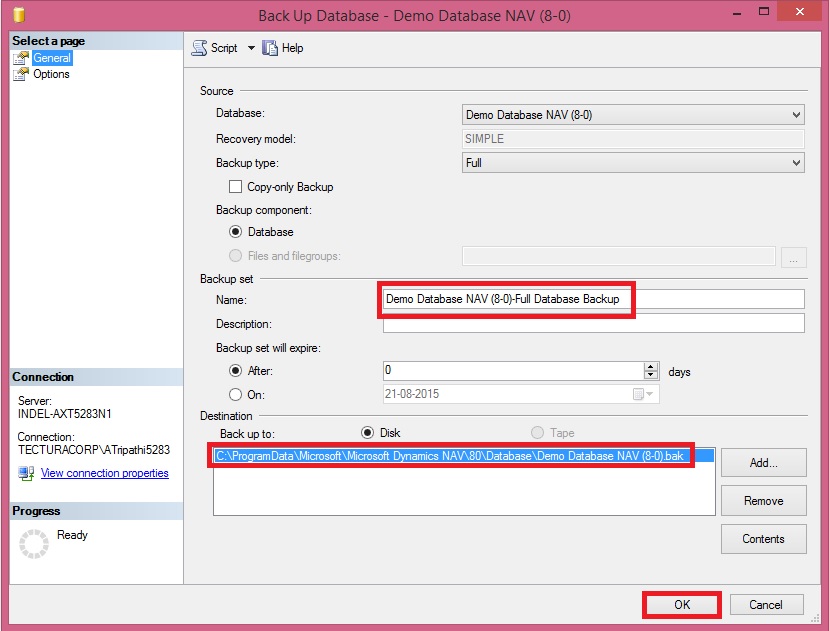
  • Take an SQL Backup of the running Demo Database NAV (8-0) database.


Multitenancy-1
Multitenancy-2
Multitenancy-3

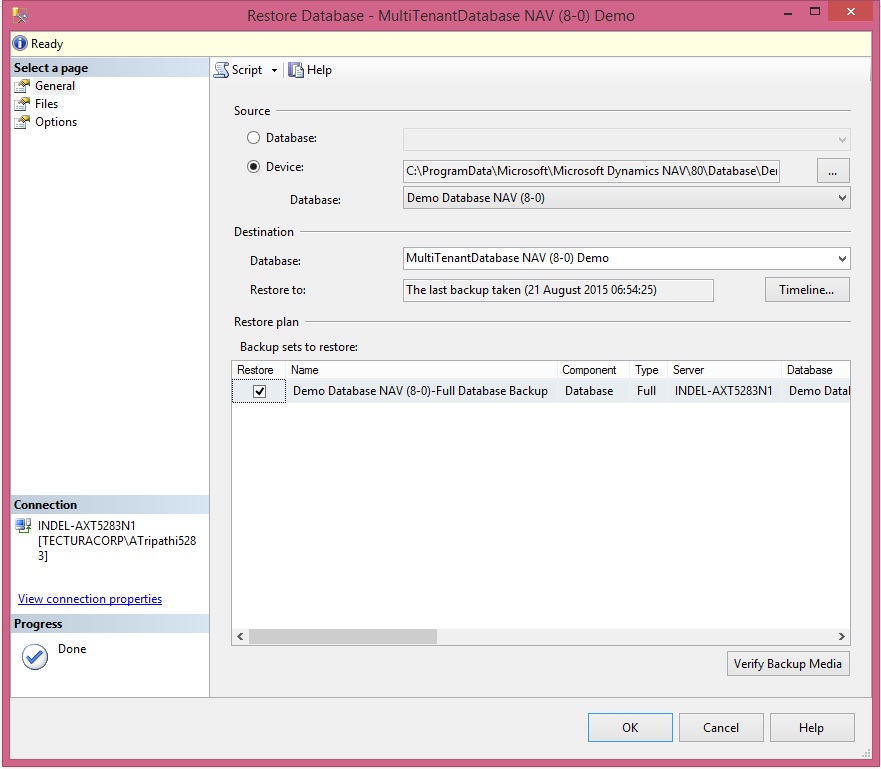
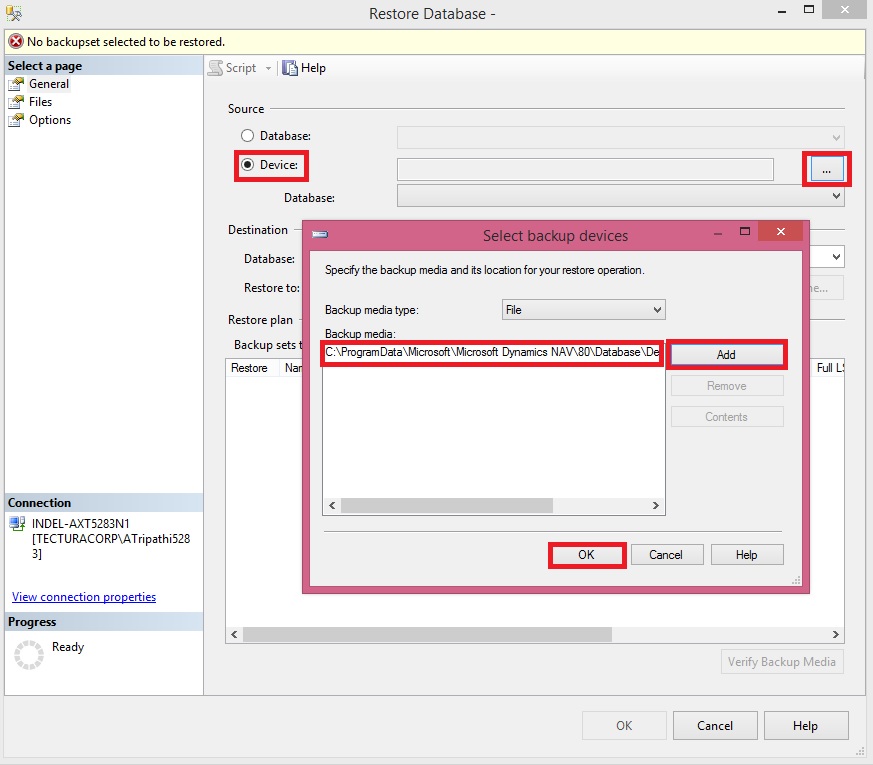
  • Restore the newly made SQL Backup to a new database (MultiTenantDatabase NAV (8-0) Demo).


Multitenancy-4
Multitenancy-5
Multitenancy-6
Multitenancy-7

  • On the NAV Server, using the NAV 2015 Administration console, create a new NAV Server Instance named MTenantDemo


Multitenancy-8

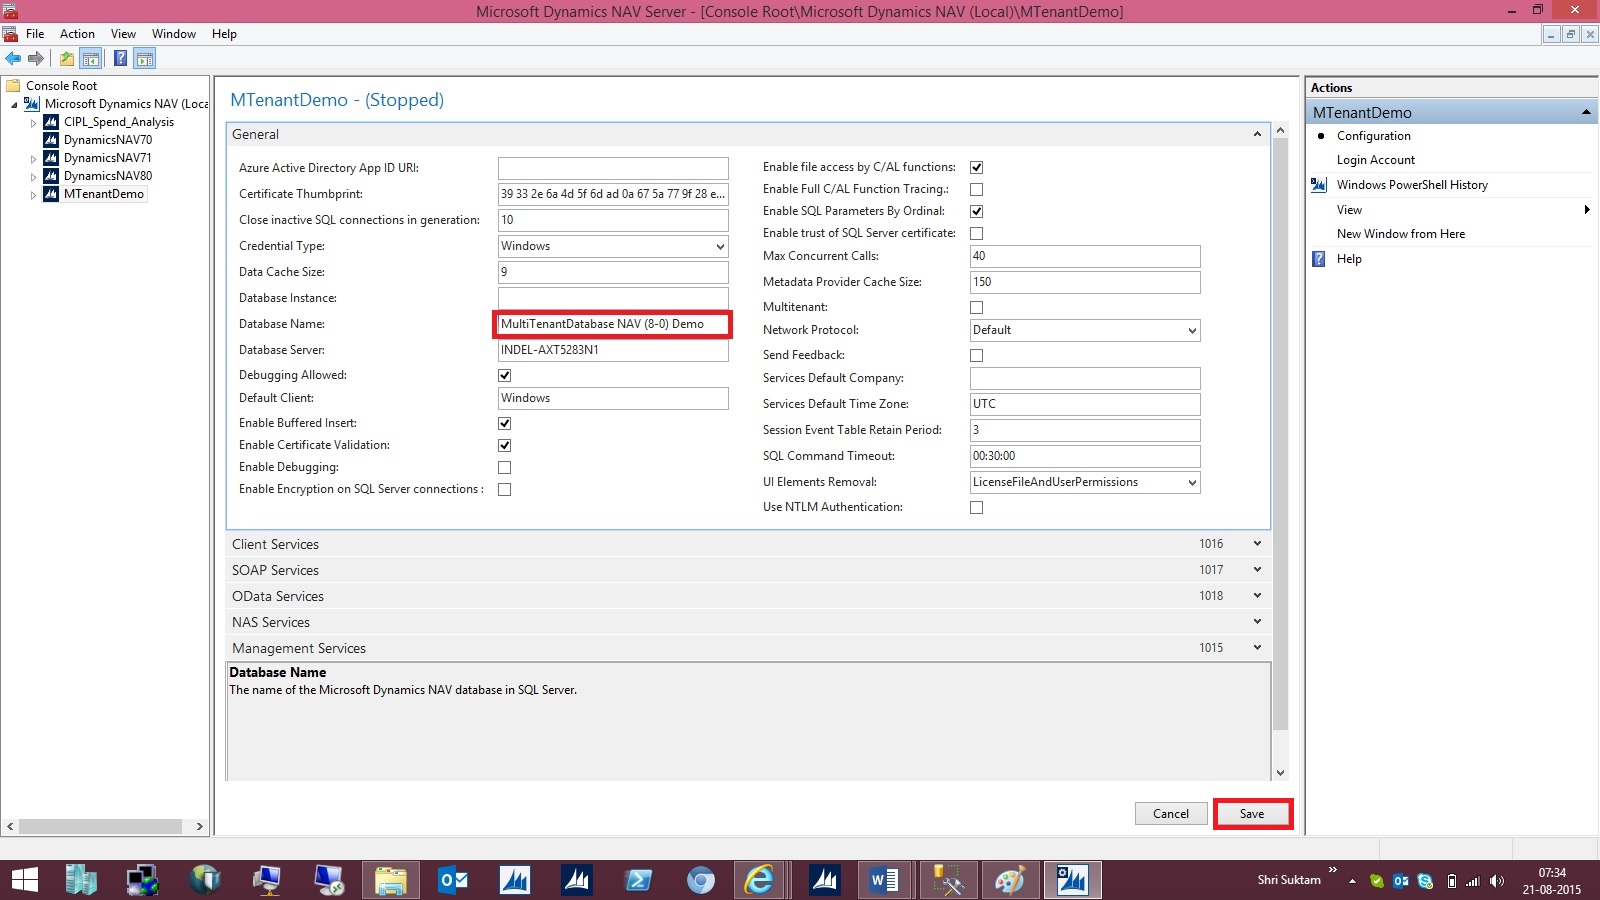
  • Edit the instance and set the database to newly created MultiTenantDatabase NAV (8-0) Demo database, and set the instance to be started with NAV Service user.


Multitenancy-9
Multitenancy-10

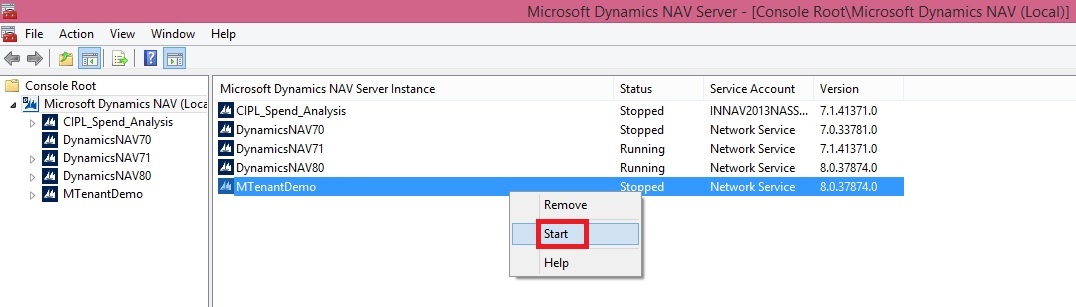
  • Start MTenantDemo – and see if you can log in

  • Once you have confirmed the MultiTenantDatabase NAV (8-0) Demo database and MTenantDemo is running, split the database in an application part and a data part:

    • Open the NAV 2015 Administration Shell (or Windows PowerShell ISE and load the NavAdminTool)

    • Export the application part from the MultiTenantDatabase NAV (8-0) Demo database to a new database (MultiTenantDatabase NAV (8-0) Demo_App):


Export-NavApplication -DatabaseServer INDEL-AXT5283N1 -DatabaseName 'MultiTenantDatabase NAV (8-0) Demo' -DestinationDatabaseName 'MultiTenantDatabase NAV (8-0) Demo_App’


  • Remove the application part from the MultiTenantDatabase NAV (8-0) Demo database:


Remove-NAVApplication -DatabaseServer INDEL-AXT5283N1 -DatabaseName 'MultiTenantDatabase NAV (8-0) Demo'

Multitenancy-11
Multitenancy-12

  • Using the NAV 2015 Administration console, edit the MTenantDemo instance and set the database to newly created MultiTenantDatabase NAV (8-0) Demo_App database
    Multitenancy-13

  • And select Multitenant (set it to True):

  • Save and restart MTenantDemo


Multitenancy-14

  • Either through a Powershell commandlet in the NAV 2015 Administration Shell or by using the NAV 2015 Administration console mount a tenant named Tenant-1 on the MTenantDemo NAV Instance:


Multitenancy-15
Multitenancy-16
Multitenancy-17

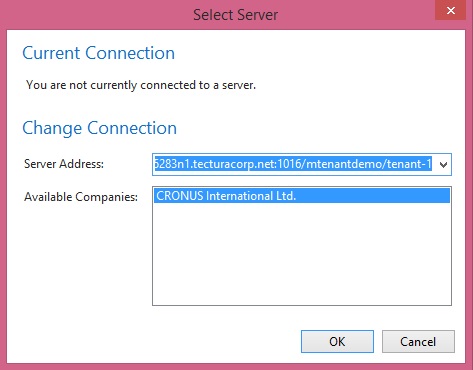
  • Start NAV using the new tenant:


Multitenancy-18

  • In Companies rename the Company Name to Tenant-1

  • Take an SQL Backup using the MultiTenantDatabase NAV (8-0) Demo_App database, and call it “App_template.bak”

  • Take an SQL Backup using the MultiTenantDatabase NAV (8-0) Demo database, and call it “Tenant_template.bak”


You now have a template you can use when you want to create a application and a tenant.

Restore the Tenant Database as Tenant-2, Tenant-3, Tenant-4, Tenant-5 etc.

Mount the Tenant Databases to NAV Service MTenantDemo as per above steps.

Now you have One Application & 5 Business Data Tenants Mounted.

You will do development in Application Database MultiTenantDatabase NAV (8-0) Demo_App and then Sync your modifications to Business Data Databases named Tenant-1/2/3/4/5 etc.

To Sync your objects to Tenants you will use below script in NAV 2015 Administration Shell:
Set-ExecutionPolicy unrestricted –Force

Import-Module 'C:\Program Files\Microsoft Dynamics NAV\80\Service\NavAdminTool.ps1'

Sync-NAVTenant MTenantDemo -Force -Tenant ‘MultiTenantDatabase NAV (8-0) Demo’

I will explain in more detail on Creating Tenants, Synchronizing Tenants and uploading License for Tenants in more details in my next upcoming post.