Showing posts with label Server. Show all posts

Thursday, 7 July 2016

SQL Server Database Backup using PowerShell

In this post we will see how we can take backup of databases from SQL Server using PowerShell and schedule it as a daily run Plan.

Step-1 : We will create Powershell Script to take backup of Databases in SQL Server.

SCheduleJob-18

Here is the full Script for your ready refrence.
param( $serverName, $backupDirectory )

[System.Reflection.Assembly]::LoadWithPartialName("Microsoft.SqlServer.SMO") | Out-Null

[System.Reflection.Assembly]::LoadWithPartialName("Microsoft.SqlServer.SmoExtended") | Out-Null

[System.Reflection.Assembly]::LoadWithPartialName("Microsoft.SqlServer.ConnectionInfo") | Out-Null

[System.Reflection.Assembly]::LoadWithPartialName("Microsoft.SqlServer.SmoEnum") | Out-Null

$server = New-Object ("Microsoft.SqlServer.Management.Smo.Server") $serverName

$dbs = $server.Databases

foreach ($database in $dbs | where { $_.IsSystemObject -eq $False })

{

$dbName = $database.Name

$timestamp = Get-Date -format yyyy-MM-dd-HHmmss

$targetPath = $backupDirectory + "\" + $dbName + "_" + $timestamp + ".bak"

$smoBackup = New-Object ("Microsoft.SqlServer.Management.Smo.Backup")

$smoBackup.Action = "Database"

$smoBackup.BackupSetDescription = "Full Backup of " + $dbName

$smoBackup.BackupSetName = $dbName + " Backup"

$smoBackup.Database = $dbName

$smoBackup.MediaDescription = "Disk"

$smoBackup.Devices.AddDevice($targetPath, "File")

$smoBackup.SqlBackup($server)

"backed up $dbName ($serverName) to $targetPath"

}

Save this Script file as ps1 extension.

You can create the script using even notepad.


Step 2: We will Create Batch file to call PowerShell scrip and to be used in Windows scheduler.

SCheduleJob-18

Save as .BAT file. Here is the batch script for ready refrence:
powershell -ExecutionPolicy RemoteSigned

-File "C:\User Data\SQL Backup\Tools\SQLServerBackupAllDatabase.ps1"

-serverName "INDEL-AXT5283NB"

-backupDirectory "C:\User Data\SQL Backup"

>> "C:\User Data\SQL Backup\LOG\\%date%.log"

Step 3 : Create a Windows Scheduler

Open Windows Task Scheduler.

Create New Task as shown below :

SCheduleJob-18

Enter Name & Description on General Tab as shown below:

SCheduleJob-18

On Trigger Tab create New Trigger and enter details as shown below :
SCheduleJob-18

On Action Tab Create Action and enter information as shown below : Here Select the batch file created in Step 2.

SCheduleJob-18

In Settings Tab do the setting as shown Below :

SCheduleJob-18

Click on OK to Save the Task and return to Task Scheduler Window.

Here you can see the newly created Task.

SCheduleJob-18

When Task is executed you will find the backup of databases at defined path in the script.

SCheduleJob-26

You can also find Log file at the path defined in batch.

SCheduleJob-27

Thats all for this post, will come up will more information in my up comming posts.

Wednesday, 29 June 2016

Configuring Session Timeout - Navision 2016

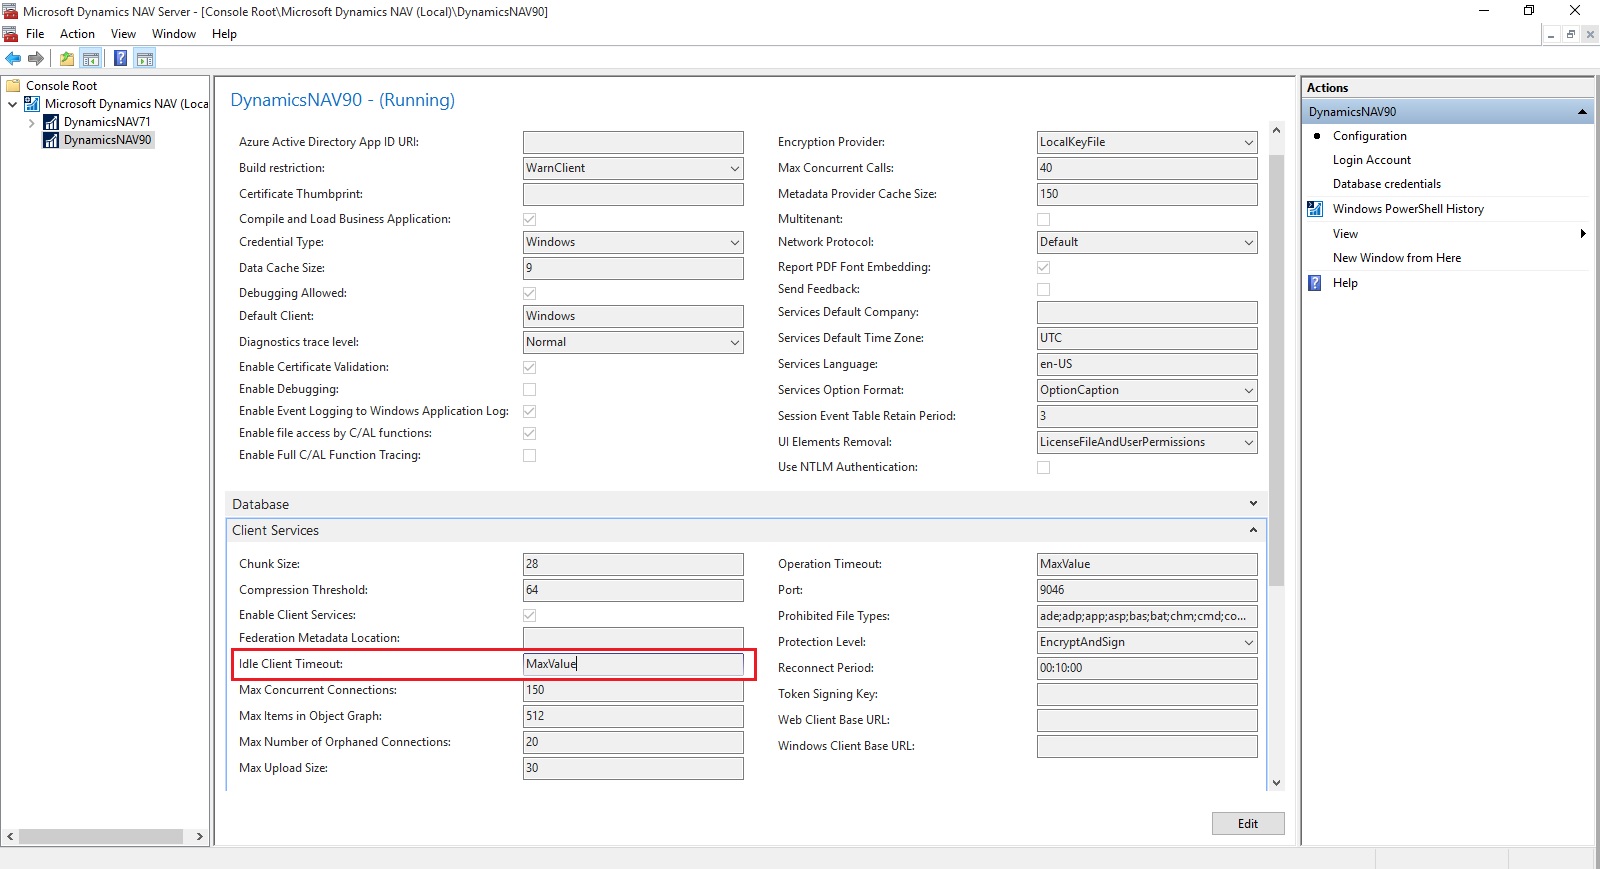
Dynamics NAV Windows client timeout configuration is managed at the service level by setting the Idle Client Timeout setting.

To configure the Dynamics NAV Windows client to time out after 10 minutes of idleness, you will require to set this to 00:10:00 and then restart the Dynamics NAV Server service so that the change comes in effect.

There are some additional settings

ClientServicesReconnectPeriod

ClientServicesMaxNumberOfOrphanedConnections,

When you start the Microsoft Dynamics NAV Windows client or Microsoft Dynamics NAV Web client, a connection is established with the Microsoft Dynamics NAV Server instance and a corresponding session is added on Microsoft Dynamics NAV Server.

Microsoft Dynamics NAV Server includes several timeout settings that determine when a session closes as a result of inactivity over the client connection, lost client connection, or closing of the client.

You can configure this in CustomSettings.config file of Microsoft Dynamics NAV Server.

ClientServicesReconnectPeriod :- This value determines the time during which a client can reconnect to an existing session on Microsoft Dynamics NAV Server before a session closes.

ClientServicesIdleClientTimeout :- This value determines the interval of time that a Microsoft Dynamics NAV client connection can remain inactive before the session is closed.

You can configure this in the ClientSettings.config file of the Microsoft Dynamics NAV Windows client.

ClientServicesKeepAliveInterval :- This value determines the interval of time (in seconds) between keep-alive messages that are sent from the Microsoft Dynamics NAV Windows client to Microsoft Dynamics NAV Server. This value is also used, in part, to define the reconnect period when a connection is lost.

You can configure this in the web.config file of Microsoft Dynamics Web Server for the client.

SessionTimeout :- This value specifies how much of time that session remains open when there is no activity over the connection from the Microsoft Dynamics NAV Web client to Microsoft Dynamics NAV Server.

SessionTimeOut-1

The SessionTimeout setting enables you to set the Microsoft Dynamics NAV Web client inactive session timeout different than for the Microsoft Dynamics NAV Windows client, which is only controlled by the ClientServicesIdleClientTimeout setting.

Typically, this is set the inactive session timeout period on Microsoft Dynamics NAV Web client connections shorter than for the Microsoft Dynamics NAV Windows client.

When the Microsoft Dynamics NAV Windows client is inactive, reliable sessions automatically sends messages from the Microsoft Dynamics NAV Windows client to Microsoft Dynamics NAV Server.

You can control the interval of the keep-alive messages by setting the ClientServicesKeepAliveInterval setting on the Microsoft Dynamics NAV Windows client.

The default value of the ClientServicesKeepAliveInterval setting is 120 seconds (2 minutes).

If there is no activity on the client connection for duration of the load balancer's idle timeout setting, then the load balancer might redirect the client connection to another server.

To avoid this condition, it is recommend that set the ClientServicesKeepAliveInterval to half the value of the load balancer’s idle timeout setting.

The idle timeout on Windows Azure is around 4 minutes, so the default setting of ClientServicesKeepAliveInterval (2 minutes) should be sufficient.

Occasionally, a Microsoft Dynamics NAV client can lose the network connection to Microsoft Dynamics NAV Server.

You can use ClientServicesReconnectPeriod setting on Microsoft Dynamics NAV Server to control how long a session remains open after the connection is lost to allow time for the client to reconnect to the session.


SessionTimeOut-2

  • The connection is lost and the initial inactivity period starts (default is 4 minutes).

  • After the initial inactivity period, the service channel enters a faulted state. When the service channel is in the faulted state, Microsoft Dynamics NAV Server considers the session with the client as orphaned and waits for it to reconnect.

  • If the client does not reconnect within the time period that is specified by the ClientServicesReconnectPeriod setting (default is 10 minutes), then Microsoft Dynamics NAV Server closes the session.

  • The session is then removed from the Active Session table in the Microsoft Dynamics NAV.


ClientKeepAlive:- This  setting is managed at the user level and located in the ClientUserSettings.config file.

The value of this setting is given in seconds and defines the interval between ‘pulse’ signals sent by the client to prevent the client from going idle in some scenarios, or for some users.


In Dynamics NAV 2016 Cumulative Update 8:

The ClientKeepAlive setting has been moved from the user level to the service level, and is no longer defined in number of seconds but as a time interval, just like the Idle Client Timeout setting.


Before Cumulative Update 8:

  1. In the server configuration file, set Idle Client Timeout  to 00:10:00

  2. In the client configuration file, set ClientKeepAlive  to any value  larger than 600 This value is in seconds, so 600 equals 10 minutes.


SessionTimeOut-3

After Cumulative Update 8:

  1. In the server configuration file, set Idle Client Timeout  to 00:10:00

  2. In the server configuration file, set Keep Alive Interval  to a value larger than 00:10:00


To configure the timeout for the Dynamics NAV Web client, it is sufficient to configure the SessionTimeout setting in the web.config file to the relevant interval – in above example it’s 00:10:00.

For more information you can check out here : https://community.dynamics.com/nav/b/navteam/archive/2016/06/24/configuring-client-timeout


Saturday, 28 May 2016

Customers with Enterprise Agreement who already have SQL Server Licenses, can use them on Azure Virtual Machines

Now  Microsoft Enterprise Agreement customers can bring existing licenses to run SQL Server on Azure Virtual Machines. Since the launch of Azure Virtual Machines, customers can already run SQL Server on Azure Virtual Machines through several existing SQL Server images available in the Azure Gallery, or bring their own images to Azure.

These images and capabilities will continue to be supported so customers can continue to take advantage of pay per use licensing for SQL Server on Azure Virtual Machines.


Starting this week, customers with Enterprise Agreement who already have SQL Server Licenses, can use them on Azure Virtual Machines with Microsoft-certified (BYOL) gallery images. These images will not charge for SQL Server licensing, just for compute cost.

For more details see the Link.


Monday, 9 May 2016

Creating Virtual Machine on Azure

Continuing from my previous post.

In previous post we saw how to register for Free Azure Portal Account, if you missed you can find the link here.

Today we will see how to create Virtual Machine for Dynamics Navision 2016 pre Loaded.

Lets start creating one for our future posts practice.

Open the page : https://azure.microsoft.com/en-us/free/ and follow onscreen Instruction to login to your account.

Login using the account credentials you used for registering on Azure Portal.

Azure-5

Upon signing you will be landed to your dashboard on Portal.

You can see we don't have any resource on Portal yet.

Azure-6

Lets start creating one.

Click on New from Top right corner.

Choose Virtual Machine.

Enter "Microsoft Dynamics NAV 2016" in the search box, it will list available Virtual Machine images.

Select the one available Virtual Machine for commissioning.

I have choose this because we will get preinstalled NAV 2016 which will save our time.

Azure-7

Select Deployment Model, I have choose Classic and click on Create.

Azure-8

Next we will enter  Host Name, User Name, Password, other things you adjust as per your need. Click on Create.

Note your User Name & Password you will require this to login to the Server.

Azure-9

Give some time to get created and up your Server.

In the mean time you can explore other things till your Server is up and running for you.

Once it is made available, you can start login and explore your newly created Server.

Where to find my Server?

From the Navigation Bar choose Virtual Machine (classic).

It will list you all Virtual Machines created by you.

Select your Virtual Machine in my case it is NavDemo.

You can find the Server Name and IP of your Virtual Machine.

Azure-10

I am using my IP to login to my Server.

Open your Remote Desktop Connection and enter your IP.

The User Name & Password as we created in previous step.

Azure-11

Here I am Login to my Server.

Azure-12

You can see that Dynamics NAV 2016 is already available with my Server.

Azure-13

That's all for today, we will see more in my upcoming posts.

Till then keep exploring & Learning.


Friday, 30 October 2015

Configuring SQL Server Authentication in Microsoft Dynamics NAV 2016 – Part-3

To configure SQL Authentication on Microsoft NAV Server Instance using Microsoft Dynamics NAV 2016 Administration Shell


  • If you are modifying an existing Microsoft Dynamics NAV Server instance, run the Set-NAVServerConfiguration cmdlet.


Syntax & Parameter explaination:

Set-NAVServerConfiguration (cmdlet)
-KeyName <String>

(The configuration key name. Examine the CustomSettings.config file to determine the correct key name.)
[-Element <String> ]

(Specifies the navigation path from the root element to the appSettings section of the configuration document.)
[-ServerInstance] <String>

(Specifies the name of a Microsoft Dynamics NAV Server instance. The default instance name is DynamicsNAV90. You can specify either the full name of an instance such as MicrosoftDynamicsNavServer$myinstance or the short name such as myinstance.)
-DatabaseCredentials <PSCredential>

(The user name and password of the login account that the Microsoft Dynamics NAV Server instance will use to connect to the Microsoft Dynamics NAV database in SQL Server. This parameter configures the Microsoft Dynamics NAV Server instance to use SQL Server Authentication instead of Windows Authentication on the connection to the database. The login account must be a member of the db_owner role on the database.)
[-Force] (Forces the command to run without asking for user confirmation.)

[-KeyValue <String> ] (The configuration key value.)

[-Confirm] (Prompts you for confirmation before running the cmdlet.)

[-WhatIf] [ <CommonParameters>]

Use the DatabaseCredentials parameter to provide the login credentials of the database user that you want to use to access the application database.

Example:
C:\PS>Set-NAVServerConfiguration MyInstance -KeyName DatabaseServer -KeyValue DatabaseServer.Domain.Com


  • If you are creating a new Microsoft Dynamics NAV Server instance, run the New-NAVServerInstance cmdlet.


Syntax & Parameter explaination:

New-NAVServerInstance
[-ServerInstance] <String>

(Specifies the name of the Microsoft Dynamics NAV Server instance. The default instance name isDynamicsNAV90. You can specify either the full name of an instance, such as MicrosoftDynamicsNavServer$DynamicsNAV90, or the short name, such as DynamicsNAV90. You must use single-quotes around the instance name.)
-ManagementServicesPort <ServicePort>

(Specifies the TCP port that is used to manage the Microsoft Dynamics NAV Server instance. The Management Services port has no exceptions in the firewall, and will only be accessed from the local computer. The port is used by Windows PowerShell for access Microsoft Dynamics NAV Server management data.)
[-ClientServicesCredentialType <String> ]

(The type of client credential used for client authentication.Possible values are: Windows, Username, NavUserPassword and AccessControlService.)
[-ClientServicesPort <ServicePort> ]

(Specifies the listening TCP port for clients such as Microsoft Dynamics NAV Windows client and Microsoft Dynamics NAV Web client.)
[-DatabaseCredentials <PSCredential> ]

(The user name and password of the login account that the Microsoft Dynamics NAV Server instance will use to connect to the Microsoft Dynamics NAV database in SQL Server. This parameter configures the Microsoft Dynamics NAV Server instance to use SQL Server Authentication instead of Windows Authentication on the connection to the database. If the Microsoft Dynamics NAV Server instance is configured for multitenancy, then parameter configure SQL Authentication on the connection to the application database, not the tenant database. The login account must be a member of the db_owner role on the database.)
[-DatabaseInstance <DatabaseInstance> ]

(Specifies the SQL Server instance on which the Microsoft Dynamics NAV database is installed.)
[-DatabaseName <DatabaseName> ]

(Specifies the name of the Microsoft Dynamics NAV database.)
[-DatabaseServer <DatabaseServer> ]

(Specifies the name of the computer on which the SQL Server instance for the Microsoft Dynamics NAV database is installed.)
[-Force] (Forces the command to run without asking for user confirmation.)

[-Multitenant]

(Specifies the Microsoft Dynamics NAV Server instance to be a multitenant instance.)
[-ODataServicesPort <ServicePort> ]

(Specifies the listening HTTP port for Microsoft Dynamics NAV OData web services.)
[-ServiceAccount <ServiceAccount> ]

(Specifies the Windows-based computer account that the Microsoft Dynamics NAV Server instance must use to log on. The default value is NT AUTHORITY\NETWORK SERVICE. Only NetworkService and User values are supported. This parameter accepts values from the enum System.ServiceProcess.ServiceAccount.)
[-ServiceAccountCredential <PSCredential> ]

(Specifies a set of security credentials that you must use when configuring the service account.)
[-ServicesCertificateThumbprint <ClientServicesCertificateThumbprint> ]

(Specifies the certificate thumbprint for the x509 certificate that is going to be used for securing communication with the server. The certificate must be stored in the local machine store and in the personal sub-store in the certificate store. The private key of the certificate must be present and exchangeable. The certificate must be in .pfx format, not .cer format. The certificate can be either self-signed or issued by a trusted certification authority (CA).

When specifying a ServicesCertificateThumbprint, SOAP web services and OData web services become HTTPS.)
[-SOAPServicesPort <ServicePort> ]

(Specifies the listening HTTP port for Microsoft Dynamics NAV SOAP web services.)
[-Confirm] (Prompts you for confirmation before running the cmdlet.)

[-WhatIf] [ <CommonParameters>]

Use the DatabaseCredentials parameter to provide the login credentials of the database user that you want to use to access the application database.

Examples:
C:\PS>New-NAVServerInstance NewInstance -ManagementServicesPort 8099 -ClientServicesPort 8100 -SOAPServicesPort 8101 -ODataServicesPort 8102 –verbose

C:\PS>Get-Credential | New-NAVServerInstance NewInstance -ServiceAccount User -ManagementServicesPort 8099 -ClientServicesPort 8100 -SOAPServicesPort 8101 -ODataServicesPort 8102 –verbose


For Multitenant Environment


  1. Configure SQL Server Authentication with the application database as above.

  2. To configure SQL Authentication with the tenant database, run the Mount-NAVTenant


Syntax & Parameter explaination:

Mount-NAVTenant
[-AlternateId] <System.Collections.ObjectModel.ReadOnlyCollection[string]>

(Specifies the alternative IDs for the tenant, such as host names for the Microsoft Dynamics NAV Web client, SOAP web services, OData web services, or the Microsoft Dynamics NAV Windows client.

If you use alternative IDs for tenant resolution in the Microsoft Dynamics NAV Web client, you must also enable some of the UrlRewrite rules in the Web.Config file for the Microsoft Dynamics NAV Web Server components.)
[-AzureKeyVaultSettings] <Microsoft.Dynamics.Nav.Types.AzureKeyVaultSettings>

(Specifies the Azure key vault settings. This parameter is available only if the EncryptionProvider is set to AzureKeyVault.)
[-ServerInstance] <String>

(Specifies the Microsoft Dynamics NAV Server instance that you want to mount the tenant against, such as DynamicsNAV90. You can specify either the fully qualified name, such as 'MyServer$DynamicsNAV90', or the short name, such as 'DynamicsNAV90'.)
[-DatabaseInstance] <System.String>

(Specifies the name of the SQL Server instance that hosts the database. You can also specify the instance in the DatabaseServer parameter, such as MyServer\MyInstance.)
[-DatabaseName] <System.String>

(Specifies the name of the Microsoft Dynamics NAV database that you want to mount against the Microsoft Dynamics NAV Server instance, such as 'Demo Database NAV (9-0)'.)
[-DatabaseServer] <System.String>

(Specifies the name of the database server that hosts the Microsoft Dynamics NAV database that you want to mount against the Microsoft Dynamics NAV Server instance.)
[-DefaultCompany] <System.String>

(Specifies the name of the company that NAS services, OData web services, and SOAP web services use if no other company is specified.)
[-DefaultTimeZone] <System.TimeZoneInfo>

(Specifies the default time zone that is used by the NAS services, OData web services, and SOAP web services for this tenant.

You can set the parameter to UTC, 'Server Time Zone', or the ID of a Windows Time Zone.

UTC specifies that all business logic for services on the server instance runs in Coordinated Universal Time (UTC).

'Server Time Zone' specifies that services use the time zone of the computer that is running Microsoft Dynamics NAV Server instance.

ID of a Windows Time Zone specifies that services use a Windows time zone as defined in the system registry under HKEY_LOCAL_MACHINE\SOFTWARE\Microsoft\Windows NT\CurrentVersion\Time Zones. For example, Romance Standard Time is a valid Windows time zone value.

If this parameter is not specified, the value is taken from the ServicesDefaultTimeZone setting in the CustomSetting.config file for the Microsoft Dynamics NAV Server instance.)
[-NasServicesEnabled]

(Specifies to enable NAS services on the tenant. The default value is false.)
[-RunNasWithAdminRights]

(Specifies the NAS services to run with administrator rights. This grants the NAS service the same permissions as the SUPER permission set in Microsoft Dynamics NAV without having to add the Microsoft Dynamics NAV Server service account as a user. The default is false.)
[[-ApplicationDatabaseCredentials] <PSCredential> ]

(Specifies the user name and password of the login account that the Microsoft Dynamics NAV Server instance will use to access the application database in SQL Server. This parameter configures the Microsoft Dynamics NAV Server instance to use SQL Server Authentication instead of Windows Authentication on the connection to the application database.

The login account must be a member of the db_owner role on the database.

This parameter is only relevant when you set with the ApplicationDatabaseServer and ApplicationDatabaseName parameters )
[[-ApplicationDatabaseName] <System.String> ]

(Specifies the name of the application database to use with the tenant database.

This parameter is only relevant if the Microsoft Dynamics NAV Server instance is configured for multitenancy. This parameter, together with the ApplicationDatabaseServer parameter, enables you to mount a tenant to the same Microsoft Dynamics NAV Server instance as the application database without having to connect a running Microsoft Dynamics NAV Server instance.)
[[-ApplicationDatabaseServer] <System.String> ]

(Specifies the SQL Server name and instance, such as MyServer\MyInstance, that hosts the application database that you want to use with the tenant database,.

This parameter, together with the ApplicationDatabaseName parameter, enables you to mount a tenant to the same Microsoft Dynamics NAV Server instance as the application database without having to connect to a running Microsoft Dynamics NAV Server instance.)
[-AllowAppDatabaseWrite]

(Specifies if the tenant can write to the application database. The default value is false.)
[-DatabaseCredentials <PSCredential> ]

(Specifies the user name and password of the login account that the Microsoft Dynamics NAV Server instance will use to access the tenant database in SQL Server. This parameter configures the Microsoft Dynamics NAV Server instance to use SQL Server Authentication instead of Windows Authentication on the connection to the database.

The login account must be a member of the db_owner role on the database.)
[-EncryptionProvider <Microsoft.Dynamics.Nav.Types.EncryptionProvider> ]

(Specifies the name of the encryption provider.)
[-Force] (Forces the command to run without asking for user confirmation.)

[-OverwriteTenantIdInDatabase]

(Specifies if the Mount-NAVTenant cmdlet must overwrite the tenant ID in the database if the database has been mounted as a tenant earlier. If this is false, and the tenant database has previously been mounted with a different tenant ID, an exception is thrown.)
[-Confirm] (Prompts you for confirmation before running the cmdlet.)

[-WhatIf] [ <CommonParameters>]

Use the DatabaseCredentials parameter to provide the login credentials of the database user that you want to use to access the tenant database.

Examples:
PS C:\> Mount-NAVTenant DynamicsNAV90 -Id 'Test' -DatabaseName 'Test_Database'

PS C:\> Mount-NAVTenant DynamicsNAV90 Test Test_Database

PS C:\> Mount-NAVTenant DynamicsNAV90 -Id 'Test' -DatabaseName 'Test_Database' -DatabaseCredentials (Get-Credential)

PS C:\> Get-NAVTenant Server1 | Mount-NAVTenant Server2

PS C:\> Get-NAVTenant Server1 | Dismount-NavTenant Server1 -Force | Mount-NAVTenant Server2

PS C:\> Mount-NAVTenant DynamicsNAV90 -Id 'Test' -DatabaseName 'Test_Database'-AlternateId @( "test.mydomain.com", "http://mydomain.sharepoint.com/sites/teamsite" )

PS C:\> Mount-NAVTenant -Id 'Test' -DatabaseName 'Test_Database' -DatabaseCredentials (Get-Credential) -ApplicationDatabaseServer 'MySQLServer\NAV' -ApplicationDatabaseName 'MyNavAppDatabase' -ApplicationDatabaseCredentials (Get-Credential) -KeyFilePath 'C:\key\nav.key' -KeyFilePassword (Get-Credential).Password

Configuring SQL Server Authentication in Microsoft Dynamics NAV 2016 – Part-2

Recall from my previous post Configuring SQL Server Authentication in Microsoft Dynamics NAV 2016 – Part-1, action is almost similar with few small differences when dealing with Multitenant Deployment.
Configure SQL Server Authentication on Microsoft NAV Server Instance in a Multitenant Deployment
How to configure a Microsoft Dynamics NAV database to use SQL Server Authentication with a Microsoft Dynamics NAV Server instance.

To configure a SQL Server Authentication on a Microsoft Dynamics NAV Server instance, you set up the server instance with the login credentials (user name and password) for the user accounts for the application and tenant databases in SQL Server.

To configure SQL Authentication on Microsoft NAV Server Instance using Microsoft Dynamics NAV Server Administration tool


  • Open the Microsoft Dynamics NAV Server Administration tool.

  • In the console tree, which is the left pane, expand the node for the computer that contains the Microsoft Dynamics NAV Server instance, and then select the Microsoft Dynamics NAV Server instance.

  • Configure SQL Server Authentication with the application database as follows:

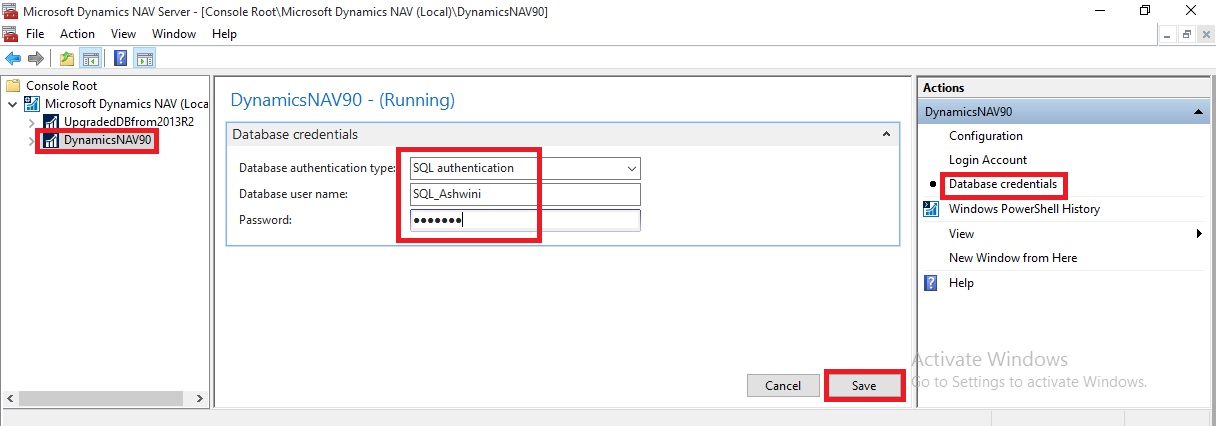
    • In the Actions pane, choose Database Credentials.

    • On the Database Credentials page, choose the Edit button.

    • Set the Database Authentication Mode to SQL Server Authentication.

    • In the Database User Name field, type the login name for the database user that you want to use to access the Microsoft Dynamics NAV application database in SQL Server.

    • In the Password field, type the login password for the database user that you want to use to access the Microsoft Dynamics NAV database in SQL Server.

    • Choose the Save button, and then on the Enable Encryption on SQL Server Connections dialog box, choose the OK button.


Encryption keys are used to help secure the login credentials over the connection between the Microsoft Dynamics NAV Server instance and the Microsoft Dynamics NAV database in SQL Server.

  • On the Information dialog box about encryption, choose the OK button.


This dialog box is to inform you to enable encryption on SQL Server connections, which is disabled by default.

  • If you want to enable encryption on SQL Server connections, in the Action pane, choose Configuration, and then choose the Edit button. In the Database tab, select Enable Encryption on SQL Connections, choose the Save button, and then the OK button.

  • To configure SQL Server Authentication with the tenant database, mount the tenant to the Microsoft Dynamics NAV Server instance and specify the login credentials (user name and password) for the database user that you want to use to access the Microsoft Dynamics NAV tenant database in SQL Server.


If the tenant is already mounted to the Microsoft Dynamics NAV Server instance, you must dismount the tenant, and mount it again.

Restart the server instance.

Thursday, 29 October 2015

Configuring SQL Server Authentication in Microsoft Dynamics NAV 2016 – Part-1

Microsoft Dynamics NAV 2016 supports SQL Server authentication between the Microsoft Dynamics NAV Server instance and the Microsoft Dynamics NAV database in SQL Server. Previously only Windows authentication was supported.

Set Up an Encryption Key

When using SQL Server authentication, Microsoft Dynamics NAV requires an encryption key to encrypt the credentials (user name and password) that the Microsoft Dynamics NAV Server instance uses to connect to the Microsoft Dynamics NAV database in SQL Server.

The encryption key must be installed on the computer where the Microsoft Dynamics NAV Server is installed and also in the database in SQL Server.

In a multitenant deployment, the encryption key must be installed in the application database.

To set up an encryption key, you can use one of the following methods:

  • You can create and import your own encryption key by using Microsoft Dynamics NAV 2016 Administration Shell cmdlets.

  • If you are configuring SQL Server authentication on a Microsoft Dynamics NAV Server instance for the first time, you can use the Microsoft Dynamics NAV Server Administration tool which can automatically create and install a system encryption key. If you decide to use this method, no action is required.


To create and import encryption key

  • In the Microsoft Dynamics NAV 2016 Administration Shell, run the New-NAVEncryptionkey


Create an encryption key and stores it in a file in a specified path on the computer or network.

Syntax
New-NAVEncryptionKey [-KeyPath] <String> [-Force] [-Password <SecureString> ] [-Confirm] [-WhatIf] [ <CommonParameters>]

The New-NAVEncryptionKey cmdlet enables you to specify a destination file for the key and specify a password to protect the file.

This creates a file that contains an encryption key. If you already have an encryption key file, you can skip this step.
Example: New-NAVEncryptionKey  -KeyPath "C:\UserData\SQLKey\MySQLKey" -Password (Get-Credential).Password

SQLServerAuthentication1

  • Run the Import-NAVEncryptionkey cmdlet to install the encryption key on the Microsoft Dynamics NAV Server instance and database.


Imports an encryption key from a file to a Microsoft Dynamics NAV Server instance and database in SQL Server.

Syntax
Import-NAVEncryptionKey [[-ServerInstance] <String> ] [-KeyPath] <String> -ApplicationDatabaseName <String> -ApplicationDatabaseServer <String> [-ApplicationDatabaseCredentials <PSCredential> ] [-Force] [-Password <SecureString> ] [-Confirm] [-WhatIf] [ <CommonParameters>]

Example: Import-NAVEncryptionKey -ServerInstance 'DynamicsNAV90' -KeyPath "C:\UserData\SQLKey\MySQLKey.key" -ApplicationDatabaseServer 'INDEL-AXT5283VM' -ApplicationDatabaseName 'Demo Database NAV (9-0)' -Password (Get-Credential).Password

SQLServerAuthentication2

You cannot import an encryption key on the Microsoft Dynamics NAV Server instance if an encryption key file already exists. You must first delete the encryption key from the computer where Microsoft Dynamics NAV Server is installed.

By default, encryption keys are stored in the C:\ProgramData\Microsoft\Microsoft Dynamics NAV\90\Server\Keys folder.

Configure SQL Authentication on the Database

This section describes how to configure a Microsoft Dynamics NAV database to use SQL Server Authentication with a Microsoft Dynamics NAV Server instance. You can complete the steps in this procedure by using SQL Server Management Studio or Transact-SQL.

Important : In a deployment where the Microsoft Dynamics NAV Server instance is configured as a multitenant server instance, you must complete the following procedure on the application database and tenant database.

To configure SQL Server Authentication on the database in SQL Server

  • Configure the SQL Server instance (Database Engine) that hosts the Microsoft Dynamics NAV database to use SQL Server Authentication.


To use SQL Server authentication, you configure the database instance to mixed authentication mode (SQL Server and Windows Authentication).

In the SQL Server instance, create a login that uses SQL Server authentication.
SQLServerAuthentication3

  • Map the login to a user in the Microsoft Dynamics NAV database, and add the user to the db_owner role of the Microsoft Dynamics NAV database.


SQLServerAuthentication4
Configure SQL Server Authentication on Microsoft NAV Server Instance (Non-Multitenant)
You configure the Microsoft Dynamics NAV Server instance with the login credentials (user name and password) of the user account in the Microsoft Dynamics NAV database in SQL Server that you want to use for authentication. You can do this using the Microsoft Dynamics NAV Server Administration tool or Microsoft Dynamics NAV 2016 Administration Shell.
To configure SQL Authentication on Microsoft NAV Server Instance using Microsoft Dynamics NAV Server Administration tool

  • Open the Microsoft Dynamics NAV Server Administration tool.

  • In the Actions pane, choose Database Credentials.

  • Set the Database Authentication Type to SQL Authentication.

  • In the Database User Name field, type the login name for the database user that you want to use to access the Microsoft Dynamics NAV database in SQL Server.


In the Password field, type the login password for the database user that you want to use to access the Microsoft Dynamics NAV database in SQL Server.
SQLServerAuthentication5

  • Choose the Save button, and then on the Enable Encryption on SQL Server Connections dialog box, choose the OK button.


SQLServerAuthentication6

Encryption keys are used to help secure the login credentials over the connection between the Microsoft Dynamics NAV Server instance and the Microsoft Dynamics NAV database in SQL Server.

  • On the Information dialog box about encryption, choose the OK button.


This dialog box is to inform you to enable encryption on SQL Server connections, which is disabled by default.
SQLServerAuthentication7

  • If you want to enable encryption on SQL Server connections, in the Action pane, choose Configuration, and then choose the Edit button. In the Database tab, select Enable Encryption on SQL Connections, choose the Save button, and then the OK button.


SQLServerAuthentication8

  • Restart the server instance.


Checkout my upcoming posts for more details on this.

Wednesday, 16 September 2015

Installing and Publishing the Jet Business Objects on the Microsoft Dynamics Server

To install the .fob file open the Microsoft Dynamics NAV Development Environment and then connect to the database.

  • Open the Object Designer (on the Tools menu, choose Object Designer)

  • Import the .fob file (on the File menu, choose Import)

  • Locate the import file (Jet Reports Objects.fob), and then choose Open.

  • The .fob file includes modified objects. When prompted choose Yes to import all objects.

  • Verify that no objects are to be skipped. Objects are skipped if the version of the object in the database is later than the one in the .fob file.

  • Choose the OK button to import the .fob file.


The .fob file installs a set of business objects in the range of 14125500-14125504 and Table 14125600.
JetExcel-3
Jet Express users must have Read, Insert, Modify, Delete (RIMD-) permissions to Table 4125600 “Jet Cancellation”.

Checkout upcoming posts for more information.

Saturday, 22 August 2015

Uploading License to Tenant in Multitenant Environment

When we deploy solution for Multitenant Environment ever Tenant will be required a Separate License. Depending upon the License agreement with Microsoft every Tenant will either share same License or individual License.

Assume we are implementing Distributor Management System. Where every Tenant is a different Business entity linked with the Parent Group.

In this case the Server & Network is provided by the Parent Group and other Business group will share information but they will use their specific License to use the system, doesn’t matter who pays for fee.

In any case we need to upload License to each database in Multitenancy.

Import-NAVServerLicense

Imports a license file into a Microsoft Dynamics NAV database.

Syntax
Parameter Set: __AllParameterSets

Import-NAVServerLicense [-ServerInstance] <String> [-Database <LicenseDatabase> ] [-Force] [-Tenant <TenantId> ] [-Confirm] [-WhatIf] [ <CommonParameters>]

Parameter Set: LicenseDataSet

Import-NAVServerLicense [-LicenseData] <Byte[]> [-Force] [-Confirm] [-WhatIf] [ <CommonParameters>]

Parameter Set: LicenseFileSet

Import-NAVServerLicense [-LicenseFile] <String> [-Force] [-Confirm] [-WhatIf] [ <CommonParameters>]

Detailed Description

Use the Import-NAVServerLicense cmdlet to import a license file into a Microsoft Dynamics NAV database. If the Microsoft Dynamics NAV Server account specified does not have access to the location where the license file is stored, an error results. Check the Event Log on the Microsoft Dynamics NAV Server computer to see what permissions are required.

After importing a new license, restart all Microsoft Dynamics NAV Server instances to activate the license for client users.

Parameters

-Database<LicenseDatabase>

Specifies the database into which to import the license file. The possible values are described in the following list:
Default = 0

Default; overrides the license file currently in use.

Master = 1

Forces the license file to be global.

NavDatabase = 2

Forces the license file to be local and stored in the Microsoft Dynamics NAV database that is used by the specified Microsoft Dynamics NAV Server instance.
Tenant = 3

Forces the license file to be local and stored in the Microsoft Dynamics NAV database that is used by the tenant that is specified in the Tenant parameter.


Aliasesnone
Required?false
Position?named
Default Valuenone
Accept Pipeline Input?false
Accept Wildcard Characters?false

-Force

Forces the command to run without asking for user confirmation.


Aliasesnone
Required?false
Position?named
Default Valuenone
Accept Pipeline Input?false
Accept Wildcard Characters?false

-LicenseData<Byte[]>

Specifies the content retrieved from the certificate file by using the Get-Content cmdlet. For more information, see the examples.


Aliasesnone
Required?true
Position?2
Default Valuenone
Accept Pipeline Input?false
Accept Wildcard Characters?false

-LicenseFile<String>


Aliasesnone
Required?true
Position?2
Default Valuenone
Accept Pipeline Input?false
Accept Wildcard Characters?false

-ServerInstance<String>

Specifies the name of a Microsoft Dynamics NAV Server instance. The default instance name is DynamicsNAV80. You can specify either the full name of an instance (such as MicrosoftDynamicsNavServer$myinstance) or the short name (such as myinstance).


Aliasesnone
Required?true
Position?1
Default Valuenone
Accept Pipeline Input?True (ByValue, ByPropertyName)
Accept Wildcard Characters?false

-Tenant<TenantId>

Specifies the ID of the tenant in which you want to import the license, such as Tenant1. This parameter is required unless the specified service instance is not configured to run multiple tenants.


AliasesId
Required?false
Position?named
Default Valuenone
Accept Pipeline Input?True (ByPropertyName)
Accept Wildcard Characters?false

-Confirm

Prompts you for confirmation before running the cmdlet.


Required?false
Position?named
Default Valuefalse
Accept Pipeline Input?false
Accept Wildcard Characters?false

-WhatIf

Shows what would happen if the cmdlet runs. The cmdlet is not run.


Required?false
Position?named
Default Valuefalse
Accept Pipeline Input?false
Accept Wildcard Characters?false

<CommonParameters>

This cmdlet supports the common parameters: -Verbose, -Debug, -ErrorAction, -ErrorVariable, -OutBuffer, and -OutVariable.

Inputs

The input type is the type of the objects that you can pipe to the cmdlet.

  • System.String


You can pipe a string that contains a Microsoft Dynamics NAV Server instance name to the cmdlet.

Outputs

The output type is the type of the objects that the cmdlet emits.

  • None


This cmdlet does not generate any output.

Examples

This example imports a license file that is named "fin.flf" from the current directory into the default database.
C:\PS>Import-NAVServerLicense DynamicsNAV80 -LicenseData ([Byte[]]$(Get-Content -Path "fin.flf" -Encoding Byte))

This example imports a license file that is named "fin.flf" from the current directory into the local Microsoft Dynamics NAV database that is used by the MyInstance Microsoft Dynamics NAV Server instance.
C:\PS>Import-NAVServerLicense MyInstance -LicenseData ([Byte[]]$(Get-Content -Path "fin.flf" -Encoding Byte)) -Database NavDatabase

This example imports a license file that is named "fin.flf" from the current directory into the master database.
C:\PS>Import-NAVServerLicense 'MicrosoftDynamicsNavServer$MyInstance' -LicenseData ([Byte[]]$(Get-Content -Path "fin.flf" -Encoding Byte)) -Database Master

This example imports a license file that is named "fin.flf" from the current directory into the database that is used by the specified tenant, Tenant1.
C:\PS>Import-NAVServerLicense 'MicrosoftDynamicsNavServer$MyInstance' -LicenseData ([Byte[]]$(Get-Content -Path "fin.flf" -Encoding Byte)) -Database Tenant –Tenant Tenant1

Let import the license to the Tenants which we created in our earlier post.

If you missed previous post you can find it here. Adding Tenants to multitenancy Environment

I have created the Folder and placed my Tenants License in this.

License-1
Set-ExecutionPolicy unrestricted -Force

Import-Module 'C:\Program Files\Microsoft Dynamics NAV\80\Service\NavAdminTool.ps1'

Import-NAVServerLicense MTenantDemo -Tenant 'Tenant-1' -LicenseData ([Byte[]]$(Get-Content -Path "C:\User Data\NAV 2015\MultiTenantDemo\Tenant License\Tenant-1.flf" -Encoding Byte))

Import-NAVServerLicense MTenantDemo -Tenant 'Tenant-2' -LicenseData ([Byte[]]$(Get-Content -Path "C:\User Data\NAV 2015\MultiTenantDemo\Tenant License\Tenant-2.flf" -Encoding Byte))

Import-NAVServerLicense MTenantDemo -Tenant 'Tenant-3' -LicenseData ([Byte[]]$(Get-Content -Path "C:\User Data\NAV 2015\MultiTenantDemo\Tenant License\Tenant-3.flf" -Encoding Byte))

Import-NAVServerLicense MTenantDemo -Tenant 'Tenant-4' -LicenseData ([Byte[]]$(Get-Content -Path "C:\User Data\NAV 2015\MultiTenantDemo\Tenant License\Tenant-4.flf" -Encoding Byte))

Import-NAVServerLicense MTenantDemo -Tenant 'Tenant-5' -LicenseData ([Byte[]]$(Get-Content -Path "C:\User Data\NAV 2015\MultiTenantDemo\Tenant License\Tenant-5.flf" -Encoding Byte))

Copy the above Script and paste into the Microsoft Dynamics NAV 2015 Administration Shell.

License-2

Our License have now successfully uploaded to respective databases. As the message suggest we need to re-start the service so that new License comes into effect.

You can use above Script to Upload License to individual Tenants, License could be different or same depends how you discussed with Microsoft and purchased.

Adding Tenants to Multitenancy Environment

In my previous post Creating the Multitenant Environment, We were done with the basic setup for MultiTenantDatabase NAV (8-0) Demo_App, the first Tenant MultiTenantDatabase NAV (8-0) Demo.

All other Tenants can now be created in similar fashion.

It is recommended to create a tenant template, and in turn use this template to make other tenants.

To create a template follow bellow steps:

  • Remove all users leaving only Administrator Account as Super Permission.

  • Remove any Transaction data specific to Company and other Setups

  • Take the backup of the database and keep it as template for other tenant’s database creation. Basically we will restore this database for each new tenant we need to add.


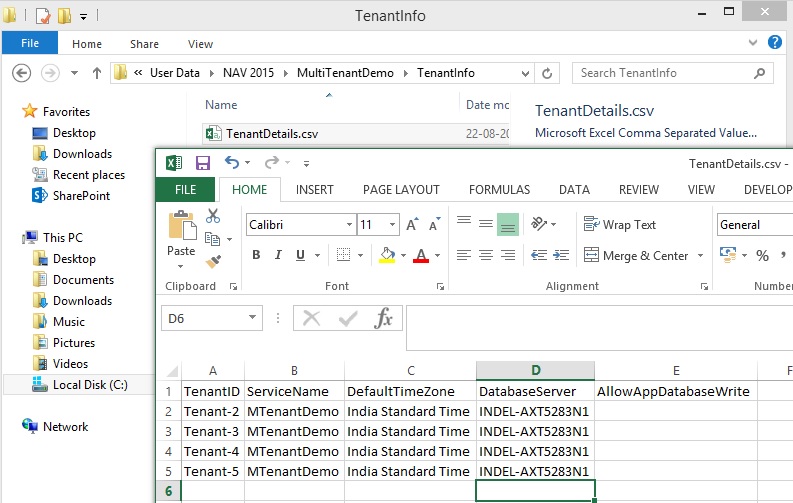
You can restore the database and mount it to the service one by one and rename the company name manually and do other modifications. But if you need to create 100 or 1000 tenants then this process will be quite time taking. To make this step easy we can use CSV file to store all necessary information and create a Shell Script to read information from CSV file and input as parameter to the commands to make this process fast and save with unnecessary effort.

Today I am going to discuss this, as a sample I have taken bare minimum information to get our task done. In real scenario many more things you may require but you can use this as a template and design your CSV and Script accordingly.

Let’s do the Preparation:

AddTenant-1
I have created the Folder structure as shown in above screen shot.

I will keep my CSV File in TenantInfo Folder.

AddTenant-2
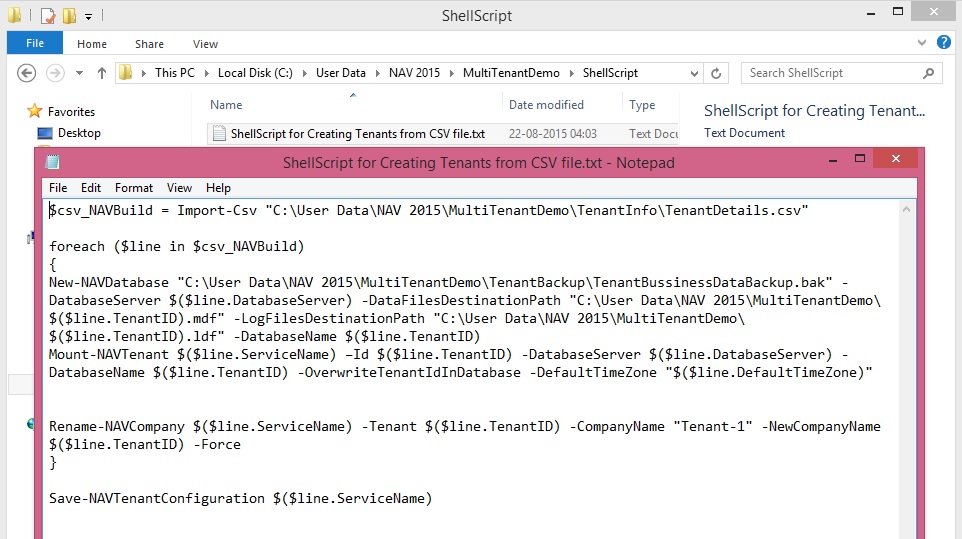
I will store my Shell Script in ShellScript Folder.

AddTenant-3
$csv_NAVBuild = Import-Csv "C:\User Data\NAV 2015\MultiTenantDemo\TenantInfo\TenantDetails.csv"

foreach ($line in $csv_NAVBuild)
{
New-NAVDatabase "C:\User Data\NAV 2015\MultiTenantDemo\TenantBackup\TenantBussinessDataBackup.bak" -DatabaseServer $($line.DatabaseServer) -DataFilesDestinationPath "C:\User Data\NAV 2015\MultiTenantDemo\$($line.TenantID).mdf" -LogFilesDestinationPath "C:\User Data\NAV 2015\MultiTenantDemo\$($line.TenantID).ldf" -DatabaseName $($line.TenantID)
Mount-NAVTenant $($line.ServiceName) –Id $($line.TenantID) -DatabaseServer $($line.DatabaseServer) -DatabaseName $($line.TenantID) -OverwriteTenantIdInDatabase -DefaultTimeZone "$($line.DefaultTimeZone)"
Rename-NAVCompany $($line.ServiceName) -Tenant $($line.TenantID) -CompanyName "Tenant-1" -NewCompanyName $($line.TenantID) -Force
}

Save-NAVTenantConfiguration $($line.ServiceName)

I will place my tenant database template file in TenantBackup Folder prepared as per above discussed step. I will take the SQL backup and place the .bak file in this folder.

AddTenant-4
Creating and Mounting Tenants

It is possible to create PowerShell scripts that aids the setup of Tenants. Basically, what the script does, is:

  1. Calls a CSV file (Comma separated file) with settings for all the Tenants

  2. Restores and creates new Tenants based on the tenant template SQL backup

  3. Mounts the new database as a tenant on NAV Server Instance

  4. Renames the default company name to the specified company name

  5. Saves NAV tenant configurations of NAV Server Instance


Open the Microsoft Dynamics NAV 2015 Administrator Shell, Make sure you run it as Administrator. Copy and Paste your above created script.
AddTenant-5
On completion of execution of script, Verify your Tenants are Mounted to the Service using Microsoft Dynamics NAV 2015 Administration.
AddTenant-6
Verify using SQL Server Management your all database is created.

AddTenant-7

Verify that the database Files are created in Specified Folder in the Script.

AddTenant-8

Verify that you are able to login to each Tenant database in RTC.

AddTenant-9

Now you are done with Creating the Tenants and Mounting the same to the Navision Service using CSV file and Shell Script.

Shell Script had made your life so easy, think if manually you have to do it for 5000 tenants how much time will you take to get this task done.

Friday, 21 August 2015

Creating the Multitenant Environment

Before you start I will recommend to go through my earlier post on Multitenancy Concept & Overview here.

To start with the below steps you will require 2 Accounts preferably Domain Accounts:

  • An Account for running MS Dynamics Navision Service

  • An Administrator account for Database & RTC


How to setup these accounts and what permissions are required for these accounts I would recommend to go through my earlier post on Provisioning the Microsoft Dynamics NAV Server Account here.

Add both the above account to Navision Database with Super permission.

In order to create a multitenant environment (here for Demo Database NAV (8-0)), the following steps need to be done:

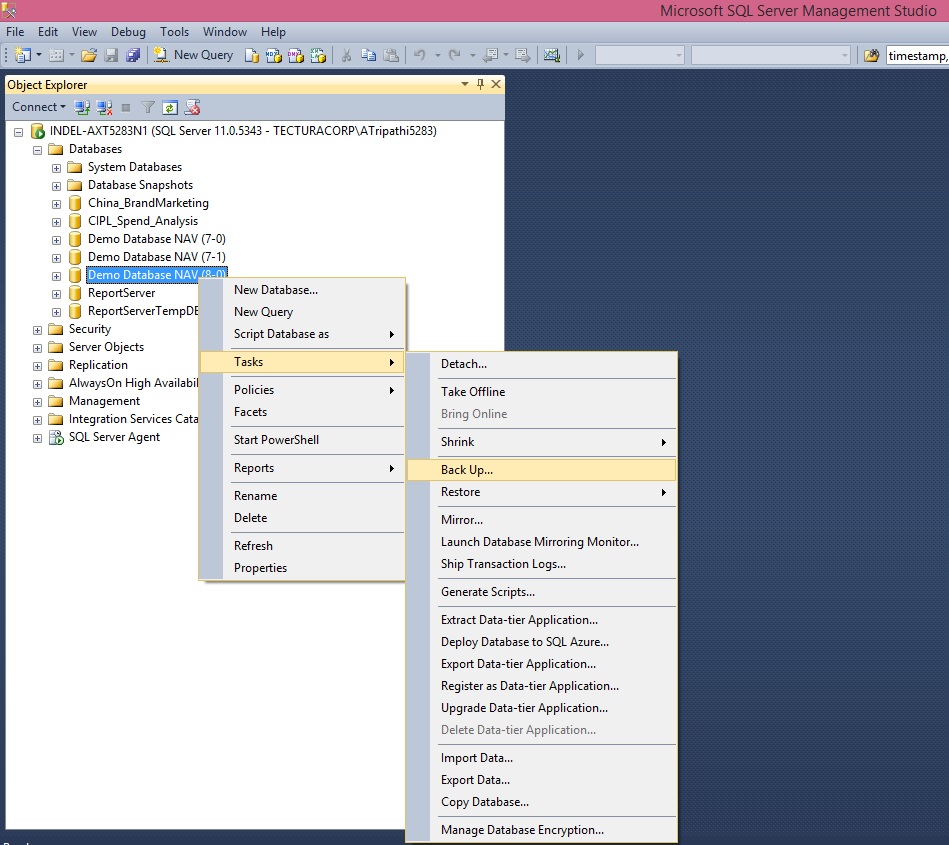
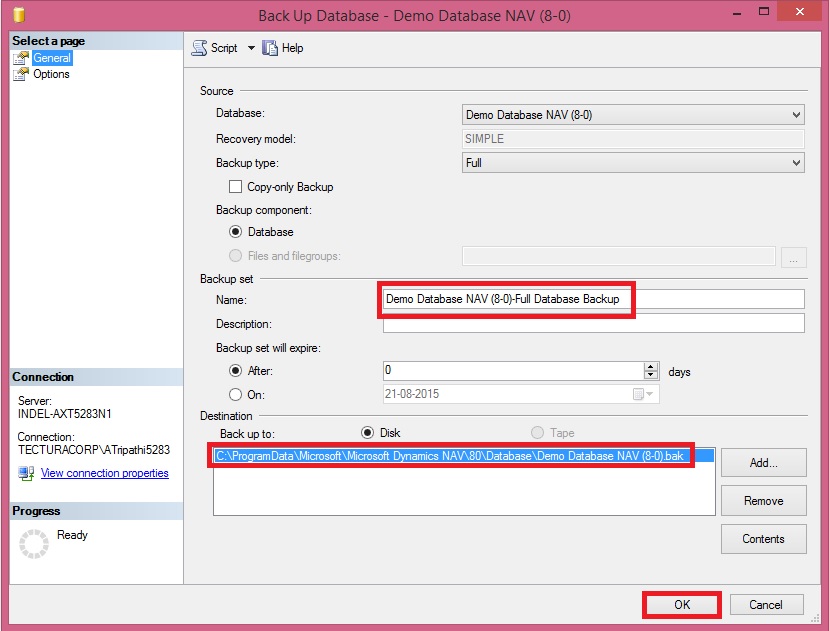
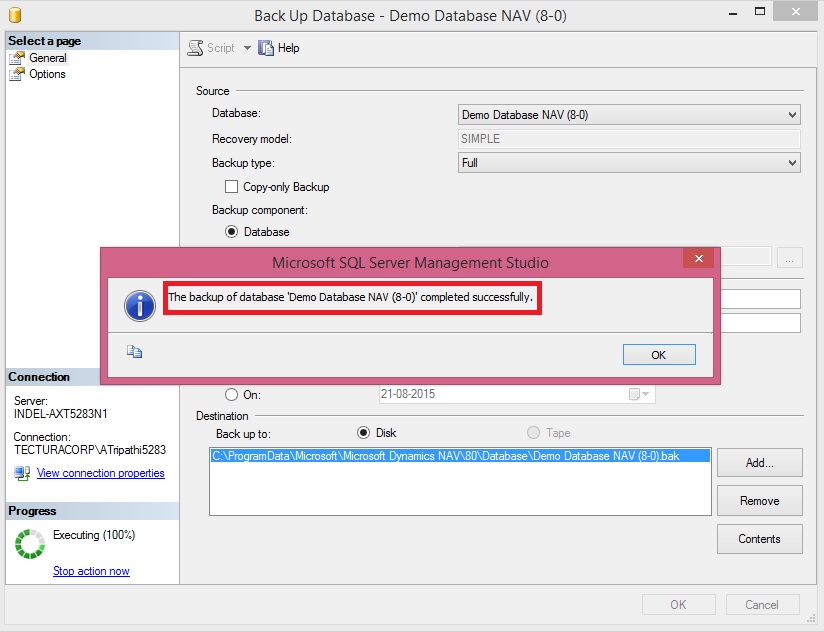
  • Take an SQL Backup of the running Demo Database NAV (8-0) database.


Multitenancy-1
Multitenancy-2
Multitenancy-3

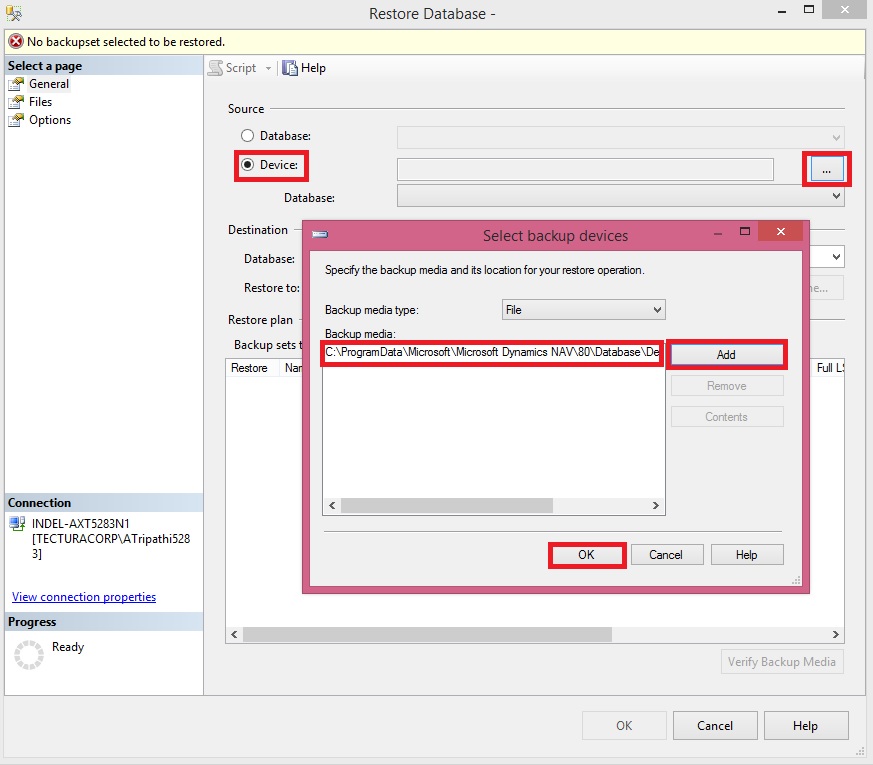
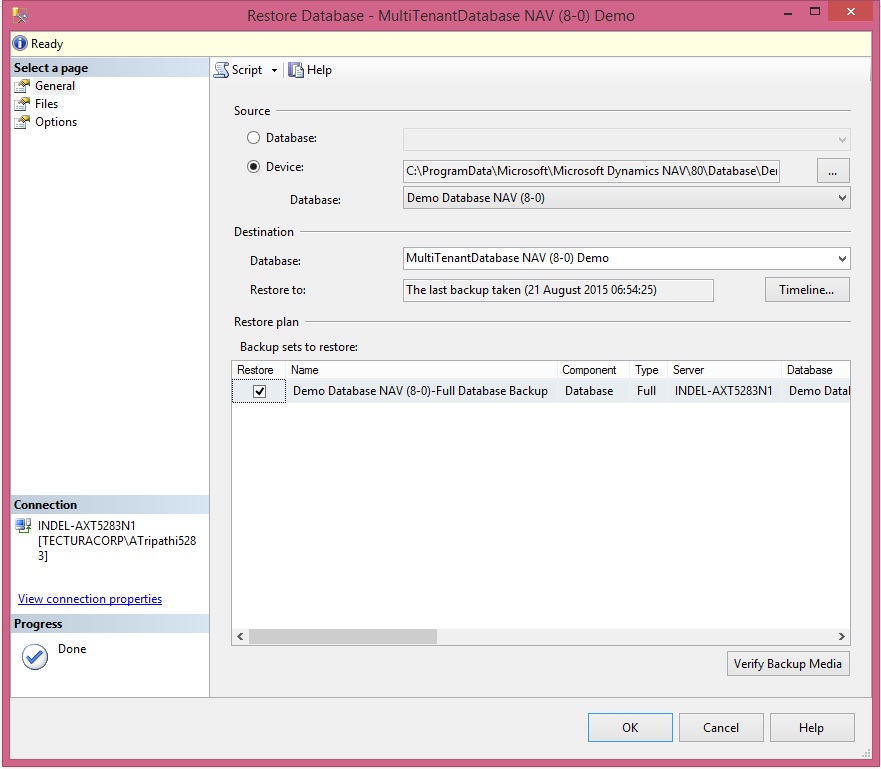
  • Restore the newly made SQL Backup to a new database (MultiTenantDatabase NAV (8-0) Demo).


Multitenancy-4
Multitenancy-5
Multitenancy-6
Multitenancy-7

  • On the NAV Server, using the NAV 2015 Administration console, create a new NAV Server Instance named MTenantDemo


Multitenancy-8

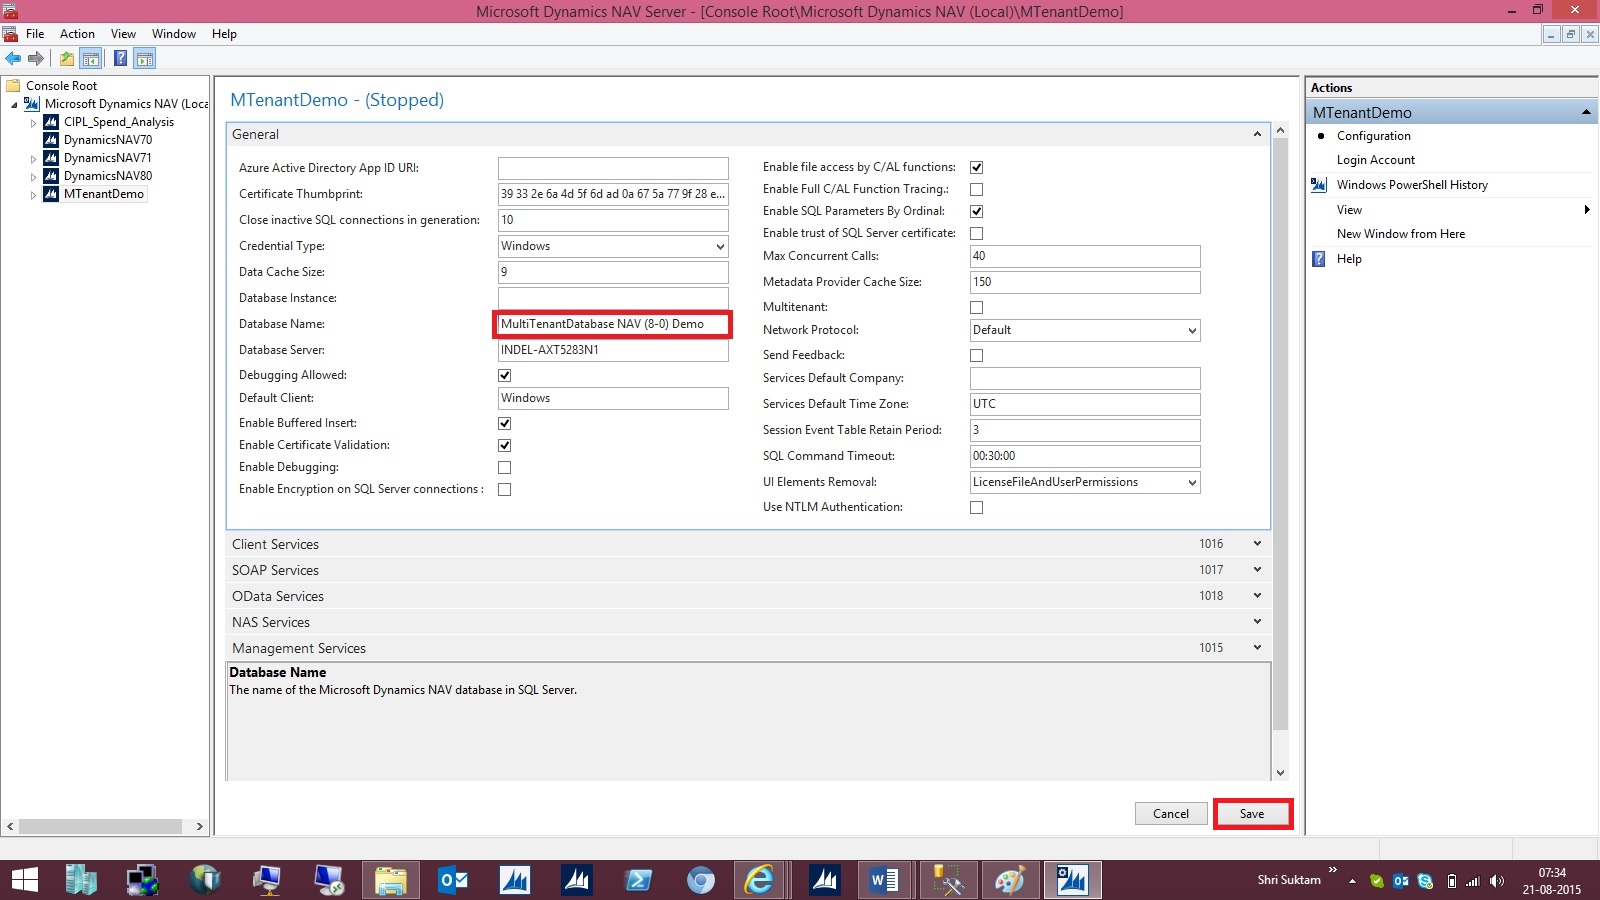
  • Edit the instance and set the database to newly created MultiTenantDatabase NAV (8-0) Demo database, and set the instance to be started with NAV Service user.


Multitenancy-9
Multitenancy-10

  • Start MTenantDemo – and see if you can log in

  • Once you have confirmed the MultiTenantDatabase NAV (8-0) Demo database and MTenantDemo is running, split the database in an application part and a data part:

    • Open the NAV 2015 Administration Shell (or Windows PowerShell ISE and load the NavAdminTool)

    • Export the application part from the MultiTenantDatabase NAV (8-0) Demo database to a new database (MultiTenantDatabase NAV (8-0) Demo_App):


Export-NavApplication -DatabaseServer INDEL-AXT5283N1 -DatabaseName 'MultiTenantDatabase NAV (8-0) Demo' -DestinationDatabaseName 'MultiTenantDatabase NAV (8-0) Demo_App’


  • Remove the application part from the MultiTenantDatabase NAV (8-0) Demo database:


Remove-NAVApplication -DatabaseServer INDEL-AXT5283N1 -DatabaseName 'MultiTenantDatabase NAV (8-0) Demo'

Multitenancy-11
Multitenancy-12

  • Using the NAV 2015 Administration console, edit the MTenantDemo instance and set the database to newly created MultiTenantDatabase NAV (8-0) Demo_App database
    Multitenancy-13

  • And select Multitenant (set it to True):

  • Save and restart MTenantDemo


Multitenancy-14

  • Either through a Powershell commandlet in the NAV 2015 Administration Shell or by using the NAV 2015 Administration console mount a tenant named Tenant-1 on the MTenantDemo NAV Instance:


Multitenancy-15
Multitenancy-16
Multitenancy-17

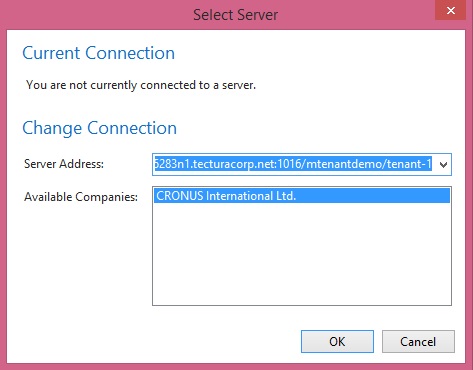
  • Start NAV using the new tenant:


Multitenancy-18

  • In Companies rename the Company Name to Tenant-1

  • Take an SQL Backup using the MultiTenantDatabase NAV (8-0) Demo_App database, and call it “App_template.bak”

  • Take an SQL Backup using the MultiTenantDatabase NAV (8-0) Demo database, and call it “Tenant_template.bak”


You now have a template you can use when you want to create a application and a tenant.

Restore the Tenant Database as Tenant-2, Tenant-3, Tenant-4, Tenant-5 etc.

Mount the Tenant Databases to NAV Service MTenantDemo as per above steps.

Now you have One Application & 5 Business Data Tenants Mounted.

You will do development in Application Database MultiTenantDatabase NAV (8-0) Demo_App and then Sync your modifications to Business Data Databases named Tenant-1/2/3/4/5 etc.

To Sync your objects to Tenants you will use below script in NAV 2015 Administration Shell:
Set-ExecutionPolicy unrestricted –Force

Import-Module 'C:\Program Files\Microsoft Dynamics NAV\80\Service\NavAdminTool.ps1'

Sync-NAVTenant MTenantDemo -Force -Tenant ‘MultiTenantDatabase NAV (8-0) Demo’

I will explain in more detail on Creating Tenants, Synchronizing Tenants and uploading License for Tenants in more details in my next upcoming post.