Monday, 3 August 2015

First Achievement within Month

I have started Blogging from June 27 2015 here.

Syndicated my blog to Microsoft Dynamics Navision Community 24 days ago.

And today I received below award. Feeling Happy.

Will keep helping others request support from all the visitors.
Award

Usage of RUNREQUESTPAGE, EXECUTE, SAVEAS and PRINT function of Reports Object

Today we will discuss usage of RUNREQUESTPAGE, EXECUTE, SAVEAS and PRINT function of Report Object.

You will be using RUNREQUESTPAGE function to run the request page of desired Report.

We will save the value of Parameters in Table for further use. For this we will require to create a table with below structure let name it as Report Request Parameters.

Create a table called Report Request Parameters that has the following fields.


Field Name Data Type Length
ReportIdInteger
UserIdCode100
ParametersBLOB

ReportParameter-1

Then we will use these value with

EXECUTE – To preview the report.

SAVEAS – To save it as pdf file.

PRINT – To print the Report.

To continue with our demo we will require to create a codeunit, let’s name it as Using Report Functions.

We will add the following variables in the C/AL Globals window.


Variable name DataType Subtype Length
ReportParametersRecordReport Request Parameters
XmlParametersText
OStreamOutStream
IStreamInStream
CurrentUserCode100
ContentFile
TempFileNameText

ReportParameter-2

Now we will add the following code to the OnRun trigger of the codeunit.

We will be taking Report 206 as an example for this demo.

ReportParameter-3

You can copy below code for your demo.
// Use the REPORT.RUNREQUESTPAGE function to run the request page to get report parameters

XmlParameters := REPORT.RUNREQUESTPAGE(206);

CurrentUser := USERID;

// Save the request page parameters to the database table

WITH ReportParameters DO BEGIN

// Cleanup

     IF GET(206,CurrentUser) THEN

DELETE;

SETAUTOCALCFIELDS(Parameters);

ReportId := 206;

UserId := CurrentUser;

Parameters.CREATEOUTSTREAM(OStream,TEXTENCODING::UTF8);

MESSAGE(XmlParameters);

OStream.WRITETEXT(XmlParameters);

INSERT;

END;

CLEAR(ReportParameters);

XmlParameters := '';

// Read the request page parameters from the database table

WITH ReportParameters DO BEGIN

SETAUTOCALCFIELDS(Parameters);

GET(206,CurrentUser);

Parameters.CREATEINSTREAM(IStream,TEXTENCODING::UTF8);

IStream.READTEXT(XmlParameters);

END;

// Use the REPORT.SAVEAS function to save the report as a PDF file

Content.CREATE('TestFile.pdf');

Content.CREATEOUTSTREAM(OStream);

REPORT.SAVEAS(206,XmlParameters,REPORTFORMAT::Pdf,OStream);

Content.CLOSE;

// Use the REPORT.EXECUTE function to preview the report

REPORT.EXECUTE(206,XmlParameters);

// Use the REPORT.Print function to print the report

REPORT.PRINT(206,XmlParameters);

We are done, definitely this will help you doing some useful stuffs in your projects.

Run the Codeunit and see the output. You will get three output
a) Report Output will be saved as pdf, you can specify your custom path to save the file to specified location.

b) Report Print Preview

c) Report will be send for Printing

Saturday, 1 August 2015

Testing Best Practices

There is always trade-off between Quality & Quantity of deliverables.

Sometimes small Partners don’t want to invest on resources and time for their deliverables to make big profits.

Sometimes customers are not interested in paying more for their customizations requested, their after they keep investing on recursive fixes for their solutions.

Sometime requirement is not well aligned with Business Logic and the process keeps refining over the time.

Which leads to arguments on Product capability and Partner Quality of work.

Whatsoever may be the reason but before any piece of code is moved to the Production environment should be well tested and accepted by the clients/customers.

Microsoft recommends the following best practices for designing your application tests:

  • Test code should be kept separate from the code that is being tested. That way, you can release the tested code to a production environment without releasing the test code.

  • Test code should test that the code being tested works as intended both under successful and failing conditions. These are called positive and negative tests. The positive tests validate that the code being tested works as intended under successful conditions. The negative tests validate that the code being tested work as intended under failing conditions.


    • In positive tests, the test function should validate the results of application calls, such as return values, state changes, or database transactions.

    • In negative tests, the test function should validate that the intended errors occur, error messages are presented, and the data has the expected values.


  • Automated tests should not require user intervention.

  • Tests should leave the system in the same well-known state as when the test started so that you can re-run the test or run other tests in any order and always start from the same state.

  • Test execution and reporting should be fast and able to integrate with the test management system so that the tests can be used as check-in tests or other build verification tests, which typically run on unattended servers.

  • Create test functions that follow the same pattern:


    • Initialize and set up the conditions for the test.

    • Invoke the business logic that you want to test.

    • Validate that the business logic performed as expected.


For more details see below Links:

Creating a Test Codeunit and Test Function
Creating a Test Runner Codeunit
Adding a Test to a Test Runner Codeunit

Adding a Test to a Test Runner Codeunit

How to add a line to test runner codeunit that runs the new TestVendorDiscount codeunit.

The test runner codeunit runs all the test codeunits that you may have created to test the other customized functionality.

To add a test to a test runner codeunit

  • In the development environment, on the Tools menu, choose Object Designer.

  • In Object Designer, choose Codeunit, select the existing test runner codeunit, and then choose the Design button.

  • In the C/AL Editor, in the OnRun function, add the following code.


CODEUNIT.RUN(CODEUNIT::TestVendorDiscount);


  • On the File menu, choose Save.


For more details see below posts:

Creating a Test Codeunit and Test Function
Creating a Test Runner Codeunit

Creating a Test Runner Codeunit

Follow below Steps to Create Test Runner

  • In the development environment, on the Tools menu, choose Object Designer.

  • In Object Designer, choose Codeunit, and then choose New.

  • On the View menu, choose Properties.

  • In the Properties window, in the Subtype field, select TestRunner to specify that this is a test runner codeunit.

  • In the TestIsolation field, specify which changes to that you want to roll back. You can choose from the following values:


    • Disabled

    • Codeunit

    • Function


TestCu-5


Value Description
DisabledDo not roll back any changes to the database. Tests are not isolated from each other.This is the default value.
CodeunitRoll back all changes to the database after each test codeunit executes.
FunctionRoll back all changes to the database after each test function executes.

It is recommend that you design tests to be independent of each other. Tests might read from and write to the same database, which means that tests can interact with each other.

If tests interact, then you may experience incorrect test results.

To eliminate test interactions, use the TestIsolation property to roll back changes to the database after each test function or after each test codeunit.

If you specify that you want to roll back database changes, then all database changes are rolled back, including changes that were explicitly committed to the database during the test by using the COMMIT function.

  • In the C/AL Editor, in the OnRun function, enter code to run the test codeunits. For example, the following code in the OnRun function of a test runner codeunit runs test codeunits.


CODEUNIT.RUN(CODEUNIT::TestVendorDiscount);


Note
You may want to define your test suite in a table and then write code in the OnRun function of the test runner codeunit to iterate through items in the table and run each test codeunit.


  • (optional) To create an OnBeforeTestRun trigger, do the following steps:


    • On the View menu, choose C/AL Globals.

    • In the C/AL Globals window, on the Functions tab, on a new line in the Name field, enter OnBeforeTestRun, and then choose Locals.

    • In the C/AL Locals window, on the Parameters tab, enter the following.


TestCu-6


    • In the C/AL Locals window, on the Return Value tab, enter the following


TestCu-7


    • Close the C/AL Locals window.

    • In the C/AL Editor, in the OnBeforeTestRun trigger, enter code that executes before each test function. Typically, the code in the OnBeforeTestRun function determines if the test function should execute and returns true if it should. Otherwise, the trigger returns false. The OnBeforeTestRun trigger may also initialize logging variables. For example, the following code initializes a logging variable and returns true to indicate that the test function should execute. This example requires that you create the following global variable.


TestCu-8

  • (optional) Do the following steps to create an OnAfterTestRun trigger:


    • On the View menu, choose C/AL Globals.

    • In the C/AL Globals window, on the Functions tab, on a new line in the Name field, enter OnAfterTestRun, and then choose Locals.

    • In the C/AL Locals window, on the Parameters tab, enter the following.


TestCu-9


    • Close the C/AL Locals window.

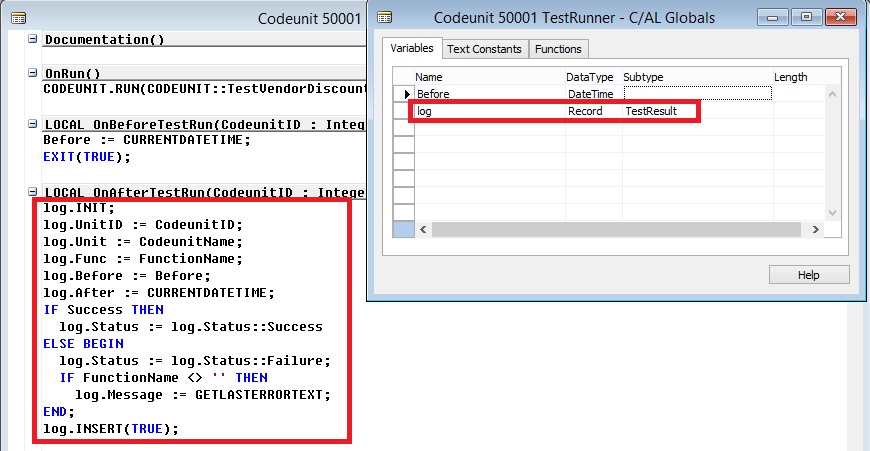
    • In the C/AL Editor, in the OnAfterTestRun trigger, enter code that executes after each test function. For example, the following code logs the results of the tests to the test reporting system. This example requires that you create a record variable named log.


TestCu-10

TestCu-11
log.INIT;

log.UnitId := CodeunitId;

log.Unit := CodeunitName;

log.Func := FunctionName;

log.Before := Before;

log.After := CURRENTDATETIME;

If Success THEN

log.Status := log.Status::Success

ELSE BEGIN

log.Status := log.Status::Failure;

IF FunctionName <> '' THEN

log.Message := GETLASTERRORTEXT;

END

log.INSERT(true);

Note

If you implement the OnAfterTestRun trigger, then it suppresses the automatic display of the results message after the test codeunit runs.

  • On the File menu, choose Save.

  • In the Save As window, in the ID field, enter an ID and in the Name field, enter a name for the codeunit. Verify that the Compiled check box is selected, and then choose OK.


For more details see also below posts:

Creating a Test Codeunit and Test Function
Adding a Test to a Test Runner Codeunit

Creating a Test Codeunit and Test Function

Let’s creates the test function, which tests the Purch-Calc.Discount functionality, to this test codeunit.

To create the test codeunit and test function

  • In the development environment, on the Tools menu, choose Object Designer.

  • In Object Designer, choose Codeunit, and then choose New.

  • On the View menu, choose Properties.

  • In the Properties window, in the Subtype field, select Test to specify that this is a test codeunit.

  • On the View menu, choose C/AL Globals.

  • In the C/AL Globals window, on the Functions tab, enter CalculateVendorDiscount. This is the name of the test function.


TestCU-1


Note
By default, functions that you add to test codeunits have the FunctionType property set to Test.


  • On the Functions tab, choose Locals.

  • In the C/AL Locals window, on the Variables tab, enter the following variables, which you will use in the CalculateVendorDiscount test function.


TestCU-2

Important

Be sure to create these variables on the Variables tab, not on the Parameters tab. If you create them on the Parameters tab, then you get an error when you compile that says the test method signature is invalid

  • In the C/AL Locals window, on the Text Constants tab, in the Name field, enter VendorDiscountError. In the ConstValue field, enter Vendor Discount Error - Line Amount: %1, Discount: %2, Discount Amount: %3.


TestCU-3

  • Close the C/AL Locals window and the C/AL Globals window.

  • In the C/AL Editor, in the CalculateVendorDiscount function, enter the following code.


TestCU-4

You can copy above code from below:
Discount := RANDOM(99) + 1; // Set Discount > 0, <= 100

// Find purchase line.

PurchaseLine.SETFILTER("Line Amount", '>0');

PurchaseLine.SETFILTER("Allow Invoice Disc.", '=%1', TRUE);

IF NOT (PurchaseLine.FINDFIRST) THEN

ERROR('No Purchase Line found for the Calculate Vendor Discount test');

// Create vendor discount.

WITH PurchaseLine DO BEGIN

IF NOT (VendorDiscount.GET("Buy-from Vendor No.", "Currency Code", "Line Amount")) THEN BEGIN

VendorDiscount.INIT;

VendorDiscount.Code := "Buy-from Vendor No.";

VendorDiscount.VALIDATE("Currency Code","Currency Code");

VendorDiscount.VALIDATE("Minimum Amount","Line Amount");

VendorDiscount.INSERT(TRUE);

END;

END;

VendorDiscount.VALIDATE("Discount %", Discount);

VendorDiscount.MODIFY(TRUE);

// Run codeunit "Purch.-Calc.Discount" for calculating discount.

PurchCalcDisc.RUN(PurchaseLine);

PurchaseLine.GET(PurchaseLine."Document Type",PurchaseLine."Document No.",PurchaseLine."Line No.");

// Validate purchase discount amount

WITH PurchaseLine DO BEGIN

IF NOT (ROUND("Line Amount" * Discount / 100) = "Inv. Discount Amount") THEN

ERROR(VendorDiscountError, "Line Amount", Discount, "Inv. Discount Amount" );

END;

The code in this test function prepares the test data by setting a random discount amount, getting a record from the Purchase Line table that satisfies two filters, and creating a record in the Vendor Invoice Disc. table with the random discount amount.

Next, it runs the Purch-Calc.Discount codeunit, which contains the code that is being tested. Finally, it validates the results of running the Purch-Calc.Discount codeunit and raises an error if the results are not as expected.

Note

This test code does not guarantee that the state of the database after you run the test is the same as the state of the database before you run the test.

  • On the File menu, choose Save.

  • In the Save As window, in the ID field, enter ID. In the Name field, enter TestVendorDiscount. Verify that the Compiled check box is selected, and then choose the OK button.


Now create additional test functions in the TestVendorDiscount test codeunit to test other aspects of vendor discounts.

These test functions should include negative tests, which validate that the code being tested works as intended under failing conditions.

For more details See below posts:

Creating a Test Runner Codeunit
Adding a Test to a Test Runner Codeunit

Defining Action Scope for Microsoft Dynamics NAV Pages - in Navision 2015

When developing pages for Microsoft Dynamics NAV Tablet client that include a repeater control, it is useful to be able to define whether the actions available on a page apply to the whole page or are related to the repeater control on the page. The purpose of the Scope property is to enable application developers to add row-specific actions to the shortcut menu which is available to the user on each line. This gives users a more direct way to invoke actions that relate to the selected row/line.

This is the case when you have, for example, Line Comments which are related to a line, but appear in the ribbon. You can specify the scope of action by setting the Scope property on the page action to be either Page or Repeater.

Specifies the scope of the action to be either page-specific, or specific to a repeater control. The Scope property has two options; Page and Repeater.

The Scope property is only used on pages that include a repeater control and it offers a way to determine the scope of an action to be the page or to be specific to the repeater control. The default behaviour of the Scope property is Page.

Let’s see how to do the same:

  • Open a Page which have repeaters for example I am using Page 42 Sales Order.


ScopeProperty

  • Select View Page Action.

  • Select the Action for which you wish to change the Scope Property, for example I have selected the Statistics for demo purpose.


The Scope property has the following effect:

  • On a Microsoft Dynamics NAV Windows client, the Scope property has no effect. All actions are shown in the ribbon.

  • On a Microsoft Dynamics NAV Web client, if the Scope property is set to Page, the action will be shown in the ribbon. If the Scope property is set to Repeater the action will be shown in both the repeater control and in the ribbon.

  • On a Microsoft Dynamics NAV Tablet client, if the Scope property is set to Page the action will be shown in the page action menu. If the Scope property is set to Repeater, the action is moved from the page action menu to the repeater control shortcut menu.