- In the development environment, on the Tools menu, choose Object Designer.
- In Object Designer, choose Codeunit, and then choose New.
- On the View menu, choose Properties.
- In the Properties window, in the Subtype field, select TestRunner to specify that this is a test runner codeunit.
- In the TestIsolation field, specify which changes to that you want to roll back. You can choose from the following values:
- Disabled
- Codeunit
- Function

| Value | Description |
| Disabled | Do not roll back any changes to the database. Tests are not isolated from each other.This is the default value. |
| Codeunit | Roll back all changes to the database after each test codeunit executes. |
| Function | Roll back all changes to the database after each test function executes. |
It is recommend that you design tests to be independent of each other. Tests might read from and write to the same database, which means that tests can interact with each other.
If tests interact, then you may experience incorrect test results.
To eliminate test interactions, use the TestIsolation property to roll back changes to the database after each test function or after each test codeunit.
If you specify that you want to roll back database changes, then all database changes are rolled back, including changes that were explicitly committed to the database during the test by using the COMMIT function.
- In the C/AL Editor, in the OnRun function, enter code to run the test codeunits. For example, the following code in the OnRun function of a test runner codeunit runs test codeunits.
CODEUNIT.RUN(CODEUNIT::TestVendorDiscount);
| Note | |
| You may want to define your test suite in a table and then write code in the OnRun function of the test runner codeunit to iterate through items in the table and run each test codeunit. |
- (optional) To create an OnBeforeTestRun trigger, do the following steps:
- On the View menu, choose C/AL Globals.
- In the C/AL Globals window, on the Functions tab, on a new line in the Name field, enter OnBeforeTestRun, and then choose Locals.
- In the C/AL Locals window, on the Parameters tab, enter the following.

- In the C/AL Locals window, on the Return Value tab, enter the following

- Close the C/AL Locals window.
- In the C/AL Editor, in the OnBeforeTestRun trigger, enter code that executes before each test function. Typically, the code in the OnBeforeTestRun function determines if the test function should execute and returns true if it should. Otherwise, the trigger returns false. The OnBeforeTestRun trigger may also initialize logging variables. For example, the following code initializes a logging variable and returns true to indicate that the test function should execute. This example requires that you create the following global variable.

- (optional) Do the following steps to create an OnAfterTestRun trigger:
- On the View menu, choose C/AL Globals.
- In the C/AL Globals window, on the Functions tab, on a new line in the Name field, enter OnAfterTestRun, and then choose Locals.
- In the C/AL Locals window, on the Parameters tab, enter the following.

- Close the C/AL Locals window.
- In the C/AL Editor, in the OnAfterTestRun trigger, enter code that executes after each test function. For example, the following code logs the results of the tests to the test reporting system. This example requires that you create a record variable named log.
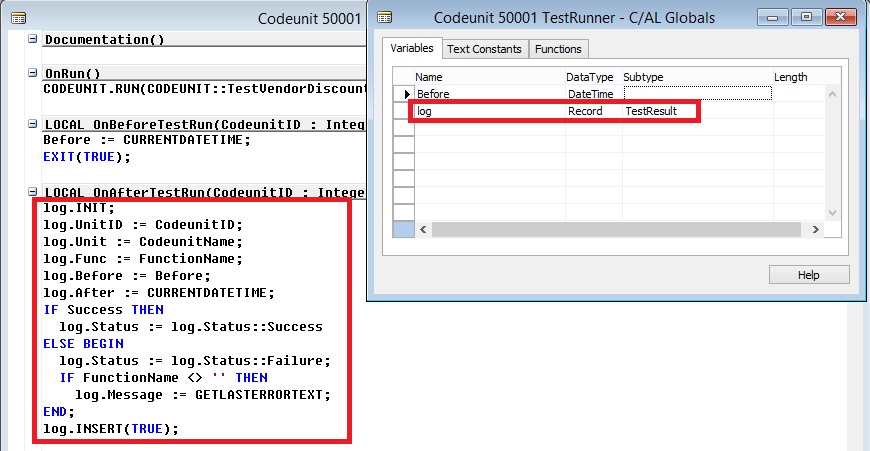

log.INIT;
log.UnitId := CodeunitId;
log.Unit := CodeunitName;
log.Func := FunctionName;
log.Before := Before;
log.After := CURRENTDATETIME;
If Success THEN
log.Status := log.Status::Success
ELSE BEGIN
log.Status := log.Status::Failure;
IF FunctionName <> '' THEN
log.Message := GETLASTERRORTEXT;
END
log.INSERT(true);
Note
If you implement the OnAfterTestRun trigger, then it suppresses the automatic display of the results message after the test codeunit runs.
- On the File menu, choose Save.
- In the Save As window, in the ID field, enter an ID and in the Name field, enter a name for the codeunit. Verify that the Compiled check box is selected, and then choose OK.
For more details see also below posts:
Creating a Test Codeunit and Test Function
Adding a Test to a Test Runner Codeunit
[…] Creating a Test Runner Codeunit Adding a Test to a Test Runner Codeunit […]
ReplyDelete[…] Creating a Test Codeunit and Test Function Creating a Test Runner Codeunit […]
ReplyDelete[…] a Test Codeunit and Test Function Creating a Test Runner Codeunit Adding a Test to a Test Runner […]
ReplyDelete