Showing posts with label and. Show all posts

Tuesday, 26 July 2016

Jet Professional 2017 - Introduction and Installation

Why to switch to and What's New in Jet Professional 2017?

Its valid question same came to my mind also when i heard about new Release.

Then i tried to explore a bit about it and got an information about some exciting features introduced with it. I will discuss as i progress with my evaluation and exploration with these features.

Here i am giving bit overview about some features and limit to Installation topic in this post. If you wish to know more you will have to wait for my next few upcomming posts.

As per Jet Report Sources:
Jet Professional 2017 makes sharing your reports easier than ever before!  

Reporting with (and without) the Jet add-in for Excel

The Jet Web Portal is an online interface that provides an easy-to-manage repository for your organization’s reports.

Using the web interface and Office 365 Online, you can allow any of your network users – whether they have Excel and the Jet add-in installed or not – to view reports directly from their web browser.

Jet Mobile for Jet Enterprise

Jet Professional integrates with the Jet Mobile web client – allowing you to log into one site to see and run all your reports - and to see all of your business intelligence dashboards.

And... Jet Mobile for Jet Enterprise includes many new features - making your dashboards more powerful and even easier to use.

What's New?

Publishing to the Jet Web Portal


The Jet ribbon within Excel includes the ability to publish your reports to the Jet Web Portal.  The Jet Web Portal provides a manageable repository for your organization’s reports. All your users – whether they have Excel and Jet Professional installed or not – can run and view reports directly from their web browser.


What is Jet Web Portal


Jet Professional 2017 represents a new way to manage, run and view your business reports. Designed for today’s always-connected, always-moving workforce, Jet Professional 2016 introduces a new Information Management System that allows business users access to their business reports using virtually any device through a simple web interface.


As a user, you don’t need to install anything to run and view reports. Within the Jet Web Portal, you can quickly find the report that you’re after, specify report parameters, run the report to get up-to-the-minute data and view it in Excel Online.


With features like sharing, search, version control and report permissions, Jet Professional 2017 is a complete report management system.


Will comeup with more detailed about new features in my upcomming posts.

Let us move to Installation part.

To get the installation file go to this link : https://www.jetreports.com/support/product-downloads/

After downloading you will get the Jet Professional Installation Files.Zip, extract it.

Install-1

Befor you start installation make sure no Excel instance is running on your system.

I am doing simple one system Instalation, will come up with more details and other options later.

Double click to Setup file to begin with installation.

Install-2

If you have Activation code enter it or you can continue and activate later.

Install-3

Select instalation type as desired, i am installing All Components.

Install-4

Select the features you want to install, since i am performing complete install, so i am accepting all as suggested by default.

Install-5

Select the Account to run the service, and don't forget to select Add rules to Windows Firewall. Rest all as default suggested.
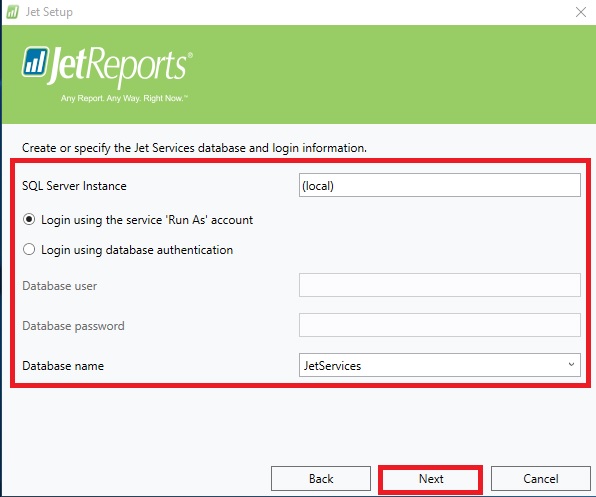
Install-6

Select the SQL Instance for Jet Service Database and login method.
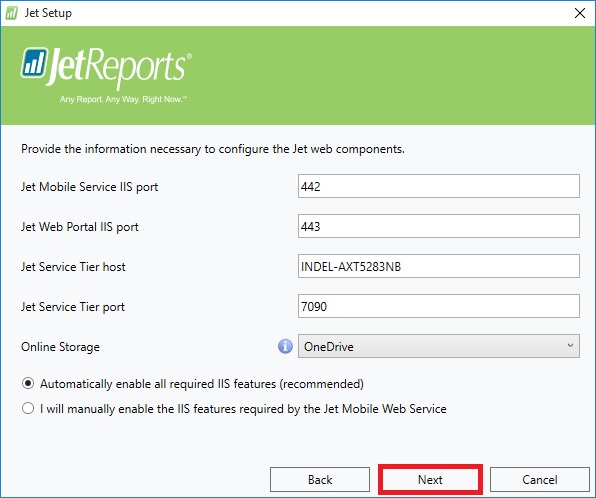
Install-7

Select desired ports and host detail or accept as suggested as default.

Install-8

Enter Jet Service Tier details or accept suggested as default.

Now your pre-configuration part is completed. Click on Install to proceed with Jet Components Instalation.
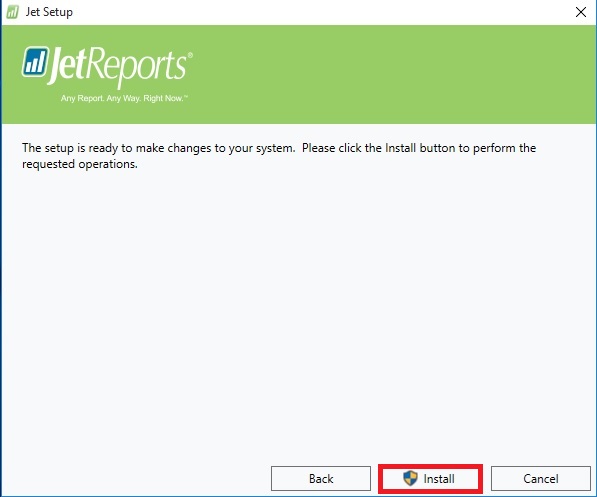
Install-10

Click on Install to proceed.

Install-11

Click on Finish to exit Instalation wizard, your Jet is now installed with above provided configuration.

Install-12

Next Step is to Activate your Jet Professional.

From Jet Tab on Ribbon select Activate Jet Professional.

choose the desired option.
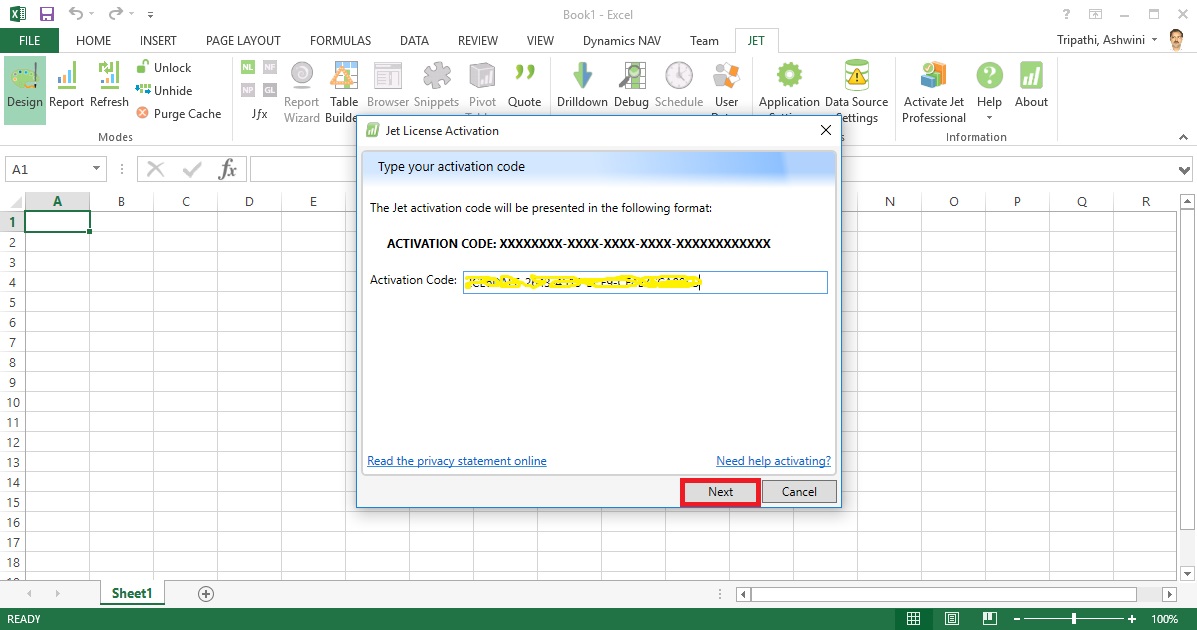
Install-13

Enter your activation code and click on Next.

Install-14

Copy the message and send to the mentioned e-mail id and click Next.

Install-15

Close to exit.

Wait for the Activation Token, it may take upto 24 hours to receive mail with this code.
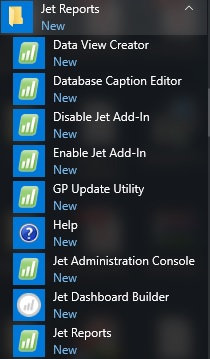
Install-16

If you check your Start Menu you will find these components got installed.
Install-17

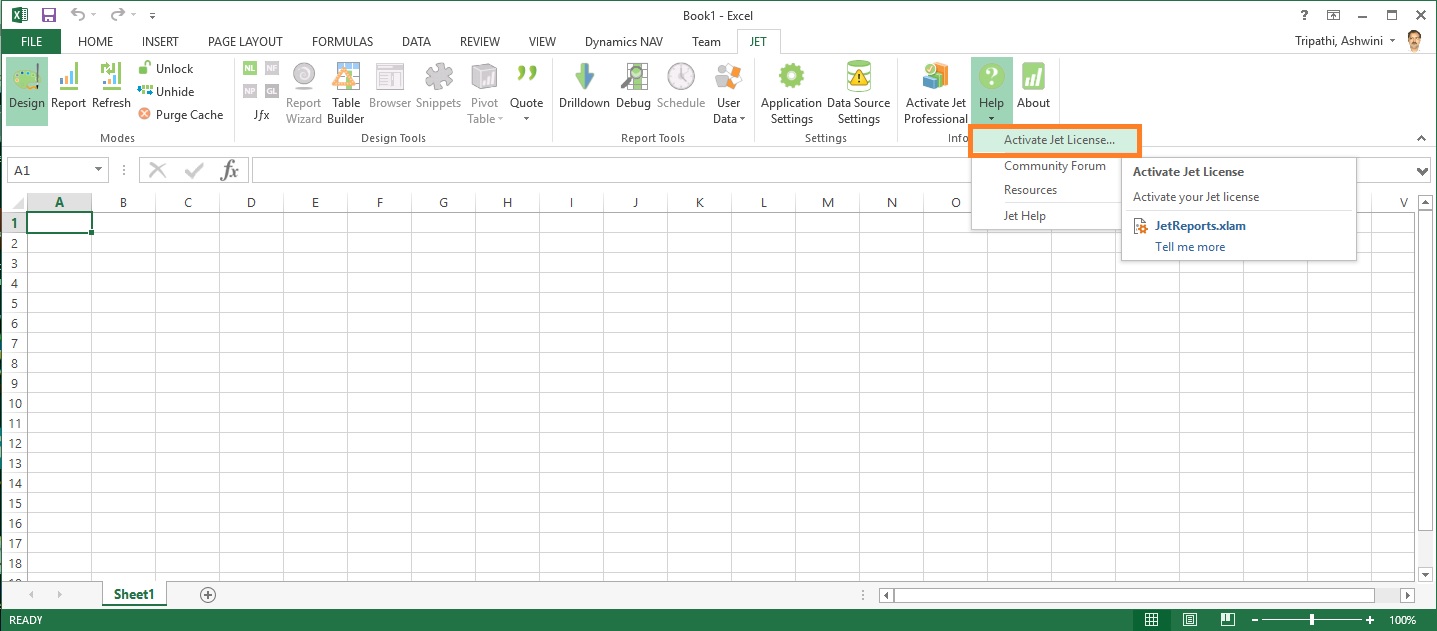
Once you receive your Tocken.

Launch Excel, From Jet Tab, Click on Help from ribbon and select Activate License.
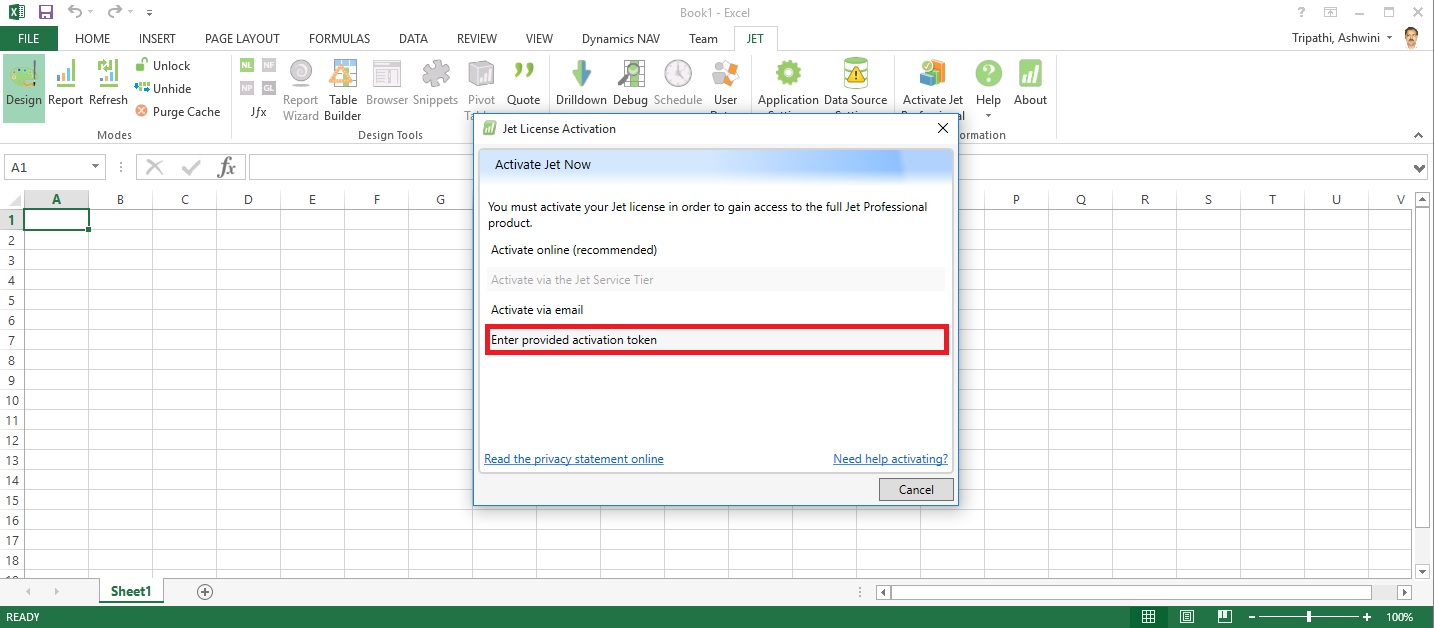
Install-18

Select Enter provided Activation token.
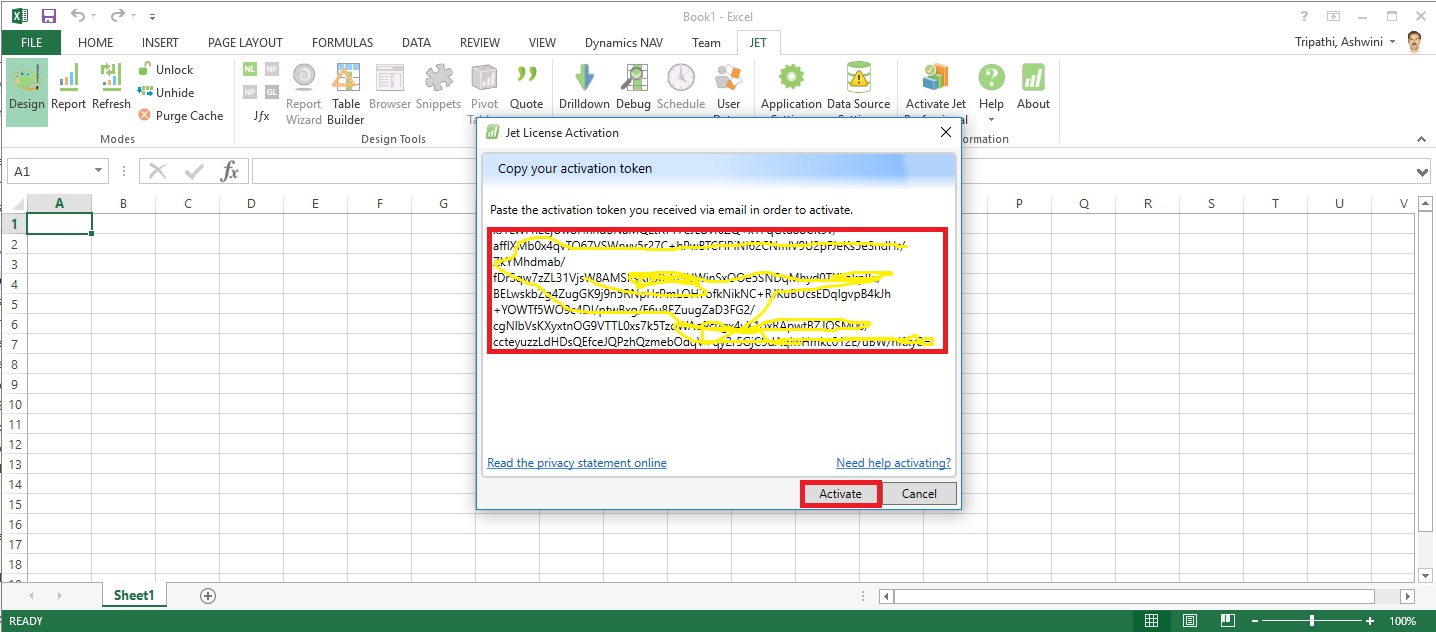
Install-19

Copy the Token you received via mail here and click on Activate.
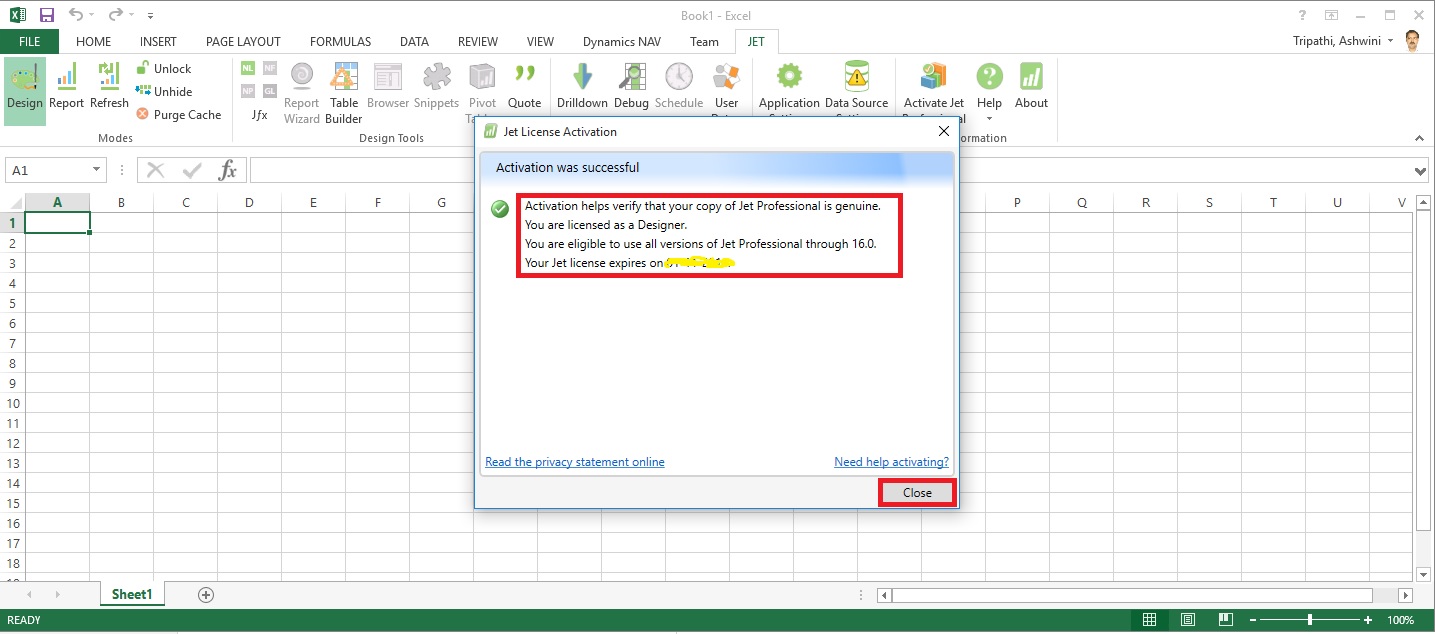
Install-20

If every thing is fine you will receive the Activation Successful message.

Now you are ready to start with using Jet Professional.

I will come up with more details on this in my upcomming posts till then keep exploring and learning.


Saturday, 30 April 2016

Exposing & Consuming the Web service from & inside Navision – Part-4

Continuing from my previous post. Find the link to access the same in case you missed it.

Exposing & Consuming the Web service from & inside Navision – Part-1

Exposing & Consuming the Web service from & inside Navision – Part-2

Exposing & Consuming the Web service from & inside Navision – Part-3


Step 5: Create a Codeunit to test Retrieve the data using above DLL and Send data in XML Format using another Web Service exposed in Dot Net.

How to create WCF Service Application using C#, Publishing it and creating DLL Class Library is out of scope of this document. You may require to take help from guy who are comfortable in .Net technology.

Let’s start with new codeunit, select the available ID in your database and suitable name to save this codeunit.

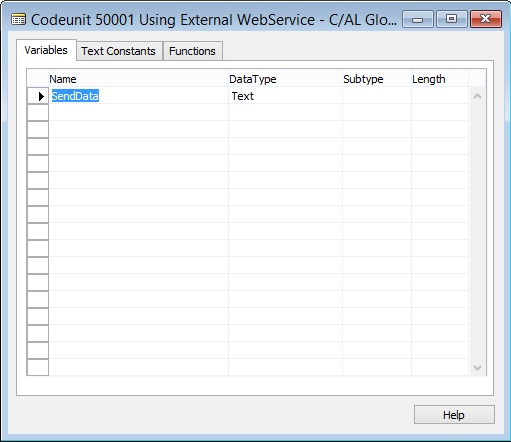
We will define a Global variable to hold the data we receive from Navision Web Service and pass to Web Service exposed outside Navision.

WebServiceUsage-16

Create a Function to Read/Export the data using Navision Web Service.

Variables defined to the function is also shown in below screen.

We will add the code similar to below. Description provided along with the code in below screenshot.

WebServiceUsage-17

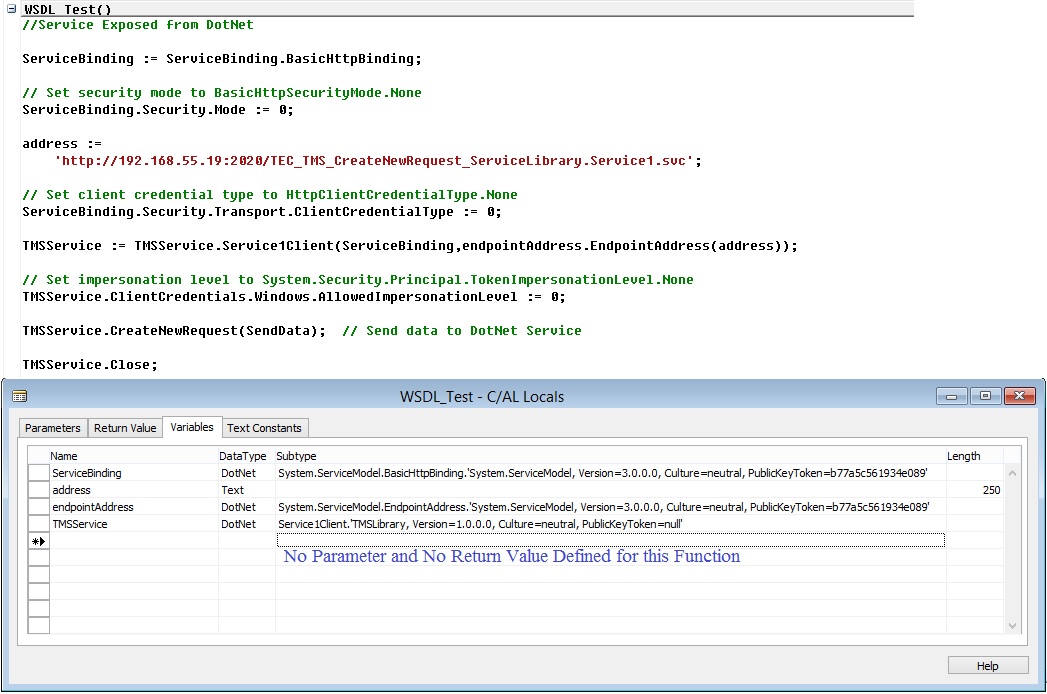
Create a Function to Send Exported data from above function to the Web Service created outside the Navision. Web Service created in DotNet.

Here too we are using DLL file of the Outside Exposed Web Service.

Variables defined to the function is also shown in below screen.

We will add the code similar to below. Description provided along with the code in below screenshot.

WebServiceUsage-18

Now we have our both function ready.

One which Export data consuming the Navision Published Web Service and then read the data in BigText Variable and finally converted to Text variable.

Second one will send data consuming the Web Service Exposed outside Navision created in DotNet. 

Let us test our process if it works as desired.

We will call above both function.

When we call First Web Service as a result we get the XML format file data in my Global defined Text Variable.

We will review the data which we are going to send to Second Web Service on Screen for which we are simply calling the Message.

Finally we will send the data to the Second Web Service, the content of XML file stored in our Global Variable.

Code we use is as below shown screenshot.

WebServiceUsage-19

Save the codeunit and execute, as we have written our test code in Run trigger so we can directly run this codeunit.

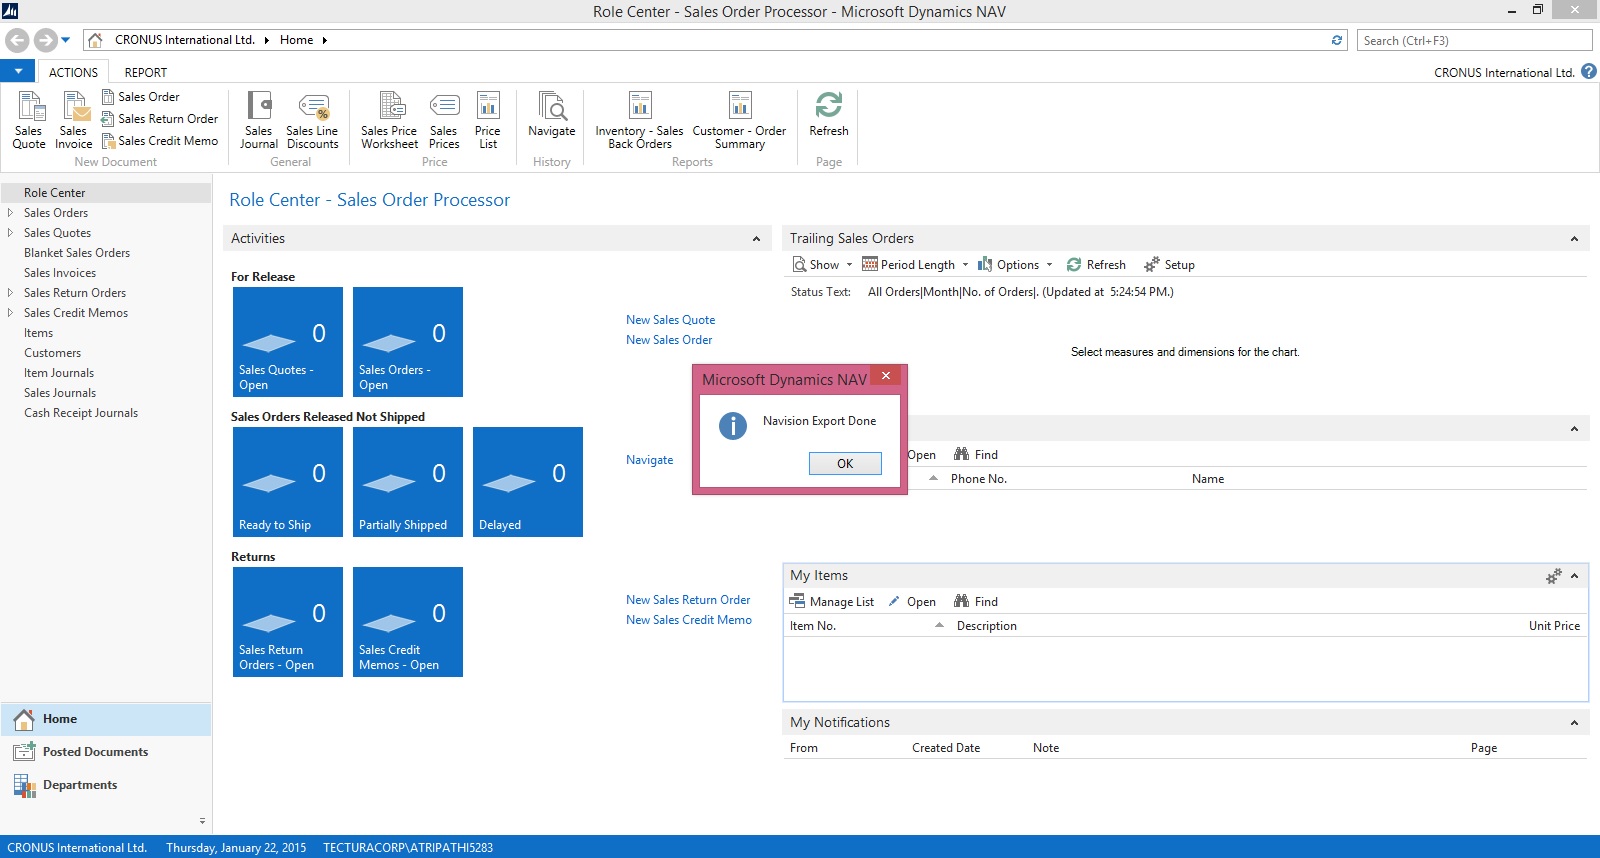
The output will be as shown in below screenshots.

Until this step our Data is Exported and data is loaded in Global defined Text variable.

WebServiceUsage-20

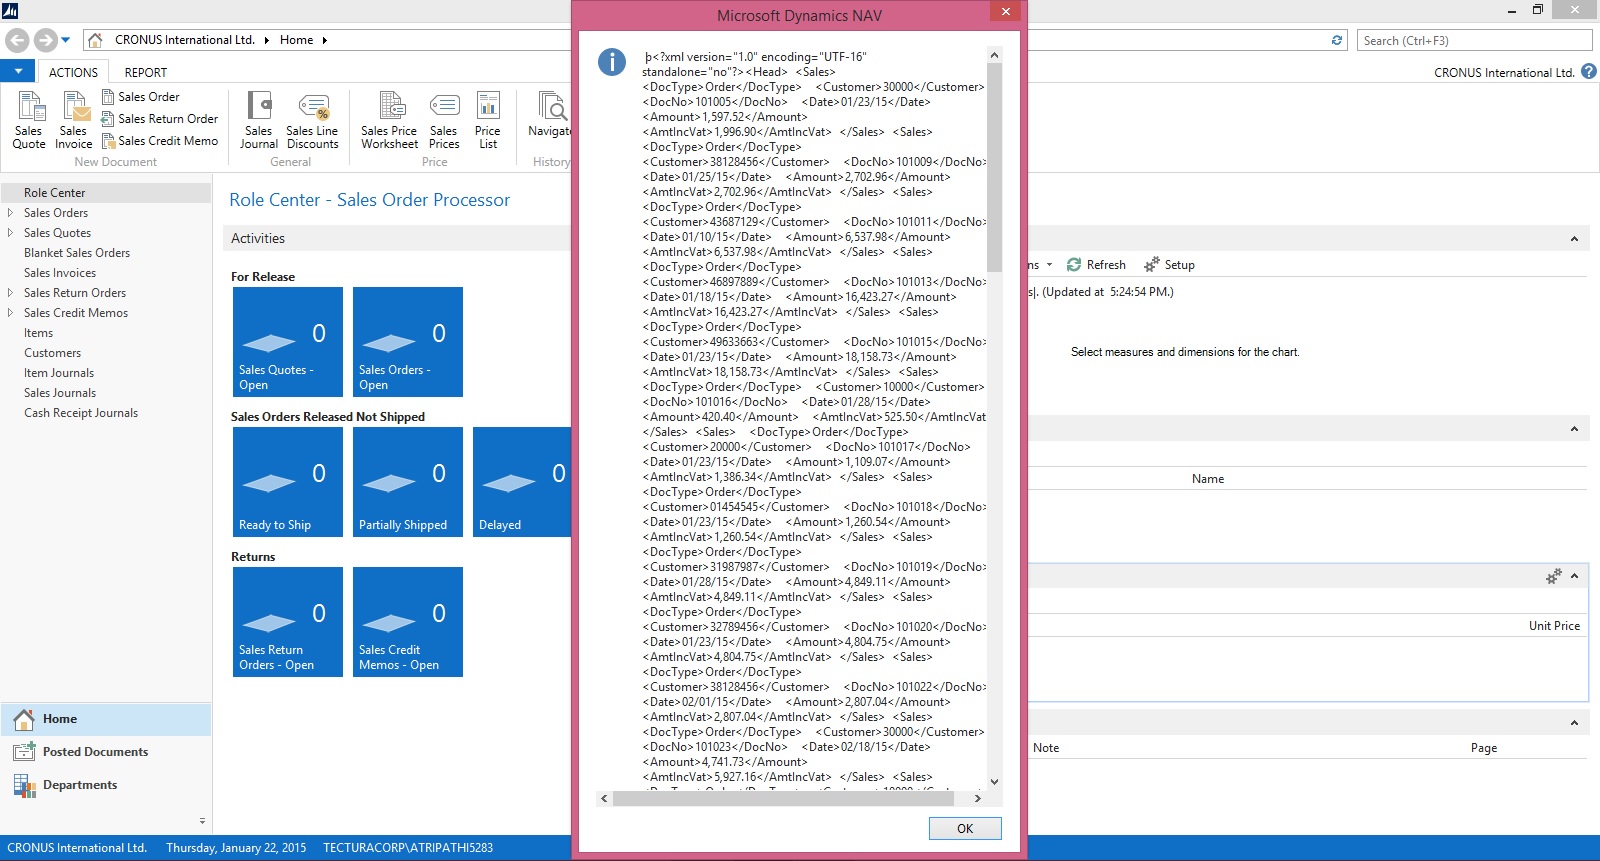
Here the content of Text variable is shown in Message window, which we can verify the data which we are going to send to the external Web Service.

WebServiceUsage-21

As a final step we are sending this content to the External Web Service Exposed using DotNet.

WebServiceUsage-22

Verify the data received at the DotNet side. You can program the Second Web Service as save the content on disk as file or perform any processing like inserting those data in some other table or displayed on screen. 

That’s it for this series.

I will be posting couple of more posts on Web Services soon.

Since this was in response of request from one of my reader so I stick to the requirement.

In my other post I will show some different flavour of using the same.

Till then keep exploring and learning.

Will be back with other posts soon.

Thursday, 28 April 2016

Exposing & Consuming the Web service from & inside Navision – Part-3


Continuing from my previous post. Find the link to access the same in case you missed it.

Exposing & Consuming the Web service from & inside Navision – Part-1

Exposing & Consuming the Web service from & inside Navision – Part-2


Step 4: Create a DLL to use as Add-in to consume the Web Service itself in Navision.

We will start with Class Library Project in Visual Studio.

It’s very simple with few steps to follow, and we will be done with our requirement.

Enter Name and select the path for your project solution folder. In my case I am saving my project to the default location of Visual Studio. And I am naming my project as XMLData.

WebServiceUsage-8

Right click on the project folder and Add Service reference to the project.

WebServiceUsage-9

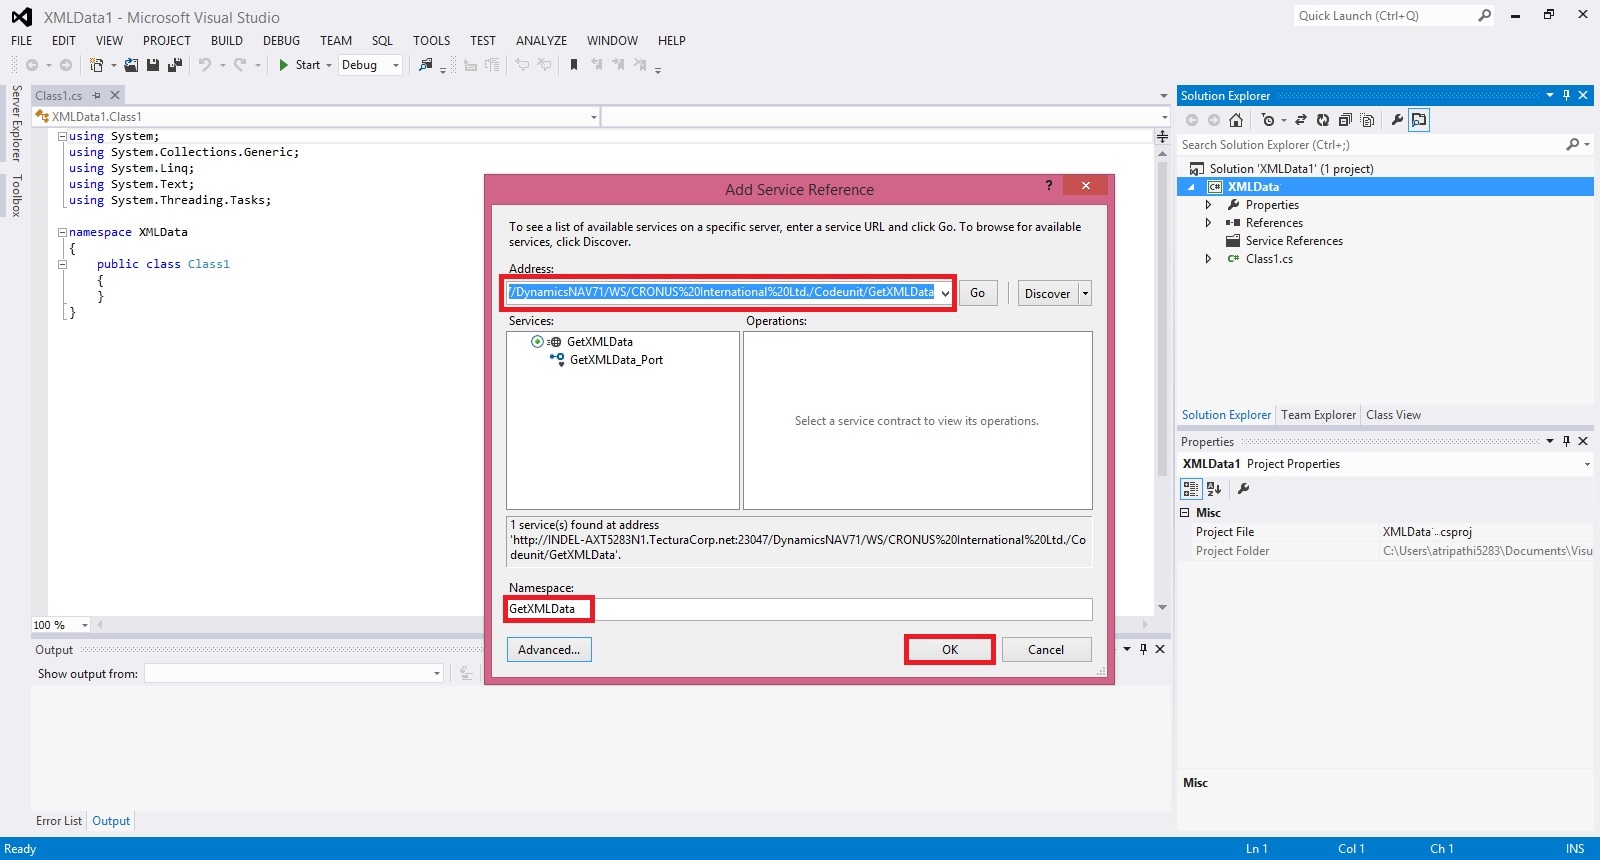
Enter your Web Service URL and click on GO.

Once your Service is listed, enter the Reference Namespace. And click on OK to add the Service Reference to the project.

WebServiceUsage-10

Click on app.config in Solution browser to open.

Verify your code similar to below.

WebServiceUsage-11

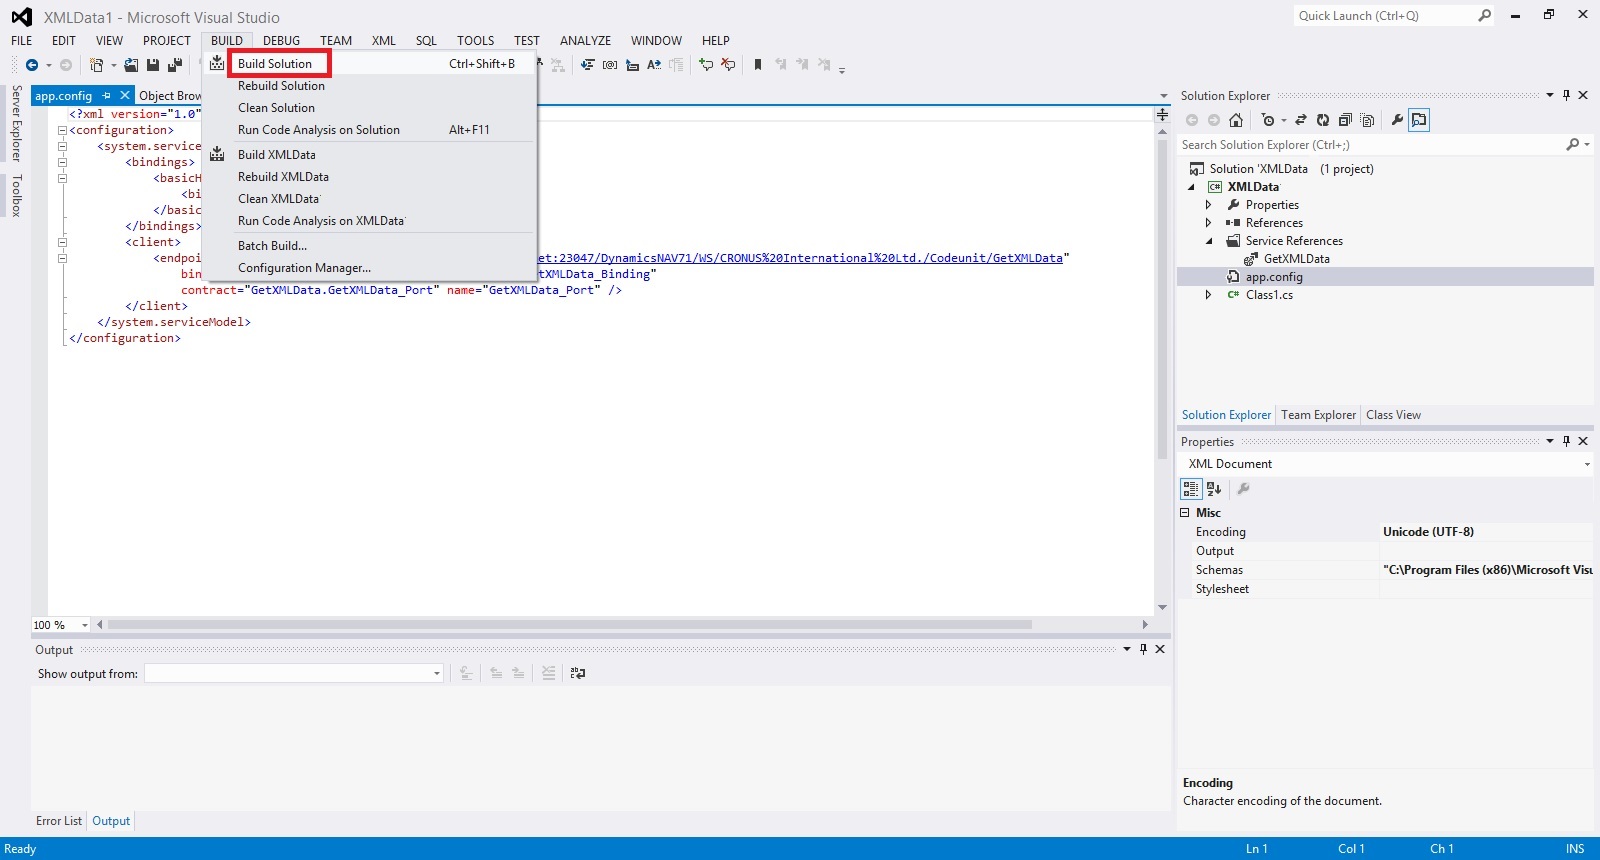
Build your Project to obtain the .dll file.

WebServiceUsage-12

Below screen shows we have no errors and the .dll file is created successfully.

WebServiceUsage-13

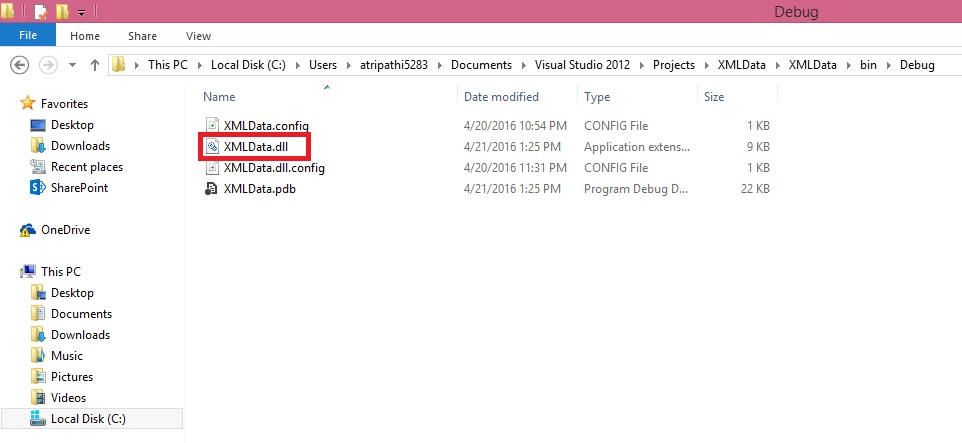
Locate the .dll file in your Project folder similar to path shown below. Copy your dll file.

WebServiceUsage-14

Create a folder and paste your .dll file to Service & RTC folder, as shown in below screen.

WebServiceUsage-15


We are ready with the Add-in, which we will use in our next post to consume our service with the help of this dll, and call the method to obtain our file for further processing.

That’s all for this post, I will be back with next post in series soon.

Till then keep practicing.


To be Continued....


Wednesday, 20 April 2016

Financial Statements and Data Warehousing (Jet Reports)

Learn how a data warehouse makes creating financial statements from multiple systems fast and easy by storing all of your data in a single place that is optimized for end user reporting.

Video-1
http://jetreports.wistia.com/medias/018bcsea5n?embedType=iframe&videoWidth=640

Video-2
http://jetreports.wistia.com/medias/93wgjbfxep?embedType=iframe&videoWidth=640

Friday, 15 April 2016

Madeira - Look & Feel - Part-I

Hi Friends I am providing this Blog to my readers who are yet not able to give try to the Project Madeira First Preview. But wish to have the Look and feel how it looks.

Today I will be showing few Look & Feel changes. Up till Now only Preview is available we need to wait for some more time to hear more about the product and features.

How ever below I am presenting few details, Login to the Project Madeira using your credentials provided while Setup.

Preview-1

Here is the Landing Screen which you get post Logging in to Madeira.

Top right corner is the Search,  that we usually use to search pages.

Preview-2

Here you type the Page you wish to switch to, in my example I am trying to search Role Center Page. It will be similar to one below screen shot.

Preview-3

If you click on action Tab it will show you the ribbon having actions available on Page. You can hide it to gain more space on screen by clicking on ^ at the bottom right corner of the Ribbon Tab.

Preview-4

Lets have a Look on Item List, you have 3 View available as below

  1. Large Picture Card View


Preview-5

2. Small Picture Card View

Preview-6

3. Simple List view as usually we have in earlier Versions.

Preview-7

Let's have a view of Customers List Page. On the right side you can see History Card Fact Box in form of Cues.

Preview-8

Here is the Vendor List Page. On the right side you can see History Card Fact Box in form of Cues.

Preview-8

Here is the Page search when you click on Magnifying search it will provide you the text box to enter you search, I am trying to search Items containing lo in its Name/ Description.

Preview-9

Click on Home to see Drop Menu to select sub Items defined under it. You can Minimize the same clicking on ^. This is available on almost all Pages and Ribbons to hide unwanted information to gain more space on Screen to view only required information. Some places it acts as hiding the Tab where as other places it serves as showing Sub-Menus.

Preview-10

Here is the example of Sub-Menu.

Preview-12


Preview-13


Preview-14

This is how Page appears you select from Sub-Menu.

On Page at Right Top corner arrow are used to Minimize or Maximize the page.

Preview-15

View of above Page in Maximized form.

Preview-16

You can use Menu on Page to send data to Excel.

Preview-17

Preview-18

Here is how line action menu is shown.

Preview-19

Below is the Matrix Page type View.

Preview-20

Picture Card Menu. Now on Pages Information and divided in respective small pages.

Preview-21


I will come up with more Look and Feel of New Project Madeira.

Till then keep exploring and Learning. You can find more information on other Blogs too.

However official Blog for same is : https://madeira.microsoft.com/en-us/blog/welcome-to-project-madeira/