Wednesday, 4 November 2015

Tuesday, 3 November 2015
Configuring SSL to Secure the Connection to Microsoft Dynamics NAV Web Client
It is always recommend that you secure Microsoft Dynamics NAV data that is transmitted over the Internet by enabling Secure Sockets Layer (SSL) on the connection to Microsoft Dynamics NAV Web client.
Enabling SSL on a website requires that an SSL certificate is installed on the web server. An SSL certificate is a small file that the web server uses to prove its identity and establish a trusted connection with the browser that is trying to access Microsoft Dynamics NAV Web client.
When a browser connects to the Microsoft Dynamics NAV Web client, the web server replies by sending its certificate to the browser. This certificate contains the web server's public encryption key and the name of the authority that granted the certificate. The browser verifies the certificate using the authority's public key.
Note You can configure SSL for the Microsoft Dynamics NAV Web client when you install the Microsoft Dynamics NAV Web Server components.
Obtaining an SSL Certificate
In a production environment, you should obtain an SSL certificate from a certification authority. Some large organizations may have their own certification authorities, and other organizations can request a certificate from a third-party organization. In a test environment or development environment, you can create your own self-signed certificate.
To create a self-signed SSL certificate
Open Internet Information Services (IIS) Manager, on the Start menu, choose Administrative Tools, and then choose Internet Information Service (IIS) Manager.


The new certificate appears on the Server Certificate page.

Adding an HTTPS Binding That Uses the Certificate on the Microsoft Dynamics NAV Web Client Site
After you get the certificate, you add a binding to the https protocol on the website. When you add the binding, you associate it with the certificate.
To add an https binding with the certificate to the website
By default, the site has the name Microsoft Dynamics NAV 2016 Web Client.


You can use the default port 443 or change it to another port. If you change it to another port, you will have to provide the port number in the URL when you try to open the client.

Redirecting HTTP to HTTPS (Optional)
To ensure that users always access the site that is secured with SSL, you can automatically redirect HTTP requests to HTTPS. This means that users do not have to explicitly include https in the URL in the browser.
For example, the nonsecure URL of the Microsoft Dynamics NAV Web client could be
The secure URL could be
If a user types
the browser automatically redirects to
There are different ways to redirect HTTP requests to HTTPS.
The following procedure describes how to redirect HTTP requests to HTTPS by installing the Microsoft Application Request Routing for IIS 7 and modifying the web.config file for the Microsoft Dynamics NAV Web client.
To redirect HTTP to HTTPS
The web.config file is located in the physical path of the web application on IIS. By default, the path is
For example, the folder for the default Microsoft Dynamics NAV Web client application is
Enabling SSL on a website requires that an SSL certificate is installed on the web server. An SSL certificate is a small file that the web server uses to prove its identity and establish a trusted connection with the browser that is trying to access Microsoft Dynamics NAV Web client.
When a browser connects to the Microsoft Dynamics NAV Web client, the web server replies by sending its certificate to the browser. This certificate contains the web server's public encryption key and the name of the authority that granted the certificate. The browser verifies the certificate using the authority's public key.
Note You can configure SSL for the Microsoft Dynamics NAV Web client when you install the Microsoft Dynamics NAV Web Server components.
Obtaining an SSL Certificate
In a production environment, you should obtain an SSL certificate from a certification authority. Some large organizations may have their own certification authorities, and other organizations can request a certificate from a third-party organization. In a test environment or development environment, you can create your own self-signed certificate.
To create a self-signed SSL certificate
Open Internet Information Services (IIS) Manager, on the Start menu, choose Administrative Tools, and then choose Internet Information Service (IIS) Manager.
- In the Connections pane, choose the top-level node for the server.
- On the Home page, under IIS, choose Server Certificates, and then in the Actions pane, choose Open Feature.
- On the Server Certificates page, choose Create Self-Signed Certificate.
- In the Specify Friendly Name dialog box, type a brief name for the certificate, and then choose the OK button.
The new certificate appears on the Server Certificate page.
Adding an HTTPS Binding That Uses the Certificate on the Microsoft Dynamics NAV Web Client Site
After you get the certificate, you add a binding to the https protocol on the website. When you add the binding, you associate it with the certificate.
To add an https binding with the certificate to the website
- Open Internet Information Services (IIS) Manager.
- In the Connections pane, expand the Sites node, and then choose the Microsoft Dynamics NAV Web client site to which you want to add the binding.
By default, the site has the name Microsoft Dynamics NAV 2016 Web Client.
- In the Actions pane, choose Bindings.
- In the Site Bindings dialog box, choose Add.
- In the Add Site Binding dialog box, set the Type field to https.
You can use the default port 443 or change it to another port. If you change it to another port, you will have to provide the port number in the URL when you try to open the client.
- Set the SSL certificate field to the certificate that you obtained or created for the site.
- Choose the OK button, and then choose the Close button.
Redirecting HTTP to HTTPS (Optional)
To ensure that users always access the site that is secured with SSL, you can automatically redirect HTTP requests to HTTPS. This means that users do not have to explicitly include https in the URL in the browser.
For example, the nonsecure URL of the Microsoft Dynamics NAV Web client could be
http://mywebclient:8080/DynamicsNAV90/WebClient
The secure URL could be
https://MyWebclient:443/DynamicsNAV90/WebClient
If a user types
http://MyWebclient:8080/DynamicsNAV90/WebClient,
the browser automatically redirects to
https://MyWebclient:443/DynamicsNAV90/WebClient
There are different ways to redirect HTTP requests to HTTPS.
The following procedure describes how to redirect HTTP requests to HTTPS by installing the Microsoft Application Request Routing for IIS 7 and modifying the web.config file for the Microsoft Dynamics NAV Web client.
To redirect HTTP to HTTPS
- Download and install Microsoft Application Request Routing for IIS. You can use one of the following links:
- Microsoft Application Request Routing Version 2 for IIS 7 (x64)
- Microsoft Application Request Routing Version 2 for IIS 7 (x86)
- On the computer that is running Microsoft Dynamics NAV Web Server components, open the web.config file for the web server instance for Microsoft Dynamics NAV Web client. Use a text editor, such as Notepad.
The web.config file is located in the physical path of the web application on IIS. By default, the path is
%systemroot%\inetpub\wwwroot\[VirtualDirectoryName]\WebClient.
For example, the folder for the default Microsoft Dynamics NAV Web client application is
%systemroot%\inetpub\wwwroot\DynamicsNAV90\WebClient.
- In the <system.webServer> element, add the following elements.
<rewrite>
<rules>
<rule name="Redirect to HTTPS">
<match url="(.*)" />
<conditions>
<add input="{HTTPS}" pattern="off" ignoreCase="true" />
</conditions>
<action type="Redirect" url="https://{SERVER_NAME}/{R:1}" redirectType="SeeOther" />
</rule>
</rules>
</rewrite>
- Save the web.config file.
Cumulative Update 1 for Microsoft Dynamics NAV 2016 (Build 43402) Released
This cumulative update includes all hotfixes and regulatory features that have been released for Microsoft Dynamics NAV 2016, including hotfixes and regulatory features that were released in previous cumulative updates.
You can find more information here.
For more information see this Link.
Additional Information
For information about how to install the cumulative update, see How to Install a Microsoft Dynamics NAV 2016 Cumulative Update
For a list of all cumulative updates for this version, see Released Cumulative Updates for Microsoft Dynamics NAV 2016
You can find more information here.
For more information see this Link.
Additional Information
For information about how to install the cumulative update, see How to Install a Microsoft Dynamics NAV 2016 Cumulative Update
For a list of all cumulative updates for this version, see Released Cumulative Updates for Microsoft Dynamics NAV 2016
Monday, 2 November 2015
Working with Data Encryption in Navision 2016
You can encrypt data on the Microsoft Dynamics NAV Server by generating new or importing existing encryption keys.
How to: Enable Encryption Keys
You can enable data encryption on the Microsoft Dynamics NAV Server instance that connects to the database.
If you export companies and other data that is secured by data encryption, then remember to also export the encryption key so that you can access the data after you import it into another database, for example when you restore a backup. Creating a backup of encrypted data involves the following high-level steps.
How to: Export and Import Encryption Keys
Note: You cannot generate different keys within one multiple-server instance environment.
Exporting an Encryption Key
You export an encryption key to make a copy of the key or so that it can be imported on another server instance.
Exporting an encryption key stores the encryption key that is used by the current server instance to a file on your computer or network.
To export an encryption key
Importing an Encryption Key
You can import an encryption key to a server instance from an encryption key file that was exported from another server instance or saved as a copy when the encryption was enabled.
You cannot import an encryption key on a server instance that already includes an encryption key. In this case, you must change the encryption key instead.
To import an encryption key
Changing an Encryption Key
If a server instance already has an encryption key, then you can replace the current encryption key with an encryption key that is stored in an encryption key file that was exported from another server.
To change an encryption key
How to: Enable Encryption Keys
You can enable data encryption on the Microsoft Dynamics NAV Server instance that connects to the database.
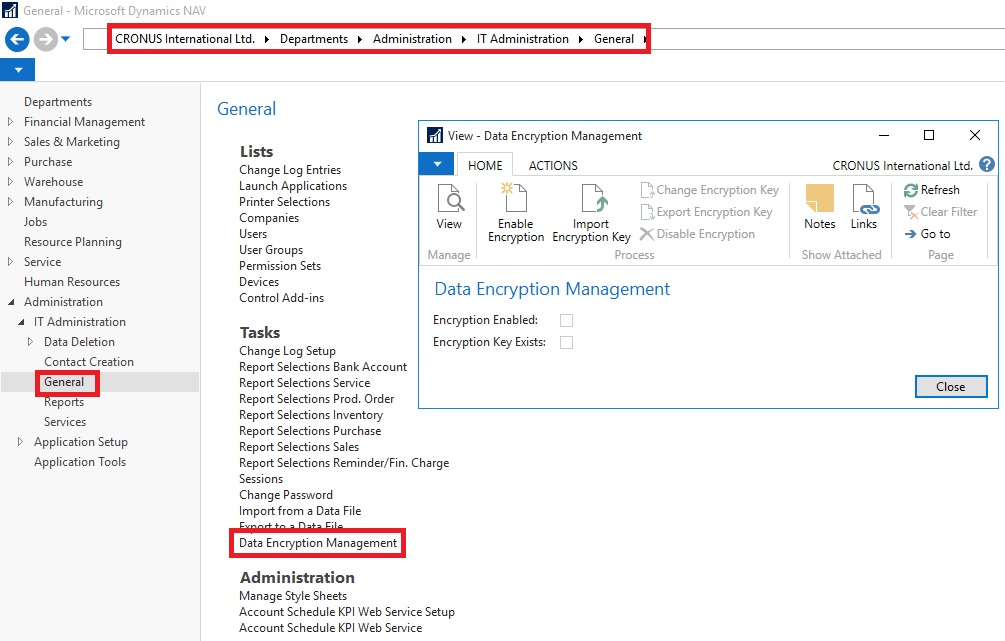
- Open the Data Encryption Management Card, as path suggested in below Image.
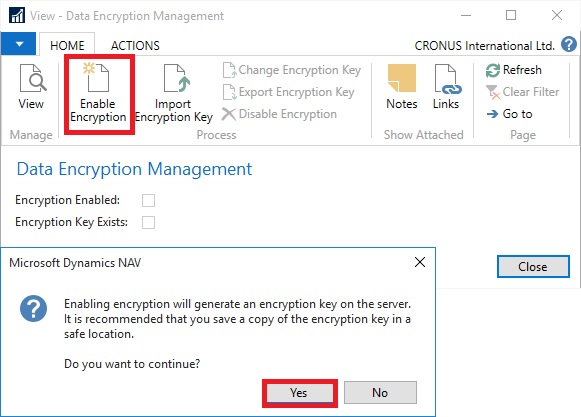
- Click on Enable Encryption in Process of Home tab.
- On Confirmation Dialog box choose Yes.
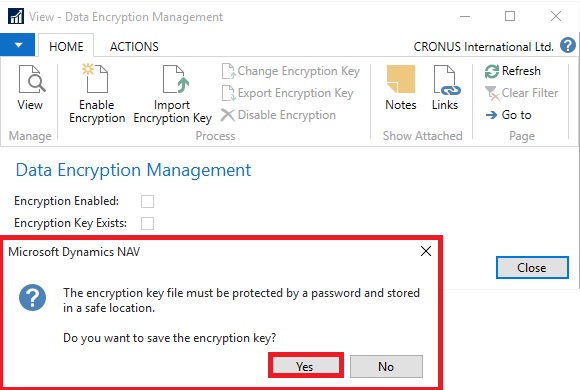
- On further Confirmation of Password choose Yes.
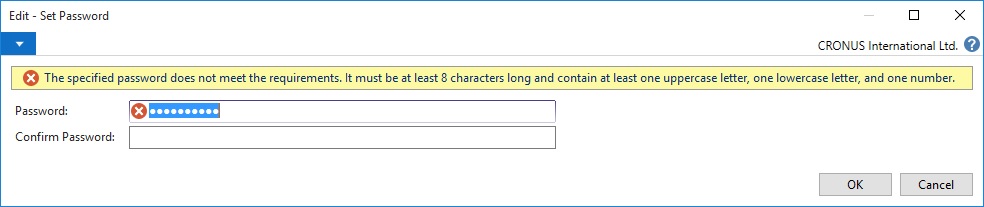
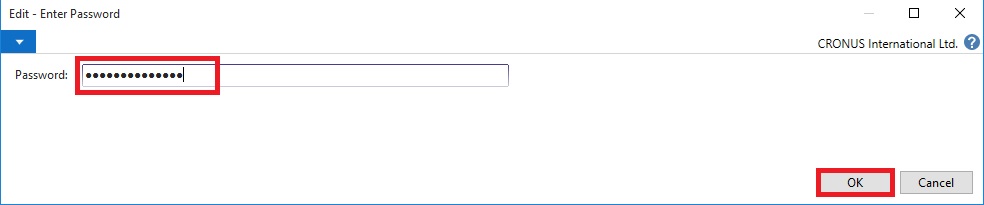
- Enter the Password as defined in Rule as shown in below Image.
- Upon entering Password choose OK to continue.
- Key is created with password protected and offered to Export.
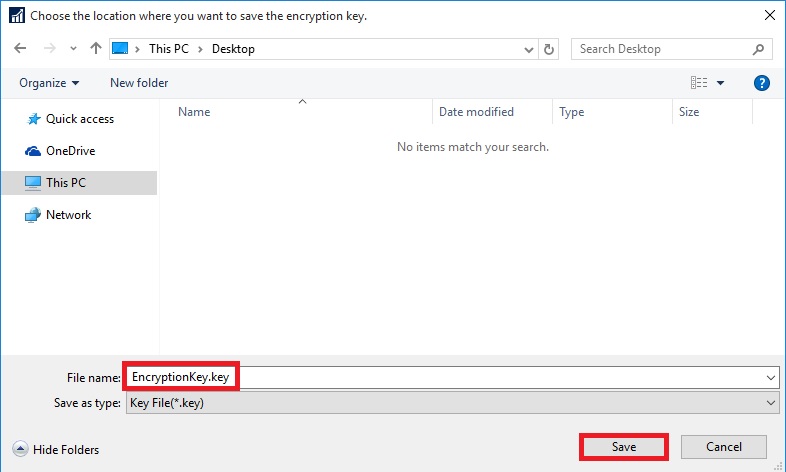
- Choose Save, and save it as Safe Location as you will require it again whenever you restore the database or Import Export the data. Please make sure you also store the password for further reference whenever required.
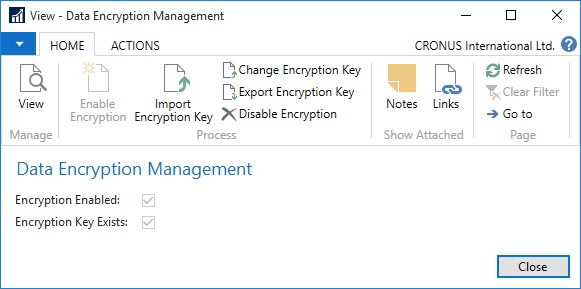
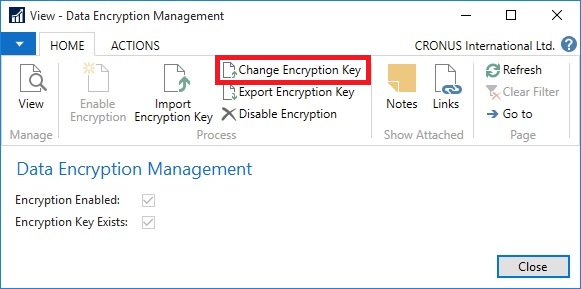
- Once Key is generated, you can see that the Encryption Enabled & Encryption Key Exists is checked TRUE.
- Also in Ribbon you will find the Change Encryption Key, Export Encryption Key & Disable Encryption is now enabled.
- If Microsoft Dynamics NAV is configured with multiple service tiers (Microsoft Dynamics NAV Server instances), then you must first enable encryption on one server instance, and then export the key and import to other server instances where you enable encryption.
If you export companies and other data that is secured by data encryption, then remember to also export the encryption key so that you can access the data after you import it into another database, for example when you restore a backup. Creating a backup of encrypted data involves the following high-level steps.
- Export the data from one database.
- Export the data encryption key.
- Import the data into another database.
- Import the data encryption key.
How to: Export and Import Encryption Keys
Note: You cannot generate different keys within one multiple-server instance environment.
Exporting an Encryption Key
You export an encryption key to make a copy of the key or so that it can be imported on another server instance.
Exporting an encryption key stores the encryption key that is used by the current server instance to a file on your computer or network.
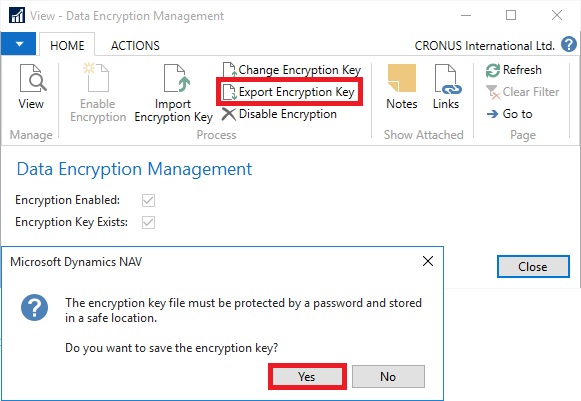
To export an encryption key
- On the message about saving the encryption key, choose Yes.
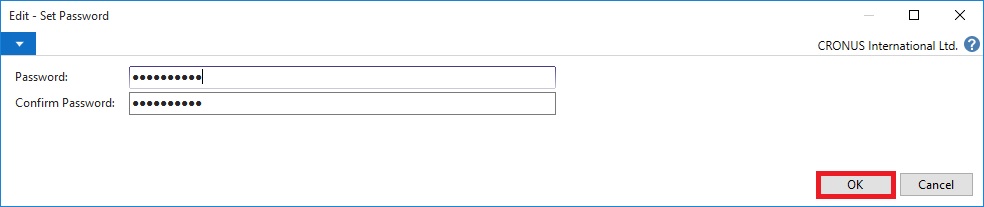
- In the Set Password window, enter the password that will protect the exported key file, and then choose OK.
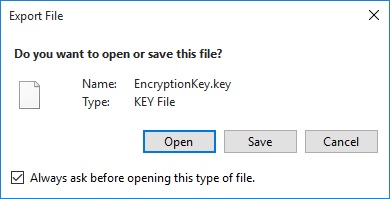
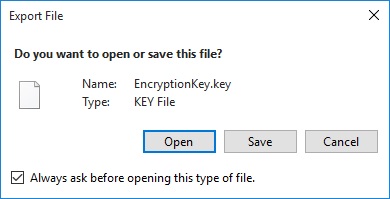
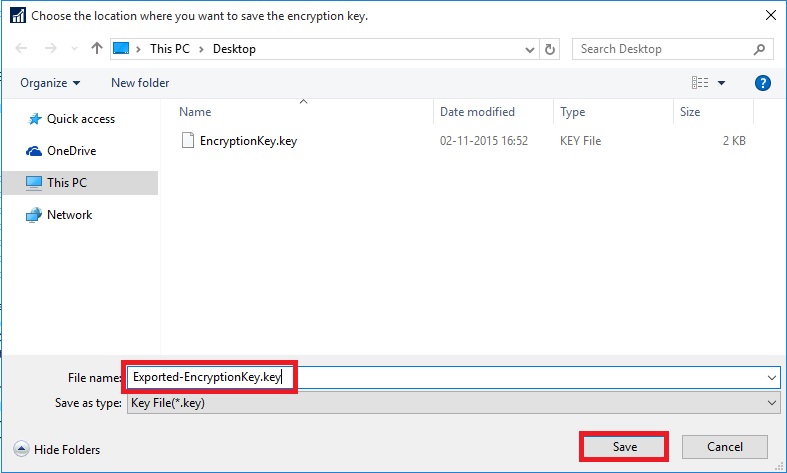
- In the Export File window, choose Save, choose a safe location where the key file is stored, and then choose Save.
Importing an Encryption Key
You can import an encryption key to a server instance from an encryption key file that was exported from another server instance or saved as a copy when the encryption was enabled.
You cannot import an encryption key on a server instance that already includes an encryption key. In this case, you must change the encryption key instead.
To import an encryption key
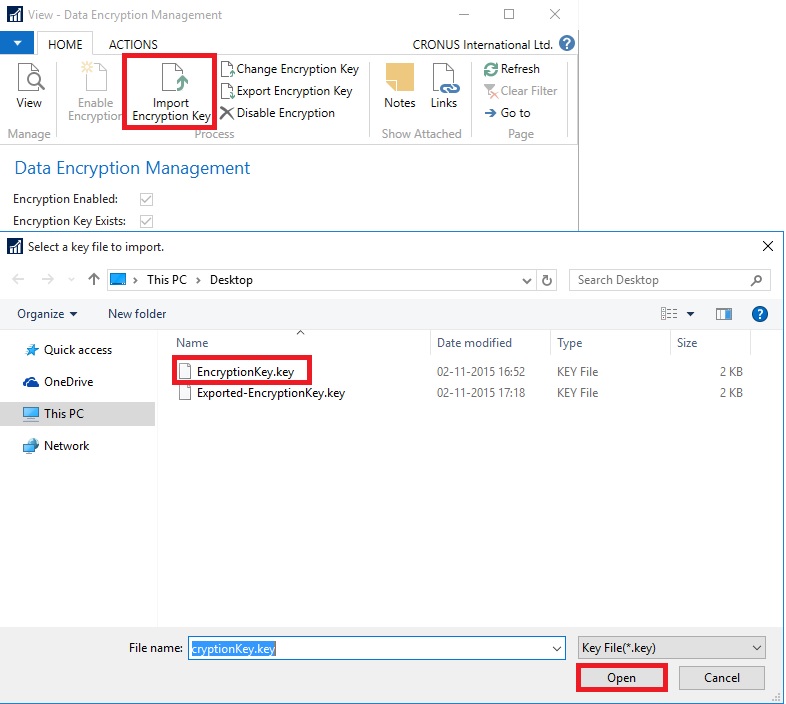
- On the Home tab, in the Process group, choose Import Encryption Key.
- In the Select a key file to import window, choose the encryption key file, and then choose Open.
- In the Password window, enter the password that protects the key file, and then choose OK.
Changing an Encryption Key
If a server instance already has an encryption key, then you can replace the current encryption key with an encryption key that is stored in an encryption key file that was exported from another server.
To change an encryption key
- On the Home tab, in the Process group, choose Change Encryption Key.
- In the Select a key file to import window, choose the encryption key file, and then choose Open. Same as in above process.
- In the Password window, enter the password that protects the key file, and then choose OK. Same as in above process.
Working with Profiles in Navision 2016
How to: Create a Profile
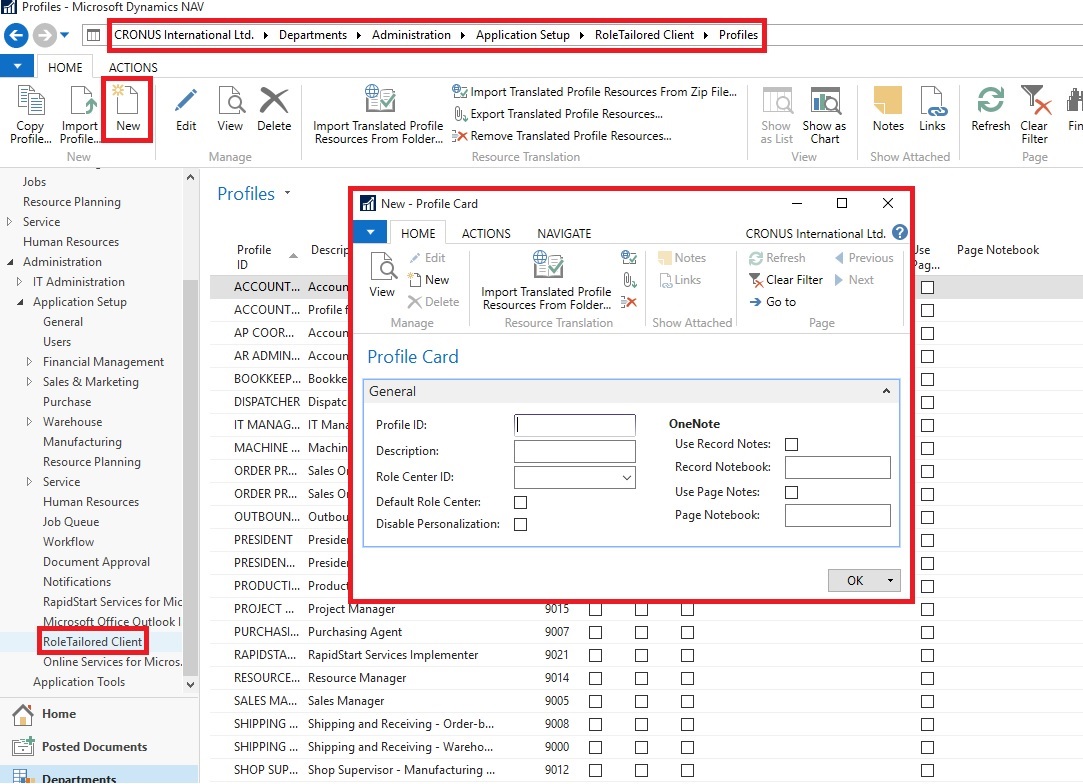
You use the Profile card to create profiles for end users. Each profile is associated with a Role Center. Profiles are typically based on job titles in a company.
To create a profile
The procedure for modifying an existing profile is the same, except you select an existing profile in the Profiles page instead of clicking New.
How to: Assign a User to a Profile
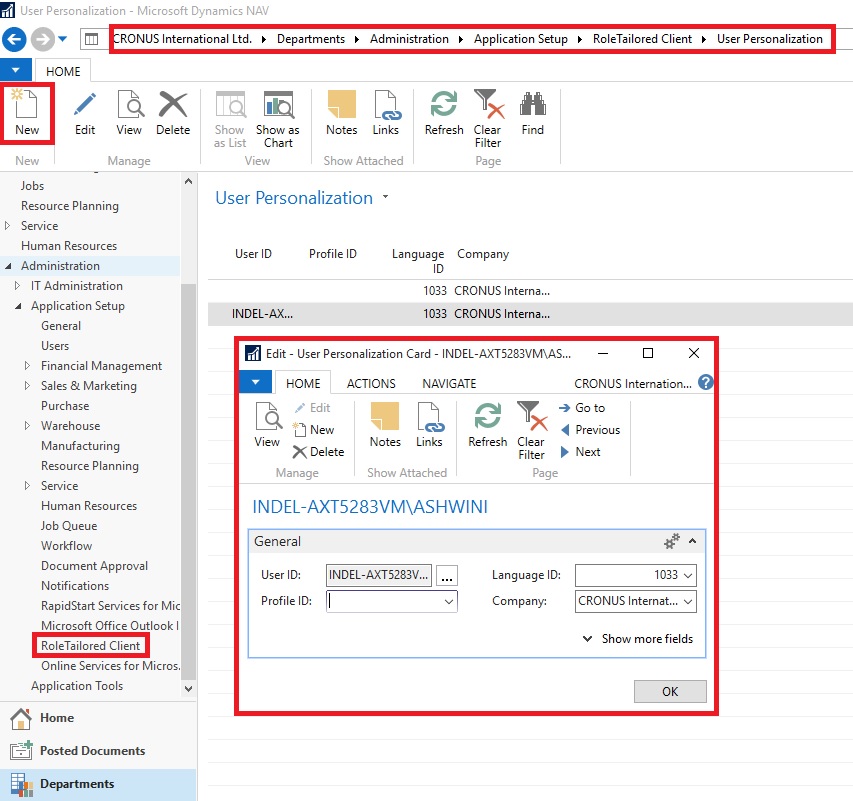
You use the User Personalization page to assign a user to a profile.
To assign a user to a profile
Note The Language ID and Company values are overwritten by user values when the user starts a session.
How to: Open Microsoft Dynamics NAV in Configuration Mode
To configure a profile, for example to customize the profile’s user interface, you must open the Microsoft Dynamics NAV Windows client in configuration mode.
To open the Microsoft Dynamics NAV Windows client in configuration mode
Replace profileid with the name of the profile that you want to configure.
Important You must be the owner of a profile to open it in configuration mode
For example, to configure the Accounting Manager profile, use this command to open the Microsoft Dynamics NAV Windows client in configuration mode:
You use the Profile card to create profiles for end users. Each profile is associated with a Role Center. Profiles are typically based on job titles in a company.
To create a profile
- In the Profile ID field, enter a name that describes the intended role of the user.
- In the Owner ID field, click the AssistEdit button to view all available logins, and then select a Windows user.
- In the Description field, enter a description of the Profile ID, for example, Order Processor.
- In the Role Center ID field, click the AssistEdit button to view all available Role Centers. Select a Role Center.
- To make this Role Center the default for the profile, select Default Role Center.
- Click OK to save your changes.
The procedure for modifying an existing profile is the same, except you select an existing profile in the Profiles page instead of clicking New.
How to: Assign a User to a Profile
You use the User Personalization page to assign a user to a profile.
To assign a user to a profile
- In the User Personalization window, fill in the fields described in the following table.
| Field | Description |
| User ID | Choose the AssistEdit button to view all available user logins, select the relevant user, and then choose the OK button. |
| Profile ID | Select a profile ID that you have already created. Choose the AssistEdit button to view all available profiles. |
| Language ID | Select the appropriate language ID, or leave this field blank. |
| Company | Select a company from the Companies window. |
- Choose the OK button.
Note The Language ID and Company values are overwritten by user values when the user starts a session.
How to: Open Microsoft Dynamics NAV in Configuration Mode
To configure a profile, for example to customize the profile’s user interface, you must open the Microsoft Dynamics NAV Windows client in configuration mode.
To open the Microsoft Dynamics NAV Windows client in configuration mode
- At the command prompt, navigate to the root folder of the Microsoft Dynamics NAV Windows client. For example:
cd C:\Program Files (x86)\Microsoft Dynamics NAV\90\RoleTailored Client
- Type the following command:
Microsoft.Dynamics.Nav.Client.exe -configure -profile:"profileid"
Replace profileid with the name of the profile that you want to configure.
Important You must be the owner of a profile to open it in configuration mode
For example, to configure the Accounting Manager profile, use this command to open the Microsoft Dynamics NAV Windows client in configuration mode:
Microsoft.Dynamics.Nav.Client.exe -configure -profile:"Accounting Manager"
Sunday, 1 November 2015
Achievments in Oct 2015
Dear Friends,
Today I am not writing any blog, wanted to share status as usually I do in every month as my first post.
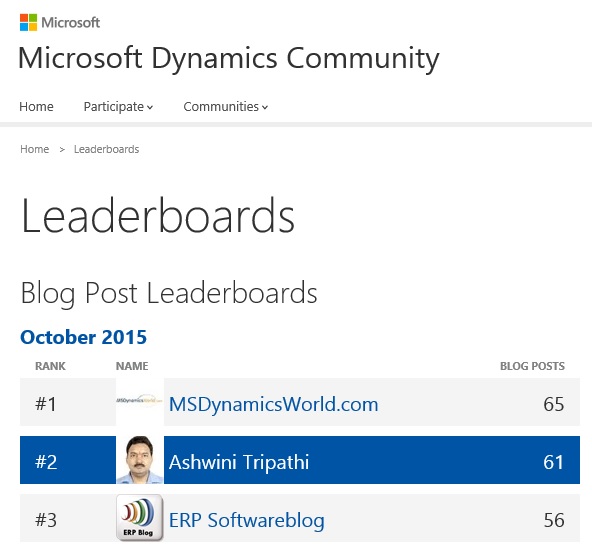
I was awarded with Top 10 Blogger in July month and my Rank was 6, in Aug moved to Rank 3, in Sep slipped to Rank 4 and in this month Oct Ranked to 2.
October was full of excitement as new Version of Navision 2016 was officially released. Lots of new posts from entire blog community was so excited that everyone flooded with new posts on this topic.
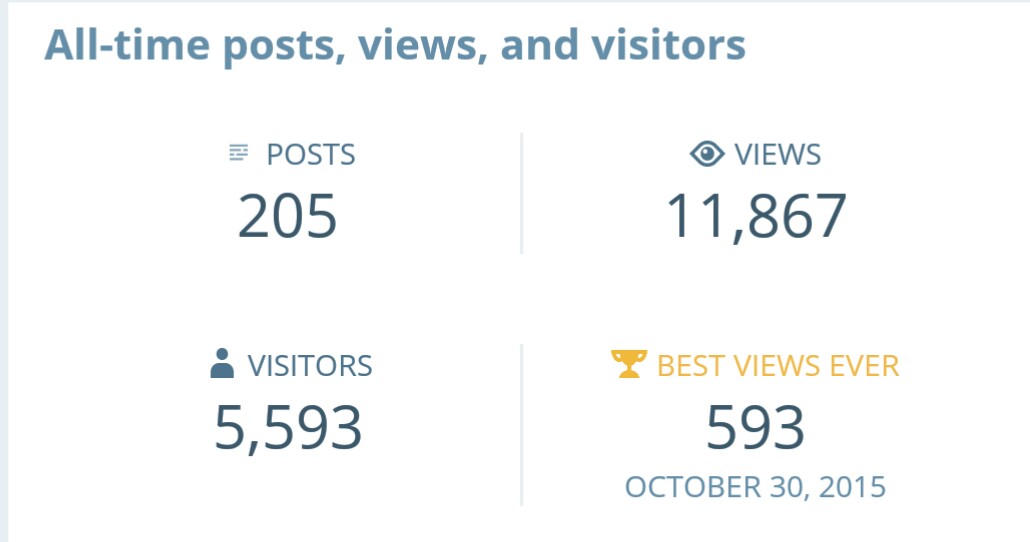
I stepped in blogging world 4 months ago, on 27 June 2015 I published my first post.
During this period I published almost 205 posts, most of them were more on technical side, Development Tips & Tricks.
Being a technical what I learned in past 10 years want to share with you all.
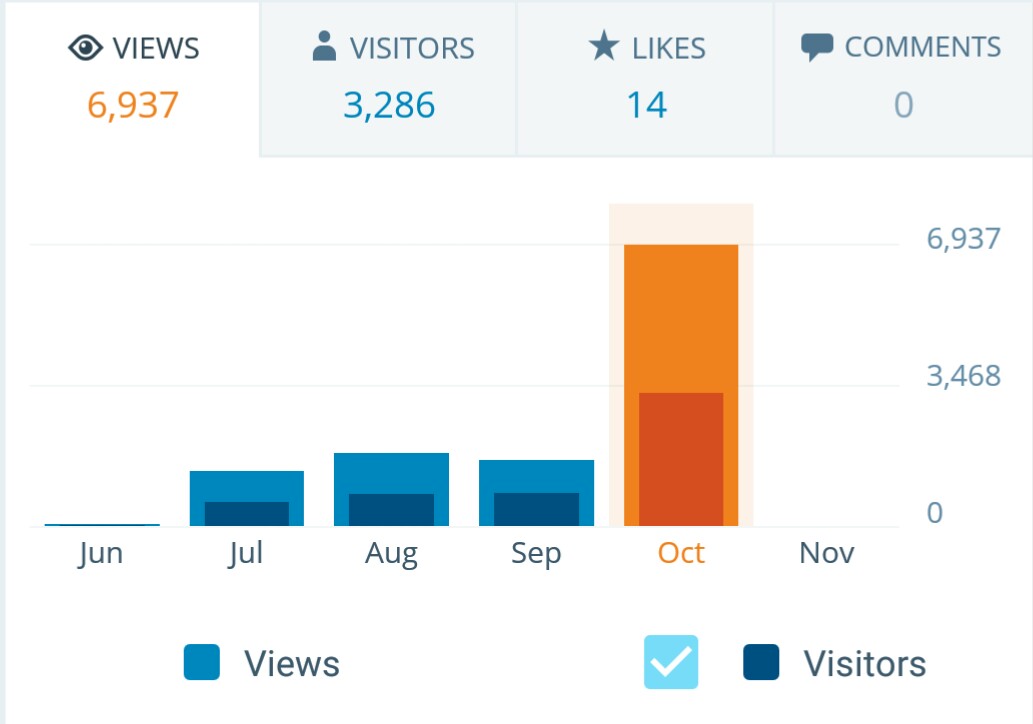
The best thing which happened this month was that my Blog Site crossed 11000 hits almost 12000. Prior to Oct in 3 months total hit was less than alone that it was received itself in this month, Thanks to all of the visitors from bottom of my heart, hope you will keep showering your blessings in future too.
Also my Google+ Page crossed 26000 hits almost 27000.

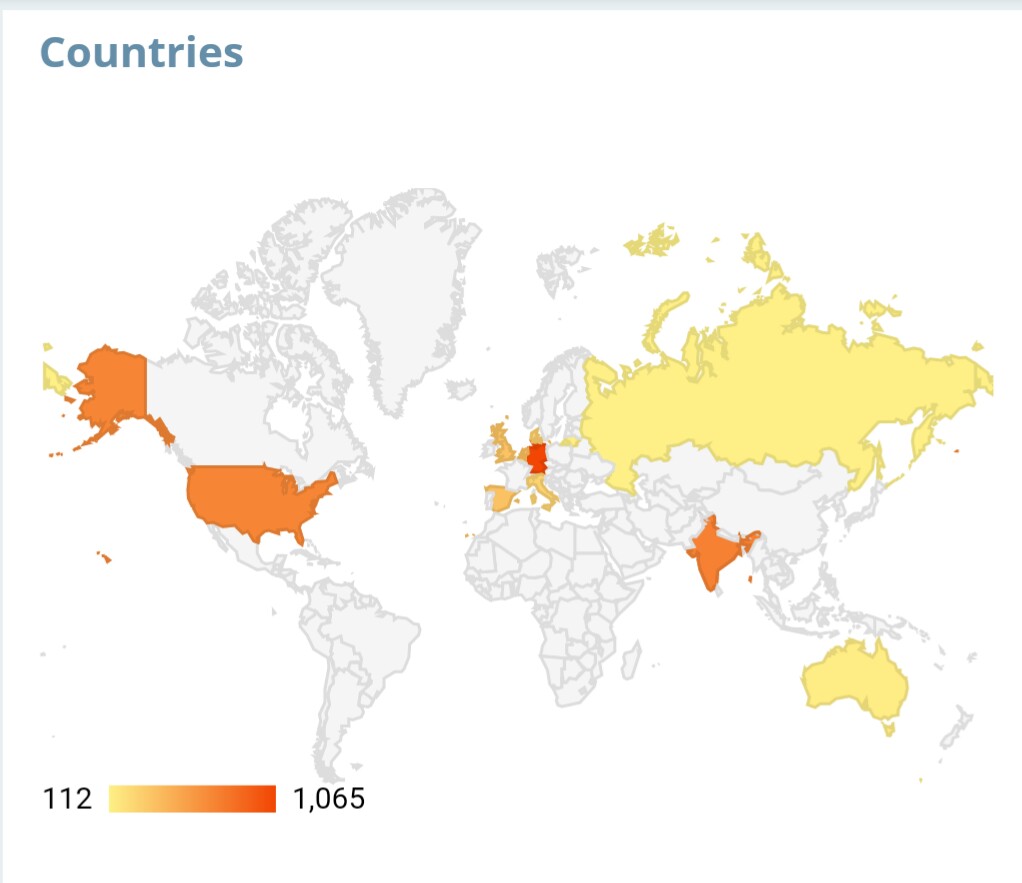
Stay tuned Follow the blog, Register to Feeds, Like the Facebook Page, Connect with Google + Page, Connect with Dynamics NAV Community, Connect with Twitter and Join on LinkedIn to remain updated about new posts. If you are technical don’t miss to get connected by any medium. I will make sure you keep getting good and useful stuffs.
I have created one Group on LinkedIn also this month started Hike Group , join them so that we can discuss on some good topics where you can participate & are free to express your views and review others view.
Together we can learn from each other, no one is perfect in this world, its never late for learning.
Please participate and suggest topics, which you wish to see on this blog. During this period I received request from many of you and tried to fulfil few requests. Request which yet I have not responded doesn’t mean I am not considering, I will make sure those too get posted at earliest.
After full day hectic schedule hardly I am able to takeout 2 hrs. for this task.
I will keep serving the community on my full strength.
I am speechless how to thank you all showing so much Love and Faith on my Blog.
Seeing your Love and Recognition you all given to me in Oct 2015 month, I am feeling bit emotional today I am not able to stop myself saying below quote

Seeing forward same spirit and love from you all in future too.
It is always good welcoming new ones without losing them who are with you.
See you all via my next post soon.
Today I am not writing any blog, wanted to share status as usually I do in every month as my first post.
I was awarded with Top 10 Blogger in July month and my Rank was 6, in Aug moved to Rank 3, in Sep slipped to Rank 4 and in this month Oct Ranked to 2.
October was full of excitement as new Version of Navision 2016 was officially released. Lots of new posts from entire blog community was so excited that everyone flooded with new posts on this topic.
I stepped in blogging world 4 months ago, on 27 June 2015 I published my first post.
During this period I published almost 205 posts, most of them were more on technical side, Development Tips & Tricks.
Being a technical what I learned in past 10 years want to share with you all.
The best thing which happened this month was that my Blog Site crossed 11000 hits almost 12000. Prior to Oct in 3 months total hit was less than alone that it was received itself in this month, Thanks to all of the visitors from bottom of my heart, hope you will keep showering your blessings in future too.
Also my Google+ Page crossed 26000 hits almost 27000.
Stay tuned Follow the blog, Register to Feeds, Like the Facebook Page, Connect with Google + Page, Connect with Dynamics NAV Community, Connect with Twitter and Join on LinkedIn to remain updated about new posts. If you are technical don’t miss to get connected by any medium. I will make sure you keep getting good and useful stuffs.
I have created one Group on LinkedIn also this month started Hike Group , join them so that we can discuss on some good topics where you can participate & are free to express your views and review others view.
Together we can learn from each other, no one is perfect in this world, its never late for learning.
Please participate and suggest topics, which you wish to see on this blog. During this period I received request from many of you and tried to fulfil few requests. Request which yet I have not responded doesn’t mean I am not considering, I will make sure those too get posted at earliest.
After full day hectic schedule hardly I am able to takeout 2 hrs. for this task.
I will keep serving the community on my full strength.
I am speechless how to thank you all showing so much Love and Faith on my Blog.
Seeing your Love and Recognition you all given to me in Oct 2015 month, I am feeling bit emotional today I am not able to stop myself saying below quote
Seeing forward same spirit and love from you all in future too.
It is always good welcoming new ones without losing them who are with you.
See you all via my next post soon.
Subscribe to:
Posts (Atom)