Showing posts with label Working. Show all posts

Saturday, 30 July 2016

Working with Alerts in Power BI

Knowing about changes to important metrics quickly some time can help you taking quick decisions or help you keep eyes on things you care most.

With data driven alerts in Power BI, you can now get notifications when a metric you care about on your dashboard exceeds a set threshold.

Alert notifications will be sent to you as an email, and appear in your notification center on the web and in mobile apps.

You can set alerts for your numeric tiles featuring cards and gauges only. You have control over how often you want to be notified about your data, and whether you want to receive an email when your data goes beyond the limits you set.

Only you can see the alerts you set, even if you share your dashboard.

Alerts only work on data that is refreshed. When data refreshes, Power BI looks to see if an alert is set for that data. If the data has reached an alert threshold, an alert is triggered.

Alerts only work with numeric data types.

Alerts only work on data that is refreshed. They do not work on static data.

Today we will see how to work with Alert feature in Power BI.

Login to your Power BI using your credentials.

Switch to your Dashboard.

I have one ready to use dashboard from my previous post to show Alert feature I am using the same.

As discussed above it works only for Numeric & Gauges Tiles only, for others you will not get even the Alert option.

Luckily I have one on my Dashboard, if want to learn how to create Numeric Tiles or more details on working with Power BI you can refer to any of my previous posts on Power BI. However you can find here one direct Link to the topic in question.

You see I have selected my Numeric Tile in below screen shot.
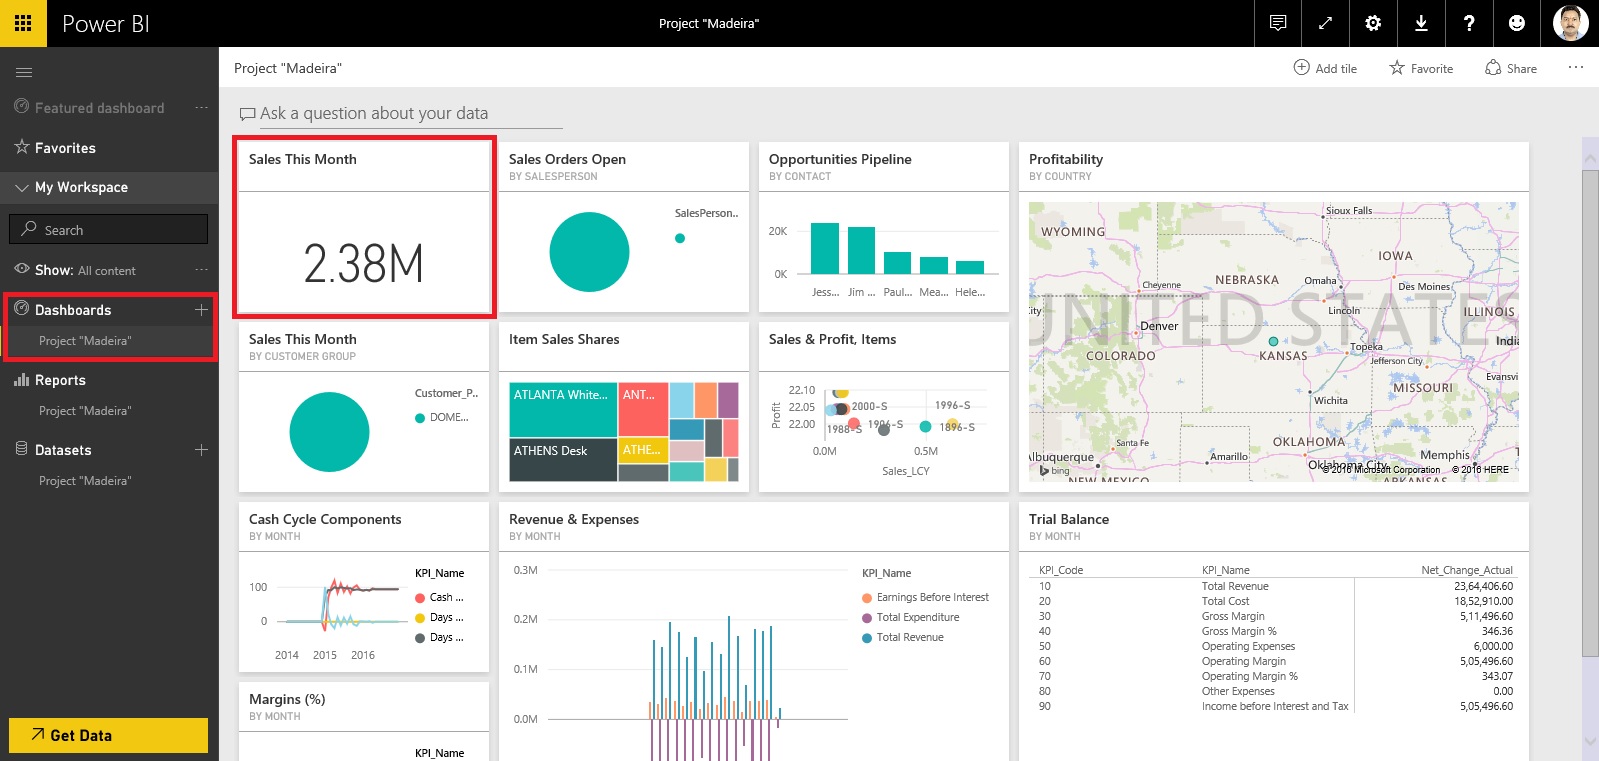
DataAlert-1

How to Set Data Alerts:

From a dashboard tile, select the ellipses.

Select the bell icon  to add one or more alerts.
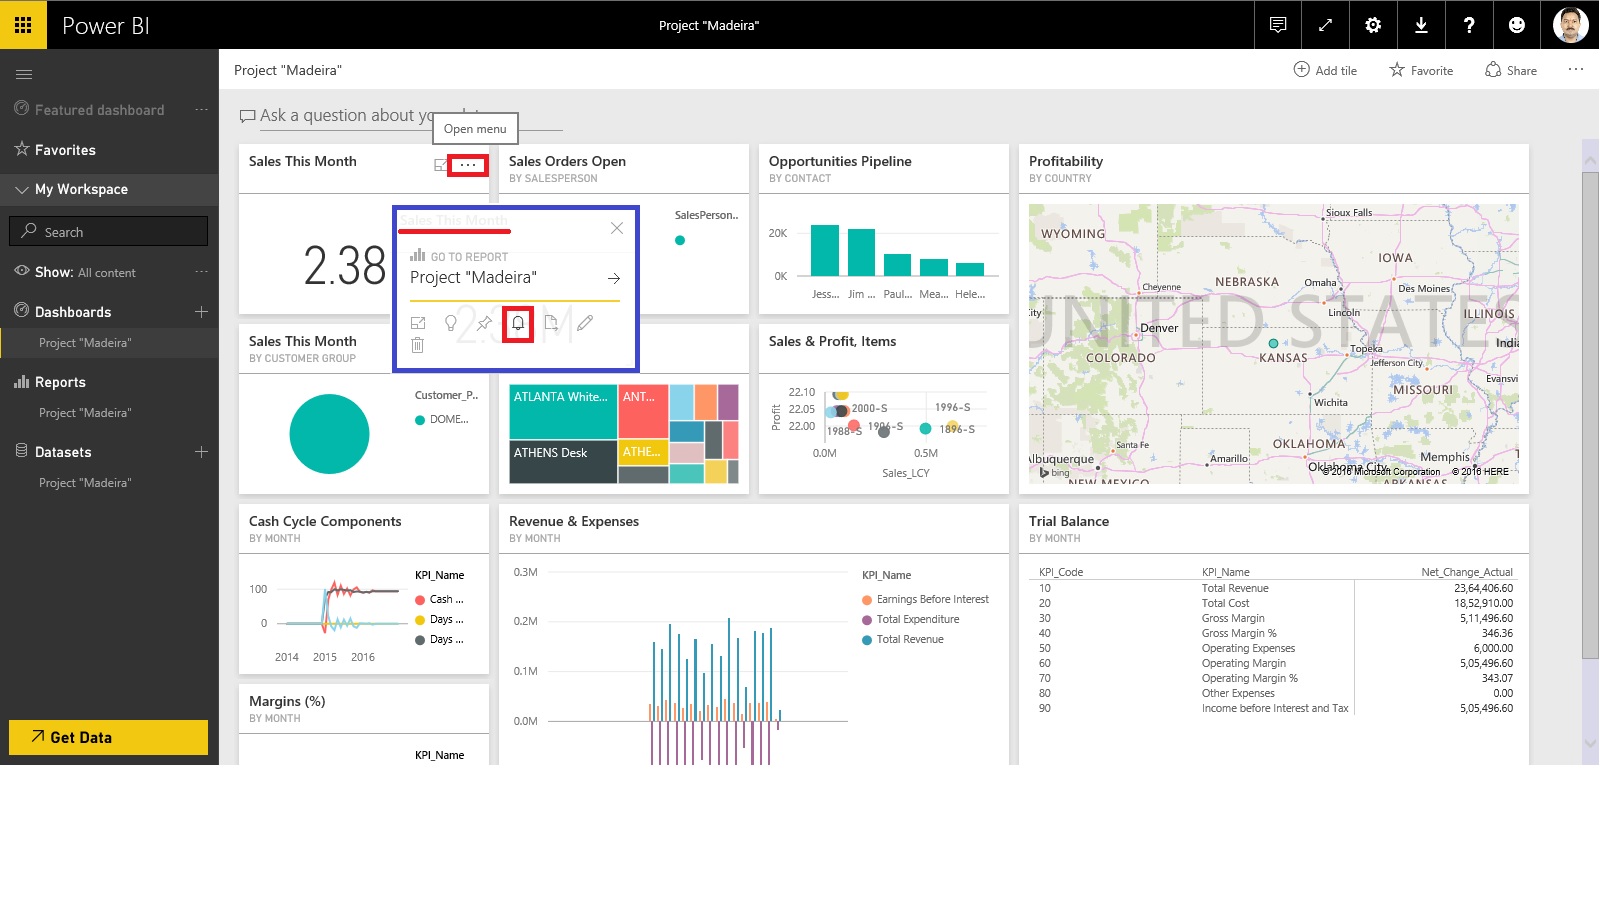
DataAlert-2

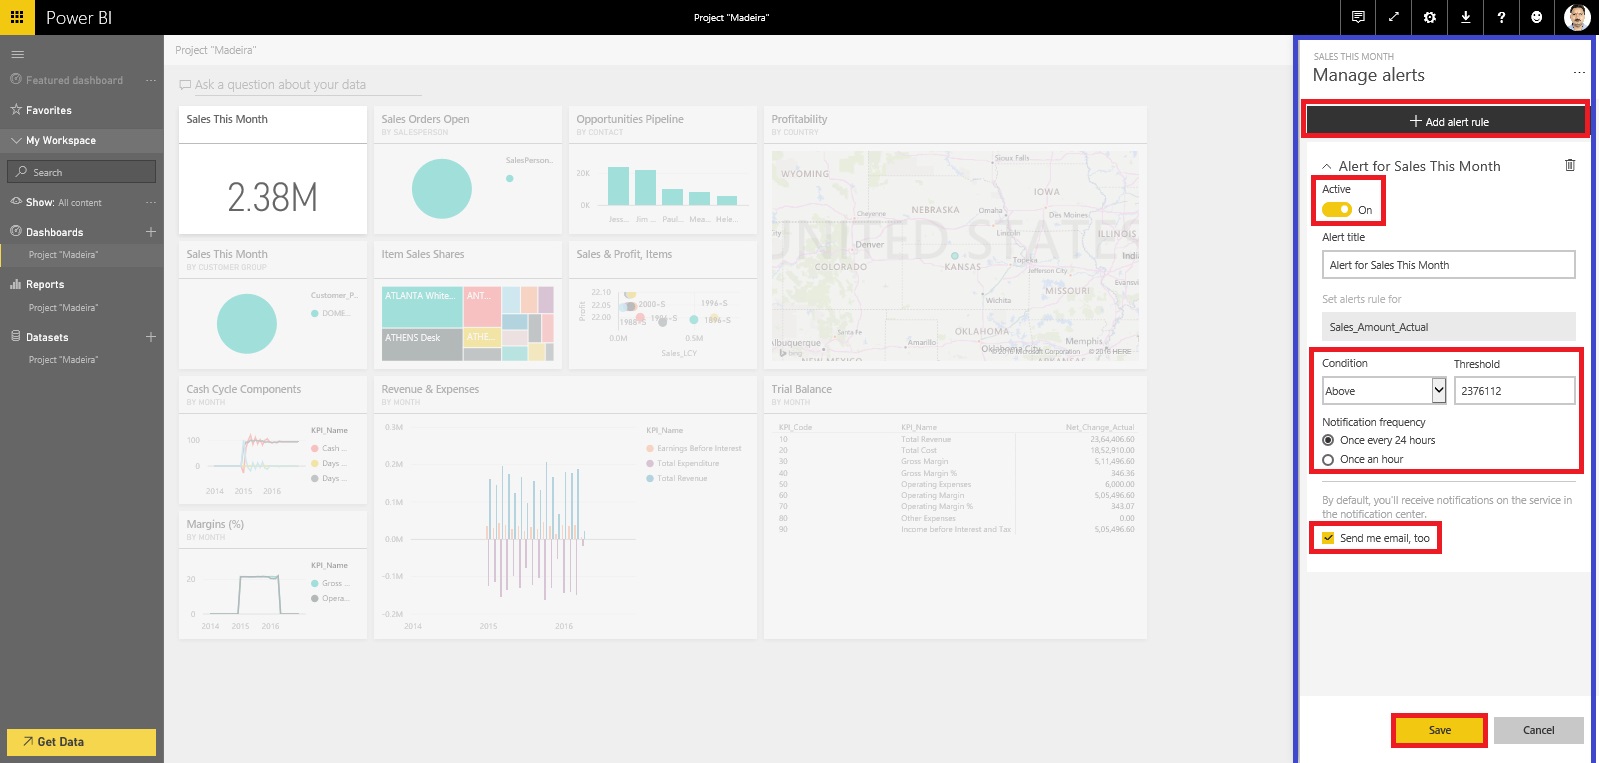
Click on Add Alert Rule.

To start, ensure the Active slider is set to ON, and give your alert a title.
DataAlert-3


Set your Condition, Threshold, and Notification Frequency also don’t forget to tick on send me mail too.

Click on Save to save your Alert.


Receiving alerts:

When the data being tracked reaches one of the thresholds you've set, several things will happen.

Power BI checks to see if time have lapsed or more than depending on the option you selected since the last alert was sent.

As long as the data is past the threshold, you'll get an alert every hour or every 24 hours depending on option you selected.

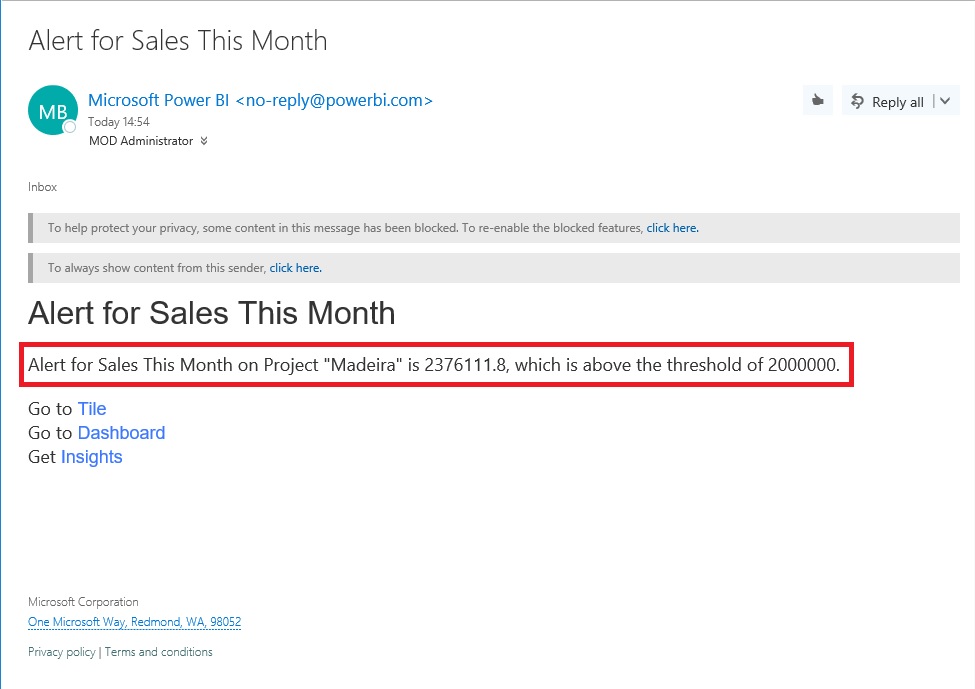
If you've set the alert to send you an email, you'll find something like as shown in below screen, this in your Inbox.
 

DataAlert-4


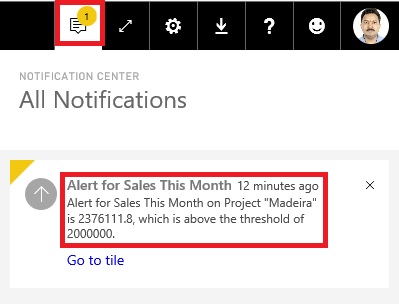
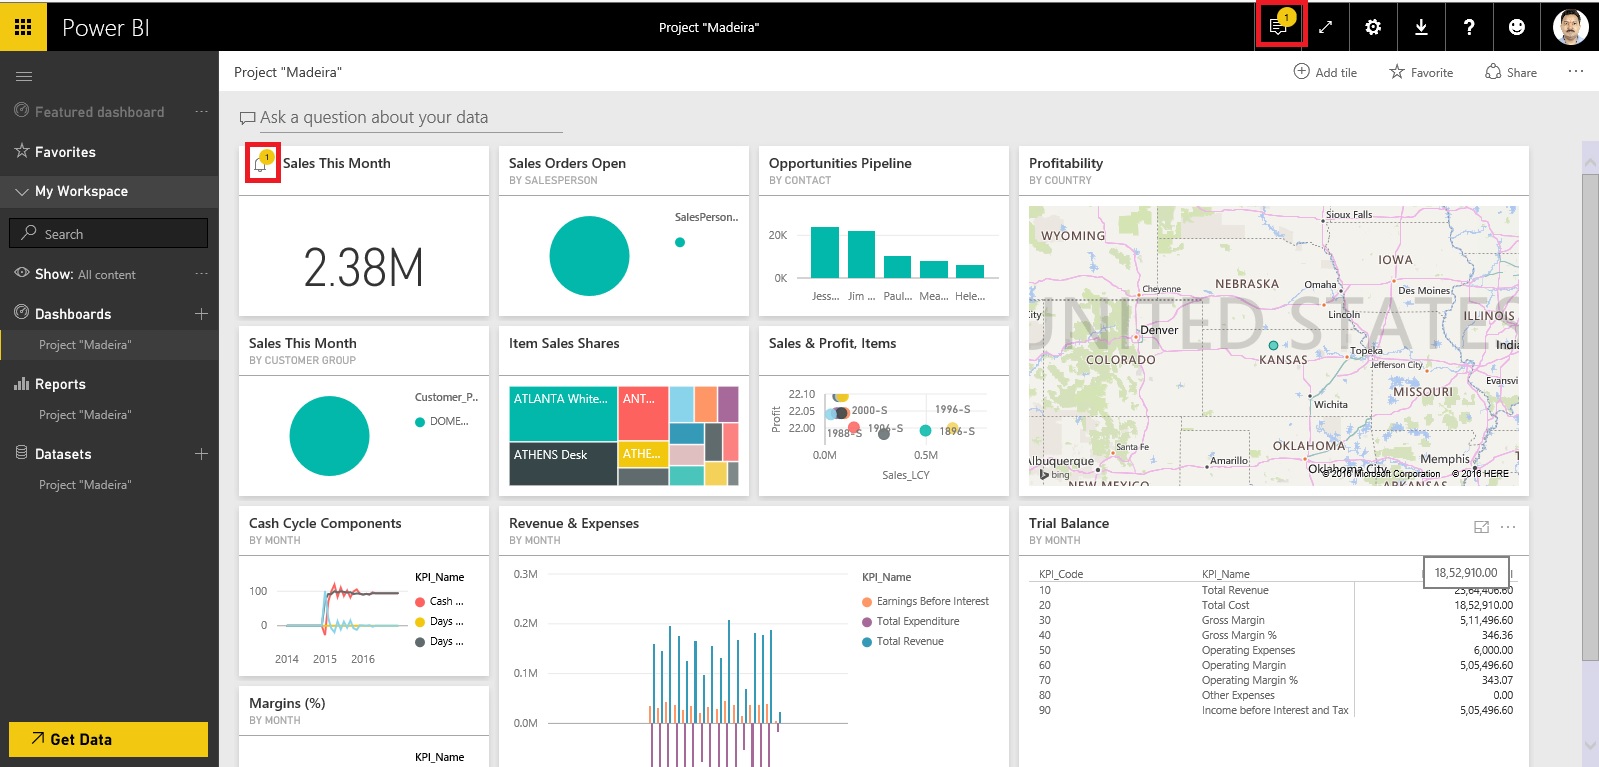
Power BI will add a message to your Notification center and adds a new alert icon to the applicable tile as shown in below screen.
DataAlert-5


Access to your Notification.

DataAlert-6


Manage alerts:

There are three ways to manage your alerts:

From the dashboard tile

From the Power BI Settings menu

On an individual tile in the Mobile App
DataAlert-7


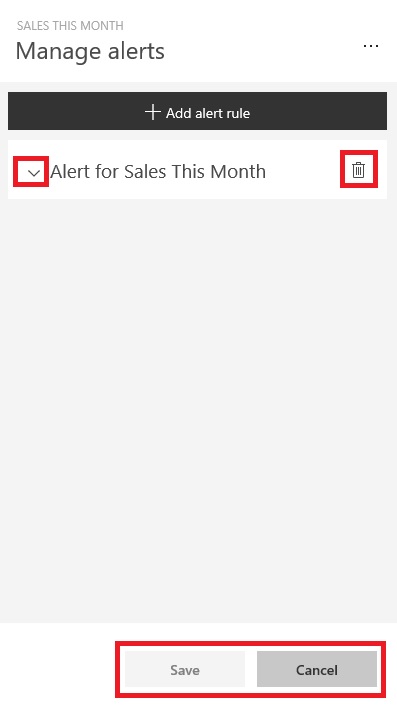
As we have seen above how to create Alerts follow same steps to access Alert Window.

At the Left click on Expand make Necessary Modifications and save.

At the right select the trashcan to delete the Alert.

Select cancel to return to previous window.
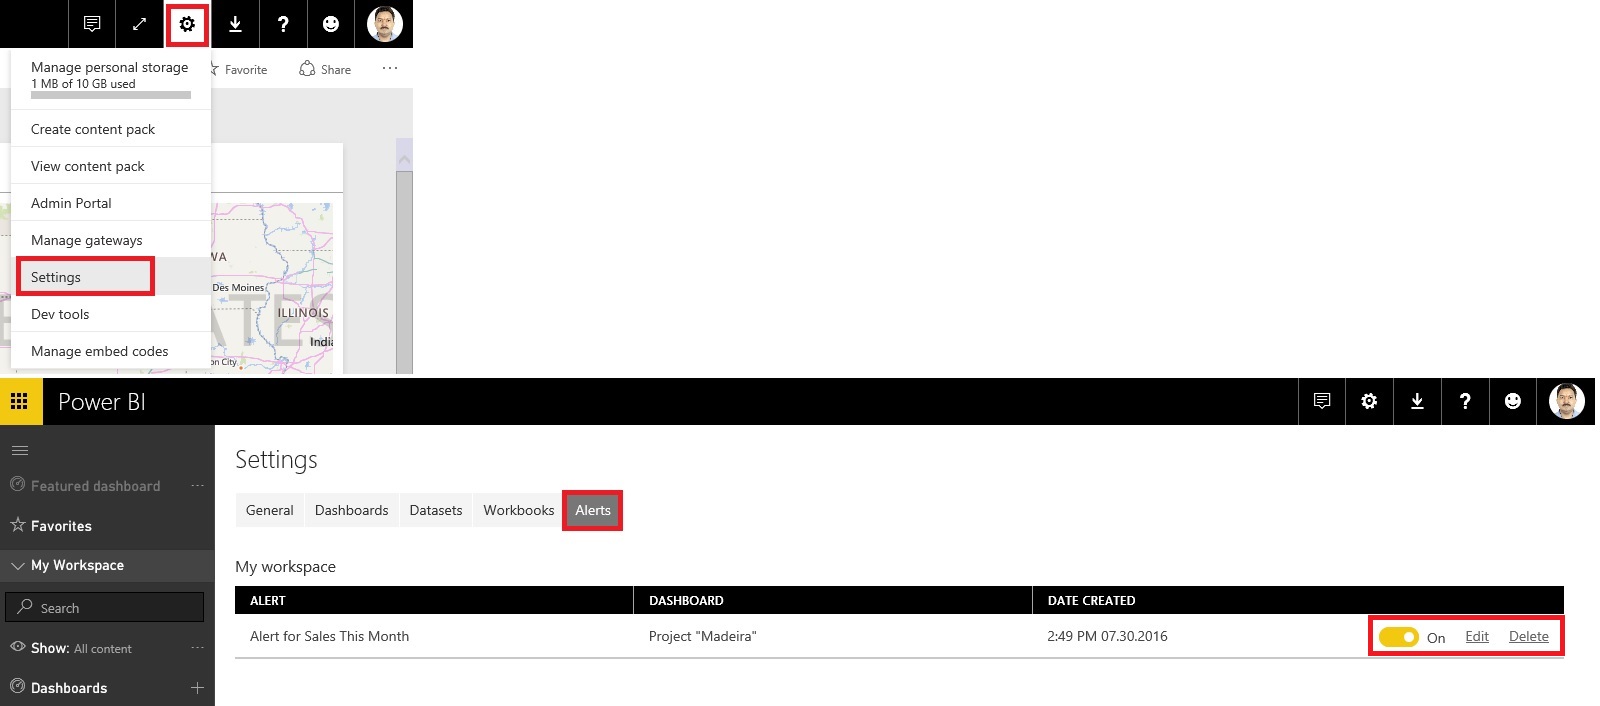
 

DataAlert-8

From here you can turn alerts on and off, open the Manage alerts window to make changes, or delete the alert.


That’s all for today.

I will come up with more details in my upcoming posts.

Till then keep exploring and learning.


Friday, 29 July 2016

Working with Item Attributes in Madeira

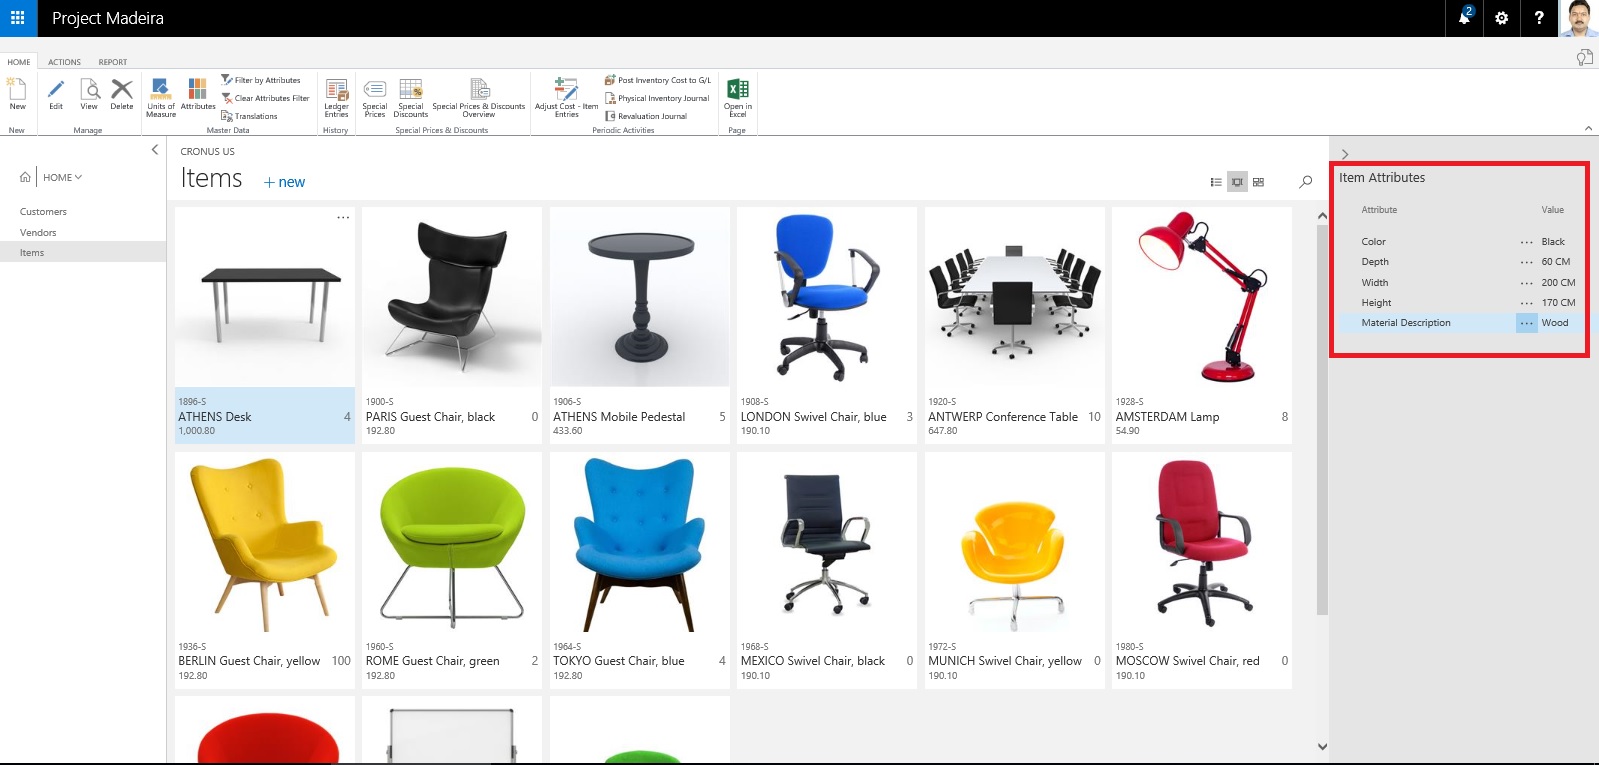
In Madeira you can assign item attribute values of different types to your items, which can then be used when searching for items.

Open your Item List/Card and in the right side of the window Factbox you see Item Attributes.

Today in this post we will see how to define, assign and use it for searching the items.

ItemAttribute-1

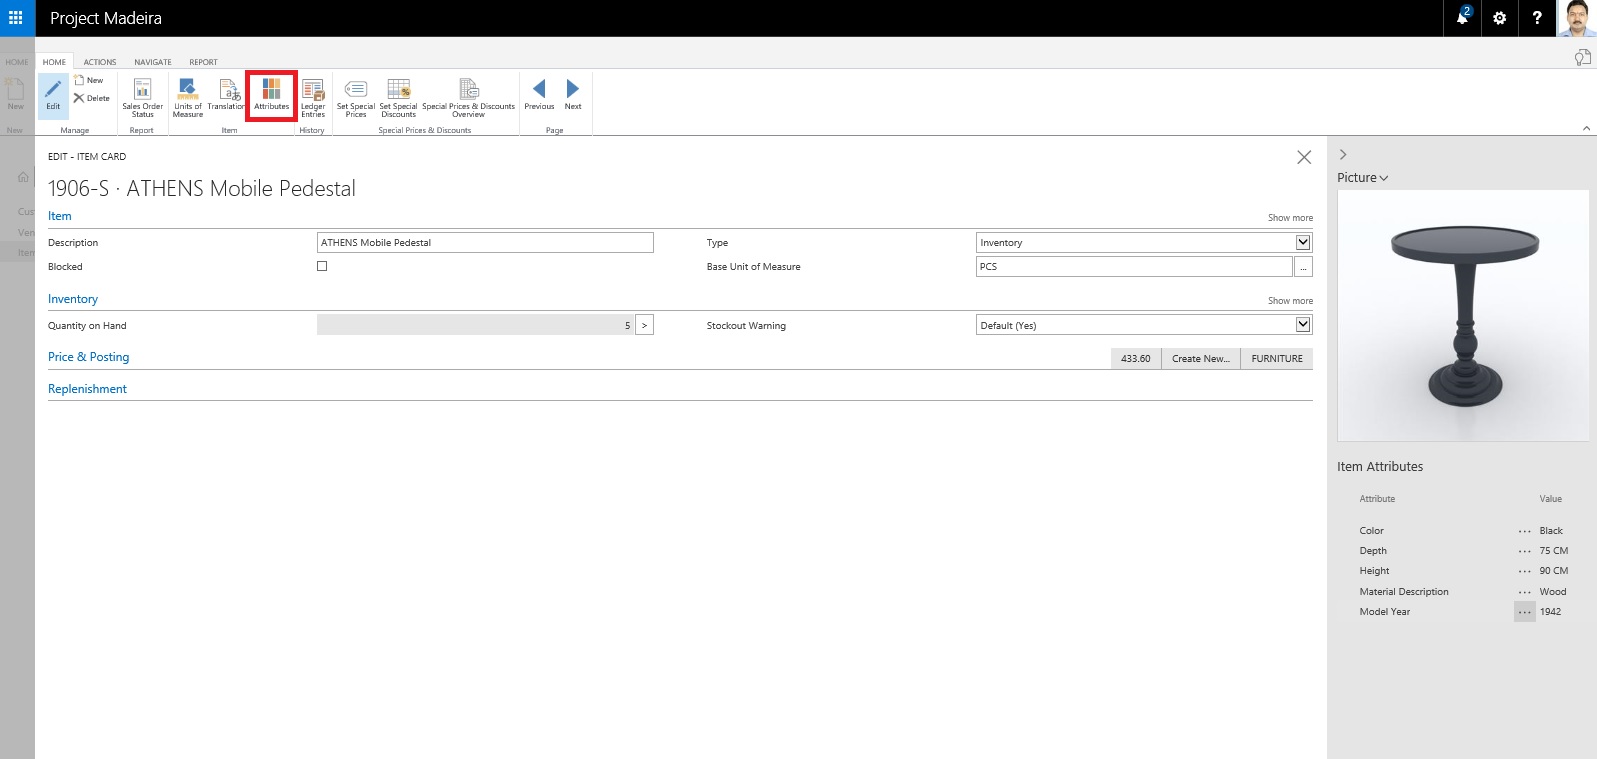
Either from the List Page or Card Page Select Attributes as shown in below screen shot.

From Home or Action Tab Ribbon.

ItemAttribute-2

It will show you all the Attributes and their Values assigned to the Item.

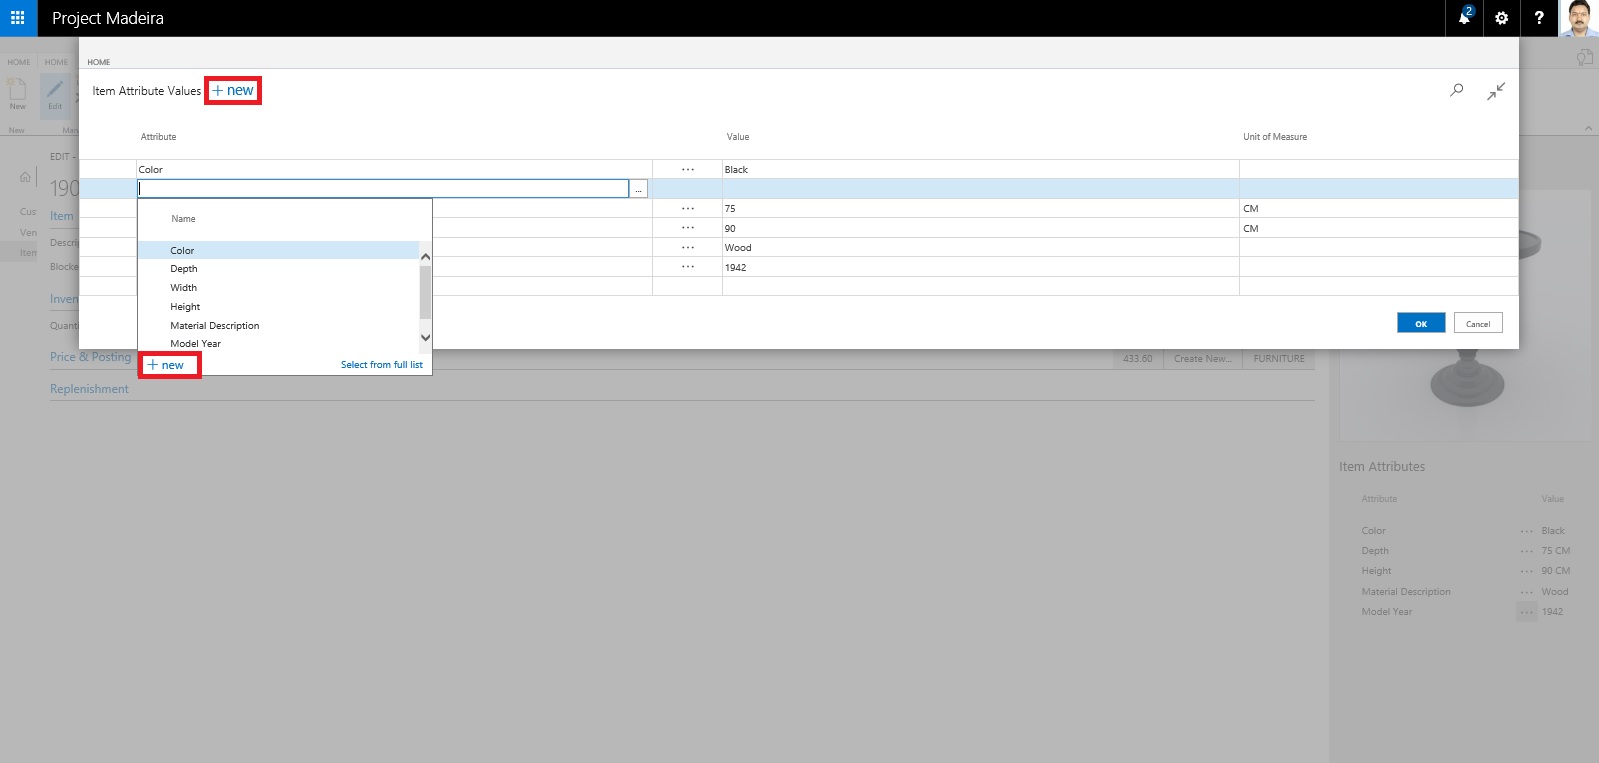
You can create New Attribute, Click on +New, a New Line will be inserted to Assign Attribute and its Value.

If you wish to create New Attribute for the Item from the Dropdown List click on +New.

ItemAttribute-3

Attribute definition window opens.

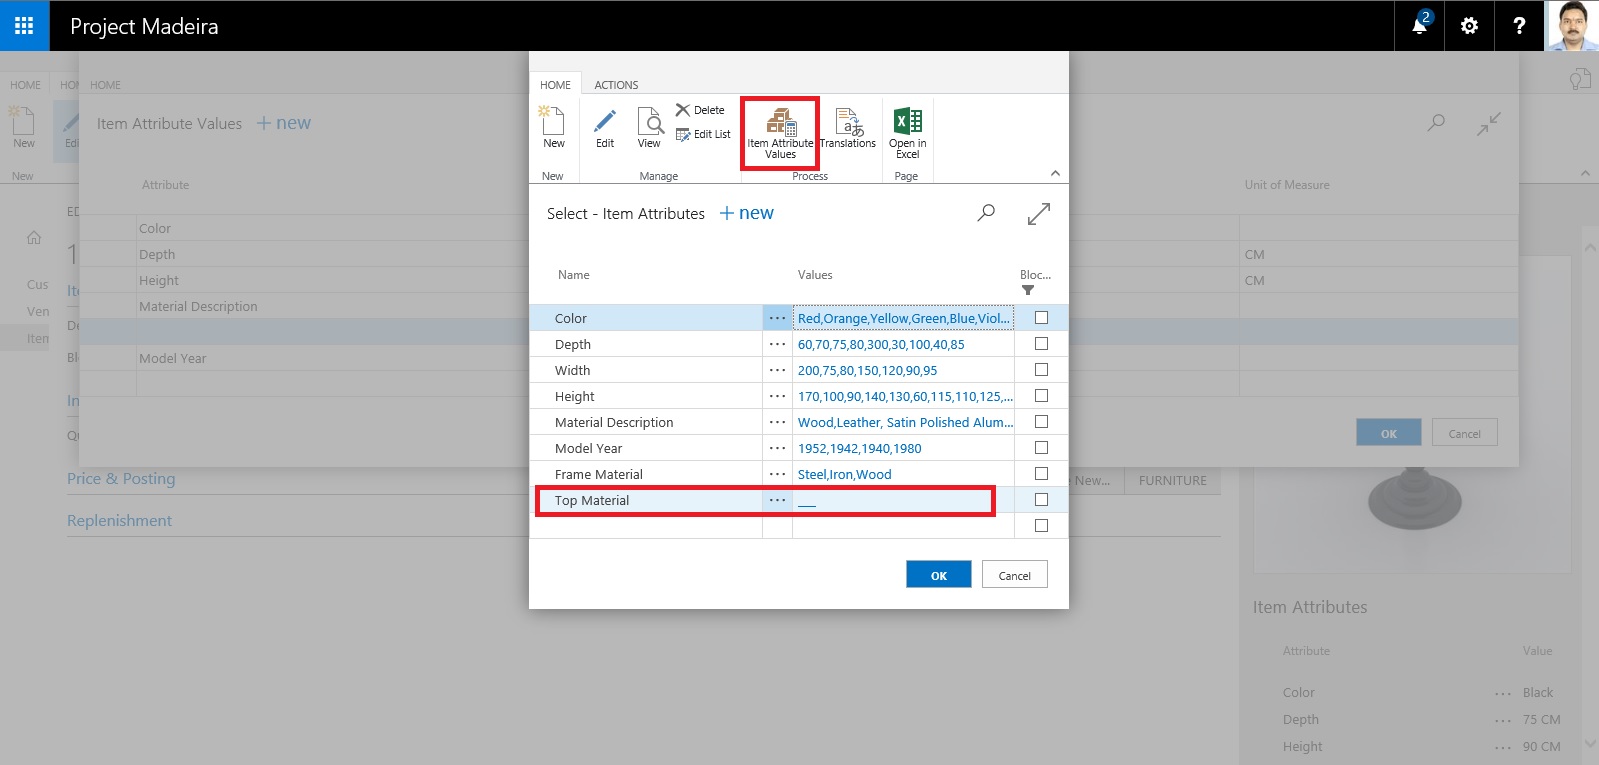
Define you New Attribute. Once Attribute is created you need to define available values for the same. In below Screen i have created New Attribute "TopMaterial".

To define applicable values for this Attribute from Ribbon click on Item Attribute Values.

ItemAttribute-4

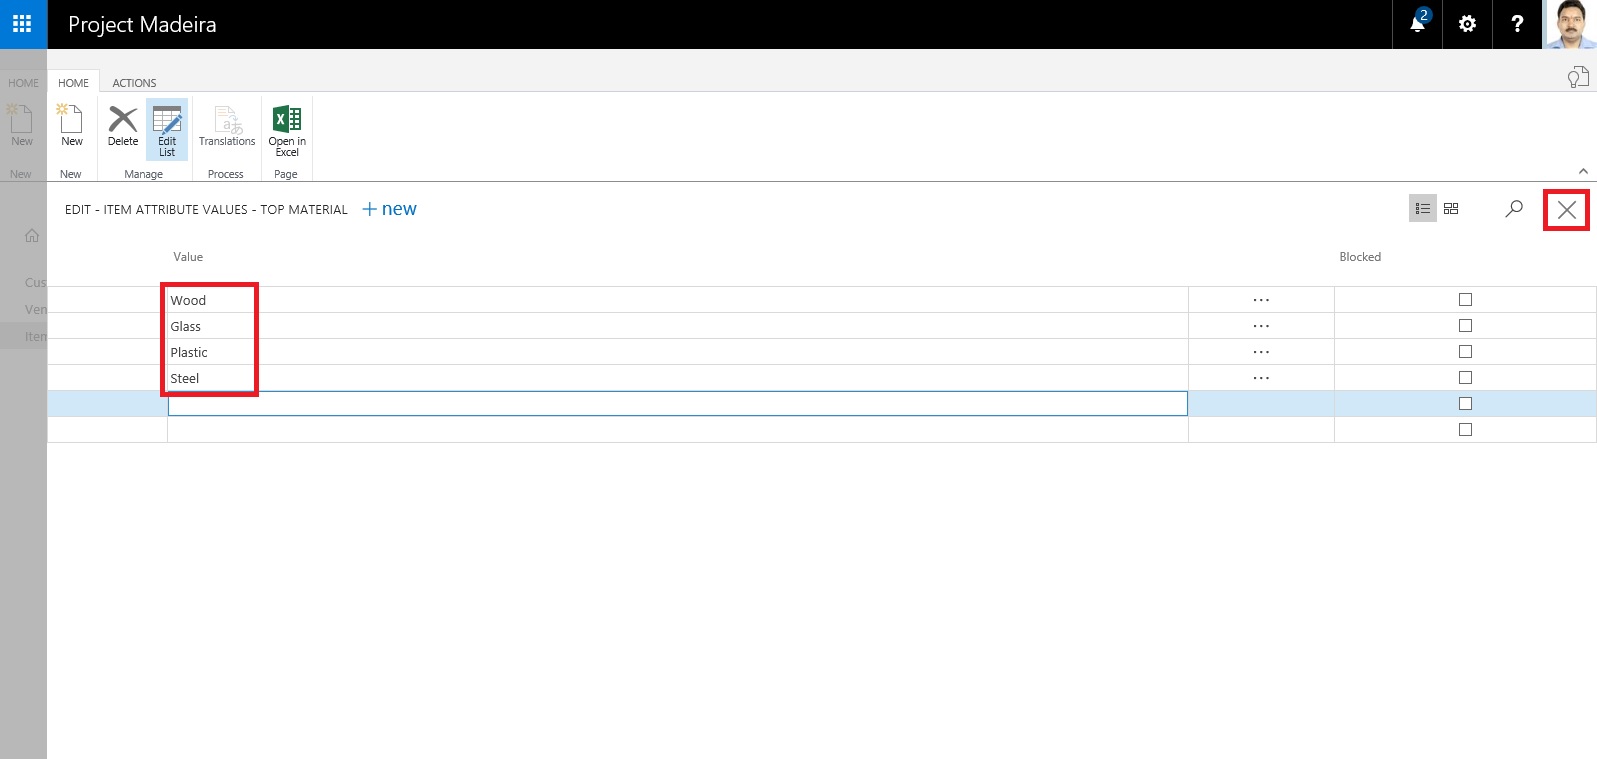
In Value window define all the applicable values and close the window.

ItemAttribute-5

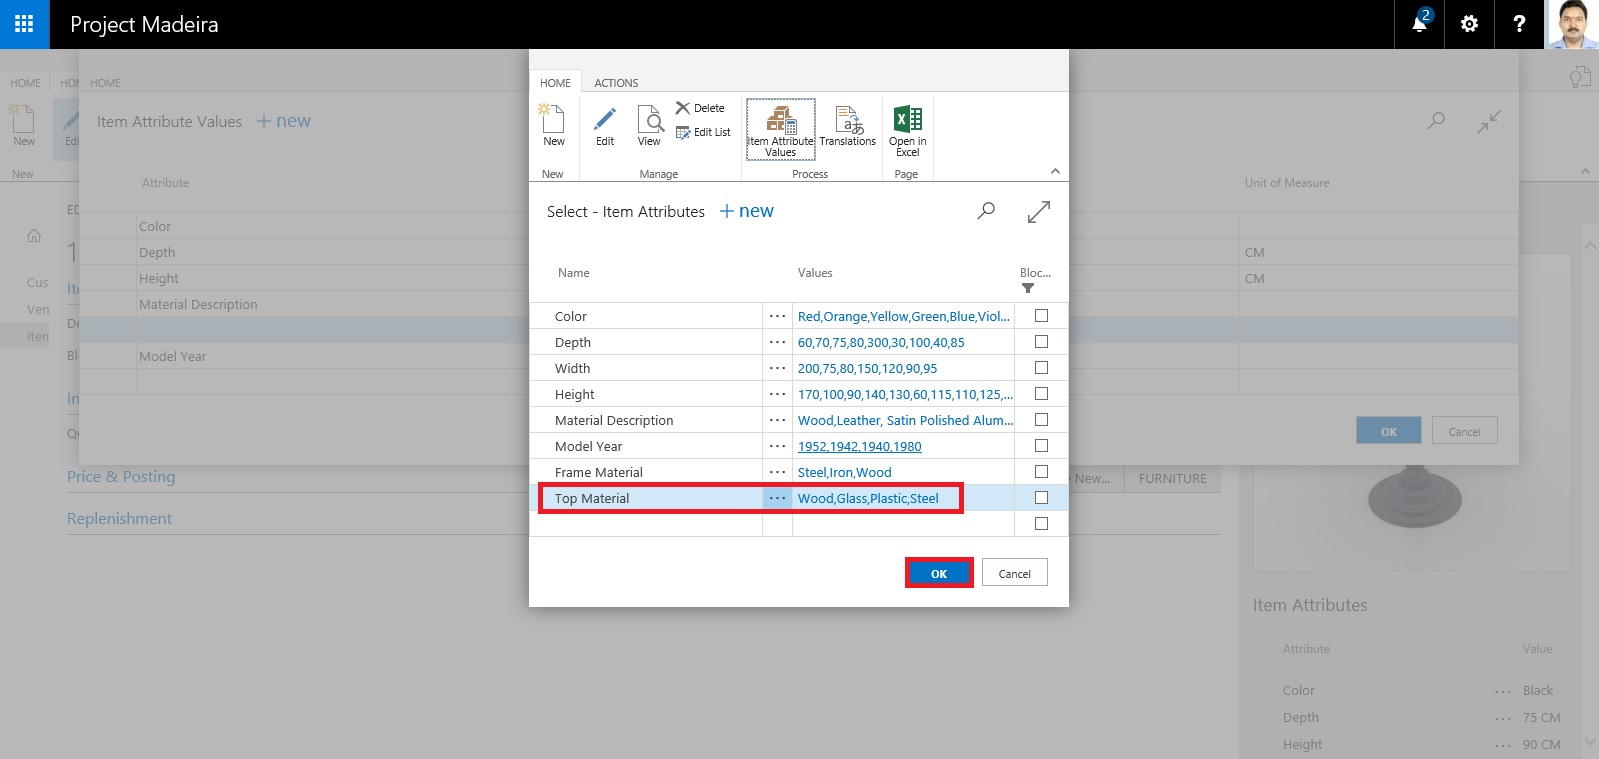
You will be returned to the previous Page and you can see your Attribute and Value defined, just we created in our above steps. Click on OK to return to previous page.

ItemAttribute-6

Next we will Assign these Attribute and Values on the Item.

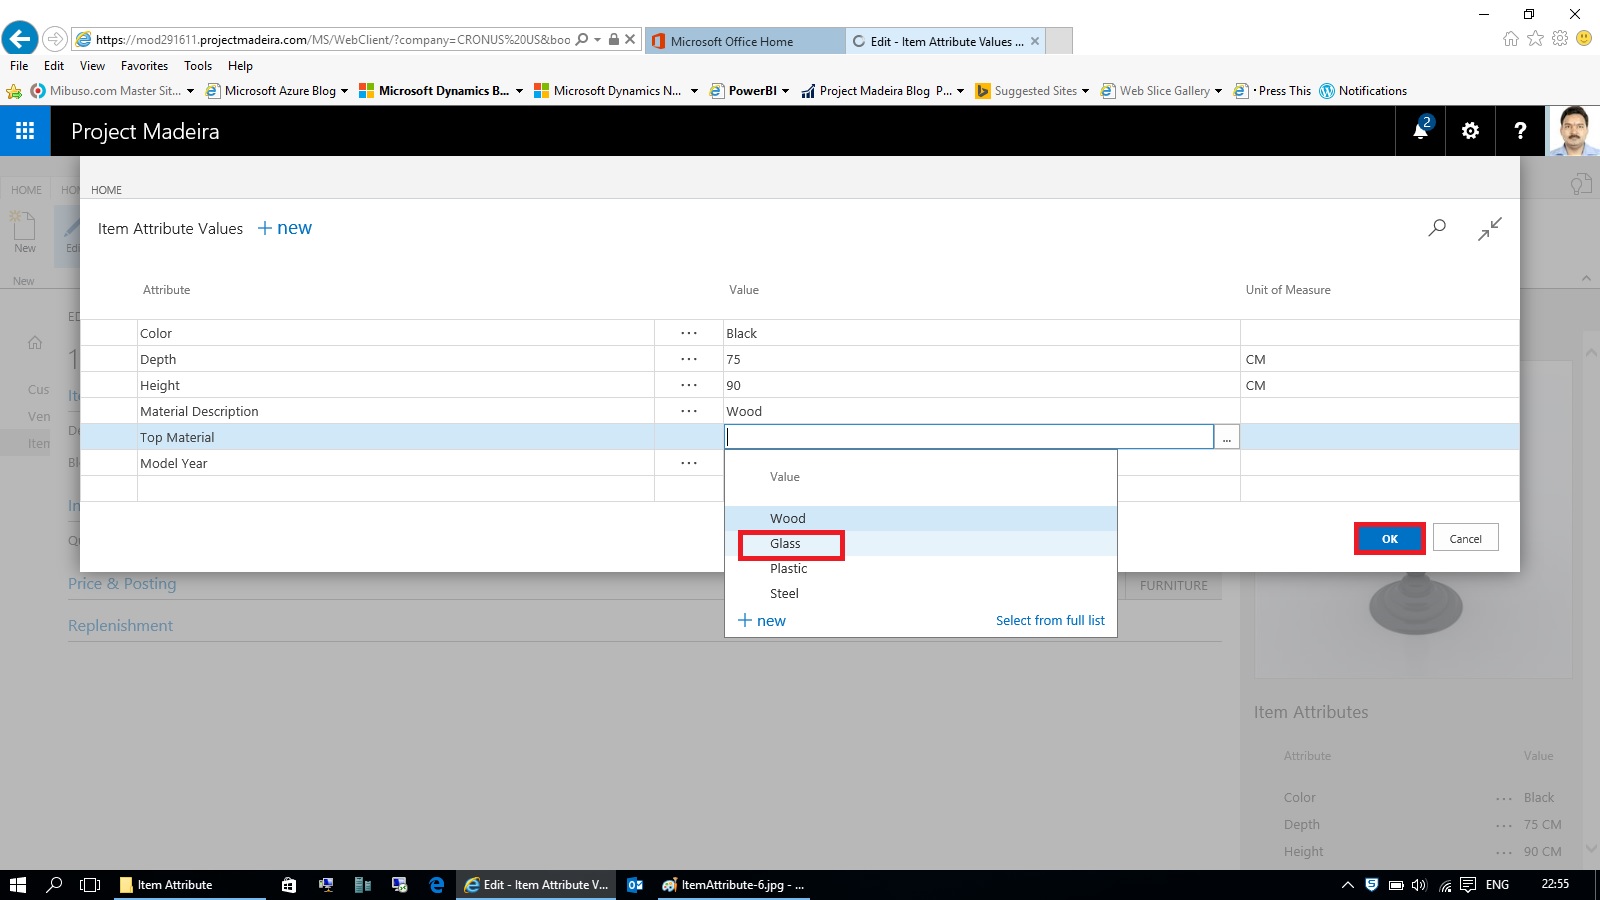
Select the Attribute and Value for the Item as shown in below screen.

After assigning click on OK to close the Page.

ItemAttribute-7

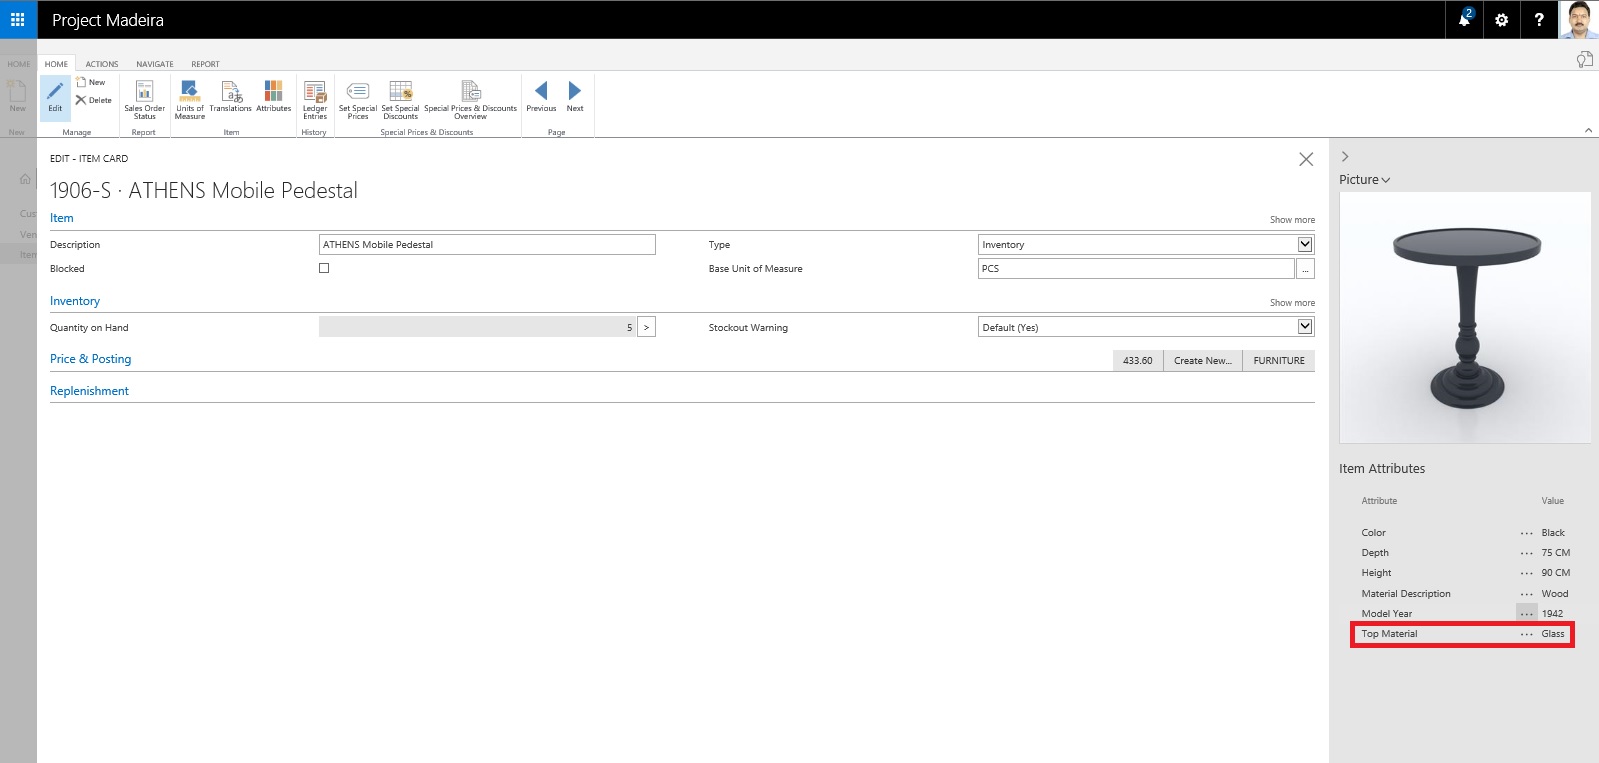
When you return to your Item Card or List Page you will see that your New assigned Attribute and its Value is displayed on Factbox.

ItemAttribute-8

Switch to your Item List Page.

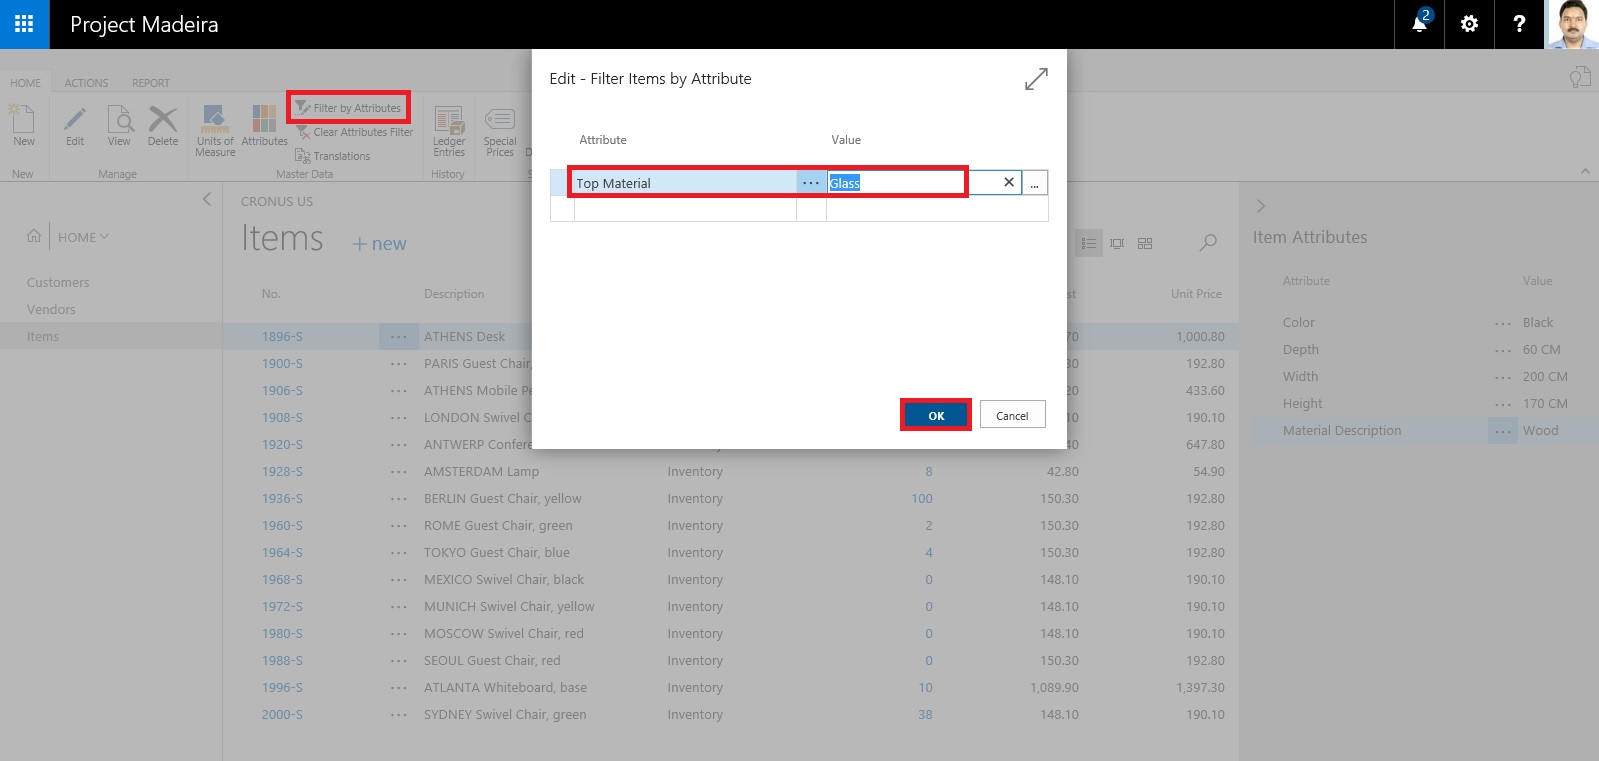
From Ribbon click on Filter on Attribute a Filter window will open.

Select the Attribute and Value for filter that you want to assign.

Click on OK to apply the filter on the page.

ItemAttribute-9

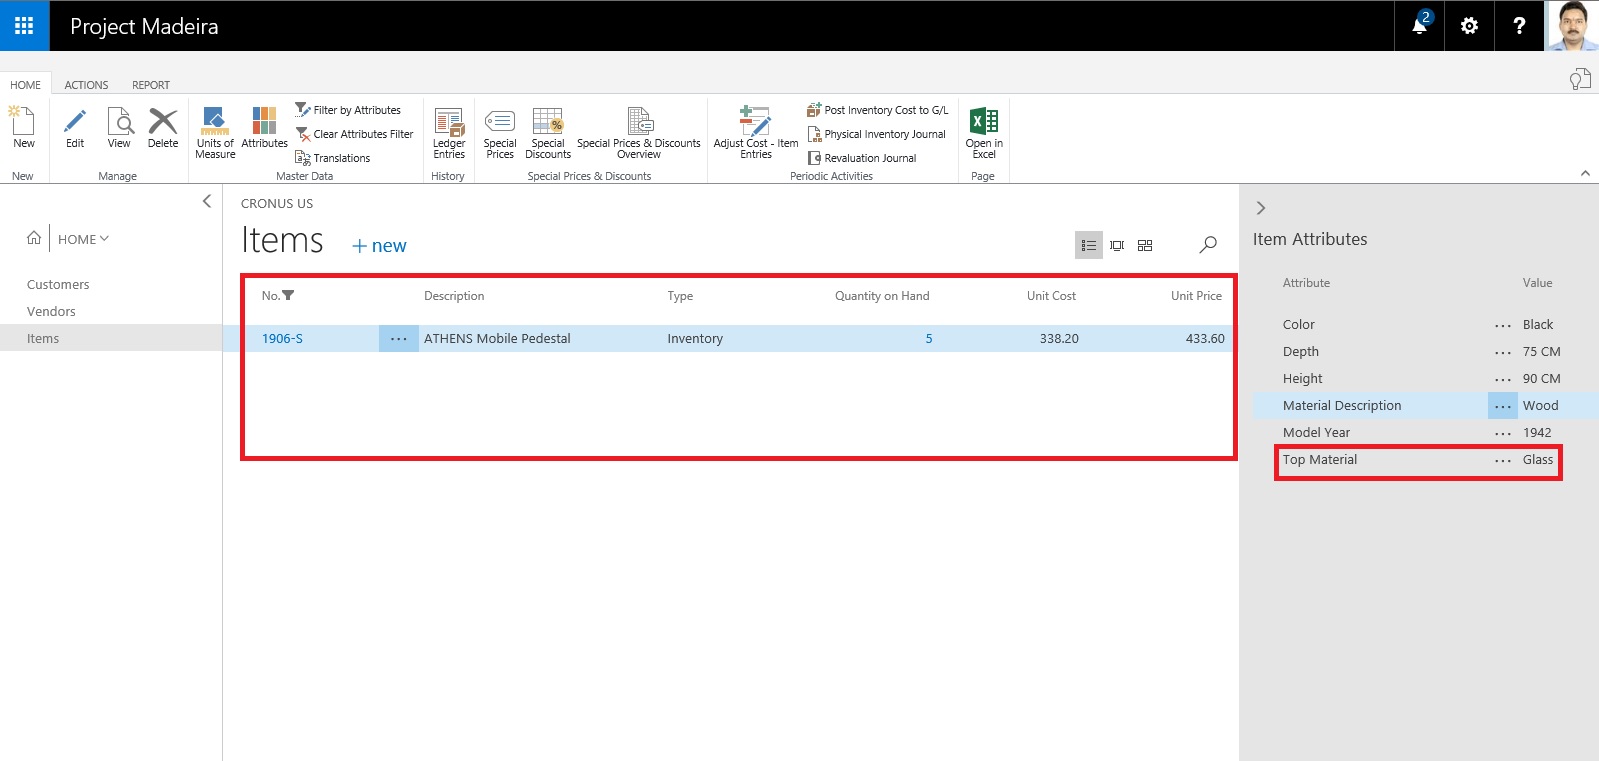
Since we have asigned this Attribute and Value on one Item, It will be filtered and all Items satisfying the filter condition will be displayed.

ItemAttribute-10

The items in the Items window are filtered by the specified item attribute values.

Thats all for this post.

I will comeup with some more details in my upcoming posts.

Till then keep exploring and learning.


Monday, 2 November 2015

Working with Data Encryption in Navision 2016

You can encrypt data on the Microsoft Dynamics NAV Server by generating new or importing existing encryption keys.

How to: Enable Encryption Keys

You can enable data encryption on the Microsoft Dynamics NAV Server instance that connects to the database.

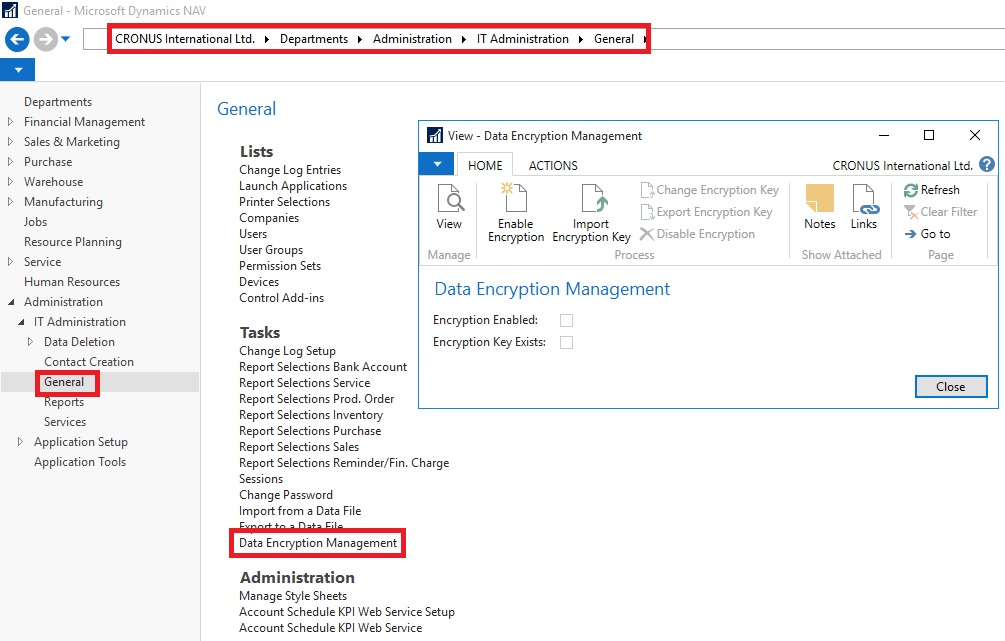
  • Open the Data Encryption Management Card, as path suggested in below Image.


DataEncryption-1

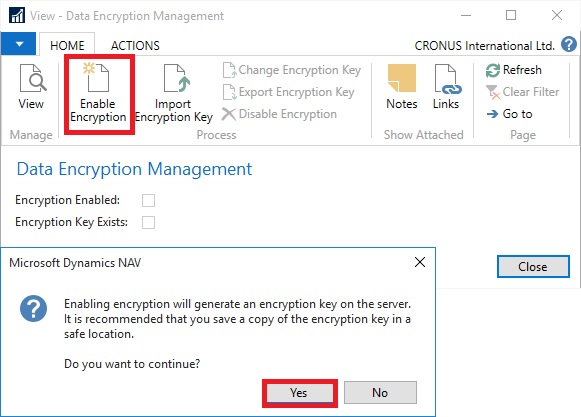
  • Click on Enable Encryption in Process of Home tab.


DataEncryption-2

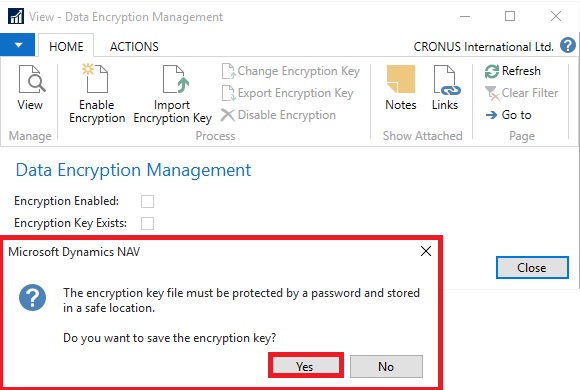
  • On Confirmation Dialog box choose Yes.

  • On further Confirmation of Password choose Yes.


DataEncryption-3

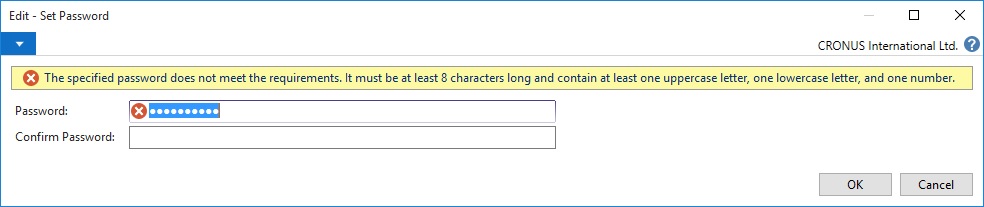
  • Enter the Password as defined in Rule as shown in below Image.


DataEncryption-4

  • Upon entering Password choose OK to continue.

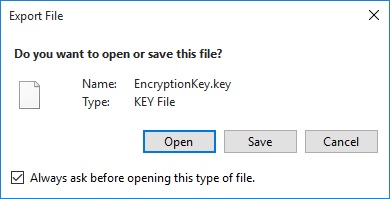
  • Key is created with password protected and offered to Export.


DataEncryption-5

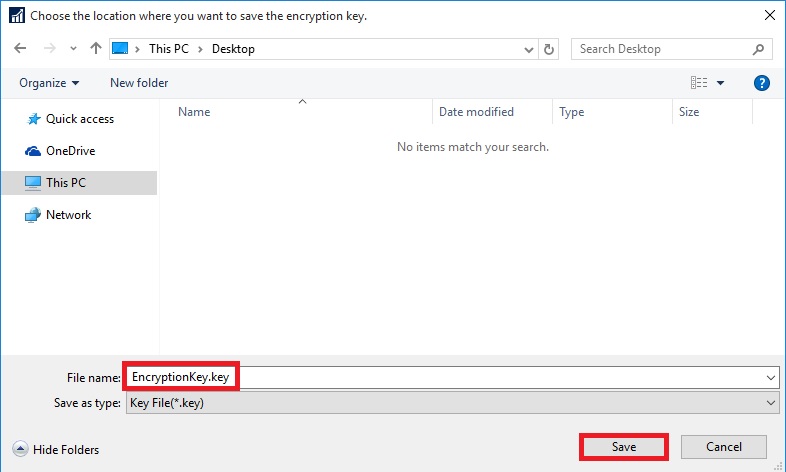
  • Choose Save, and save it as Safe Location as you will require it again whenever you restore the database or Import Export the data. Please make sure you also store the password for further reference whenever required.


DataEncryption-6

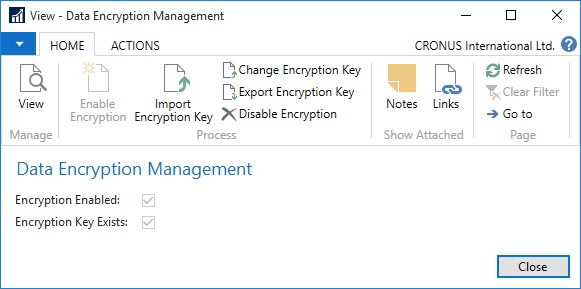
  • Once Key is generated, you can see that the Encryption Enabled & Encryption Key Exists is checked TRUE.

  • Also in Ribbon you will find the Change Encryption Key, Export Encryption Key & Disable Encryption is now enabled.


DataEncryption-7

  • If Microsoft Dynamics NAV is configured with multiple service tiers (Microsoft Dynamics NAV Server instances), then you must first enable encryption on one server instance, and then export the key and import to other server instances where you enable encryption.


If you export companies and other data that is secured by data encryption, then remember to also export the encryption key so that you can access the data after you import it into another database, for example when you restore a backup. Creating a backup of encrypted data involves the following high-level steps.

  • Export the data from one database.

  • Export the data encryption key.

  • Import the data into another database.


  • Import the data encryption key.


How to: Export and Import Encryption Keys

Note: You cannot generate different keys within one multiple-server instance environment.

Exporting an Encryption Key

You export an encryption key to make a copy of the key or so that it can be imported on another server instance.

Exporting an encryption key stores the encryption key that is used by the current server instance to a file on your computer or network.

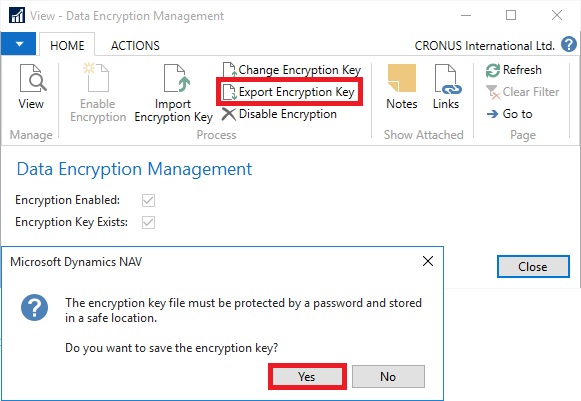
To export an encryption key
DataEncryption-8

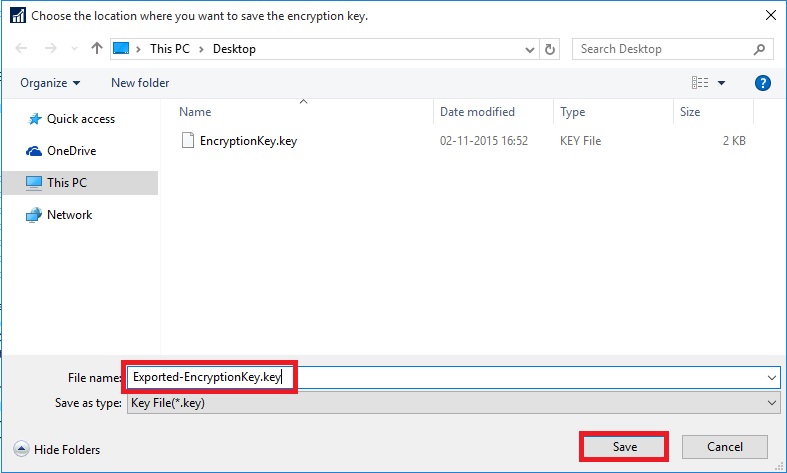
  • On the message about saving the encryption key, choose Yes.


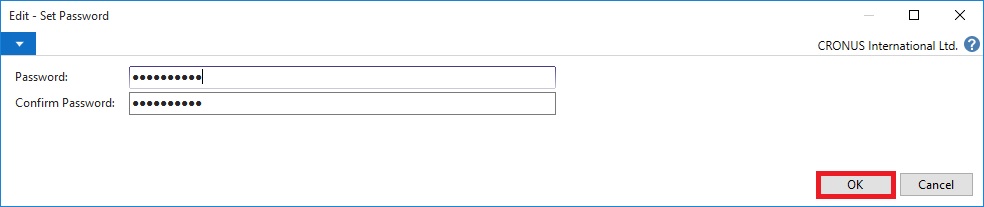
  • In the Set Password window, enter the password that will protect the exported key file, and then choose OK.


DataEncryption-9

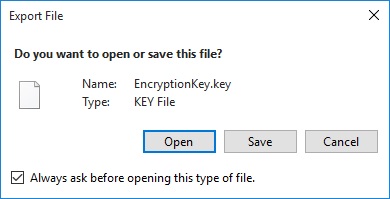
  • In the Export File window, choose Save, choose a safe location where the key file is stored, and then choose Save.


DataEncryption-10

DataEncryption-11

Importing an Encryption Key

You can import an encryption key to a server instance from an encryption key file that was exported from another server instance or saved as a copy when the encryption was enabled.

You cannot import an encryption key on a server instance that already includes an encryption key. In this case, you must change the encryption key instead.

To import an encryption key
DataEncryption-12

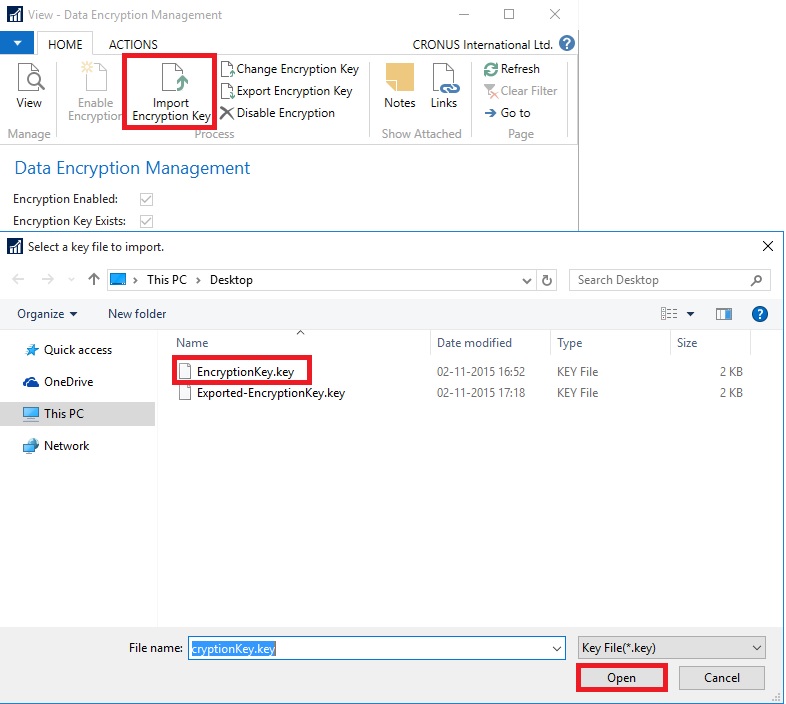
  • On the Home tab, in the Process group, choose Import Encryption Key.

  • In the Select a key file to import window, choose the encryption key file, and then choose Open.


DataEncryption-13

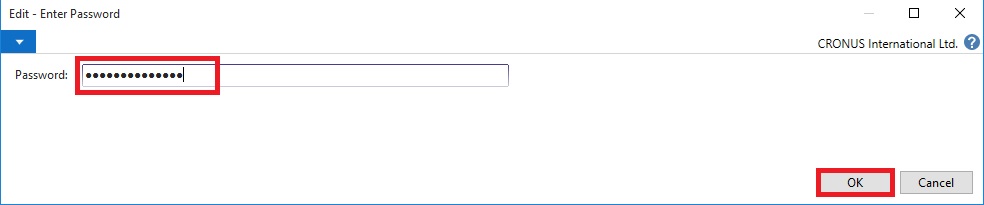
  • In the Password window, enter the password that protects the key file, and then choose OK.


Changing an Encryption Key

If a server instance already has an encryption key, then you can replace the current encryption key with an encryption key that is stored in an encryption key file that was exported from another server.

To change an encryption key

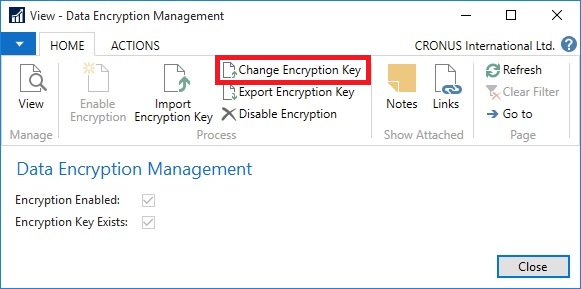
  • On the Home tab, in the Process group, choose Change Encryption Key.


DataEncryption-14

  • In the Select a key file to import window, choose the encryption key file, and then choose Open. Same as in above process.

  • In the Password window, enter the password that protects the key file, and then choose OK. Same as in above process.

Working with Profiles in Navision 2016

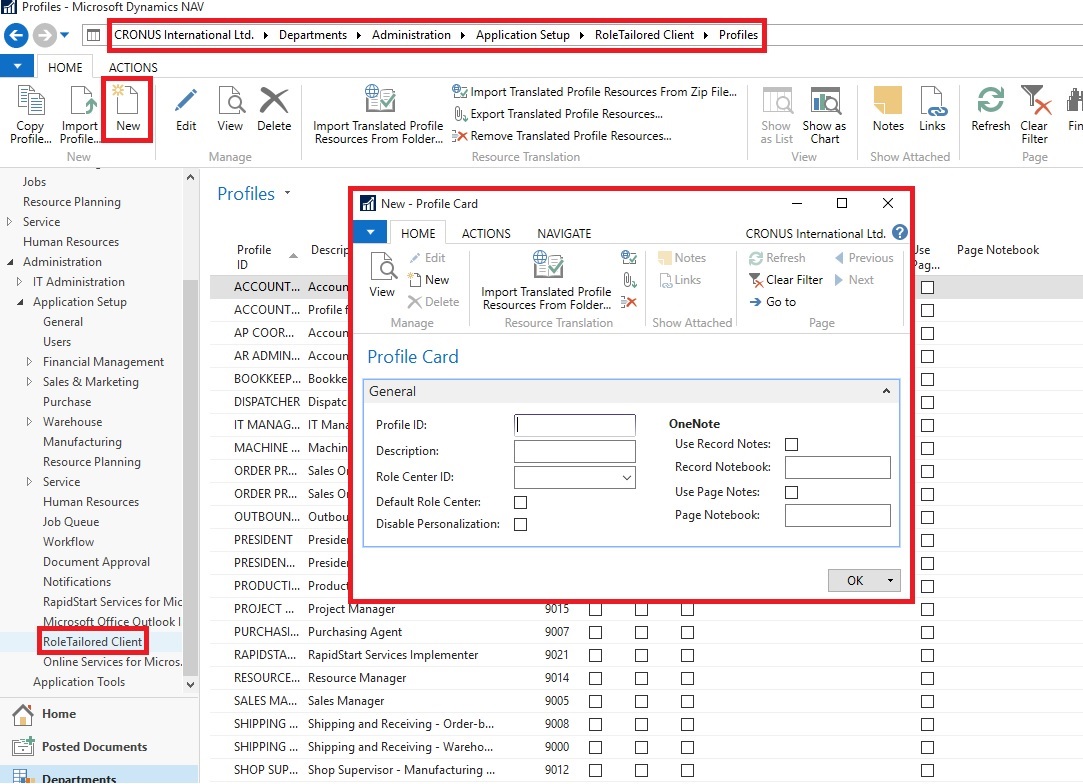
How to: Create a Profile

You use the Profile card to create profiles for end users. Each profile is associated with a  Role Center. Profiles are typically based on job titles in a company.

To create a profile

Profiles-1

  • In the Profile ID field, enter a name that describes the intended role of the user.

  • In the Owner ID field, click the AssistEdit button to view all available logins, and then select a Windows user.

  • In the Description field, enter a description of the Profile ID, for example, Order Processor.

  • In the Role Center ID field, click the AssistEdit button to view all available Role Centers. Select a Role Center.

  • To make this Role Center the default for the profile, select Default Role Center.

  • Click OK to save your changes.


The procedure for modifying an existing profile is the same, except you select an existing profile in the Profiles page instead of clicking New.

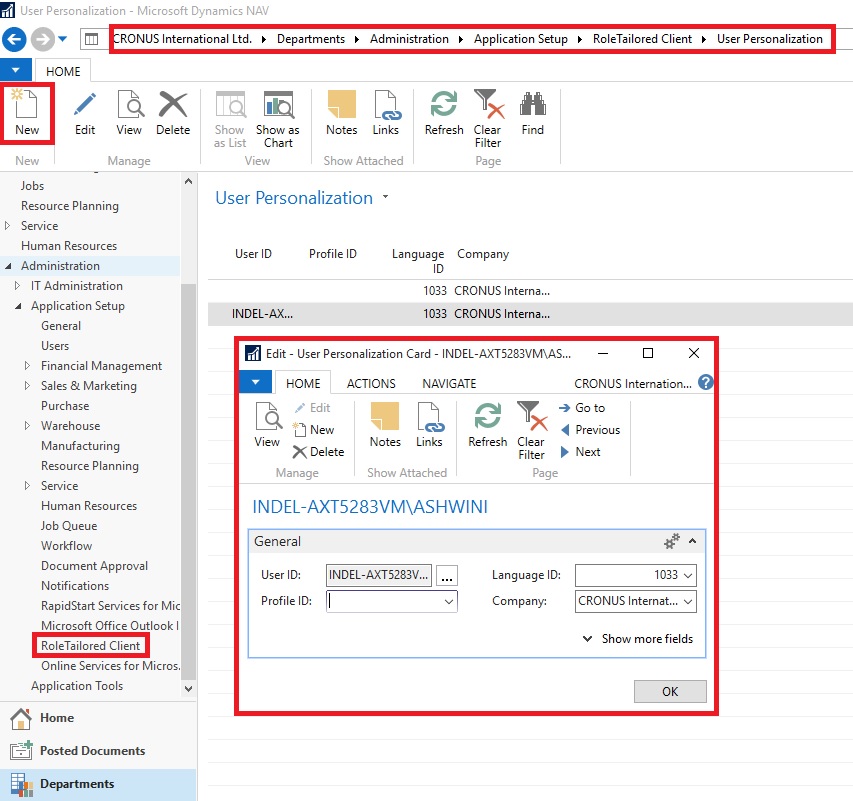
How to: Assign a User to a Profile

You use the User Personalization page to assign a user to a profile.

To assign a user to a profile

Profiles-2

  • In the User Personalization window, fill in the fields described in the following table.


Field Description
User IDChoose the AssistEdit button to view all available user logins, select the relevant user, and then choose the OK button.
Profile IDSelect a profile ID that you have already created. Choose the AssistEdit button to view all available profiles.
Language IDSelect the appropriate language ID, or leave this field blank.
CompanySelect a company from the Companies window.


  • Choose the OK button.


Note The Language ID and Company values are overwritten by user values when the user starts a session.

How to: Open Microsoft Dynamics NAV in Configuration Mode

To configure a profile, for example to customize the profile’s user interface, you must open the Microsoft Dynamics NAV Windows client in configuration mode.

To open the Microsoft Dynamics NAV Windows client in configuration mode

  • At the command prompt, navigate to the root folder of the Microsoft Dynamics NAV Windows client. For example:


cd C:\Program Files (x86)\Microsoft Dynamics NAV\90\RoleTailored Client


  • Type the following command:


Microsoft.Dynamics.Nav.Client.exe -configure -profile:"profileid"

Replace profileid with the name of the profile that you want to configure.

Important You must be the owner of a profile to open it in configuration mode

For example, to configure the Accounting Manager profile, use this command to open the Microsoft Dynamics NAV Windows client in configuration mode:
Microsoft.Dynamics.Nav.Client.exe -configure -profile:"Accounting Manager"