Showing posts with label OData. Show all posts

Wednesday, 19 August 2015

Viewing Page Data in Excel Using PowerPivot (OData)

Here I will discuss how you can use OData to expose a Microsoft Dynamics NAV 2015 page as a web service and then analyse the page data using Microsoft PowerPivot for Excel 2013.

With OData and PowerPivot, you gain access to a powerful set of tools and technologies for data exchange and analysis.

This walkthrough illustrates the following tasks:

  • Publishing a Microsoft Dynamics NAV page as a web service.

  • Verifying web service availability from a browser.

  • Using the PowerPivot add-in for Excel to import the table data as a new worksheet.

  • This procedure also includes optional instructions about how to use a web service access key.

  • Creating a PivotTable from the worksheet, selecting relevant fields, and then organizing and formatting the data to highlight strategic data.


Optional:

If you want to use a web service access key to authenticate access to the web service, Microsoft Dynamics NAV must meet the following requirements:

The Microsoft Dynamics NAV Server is configured to authenticate users by using the NavUserPassword credential type.

There is a Microsoft Dynamics NAV user account that has a web service access key.

You can find more details in my earlier post here

Publishing a Page as a Web Service

You can publish a web service by using the Microsoft Dynamics NAV Web client or the Microsoft Dynamics NAV Windows client.

To register and publish a page as a web service

  • Open the RoleTailored client and connect to the CRONUS International Ltd. company.

  • In the Search box, enter Web Services, and then choose the related link.

  • In the Web Services page, choose New.

  • In the Object Type column, select Page. In the Object ID column, enter 21, and in the Service Name column, enter Customer.


This exposes the Customer Card page as an OData web service.

  • Select the check box in the Published column.


Choose the OK button to close the New - Web Services page.

PowerPivot-1
Verifying the Web Service’s Availability

Security Note

After publishing a web service, verify that the port that web service applications will use to connect to your web service is open. The default port for OData web services is 7048. You can configure this value by using the Microsoft Dynamics NAV Server Administration Tool.

To verify availability of a Microsoft Dynamics NAV web service

Start Windows Internet Explorer.

In the Address field, enter a URI using the following format: http://Server : WebServicePort/ServerInstance/OData/

Server is the name of the computer that is running Microsoft Dynamics NAV Server.

WebServicePort is the port that OData is running on. The default port is 7048.

ServiceInstance is the name of the Microsoft Dynamics NAV Server instance for your solution. The default name is DynamicsNAV80.

For example, if the Microsoft Dynamics NAV Server is running on the computer that you are working on, you can use: http://localhost:7048/DynamicsNAV80/OData/

In my case: - http://indel-axt5283n1.tecturacorp.net:8048/DynamicsNAV80/OData/

The browser should now show the web service that you have published, as shown in the following illustration.

PowerPivot-2
Note

If the browser cannot find the web service, it may indicate that the specified Microsoft Dynamics NAV Server instance is not running.

Make Sure Enable OData Services is checked.
PowerPivot-3
Importing Microsoft Dynamics NAV Data into Excel

In the following procedures, you use PowerPivot to import Microsoft Dynamics NAV data into Excel. If you will be using a web service access key for authentication, only perform the second procedure; otherwise, only perform the first procedure.

To import Microsoft Dynamics NAV data into Excel

Start Microsoft Excel.

In Excel, on the PowerPivot tab, choose Manage.
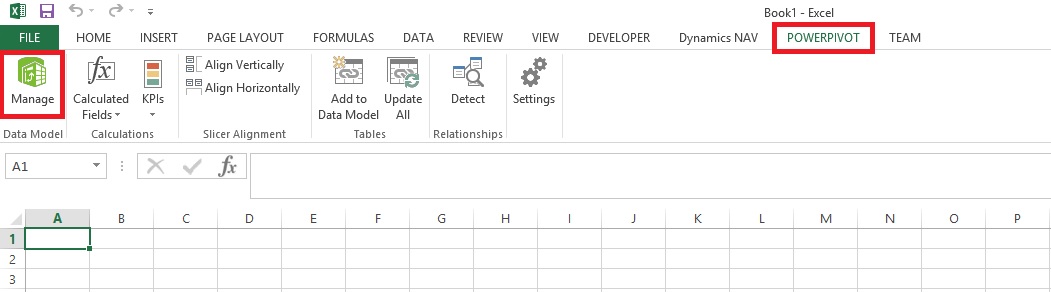
PowerPivot-4
This opens the PowerPivot for Excel window.
PowerPivot-5
In PowerPivot, on the Home tab, choose Get External Data, choose From Data Service, and then choose From OData Data Feed.

The Table Import Wizard opens.

PowerPivot-6
If your Microsoft Dynamics NAV implementation requires that you use a web service access key, you must specify the NavUserPassword credentials as described in the following steps:

In the Advanced dialog box, in the Security section, set the Integrated Security field to Basic. If your OData is configured to use SSL, then set the field to SSPL.

In the Password field, type the web service access key.

In the UserID field, type the user name for the Microsoft Dynamics NAV user account. For this walkthrough, use NavTest.

In the Source section, in the Service Document URL field, type the URL for the OData web service that you verified in the previous procedure, for example, http://localhost:7048/DynamicsNAV80/OData/.

In my case: - http://indel-axt5283n1.tecturacorp.net:8048/DynamicsNAV80/OData/

Choose the OK button to return to the Table Import Wizard.

In the Connect to a Data Feed page, in the Data Feed Url field, enter the OData URI that you verified in the previous procedure.
PowerPivot-7

Choose the Next button.

Important: The URI must end with a slash (/) as shown in the example.

Verify that Customer appears in the Source Table column.

Select the check box next to the Customer web service, and then choose Finish.
PowerPivot-8
After you see the Success message, choose the Close button.
PowerPivot-9

The data from the Customer OData web service displays, and you can use the data to build pivot-based views in the Excel workbook.

Creating a PivotTable Containing Key Microsoft Dynamics NAV Data

In this procedure, you use the Excel workbook with data from the Customer web service to create a PivotTable from the worksheet. You select relevant fields and then organize and format the data to highlight strategic data. Building a pivot table is a way to select and arrange data so as to highlight and focus on key elements.

To create a PivotTable

In Excel, select the cell where you want the PivotTable located.

In the ribbon, choose the Insert tab, and then in the Tables group, choose PivotTable.

In the Create PivotTable dialog box, select Use an external data source, and then choose the Choose Connection button.

In the Existing Connections dialog box, on the Connections tab, under Connections in this Workbook, choose the data feed for your OData web service, and then choose the Open button.
PowerPivot-10

Choose the OK button to add the PivotTable to the Excel worksheet.

The PowerPivot Field pane on the right side includes a list of fields from the Customer web service that where imported from PowerPivot.

In the PowerPivot Field List pane, choose Location_Code.

Tip

To quickly find a field in the field list, type part or all of the field name in the Search text box that is above the list of fields, and then press Enter to highlight the first field that contains the text. You can then choose the right arrow to proceed to the next field, and so on.

Select the Balance_LCY field.

Select the Name field.

You can now see the data in the body of the worksheet, as shown in the following illustration.

The PivotTable shows customers by location and individual customer balances, and also adds the balances by location. To make the information more readable, you can update the headings on the PivotTable.
PowerPivot-11

Select the cell that has the heading Sum of Balance_LCY, and then, in the formula field, type Balance.

Select the cell that has the heading Row Labels, and then in the formula field, type Customers by location.

Select the empty cell that is below the Customers by location cell, and then, in the formula field, type Location not specified.

The above illustration shows how the worksheet looks after you make these changes.

Next Steps

Now that you have created your PivotTable, you can continue to enhance the data to make it more useful and readable. You can:

Add a column to the data that shows average balance by region.

Enhance data presentation with a graph.

Post the data in a Microsoft SharePoint environment with live data from Microsoft Dynamics NAV 2015.

Sunday, 9 August 2015

Configuring Web Services to Use SSL (SOAP and OData)

Secure Sockets Layer (SSL) is a cryptographic protocol that helps provide security and data integrity for data communications over a network.

By encrypting your Microsoft Dynamics NAV web services using SSL, you make your data and the network more secure and more reliable.

Microsoft Dynamics NAV Web Services and SSL


Microsoft Dynamics NAV supports SSL authentication for SOAP and OData web services.

The server authenticates itself to the client, but the client does not authenticate itself to the server.

When the web service client connects to the Microsoft Dynamics NAV Server instance, the server replies by sending its digital certificate to the client. This certificate contains the server's public encryption key and the name of the authority that granted the certificate. The client verifies the certificate using the authority's public key.

We have covered above top related to Creating and Implementing Certificates for Microsoft Dynamics NAV Server. If not seen please follow below links for better understanding:

How to create a root CA and a private key file by using the makecert.exe utility

How to create certificate revocation list for the root certification authority

How to create and install a test certificate for the Microsoft Dynamics NAV Server computer

How to grant access to the certificate’s private key to the service account for the Microsoft Dynamics NAV Server

Implementing Security Certificates.

Configuring Microsoft Dynamics NAV Web Services to Use SSL


The first step is to prepare Microsoft Dynamics NAV to use SSL. This involves configuring the relevant Microsoft Dynamics NAV Server instance to specify SSL.

The following procedure uses Microsoft Dynamics NAV Server Administration tool to configure the Microsoft Dynamics NAV Server instance.

  • Choose the Start button, and in the Search programs and files box, type Microsoft Dynamics NAV Administration, and then choose the related link.

  • In Microsoft Dynamics NAV Server Administration tool, in the left pane, under Console Root, expand the node for the Microsoft Dynamics NAV Server computer. This is typically named Microsoft Dynamics NAV (Local), which is the local computer.


The Microsoft Dynamics NAV Server instances on the computer appear in the left pane and center panes.

In the left pane, choose the relevant instance to display settings for that instance in the center pane.

UseSSL-1

  • At the bottom of the center pane, choose Edit.

  • To configure SOAP web services to use SSL, expand the SOAP Web Services tab, and then select the Enable SSL


Make a note of the port that is used by SOAP web services. You will need the port number later on in this walkthrough.

UseSSL-2

  • To configure OData web services to use SSL, expand the OData Web Services tab, and then select the Enable SSL


Make a note of the port that is used by OData web services. You will need the port number later on in this walkthrough
UseSSL-3

  • Choose Save at the bottom of the center pane.

  • In the right pane, under Actions, choose Login Account.

  • Make a note of the service account information. You will need this information later on in this walkthrough.


UseSSL-4

Configuring the Access Control List and the Web Services Ports for SSL


An access control list (ACL) is part of the Windows security infrastructure and features. The ACL controls who can access resources on a computer.

Note

These procedures use the netsh tool (netsh.exe) for configuring the HTTP server. The netsh tool is supplied with Windows 7 and Windows Server 2008.

By default the netsh tool is located in the c:\Windows\System32 folder.

To configure the ACL


  1. On the computer running Microsoft Dynamics NAV Server, open a command prompt as an administrator as follows:


    1. From the Start menu, choose All Programs, and then choose Accessories.

    2. Right-click Command Prompt, and then choose Run as administrator.


  1. At the command prompt, type the following command to change to the Windows\System32 directory.


cd\Windows\System32


  1. To view the ACL for the web services ports to determine if any entries are already using the relevant host name and port, type the following command:


netsh http show urlacl

  1. Each entry is listed by the Reserved URL field, which has the format http://hostname:port. hostname is the name of the computer running the service and port is the port number the service runs on. A '+' (plus sign) in the Reserved URL field represents localhost, which indicates the computer that you are working on.

  2. By default, SOAP and OData web services in Microsoft Dynamics NAV use ports 7047 and 7048, respectively, and connect to a Microsoft Dynamics NAV Server instance named DynamicsNAV80. The default reserved URL entries for these services are: http://+:7047/DynamicsNAV80/ and http://+:7048/DynamicsNAV80/.

  3. You must delete any entries that use the same port as the SOAP or OData web services.


To delete an entry, type the following command:
netsh http delete urlacl url=http://hostname:Port/NAVserver/

Substitute Port with the port number of the SOAP or OData web service and NAVserver with the name of the Microsoft Dynamics NAV Server instance.

For example, to delete the default entries for SOAP and OData, use the following two commands:
netsh http delete urlacl url=http://+:7047/DynamicsNAV80/

netsh http delete urlacl url=http://+:7048/DynamicsNAV80/


  1. To register the ports for the SOAP and OData web service with https, type the following command for each service:


netsh http add urlacl url=https://hostname:port/navserver user=DOMAIN\user


  1. Substitute the following options with the proper values:


Option Description
hostnameThe name of the computer running Microsoft Dynamics NAV Server. Use + for localhost.
portThe port that is used by the web service.
navserverThe name of the Microsoft Dynamics NAV Server instance to use with the web service. The default is DynamicsNAV80.
DOMAIN\usernameThe domain and user name of the service account for Microsoft Dynamics NAV Server. If the service account for Microsoft Dynamics NAV Server is Network Service, then use "NT AUTHORITY\NETWORK SERVICE".


  1. For example, if the service account for Microsoft Dynamics NAV Server has the domain ABC and the user name xyz, and then the command for the SOAP web service is as follows:


netsh http add urlacl url=https://+:7047/DynamicsNAV80 user="NT AUTHORITY\NETWORK SERVICE"


  1. If the service account for Microsoft Dynamics NAV Server is Network Service, then the command is as follows:


netsh http add urlacl url=https://+:7047/DynamicsNAV80 user="NT AUTHORITY\NETWORK SERVICE"


  1. To verify that your port has been registered, repeat step 3.


To configure the port to use the SSL certificate


  1. At the command prompt, type the following command to view the current port configurations:


netsh http show sslcert

  1. All port bindings to SSL certificates are listed. Each entry is indicated by the IP:port field, where IP is the IP address that uses the port (0.0.0.0 indicates all IP addresses) and port is the port number.

  2. If SSL is already configured on the address and port that you want to use for SOAP or OData web services, then use the following command to delete the entry:


netsh http delete ssl ipport=ipaddress:port


  1. Substitute ipaddress and port with the IP address and port number of the entry that you want to delete.

  2. For example, to delete the entry on the default SOAP port, use the following command:


netsh http delete ssl ipport=0.0.0.0:7047


  1. To bind an SSL certificate to the SOAP or OData web service port, use the following command:


netsh http add sslcert ipport=ipaddress:port certhash=thumbprint appid={id}


  1. Substitute the following options with the proper values:


Option Description
ipaddressThe IP address that can use the web service. Use 0.0.0.0 to include all IP addresses.
portThe port that is used by the web service.
thumbprintThe certificate thumbprint that you obtained in previous post.
idA 32-digit hexadecimal number that identifies the Microsoft Dynamics NAV application. The id must be in the format {NNNNNNNN-NNNN-NNNN-NNNN-NNNNNNNNNNNN). If you do not know the appid, then use any value, such as {00112233-4455-6677-8899-AABBCCDDEEFF}.


  1. For example, the following command binds a certificate that has the thumbprint c0d0f27095b03d4317e219841024328cef248779 to port 7047 for all IP addresses:


netsh http add sslcert ipport=0.0.0.0:7047 certhash=c0d0f27095b03d4317e219841024328cef248779 appid={00112233-4455-6677-8899-AABBCCDDEEFF}

Imp Note: - Please replace the port and thumbprint values with your valid values.

Restart the Microsoft Dynamics NAV Server Instance


You can use the Microsoft Dynamics NAV Server Administration Tool to restart the Microsoft Dynamics NAV Server instance.

To restart Microsoft Dynamics NAV Server


  1. In Microsoft Dynamics NAV Server Administration tool, in the left pane, under Console Root, choose the Microsoft Dynamics NAV Server computer.

  2. In the center pane, choose the Microsoft Dynamics NAV Server instance that you have configured, and then in the right pane under Actions, choose Restart.

  3. After the instance restarts, close Microsoft Dynamics NAV Server Administration tool.


Verifying the Configuration


You should now be able to use web services that are encrypted with SSL. To verify this, type the following URL in the address bar for your browser.
https://localhost:7047/DynamicsNAV80/WS/services

The page lists any web services that have been published.