Showing posts with label Service. Show all posts

Wednesday, 23 March 2016

Microsoft Power BI – Part – VI

Continuing from my previous post, if you have not seen yet please check it out it will help you continuing with this post.

You can check:

Microsoft Power BI – Part – I

Microsoft Power BI – Part – II

Microsoft Power BI – Part – III

Microsoft Power BI – Part – IV

Microsoft Power BI – Part – V

Today we will discuss how to use Power BI Content Pack:
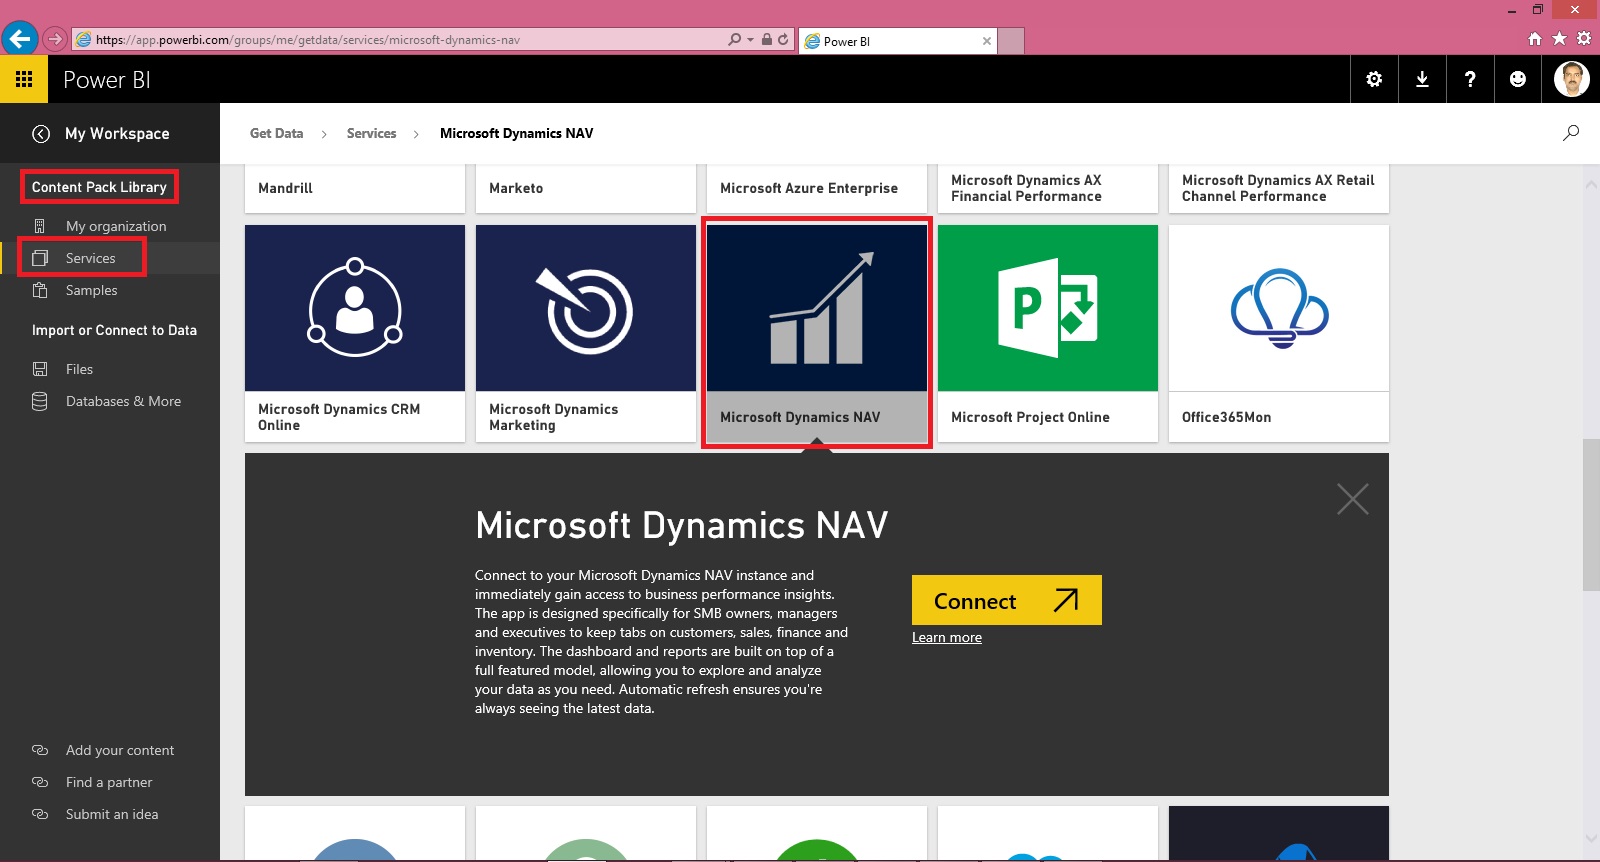
PowerBI-60

Few things to keep in mind to get report Generated Successfully.

Point-1 You have required objects for this content pack in your database.

If you are using 2016, you can skip this as these objects are available in 2016. If you are using 2015 or 2013 then export these objects from 2016 and import in your database.
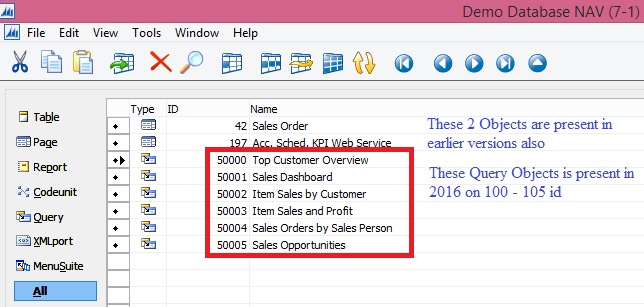
PowerBI-61

Above Pages will be present in your previous version of database, you need to import the 6 Query objects. These are necessary as these are used as source to fetch data from your data base by this content pack.

Point-2 Web Services need to be published.
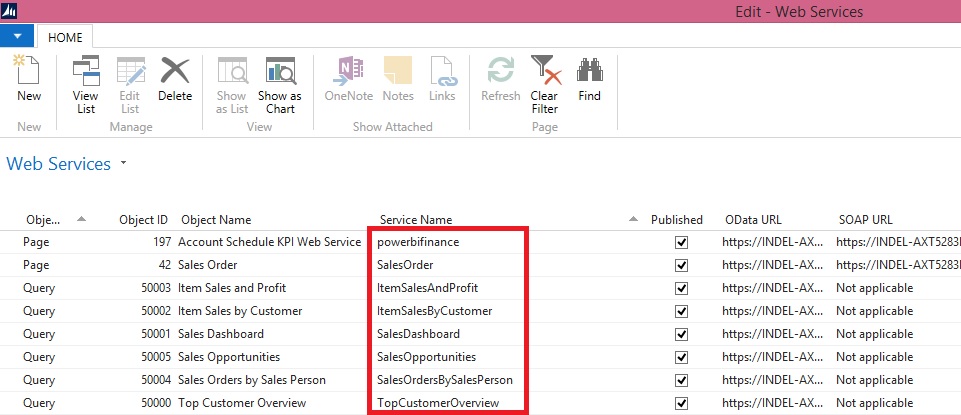
PowerBI-62

Make sure you use same name for Services as you may get error while connecting and refreshing/ fetching data using this content pack.

Point-3 SSL port and web address is used to access the services.

https is used as this will not work on http.

Self-signed certificate will not work which we use for test purpose for publishing services and testing. It will throw Trusted relationship connection type error. If you have one use the same instead using Self-signed certificate.

No worries, don’t be disappointed. I will give you tip to overcome this requirement just follow as below:

You may remember that in our previous post we installed and used Power BI Gateway, actually we got a Trusted Certificate which we can use for this purpose.

PowerBI-63

Open IIS Manager on your system.

PowerBI-64

Select Serve/ Machine in Left Navigation Tree and Select Server Certificates.
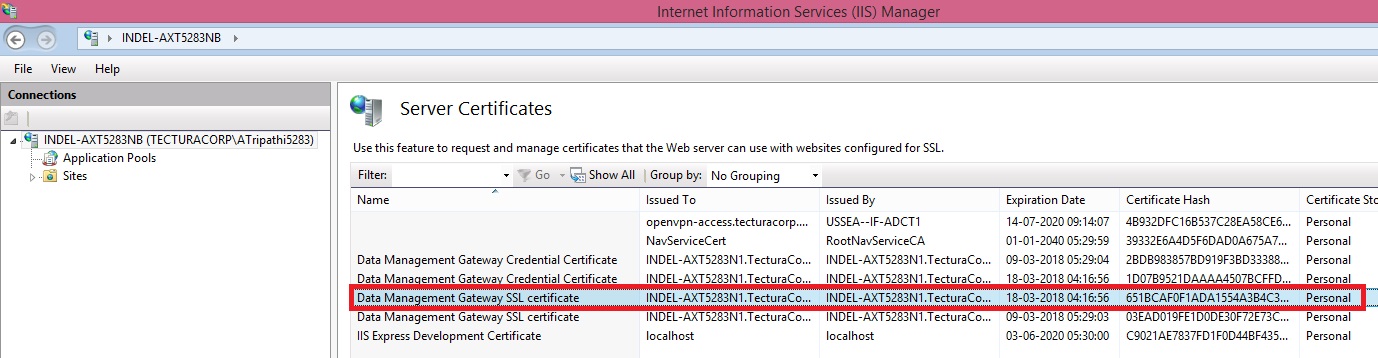
PowerBI-65

Locate the Data Management Gateway SSL Certificate, this got installed when you installed Gateway. Double click to open the Properties of the certificate.

PowerBI-66

Switch to Details Tab, Scroll down to find Thumbprint, and Copy the Thumbprint and paste to Notepad finally remove all space leading, trailing and any in between.

It should look like above right bottom corner notepad window no space in Thumbprint signature.

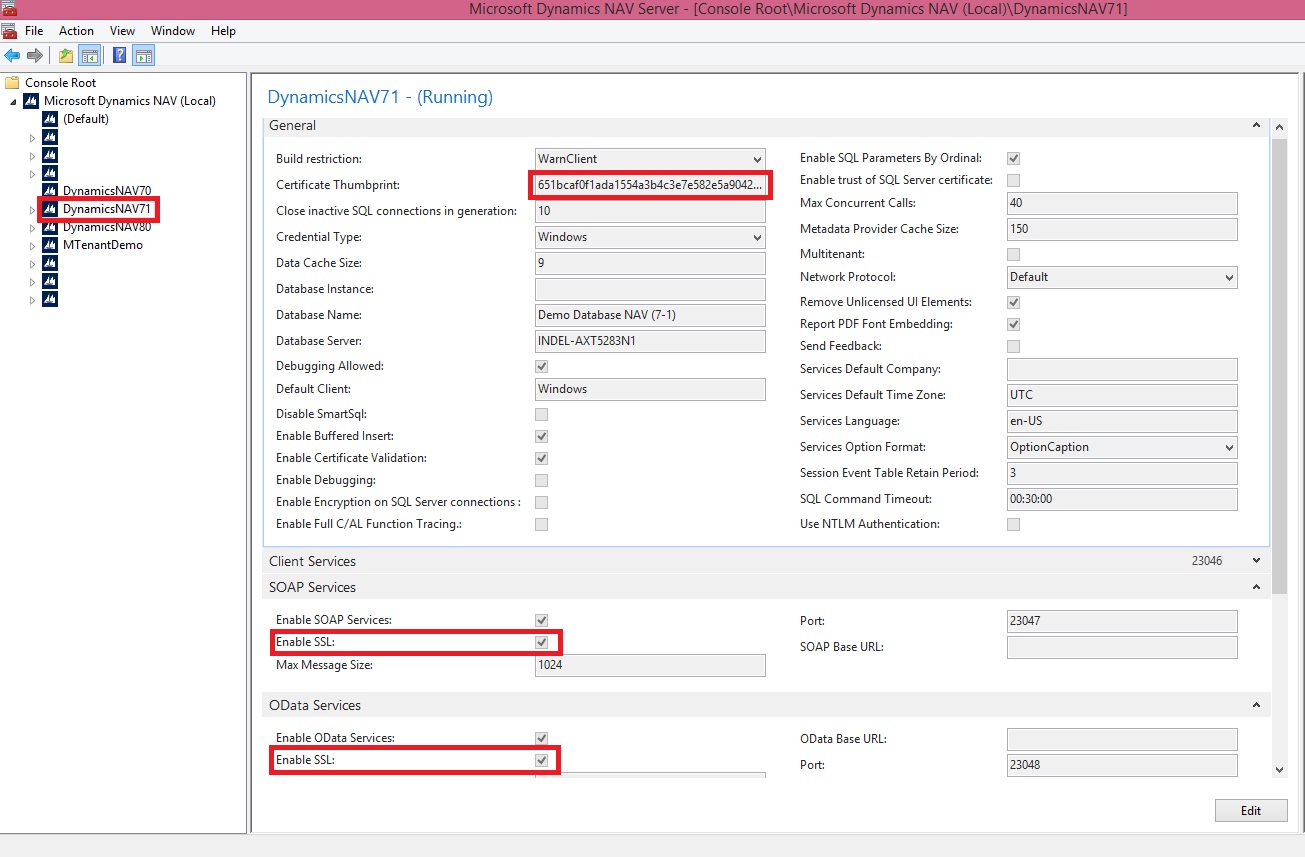
Copy this Value and use as Thumbprint in you Navision Service.
PowerBI-67

Select Your Service.

Edit.

Paste the Certificate Thumbprint.

Make Sure SSL is Enabled for your OData Services.

Save.

Restart the Service.

We are done with the basic requirements now let us connect using Power BI Miscrosoft Navision Content Pack.

Now Login with your credentials to Power BI.
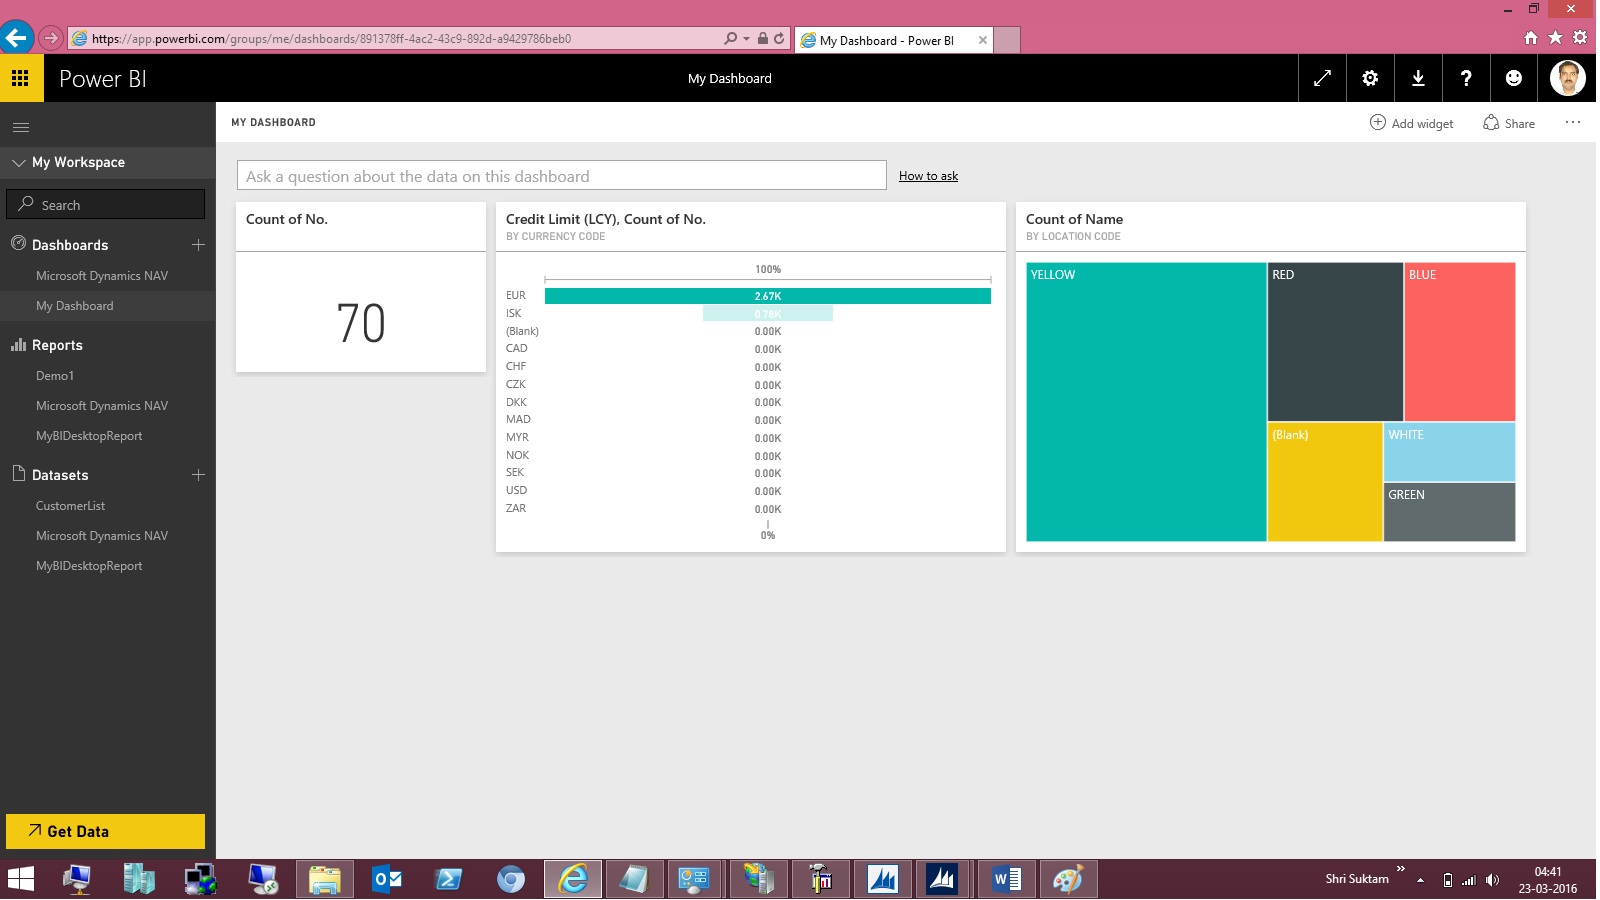
PowerBI-68

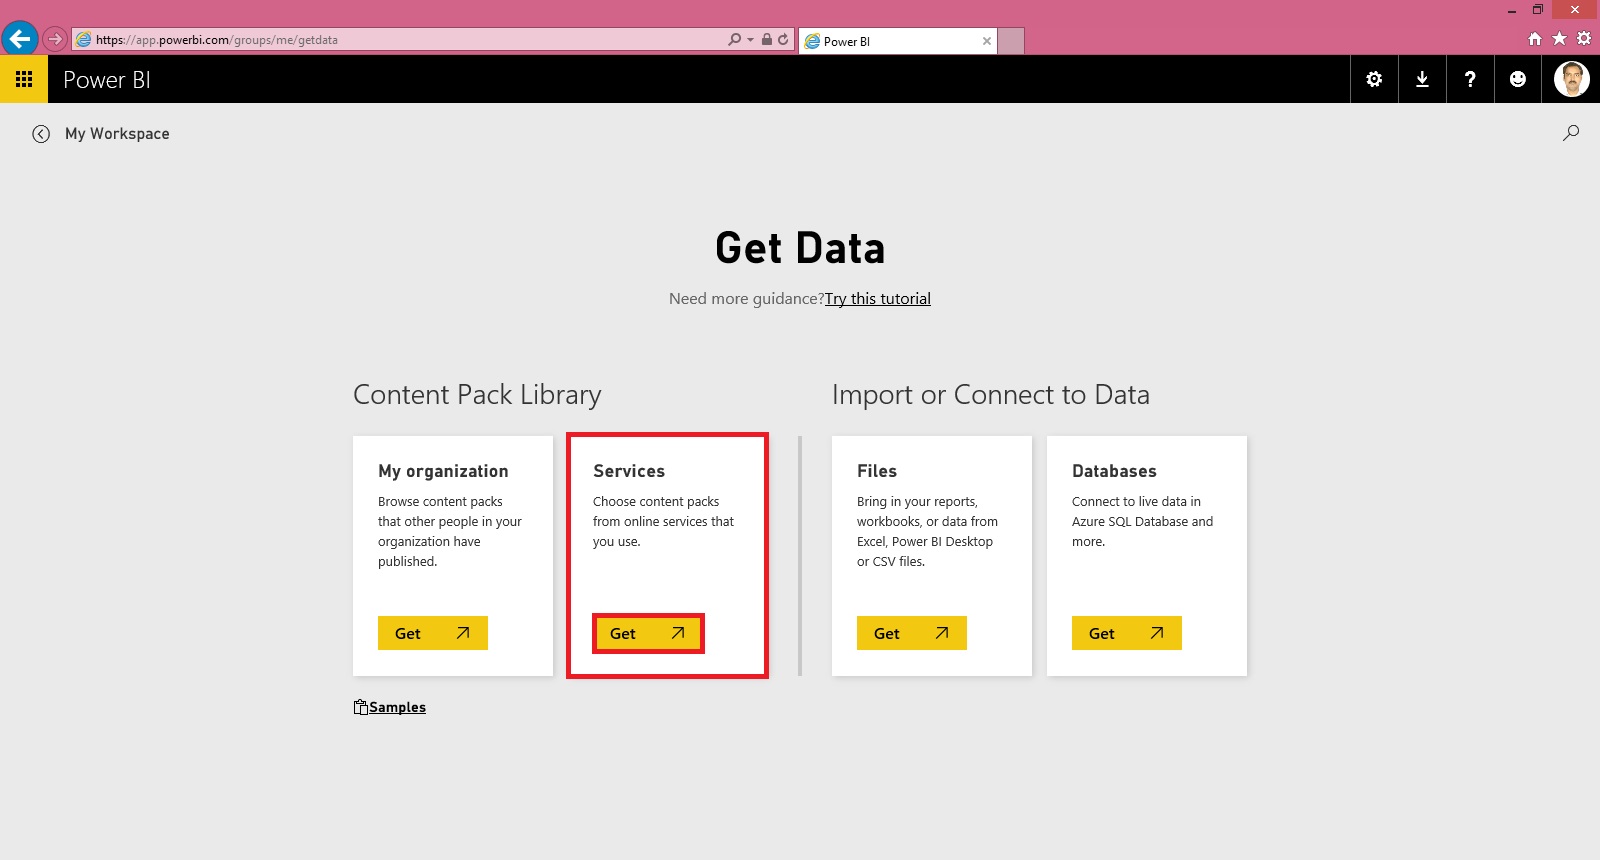
From Left bottom corner Select Get Data.
PowerBI-69

Select Get Data from Services.

PowerBI-70

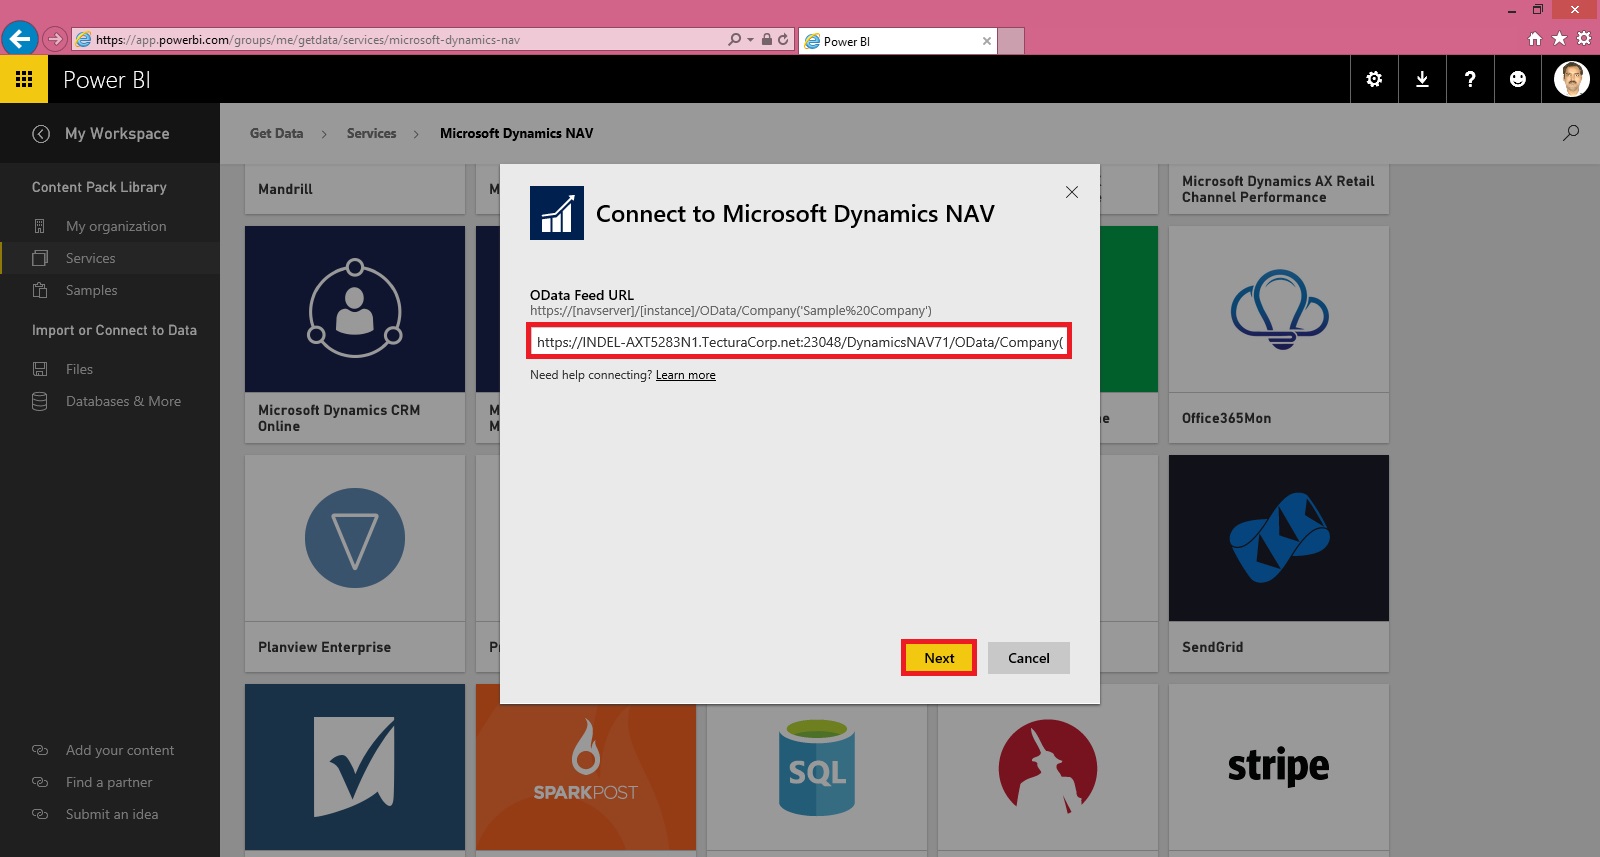
Scroll to find Microsoft Dynamics NAV Services and Select Connect.
PowerBI-71

Copy your OData Service URL. Make sure you remove Service name from the URL and trailing ‘/’ after company name from the URL.

Select Next.

PowerBI-72

Select the Authentication Method and then Sign In.

PowerBI-73

Wait for few minutes you dataset will be loaded.

As a result you will get: Dataset, Report & Dashboard ready for you in few minutes depending upon the data volume and connection speed.

PowerBI-74

The report and dashboard view will be as per the available data in your database.

Hurray!!!

You are done with your practice session.

This is a Holi Gift for my reader from my side.

I will come up with more features explanation and other Tips & Tricks in my upcoming posts, till then keep practicing and learning from blogs and helps available online.


Wednesday, 16 September 2015

Publishing the Jet Data Source Codeunit to the Web Service

Microsoft Dynamics NAV 2015 includes a "Jet Data Source" codeunit which must be published to enable Jet Essentials or Jet Express to operate. This can be published using the Microsoft Dynamics NAV Role Tailored Client (RTC).

To publish this code unit, inside the RTC go to Departments > Administration > IT Administration > General and select Web Services.

JetExcel-4
Publish the Jet Data Source code unit by selecting New from the Web services ribbon

  • Object Type: Codeunit

  • Object ID: 14125500

  • Service Name: Jet Data Source

  • And check the box to publish.

  • Click OK


Checkout Upcoming posts for more information.

Friday, 7 August 2015

How to grant access to the certificate’s private key to the service account for Microsoft Dynamics NAV Server

To start with this exercise you need to first create certificate and certificate revocation list, if not yet created refer to previous post.

Previous Step Link- How to create a root CA and a private key file by using the makecert.exe utility

Previous Step Link- How to create certificate revocation list for the root certification authority

Previous Step Link- How to create and install a test certificate for the Microsoft Dynamics NAV Server computer

Let’s start with this exercise:

  • In the left pane of MMC, expand the Certificates (Local Computer) node, expand the Personal node, and then select the Certificates subfolder.

  • In the right pane, right-click the NavServiceCert certificate, choose All Tasks, and then choose Manage Private Keys.

  • In the Permissions for NavServiceCert private keys dialog box, choose Add.


In the Select Users, Computers, Service Accounts, or Groups dialog box, enter the name of the service account that is used by Microsoft Dynamics NAV Server By default, the service account is NETWORK SERVICE. Choose OK when done.
Certificate-15
Security Note

In a production environment, you run Microsoft Dynamics NAV Server under a dedicated domain user account instead of the less secure NETWORK SERVICE account. Because this is a test implementation, the NETWORK SERVICE account is acceptable.

  • In the Permissions for NavServiceCert private keys dialog box, select the account, and then select the Allow check box next to Full Control. Choose OK when done.

  • In the right pane, double-click the NavServiceCert certificate.

  • In the Certificate dialog box, choose the Details tab, and then select the Thumbprint field.


Copy or note the value of the Thumbprint field.
Certificate-16
In next step we will Implement Security Certificates and configure Microsoft Dynamics Server and update configuration file for Windows & Web Clients to support login over a WAN.

Next Step Link- Implementing Security Certificates.