See how a robust business intelligence solution can help you leverage technology in order to gain new visibility on your business that will enable profitable, data-driven decisions on a daily basis.
Video-1
http://jetreports.wistia.com/medias/bkl74oqz8r?embedType=async&videoWidth=640
Video-2
http://jetreports.wistia.com/medias/yoa1upnb80?embedType=async&videoWidth=640
Thursday, 30 June 2016
Finding the Right Business Intelligence Solution for your Company
Get answers to the most commonly asked questions around what to look for in a business intelligence solution and provider, including implementation expectations, important features to look for (that you probably didn’t know you need), and different options for report and dashboard distribution.
Watch Video here :
http://jetreports.wistia.com/medias/p4gkz27iw1?embedType=async&videoWidth=640
Watch Video here :
http://jetreports.wistia.com/medias/p4gkz27iw1?embedType=async&videoWidth=640
Microsoft Word Document Reports in Dynamics NAV and Project Madeira
In Microsoft Dynamics NAV and Project Madeira, it is possible to use Microsoft Word 2013 or later to modify the report layout to some extent . Customers can edit/modify the report layout in Microsoft word document and this editing experience is WYSIWYG. This feature makes it easy for customers to modify their reports and save them without touching the underlying report objects.
More about Loops in PowerShell
Do Until
The logic of this loop is to execute the Do {block} until (the condition is true).
As usual in PowerShell, pay close attention to the style of brackets, the curly brackets or parentheses guides you to write the correct code.
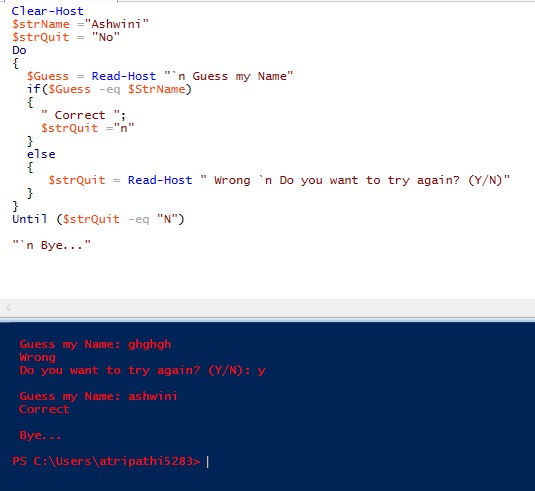
Note: Don't try: Until ($strQuit = "N"). You need here to use -eq, this is PowerShell's way of comparing two values.
Do While
The logic of 'Do ... While' is the opposite of the Do Until. {Execute the block statement} while the (condition is true)
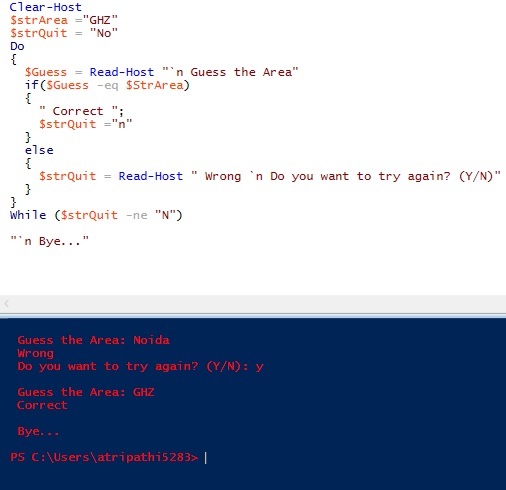
Note: There are difference between until & while in above two examples: Until ($strQuit -eq "N") While ($strQuit -ne "N")
'While' on Its Own - No Explicit 'Do'
This method is the more traditional way with the (condition) followed by the {Block command}. Clearly, PowerShell's While loop is simpler and more basic than the 'Do ... While' construction in above two examples.

Note: In this example the 'While' clause is at the beginning instead of the end.
'For' Loop
Below example is a simple method using the keyword ‘For’. As usual there is a (condition) and {Block Statement}.
The speciality of this loop is the <init> and <repeat> sections.
Here is the syntax:
For (<init>; <condition>; <repeat>) {<command_block>}
Example: Times Table for 25

One side-effect of the For loop is that it always returns the <init> before it tests for the condition.
The <repeat> modifies the $i variable, which is then tested inside the <condition> of the next cycle.
'Foreach' loop
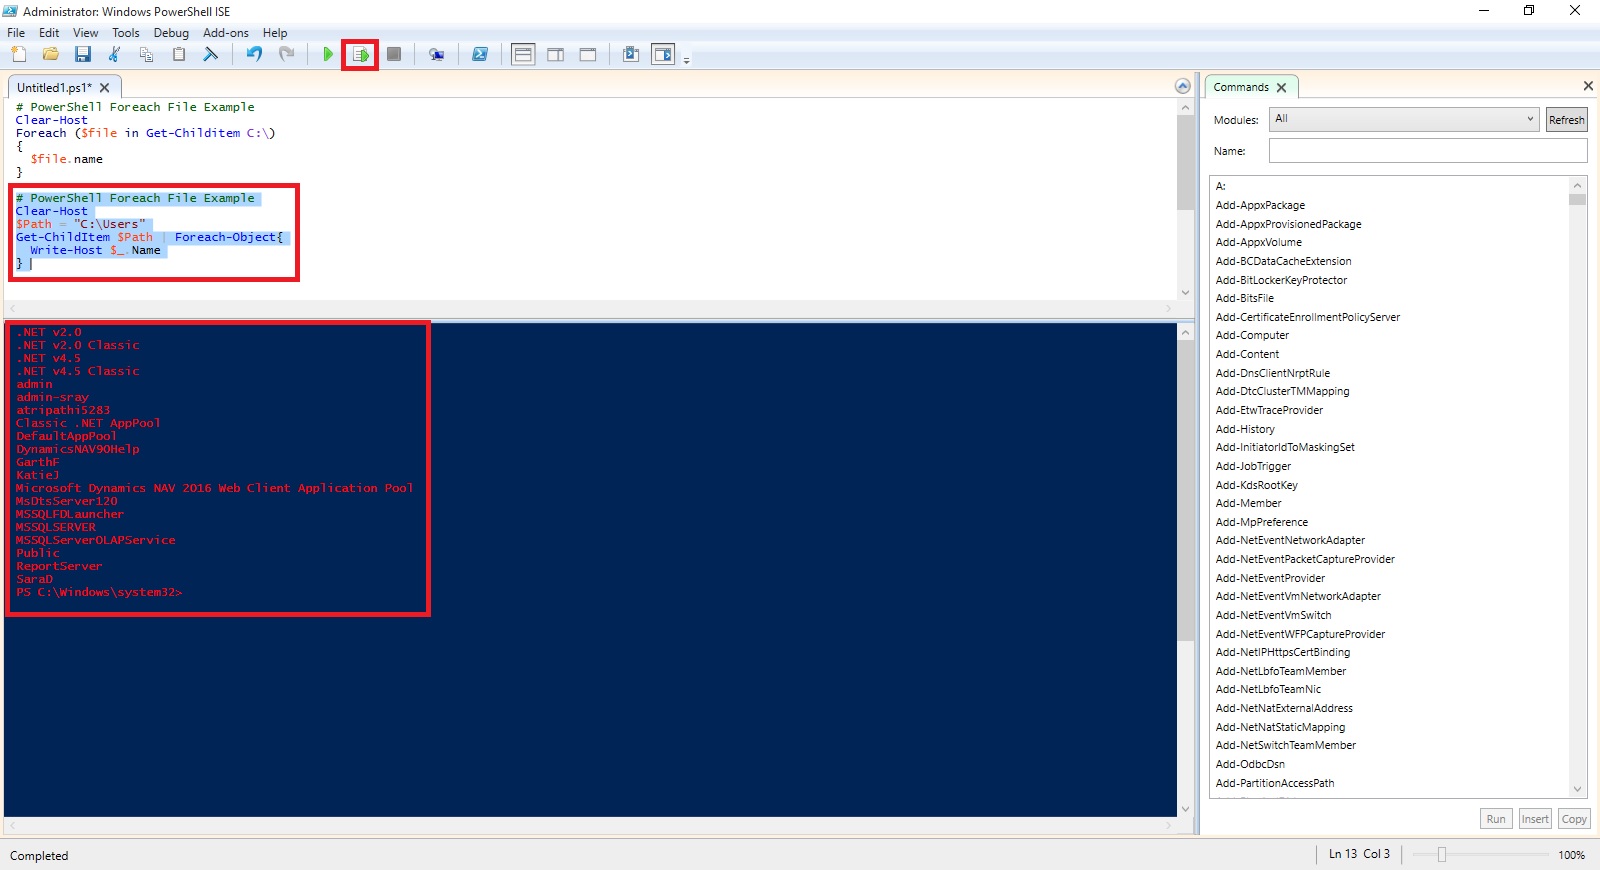
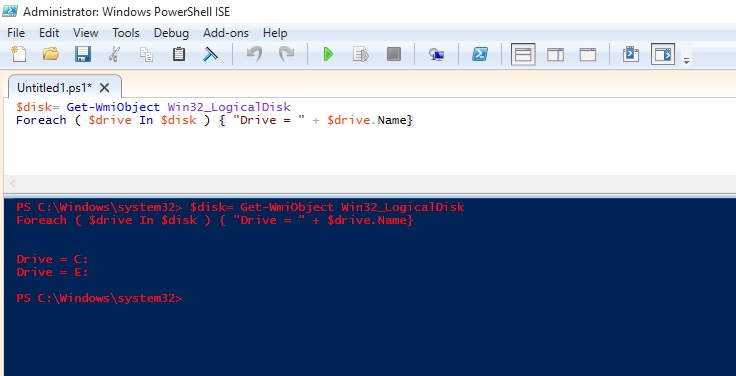
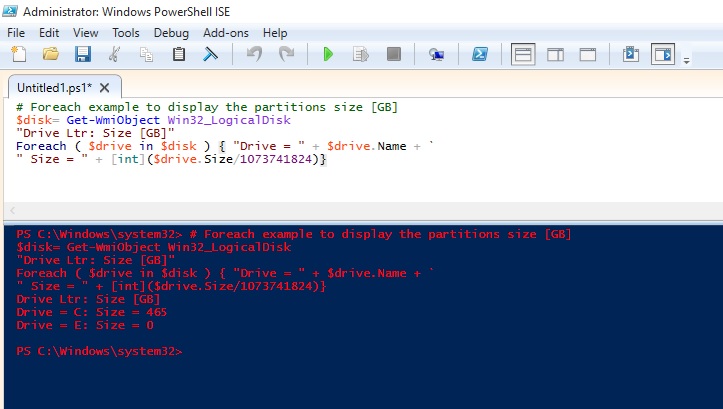
The PowerShell 'Foreach' loop is more complex, and has more arguments than the 'for' and 'Do While' loops. The key feature is that the loop interrogates an array, known as a collection. It then applies a {Statement Block} to each iteration. In addition to the position and the type of bracket, observe the tiny, but crucial keyword - 'In'.
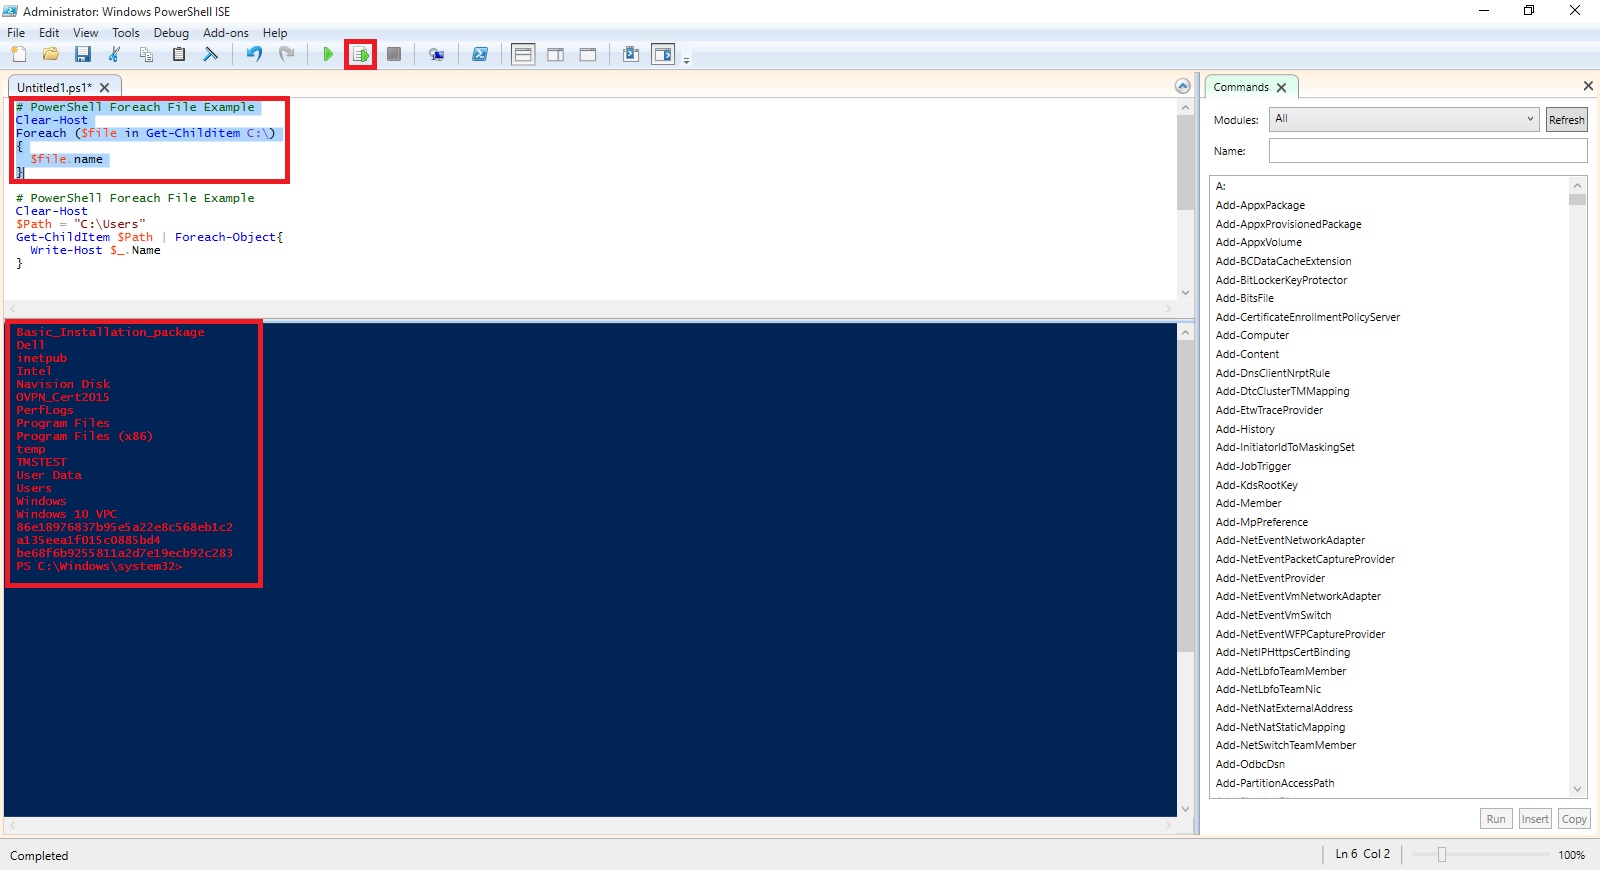
# PowerShell ForEach loop to display files in C:\Program files
$Path = "C:\Program Files\" "{0,10} {1,-24} {2,-2}" -f ` " Size", "Last Accessed", "File Name " Foreach ($file in Get-Childitem $Path -recurse -force) {If ($file.extension -eq ".txt") { "{0,10} {1,-24} {2,-2}" -f ` $file.length, $file.LastAccessTime, $file.fullname } }
# PowerShell ForEach-Objcet piping into block statement
Clear-Host $Path = "C:\Program Files\" Get-Childitem $Path -recurse -force | Foreach-Object {If ($_.extension -eq ".txt") {Write-Host $_.fullname } }
I will come up with more stuffs in my upcoming posts.
Till then keep practicing and stay tuned for more details.
The logic of this loop is to execute the Do {block} until (the condition is true).
As usual in PowerShell, pay close attention to the style of brackets, the curly brackets or parentheses guides you to write the correct code.

Note: Don't try: Until ($strQuit = "N"). You need here to use -eq, this is PowerShell's way of comparing two values.
Do While
The logic of 'Do ... While' is the opposite of the Do Until. {Execute the block statement} while the (condition is true)

Note: There are difference between until & while in above two examples: Until ($strQuit -eq "N") While ($strQuit -ne "N")
'While' on Its Own - No Explicit 'Do'
This method is the more traditional way with the (condition) followed by the {Block command}. Clearly, PowerShell's While loop is simpler and more basic than the 'Do ... While' construction in above two examples.

Note: In this example the 'While' clause is at the beginning instead of the end.
'For' Loop
Below example is a simple method using the keyword ‘For’. As usual there is a (condition) and {Block Statement}.
The speciality of this loop is the <init> and <repeat> sections.
Here is the syntax:
For (<init>; <condition>; <repeat>) {<command_block>}
Example: Times Table for 25

One side-effect of the For loop is that it always returns the <init> before it tests for the condition.
The <repeat> modifies the $i variable, which is then tested inside the <condition> of the next cycle.
'Foreach' loop
The PowerShell 'Foreach' loop is more complex, and has more arguments than the 'for' and 'Do While' loops. The key feature is that the loop interrogates an array, known as a collection. It then applies a {Statement Block} to each iteration. In addition to the position and the type of bracket, observe the tiny, but crucial keyword - 'In'.


# PowerShell ForEach loop to display files in C:\Program files
$Path = "C:\Program Files\" "{0,10} {1,-24} {2,-2}" -f ` " Size", "Last Accessed", "File Name " Foreach ($file in Get-Childitem $Path -recurse -force) {If ($file.extension -eq ".txt") { "{0,10} {1,-24} {2,-2}" -f ` $file.length, $file.LastAccessTime, $file.fullname } }
# PowerShell ForEach-Objcet piping into block statement
Clear-Host $Path = "C:\Program Files\" Get-Childitem $Path -recurse -force | Foreach-Object {If ($_.extension -eq ".txt") {Write-Host $_.fullname } }


I will come up with more stuffs in my upcoming posts.
Till then keep practicing and stay tuned for more details.
Labels:
about,
Development Tips,
How To,
in,
Information,
Loops,
More,
PowerShell,
Tip amp; Tricks
Wednesday, 29 June 2016
An Introduction to PowerShell - Profile
PowerShell is a great way to automate almost anything in Windows.
However, it’s not just a scripting language.
If you find yourself using it as a command line shell it may be useful to store your functions and customizations in a profile that gets loaded every time you load the Console.
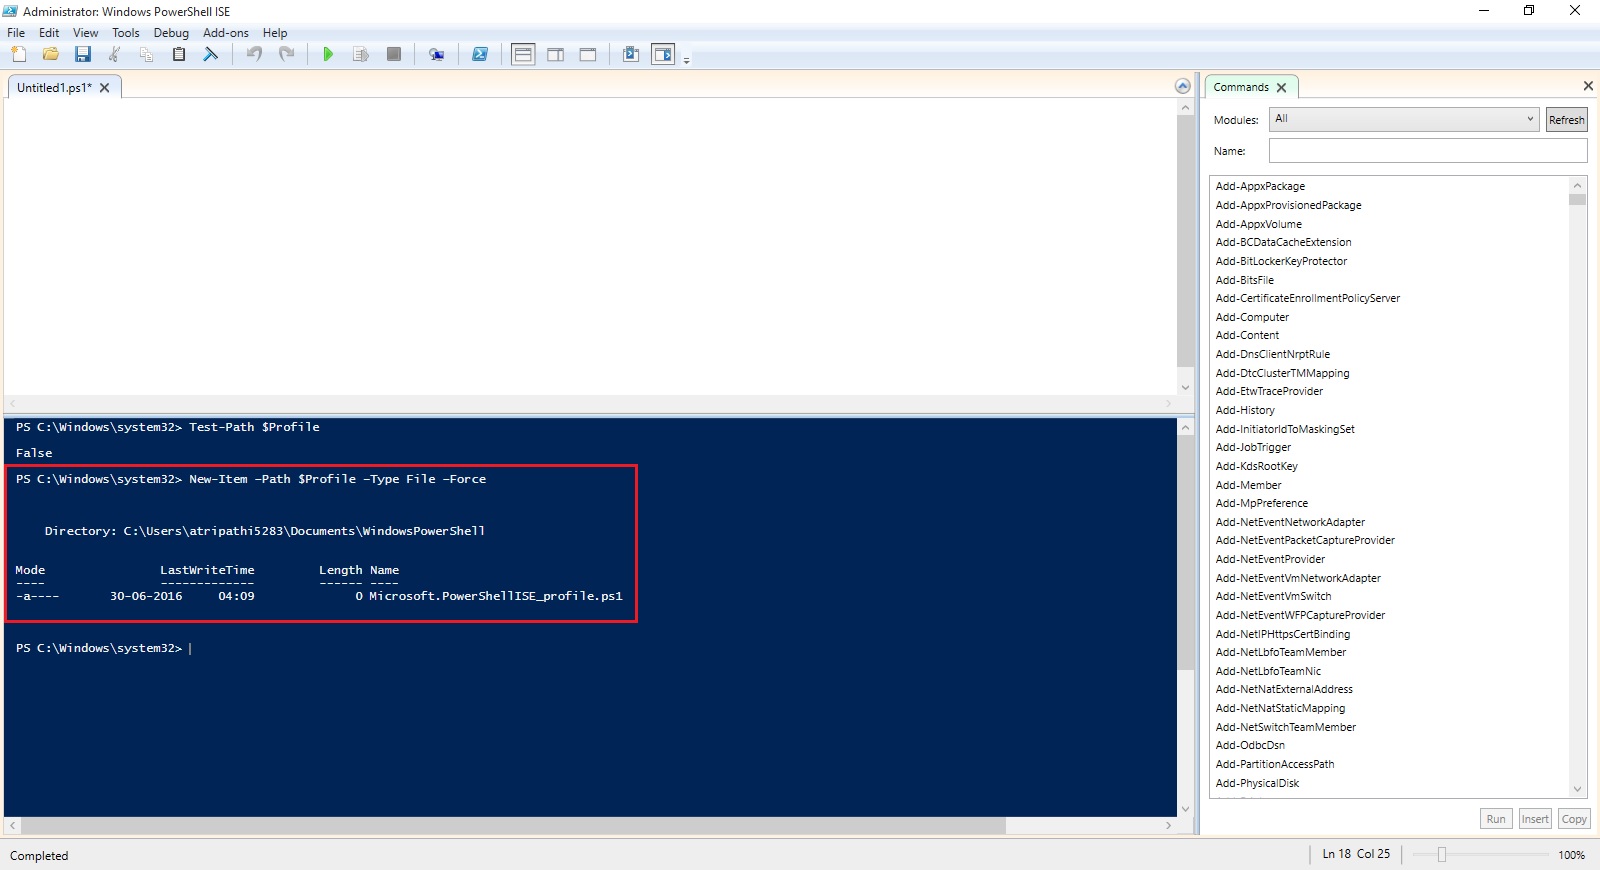
The first thing we do here is check if we already have a profile. There is an automatic variable, $Profile, that stores the fully qualified location of the PowerShell profile. An easy way to check if any profile exists is to use the Test-Path cmdlet on the $Profile variable.

As you can see no profile file yet created for me, so we will create one, we can easily do that with the New-Item cmdlet.
Using the force parameter will cause a profile to be created even if already we have one. This means our old profile will be overwritten and new will be created.
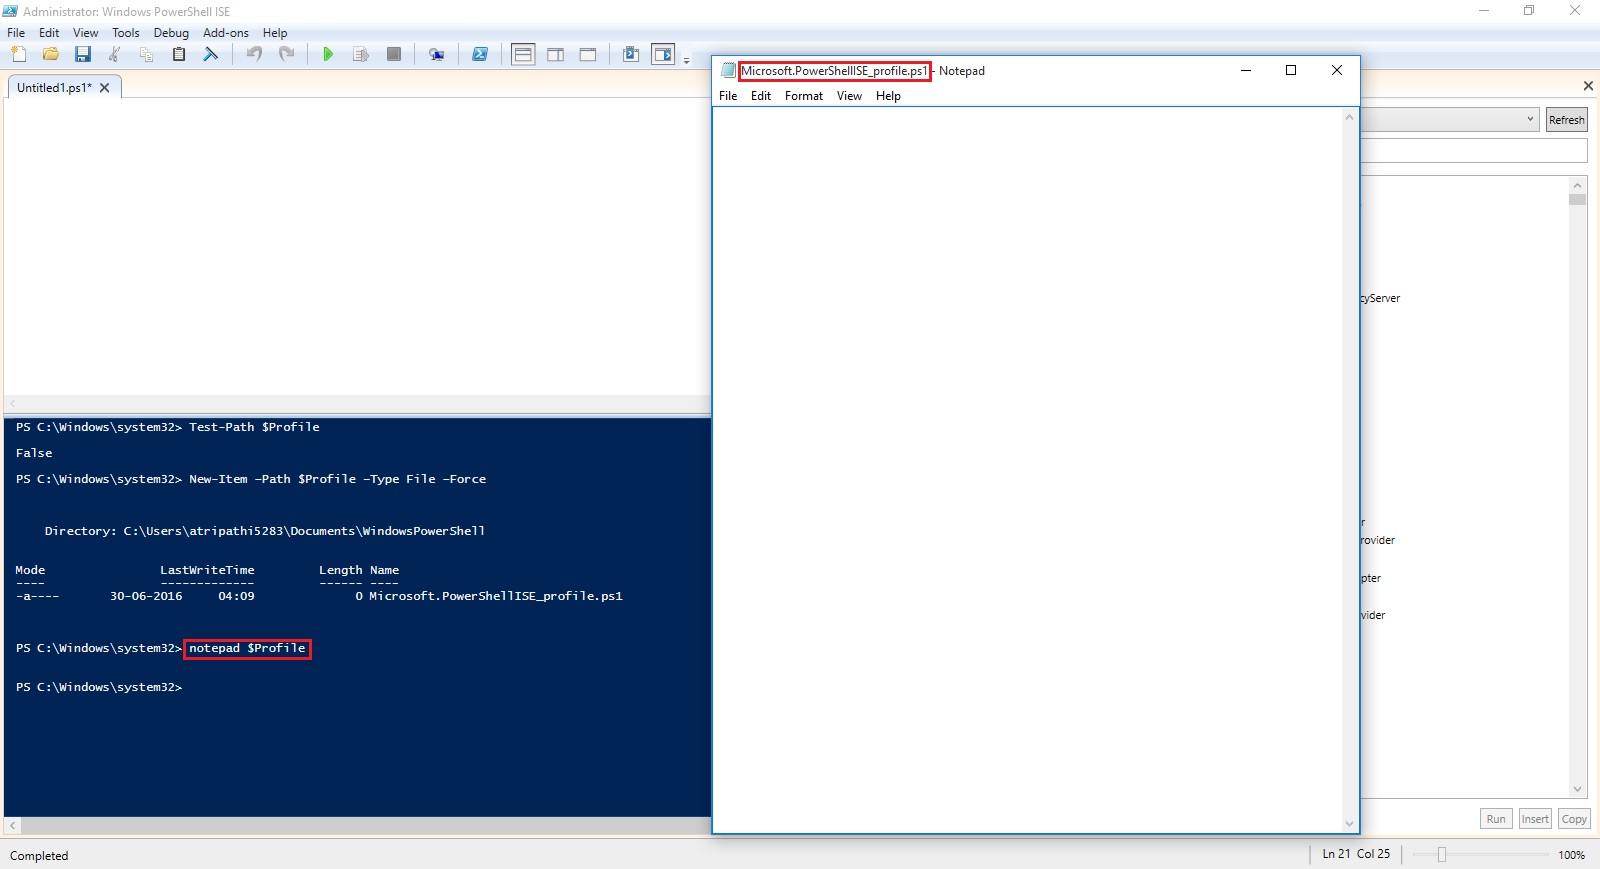
Profile can be edit using notepad, which can be easily started using PowerShell.
You can put any commands, functions, alias’s and even module imports into your PowerShell profile.
I normally work on PowerShell for Navision so I would prefer loading module whenever I launch the PowerShell command, so I include my cmdlets for loading the same in my profile.

Save the Profile and close the PowerShell. Next time I launch PowerShell this Module get loaded for me by default.
Finally, I would like to also have some customizations to the console. One is it basically determines if you have opened an elevated PowerShell console and changes the font colour, this way I will always remember that I am running with elevated privileges.
Let us Save the Profile and check the effect of this Profile.

That’s all for today.
I will come up with more stuffs in my upcoming posts.
Till then keep practicing and stay tuned for more details.
However, it’s not just a scripting language.
If you find yourself using it as a command line shell it may be useful to store your functions and customizations in a profile that gets loaded every time you load the Console.
The first thing we do here is check if we already have a profile. There is an automatic variable, $Profile, that stores the fully qualified location of the PowerShell profile. An easy way to check if any profile exists is to use the Test-Path cmdlet on the $Profile variable.
Test-Path $Profile

As you can see no profile file yet created for me, so we will create one, we can easily do that with the New-Item cmdlet.
New-Item –Path $Profile –Type File –Force
Using the force parameter will cause a profile to be created even if already we have one. This means our old profile will be overwritten and new will be created.

Profile can be edit using notepad, which can be easily started using PowerShell.
notepad $Profile

You can put any commands, functions, alias’s and even module imports into your PowerShell profile.
I normally work on PowerShell for Navision so I would prefer loading module whenever I launch the PowerShell command, so I include my cmdlets for loading the same in my profile.

Save the Profile and close the PowerShell. Next time I launch PowerShell this Module get loaded for me by default.
Finally, I would like to also have some customizations to the console. One is it basically determines if you have opened an elevated PowerShell console and changes the font colour, this way I will always remember that I am running with elevated privileges.
Let us Save the Profile and check the effect of this Profile.

That’s all for today.
I will come up with more stuffs in my upcoming posts.
Till then keep practicing and stay tuned for more details.
An Introduction to PowerShell - Execution Policies
PowerShell has something called Execution Policies, which stop you from just running any old script. In fact, by default, you can’t run any scripts and need to change your execution policy if you want to be allowed to run them. There are 4 notable Execution Policies:
To see what your current Execution Policy is set to, open a PowerShell Console and type:

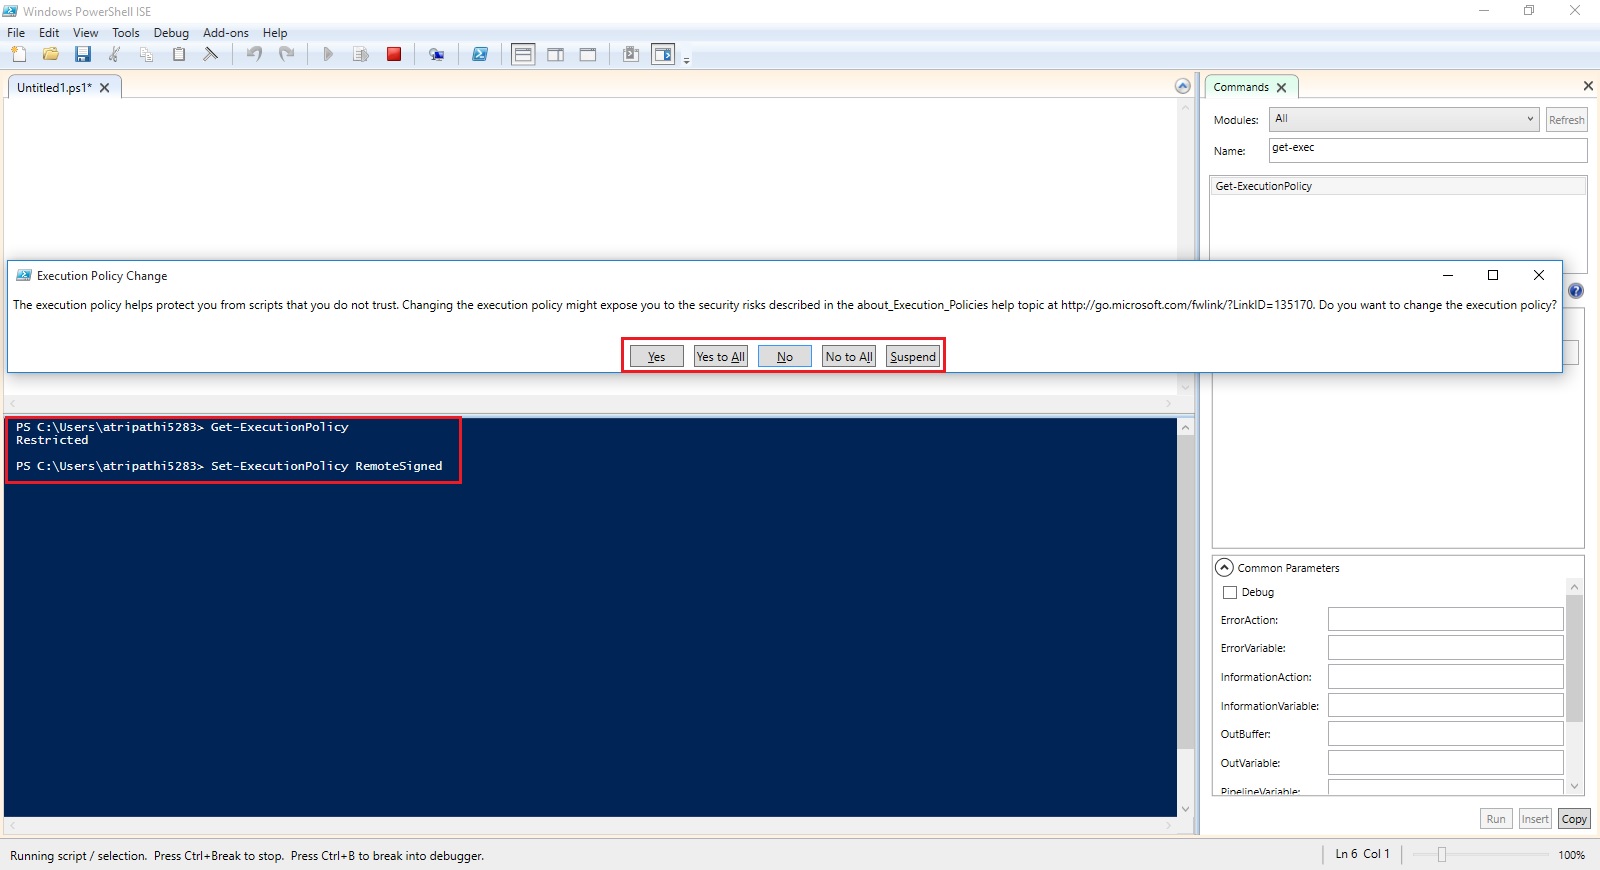
To run this command you need to run the PowerShell with Administrative rights. Right click on icon and select Run as Administrator and try the command again.
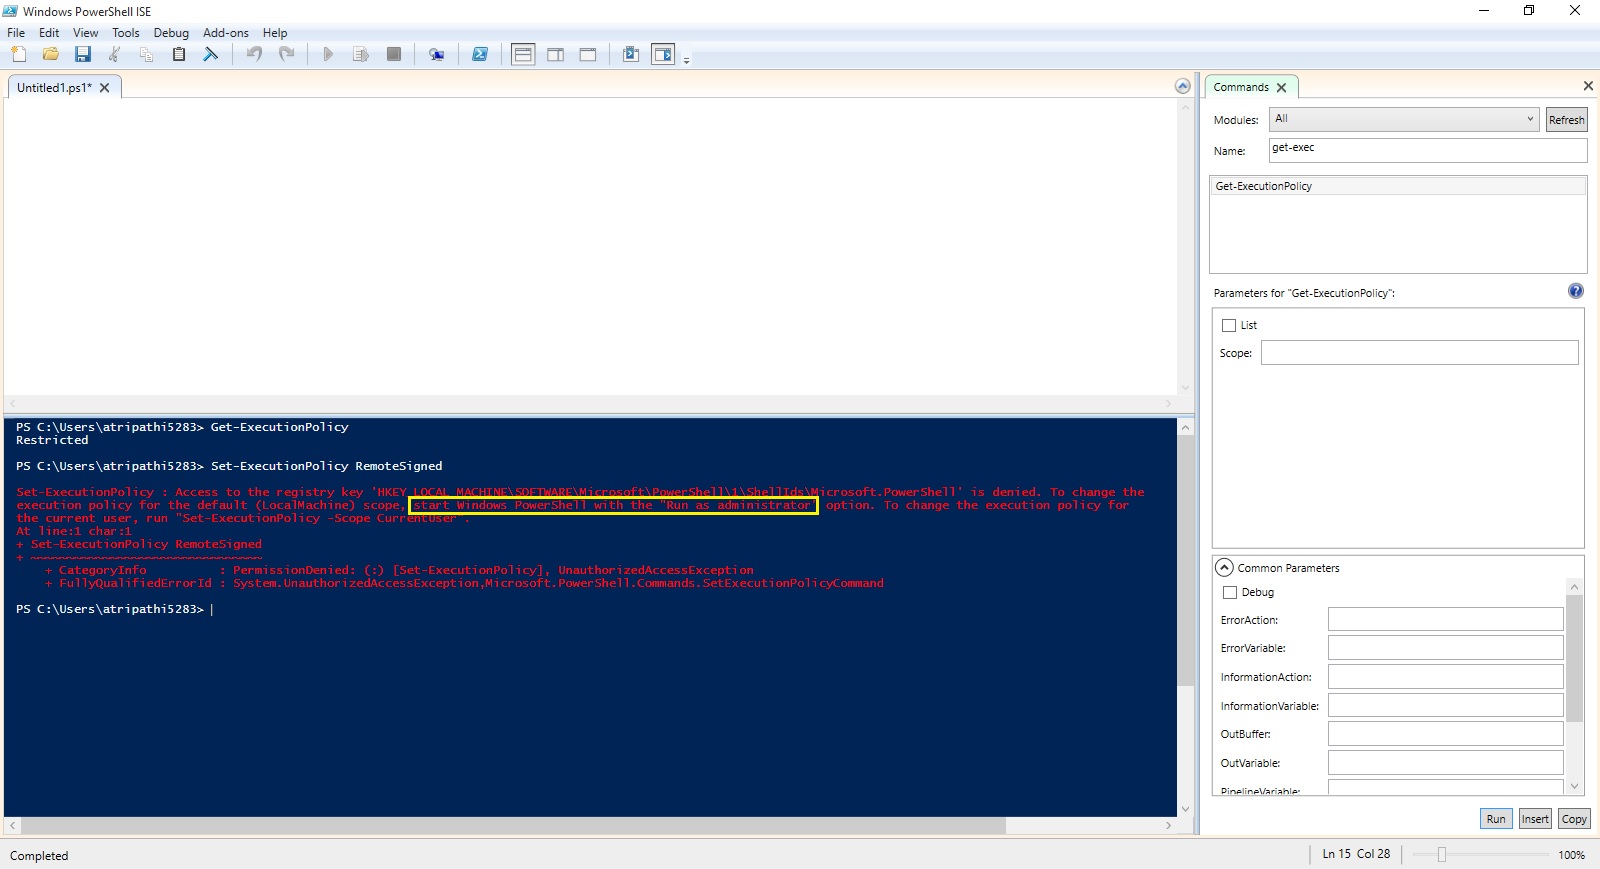
When i run PowerShell as Administrator, now i am able to execute the command successfully as in below screen.

The proper term for a PowerShell command is a cmdlet, and from now on we will use this correct terminology. It just felt more appropriate to call them commands for this introduction.
I will come up with more stuffs in my upcoming posts.
Till then keep practicing and stay tuned for more details.
- Restricted: This is the default configuration in PowerShell. This setting means that no script can run, regardless of its signature. The only thing that can be run in PowerShell with this setting is an individual command.
- AllSigned: This setting does allow scripts to run in PowerShell. The script must have an associated digital signature from a trusted publisher. There will be a prompt before you run the scripts from trusted publishers.
- RemoteSigned: This setting allows scripts to be run, but requires that the script and configuration files that are downloaded from the Internet have an associated digital signature from a trusted publisher. Scripts run from the local computer don’t need to be signed. There are no prompts before running the script.
- Unrestricted: This allows unsigned scripts to run, including all scripts and configuration files downloaded from the Internet. This will include files from Outlook and Messenger. The risk here is running scripts without any signature or security. It is recommenced that you never us this setting.
To see what your current Execution Policy is set to, open a PowerShell Console and type:
Get-ExecutionPolicy

Set-ExecutionPolicy RemoteSigned

To run this command you need to run the PowerShell with Administrative rights. Right click on icon and select Run as Administrator and try the command again.

When i run PowerShell as Administrator, now i am able to execute the command successfully as in below screen.

The proper term for a PowerShell command is a cmdlet, and from now on we will use this correct terminology. It just felt more appropriate to call them commands for this introduction.
I will come up with more stuffs in my upcoming posts.
Till then keep practicing and stay tuned for more details.
An Introduction to PowerShell – ForEach
ForEach simply looks at a set of list and pulls out one at a time to look at them and then, perform some type of action or set of commands on it.
One different part of a ForEach loop is the keyword in that lives within that parenthetical statement. That tells PowerShell to create a single variable to hold the values that come out, one at a time, for your list.
Let’s define a variable with list of Fruits
When we make a list within a variable, we have created an array, which is simply a sort of matrix thing that PowerShell holds in memory that lets it store a lots of things at one time.
Let's also initialize a count variable so we get a feel of how the loop is going.
Let's use a ForEach loop to count how many names we have. Remember our keyword in we have to create a new variable that we can call FruitName. This holds each single name that comes out of that list of names we have stored in the variable $names.
Finally, I'll add a simple Write-Host line after the end (after the right curly brace, that is) to display the count, so we can actually give us the count of names in the list of Fruits.
Here is the output of above script.
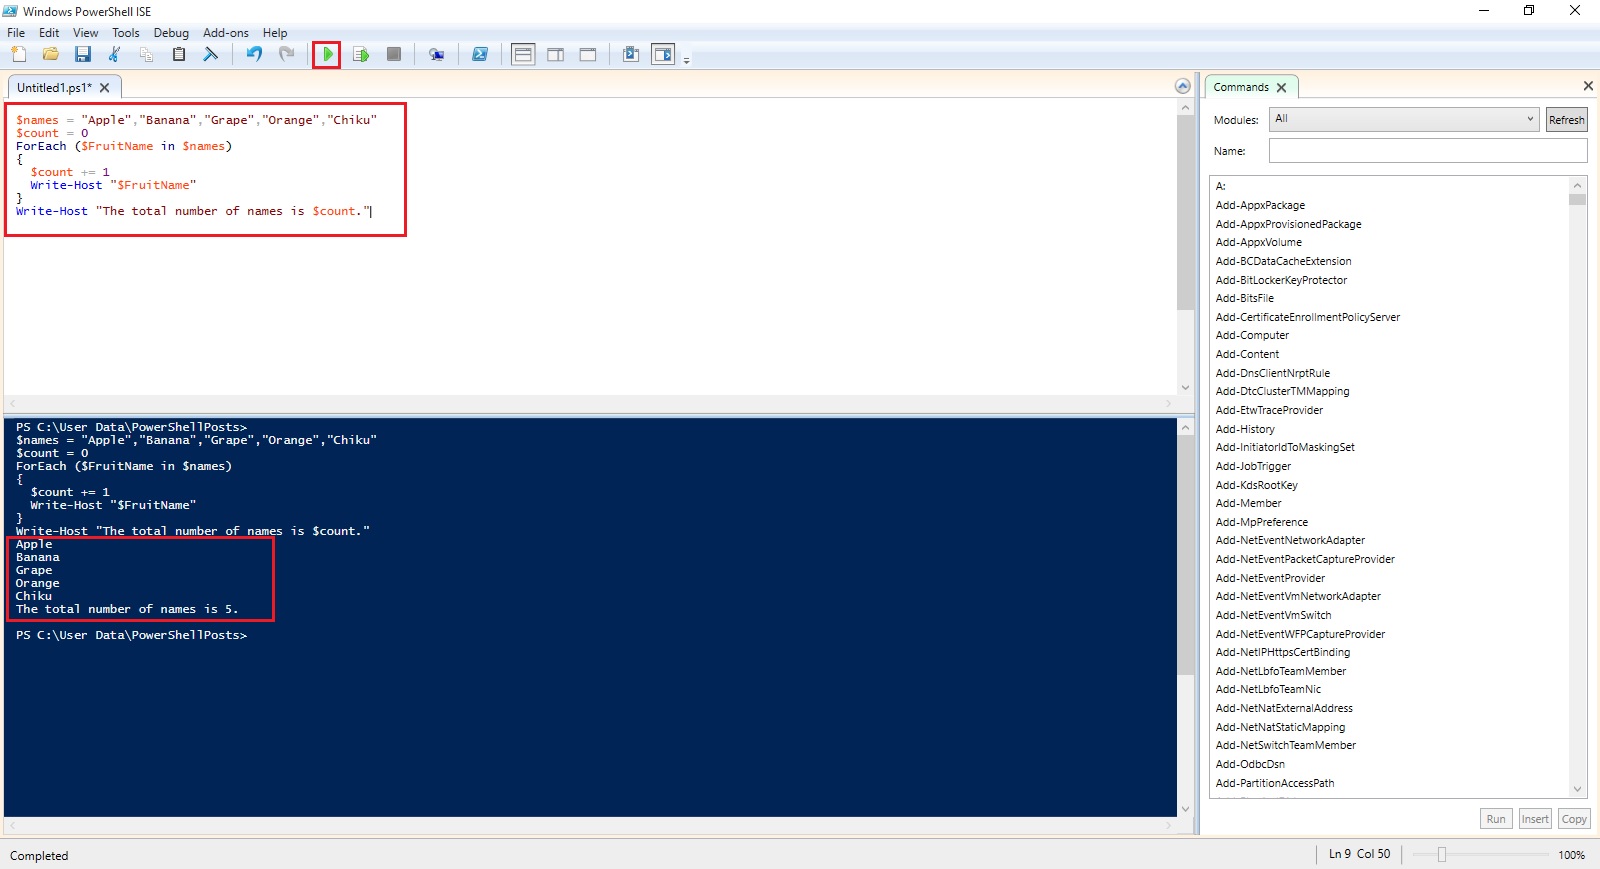
I will come up with more stuffs in my upcoming posts.
Till then keep practicing and stay tuned for more details.
One different part of a ForEach loop is the keyword in that lives within that parenthetical statement. That tells PowerShell to create a single variable to hold the values that come out, one at a time, for your list.
Let’s define a variable with list of Fruits
$names = "Apple","Banana","Grape","Orange","Chiku"
When we make a list within a variable, we have created an array, which is simply a sort of matrix thing that PowerShell holds in memory that lets it store a lots of things at one time.
Let's also initialize a count variable so we get a feel of how the loop is going.
$count = 0
Let's use a ForEach loop to count how many names we have. Remember our keyword in we have to create a new variable that we can call FruitName. This holds each single name that comes out of that list of names we have stored in the variable $names.
ForEach ($FruitName in $names)
{
$count += 1
Write-Host "$FruitName"
}
Finally, I'll add a simple Write-Host line after the end (after the right curly brace, that is) to display the count, so we can actually give us the count of names in the list of Fruits.
Write-Host "The total number of names is $count."
Here is the output of above script.

I will come up with more stuffs in my upcoming posts.
Till then keep practicing and stay tuned for more details.
An Introduction to PowerShell – Do While
Do While is the simplest of the looping constructs in PowerShell.
A looping construct is basically a piece of code that repeats the same action over and over again to a set of iteration, it loops through a set of statements, doing some action in each of its iteration, until some condition is met or that set of statement is exhausted.
Do While is simply a construct that says to PowerShell, "repeat set of things until some condition becomes true”.
For example, let's set up a control variable called count and give it an initial value of one.
Then, let’s set up a simple Do While construct that adds 1 to whatever value of count is already in that variable, until the variable has the number 10 in it.

Another way of doing same is:
You can also set up a Do While construct so that your set of commands only executes when the condition is true. You just need to eliminate the do statement, and only use while.
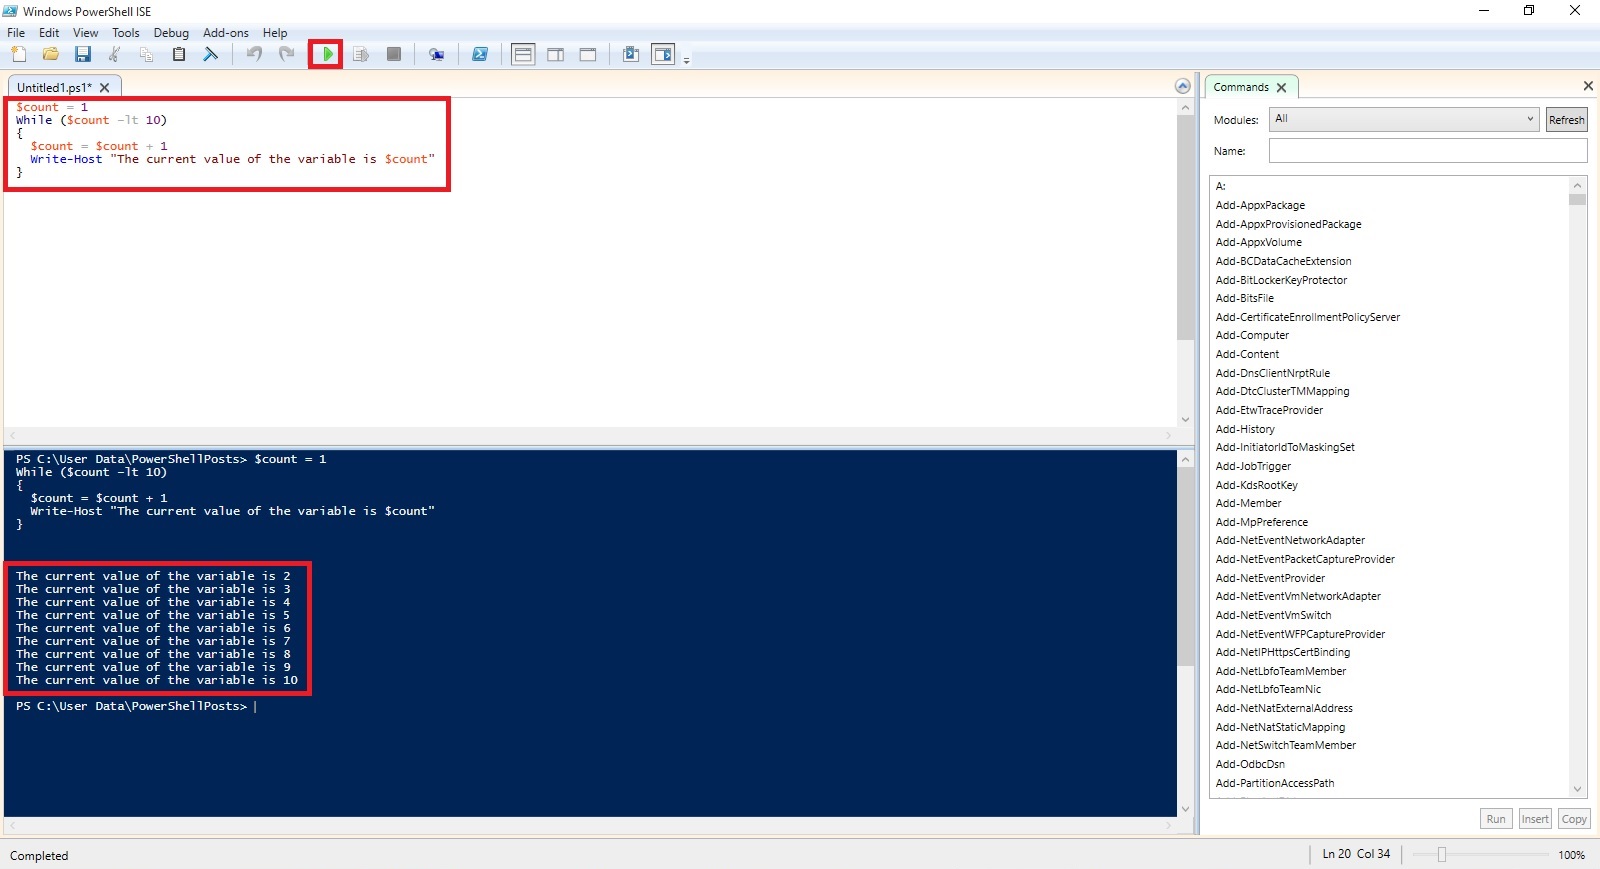
Only difference in above both way of using Do While construct is in first way if we initialize Count with 11 then also the loop with execute once as the condition is tested after loop is executed at least once if condition is satisfied the loop will continue else will exit. Where as in second way the condition is tested before it enters the loop and will exit before first iteration of the loop.

I will come up with more stuffs in my upcoming posts.
Till then keep practicing and stay tuned for more details.
A looping construct is basically a piece of code that repeats the same action over and over again to a set of iteration, it loops through a set of statements, doing some action in each of its iteration, until some condition is met or that set of statement is exhausted.
Do While is simply a construct that says to PowerShell, "repeat set of things until some condition becomes true”.
For example, let's set up a control variable called count and give it an initial value of one.
$count = 1
Then, let’s set up a simple Do While construct that adds 1 to whatever value of count is already in that variable, until the variable has the number 10 in it.
Do
{
$count = $count + 1
Write-Host "The current value of the variable is $count"
} While ($count –lt 10)

Another way of doing same is:
You can also set up a Do While construct so that your set of commands only executes when the condition is true. You just need to eliminate the do statement, and only use while.
While ($count –lt 10)
{
$count = $count + 1
Write-Host "The current value of the variable is $count"
}

Only difference in above both way of using Do While construct is in first way if we initialize Count with 11 then also the loop with execute once as the condition is tested after loop is executed at least once if condition is satisfied the loop will continue else will exit. Where as in second way the condition is tested before it enters the loop and will exit before first iteration of the loop.

I will come up with more stuffs in my upcoming posts.
Till then keep practicing and stay tuned for more details.
An Introduction to PowerShell – If/Then
The simplest form of decision making in PowerShell is the if/then mechanism.
The code that runs if your comparison clause is YES/TRUE or NO/FALSE must be surrounded within curly braces, it is best practice to put these curly braces on lines by themselves so that you can match them up when you are writing more complicated scripts.
Example:
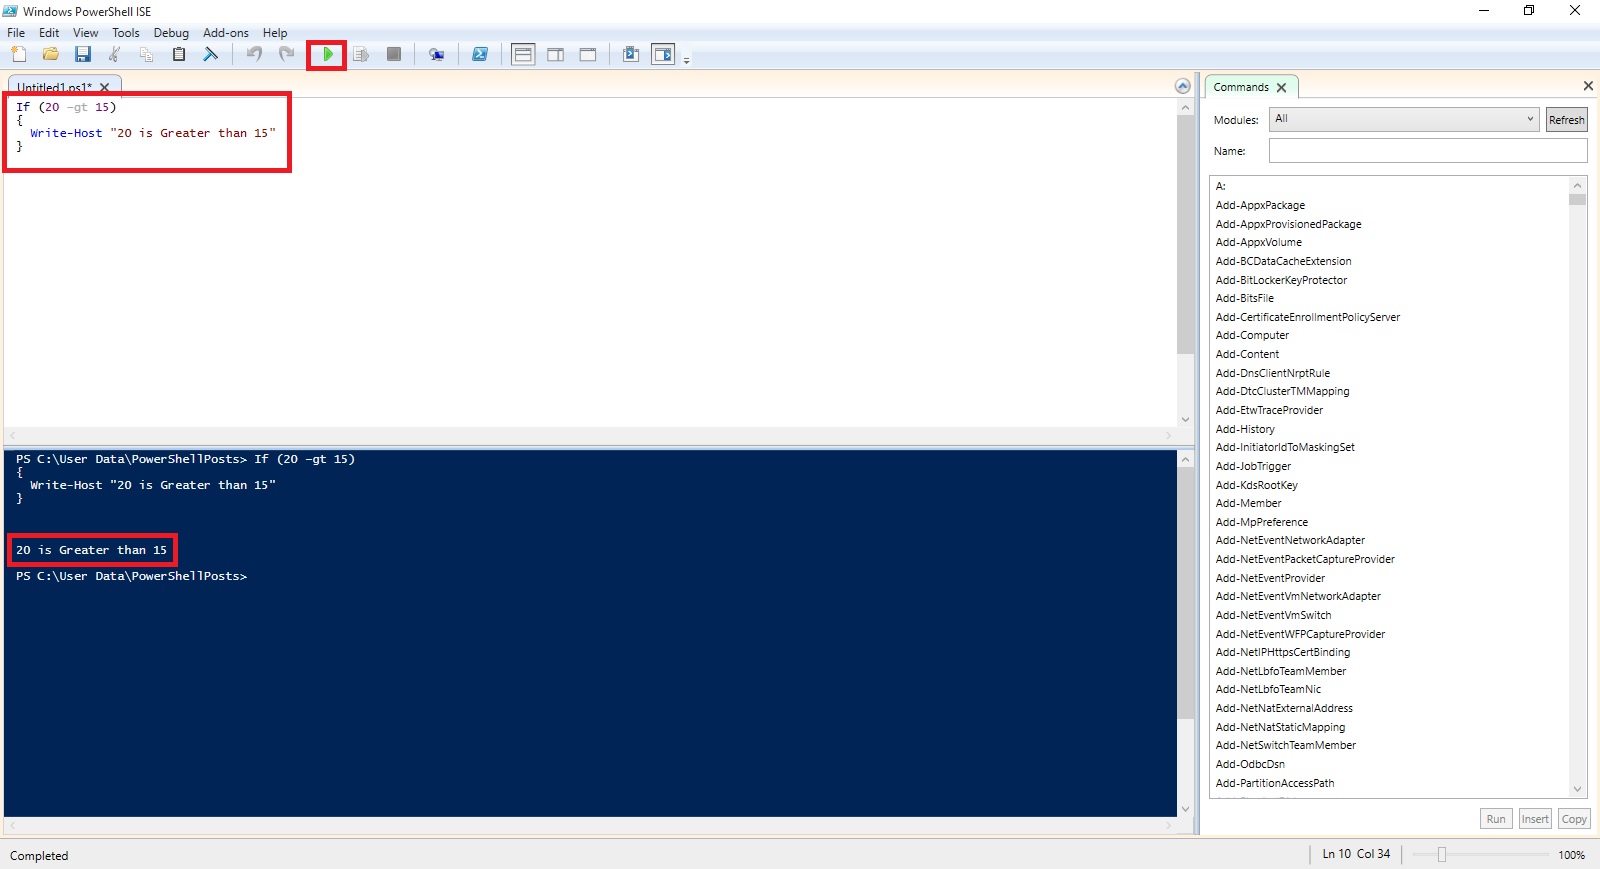
Here the –gt is the PowerShell switch for "greater than".
Another Example using Nesting
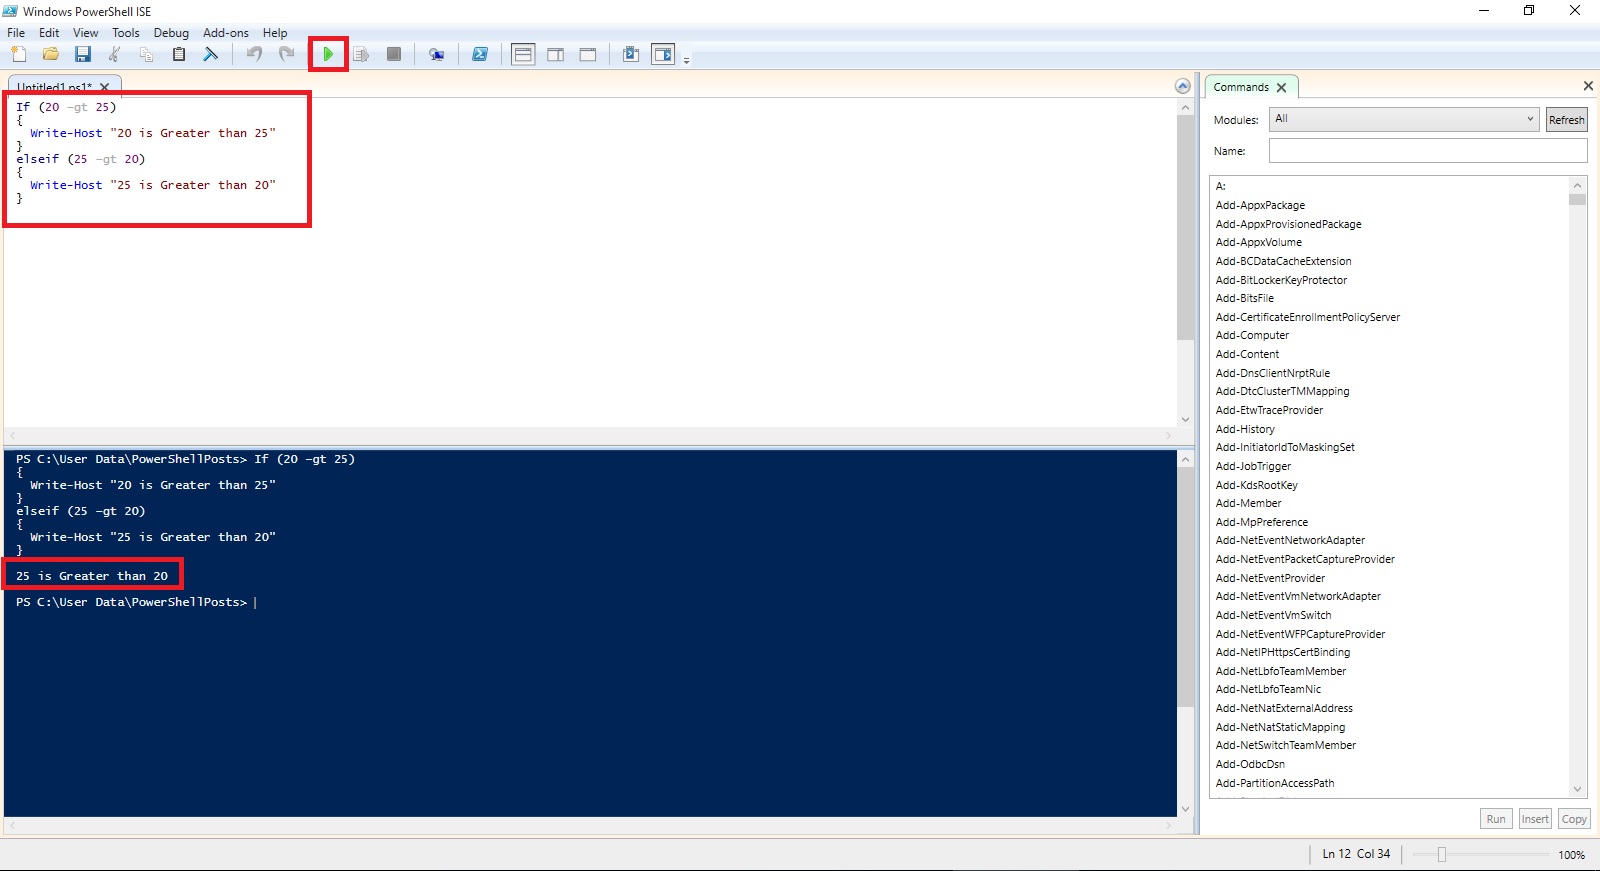
You can include n number of these elseif blocks in your script, there is no maximum limit for how many times it occurs in script.

I will come up with more stuffs in my upcoming posts.
Till then keep practicing and stay tuned for more details.
The code that runs if your comparison clause is YES/TRUE or NO/FALSE must be surrounded within curly braces, it is best practice to put these curly braces on lines by themselves so that you can match them up when you are writing more complicated scripts.
If condition is met then
{
Do This
}
Else
{
Do This
}
Example:
If (20 –gt 15)
{
Write-Host "20 is Greater than 15"
}

Here the –gt is the PowerShell switch for "greater than".
Another Example using Nesting
If (20 –gt 25)
{
Write-Host "20 is Greater than 25"
}
elseif (25 –gt 20)
{
Write-Host "25 is Greater than 20"
}

You can include n number of these elseif blocks in your script, there is no maximum limit for how many times it occurs in script.
If (10 –gt 11)
{
Write-Host "10 is Greater than 11"
}
elseif (11 –lt 10)
{
Write-Host "11 is Less than 10"
}
elseif (20 –gt 40)
{
Write-Host "20 is Greater than 40"
}
else
{
Write-Host "None of above conditions are true"
}

I will come up with more stuffs in my upcoming posts.
Till then keep practicing and stay tuned for more details.
An Introduction to PowerShell – basics and how to define Variables
PowerShell is built into Windows, so there is no requirement of separate fee or licensing cost. In addition, different server products come with their own Power Shells, too, which expands the capability to do things you want using PowerShell.
For demo purpose I am using Windows PowerShell ISE.

An introduction to scripts
Scripts in PowerShell are basically just text files with the special filename extension of ps1.
To create a script, you enter a series of PowerShell commands in a sequence in a new Notepad file or any text editor you like, and then save that file with extension as .ps1, where name of your file is a friendly description of your script with no spaces.
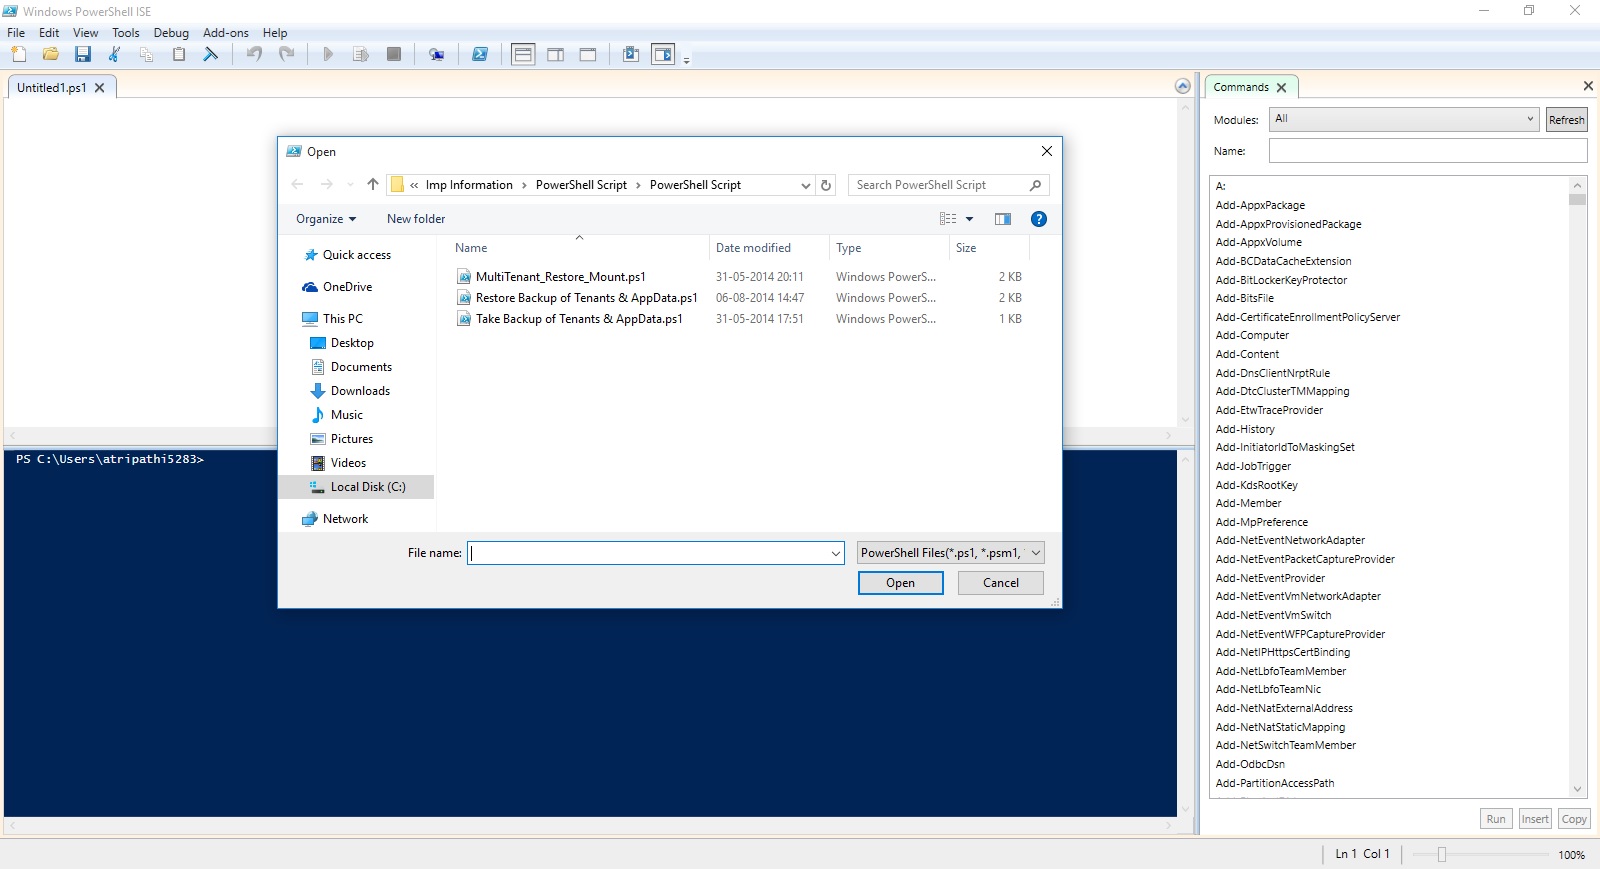
How do I run my scripts?
To run a PowerShell script that you already have, you enter in a PowerShell window either:
The full path (folder and file name) of the script, like so: c:\powershell\myscript.ps1
Or
If your script is in the current directory the console is looking at, use a period and then a backslash, like this: .\myscrip.ps1
Other than this, there is nothing special needed for creating a script in PowerShell. You can simply add the commands you like.
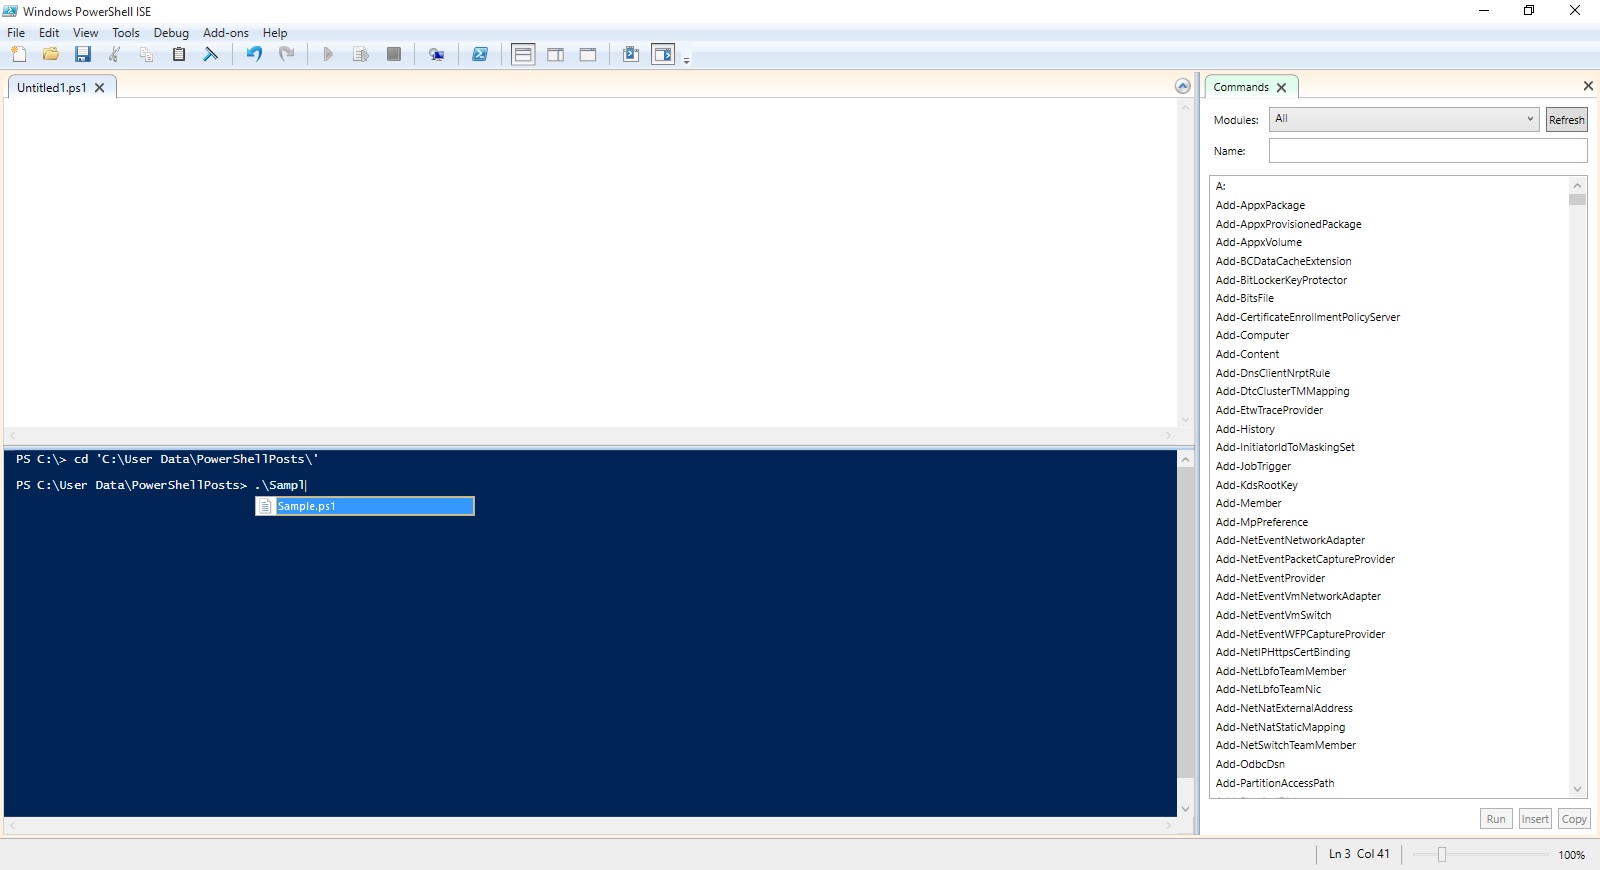
How do I define Variables?
In PowerShell, variables always have a dollar sign ($) prefixed before them.
Let us declare few variables right now:
$name = 'Ashwini'
$anynumber = 111074
$location = 'Ghaziabad'
$listofnumbers = 15,20,35,40

If I want to define a variable with text as its value, I will require to add a single quote on either side of the text value.
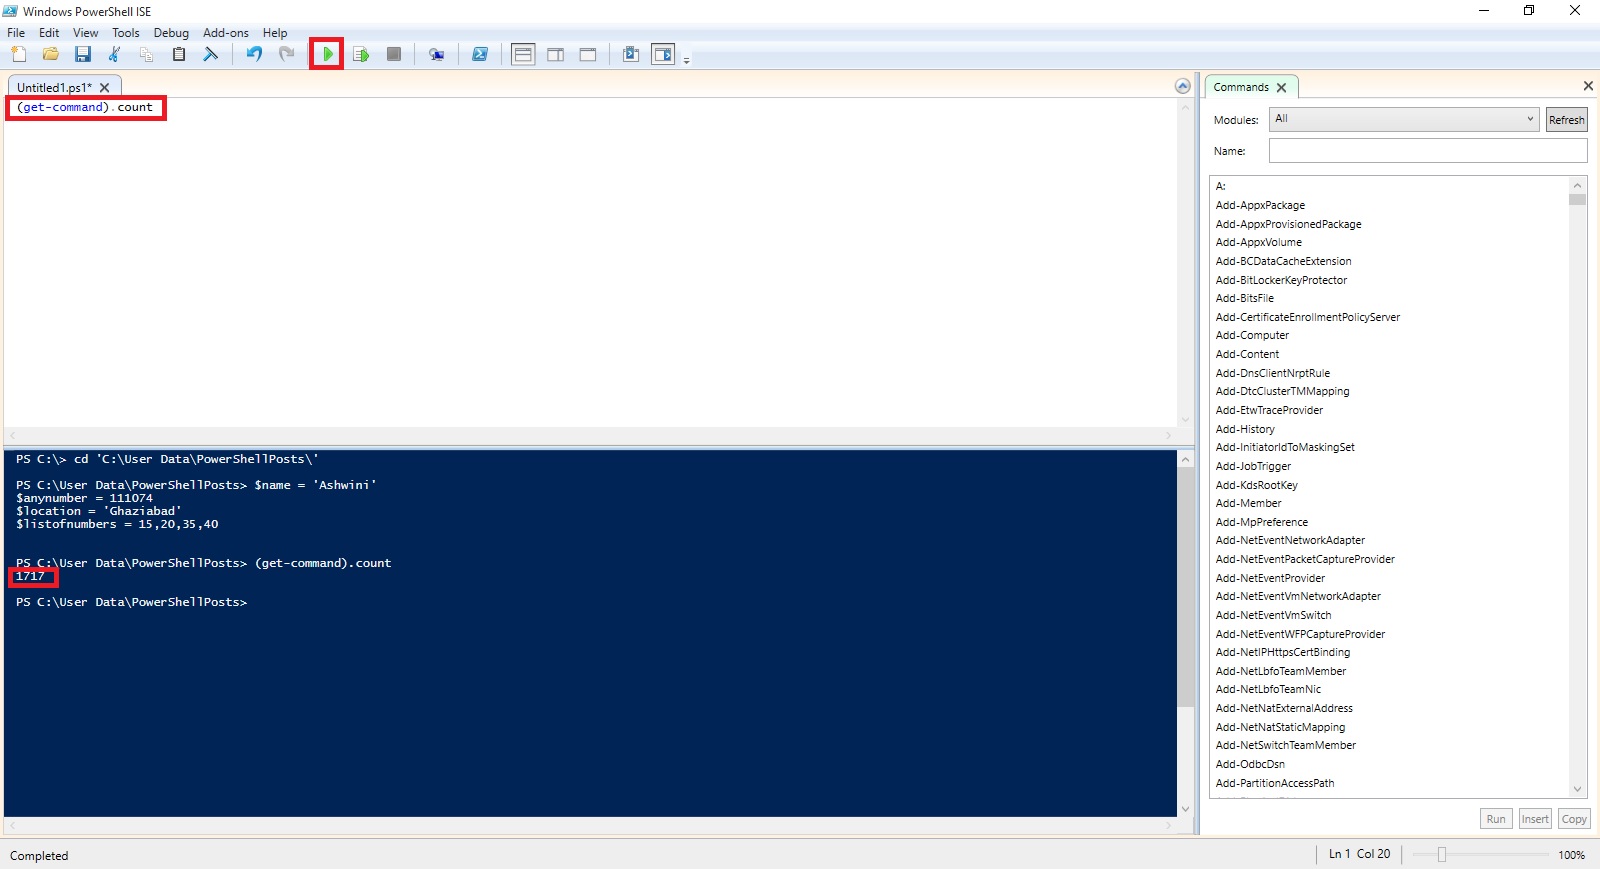
Let’s say we want to find out the total number of cmdlets available on the system, we can use:
(get-command).count
Let's declare a variable to store that count in. We’ll call it
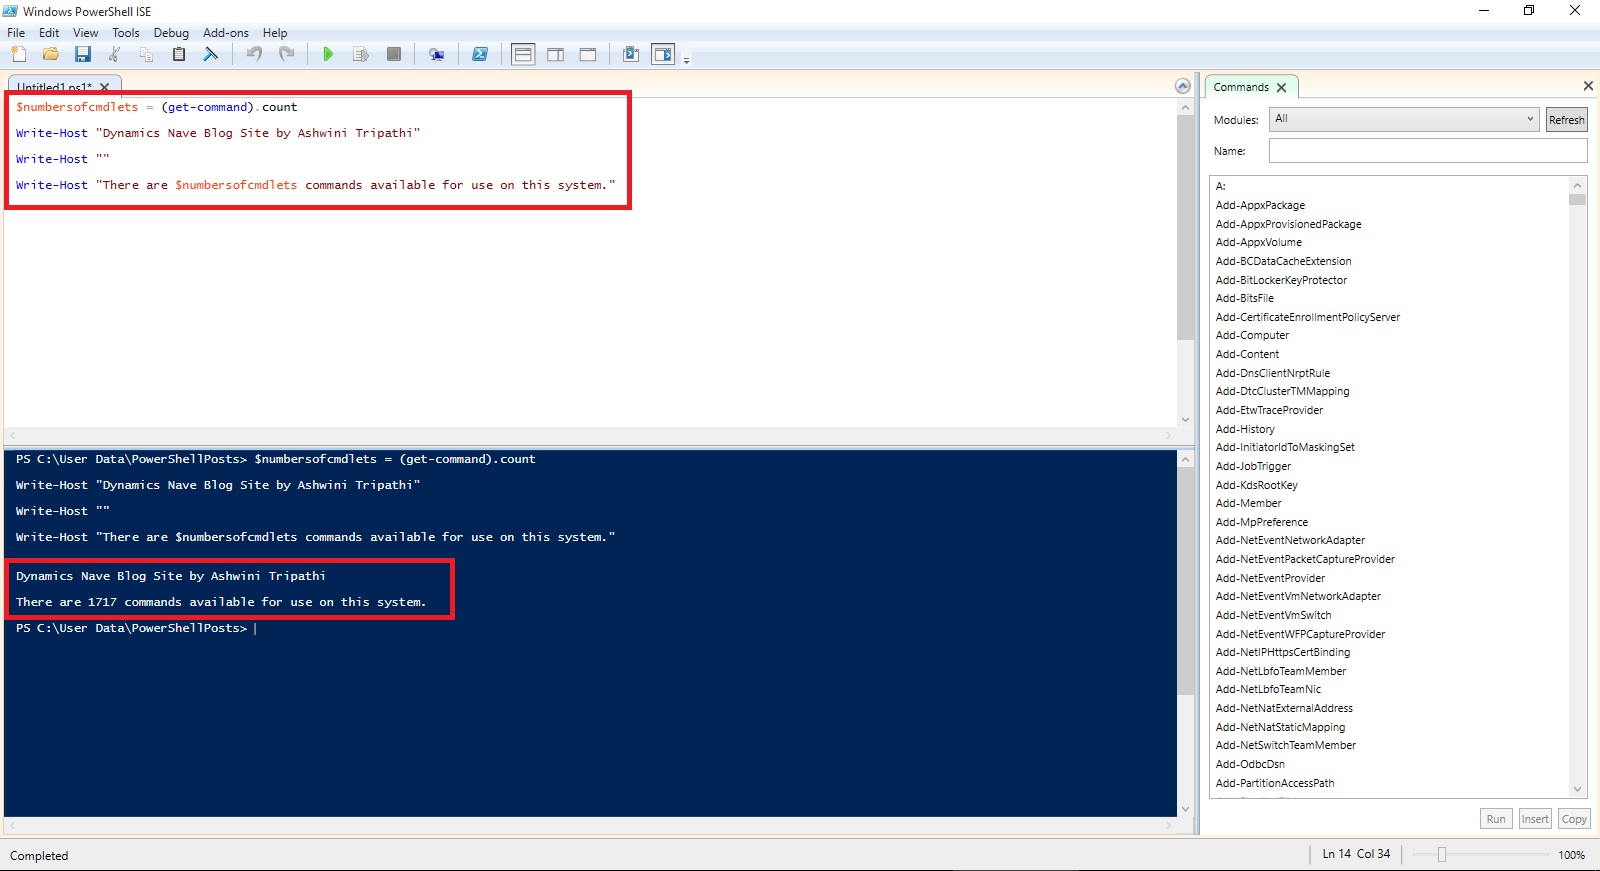
$numbersofcmdlets
We will store output in this variable of the (get-command).count .
$numbersofcmdlets = (get-command).count
Now we can use this variable as part of something else.
For a simple example, let's look at the Write-Host cmdlet, which simply writes text to the screen of the machine hosting the PowerShell session. Write-Host has a lots of capabilities, but in its simplest form, you can just say:
Write-Host "Dynamics Nav Blog Site by Ashwini Tripathi"
You can integrate variables with Write-Host. You just call them with the dollar sign notation and work them right into your text.
For example, I can say:
Write-Host "There are $numbersofcmdlets commands available for use on this system."
I will come up with more stuffs in my upcoming posts.
Till then keep practicing and stay tuned for more details.
For demo purpose I am using Windows PowerShell ISE.

An introduction to scripts
Scripts in PowerShell are basically just text files with the special filename extension of ps1.
To create a script, you enter a series of PowerShell commands in a sequence in a new Notepad file or any text editor you like, and then save that file with extension as .ps1, where name of your file is a friendly description of your script with no spaces.

How do I run my scripts?
To run a PowerShell script that you already have, you enter in a PowerShell window either:
The full path (folder and file name) of the script, like so: c:\powershell\myscript.ps1
Or
If your script is in the current directory the console is looking at, use a period and then a backslash, like this: .\myscrip.ps1
Other than this, there is nothing special needed for creating a script in PowerShell. You can simply add the commands you like.

How do I define Variables?
In PowerShell, variables always have a dollar sign ($) prefixed before them.
Let us declare few variables right now:
$name = 'Ashwini'
$anynumber = 111074
$location = 'Ghaziabad'
$listofnumbers = 15,20,35,40

If I want to define a variable with text as its value, I will require to add a single quote on either side of the text value.
Let’s say we want to find out the total number of cmdlets available on the system, we can use:
(get-command).count

Let's declare a variable to store that count in. We’ll call it
$numbersofcmdlets
We will store output in this variable of the (get-command).count .
$numbersofcmdlets = (get-command).count
Now we can use this variable as part of something else.
For a simple example, let's look at the Write-Host cmdlet, which simply writes text to the screen of the machine hosting the PowerShell session. Write-Host has a lots of capabilities, but in its simplest form, you can just say:
Write-Host "Dynamics Nav Blog Site by Ashwini Tripathi"
You can integrate variables with Write-Host. You just call them with the dollar sign notation and work them right into your text.
For example, I can say:
Write-Host "There are $numbersofcmdlets commands available for use on this system."

I will come up with more stuffs in my upcoming posts.
Till then keep practicing and stay tuned for more details.
Labels:
Basics,
Define,
How,
How To,
Information,
Introduction,
PowerShell,
Tip amp; Tricks,
To,
Variables
Configuring Session Timeout - Navision 2016
Dynamics NAV Windows client timeout configuration is managed at the service level by setting the Idle Client Timeout setting.
To configure the Dynamics NAV Windows client to time out after 10 minutes of idleness, you will require to set this to 00:10:00 and then restart the Dynamics NAV Server service so that the change comes in effect.
There are some additional settings
ClientServicesReconnectPeriod
ClientServicesMaxNumberOfOrphanedConnections,
When you start the Microsoft Dynamics NAV Windows client or Microsoft Dynamics NAV Web client, a connection is established with the Microsoft Dynamics NAV Server instance and a corresponding session is added on Microsoft Dynamics NAV Server.
Microsoft Dynamics NAV Server includes several timeout settings that determine when a session closes as a result of inactivity over the client connection, lost client connection, or closing of the client.
You can configure this in CustomSettings.config file of Microsoft Dynamics NAV Server.
ClientServicesReconnectPeriod :- This value determines the time during which a client can reconnect to an existing session on Microsoft Dynamics NAV Server before a session closes.
ClientServicesIdleClientTimeout :- This value determines the interval of time that a Microsoft Dynamics NAV client connection can remain inactive before the session is closed.
You can configure this in the ClientSettings.config file of the Microsoft Dynamics NAV Windows client.
ClientServicesKeepAliveInterval :- This value determines the interval of time (in seconds) between keep-alive messages that are sent from the Microsoft Dynamics NAV Windows client to Microsoft Dynamics NAV Server. This value is also used, in part, to define the reconnect period when a connection is lost.
You can configure this in the web.config file of Microsoft Dynamics Web Server for the client.
SessionTimeout :- This value specifies how much of time that session remains open when there is no activity over the connection from the Microsoft Dynamics NAV Web client to Microsoft Dynamics NAV Server.

The SessionTimeout setting enables you to set the Microsoft Dynamics NAV Web client inactive session timeout different than for the Microsoft Dynamics NAV Windows client, which is only controlled by the ClientServicesIdleClientTimeout setting.
Typically, this is set the inactive session timeout period on Microsoft Dynamics NAV Web client connections shorter than for the Microsoft Dynamics NAV Windows client.
When the Microsoft Dynamics NAV Windows client is inactive, reliable sessions automatically sends messages from the Microsoft Dynamics NAV Windows client to Microsoft Dynamics NAV Server.
You can control the interval of the keep-alive messages by setting the ClientServicesKeepAliveInterval setting on the Microsoft Dynamics NAV Windows client.
The default value of the ClientServicesKeepAliveInterval setting is 120 seconds (2 minutes).
If there is no activity on the client connection for duration of the load balancer's idle timeout setting, then the load balancer might redirect the client connection to another server.
To avoid this condition, it is recommend that set the ClientServicesKeepAliveInterval to half the value of the load balancer’s idle timeout setting.
The idle timeout on Windows Azure is around 4 minutes, so the default setting of ClientServicesKeepAliveInterval (2 minutes) should be sufficient.
Occasionally, a Microsoft Dynamics NAV client can lose the network connection to Microsoft Dynamics NAV Server.
You can use ClientServicesReconnectPeriod setting on Microsoft Dynamics NAV Server to control how long a session remains open after the connection is lost to allow time for the client to reconnect to the session.

ClientKeepAlive:- This setting is managed at the user level and located in the ClientUserSettings.config file.
The value of this setting is given in seconds and defines the interval between ‘pulse’ signals sent by the client to prevent the client from going idle in some scenarios, or for some users.
In Dynamics NAV 2016 Cumulative Update 8:
The ClientKeepAlive setting has been moved from the user level to the service level, and is no longer defined in number of seconds but as a time interval, just like the Idle Client Timeout setting.
Before Cumulative Update 8:
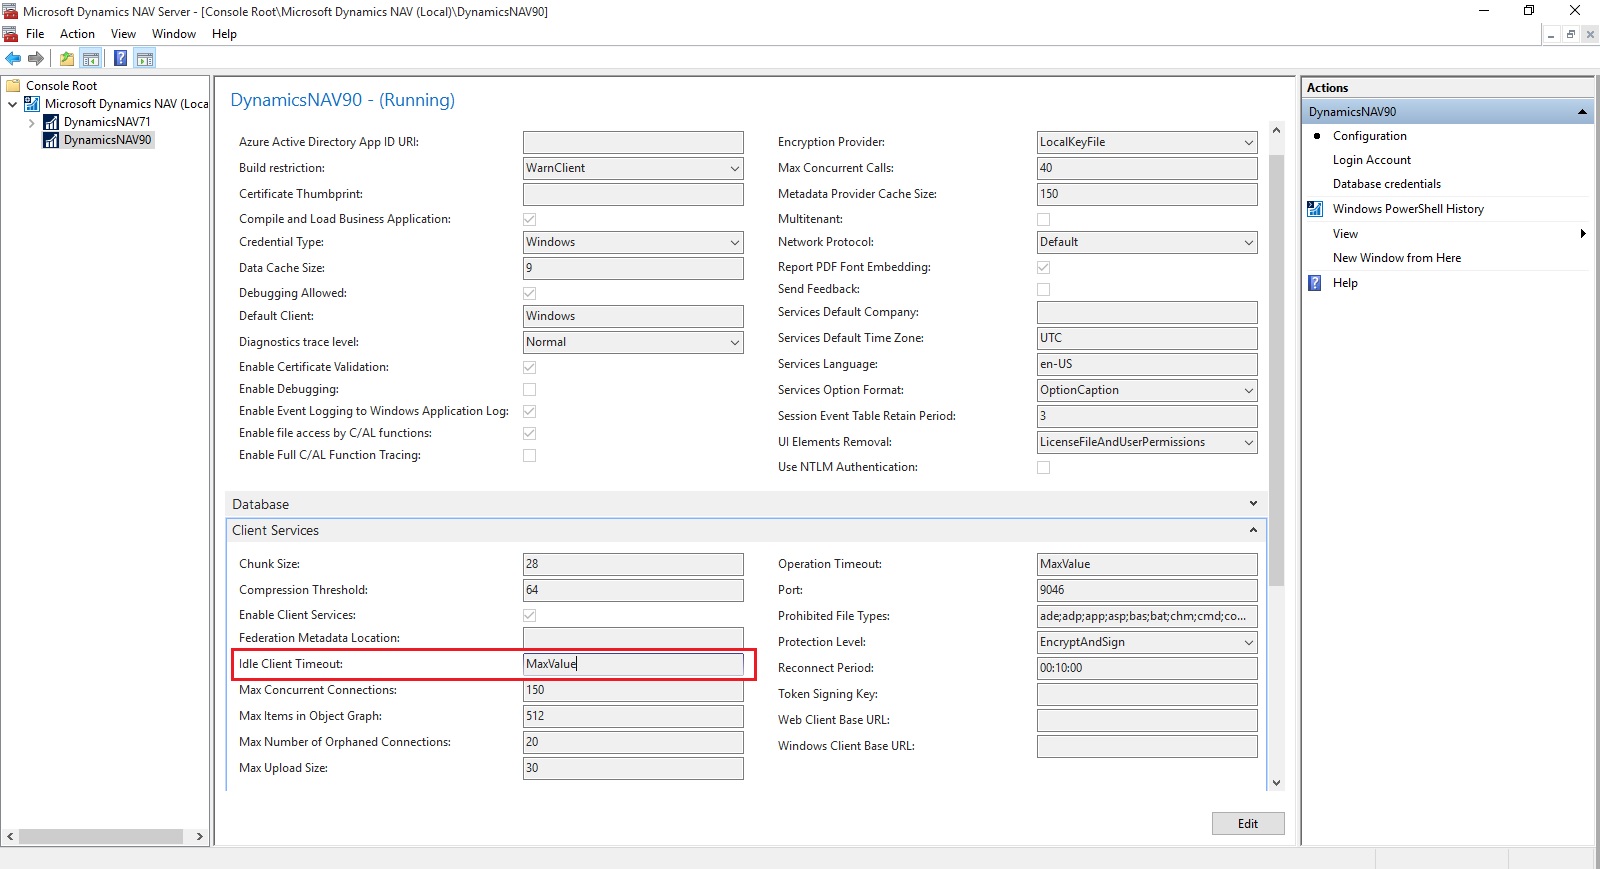
After Cumulative Update 8:
To configure the timeout for the Dynamics NAV Web client, it is sufficient to configure the SessionTimeout setting in the web.config file to the relevant interval – in above example it’s 00:10:00.
For more information you can check out here : https://community.dynamics.com/nav/b/navteam/archive/2016/06/24/configuring-client-timeout
To configure the Dynamics NAV Windows client to time out after 10 minutes of idleness, you will require to set this to 00:10:00 and then restart the Dynamics NAV Server service so that the change comes in effect.
There are some additional settings
ClientServicesReconnectPeriod
ClientServicesMaxNumberOfOrphanedConnections,
When you start the Microsoft Dynamics NAV Windows client or Microsoft Dynamics NAV Web client, a connection is established with the Microsoft Dynamics NAV Server instance and a corresponding session is added on Microsoft Dynamics NAV Server.
Microsoft Dynamics NAV Server includes several timeout settings that determine when a session closes as a result of inactivity over the client connection, lost client connection, or closing of the client.
You can configure this in CustomSettings.config file of Microsoft Dynamics NAV Server.
ClientServicesReconnectPeriod :- This value determines the time during which a client can reconnect to an existing session on Microsoft Dynamics NAV Server before a session closes.
ClientServicesIdleClientTimeout :- This value determines the interval of time that a Microsoft Dynamics NAV client connection can remain inactive before the session is closed.
You can configure this in the ClientSettings.config file of the Microsoft Dynamics NAV Windows client.
ClientServicesKeepAliveInterval :- This value determines the interval of time (in seconds) between keep-alive messages that are sent from the Microsoft Dynamics NAV Windows client to Microsoft Dynamics NAV Server. This value is also used, in part, to define the reconnect period when a connection is lost.
You can configure this in the web.config file of Microsoft Dynamics Web Server for the client.
SessionTimeout :- This value specifies how much of time that session remains open when there is no activity over the connection from the Microsoft Dynamics NAV Web client to Microsoft Dynamics NAV Server.

The SessionTimeout setting enables you to set the Microsoft Dynamics NAV Web client inactive session timeout different than for the Microsoft Dynamics NAV Windows client, which is only controlled by the ClientServicesIdleClientTimeout setting.
Typically, this is set the inactive session timeout period on Microsoft Dynamics NAV Web client connections shorter than for the Microsoft Dynamics NAV Windows client.
When the Microsoft Dynamics NAV Windows client is inactive, reliable sessions automatically sends messages from the Microsoft Dynamics NAV Windows client to Microsoft Dynamics NAV Server.
You can control the interval of the keep-alive messages by setting the ClientServicesKeepAliveInterval setting on the Microsoft Dynamics NAV Windows client.
The default value of the ClientServicesKeepAliveInterval setting is 120 seconds (2 minutes).
If there is no activity on the client connection for duration of the load balancer's idle timeout setting, then the load balancer might redirect the client connection to another server.
To avoid this condition, it is recommend that set the ClientServicesKeepAliveInterval to half the value of the load balancer’s idle timeout setting.
The idle timeout on Windows Azure is around 4 minutes, so the default setting of ClientServicesKeepAliveInterval (2 minutes) should be sufficient.
Occasionally, a Microsoft Dynamics NAV client can lose the network connection to Microsoft Dynamics NAV Server.
You can use ClientServicesReconnectPeriod setting on Microsoft Dynamics NAV Server to control how long a session remains open after the connection is lost to allow time for the client to reconnect to the session.

- The connection is lost and the initial inactivity period starts (default is 4 minutes).
- After the initial inactivity period, the service channel enters a faulted state. When the service channel is in the faulted state, Microsoft Dynamics NAV Server considers the session with the client as orphaned and waits for it to reconnect.
- If the client does not reconnect within the time period that is specified by the ClientServicesReconnectPeriod setting (default is 10 minutes), then Microsoft Dynamics NAV Server closes the session.
- The session is then removed from the Active Session table in the Microsoft Dynamics NAV.
ClientKeepAlive:- This setting is managed at the user level and located in the ClientUserSettings.config file.
The value of this setting is given in seconds and defines the interval between ‘pulse’ signals sent by the client to prevent the client from going idle in some scenarios, or for some users.
In Dynamics NAV 2016 Cumulative Update 8:
The ClientKeepAlive setting has been moved from the user level to the service level, and is no longer defined in number of seconds but as a time interval, just like the Idle Client Timeout setting.
Before Cumulative Update 8:
- In the server configuration file, set Idle Client Timeout to 00:10:00
- In the client configuration file, set ClientKeepAlive to any value larger than 600 This value is in seconds, so 600 equals 10 minutes.

After Cumulative Update 8:
- In the server configuration file, set Idle Client Timeout to 00:10:00
- In the server configuration file, set Keep Alive Interval to a value larger than 00:10:00
To configure the timeout for the Dynamics NAV Web client, it is sufficient to configure the SessionTimeout setting in the web.config file to the relevant interval – in above example it’s 00:10:00.
For more information you can check out here : https://community.dynamics.com/nav/b/navteam/archive/2016/06/24/configuring-client-timeout
Sunday, 19 June 2016
Create Production Orders for/from Sales Order
One of my reader have requested to demonstrate how he can create Sales Order which is directly associated with Sales Order.
Let us start with creating a Sales Order:
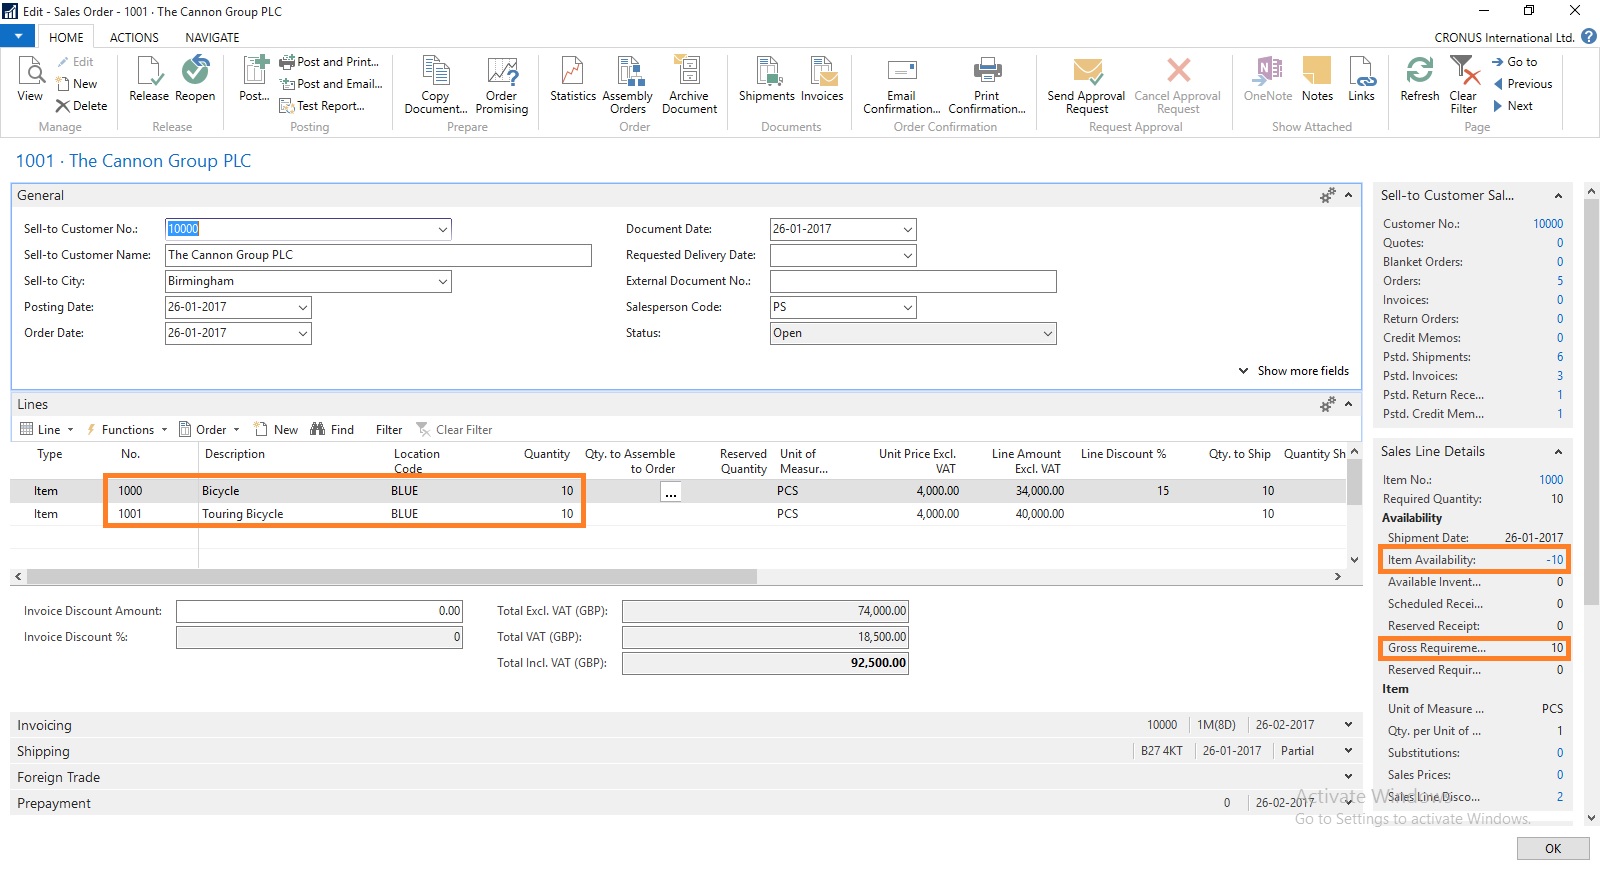
Here you can see we don’t have Available Inventory to fulfil the demand of this Order.
To fulfil the demand we will create Production Order for this Order.
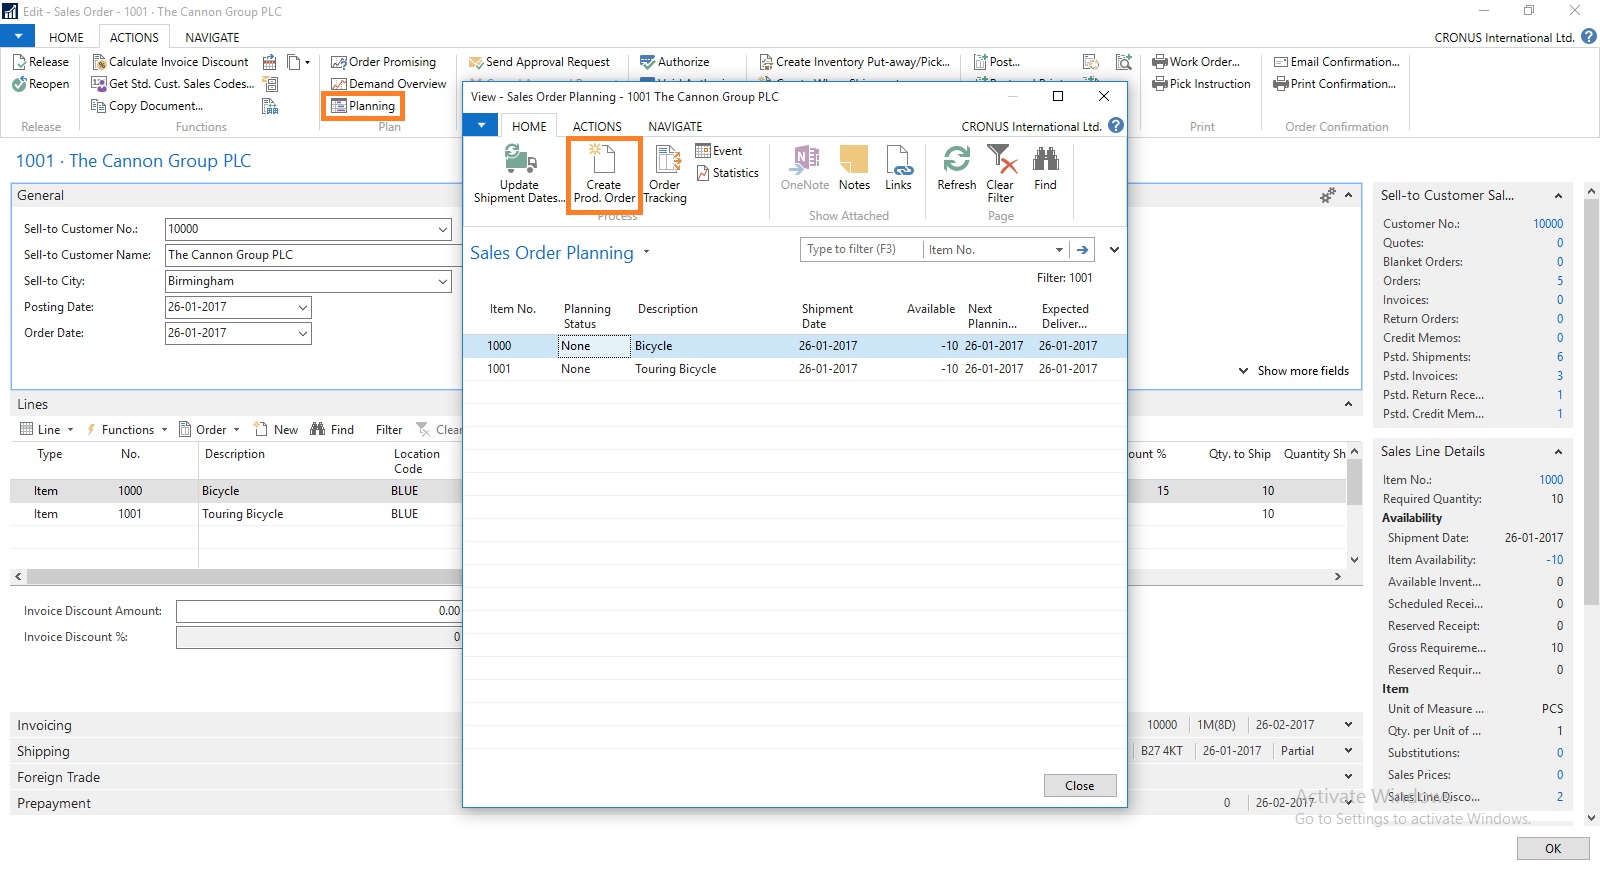
Select Planning from Action TAB on Ribbon.
Sales Order Planning Window Opens, Select Create Production Order.
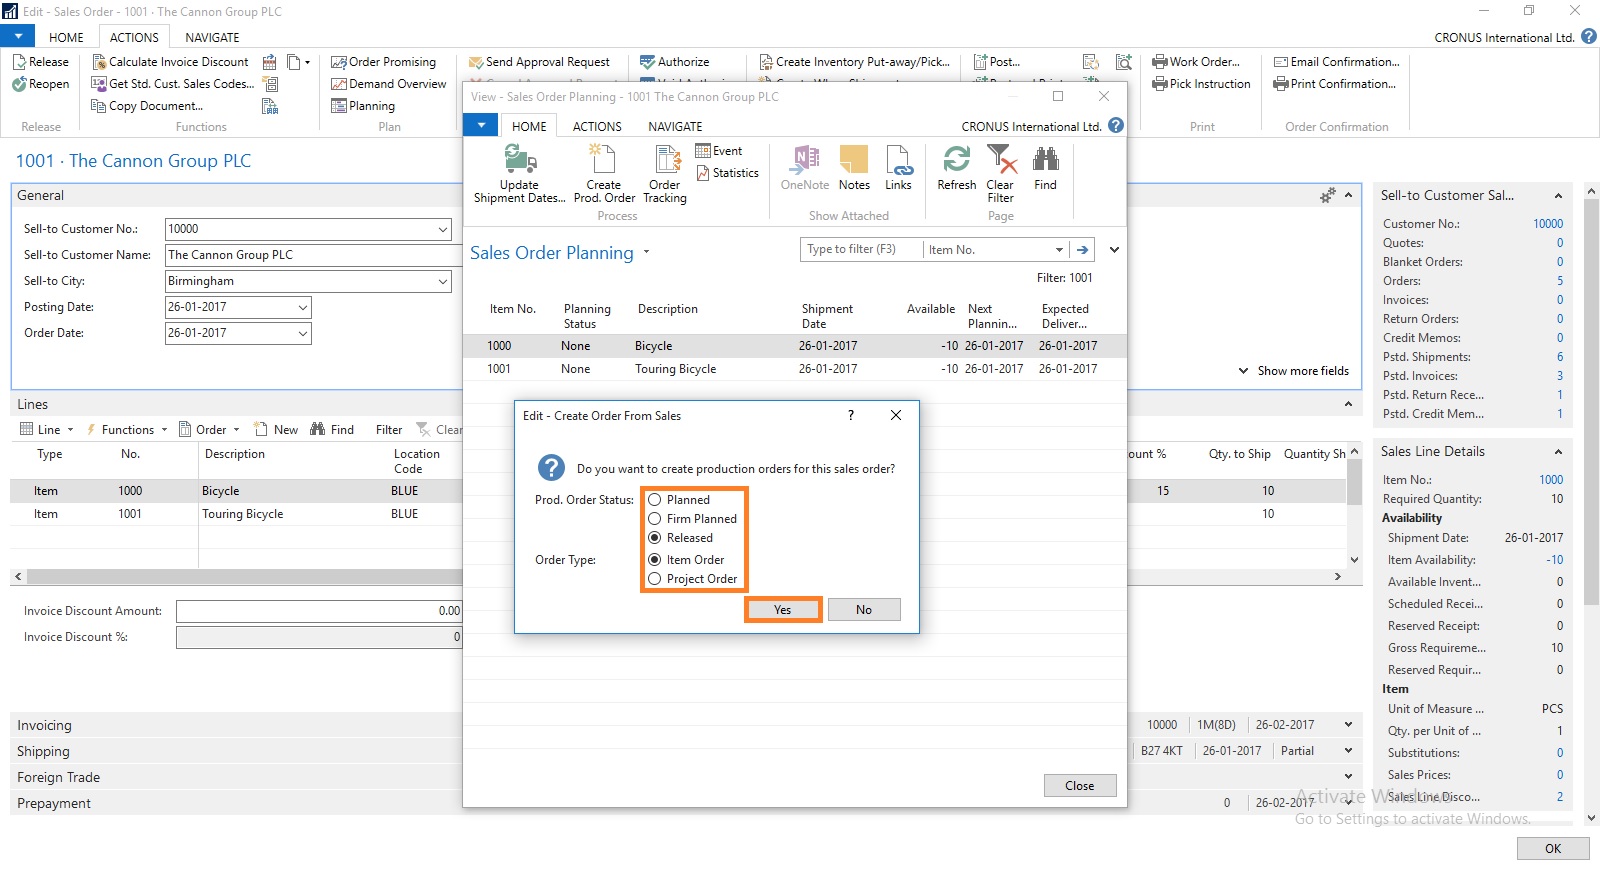
Select the Status for Production Order as desired.
For Order Type you have 2 Options
Select the desired option and respond to Yes.

I have Selected Released & Project Order in my case.
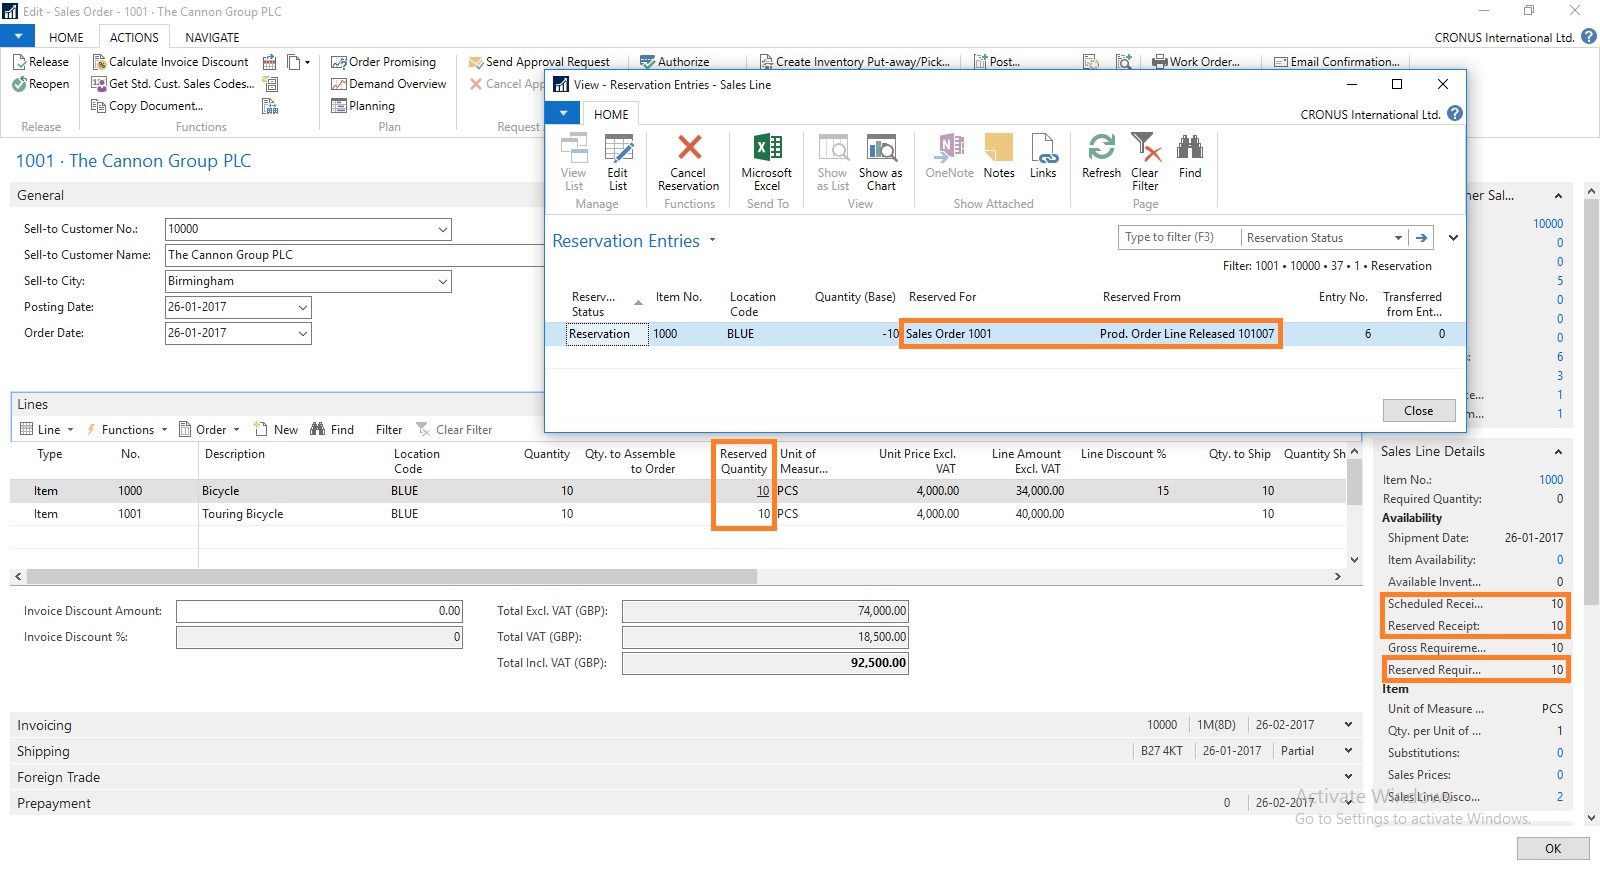
You can check that Quantity to be produced is reserved for this Order.
There could be the situation where you may have few Inventory available, in that case you need to reserve the quantity from Function before creating Production Order else all quantity will be created. In other case only short quantity will be a quantity of Production Order.

Select the line from available lines in Item Ledger Entries (e.g. on hand inventory) and by using the ‘Reserve from Current Line’ function you can reserve those against the sales order line. The ‘Reserved Quantity’ then gets updated and you can see the rest in the ‘Unreserved Quantity’ field.
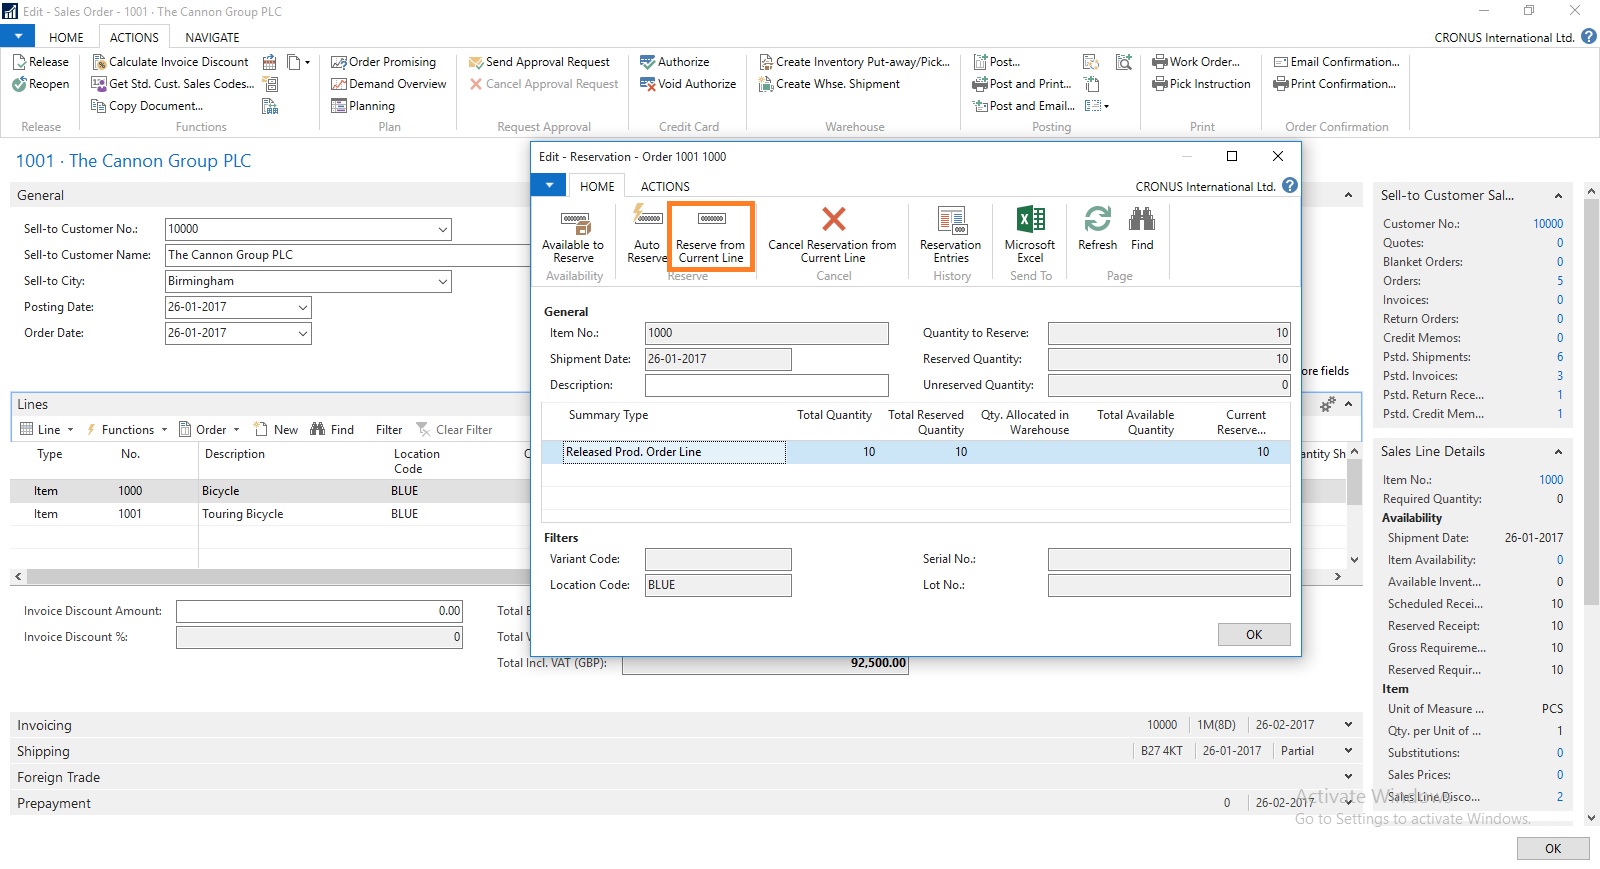
Although in this case entire line is already reserved from the Production Order.
But in case you want to reserve from any available Inventory in hand from Ledger entry.
This was one of the way how you can perform Creating Production Order and Reserving for Sales Order.
We can do the same by another way as below, directly creating Production Order for this Sales Order.
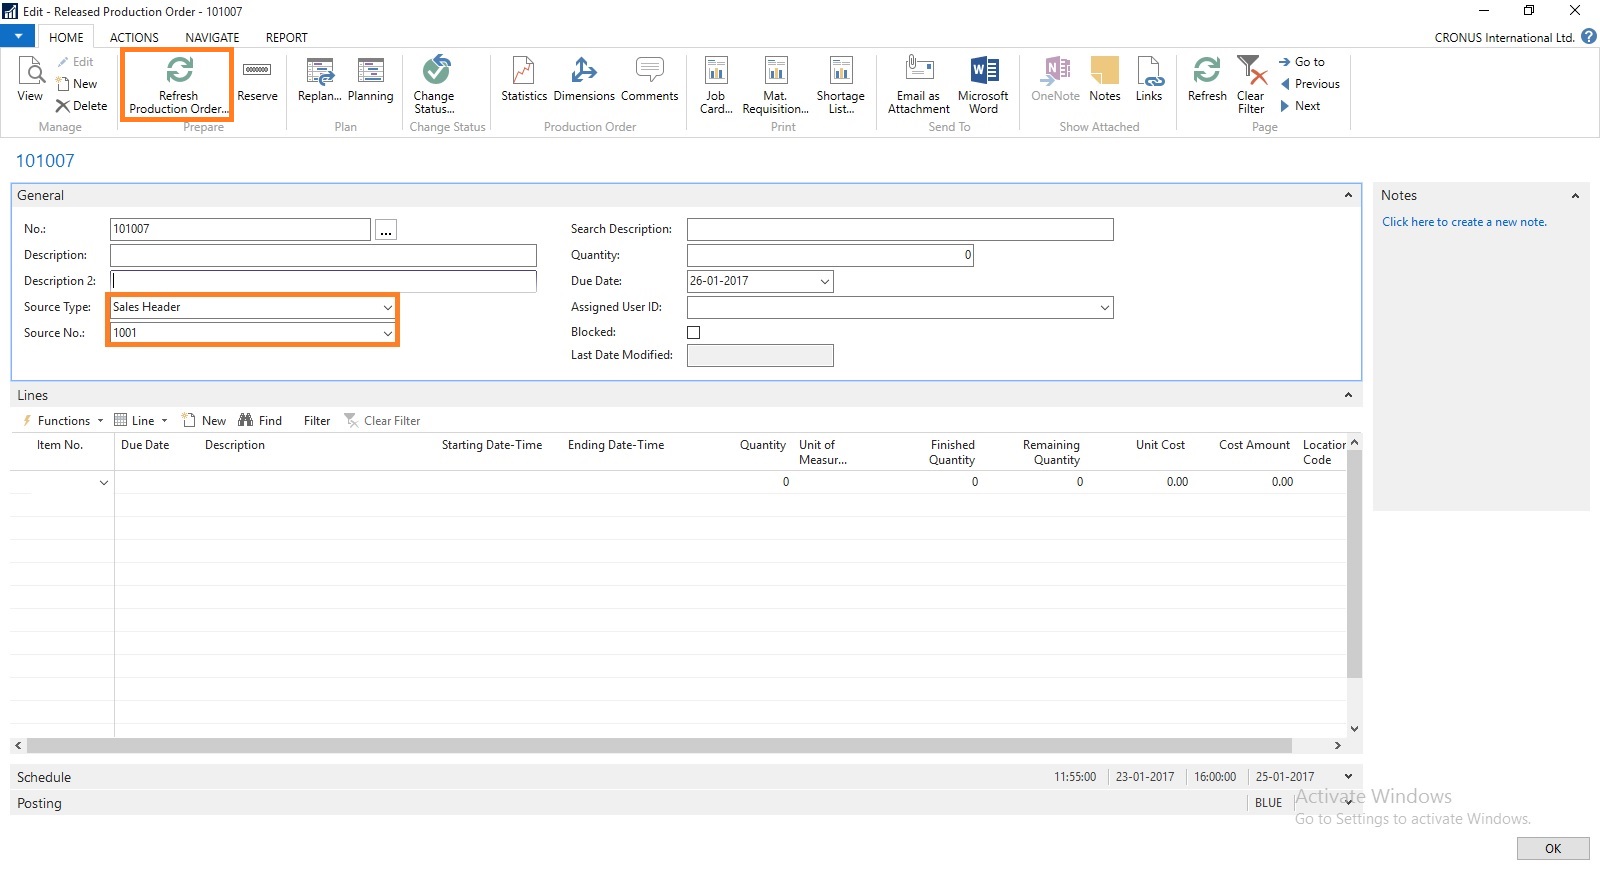
Create a Production Order Select Source Type as Sales Header and Source No as Sales Order No.
Then Refresh the Production Order.


This way we can create and Reserve the Item for required demand.
I will come with more details in my upcoming posts.
Let us start with creating a Sales Order:

Here you can see we don’t have Available Inventory to fulfil the demand of this Order.

To fulfil the demand we will create Production Order for this Order.
Select Planning from Action TAB on Ribbon.
Sales Order Planning Window Opens, Select Create Production Order.

Select the Status for Production Order as desired.
For Order Type you have 2 Options
- Item Order – Production Order is created for each Item on Lines
- Project Order – Single Production order for Entire Order
Select the desired option and respond to Yes.

I have Selected Released & Project Order in my case.

You can check that Quantity to be produced is reserved for this Order.
There could be the situation where you may have few Inventory available, in that case you need to reserve the quantity from Function before creating Production Order else all quantity will be created. In other case only short quantity will be a quantity of Production Order.

Select the line from available lines in Item Ledger Entries (e.g. on hand inventory) and by using the ‘Reserve from Current Line’ function you can reserve those against the sales order line. The ‘Reserved Quantity’ then gets updated and you can see the rest in the ‘Unreserved Quantity’ field.

Although in this case entire line is already reserved from the Production Order.
But in case you want to reserve from any available Inventory in hand from Ledger entry.
This was one of the way how you can perform Creating Production Order and Reserving for Sales Order.
We can do the same by another way as below, directly creating Production Order for this Sales Order.

Create a Production Order Select Source Type as Sales Header and Source No as Sales Order No.
Then Refresh the Production Order.


This way we can create and Reserve the Item for required demand.
I will come with more details in my upcoming posts.
Labels:
2016,
Corfu Navision 2016,
Create,
Dynamics,
for,
from,
Functional Tips,
How To,
Information,
Microsoft,
MS,
Nav,
Navision,
Order,
Production,
Sales,
Tip amp; Tricks
Sunday, 12 June 2016
Basics of Demand, Forecast, MPS & MRP
What is MPS?
MPS term is used for Master Production Schedule. It is used to plan items which have direct demand. Like Sales Order, Service Orders and Forecasts. It is run Weekly based on Orders and forecasts for that period.
What is MRP?
MRP term is used for Material Requirements Planning. It is used to plan items which have dependent demand. Like sub items used to produce FG or are defined in BOM. It is run Daily to expedit parts required to produce the plan.
What is Forecast?
Forecasting allows your company to create "what if" scenarios and efficiently and cost-effectively plan for and meet demand. Accurate forecasting can make a critical difference in customer satisfaction levels with regard to order promising dates and on-time delivery.
The forecasting functionality in the program can be used to create sales or production forecasts, in combination or independently.
What is Demand?
Calculation is done order-by-order, meaning that the order that includes the demand line with the earliest due date or shipment date is considered first, and all other demand lines in that production order, irrespective of their individual due dates or shipment dates, are also calculated for that order. When the calculation is completed, all unfulfilled demand is displayed as planning lines, sorted by the earliest demand date, with the various quantity fields filled in.
Actual demand is calculated from Sales Order, Service Orders, Components Needed, Job Planning Lines.
This demand is compared with the Forcasted demands like defined in Production Forecast.
Regenerative Plan is calculated as per Period, MPS, MRP and other provided parameters.
Lets understand this via a simple Example:
Step-1
Define Forecast for Item A as requirement of 1000 Qty for Jan Month.
Step -2
Run the Regenerative Plan, you will get the Planning for Item A with due date as 1st Jan of 1000 Qty.
Let us see what happens under different demand levels.
Scenario-1
When demand is less than Forecast for the month.
Let us Make a Sales Order for 200 Qty of Item A.
Lets see the impact of this on our Plan.
If we run our Plan 2 lines will be created as below
a) 200 Qty with due date equivalent to Sales Order date
b) 800 Qty with due date as 1st Jan from Forecast
Scenario-2
When demand is equal to Forecast for the month.
Let us Make a Sales Order for 1000 Qty of Item A.
Lets see the impact of this on our Plan.
If we run our Plan 1 line will be created as below
a) 1000 Qty with due date equivalent to Sales Order date
Scenario-3
When demand is greater than Forecast for the month.
Let us Make a Sales Order for 1500 Qty of Item A.
Lets see the impact of this on our Plan.
If we run our Plan 1 line will be created as below
a) 1500 Qty with due date equivalent to Sales Order date
Will comeup with more details in my upcomming posts.
MPS term is used for Master Production Schedule. It is used to plan items which have direct demand. Like Sales Order, Service Orders and Forecasts. It is run Weekly based on Orders and forecasts for that period.
What is MRP?
MRP term is used for Material Requirements Planning. It is used to plan items which have dependent demand. Like sub items used to produce FG or are defined in BOM. It is run Daily to expedit parts required to produce the plan.
What is Forecast?
Forecasting allows your company to create "what if" scenarios and efficiently and cost-effectively plan for and meet demand. Accurate forecasting can make a critical difference in customer satisfaction levels with regard to order promising dates and on-time delivery.
The forecasting functionality in the program can be used to create sales or production forecasts, in combination or independently.
What is Demand?
Calculation is done order-by-order, meaning that the order that includes the demand line with the earliest due date or shipment date is considered first, and all other demand lines in that production order, irrespective of their individual due dates or shipment dates, are also calculated for that order. When the calculation is completed, all unfulfilled demand is displayed as planning lines, sorted by the earliest demand date, with the various quantity fields filled in.
Actual demand is calculated from Sales Order, Service Orders, Components Needed, Job Planning Lines.
This demand is compared with the Forcasted demands like defined in Production Forecast.
Regenerative Plan is calculated as per Period, MPS, MRP and other provided parameters.
Lets understand this via a simple Example:
Step-1
Define Forecast for Item A as requirement of 1000 Qty for Jan Month.
Step -2
Run the Regenerative Plan, you will get the Planning for Item A with due date as 1st Jan of 1000 Qty.
Let us see what happens under different demand levels.
Scenario-1
When demand is less than Forecast for the month.
Let us Make a Sales Order for 200 Qty of Item A.
Lets see the impact of this on our Plan.
Sales demand is for 200 Qty
Forecast demand will be for 800 Qty (1000 - 200)
Actual demand in this case is of 200 Qty
If we run our Plan 2 lines will be created as below
a) 200 Qty with due date equivalent to Sales Order date
b) 800 Qty with due date as 1st Jan from Forecast
If we see our Total demand is still 1000 Qty
Scenario-2
When demand is equal to Forecast for the month.
Let us Make a Sales Order for 1000 Qty of Item A.
Lets see the impact of this on our Plan.
Sales demand is for 1000 Qty
Forecast demand will be for 0 Qty (1000 - 1000)
Actual demand in this case is of 1000 Qty
If we run our Plan 1 line will be created as below
a) 1000 Qty with due date equivalent to Sales Order date
If we see our Total demand is still 1000 Qty
Scenario-3
When demand is greater than Forecast for the month.
Let us Make a Sales Order for 1500 Qty of Item A.
Lets see the impact of this on our Plan.
Sales demand is for 1500 Qty
Forecast demand will be for 0 Qty
Actual demand in this case is of 1500 Qty
If we run our Plan 1 line will be created as below
a) 1500 Qty with due date equivalent to Sales Order date
If we see our Total demand is now 1500 Qty
Will comeup with more details in my upcomming posts.
Labels:
2016,
Basics,
Corfu Navision 2016,
Demand,
Development Tips,
Dynamics,
Forecast,
Functional Tips,
How To,
Information,
Inventory,
Manufacturing,
Microsoft,
MPS,
MRP,
MS,
Nav,
Navision,
Tip amp; Tricks
Saturday, 11 June 2016
How Inventory is Calculated in Navision 2016
Today we will see terms used for Inventory and how Inventory is calculated in Navision.
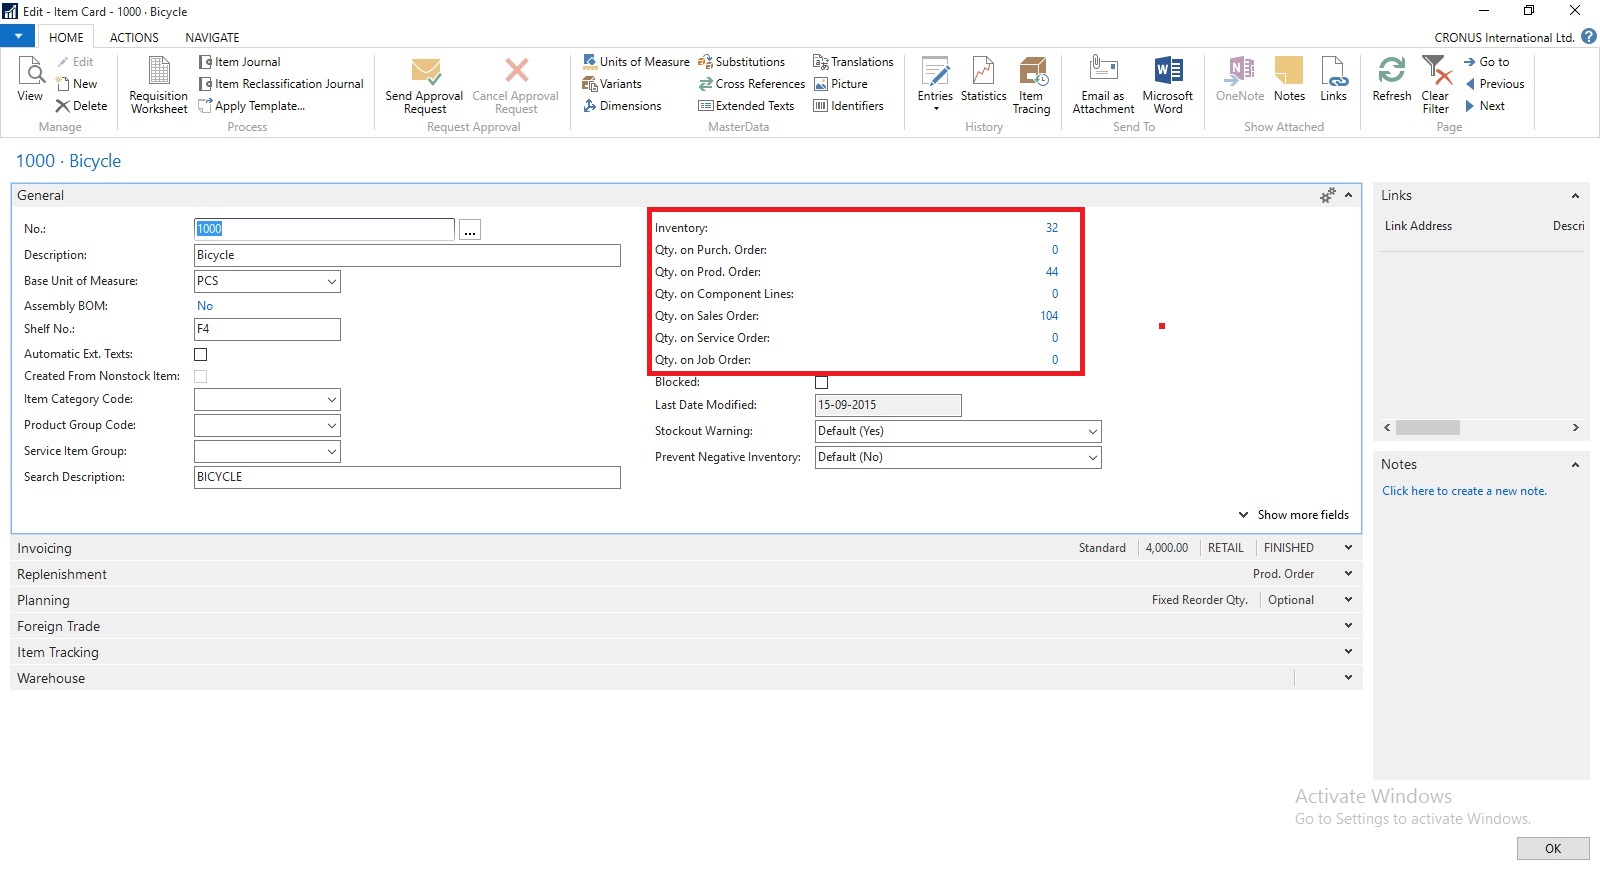
You can find details of Inventory on Item Card itself. Also how much Inventory is available or required at different area in ERP.
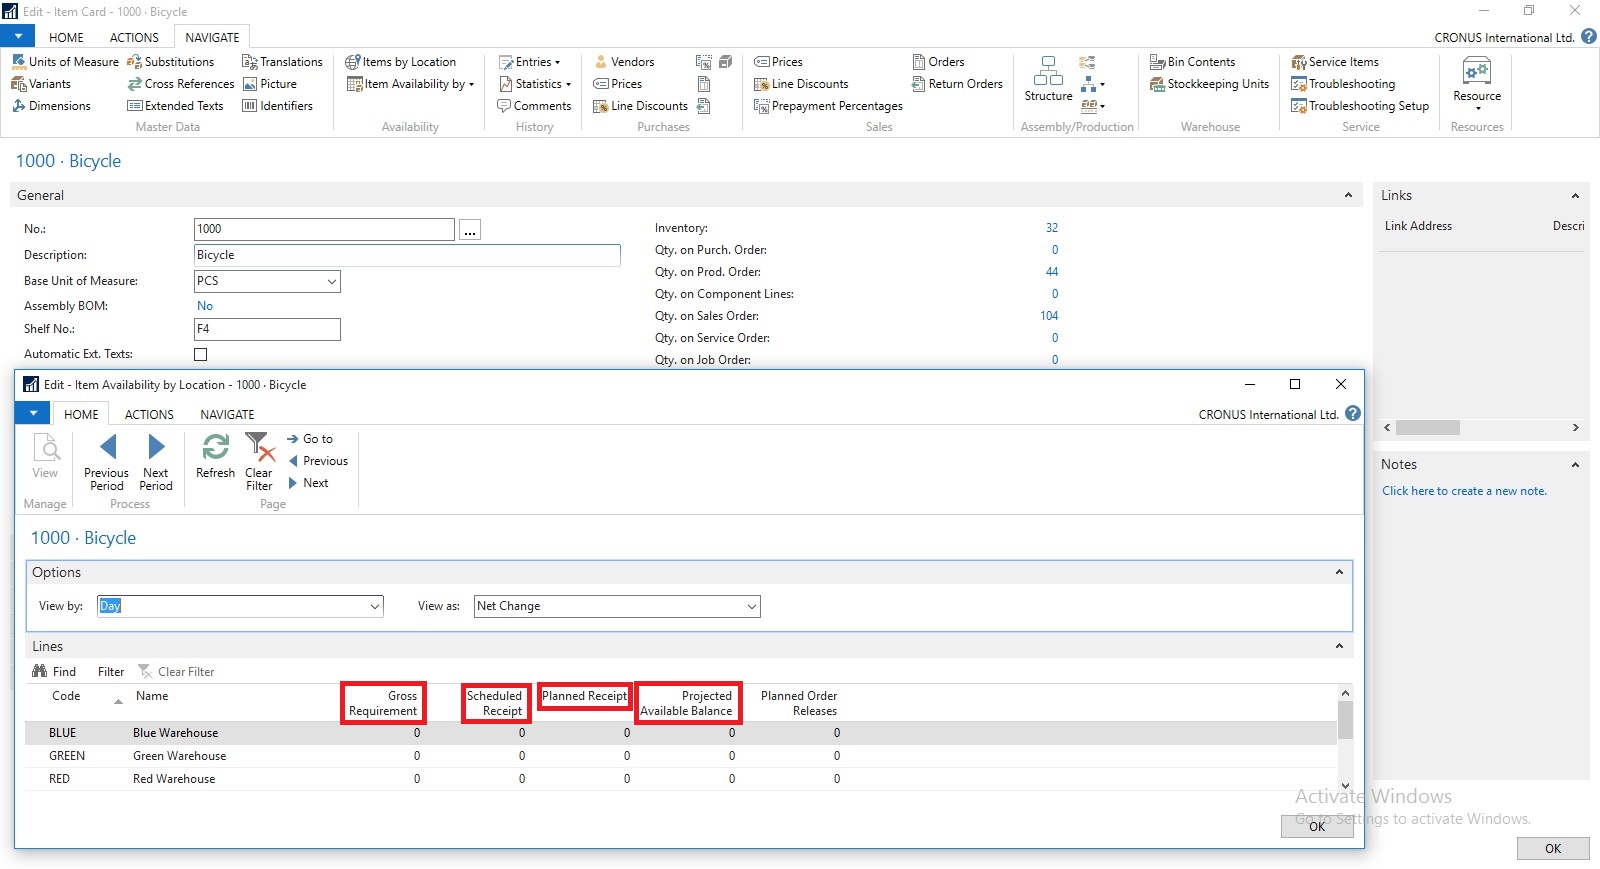
If you open Item Availability by Location you will find in more details. When you drilldown you can find in more details from where these figure comes from.
Scheduled Receipts:
Here all the entries from below area is included:
How Navision calculates?
AvailType::"Scheduled Order Receipt":
BEGIN
InsertEntry(DATABASE::"Purchase Line",Item.FIELDNO("Qty. on Purch. Order"),PurchLine.TABLECAPTION,Item."Qty. on Purch. Order");
InsertEntry(DATABASE::"Prod. Order Line",Item.FIELDNO("FP Order Receipt (Qty.)"),STRSUBSTNO(Text002,ProdOrderLine.TABLECAPTION),Item."FP Order Receipt (Qty.)");
InsertEntry(DATABASE::"Prod. Order Line",Item.FIELDNO("Rel. Order Receipt (Qty.)"),STRSUBSTNO(Text003,ProdOrderLine.TABLECAPTION),Item."Rel. Order Receipt (Qty.)");
InsertEntry(DATABASE::"Transfer Line",Item.FIELDNO("Qty. in Transit"),Item.FIELDCAPTION("Qty. in Transit"),Item."Qty. in Transit");
InsertEntry(DATABASE::"Transfer Line",Item.FIELDNO("Trans. Ord. Receipt (Qty.)"),Item.FIELDCAPTION("Trans. Ord. Receipt (Qty.)"),Item."Trans. Ord. Receipt (Qty.)");
InsertEntry(DATABASE::"Sales Line",0,SalesLine.TABLECAPTION,Item."Qty. on Sales Return");
InsertEntry(DATABASE::"Assembly Header",Item.FIELDNO("Qty. on Assembly Order"),AssemblyHeader.TABLECAPTION,Item."Qty. on Assembly Order");
END;
Planned Receipts:
Here all the entries from below area is included:
How Navision calculates?
AvailType::"Planned Order Receipt":
BEGIN
InsertEntry(DATABASE::"Requisition Line",Item.FIELDNO("Purch. Req. Receipt (Qty.)"),ReqLine.TABLECAPTION,Item."Purch. Req. Receipt (Qty.)");
InsertEntry(DATABASE::"Prod. Order Line",Item.FIELDNO("Planned Order Receipt (Qty.)"),STRSUBSTNO(Text000,ProdOrderLine.TABLECAPTION),Item."Planned Order Receipt (Qty.)");
END;
Gross Requirement:
Here all the entries from below area is included:
How Navision calculates?
AvailType::"Gross Requirement":
BEGIN
InsertEntry(DATABASE::"Sales Line",Item.FIELDNO("Qty. on Sales Order"),SalesLine.TABLECAPTION,Item."Qty. on Sales Order");
InsertEntry(DATABASE::"Service Line",Item.FIELDNO("Qty. on Service Order"),ServLine.TABLECAPTION,Item."Qty. on Service Order");
InsertEntry(DATABASE::"Job Planning Line",Item.FIELDNO("Qty. on Job Order"),JobPlanningLine.TABLECAPTION,Item."Qty. on Job Order");
InsertEntry(DATABASE::"Prod. Order Component",Item.FIELDNO("Scheduled Need (Qty.)"),ProdOrderComp.TABLECAPTION,Item."Scheduled Need (Qty.)");
InsertEntry(DATABASE::"Planning Component",Item.FIELDNO("Planning Issues (Qty.)"),PlanningComponent.TABLECAPTION,Item."Planning Issues (Qty.)");
InsertEntry(DATABASE::"Transfer Line",Item.FIELDNO("Trans. Ord. Shipment (Qty.)"),Item.FIELDCAPTION("Trans. Ord. Shipment (Qty.)"),Item."Trans. Ord. Shipment (Qty.)");
InsertEntry(DATABASE::"Purchase Line",0,PurchLine.TABLECAPTION,Item."Qty. on Purch. Return");
InsertEntry(DATABASE::"Assembly Line",Item.FIELDNO("Qty. on Asm. Component"),AssemblyLine.TABLECAPTION,Item."Qty. on Asm. Component");
END;
Planned Order Releases:
How Navision calculates?
AvailType::"Planned Order Release":
BEGIN
InsertEntry(DATABASE::"Requisition Line",Item.FIELDNO("Purch. Req. Release (Qty.)"),ReqLine.TABLECAPTION,Item."Purch. Req. Release (Qty.)");
InsertEntry(DATABASE::"Prod. Order Line",Item.FIELDNO("Planned Order Release (Qty.)"),STRSUBSTNO(Text001,ProdOrderLine.TABLECAPTION),Item."Planned Order Release (Qty.)");
InsertEntry(DATABASE::"Requisition Line",Item.FIELDNO("Planning Release (Qty.)"),ReqLine.TABLECAPTION,Item."Planning Release (Qty.)");
END;
Finally we can calculate Projected Available Inventory as below formula:
thats all for today, will come with more information in my upcomming posts.

You can find details of Inventory on Item Card itself. Also how much Inventory is available or required at different area in ERP.

If you open Item Availability by Location you will find in more details. When you drilldown you can find in more details from where these figure comes from.
Scheduled Receipts:
Here all the entries from below area is included:
a) Purchase Orders
b) Transfer Orders
c) Firm Planned Production Order
d) Release Production Order
e) Assembly Orders
How Navision calculates?
AvailType::"Scheduled Order Receipt":
BEGIN
InsertEntry(DATABASE::"Purchase Line",Item.FIELDNO("Qty. on Purch. Order"),PurchLine.TABLECAPTION,Item."Qty. on Purch. Order");
InsertEntry(DATABASE::"Prod. Order Line",Item.FIELDNO("FP Order Receipt (Qty.)"),STRSUBSTNO(Text002,ProdOrderLine.TABLECAPTION),Item."FP Order Receipt (Qty.)");
InsertEntry(DATABASE::"Prod. Order Line",Item.FIELDNO("Rel. Order Receipt (Qty.)"),STRSUBSTNO(Text003,ProdOrderLine.TABLECAPTION),Item."Rel. Order Receipt (Qty.)");
InsertEntry(DATABASE::"Transfer Line",Item.FIELDNO("Qty. in Transit"),Item.FIELDCAPTION("Qty. in Transit"),Item."Qty. in Transit");
InsertEntry(DATABASE::"Transfer Line",Item.FIELDNO("Trans. Ord. Receipt (Qty.)"),Item.FIELDCAPTION("Trans. Ord. Receipt (Qty.)"),Item."Trans. Ord. Receipt (Qty.)");
InsertEntry(DATABASE::"Sales Line",0,SalesLine.TABLECAPTION,Item."Qty. on Sales Return");
InsertEntry(DATABASE::"Assembly Header",Item.FIELDNO("Qty. on Assembly Order"),AssemblyHeader.TABLECAPTION,Item."Qty. on Assembly Order");
END;
Planned Receipts:
Here all the entries from below area is included:
a) Planned Production Order
b) Planning Worksheet
c) Requisition Worksheet
How Navision calculates?
AvailType::"Planned Order Receipt":
BEGIN
InsertEntry(DATABASE::"Requisition Line",Item.FIELDNO("Purch. Req. Receipt (Qty.)"),ReqLine.TABLECAPTION,Item."Purch. Req. Receipt (Qty.)");
InsertEntry(DATABASE::"Prod. Order Line",Item.FIELDNO("Planned Order Receipt (Qty.)"),STRSUBSTNO(Text000,ProdOrderLine.TABLECAPTION),Item."Planned Order Receipt (Qty.)");
END;
Gross Requirement:
Here all the entries from below area is included:
a) Sales Order
b) Transfer Order
c) Firm Planned Production Order Components
d) Released Production Order Components
e) Job Planning Lines
f) Service Orders
g) Assembly Orders Components
How Navision calculates?
AvailType::"Gross Requirement":
BEGIN
InsertEntry(DATABASE::"Sales Line",Item.FIELDNO("Qty. on Sales Order"),SalesLine.TABLECAPTION,Item."Qty. on Sales Order");
InsertEntry(DATABASE::"Service Line",Item.FIELDNO("Qty. on Service Order"),ServLine.TABLECAPTION,Item."Qty. on Service Order");
InsertEntry(DATABASE::"Job Planning Line",Item.FIELDNO("Qty. on Job Order"),JobPlanningLine.TABLECAPTION,Item."Qty. on Job Order");
InsertEntry(DATABASE::"Prod. Order Component",Item.FIELDNO("Scheduled Need (Qty.)"),ProdOrderComp.TABLECAPTION,Item."Scheduled Need (Qty.)");
InsertEntry(DATABASE::"Planning Component",Item.FIELDNO("Planning Issues (Qty.)"),PlanningComponent.TABLECAPTION,Item."Planning Issues (Qty.)");
InsertEntry(DATABASE::"Transfer Line",Item.FIELDNO("Trans. Ord. Shipment (Qty.)"),Item.FIELDCAPTION("Trans. Ord. Shipment (Qty.)"),Item."Trans. Ord. Shipment (Qty.)");
InsertEntry(DATABASE::"Purchase Line",0,PurchLine.TABLECAPTION,Item."Qty. on Purch. Return");
InsertEntry(DATABASE::"Assembly Line",Item.FIELDNO("Qty. on Asm. Component"),AssemblyLine.TABLECAPTION,Item."Qty. on Asm. Component");
END;
Planned Order Releases:
How Navision calculates?
AvailType::"Planned Order Release":
BEGIN
InsertEntry(DATABASE::"Requisition Line",Item.FIELDNO("Purch. Req. Release (Qty.)"),ReqLine.TABLECAPTION,Item."Purch. Req. Release (Qty.)");
InsertEntry(DATABASE::"Prod. Order Line",Item.FIELDNO("Planned Order Release (Qty.)"),STRSUBSTNO(Text001,ProdOrderLine.TABLECAPTION),Item."Planned Order Release (Qty.)");
InsertEntry(DATABASE::"Requisition Line",Item.FIELDNO("Planning Release (Qty.)"),ReqLine.TABLECAPTION,Item."Planning Release (Qty.)");
END;
Finally we can calculate Projected Available Inventory as below formula:
Inventory + Scheduled Receipts + Planned Receipts - Gross Requirement
thats all for today, will come with more information in my upcomming posts.
Labels:
2016,
Calculate,
Corfu Navision 2016,
Development Tips,
do,
Dynamics,
How,
How To,
i,
in,
Information,
Inventory,
Microsoft,
MS,
Nav,
Navision,
Tip amp; Tricks
Monday, 6 June 2016
First update of Project "Madeira" is released – June 2016
What does this update includes?
The list of incoming documents is now filtered to show only entries that have not been used to create posted documents with.
When documents are posted, the processed flag is set to Yes, such that incoming documents that have been processed into posted documents are filtered out.
You can choose to view all incoming documents in the list if desired, using the show Show All action.
You can also manually switch the processing flag.
In the top right corner, next to the Settings menu, you will notice the bell symbol that you probably already know well from other Office products: That's the Notifications menu.
Here you will receive notifications such as new mail and calendar reminders directly while working in Project "Madeira".
In Project "Madeira", the Extension Management window lists all available extensions. Some extensions are provided by Microsoft, and other extensions are provided by other companies.
With the first update of Project "Madeira", extensions have been added by other providers, and Madeira refer to the websites that these companies provide for more information.
Sana Commerce is the integrated B2B e-commerce platform for Project "Madeira" that helps wholesale, distribution and manufacturing companies efficiently run their business, improve their customer service and ultimately generate more revenue through easy online order processing and a 24/7 online access of product information. See the Sana Commerce website.
With ChargeLogic Notify, you can automatically deliver customized, targeted emails directly from Project "Madeira" for invoices, orders, shipments, returns, and sales quotes. Clearly provide the exact information you want with the exact look you want to increase customer satisfaction, promote your brand, and drive business. Using a powerful template system and business rules, you'll be able to create personalized content and custom designs in an email format and send them to all parties associated with a communication. See the ChargeLogic website. .
Filter on unprocessed incoming documents
The list of incoming documents is now filtered to show only entries that have not been used to create posted documents with.
When documents are posted, the processed flag is set to Yes, such that incoming documents that have been processed into posted documents are filtered out.
You can choose to view all incoming documents in the list if desired, using the show Show All action.
You can also manually switch the processing flag.
Office Suite notifications are now enabled in Project "Madeira"
In the top right corner, next to the Settings menu, you will notice the bell symbol that you probably already know well from other Office products: That's the Notifications menu.
Here you will receive notifications such as new mail and calendar reminders directly while working in Project "Madeira".
New extensions, such as Sana Commerce for Project "Madeira" and ChargeLogic Payments that provides payment and credit card processing capabilities.
In Project "Madeira", the Extension Management window lists all available extensions. Some extensions are provided by Microsoft, and other extensions are provided by other companies.
With the first update of Project "Madeira", extensions have been added by other providers, and Madeira refer to the websites that these companies provide for more information.
Sana Commerce is the integrated B2B e-commerce platform for Project "Madeira" that helps wholesale, distribution and manufacturing companies efficiently run their business, improve their customer service and ultimately generate more revenue through easy online order processing and a 24/7 online access of product information. See the Sana Commerce website.
With ChargeLogic Notify, you can automatically deliver customized, targeted emails directly from Project "Madeira" for invoices, orders, shipments, returns, and sales quotes. Clearly provide the exact information you want with the exact look you want to increase customer satisfaction, promote your brand, and drive business. Using a powerful template system and business rules, you'll be able to create personalized content and custom designs in an email format and send them to all parties associated with a communication. See the ChargeLogic website. .
For further details checkout Link and this Link.
Friday, 3 June 2016
Cumulative Update 8 for Microsoft Dynamics NAV 2016 released in June 2016
Cumulative Update 8 includes all application and platform hotfixes and regulatory features that have been released for Microsoft Dynamics NAV 2016.
You can download the cumulative update from KB 3166287 – Cumulative Update 8 for Microsoft Dynamics NAV 2016 (Build 46045).
Before you install a cumulative update in a production environment, take the following precautions:
For information about how to install the cumulative update, see How to Install a Microsoft Dynamics NAV 2016 Cumulative Update.
For a list of all cumulative updates for this version, see Released Cumulative Updates for Microsoft Dynamics NAV 2016.
Where to find Cumulative Update 8
You can download the cumulative update from KB 3166287 – Cumulative Update 8 for Microsoft Dynamics NAV 2016 (Build 46045).
Warning
Before you install a cumulative update in a production environment, take the following precautions:
- Test the cumulative update in a non-production environment.
- Make a backup of the system or computer where the cumulative update is to be installed.
Additional Information
For information about how to install the cumulative update, see How to Install a Microsoft Dynamics NAV 2016 Cumulative Update.
For a list of all cumulative updates for this version, see Released Cumulative Updates for Microsoft Dynamics NAV 2016.
Labels:
2016,
Cumulative,
Cumulative Updates,
Dynamics,
Microsoft,
MS,
Nav,
Navision,
Tip amp; Tricks,
Updates
Cumulative Update 20 for Microsoft Dynamics NAV 2015 released in June 2016
Cumulative Update 20 includes all application and platform hotfixes and regulatory features that have been released for Microsoft Dynamics NAV 2015.
You can download the cumulative update from KB 3166286 – Cumulative Update 20 for Microsoft Dynamics NAV 2015 (Build 46054).
Before you install a cumulative update in a production environment, take the following precautions:
For information about how to install the cumulative update, see How to Install a Microsoft Dynamics NAV 2015 Cumulative Update.
For information about how to work around a recent process change, see How to Get Back the ‘Hotfix Directories’ from NAV 2015 Cumulative Update 1.
For a list of all cumulative updates for this version, see Released Cumulative Updates for Microsoft Dynamics NAV 2015.
Where to find Cumulative Update 20
You can download the cumulative update from KB 3166286 – Cumulative Update 20 for Microsoft Dynamics NAV 2015 (Build 46054).
Warning
Before you install a cumulative update in a production environment, take the following precautions:
- Test the cumulative update in a non-production environment.
- Make a backup of the system or computer where the cumulative update is to be installed.
Additional Information
For information about how to install the cumulative update, see How to Install a Microsoft Dynamics NAV 2015 Cumulative Update.
For information about how to work around a recent process change, see How to Get Back the ‘Hotfix Directories’ from NAV 2015 Cumulative Update 1.
For a list of all cumulative updates for this version, see Released Cumulative Updates for Microsoft Dynamics NAV 2015.
Labels:
2015,
Cumulative,
Cumulative Updates,
Dynamics,
Microsoft,
MS,
Nav,
Navision,
Tip amp; Tricks,
Updates
Cumulative Update 32 for Microsoft Dynamics NAV 2013 R2 released in June 2016
Cumulative Update 32 includes all application and platform hotfixes and regulatory features that have been released for Microsoft Dynamics NAV 2013 R2.
You can download the cumulative update from KB 3166278 – Cumulative Update 32 for Microsoft Dynamics NAV 2013 R2 (Build 46057).
Before you install a cumulative update in a production environment, take the following precautions:
For more information about cumulative updates for this version, see Announcement of update rollups for Microsoft Dynamics NAV 2013 R2.
For a list of all cumulative updates for this version, see Released Cumulative Updates for Microsoft Dynamics NAV 2013 R2.
For a list of all hotfixes included in cumulative updates for this version, see the following CustomerSource and PartnerSource pages:
CustomerSource:
PartnerSource
Where to find Cumulative Update 32
You can download the cumulative update from KB 3166278 – Cumulative Update 32 for Microsoft Dynamics NAV 2013 R2 (Build 46057).
Warning
Before you install a cumulative update in a production environment, take the following precautions:
- Test the cumulative update in a non-production environment.
- Make a backup of the system or computer where the cumulative update is to be installed.
Additional Information
For more information about cumulative updates for this version, see Announcement of update rollups for Microsoft Dynamics NAV 2013 R2.
For a list of all cumulative updates for this version, see Released Cumulative Updates for Microsoft Dynamics NAV 2013 R2.
For a list of all hotfixes included in cumulative updates for this version, see the following CustomerSource and PartnerSource pages:
CustomerSource:
- Overview of Released Application Hotfixes for Microsoft Dynamics NAV 2013 R2
- Overview of Released Platform Hotfixes for Microsoft Dynamics NAV 2013 R2
PartnerSource
Cumulative Update 39 for Microsoft Dynamics NAV 2013 released in June 2016
Cumulative Update 39 includes all application and platform hotfixes and regulatory features that have been released for Microsoft Dynamics NAV 2013.
You can download the cumulative update from KB 3166277 – Cumulative Update 39 for Microsoft Dynamics NAV 2013 (Build 46056).
Before you install a cumulative update in a production environment, take the following precautions:
For a list of all cumulative updates for this version, see Released Cumulative Updates for Microsoft Dynamics NAV 2013.
For a list of all hotfixes included in cumulative updates for this version, see the following CustomerSource and PartnerSource pages:
CustomerSource:
PartnerSource:
Where to find Cumulative Update 39
You can download the cumulative update from KB 3166277 – Cumulative Update 39 for Microsoft Dynamics NAV 2013 (Build 46056).
Warning
Before you install a cumulative update in a production environment, take the following precautions:
- Test the cumulative update in a non-production environment.
- Make a backup of the system or computer where the cumulative update is to be installed.
Additional Information
For a list of all cumulative updates for this version, see Released Cumulative Updates for Microsoft Dynamics NAV 2013.
For a list of all hotfixes included in cumulative updates for this version, see the following CustomerSource and PartnerSource pages:
CustomerSource:
- Overview of Released Application Hotfixes for Microsoft Dynamics NAV 2013
- Overview of Released Platform Hotfixes for Microsoft Dynamics NAV 2013
PartnerSource:
- Overview of Released Application Hotfixes for Microsoft Dynamics NAV 2013
- Overview of Released Platform Hotfixes for Microsoft Dynamics NAV 2013
Labels:
2013,
Cumulative,
Cumulative Updates,
Dynamics,
Microsoft,
MS,
Nav,
Navision,
Tip amp; Tricks,
Updates
Subscribe to:
Comments (Atom)