Showing posts with label Sales. Show all posts

Sunday, 19 June 2016

Create Production Orders for/from Sales Order

One of my reader have requested to demonstrate how he can create Sales Order which is directly associated with Sales Order.

Let us start with creating a Sales Order:
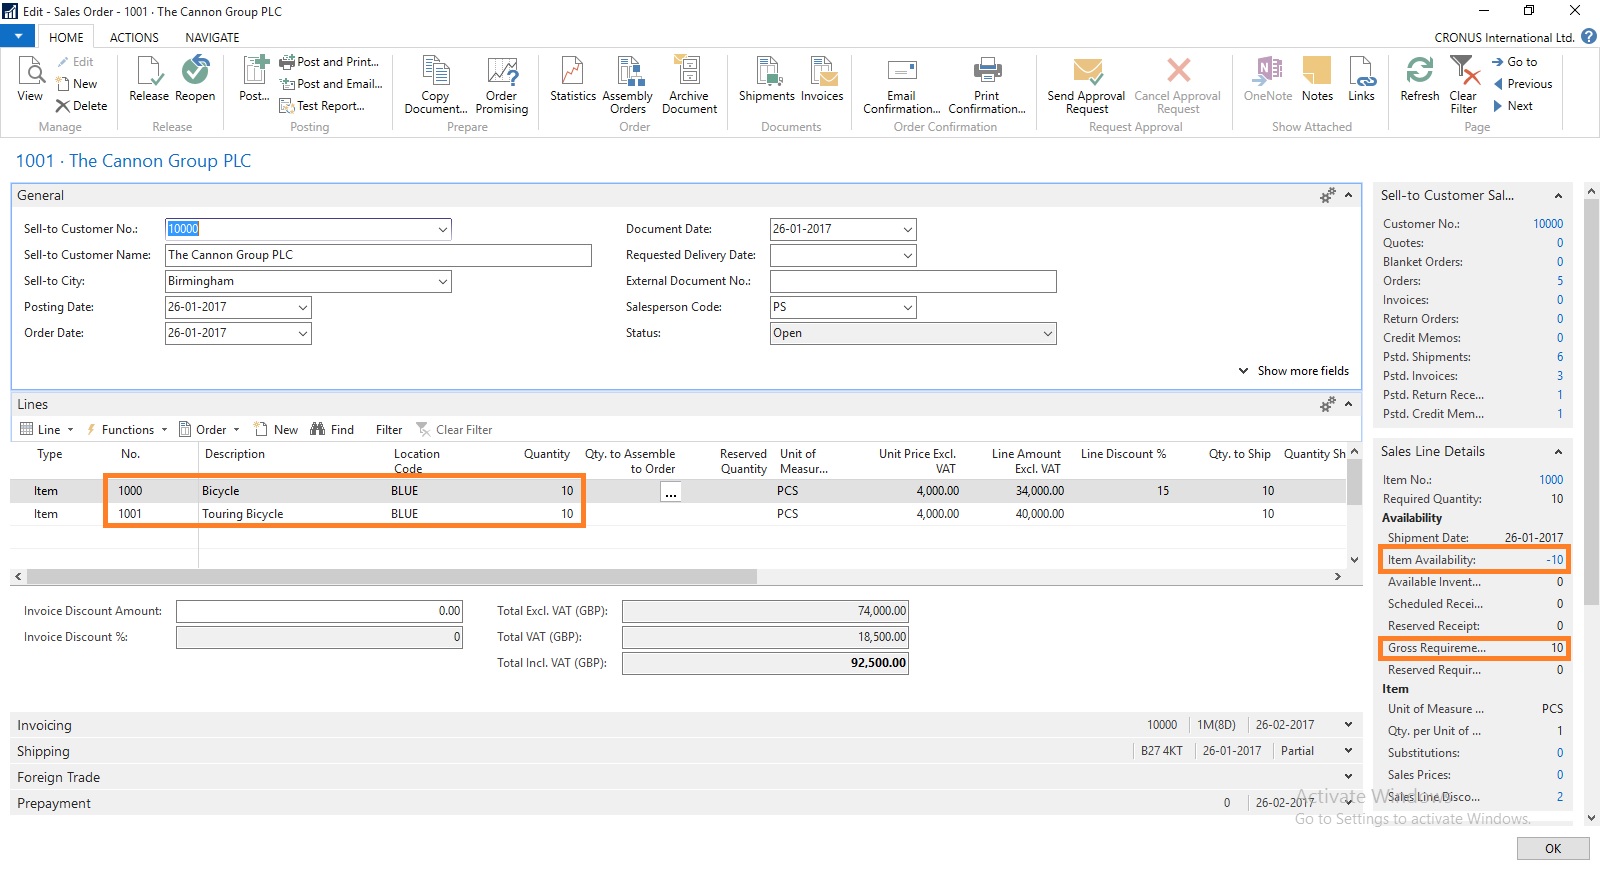
ProdOrder-1

Here you can see we don’t have Available Inventory to fulfil the demand of this Order.
ProdOrder-2

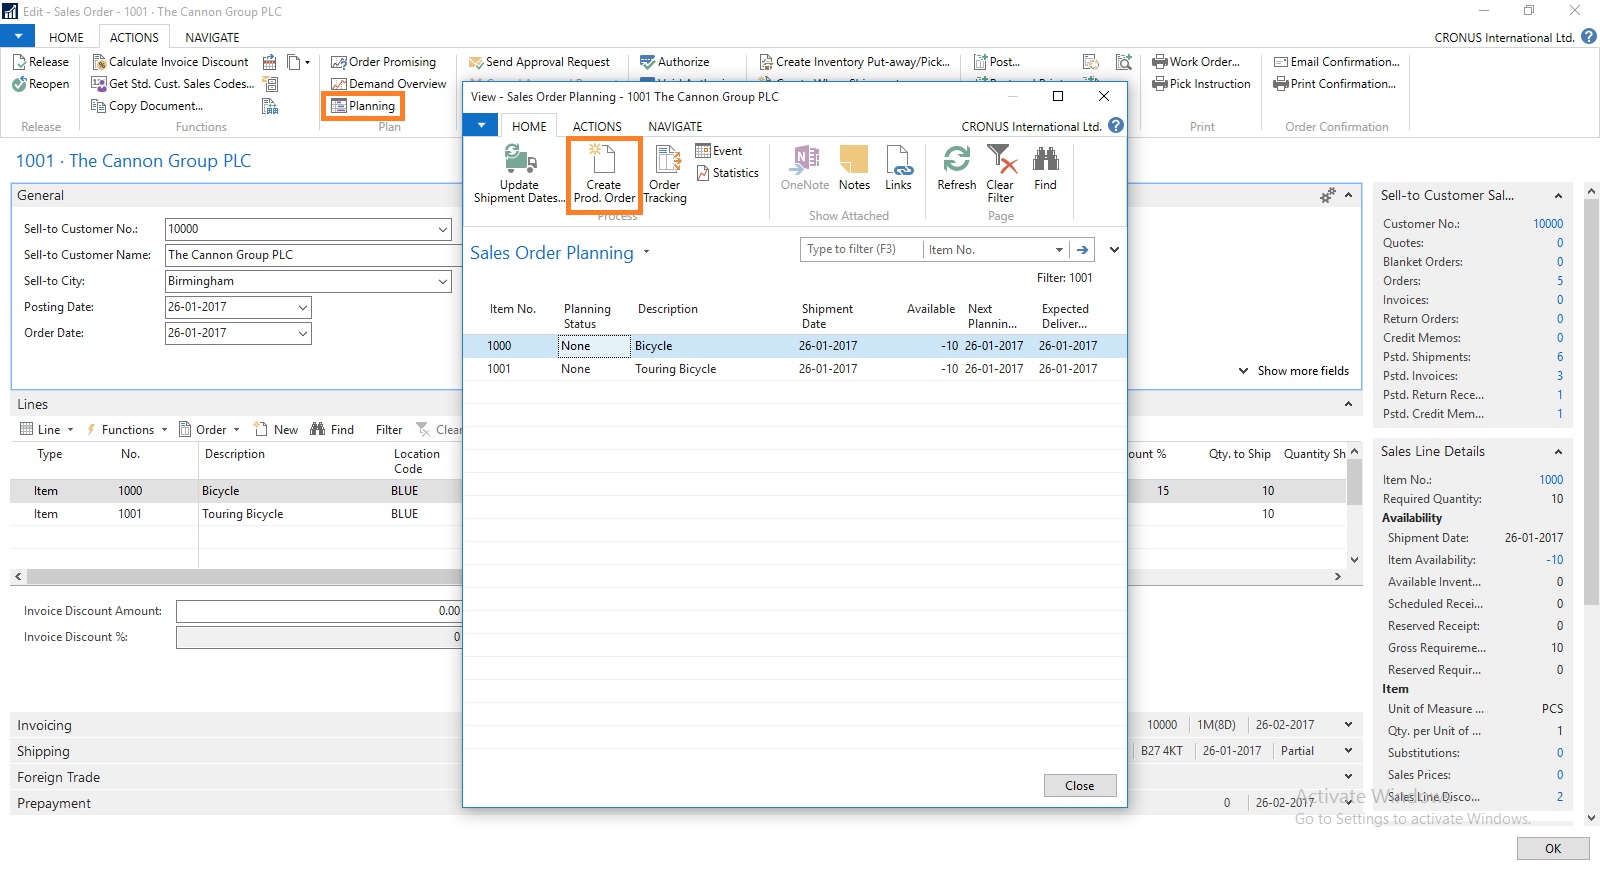
To fulfil the demand we will create Production Order for this Order.

Select Planning from Action TAB on Ribbon.

Sales Order Planning Window Opens, Select Create Production Order.
ProdOrder-3

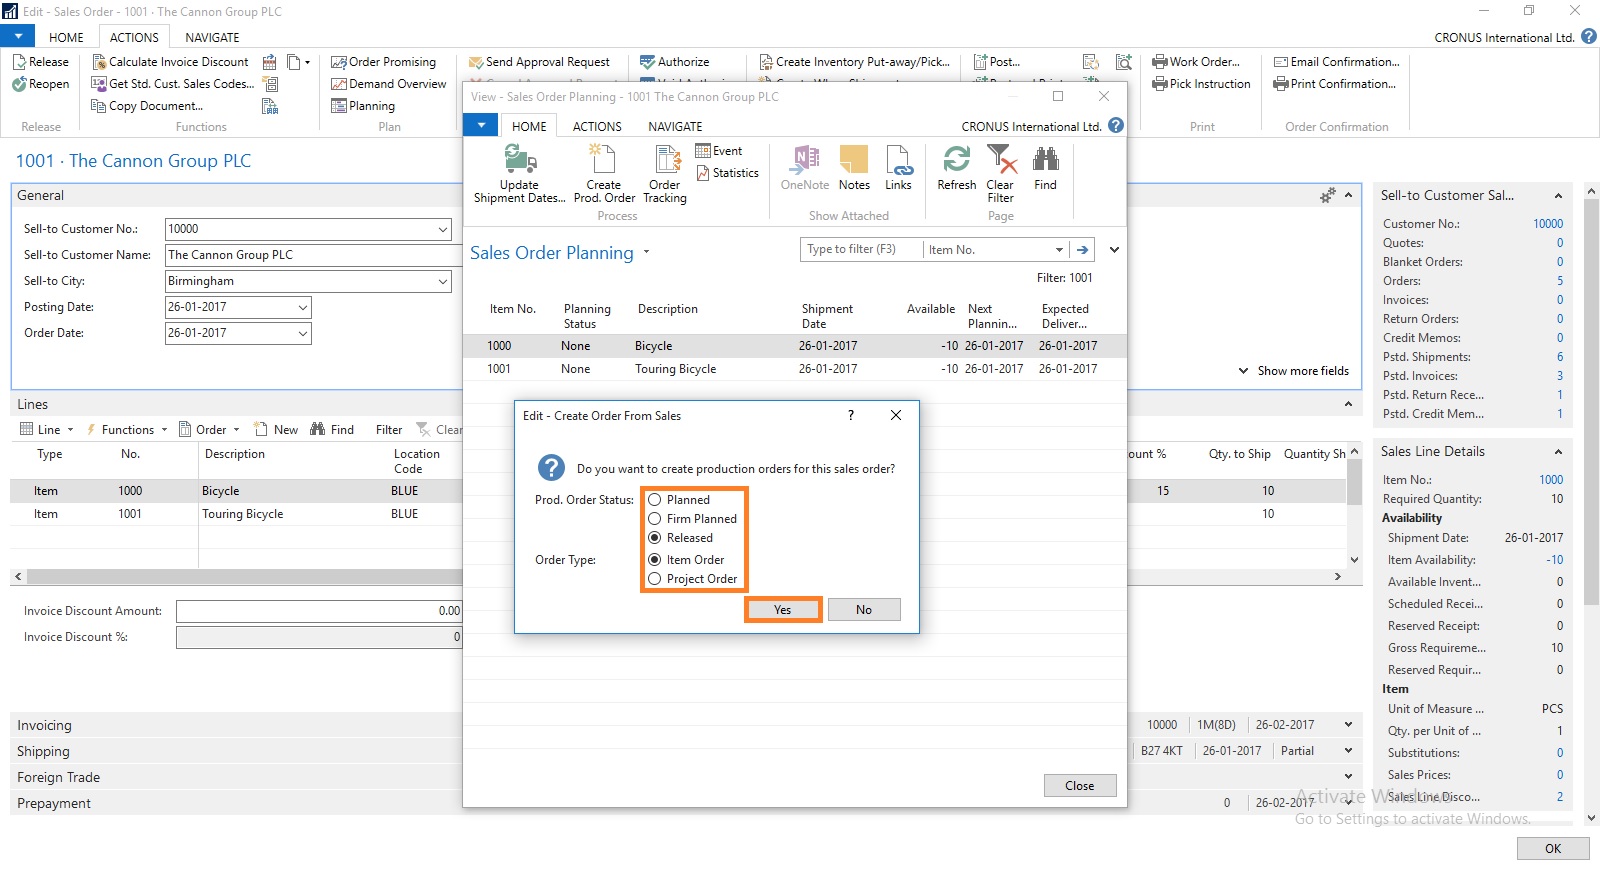
Select the Status for Production Order as desired.

For Order Type you have 2 Options

  1. Item Order – Production Order is created for each Item on Lines

  2. Project Order – Single Production order for Entire Order


Select the desired option and respond to Yes.

ProdOrder-4

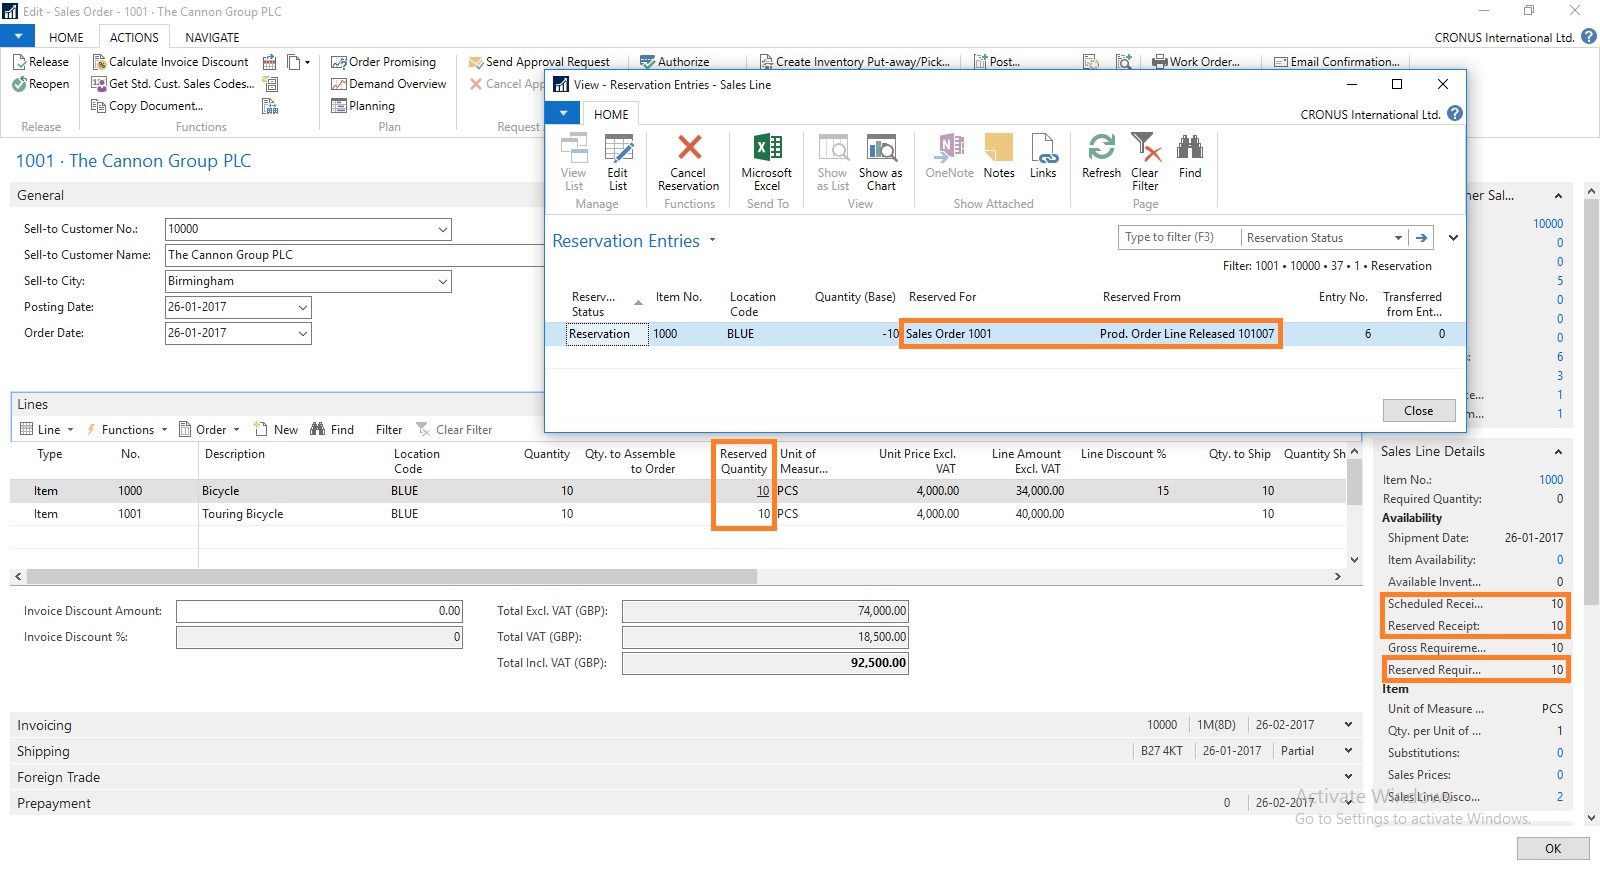
I have Selected Released & Project Order in my case.
ProdOrder-5

You can check that Quantity to be produced is reserved for this Order.

There could be the situation where you may have few Inventory available, in that case you need to reserve the quantity from Function before creating Production Order else all quantity will be created. In other case only short quantity will be a quantity of Production Order.

ProdOrder-6

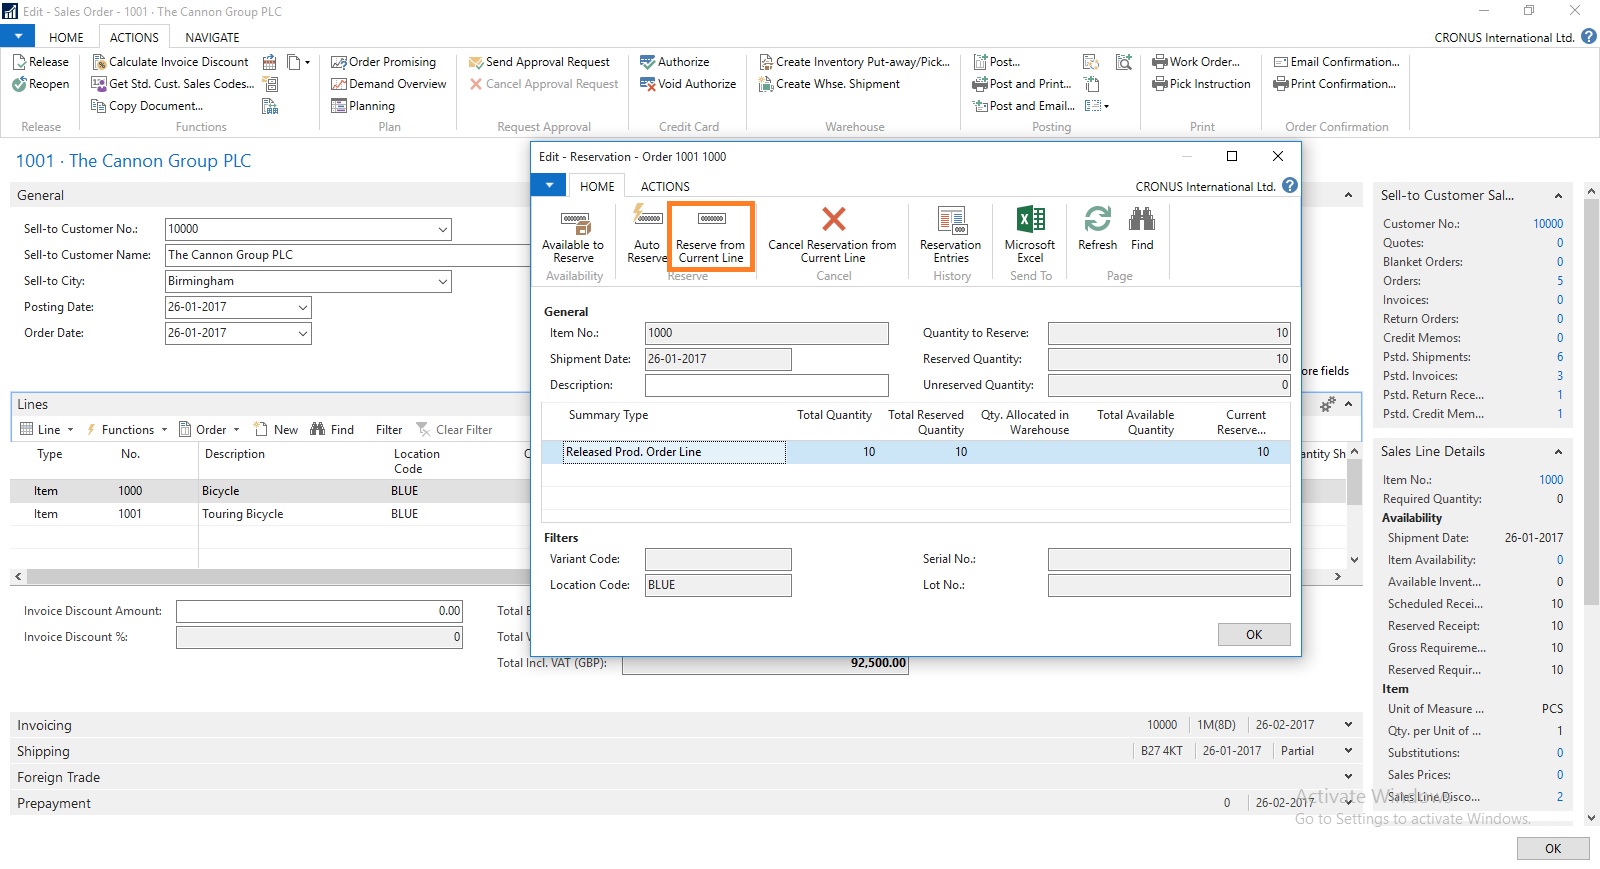
Select the line from available lines in Item Ledger Entries (e.g. on hand inventory) and by using the ‘Reserve from Current Line’ function you can reserve those against the sales order line.  The ‘Reserved Quantity’ then gets updated and you can see the rest in the ‘Unreserved Quantity’ field.
ProdOrder-7

Although in this case entire line is already reserved from the Production Order.

But in case you want to reserve from any available Inventory in hand from Ledger entry.

This was one of the way how you can perform Creating Production Order and Reserving for Sales Order.

We can do the same by another way as below, directly creating Production Order for this Sales Order.
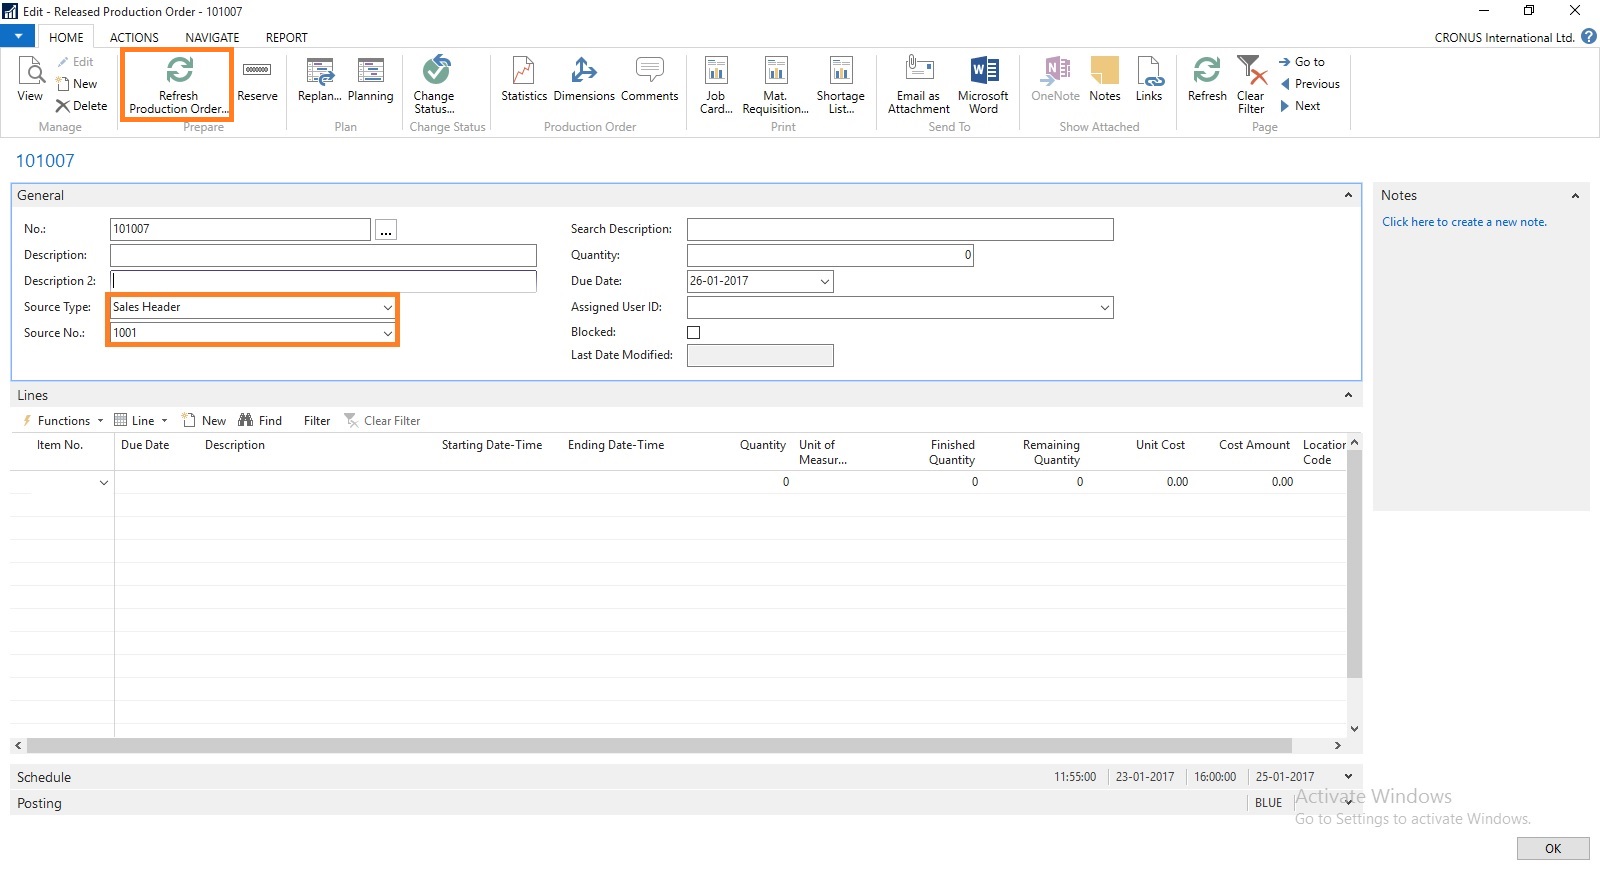
ProdOrder-8

Create a Production Order Select Source Type as Sales Header and Source No as Sales Order No.

Then Refresh the Production Order.

ProdOrder-9


ProdOrder-10


This way we can create and Reserve the Item for required demand.

I will come with more details in my upcoming posts.


Saturday, 28 May 2016

How do I process Sales Return? – In Maderia

We have seen in our previous post the feature where if a posted sales invoice has not yet been paid, then you can use the Correct or Cancel functions on the posted sales invoice to automatically reverse the involved transactions.

There could be the situation where customer wants partial refund or return of sales.

You can create the Credit Memo from the Posted Sales Invoice, which will create the Credit Memo for you and leave to you to modify and post the credit memo.

Most fields on the sales credit memo header are filled with the information from the posted sales invoice. You can edit all the fields, with new information that reflects the return agreement.

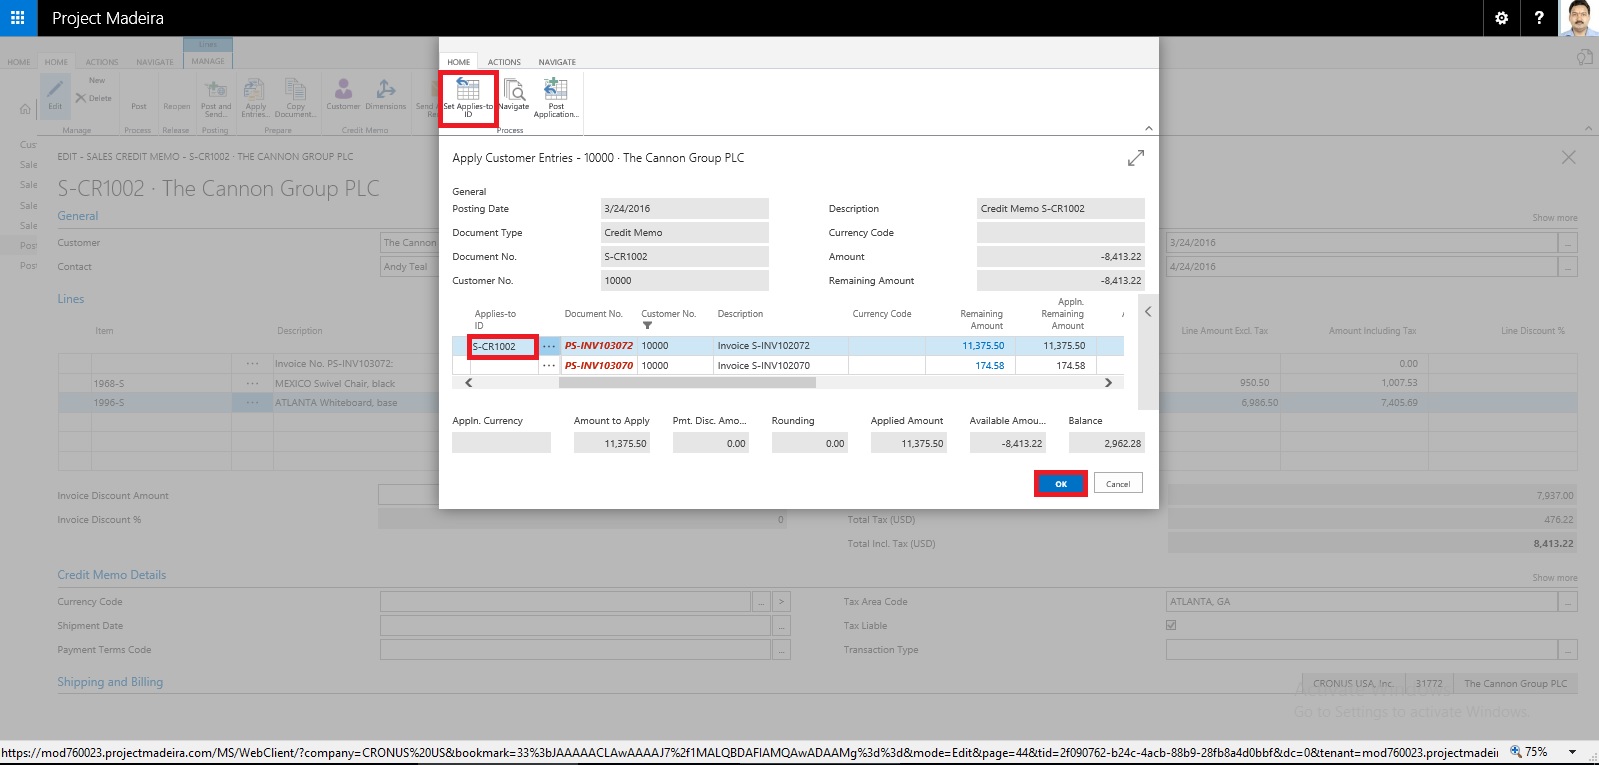
You can apply the Customer Entries via selecting the line with the posted sales document that you want to apply the sales credit memo to.

The posted sales documents that you applied the credit memo to are now reversed, and a refund payment can be created for the customer.

The sales credit memo is removed and replaced with a new document in the list of posted sales credit memos.

Let us see how we can achieve this in Madeira.


CorrectCancelSalesInvoice-12

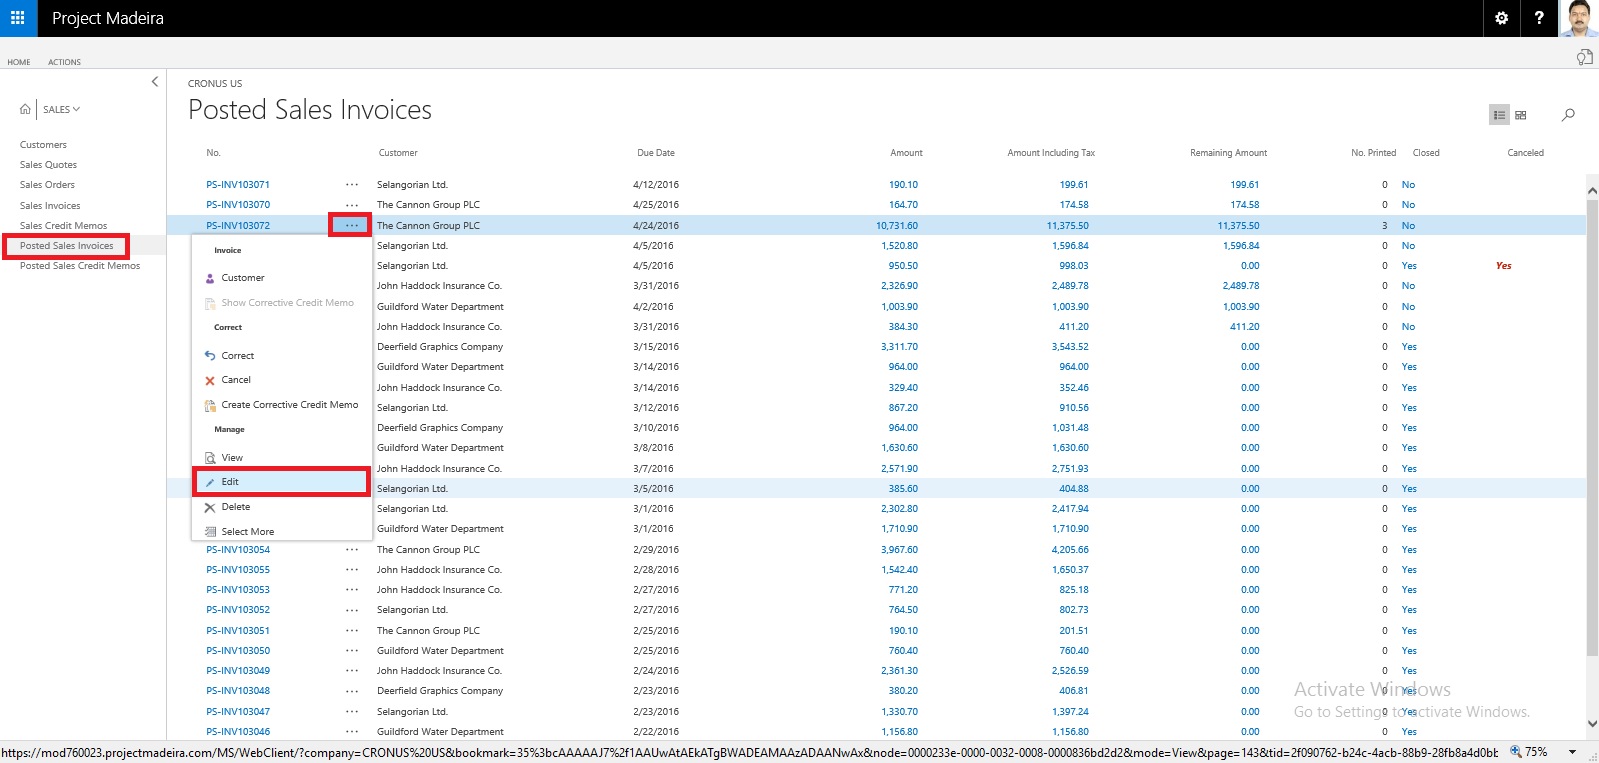
Select the Sales Invoice and open it for action.

CorrectCancelSalesInvoice-13

Select Create Corrective Credit Memo.

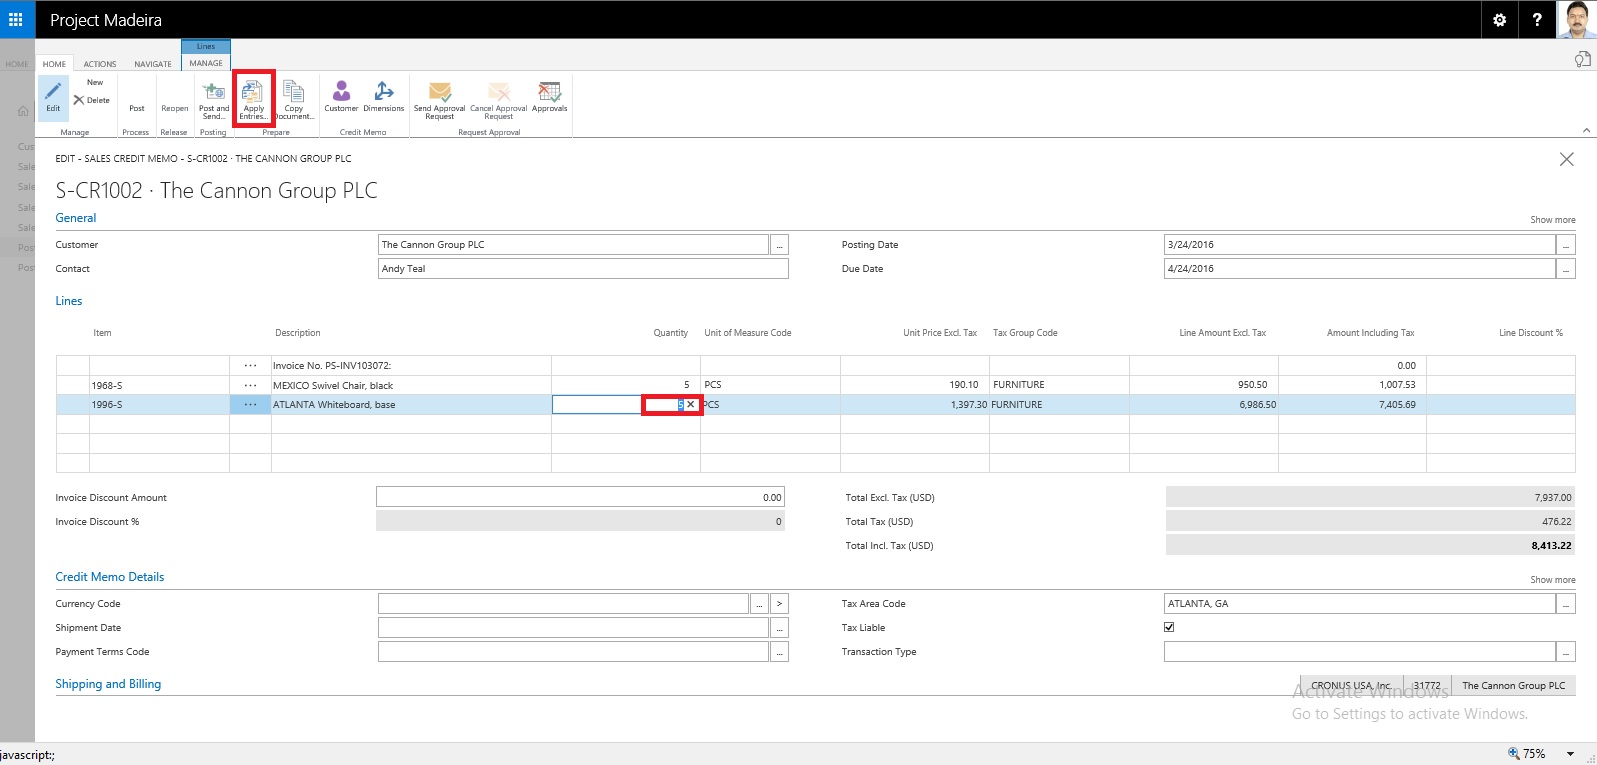
CorrectCancelSalesInvoice-14

Perform the required correction and choose Apply Entries.

CorrectCancelSalesInvoice-15

Select the document to which you want this Credit Memo to be adjusted.

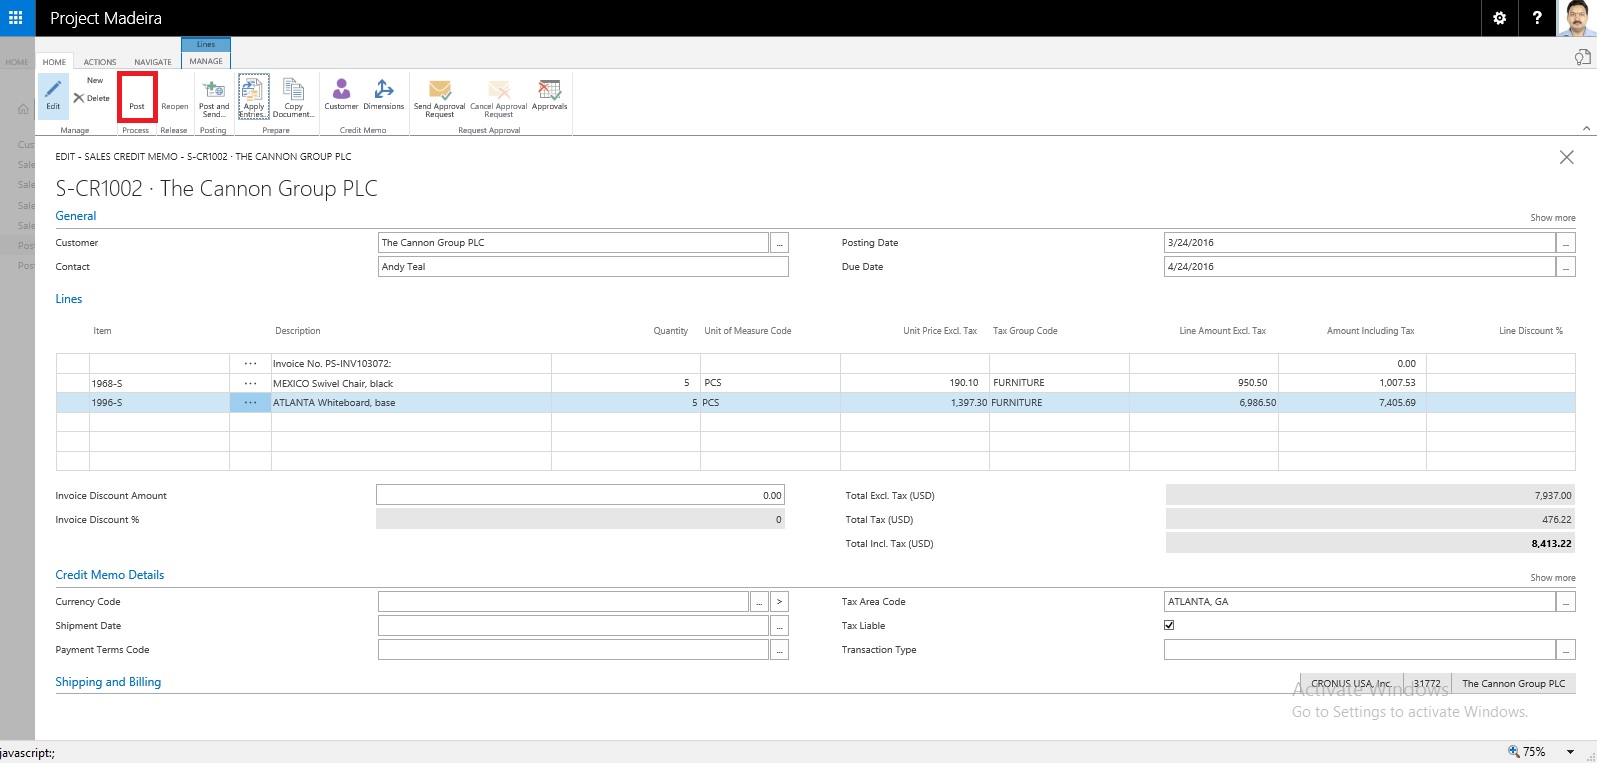
CorrectCancelSalesInvoice-16

Once Application is done, Post the Credit Memo.

Respond to Yes to post the Credit Memo.

Respond to Yes to Open the posted Credit Memo.

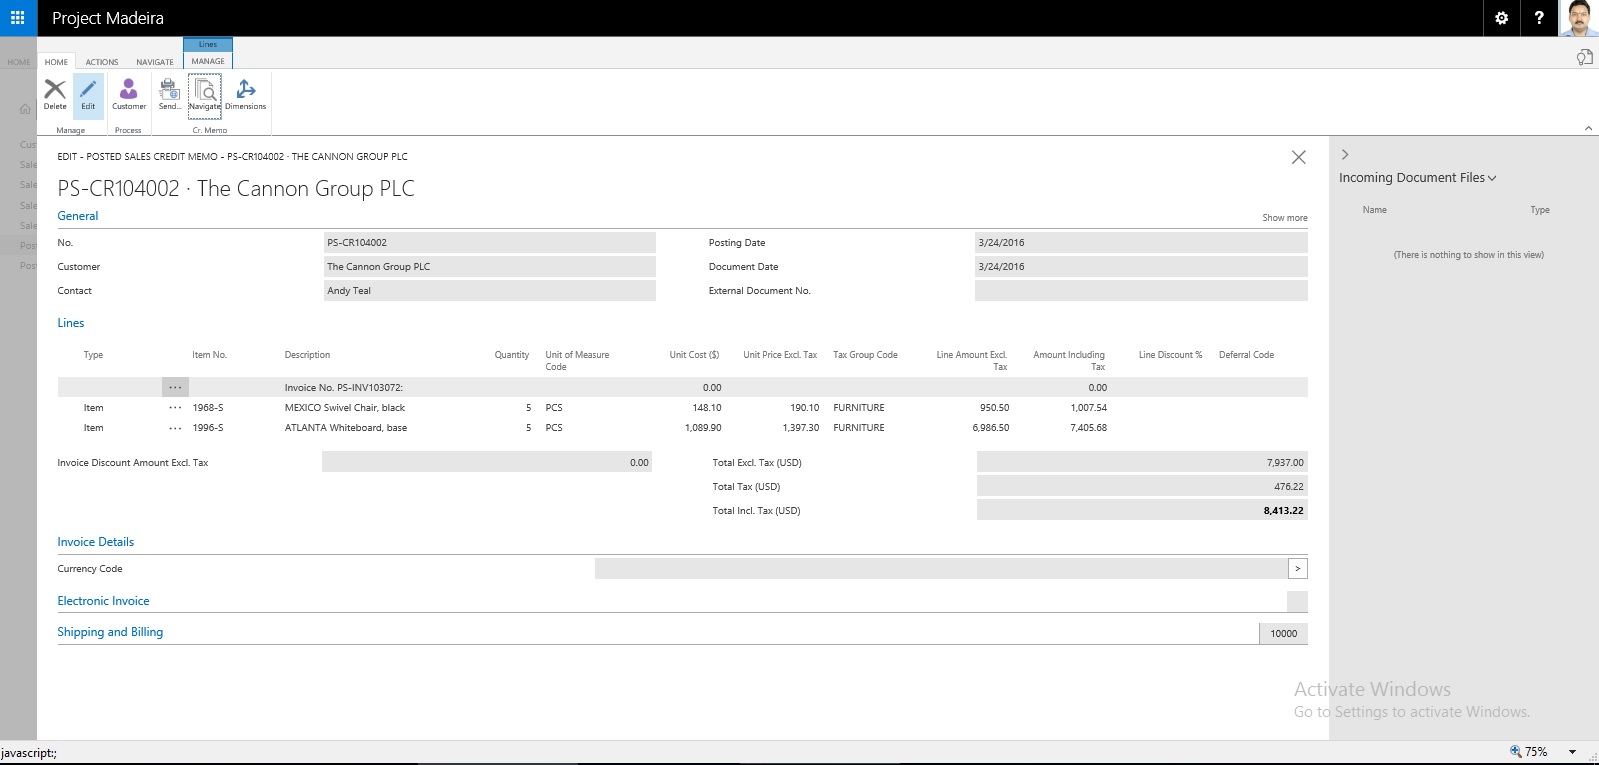
CorrectCancelSalesInvoice-17

This is the posted Credit Memo for the Invoice.

Let us check the Ledger for this Customer:

CorrectCancelSalesInvoice-18

Here you can see the net effect of the Credit Memo on Invoice.

Thats all for this post will come up with more features and details in my upcomming posts.


Correct or Cancel Unpaid Sales Invoices – in Madeira

Sometimes Invoices are posted in mistake or customer demands changes in invoice after posting.

Once the payment is initiated, partially or fully paid correction or cancellation is not allowed from Posted Sales Invoice itself. In such case you need to follow traditional way of doing so by passing Sales Credit Memo to Cancel the Sale and reimburse to customer manually.


What happens when you select Correct Action?

The Posted Invoice for which you say correct that invoice gets cancelled and new Sales Invoice with same information is created.

Naturally to maintain the integrity of data new Sales Invoice is created with new Document No.

A Sales Credit Memo for previous Invoice is created to void the effect of initial posted Sales Invoice.

The Canceled and Paid is marked on initial posted Sales Invoice document.


What happens when you select Cancel Action?

The Posted Invoice for which you say correct that invoice gets cancelled.

A Sales Credit Memo for previous Invoice is created to void the effect of initial posted Sales Invoice.

The Canceled and Paid is marked on initial posted Sales Invoice document.


Important Points:-

If the Canceled check box is selected, then you cannot correct or cancel the posted sales invoice because it has already been corrected or canceled.

Once the payment is initiated, partially or fully paid correction or cancellation is not allowed from Posted Sales Invoice itself.


Let us see how it works in Madeira:-

Login with your credentials to Madeira project.


CorrectCancelSalesInvoice-1

From the Navigation Bar choose Sales.
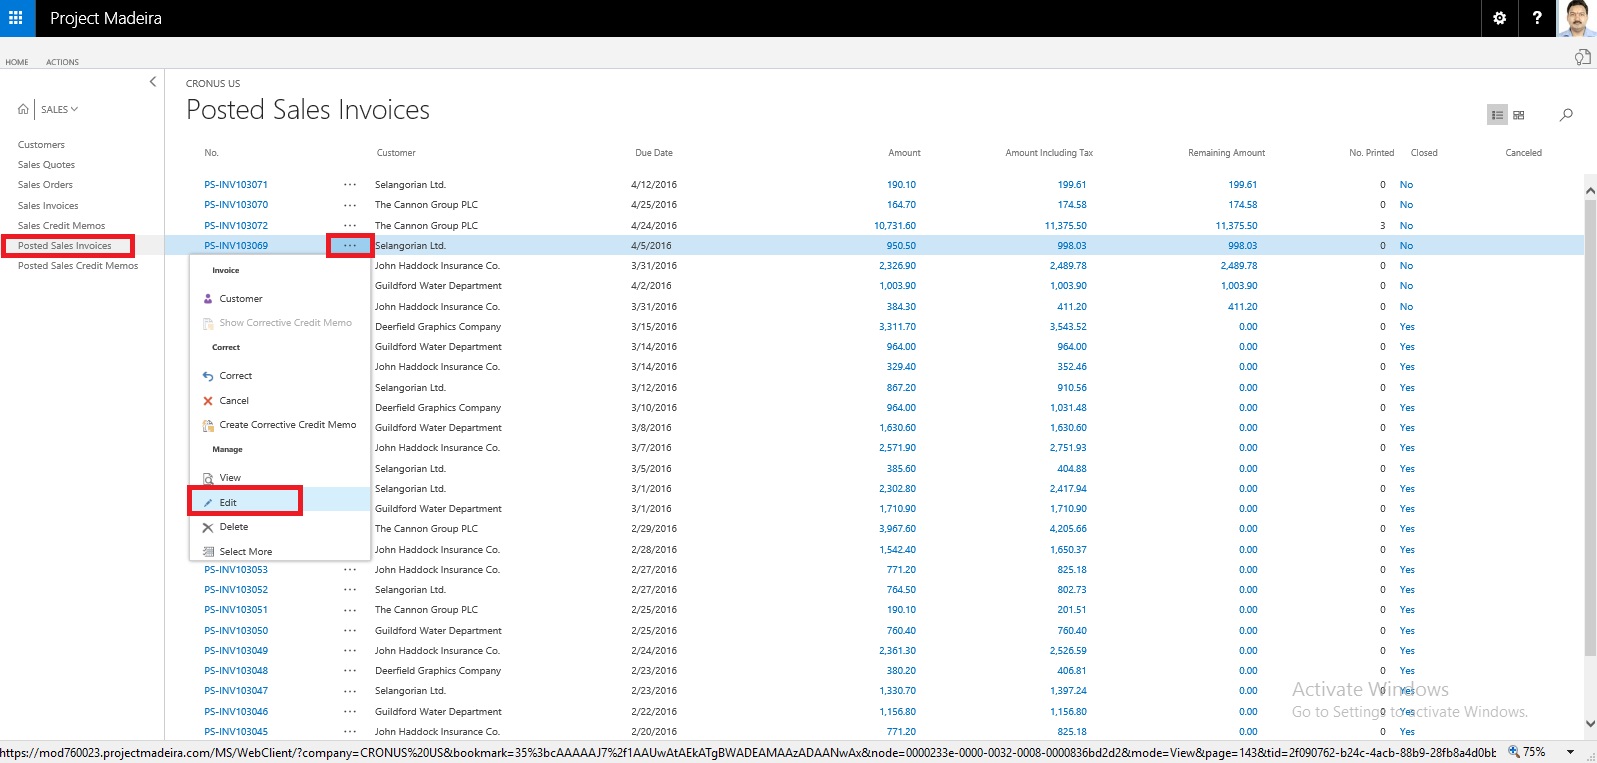
CorrectCancelSalesInvoice-2

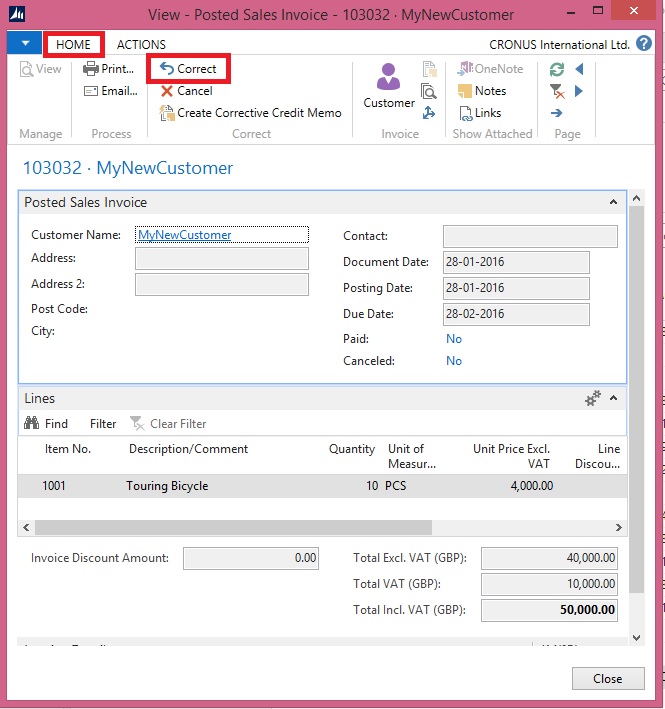
Select Posted Sales Invoice. And choose to open the posted Sales Invoice.
CorrectCancelSalesInvoice-3

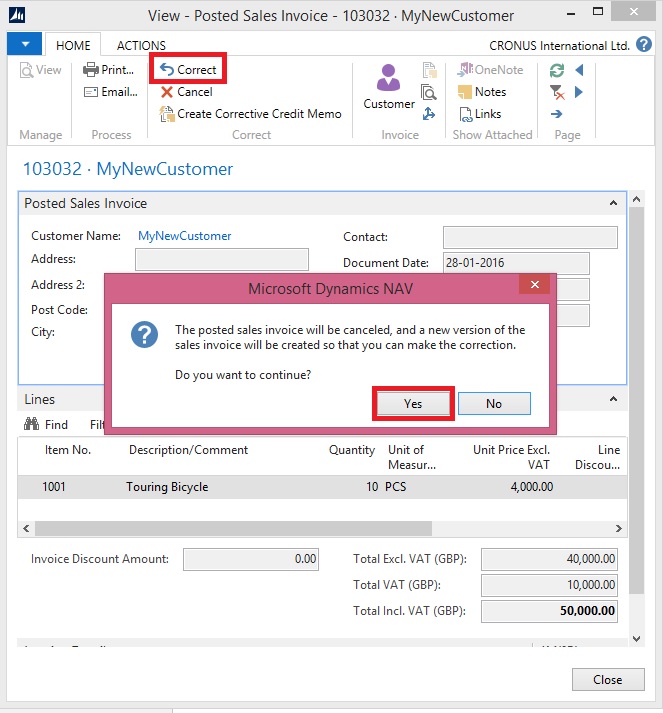
Select Correct to Modify the Invoice.

CorrectCancelSalesInvoice-4

Select Yes to continue with the process.

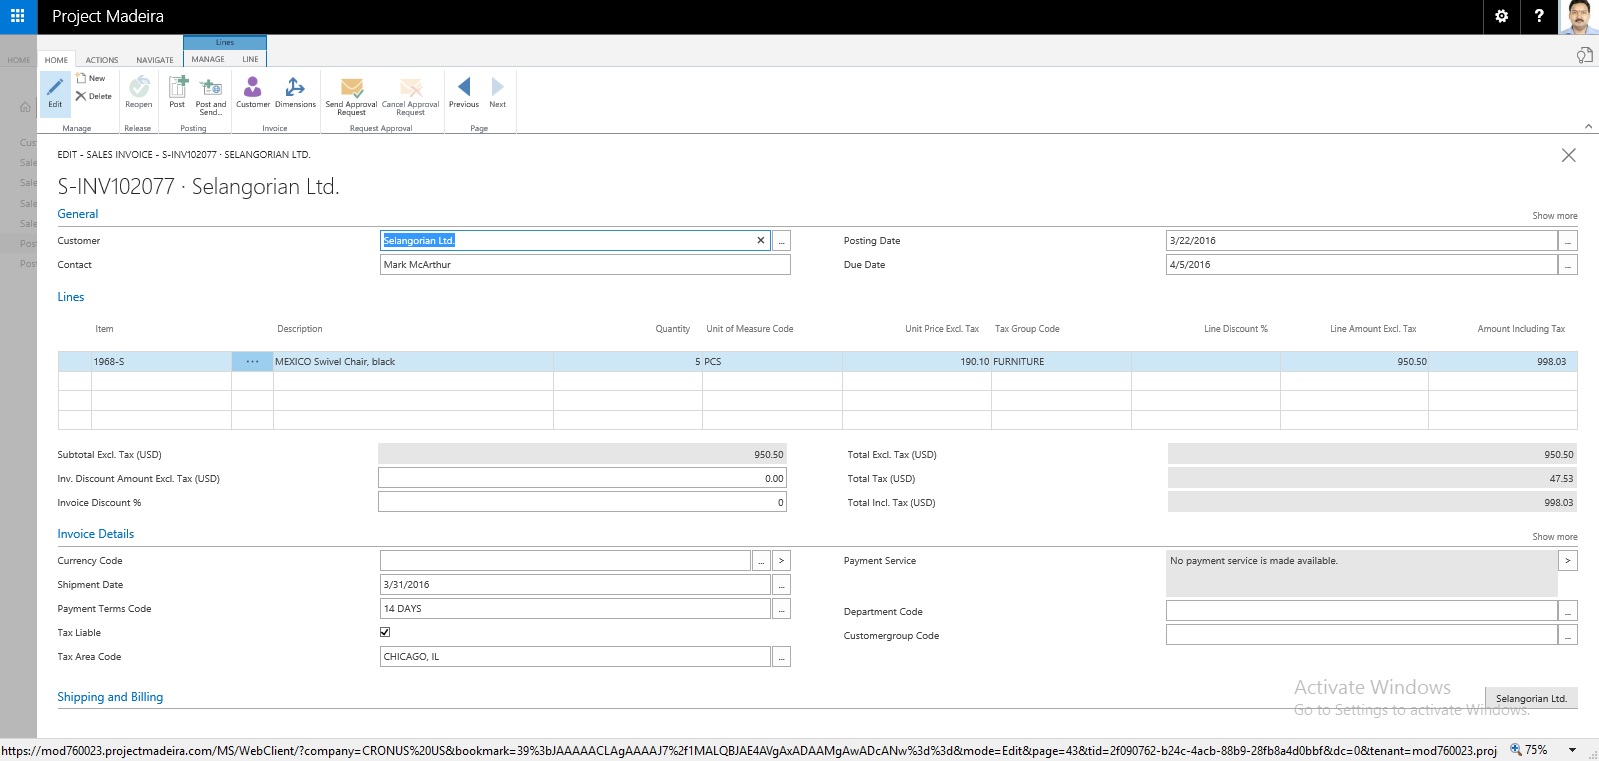
CorrectCancelSalesInvoice-5

Make the required modification to the Invoice and post it.

CorrectCancelSalesInvoice-6

Select Yes to continue with posting.

CorrectCancelSalesInvoice-7

Select Yes to continue.

CorrectCancelSalesInvoice-8

This is new modified Invoice that got posted.

Let us move to the original Invoice which we corrected.

CorrectCancelSalesInvoice-9

Select Show Corrective Credit Memo.

CorrectCancelSalesInvoice-10

This is the Credit Memo posted against the Invoice which we corrected.

CorrectCancelSalesInvoice-11

You can see the Closed and Canceled is Marked to TRUE.


Saturday, 30 April 2016

Assisted Setup (Sales Tax) – in Madeira

Today we will see how Sales Tax setup is done in Madeira. Since preview is limited to US so many of the information may not apply or some different options will be available for other countries. 

Whatsoever may be in final release we will see at that time when finally it will be released. Lets look what is available in this preview.

Login to Madeira using your credentials.

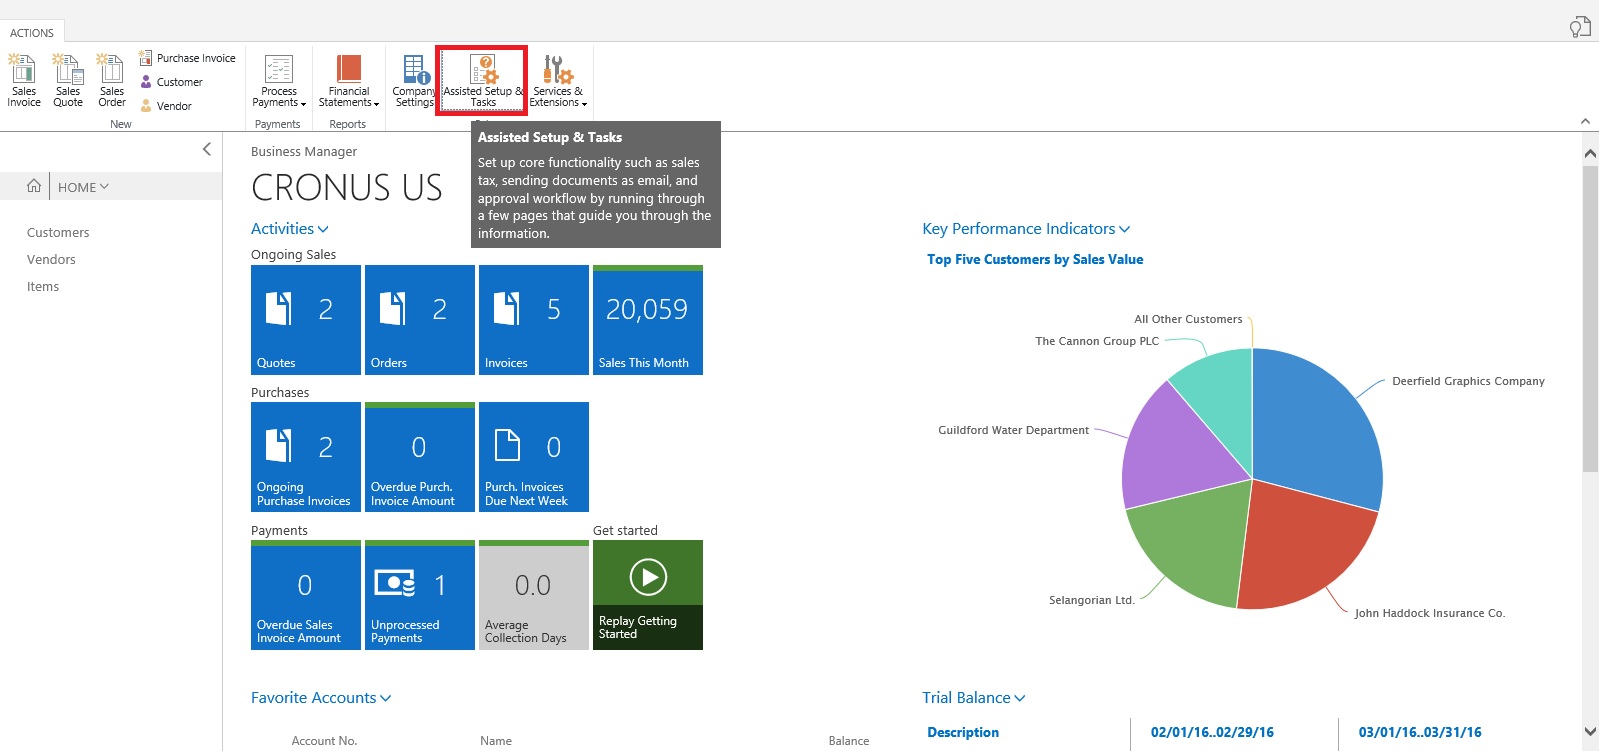
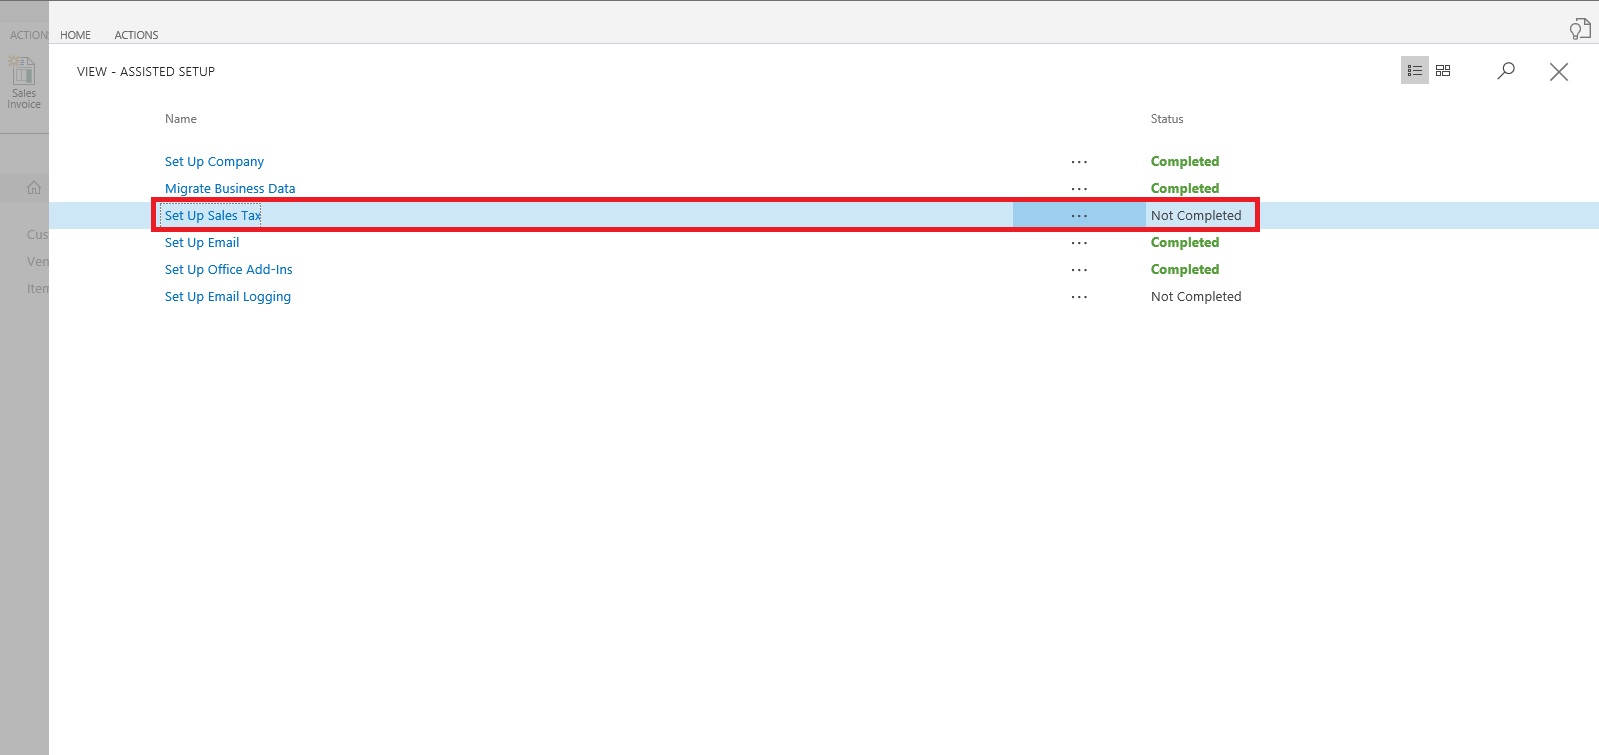
From Action Tab on landing/ Role Center Page on Ribbon click on Assisted Setup & Task.

SalesTax-1

List with available options page is opened.

SalesTax-2

Select Setup Sales Tax to continue.

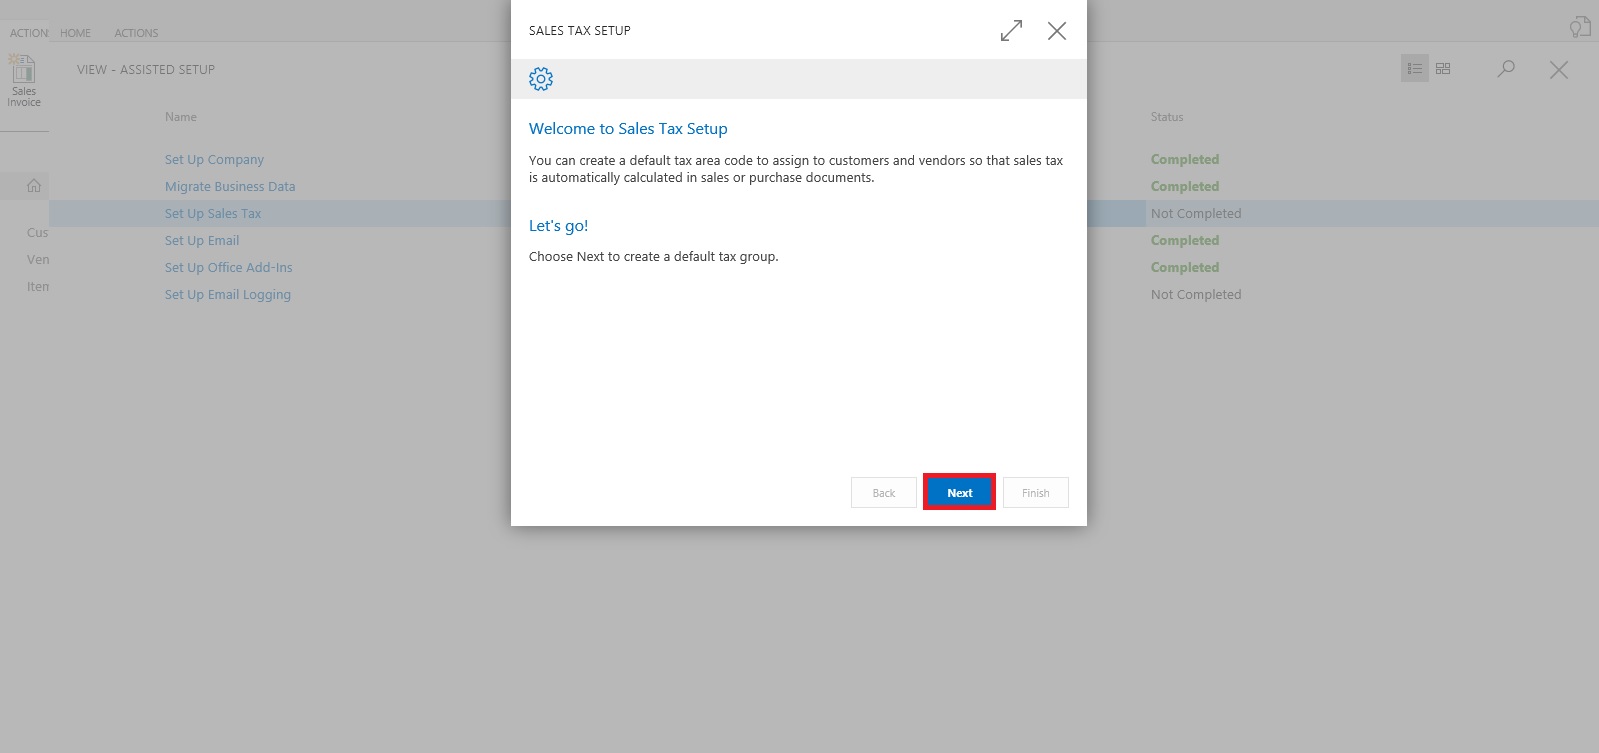
Welcome Screen appears click on Next Button.

SalesTax-3

Default tax group is created and you can start with other setup, click on Next.

SalesTax-4

We are only talking about Tax since this preview is only for US so options relevant to them only available. 

SalesTax-5

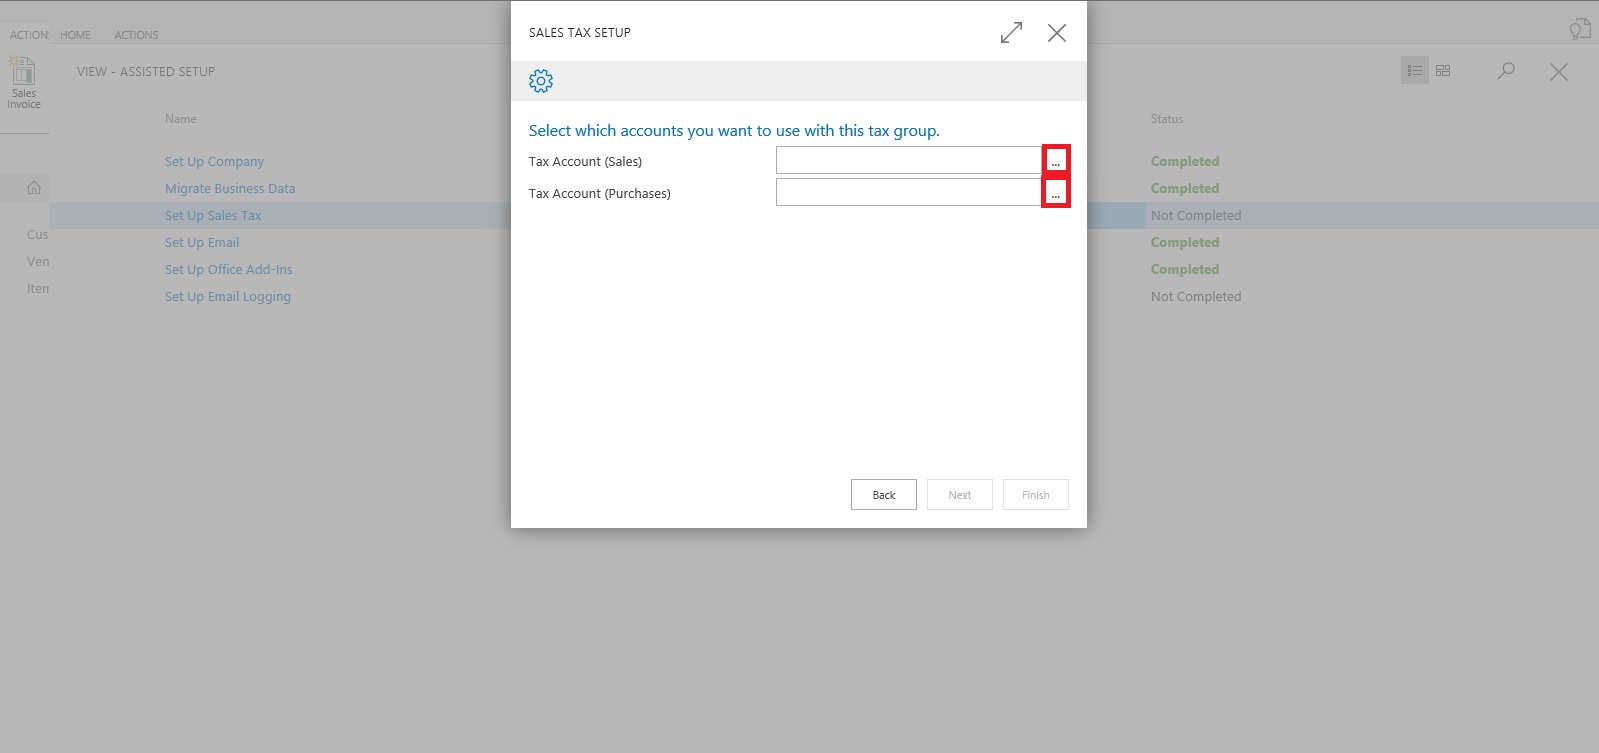
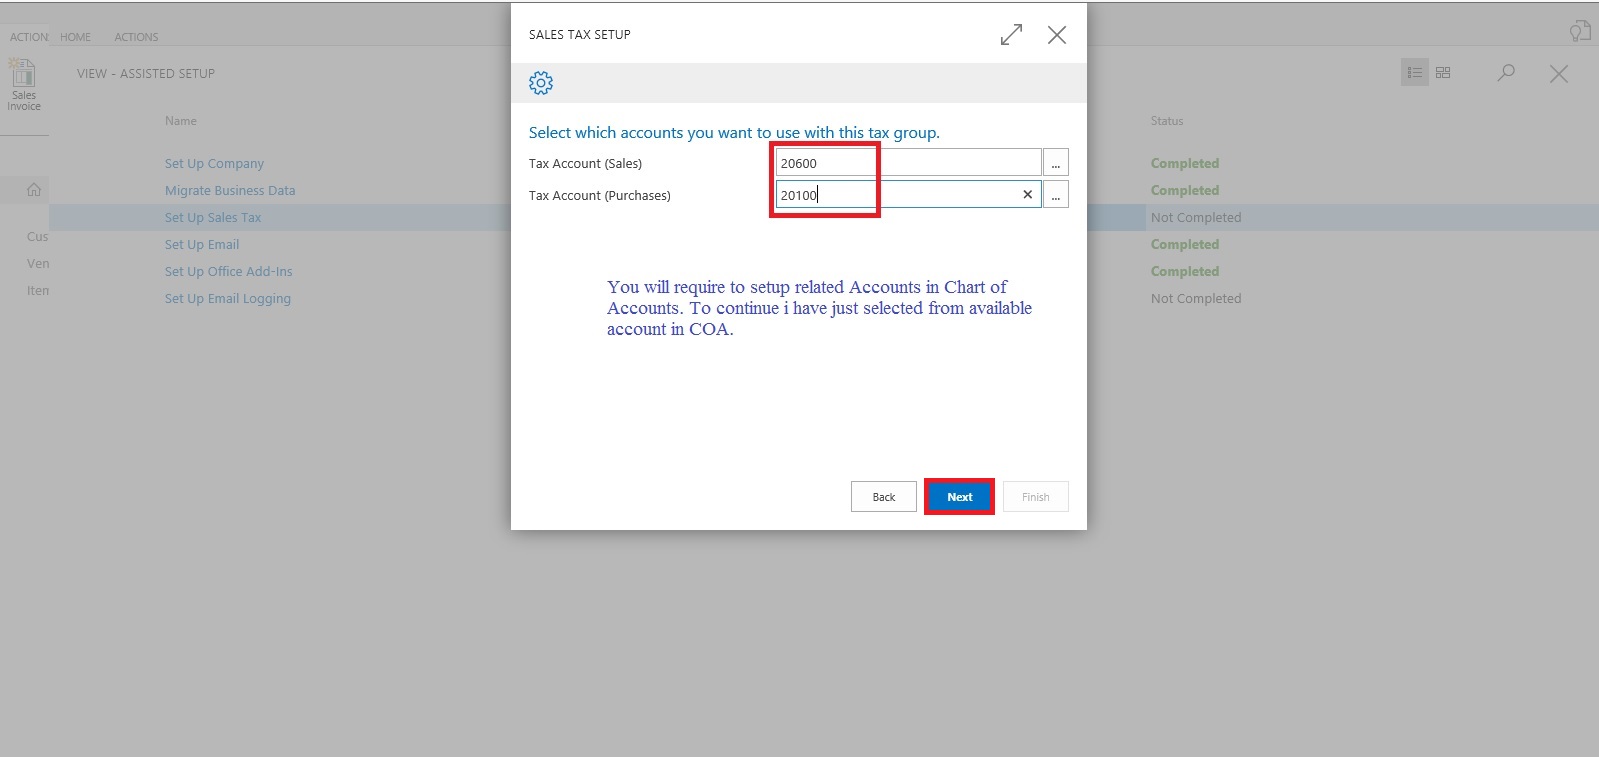
Select the Account for Tax Account (Sales & Purchase) using the Assist button which lists you the Available Accounts in COA.

SalesTax-6

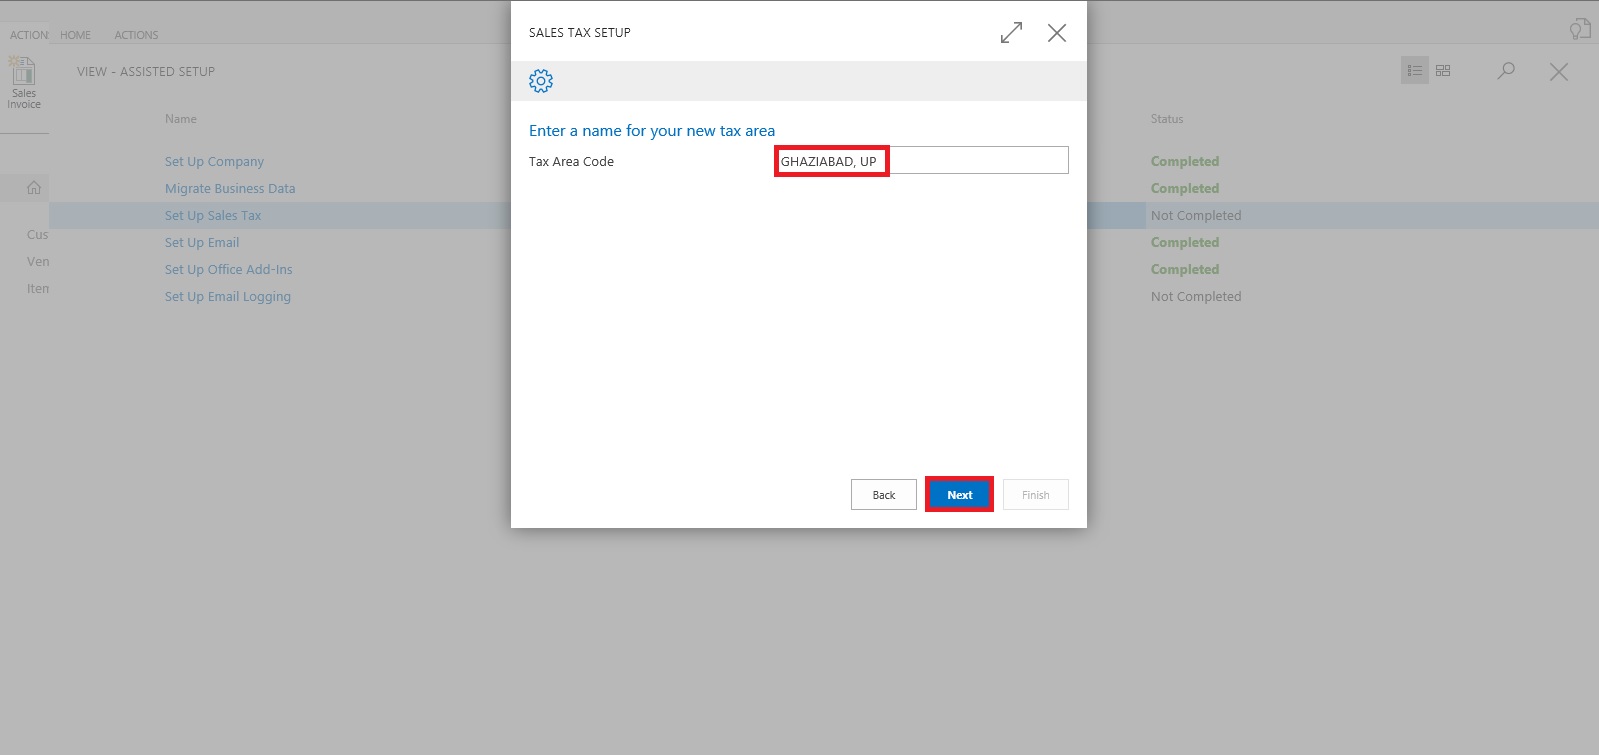
Next City, Country & State related information need to be filled, and then click Next Button to proceed.

SalesTax-7

Depending upon Information provided in Previous Screen it suggests Tax Area Code, click on Next Button to continue.

SalesTax-8

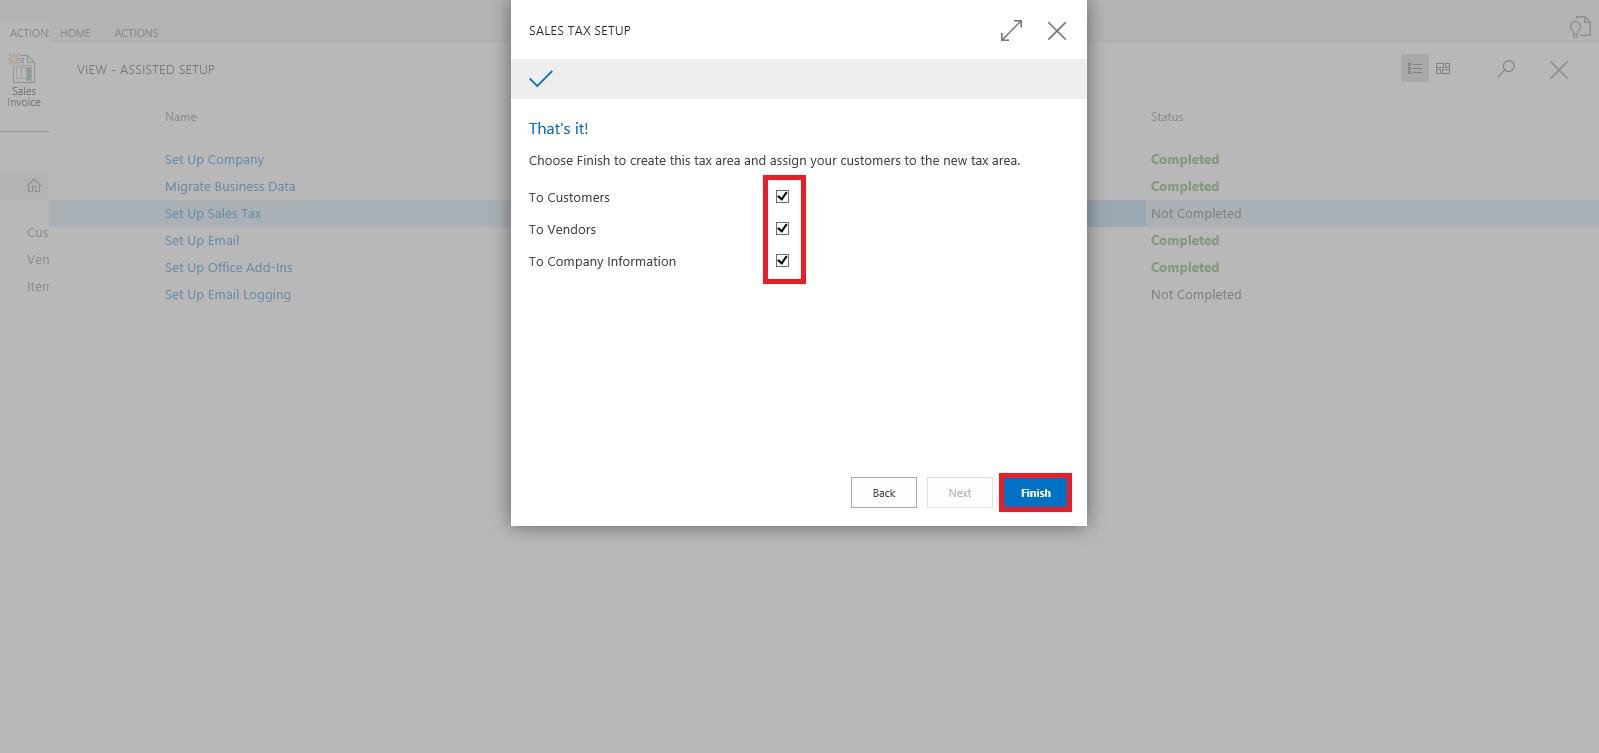
We are done with Setup now we will assign this to Customer, Vendor and Company.

Click on Next to continue.

SalesTax-9

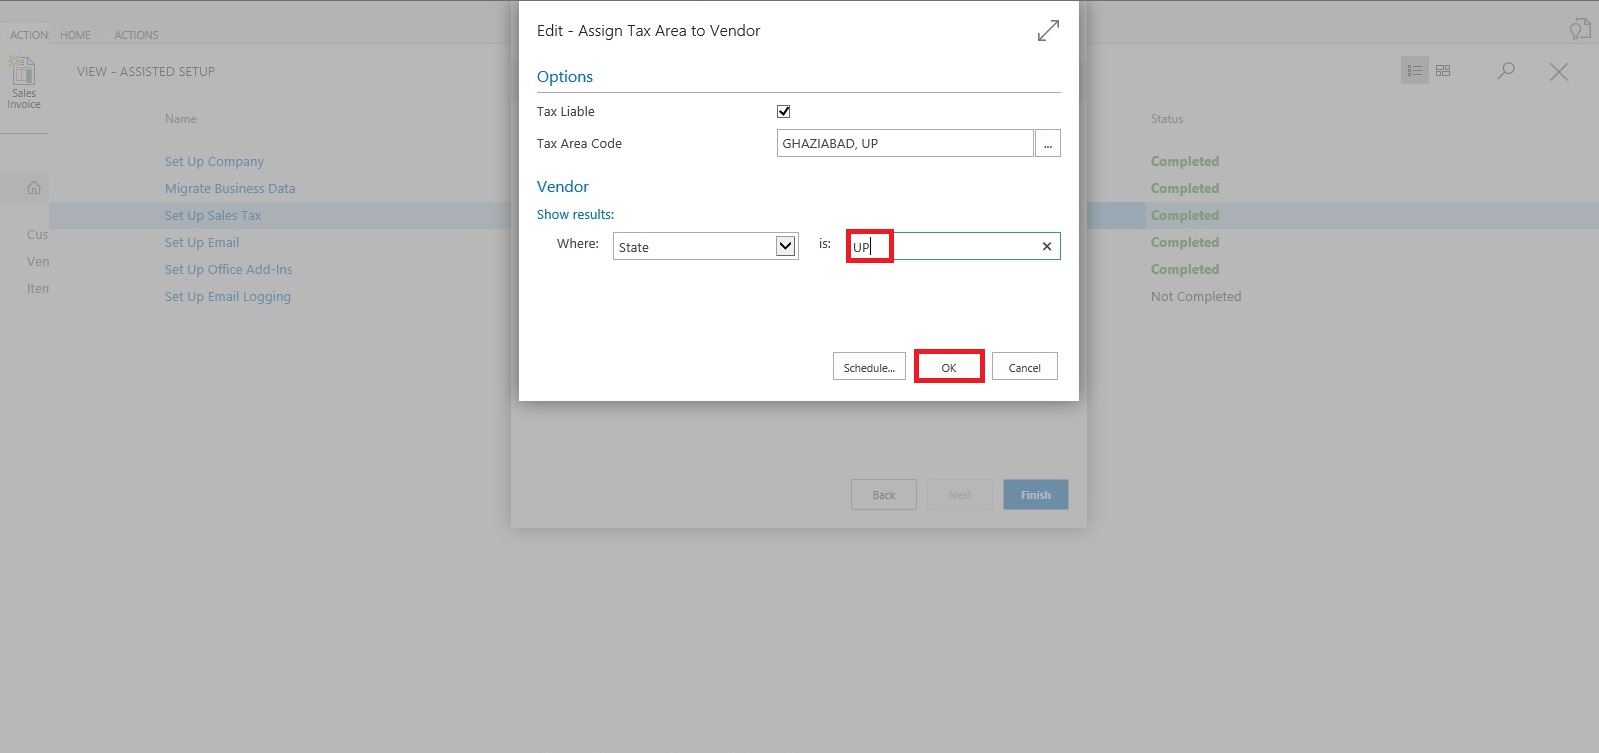
You can Assign the Tax Information to Customer as per entering simple query.

We can assign or we can leave this activity for later.

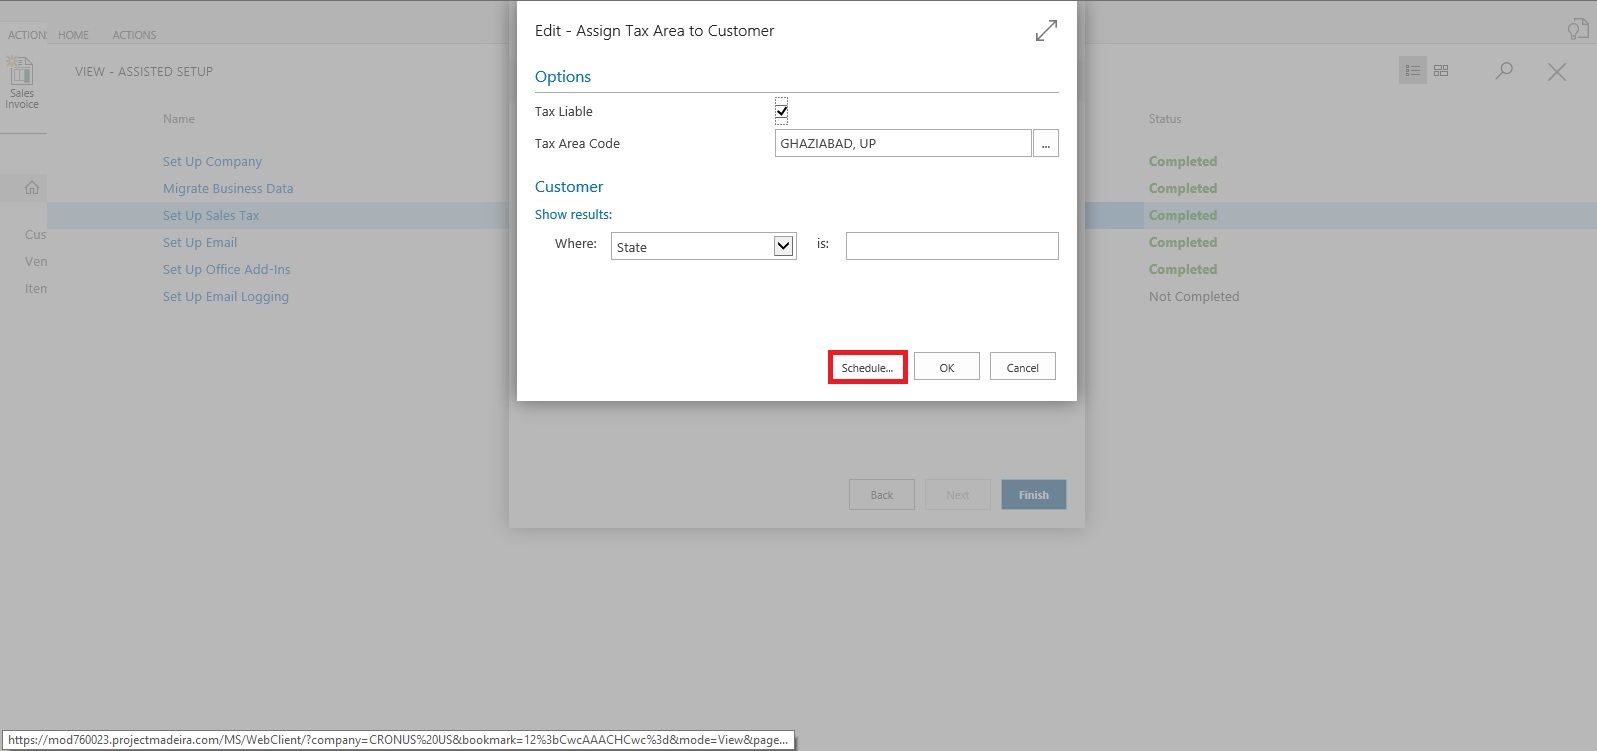
We have option to schedule a reminder for this activity. Click on Schedule to continue.

SalesTax-10

Enter the Date and Time for Start & Expiry of this reminder.

This will setup a Job for this and keep reminding you so that you have track of, that this activity is still pending and need to be completed.

Once done choose OK Button to continue.

SalesTax-11

You can see this in Jobs Entry Page.

SalesTax-11-1

Similarly you can do for Vendor too.

SalesTax-12

For company it will be applicable if you selected, so no separate screen for same for query based assignment.

Select OK to Continue.

SalesTax-13

We are done with our Tax Setup for Company, Customer & Vendor.


That’s all for today, will come up with more information in my next post.

Till then keep exploring and learning.


Tuesday, 29 December 2015

How do I: Enable the Invoice Rounding Function

If you want your sales and purchase invoices are rounded automatically, you will have to activate the invoice rounding function.

To activate the invoice rounding function

  1. In the Search box, enter Sales & Receivables Setup or Purchases & Payables Setup, and then choose the related link.

  2. On the General Fast Tab, select the Invoice Rounding check box.


InvoiceRounding-4

InvoiceRounding-5

You can activate invoice rounding separately for sales and purchase invoices.

Wednesday, 29 July 2015

Preventing Posting of Sales Invoices that Are Not on Stock - in Navision 2015

By default, Microsoft Dynamics NAV 2015 is set up so that you are allowed to post sales invoices that contain items that you currently do not have on stock.

You can change that behavior to allow posting an invoice only if all the items on the lines are on stock. In this scenario, you will learn how to do it through the Inventory Setup page.

  • On the Role Center, o the Home tab, in the Setup group, choose Setup.

  • On the drop-down menu, choose Inventory Setup. The Inventory Setup window opens.


PrevNegSIPosting-1

  • In the Inventory Setup window, select the Prevent Negative Inventory check box.

  • Choose the OK button..

Correct a Posted Sales Invoice in Nav 2015

Today we will learn correct a posted sales invoice.

In previous versions of Microsoft Dynamics NAV, this required a number of steps.

This scenario demonstrates how to perform the same action in Microsoft Dynamics NAV 2015.

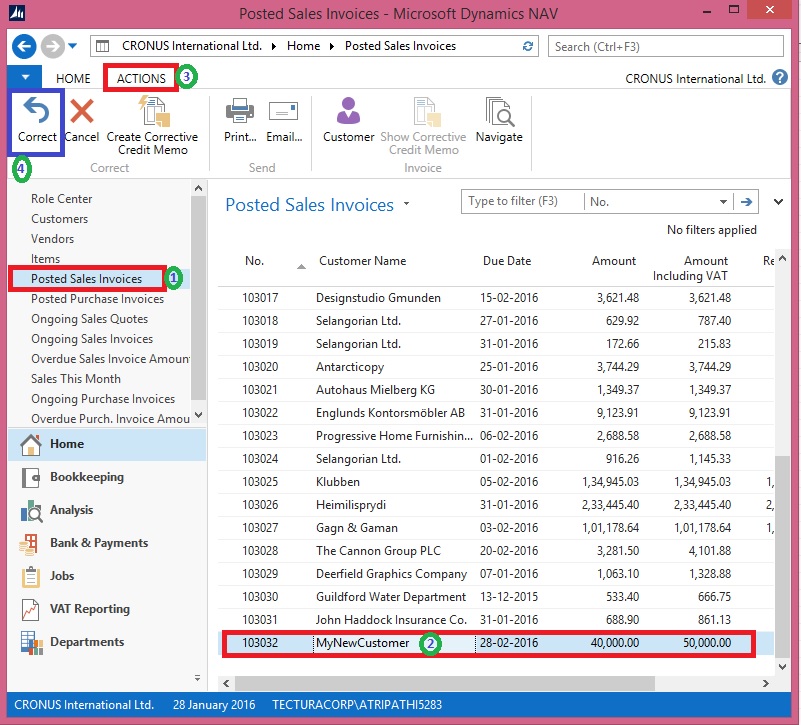
  • On the Role Centre, choose Posted Sales Invoices to open the list of posted sales invoices.

  • In the list of posted sales invoices, select the sales invoice that you posted in previous post, if not done click here to see the process we followed in earlier post.

  • On the Home tab, in the Manage group, choose View.

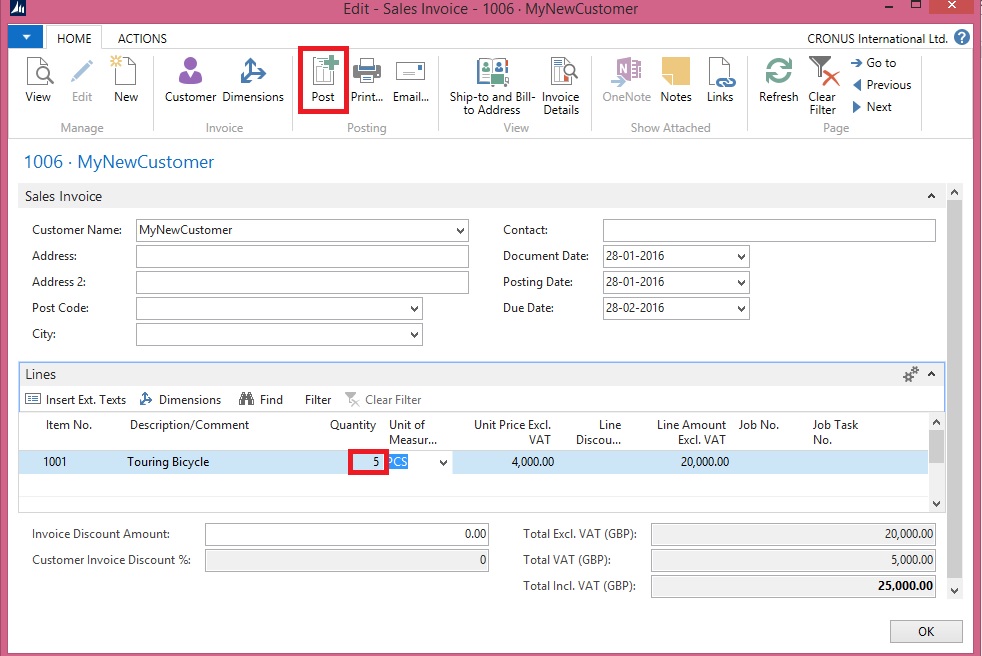
  • On the Home tab, in the Correct group, choose Correct, and then choose the Yes button


CorrectPSI-1
 or

CorrectPSI-2

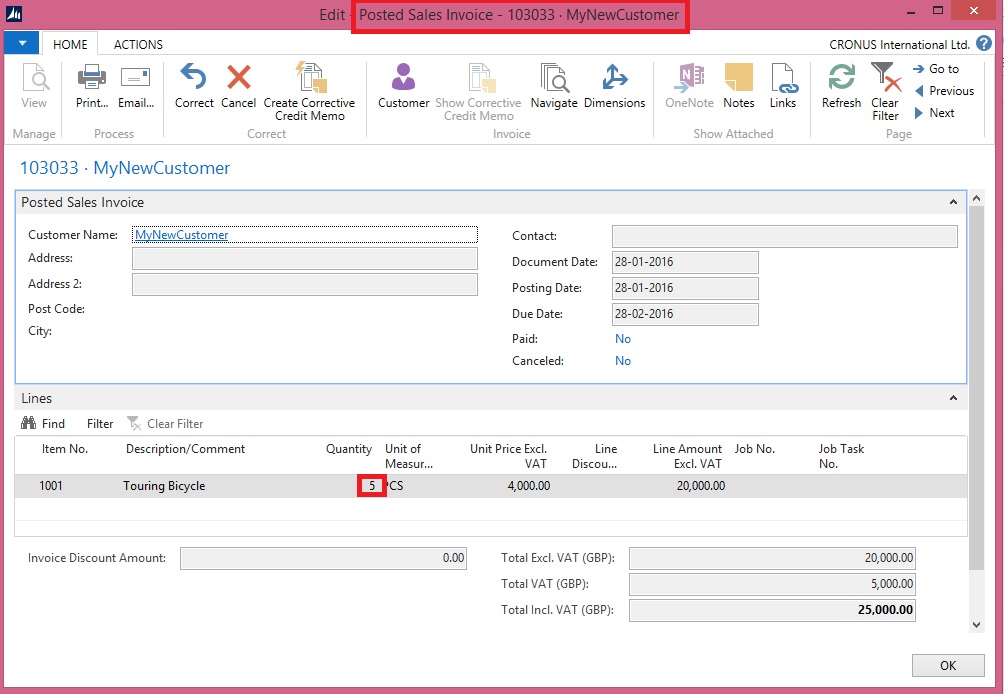
The posted sales invoice is now cancelled with a credit memo. A new sales invoice has been created for you.

CorrectPSI-3

  • To open the automatically generated New Invoice that was created, choose Yes.

  • On the new sales invoice Perform the required changes. I am changing the Quantity in my example.


CorrectPSI-4

  • On the Home tab, in the Posting group, choose Post to post the corrected sales invoice.

  • Respond Yes to review the posted New Sales Invoice.


CorrectPSI-5

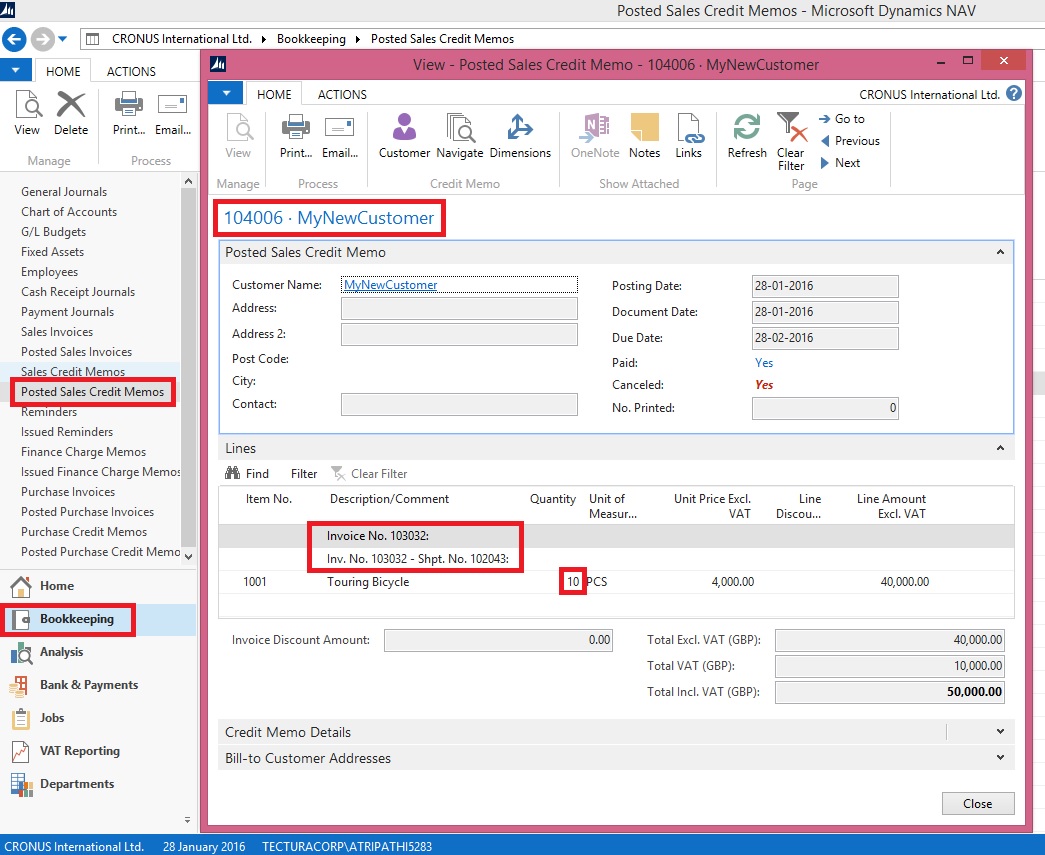
  • To review the Posted Credit Memo for the above Invoice Correction find as below:


CorrectPSI-6

We are done. It’s easy na.