Now Microsoft Enterprise Agreement customers can bring existing licenses to run SQL Server on Azure Virtual Machines. Since the launch of Azure Virtual Machines, customers can already run SQL Server on Azure Virtual Machines through several existing SQL Server images available in the Azure Gallery, or bring their own images to Azure.
These images and capabilities will continue to be supported so customers can continue to take advantage of pay per use licensing for SQL Server on Azure Virtual Machines.
Starting this week, customers with Enterprise Agreement who already have SQL Server Licenses, can use them on Azure Virtual Machines with Microsoft-certified (BYOL) gallery images. These images will not charge for SQL Server licensing, just for compute cost.
For more details see the Link.
Showing posts with label Virtual. Show all posts
Showing posts with label Virtual. Show all posts
Saturday, 28 May 2016

Monday, 9 May 2016
Creating Virtual Machine on Azure
Continuing from my previous post.
In previous post we saw how to register for Free Azure Portal Account, if you missed you can find the link here.
Today we will see how to create Virtual Machine for Dynamics Navision 2016 pre Loaded.
Lets start creating one for our future posts practice.
Open the page : https://azure.microsoft.com/en-us/free/ and follow onscreen Instruction to login to your account.
Login using the account credentials you used for registering on Azure Portal.

Upon signing you will be landed to your dashboard on Portal.
You can see we don't have any resource on Portal yet.

Lets start creating one.
Click on New from Top right corner.
Choose Virtual Machine.
Enter "Microsoft Dynamics NAV 2016" in the search box, it will list available Virtual Machine images.
Select the one available Virtual Machine for commissioning.
I have choose this because we will get preinstalled NAV 2016 which will save our time.

Select Deployment Model, I have choose Classic and click on Create.

Next we will enter Host Name, User Name, Password, other things you adjust as per your need. Click on Create.
Note your User Name & Password you will require this to login to the Server.

Give some time to get created and up your Server.
In the mean time you can explore other things till your Server is up and running for you.
Once it is made available, you can start login and explore your newly created Server.
Where to find my Server?
From the Navigation Bar choose Virtual Machine (classic).
It will list you all Virtual Machines created by you.
Select your Virtual Machine in my case it is NavDemo.
You can find the Server Name and IP of your Virtual Machine.

I am using my IP to login to my Server.
Open your Remote Desktop Connection and enter your IP.
The User Name & Password as we created in previous step.

Here I am Login to my Server.

You can see that Dynamics NAV 2016 is already available with my Server.

That's all for today, we will see more in my upcoming posts.
Till then keep exploring & Learning.
In previous post we saw how to register for Free Azure Portal Account, if you missed you can find the link here.
Today we will see how to create Virtual Machine for Dynamics Navision 2016 pre Loaded.
Lets start creating one for our future posts practice.
Open the page : https://azure.microsoft.com/en-us/free/ and follow onscreen Instruction to login to your account.
Login using the account credentials you used for registering on Azure Portal.
Upon signing you will be landed to your dashboard on Portal.
You can see we don't have any resource on Portal yet.
Lets start creating one.
Click on New from Top right corner.
Choose Virtual Machine.
Enter "Microsoft Dynamics NAV 2016" in the search box, it will list available Virtual Machine images.
Select the one available Virtual Machine for commissioning.
I have choose this because we will get preinstalled NAV 2016 which will save our time.
Select Deployment Model, I have choose Classic and click on Create.
Next we will enter Host Name, User Name, Password, other things you adjust as per your need. Click on Create.
Note your User Name & Password you will require this to login to the Server.
Give some time to get created and up your Server.
In the mean time you can explore other things till your Server is up and running for you.
Once it is made available, you can start login and explore your newly created Server.
Where to find my Server?
From the Navigation Bar choose Virtual Machine (classic).
It will list you all Virtual Machines created by you.
Select your Virtual Machine in my case it is NavDemo.
You can find the Server Name and IP of your Virtual Machine.
I am using my IP to login to my Server.
Open your Remote Desktop Connection and enter your IP.
The User Name & Password as we created in previous step.
Here I am Login to my Server.
You can see that Dynamics NAV 2016 is already available with my Server.
That's all for today, we will see more in my upcoming posts.
Till then keep exploring & Learning.
Tuesday, 11 August 2015
How to list Virtual Tables in Navision
You may have seen several posts listing the Virtual tables. Most of they say you create page/form and type in one by one table id in Range (2000000001.. 2000000200) and find the Virtual Tables and note them.
You will get below table list in every posts. I have listed tables below in Nav-2015.
All marked as Yes in above table under Virtual column are all the Virtual Tables.
I have not type one by one in the Page/form to get this list.
The Virtual table itself in Navision lists the Virtual tables in Navision. List can be different depending on the Version of Navision you see them.
Today I will share you smart way of finding this list of Virtual tables.
Next time you need not to do so hard work to list all the Virtual tables.
Here too you need to create a list page but you will not be required to key in the id of tables one by one, in fact only one table id which will give answers to your query.

Save and execute your Page/Form.
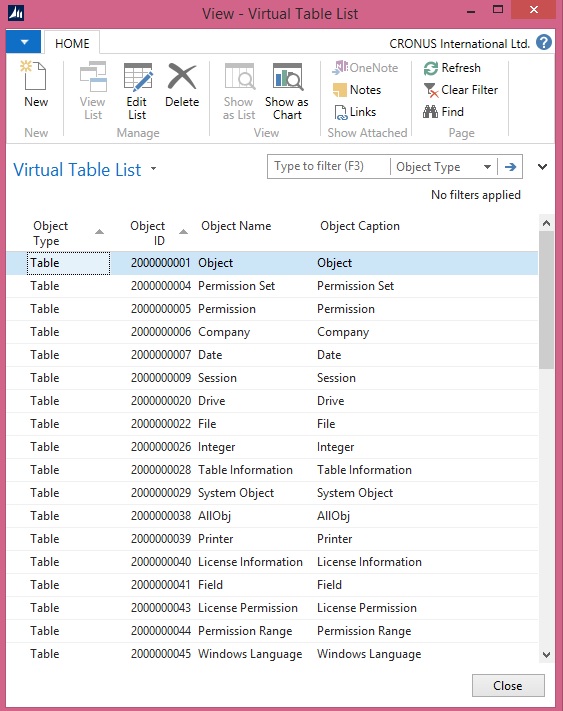
Now go to object Designer. Copy all the tables with id in range defined above and paste in Excel.
Copy above table list in Excel side by side and compare as above table shown in beginning of the post. All those which don’t match are your Virtual tables.
So easy, if anything is available why to waste effort for same.
It always good to share what you know with community, by this way we keep learning from each other.
Stay tuned for many such Tips.
Today I will demo you easy way for getting this list with no additional efforts.
You will get below table list in every posts. I have listed tables below in Nav-2015.
| Object Designer | Virtual | Itself from Virtual Table | ||||
| Type | ID | Name | Object Type | Object ID | Object Name | |
| Yes | Table | 2000000001 | Object | |||
| 1 | 2000000004 | Permission Set | Table | 2000000004 | Permission Set | |
| 1 | 2000000005 | Permission | Table | 2000000005 | Permission | |
| 1 | 2000000006 | Company | Table | 2000000006 | Company | |
| Yes | Table | 2000000007 | Date | |||
| Yes | Table | 2000000009 | Session | |||
| Yes | Table | 2000000020 | Drive | |||
| Yes | Table | 2000000022 | File | |||
| Yes | Table | 2000000026 | Integer | |||
| Yes | Table | 2000000028 | Table Information | |||
| Yes | Table | 2000000029 | System Object | |||
| Yes | Table | 2000000038 | AllObj | |||
| Yes | Table | 2000000039 | Printer | |||
| Yes | Table | 2000000040 | License Information | |||
| Yes | Table | 2000000041 | Field | |||
| Yes | Table | 2000000043 | License Permission | |||
| Yes | Table | 2000000044 | Permission Range | |||
| Yes | Table | 2000000045 | Windows Language | |||
| Yes | Table | 2000000048 | Database | |||
| Yes | Table | 2000000049 | Code Coverage | |||
| 1 | 2000000053 | Access Control | Table | 2000000053 | Access Control | |
| Yes | Table | 2000000055 | SID - Account ID | |||
| Yes | Table | 2000000058 | AllObjWithCaption | |||
| Yes | Table | 2000000063 | Key | |||
| 1 | 2000000065 | Send-To Program | Table | 2000000065 | Send-To Program | |
| 1 | 2000000066 | Style Sheet | Table | 2000000066 | Style Sheet | |
| 1 | 2000000067 | User Default Style Sheet | Table | 2000000067 | User Default Style Sheet | |
| 1 | 2000000068 | Record Link | Table | 2000000068 | Record Link | |
| 1 | 2000000069 | Client Add-in | Table | 2000000069 | Client Add-in | |
| 1 | 2000000071 | Object Metadata | Table | 2000000071 | Object Metadata | |
| 1 | 2000000072 | Profile | Table | 2000000072 | Profile | |
| 1 | 2000000073 | User Personalization | Table | 2000000073 | User Personalization | |
| 1 | 2000000074 | Profile Metadata | Table | 2000000074 | Profile Metadata | |
| 1 | 2000000075 | User Metadata | Table | 2000000075 | User Metadata | |
| 1 | 2000000076 | Web Service | Table | 2000000076 | Web Service | |
| 1 | 2000000078 | Chart | Table | 2000000078 | Chart | |
| 1 | 2000000079 | Object Tracking | Table | 2000000079 | Object Tracking | |
| 1 | 2000000080 | Page Data Personalization | Table | 2000000080 | Page Data Personalization | |
| 1 | 2000000100 | Debugger Breakpoint | Table | 2000000100 | Debugger Breakpoint | |
| Yes | Table | 2000000101 | Debugger Call Stack | |||
| Yes | Table | 2000000102 | Debugger Variable | |||
| Yes | Table | 2000000103 | Debugger Watch Value | |||
| 1 | 2000000104 | Debugger Watch | Table | 2000000104 | Debugger Watch | |
| 1 | 2000000110 | Active Session | Table | 2000000110 | Active Session | |
| 1 | 2000000111 | Session Event | Table | 2000000111 | Session Event | |
| 1 | 2000000112 | Server Instance | Table | 2000000112 | Server Instance | |
| 1 | 2000000114 | Document Service | Table | 2000000114 | Document Service | |
| 1 | 2000000120 | User | Table | 2000000120 | User | |
| 1 | 2000000121 | User Property | Table | 2000000121 | User Property | |
| 1 | 2000000130 | Device | Table | 2000000130 | Device | |
| Yes | Table | 2000000135 | Table Synch. Setup | |||
All marked as Yes in above table under Virtual column are all the Virtual Tables.
I have not type one by one in the Page/form to get this list.
The Virtual table itself in Navision lists the Virtual tables in Navision. List can be different depending on the Version of Navision you see them.
Today I will share you smart way of finding this list of Virtual tables.
Next time you need not to do so hard work to list all the Virtual tables.
Here too you need to create a list page but you will not be required to key in the id of tables one by one, in fact only one table id which will give answers to your query.
Save and execute your Page/Form.
Now go to object Designer. Copy all the tables with id in range defined above and paste in Excel.
Copy above table list in Excel side by side and compare as above table shown in beginning of the post. All those which don’t match are your Virtual tables.
So easy, if anything is available why to waste effort for same.
It always good to share what you know with community, by this way we keep learning from each other.
Stay tuned for many such Tips.
Subscribe to:
Posts (Atom)