Monday, 30 November 2015

How to Detect Duplicates

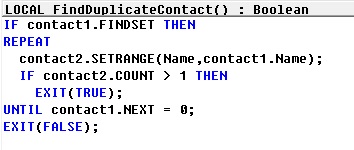
Until Dynamics NAV 2013, the only possibility was to iterate through the table in a loop and then create a sub-loop where another instance of the same table is filtered to check for duplicates.

For example, to check for duplicate names in the Contact table, the code would look like this:

Duplicate.-1

Dynamics NAV 2013 onwards, we can use queries to create a more efficient implementation of the same logic.

 The solution involves that you create a query to return duplicates, and then invoke it from a method that would test the value of the query to identify if duplicates were found.

Step 1 – Creating the Query

  • The query must be created with the table we want to search in as the dataitem.

  • The field we want to search for must be created as a grouped field.

  • Create a totaling field on the count, and add a filter for Count > 1. This ensures that only records with more than one instance of the field that we selected in the previous step are included in the query result.

  • Continuing with our Contact Name example, here is how the query would look:


Duplicate.-2

Step 2 – Invoking the Query to Check for Duplicates

Now that the query is created, all we need to do is to invoke the query and check if any records are returned, which would mean that there are duplicates.

Here is an alternate implementation of the FindDuplicateContact method using the query that we created:

Duplicate.-3


Using Argument Tables in Navision

When creating functions we sometimes need a lot of parameters to give the information we require. Number of arguments/parameters to function have limits.

Sometimes these parameters are optional, only required in some scenarios.

This makes calling them quite hard. The code becomes hard to read & understand, and sometimes spread across multiple lines.

When changing the signature of any std. function or already implemented functionality which is highly used over the system in several objects you might end up changing an endless chain of objects.

Imaging adding a field to such function, or change a datatype. The amount of code affected is pretty big and if you need to parameter only for one specific case you end up changing a lot of code for no purpose. Does this make sense?

These challenges can be solved by grouping commonly used arguments in a single table and use that table as the parameter of a function.

So the solution is to create a single table that holds the contract for the function.

When we add new fields to the table, we effectively do not change the signature of the function hence this acts as overloading allowing optional parameters to change the behavior of the code.

You can find usage of such Argument Tables in below objects:

Type      ID            Name

1              9500       Email Item

5              260         Document-Mailing

5              9520       Mail Management

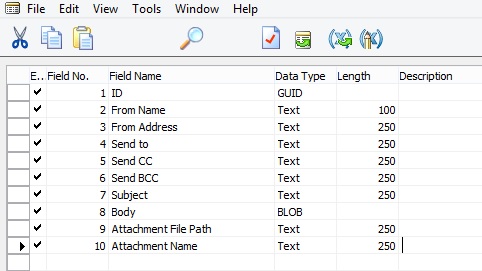
Table is created to hold Parameter Values which will be passed to the function.

ArgumentTables-1

This Function in Table Pass the record as a parameter to the function, basically this is passing 10 Parameters using single record as a Parameter to the Function.

ArgumentTables-2

In Codeunit Document-Mailing below function, This is the extra work which you will be required to perform, if you miss this part you may not get errors at compile time but all the 10 Parameters will be passed as blank. This may be counted as side-effect of using such concept.

ArgumentTables-3

In Codeunit Mail Management below function, This Pass the record as a parameter to the function, basically this is passing 10 Parameters using single record as a Parameter to the Function.

ArgumentTables-4

In Codeunit Mail Management below function, This receives the record as a parameter to the function, basically this is receiving 10 Parameters using single record as a Parameter to the Function.

ArgumentTables-5

Best part is Argument tables can be outside of a customer’s license file since we never insert data in the SQL Server database.

For more details you can see this Link. https://community.dynamics.com/nav/w/designpatterns/245.argument-table


Cost Components

Cost components are different types of costs that make up the value of an inventory increase or decrease.

The below table shows the different cost components and any subordinate cost components that they consist of.


Cost component Subordinate cost component Description
Direct costUnit cost (direct purchase price)Cost that can be traced to a cost object.
Freight cost (item charge)
Insurance cost (item charge)
Indirect costCost that cannot be traced to a cost object.
VariancePurchase varianceThe difference between actual and standard costs, which is only posted for items using the Standard costing method.
Material variance
Capacity variance
Subcontracted variance
Capacity overhead variance
Manufacturing overhead variance
RevaluationA depreciation or appreciation of the current inventory value.
RoundingResiduals caused by the way in which valuation of inventory decreases are calculated.

Freight and insurance costs are item charges that can be added to an item’s cost at any time. When you run the Adjust Cost - Item Entries batch job, the value of any related inventory decreases are updated accordingly.

Inventory Valuation

Inventory valuation is the determination of the cost that is assigned to an inventory item, as expressed by the following equation.
Ending inventory = beginning inventory + net purchasescost of goods sold

The calculation of inventory valuation uses the Cost Amount (Actual) field of the value entries for the item.

The entries are classified according to the entry type that corresponds to the cost components, direct cost, indirect cost, variance, revaluation, and rounding.

Entries are applied against each other, either by the fixed application, or according to the general cost-flow assumption defined by the costing method.

One entry of inventory decrease can be applied to more than one increase entry with different posting dates and possibly different acquisition costs.

Therefore, calculation of the inventory value for a given date is based on summing up positive and negative value entries.

Inventory Valuation report

To calculate the inventory value in the Inventory Valuation report, the report begins by calculating the value of the item’s inventory at a given starting date.

It then adds the value of inventory increases and subtracts the value of inventory decreases up to a given ending date.

The end result is the inventory value on the ending date.

The report calculates these values by summing the values in the Cost Amount (Actual) field in the value entries, using the posting dates as filters.

The printed report always shows actual amounts, that is, the cost of entries that have been posted as invoiced.

The report will also print the expected cost of entries that have posted as received or shipped, if you select the Include Expected Cost field on the Options FastTab.

Values in the Inventory Valuation report is reconciled with the Inventory account in the general ledger, meaning the value entries in question have been posted to the general ledger.

Amounts in the Value columns of the report are based on the posting date of transactions for an item.


Inventory Valuation - WIP report

A manufacturing company needs to determine the value of three types of inventory:

  • Raw Materials inventory

  • WIP inventory

  • Finished Goods inventory


The value of WIP inventory is determined by the following equation.
Ending WIP inventory = Beginning WIP inventory + manufacturing costscost of goods manufactured

As for purchased inventory, the value entries provide the basis of the inventory valuation. The calculation is made using the values in the Cost Amount (Actual) field of the item and capacity value entries associated with a production order.

The purpose of WIP inventory valuation is to determine the value of the items whose manufacturing has not yet been completed on a given date.

Therefore the WIP inventory value is based on the value entries related to the consumption and capacity ledger entries.

Consumption ledger entries must be completely invoiced at the date of the valuation.

Therefore, the Inventory Valuation – WIP report shows the costs representing the WIP inventory value in two categories: consumption and capacity.


Sunday, 29 November 2015

Accounts in the General Ledger

To reconcile inventory and capacity ledger entries with the general ledger, the related value entries are posted to different accounts in the general ledger.

From the Inventory Ledger

The below table shows the relationship between different types of inventory value entries and the accounts and balancing accounts in the general ledger.


Value entry General ledger accounts
Item ledger entry typeValue entry typeVariance typeExpected costAccountBalancing account
PurchaseDirect CostYesInventory (Interim)Invt. Accrual Acc. (Interim)
Direct CostNoInventoryDirect Cost Applied
Indirect CostNoInventoryOverhead Applied
VariancePurchaseNoInventoryPurchase Variance
RevaluationNoInventoryInventory Adjmt.
RoundingNoInventoryInventory Adjmt.
SaleDirect CostYesInventory (Interim)COGS (Interim)
Direct CostNoInventoryCOGS
RevaluationNoInventoryInventory Adjmt.
RoundingNoInventoryInventory Adjmt.
Positive Adjmt.,Negative Adjmt., TransferDirect CostNoInventoryInventory Adjmt.
RevaluationNoInventoryInventory Adjmt.
RoundingNoInventoryInventory Adjmt.
(Production) ConsumptionDirect CostNoInventoryWIP
RevaluationNoInventoryInventory Adjmt.
RoundingNoInventoryInventory Adjmt.
Assembly ConsumptionDirect CostNoInventoryInventory Adjmt.
Direct CostNoDirect Cost AppliedInventory Adjmt.
Indirect CostNoOverhead AppliedInventory Adjmt.
(Production) OutputDirect CostYesInventory (Interim)WIP
Direct CostNoInventoryWIP
Indirect CostNoInventoryOverhead Applied
VarianceMaterialNoInventoryMaterial Variance
VarianceCapacityNoInventoryCapacity Variance
VarianceSubcontractedNoInventorySubcontracted Variance
VarianceCapacity OverheadNoInventoryCap. Overhead Variance
VarianceManufacturing OverheadNoInventoryMfg. Overhead Variance
RevaluationNoInventoryInventory Adjmt.
RoundingNoInventoryInventory Adjmt.
Assembly OutputDirect CostNoInventoryInventory Adjmt.
RevaluationNoInventoryInventory Adjmt.
Indirect CostNoInventoryOverhead Applied
VarianceMaterialNoInventoryMaterial Variance
VarianceCapacityNoInventoryCapacity Variance
VarianceCapacity OverheadNoInventoryCap. Overhead Variance
VarianceManufacturing OverheadNoInventoryMfg. Overhead Variance
RoundingNoInventoryInventory Adjmt.

From the Capacity Ledger

The below table shows the relationship between different types of capacity value entries and the accounts and balancing accounts in the general ledger. Capacity ledger entries represent labor time consumed in assembly or production work.


Value entry General ledger accounts
Work typeCapacity ledger entry typeValue entry typeAccountBalancing account
AssemblyResourceDirect CostDirect Cost AppliedInventory Adjmt.
AssemblyResourceIndirect CostOverhead AppliedInventory Adjmt.
ProductionMachine Center/Work CenterDirect CostWIP AccountDirect Cost Applied
ProductionMachine Center/Work CenterIndirect CostWIP AccountOverhead Applied

Assembly Costs are Always Actual

As shown in the table above, assembly postings are not represented in interim accounts. This is because the concept of work in process (WIP) does not apply in assembly output posting, unlike in production output posting. Assembly costs are only posted as actual cost, never as expected cost.

Calculating the Amount to Post to the General Ledger

The following fields in the Value Entry table are used to calculate the expected cost amount that is posted to the general ledger:

  • Cost Amount (Actual)

  • Cost Posted to G/L

  • Cost Amount (Expected)

  • Expected Cost Posted to G/L


The following table shows how the amounts to post to the general ledger are calculated for the two different cost types.


Cost type Calculation
Actual CostCost Amount (Actual) Cost Posted to G/L
Expected CostCost Amount (Expected) Expected Cost Posted to G/L


Page Metadata Delta Field / Read BLOB data and Export into a File

User Metadata Table

Stores the personalization of metadata. The content can be viewed by exporting the BLOB. When troubleshooting, you can delete a user’s personalization for a specific page by modifying the data in this table.

Page Metadata Delta Field in User Metadata Table

An XML BLOB that contains the deltas or changes for the personalization. This can be exported and viewed.

In Navision tables we can create BLOB fields to store large amount of data. It is not possible to read the data in the BLOB fields directly.

Below I show an Example how to achieve this, you can adjust the code accordingly for other table fields.

How to get this done, Write below Codeunit:

Define below variables:

UserMetaData-1

Write below function:

UserMetaData-2

You can adjust above code accordingly to read to BLOB fields from other tables and fields.


Zip/Un-Zip files using 7Zip

Dear friends today I am sharing functionality created in Navision which can be used to zip or Un-Zip files. Upon request of one of follower of my blog I decided to discuss on this point.

Here below I present below how we can do the same. The variables, functions and process is self-explanatory.

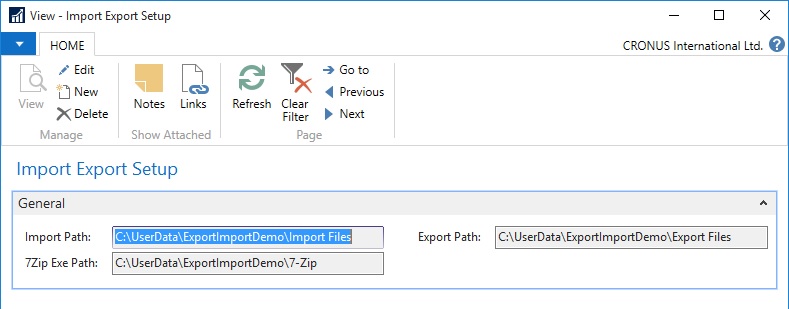
Step 1: Let us create a Setup Table and Page

Zip-UnZip-1

Zip-UnZip-2

Zip-UnZip-3

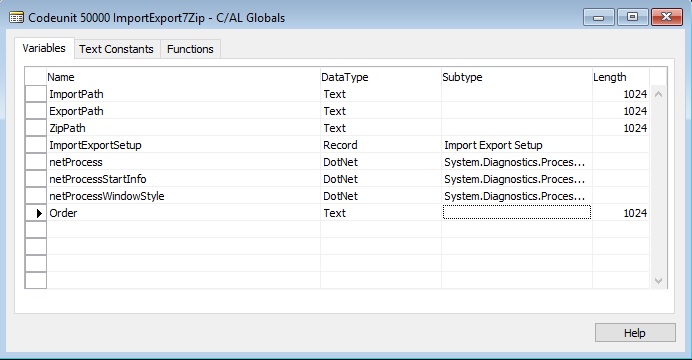
Step 2: Let us define variables

Zip-UnZip-4

Name                                                    DataType             Subtype                    Length

netProcess                                         DotNet                 System.Diagnostics.Process.'System, Version=4.0.0.0, Culture=neutral, PublicKeyToken=b77a5c561934e089'

netProcessStartInfo                       DotNet System.Diagnostics.ProcessStartInfo.'System, Version=4.0.0.0, Culture=neutral, PublicKeyToken=b77a5c561934e089'

netProcessWindowStyle              DotNet System.Diagnostics.ProcessWindowStyle.'System, Version=4.0.0.0, Culture=neutral, PublicKeyToken=b77a5c561934e089'

ImportPath                                         Text                                                        1024

ExportPath                                         Text                                                         1024

ZipPath                                                 Text                                                        1024

ImportExportSetup                         Record                  Import Export Setup

Order                                                    Text                                                          1024 

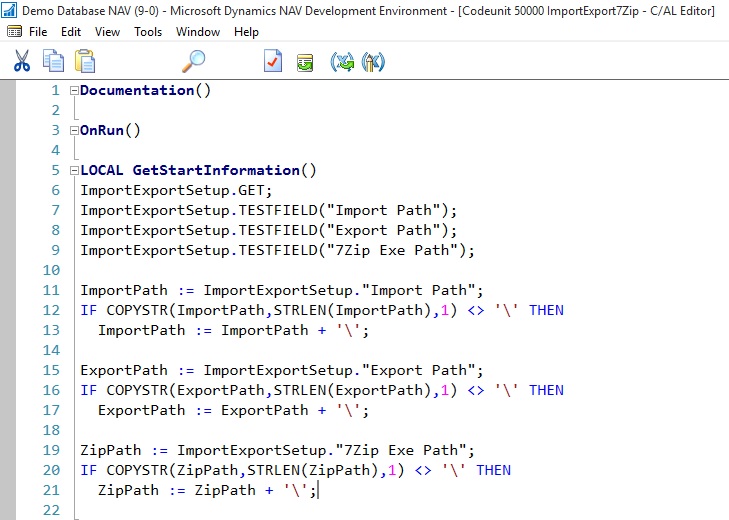
Step 3: Let us create a Function to Get Information of Path from Setup:

Zip-UnZip-5

This function is to initialize all the required variables which will be used in other functions.

It takes value from the Setup created above to store path of required folders. 

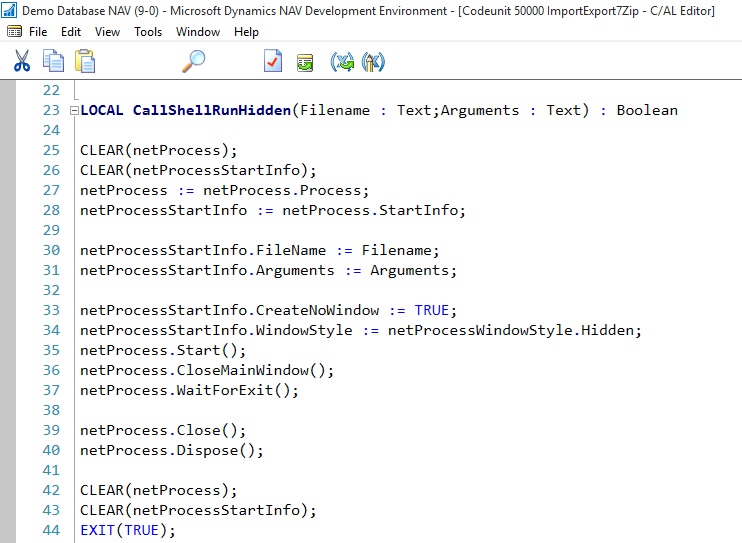
Step 4: Let us create a Function for running Shell Command for 7zip Files:

Zip-UnZip-6

This function runs the shell script in background to Zip or Un-Zip files in specified folder.

Step 5: Let us create a Function to call UnZip file after preparing the Parameters for Command

Zip-UnZip-7

This function prepares the path, Name of File and Argument for the Shell and finally calls the Shell function to run the command in background. At the end of function you will get UnZiped files from the Zip file.

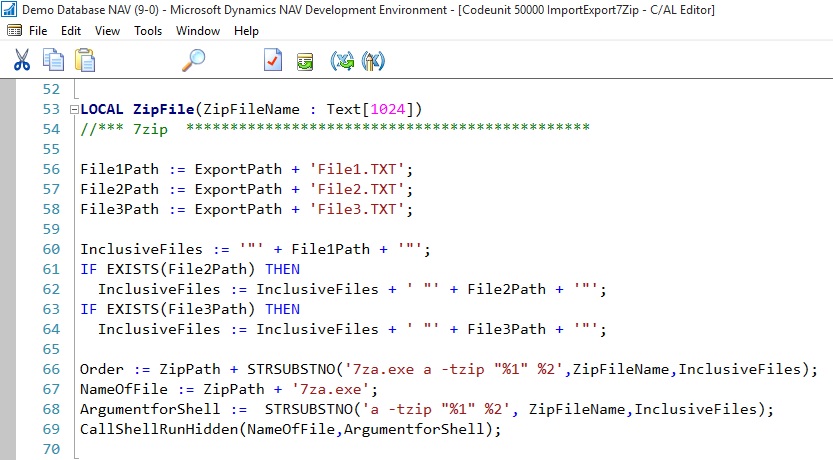
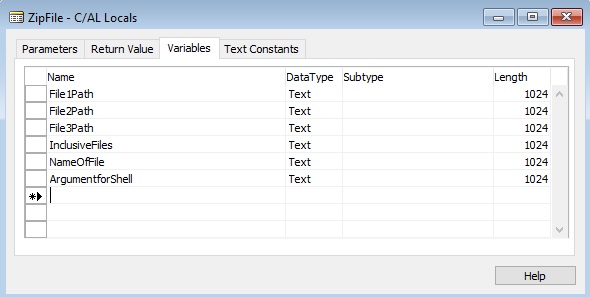
Step 6: Let us create a Function to call Zip file after preparing the Parameters for Command

Zip-UnZip-8

Zip-UnZip-9

This function prepares the path, Name of File and Argument for the Shell and finally calls the Shell function to run the command in background. At the end of function you will get Ziped file which contains the file specified in InclusiveFiles.

This way you can use above functions to Zip / Un-Zip files using 7Zip.


Unit Cost Field, Item Table

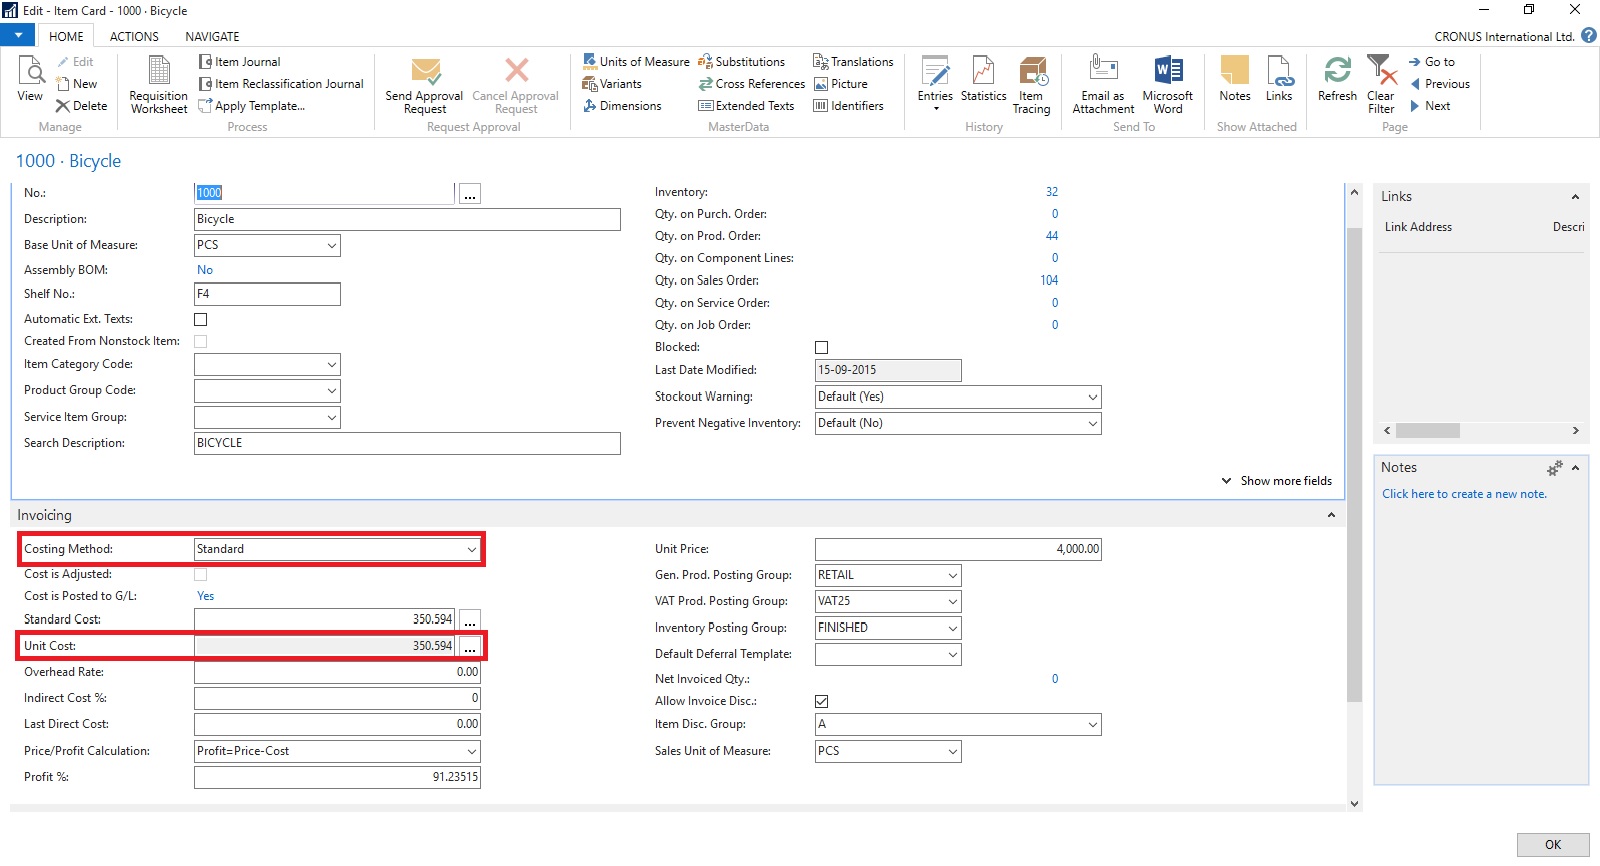
Contains the cost per unit of the item.

UnitCost-1

Depending on what you selected in the Costing Method field, the Unit Cost field is filled as follows:

  • If the costing method is Standard, then the field is grayed and non-editable.

  • If the costing method is FIFO, LIFO, Specific, or Average, then the unit cost is calculated as follows: Unit cost = inventory value of items on hand (expected cost + invoiced cost) / quantity on hand


If the costing method is FIFO, LIFO, Specific, or Average, then the Unit Cost field is updated in the following cases:

  • When the item is cost-adjusted, automatically or by the Adjust Cost – Item Entries batch job.

  • During the posting of purchase invoices, output, or positive adjustment if one of the following conditions is true:

    • The net invoiced quantity of the item changes from negative or zero to positive.

    • The current unit cost is zero.


If one of these conditions is true, then the Unit Cost field is updated with the value in the Last Direct Cost field on the item card.

Note The Unit Cost field is not updated if the current unit cost is higher than zero and the new unit cost is zero. A unit cost of zero is considered an exception from regular business. Therefore, the current unit cost is retained to provide the last known, relevant value. This exception applies even if the existing inventory has been revalued to zero.

If the item uses the costing method Average, then you can choose the field to open the Average Cost Calc. Overview window, which shows all the source value entries that are used to calculate the average cost, grouped and summarized by average cost period.


Thursday, 26 November 2015

Windows Error Reporting and Collecting Crash Dumps

For troubleshooting issues with Microsoft products in general, you can use Windows Error Reporting to report computer problems to Microsoft. Microsoft uses the problem reports to try to match descriptions of each problem to a solution. This feature is enabled by default, and generates detailed reports about the problem.

To troubleshoot application instability issues, we will often need crash dumps in addition. For Microsoft Dynamics NAV, a full crash dump might be required to provide sufficient details to isolate and fix the problem. Once crash dump is collected, contact support and provide the dump. There are number of ways and tools to collect a crash dump, but we’ll look at how to automate this action in a very simple way.

For more details see:- Here


Sunday, 22 November 2015

LS Retail Unveils Cloud-Based Management Solution for Fashion Retailers

LS Fashion Express is a more compact, cloud-based version of successful management software LS Nav, built on Microsoft Dynamics NAV. It includes everything fashion retailers need to run their business - from financials down to the Point of Sale.

See more at:
http://pointofsale.com/PointofSale.com-Blog/LS-Retail-Unveils-Cloud-Based-Management-Solution-for-Fashion-Retailers.html

Microsoft to turn Dynamics ERP into a service, starting with Dynamics AX in 2016

Microsoft to turn Dynamics ERP into a service, starting with Dynamics AX in 2016

Microsoft is preparing to release its next version of Dynamics AX ERP as a cloud-first service that will be tightly integrated with other Microsoft business services.

For more details see below link.

http://www.zdnet.com/article/microsoft-to-turn-dynamics-erp-into-a-service-starting-with-dynamics-ax-in-2016/

Tuesday, 3 November 2015

Configuring SSL to Secure the Connection to Microsoft Dynamics NAV Web Client

It is always recommend that you secure Microsoft Dynamics NAV data that is transmitted over the Internet by enabling Secure Sockets Layer (SSL) on the connection to Microsoft Dynamics NAV Web client.

Enabling SSL on a website requires that an SSL certificate is installed on the web server. An SSL certificate is a small file that the web server uses to prove its identity and establish a trusted connection with the browser that is trying to access Microsoft Dynamics NAV Web client.

When a browser connects to the Microsoft Dynamics NAV Web client, the web server replies by sending its certificate to the browser. This certificate contains the web server's public encryption key and the name of the authority that granted the certificate. The browser verifies the certificate using the authority's public key.

Note You can configure SSL for the Microsoft Dynamics NAV Web client when you install the Microsoft Dynamics NAV Web Server components.

Obtaining an SSL Certificate

In a production environment, you should obtain an SSL certificate from a certification authority. Some large organizations may have their own certification authorities, and other organizations can request a certificate from a third-party organization. In a test environment or development environment, you can create your own self-signed certificate.

To create a self-signed SSL certificate

Open Internet Information Services (IIS) Manager, on the Start menu, choose Administrative Tools, and then choose Internet Information Service (IIS) Manager.
IIS-1

  • In the Connections pane, choose the top-level node for the server.

  • On the Home page, under IIS, choose Server Certificates, and then in the Actions pane, choose Open Feature.


IIS-2

  • On the Server Certificates page, choose Create Self-Signed Certificate.

  • In the Specify Friendly Name dialog box, type a brief name for the certificate, and then choose the OK button.


IIS-3

The new certificate appears on the Server Certificate page.
IIS-4

Adding an HTTPS Binding That Uses the Certificate on the Microsoft Dynamics NAV Web Client Site

After you get the certificate, you add a binding to the https protocol on the website. When you add the binding, you associate it with the certificate.

To add an https binding with the certificate to the website

  • Open Internet Information Services (IIS) Manager.

  • In the Connections pane, expand the Sites node, and then choose the Microsoft Dynamics NAV Web client site to which you want to add the binding.


By default, the site has the name Microsoft Dynamics NAV 2016 Web Client.

  • In the Actions pane, choose Bindings.


IIS-5

  • In the Site Bindings dialog box, choose Add.

  • In the Add Site Binding dialog box, set the Type field to https.


IIS-6

You can use the default port 443 or change it to another port. If you change it to another port, you will have to provide the port number in the URL when you try to open the client.

  • Set the SSL certificate field to the certificate that you obtained or created for the site.


IIS-7

  • Choose the OK button, and then choose the Close button.


Redirecting HTTP to HTTPS (Optional)

To ensure that users always access the site that is secured with SSL, you can automatically redirect HTTP requests to HTTPS. This means that users do not have to explicitly include https in the URL in the browser.

For example, the nonsecure URL of the Microsoft Dynamics NAV Web client could be
http://mywebclient:8080/DynamicsNAV90/WebClient

The secure URL could be
https://MyWebclient:443/DynamicsNAV90/WebClient

If a user types
http://MyWebclient:8080/DynamicsNAV90/WebClient,

the browser automatically redirects to
https://MyWebclient:443/DynamicsNAV90/WebClient


There are different ways to redirect HTTP requests to HTTPS.

The following procedure describes how to redirect HTTP requests to HTTPS by installing the Microsoft Application Request Routing for IIS 7 and modifying the web.config file for the Microsoft Dynamics NAV Web client.

To redirect HTTP to HTTPS

The web.config file is located in the physical path of the web application on IIS. By default, the path is
%systemroot%\inetpub\wwwroot\[VirtualDirectoryName]\WebClient.

For example, the folder for the default Microsoft Dynamics NAV Web client application is
%systemroot%\inetpub\wwwroot\DynamicsNAV90\WebClient.


  • In the <system.webServer> element, add the following elements.


<rewrite>

<rules>

<rule name="Redirect to HTTPS">

<match url="(.*)" />

<conditions>

<add input="{HTTPS}" pattern="off" ignoreCase="true" />

</conditions>

<action type="Redirect" url="https://{SERVER_NAME}/{R:1}" redirectType="SeeOther" />

</rule>

</rules>

</rewrite>


  • Save the web.config file.


Cumulative Update 1 for Microsoft Dynamics NAV 2016 (Build 43402) Released

This cumulative update includes all hotfixes and regulatory features that have been released for Microsoft Dynamics NAV 2016, including hotfixes and regulatory features that were released in previous cumulative updates.

You can find more information here.
For more information see this Link.
Additional Information

For information about how to install the cumulative update, see How to Install a Microsoft Dynamics NAV 2016 Cumulative Update

For a list of all cumulative updates for this version, see Released Cumulative Updates for Microsoft Dynamics NAV 2016

Monday, 2 November 2015

Working with Data Encryption in Navision 2016

You can encrypt data on the Microsoft Dynamics NAV Server by generating new or importing existing encryption keys.

How to: Enable Encryption Keys

You can enable data encryption on the Microsoft Dynamics NAV Server instance that connects to the database.

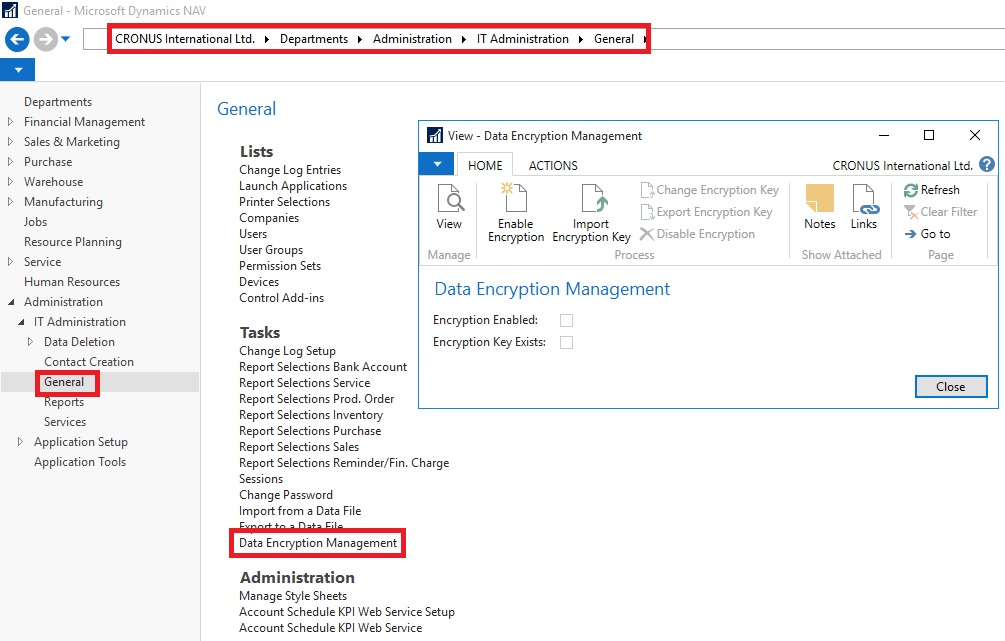
  • Open the Data Encryption Management Card, as path suggested in below Image.


DataEncryption-1

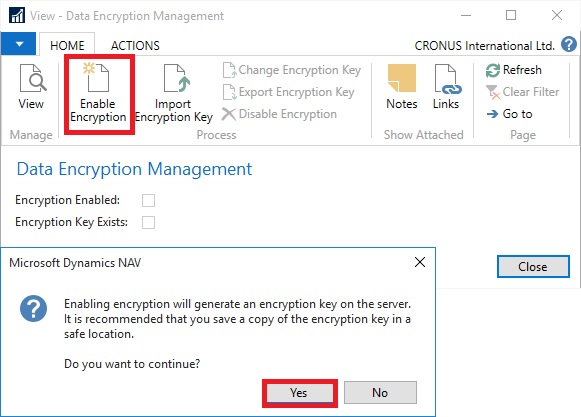
  • Click on Enable Encryption in Process of Home tab.


DataEncryption-2

  • On Confirmation Dialog box choose Yes.

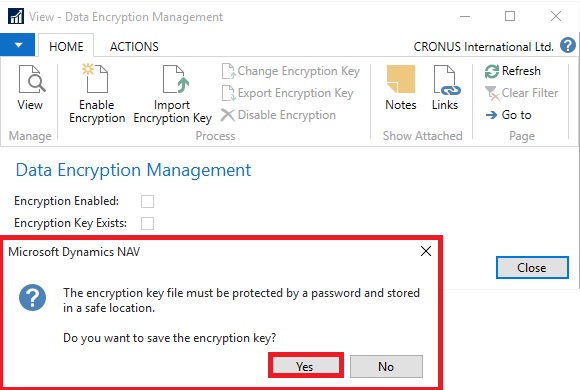
  • On further Confirmation of Password choose Yes.


DataEncryption-3

  • Enter the Password as defined in Rule as shown in below Image.


DataEncryption-4

  • Upon entering Password choose OK to continue.

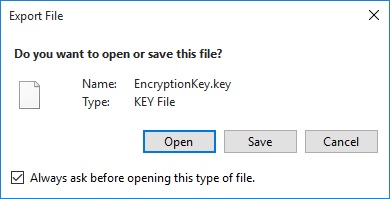
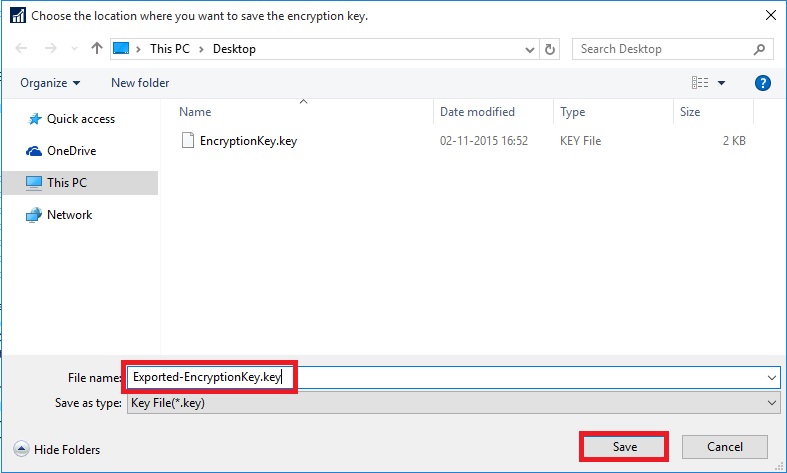
  • Key is created with password protected and offered to Export.


DataEncryption-5

  • Choose Save, and save it as Safe Location as you will require it again whenever you restore the database or Import Export the data. Please make sure you also store the password for further reference whenever required.


DataEncryption-6

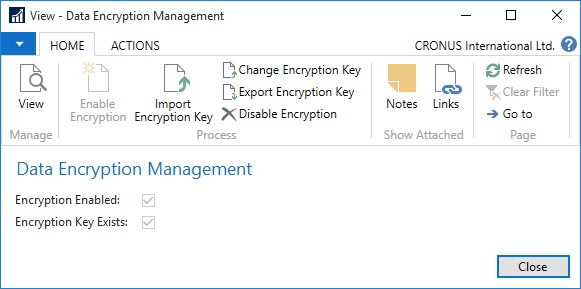
  • Once Key is generated, you can see that the Encryption Enabled & Encryption Key Exists is checked TRUE.

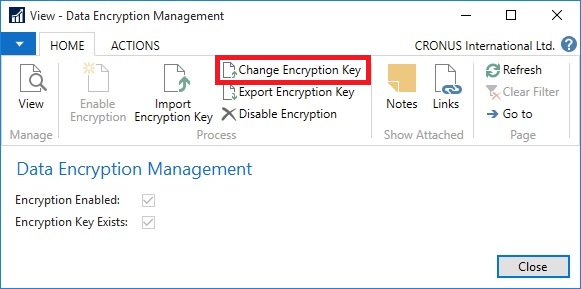
  • Also in Ribbon you will find the Change Encryption Key, Export Encryption Key & Disable Encryption is now enabled.


DataEncryption-7

  • If Microsoft Dynamics NAV is configured with multiple service tiers (Microsoft Dynamics NAV Server instances), then you must first enable encryption on one server instance, and then export the key and import to other server instances where you enable encryption.


If you export companies and other data that is secured by data encryption, then remember to also export the encryption key so that you can access the data after you import it into another database, for example when you restore a backup. Creating a backup of encrypted data involves the following high-level steps.

  • Export the data from one database.

  • Export the data encryption key.
  • Import the data into another database.


  • Import the data encryption key.


How to: Export and Import Encryption Keys

Note: You cannot generate different keys within one multiple-server instance environment.

Exporting an Encryption Key

You export an encryption key to make a copy of the key or so that it can be imported on another server instance.

Exporting an encryption key stores the encryption key that is used by the current server instance to a file on your computer or network.

To export an encryption key
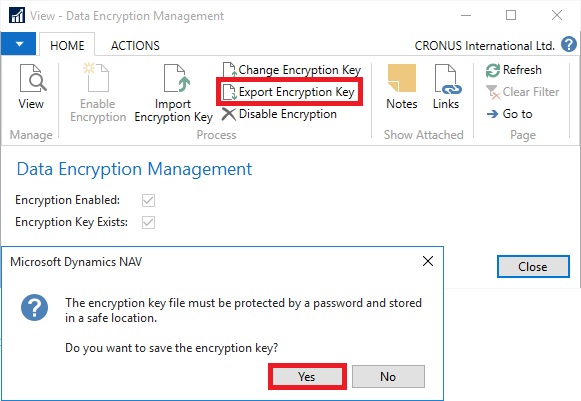
DataEncryption-8

  • On the message about saving the encryption key, choose Yes.


  • In the Set Password window, enter the password that will protect the exported key file, and then choose OK.


DataEncryption-9

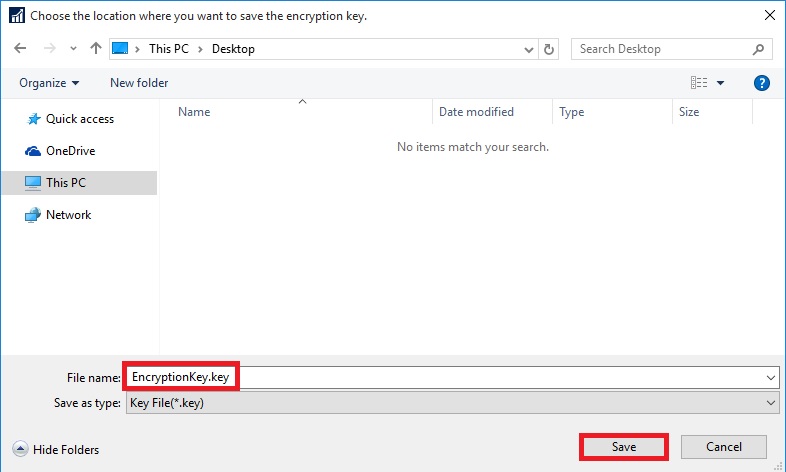
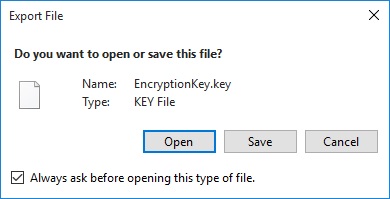
  • In the Export File window, choose Save, choose a safe location where the key file is stored, and then choose Save.


DataEncryption-10

DataEncryption-11

Importing an Encryption Key

You can import an encryption key to a server instance from an encryption key file that was exported from another server instance or saved as a copy when the encryption was enabled.

You cannot import an encryption key on a server instance that already includes an encryption key. In this case, you must change the encryption key instead.

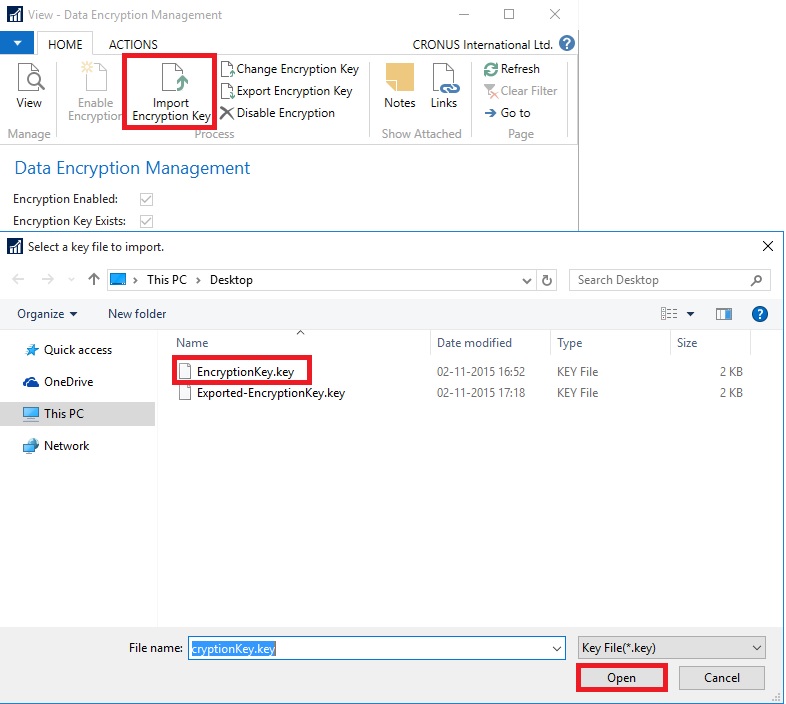
To import an encryption key
DataEncryption-12

  • On the Home tab, in the Process group, choose Import Encryption Key.

  • In the Select a key file to import window, choose the encryption key file, and then choose Open.


DataEncryption-13

  • In the Password window, enter the password that protects the key file, and then choose OK.


Changing an Encryption Key

If a server instance already has an encryption key, then you can replace the current encryption key with an encryption key that is stored in an encryption key file that was exported from another server.

To change an encryption key

  • On the Home tab, in the Process group, choose Change Encryption Key.


DataEncryption-14

  • In the Select a key file to import window, choose the encryption key file, and then choose Open. Same as in above process.

  • In the Password window, enter the password that protects the key file, and then choose OK. Same as in above process.

Working with Profiles in Navision 2016

How to: Create a Profile

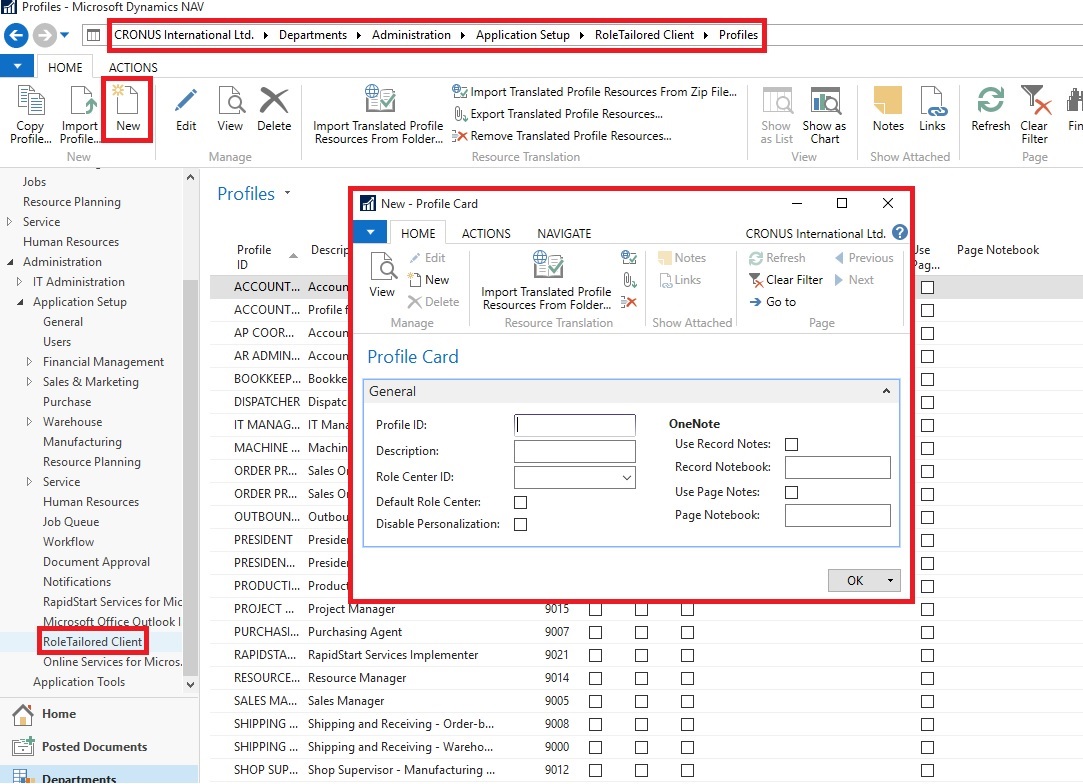
You use the Profile card to create profiles for end users. Each profile is associated with a  Role Center. Profiles are typically based on job titles in a company.

To create a profile

Profiles-1

  • In the Profile ID field, enter a name that describes the intended role of the user.

  • In the Owner ID field, click the AssistEdit button to view all available logins, and then select a Windows user.

  • In the Description field, enter a description of the Profile ID, for example, Order Processor.

  • In the Role Center ID field, click the AssistEdit button to view all available Role Centers. Select a Role Center.

  • To make this Role Center the default for the profile, select Default Role Center.

  • Click OK to save your changes.


The procedure for modifying an existing profile is the same, except you select an existing profile in the Profiles page instead of clicking New.

How to: Assign a User to a Profile

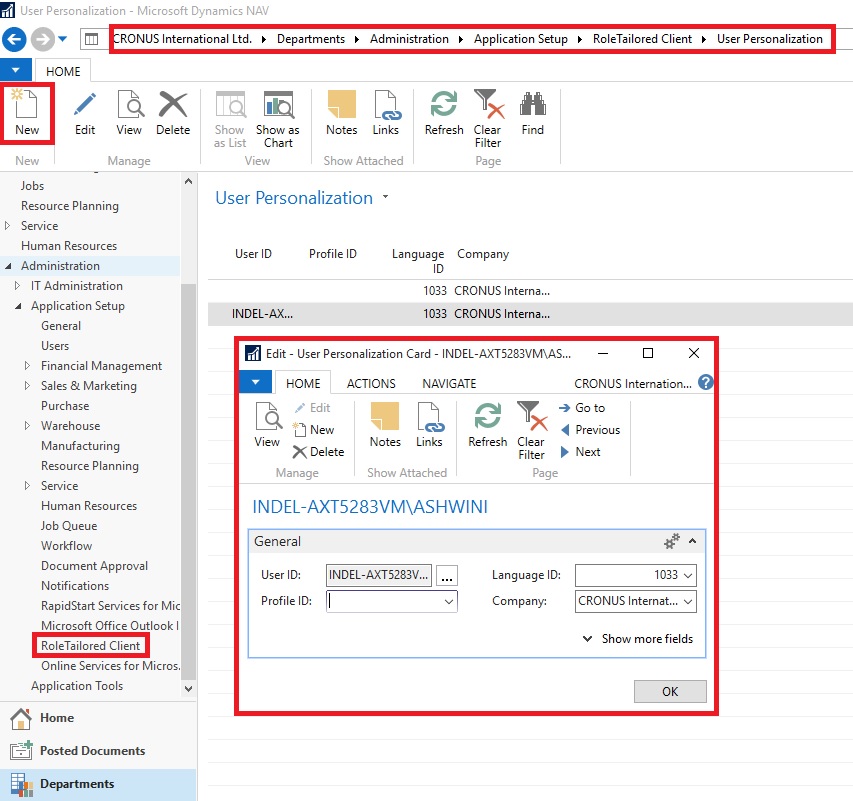
You use the User Personalization page to assign a user to a profile.

To assign a user to a profile

Profiles-2

  • In the User Personalization window, fill in the fields described in the following table.


Field Description
User IDChoose the AssistEdit button to view all available user logins, select the relevant user, and then choose the OK button.
Profile IDSelect a profile ID that you have already created. Choose the AssistEdit button to view all available profiles.
Language IDSelect the appropriate language ID, or leave this field blank.
CompanySelect a company from the Companies window.


  • Choose the OK button.


Note The Language ID and Company values are overwritten by user values when the user starts a session.

How to: Open Microsoft Dynamics NAV in Configuration Mode

To configure a profile, for example to customize the profile’s user interface, you must open the Microsoft Dynamics NAV Windows client in configuration mode.

To open the Microsoft Dynamics NAV Windows client in configuration mode

  • At the command prompt, navigate to the root folder of the Microsoft Dynamics NAV Windows client. For example:


cd C:\Program Files (x86)\Microsoft Dynamics NAV\90\RoleTailored Client


  • Type the following command:


Microsoft.Dynamics.Nav.Client.exe -configure -profile:"profileid"

Replace profileid with the name of the profile that you want to configure.

Important You must be the owner of a profile to open it in configuration mode

For example, to configure the Accounting Manager profile, use this command to open the Microsoft Dynamics NAV Windows client in configuration mode:
Microsoft.Dynamics.Nav.Client.exe -configure -profile:"Accounting Manager"

Sunday, 1 November 2015

Achievments in Oct 2015

Dear Friends,

Today I am not writing any blog, wanted to share status as usually I do in every month as my first post.

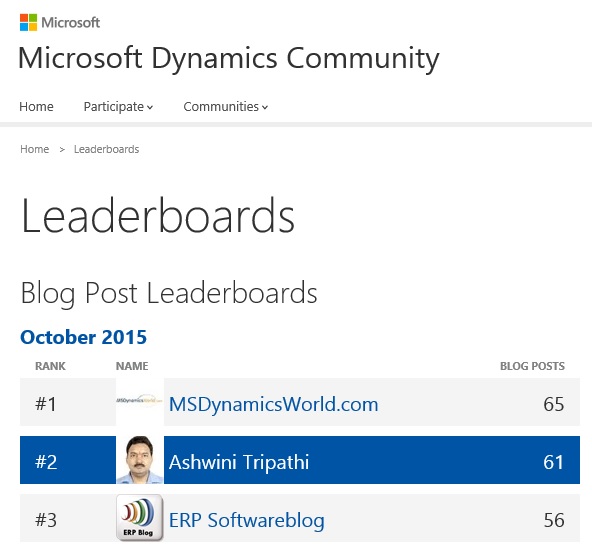
I was awarded with Top 10 Blogger in July month and my Rank was 6, in Aug moved to Rank 3, in Sep slipped to Rank 4 and in this month Oct Ranked to 2.

October was full of excitement as new Version of Navision 2016 was officially released. Lots of new posts from entire blog community was so excited that everyone flooded with new posts on this topic.

I stepped in blogging world 4 months ago, on 27 June 2015 I published my first post.

During this period I published almost 205 posts, most of them were more on technical side, Development Tips & Tricks.

Being a technical what I learned in past 10 years want to share with you all.

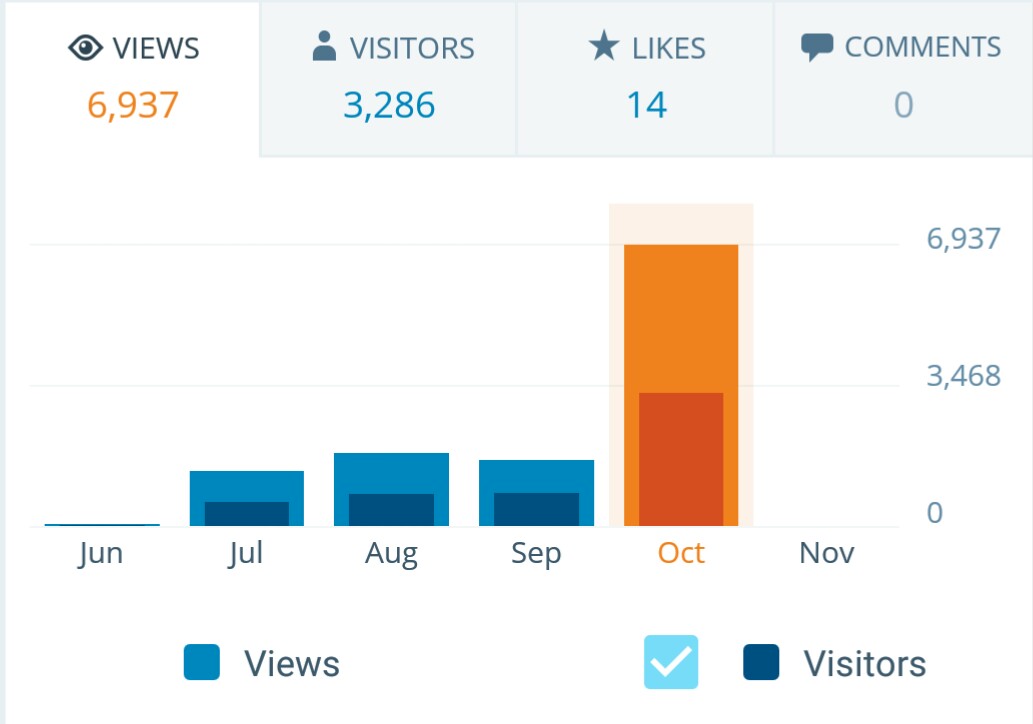
The best thing which happened this month was that my Blog Site crossed 11000 hits almost 12000. Prior to Oct in 3 months total hit was less than alone that it was received itself in this month, Thanks to all of the visitors from bottom of my heart, hope you will keep showering your blessings in future too.
OctAward-1
Also my Google+ Page crossed 26000 hits almost 27000.
OctAward-2

OctAward-3

OctAward-4

OctAward-5

Stay tuned Follow the blog, Register to Feeds, Like the Facebook Page, Connect with Google + Page, Connect with Dynamics NAV Community, Connect with Twitter and Join on LinkedIn to remain updated about new posts. If you are technical don’t miss to get connected by any medium. I will make sure you keep getting good and useful stuffs.

I have created one Group on LinkedIn  also this month started Hike Group , join them so that we can discuss on some good topics where you can participate & are free to express your views and review others view.

Together we can learn from each other, no one is perfect in this world, its never late for learning.

Please participate and suggest topics, which you wish to see  on this blog. During this period I received request from many of you and tried to fulfil few requests. Request which yet I have not responded doesn’t mean I am not considering, I will make sure those too get posted at earliest.

After full day hectic schedule hardly I am able to takeout 2 hrs. for this task.

I will keep serving the community on my full strength.

I am speechless how to thank you all showing so much Love and Faith on my Blog.

Seeing your Love and Recognition you all given to me in Oct 2015 month, I am feeling bit emotional today I am not able to stop myself saying below quote
OctAward-6
Seeing forward same spirit and love from you all in future too.

It is always good welcoming new ones without losing them who are with you.

See you all via my next post soon.