Thursday, 13 August 2015

SETAUTOCALCFIELDS Function - in Nav 2015

Sets the FlowFields that you specify to be automatically calculated when the record is retrieved from the database.
[OK :=] Record.SETAUTOCALCFIELDS([Field1,Field2, …])

To remove the automatic calculation setting on a field that you previously set with the SETAUTOCALCFIELDS function, you must call SETAUTOCALCFIELDS without parameters.

If you omit the optional return value and if the record cannot be set to automatically calculate, then a run-time error occurs.

If you include a return value, then you must handle any errors.

You can improve performance by using the SETAUTOCALCFIELDS function before looping through records with FlowFields instead of calling the CALCFIELDS function on each record in the loop.

The automatic calculation setting applies to the fields that you specify until the Record parameter goes out of scope or until you call SETAUTOCALCFIELDS without any parameters.

The fields that you specify in the Field parameters are added to any fields that you previously set with the SETAUTOCALCFIELDS function. Previously set fields are not overwritten when you call SETAUTOCALCFIELDS with different parameters. To clear the list of fields that are automatically calculated, call the SETAUTOCALCFIELDS function without parameters.

If you assign a record to another record variable, then the automatic calculation setting on FlowFields is not transferred with the record.

If you copy a record by using the COPY Function (Record), then the automatic calculation setting on FlowFields is copied with the record.

The Rec and xRec system variables are set to always automatically calculate FlowFields. If you call the NEXT function on Rec or xRec, then FlowFields in the record are automatically calculated.

Below example show how to use the CALCFIELDS function.
// Using CALCFIELDS

IF (Customer.FIND(’-’)=true) THEN

REPEAT

Customer.CALCFIELDS(Balance,"Net Change");

… // your other codes for processing.

UNTIL (Customer.NEXT=0)

Below example show how you can use the SETAUTOCALCFIELDS function instead of the CALCFIELDS function to improve performance.
// Using SETAUTOCALCFIELDS

Customer.SETAUTOCALCFIELDS(Balance,"Net Change");

IF (Customer.FIND(’-’)=true) THEN

REPEAT

// Customer.Balance and Customer."Net Change" have been auto calculated.

… //your rest of the code for processing.

UNTIL (Customer.NEXT=0)

The following example shows how to add fields to the list of automatically calculated FlowFields and how to clear the list of automatically calculated FlowFields
Customer.SETAUTOCALCFIELDS(Balance);

Customer.SETAUTOCALCFIELDS("Net Change");

// Above lines are equivalent to the following:
Customer.SETAUTOCALCFIELDS(Balance,"Net Change");

// To clear the list of automatically calculated FlowFields so that no fields are calculated automatically, use the following code.
Customer.SETAUTOCALCFIELDS();

It is a common task to retrieve data and request calculation of associated FlowFields. The following example traverses customer records, calculates the balance, and marks the customer as blocked if the customer exceeds the maximum credit limit.

Note the below Customer record and associated fields are imaginary.
IF Customer.FINDSET() THEN

REPEAT

Customer.CALCFIELDS(Customer.Balance)

IF (Customer.Balance > MaxCreditLimit) THEN BEGIN

Customer.Blocked = True;

Customer.MODIFY();

END  ELSE IF (Customer.Balance > LargeCredit) THEN BEGIN

Customer.Caution = True;

Customer.MODIFY();

END;

UNTIL Customer.NEXT = 0;

In Microsoft Dynamics NAV 2015, you can do this much faster. First, we set a filter on the customer.

This could also be done in Microsoft Dynamics NAV 2009, but behind the scenes the same code as mentioned earlier would be executed.

In Microsoft Dynamics NAV 2015, setting a filter on a record is translated into a single SQL statement.
Customer.SETFILTER(Customer.Balance,’>%1’, LargeCredit);

IF Customer.FINDSET() THEN REPEAT

Customer.CALCFIELDS(Customer.Balance)

IF (Customer.Balance > MaxCreditLimit) THEN BEGIN

Customer.Blocked = True;

Customer.MODIFY();

END   ELSE IF (Customer.Balance > LargeCredit) THEN BEGIN

Customer.Caution = True;

Customer.MODIFY();

END;

UNTIL Customer.NEXT = 0;

In the previous example, an extra call to CALCFIELDS still must be issued for the code to be able to check the value of Customer.Balance.

In Microsoft Dynamics NAV 2015, you can optimize this further by using the new SETAUTOCALCFIELDS function.
Customer.SETFILTER(Customer.Balance,’>%1’, LargeCredit);

Customer.SETAUTOCALCFIELDS(Customer.Balance)

IF Customer.FINDSET() THEN REPEAT

IF (Customer.Balance > MaxCreditLimit) THEN BEGIN

Customer.Blocked = True;

Customer.MODIFY();

END   ELSE IF (Customer.Balance > LargeCredit) THEN BEGIN

Customer.Caution = True;

Customer.MODIFY();

END;

UNTIL Customer.NEXT = 0;

Cumulative Update 10 for Microsoft Dynamics NAV 2015 (Build 42222)

https://mbs2.microsoft.com/Knowledgebase/KBDisplay.aspx?scid=kb;EN-US;3086434


Posted from WordPress for Android

Tuesday, 11 August 2015

How to list Virtual Tables in Navision

You may have seen several posts listing the Virtual tables. Most of they say you create page/form and type in one by one table id in Range (2000000001.. 2000000200) and find the Virtual Tables and note them.
Today I will demo you easy way for getting this list with no additional efforts.

You will get below table list in every posts. I have listed tables below in Nav-2015.


Object DesignerVirtualItself from Virtual Table
TypeIDName Object TypeObject IDObject Name
YesTable2000000001Object
12000000004Permission SetTable2000000004Permission Set
12000000005PermissionTable2000000005Permission
12000000006CompanyTable2000000006Company
YesTable2000000007Date
YesTable2000000009Session
YesTable2000000020Drive
YesTable2000000022File
YesTable2000000026Integer
YesTable2000000028Table Information
YesTable2000000029System Object
YesTable2000000038AllObj
YesTable2000000039Printer
YesTable2000000040License Information
YesTable2000000041Field
YesTable2000000043License Permission
YesTable2000000044Permission Range
YesTable2000000045Windows Language
YesTable2000000048Database
YesTable2000000049Code Coverage
12000000053Access ControlTable2000000053Access Control
YesTable2000000055SID - Account ID
YesTable2000000058AllObjWithCaption
YesTable2000000063Key
12000000065Send-To ProgramTable2000000065Send-To Program
12000000066Style SheetTable2000000066Style Sheet
12000000067User Default Style SheetTable2000000067User Default Style Sheet
12000000068Record LinkTable2000000068Record Link
12000000069Client Add-inTable2000000069Client Add-in
12000000071Object MetadataTable2000000071Object Metadata
12000000072ProfileTable2000000072Profile
12000000073User PersonalizationTable2000000073User Personalization
12000000074Profile MetadataTable2000000074Profile Metadata
12000000075User MetadataTable2000000075User Metadata
12000000076Web ServiceTable2000000076Web Service
12000000078ChartTable2000000078Chart
12000000079Object TrackingTable2000000079Object Tracking
12000000080Page Data PersonalizationTable2000000080Page Data Personalization
12000000100Debugger BreakpointTable2000000100Debugger Breakpoint
YesTable2000000101Debugger Call Stack
YesTable2000000102Debugger Variable
YesTable2000000103Debugger Watch Value
12000000104Debugger WatchTable2000000104Debugger Watch
12000000110Active SessionTable2000000110Active Session
12000000111Session EventTable2000000111Session Event
12000000112Server InstanceTable2000000112Server Instance
12000000114Document ServiceTable2000000114Document Service
12000000120UserTable2000000120User
12000000121User PropertyTable2000000121User Property
12000000130DeviceTable2000000130Device
YesTable2000000135Table Synch. Setup

All marked as Yes in above table under Virtual column are all the Virtual Tables.

I have not type one by one in the Page/form to get this list.

The Virtual table itself in Navision lists the Virtual tables in Navision. List can be different depending on the Version of Navision you see them.

Today I will share you smart way of finding this list of Virtual tables.

Next time you need not to do so hard work to list all the Virtual tables.

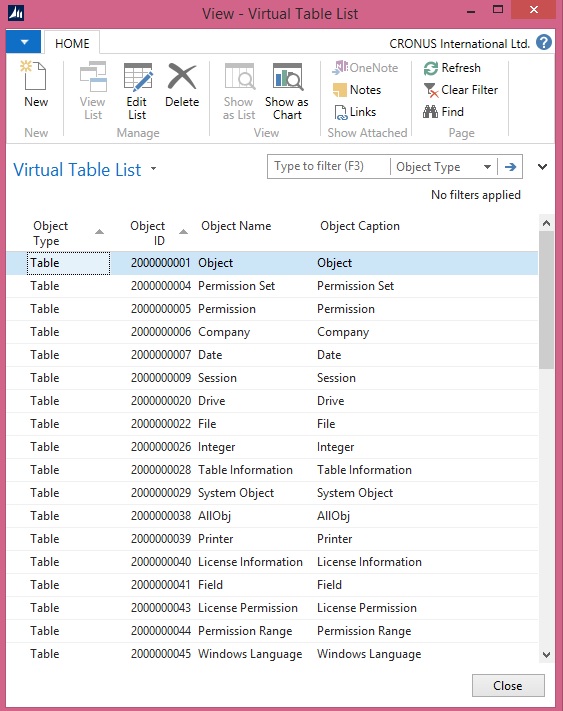
Here too you need to create a list page but you will not be required to key in the id of tables one by one, in fact only one table id which will give answers to your query.
VirtualTables-1
Save and execute your Page/Form.

VirtualTables-2
Now go to object Designer. Copy all the tables with id in range defined above and paste in Excel.

Copy above table list in Excel side by side and compare as above table shown in beginning of the post. All those which don’t match are your Virtual tables.

So easy, if anything is available why to waste effort for same.

It always good to share what you know with community, by this way we keep learning from each other.

Stay tuned for many such Tips.

Sunday, 9 August 2015

Configuring Web Services to Use SSL (SOAP and OData)

Secure Sockets Layer (SSL) is a cryptographic protocol that helps provide security and data integrity for data communications over a network.

By encrypting your Microsoft Dynamics NAV web services using SSL, you make your data and the network more secure and more reliable.

Microsoft Dynamics NAV Web Services and SSL


Microsoft Dynamics NAV supports SSL authentication for SOAP and OData web services.

The server authenticates itself to the client, but the client does not authenticate itself to the server.

When the web service client connects to the Microsoft Dynamics NAV Server instance, the server replies by sending its digital certificate to the client. This certificate contains the server's public encryption key and the name of the authority that granted the certificate. The client verifies the certificate using the authority's public key.

We have covered above top related to Creating and Implementing Certificates for Microsoft Dynamics NAV Server. If not seen please follow below links for better understanding:

How to create a root CA and a private key file by using the makecert.exe utility

How to create certificate revocation list for the root certification authority

How to create and install a test certificate for the Microsoft Dynamics NAV Server computer

How to grant access to the certificate’s private key to the service account for the Microsoft Dynamics NAV Server

Implementing Security Certificates.

Configuring Microsoft Dynamics NAV Web Services to Use SSL


The first step is to prepare Microsoft Dynamics NAV to use SSL. This involves configuring the relevant Microsoft Dynamics NAV Server instance to specify SSL.

The following procedure uses Microsoft Dynamics NAV Server Administration tool to configure the Microsoft Dynamics NAV Server instance.

  • Choose the Start button, and in the Search programs and files box, type Microsoft Dynamics NAV Administration, and then choose the related link.

  • In Microsoft Dynamics NAV Server Administration tool, in the left pane, under Console Root, expand the node for the Microsoft Dynamics NAV Server computer. This is typically named Microsoft Dynamics NAV (Local), which is the local computer.


The Microsoft Dynamics NAV Server instances on the computer appear in the left pane and center panes.

In the left pane, choose the relevant instance to display settings for that instance in the center pane.

UseSSL-1

  • At the bottom of the center pane, choose Edit.

  • To configure SOAP web services to use SSL, expand the SOAP Web Services tab, and then select the Enable SSL


Make a note of the port that is used by SOAP web services. You will need the port number later on in this walkthrough.

UseSSL-2

  • To configure OData web services to use SSL, expand the OData Web Services tab, and then select the Enable SSL


Make a note of the port that is used by OData web services. You will need the port number later on in this walkthrough
UseSSL-3

  • Choose Save at the bottom of the center pane.

  • In the right pane, under Actions, choose Login Account.

  • Make a note of the service account information. You will need this information later on in this walkthrough.


UseSSL-4

Configuring the Access Control List and the Web Services Ports for SSL


An access control list (ACL) is part of the Windows security infrastructure and features. The ACL controls who can access resources on a computer.

Note

These procedures use the netsh tool (netsh.exe) for configuring the HTTP server. The netsh tool is supplied with Windows 7 and Windows Server 2008.

By default the netsh tool is located in the c:\Windows\System32 folder.

To configure the ACL


  1. On the computer running Microsoft Dynamics NAV Server, open a command prompt as an administrator as follows:


    1. From the Start menu, choose All Programs, and then choose Accessories.

    2. Right-click Command Prompt, and then choose Run as administrator.


  1. At the command prompt, type the following command to change to the Windows\System32 directory.


cd\Windows\System32


  1. To view the ACL for the web services ports to determine if any entries are already using the relevant host name and port, type the following command:


netsh http show urlacl

  1. Each entry is listed by the Reserved URL field, which has the format http://hostname:port. hostname is the name of the computer running the service and port is the port number the service runs on. A '+' (plus sign) in the Reserved URL field represents localhost, which indicates the computer that you are working on.

  2. By default, SOAP and OData web services in Microsoft Dynamics NAV use ports 7047 and 7048, respectively, and connect to a Microsoft Dynamics NAV Server instance named DynamicsNAV80. The default reserved URL entries for these services are: http://+:7047/DynamicsNAV80/ and http://+:7048/DynamicsNAV80/.

  3. You must delete any entries that use the same port as the SOAP or OData web services.


To delete an entry, type the following command:
netsh http delete urlacl url=http://hostname:Port/NAVserver/

Substitute Port with the port number of the SOAP or OData web service and NAVserver with the name of the Microsoft Dynamics NAV Server instance.

For example, to delete the default entries for SOAP and OData, use the following two commands:
netsh http delete urlacl url=http://+:7047/DynamicsNAV80/

netsh http delete urlacl url=http://+:7048/DynamicsNAV80/


  1. To register the ports for the SOAP and OData web service with https, type the following command for each service:


netsh http add urlacl url=https://hostname:port/navserver user=DOMAIN\user


  1. Substitute the following options with the proper values:


Option Description
hostnameThe name of the computer running Microsoft Dynamics NAV Server. Use + for localhost.
portThe port that is used by the web service.
navserverThe name of the Microsoft Dynamics NAV Server instance to use with the web service. The default is DynamicsNAV80.
DOMAIN\usernameThe domain and user name of the service account for Microsoft Dynamics NAV Server. If the service account for Microsoft Dynamics NAV Server is Network Service, then use "NT AUTHORITY\NETWORK SERVICE".


  1. For example, if the service account for Microsoft Dynamics NAV Server has the domain ABC and the user name xyz, and then the command for the SOAP web service is as follows:


netsh http add urlacl url=https://+:7047/DynamicsNAV80 user="NT AUTHORITY\NETWORK SERVICE"


  1. If the service account for Microsoft Dynamics NAV Server is Network Service, then the command is as follows:


netsh http add urlacl url=https://+:7047/DynamicsNAV80 user="NT AUTHORITY\NETWORK SERVICE"


  1. To verify that your port has been registered, repeat step 3.


To configure the port to use the SSL certificate


  1. At the command prompt, type the following command to view the current port configurations:


netsh http show sslcert

  1. All port bindings to SSL certificates are listed. Each entry is indicated by the IP:port field, where IP is the IP address that uses the port (0.0.0.0 indicates all IP addresses) and port is the port number.

  2. If SSL is already configured on the address and port that you want to use for SOAP or OData web services, then use the following command to delete the entry:


netsh http delete ssl ipport=ipaddress:port


  1. Substitute ipaddress and port with the IP address and port number of the entry that you want to delete.

  2. For example, to delete the entry on the default SOAP port, use the following command:


netsh http delete ssl ipport=0.0.0.0:7047


  1. To bind an SSL certificate to the SOAP or OData web service port, use the following command:


netsh http add sslcert ipport=ipaddress:port certhash=thumbprint appid={id}


  1. Substitute the following options with the proper values:


Option Description
ipaddressThe IP address that can use the web service. Use 0.0.0.0 to include all IP addresses.
portThe port that is used by the web service.
thumbprintThe certificate thumbprint that you obtained in previous post.
idA 32-digit hexadecimal number that identifies the Microsoft Dynamics NAV application. The id must be in the format {NNNNNNNN-NNNN-NNNN-NNNN-NNNNNNNNNNNN). If you do not know the appid, then use any value, such as {00112233-4455-6677-8899-AABBCCDDEEFF}.


  1. For example, the following command binds a certificate that has the thumbprint c0d0f27095b03d4317e219841024328cef248779 to port 7047 for all IP addresses:


netsh http add sslcert ipport=0.0.0.0:7047 certhash=c0d0f27095b03d4317e219841024328cef248779 appid={00112233-4455-6677-8899-AABBCCDDEEFF}

Imp Note: - Please replace the port and thumbprint values with your valid values.

Restart the Microsoft Dynamics NAV Server Instance


You can use the Microsoft Dynamics NAV Server Administration Tool to restart the Microsoft Dynamics NAV Server instance.

To restart Microsoft Dynamics NAV Server


  1. In Microsoft Dynamics NAV Server Administration tool, in the left pane, under Console Root, choose the Microsoft Dynamics NAV Server computer.

  2. In the center pane, choose the Microsoft Dynamics NAV Server instance that you have configured, and then in the right pane under Actions, choose Restart.

  3. After the instance restarts, close Microsoft Dynamics NAV Server Administration tool.


Verifying the Configuration


You should now be able to use web services that are encrypted with SSL. To verify this, type the following URL in the address bar for your browser.
https://localhost:7047/DynamicsNAV80/WS/services

The page lists any web services that have been published.

Saturday, 8 August 2015

Using Automation to Write a Letter in Microsoft Office Word

Automation lets you use the capabilities and features of Microsoft Office products, such as Microsoft Word or Microsoft Excel, in your Microsoft Dynamics NAV application.

Today we will implement Word Automation from a customer card in the Microsoft Dynamics NAV Windows client.

Note: The Microsoft Dynamics NAV Web client does not support automation.

Most information that we need to transfer to Word for this example is in the Customer table. The Customer table contains a FlowField called Sales (LCY) that contains the aggregated sales for the customer.

In this example we are learning about Automation, so we will use the existing value. In a real customer installation, we would need to set up an appropriate date filter to get the sales for the past year only.

We also need to retrieve the information about our own company that we will use in the letterhead and in the greeting of the letter. This information is contained in the Company Information and User tables.

  • The Automation server must be installed on the computer that compiles an object that uses Automation. If you must recompile and modify an object on a computer that does not have the Automation server installed, then you must modify the code to compile it again. We recommend that you isolate code that uses Automation in separate codeunits.

  • Performance can be an issue if extra work is needed to create an Automation server with the CREATE system call. If the Automation server is to be used repeatedly, then you will gain better performance by designing your code so that the server is created only once instead of making multiple CREATE and CLEAR calls).


Performance can be improved by putting the code on the customer card because you do not have to open and close Word for each letter that is created in the session.

You can work around this problem. If Word is already open when it is called from the code, then the running instance is reused. You can manually open Word or do not close Word after creating the first letter.

We will extract and transfer data one customer at a time. We will also initiate this processing and the subsequent processing in Word from the customer card.

We will insert fields into the Word template and give these fields convenient mnemonic names that correspond to the names of the record fields that we are using.

To make this work, C/AL code must make two extra calls to Microsoft Office Word. You must call the ActiveDocument.Fields.Update method before using the fields. After you have transferred all the information, you must call the ActiveDocument.Fields.Unlink method. This ensures that you can successfully use the Word fields as placeholders.

In addition, while you can name the Customer or Address fields, you must reference them by indexing into the Fields collection of the document. This can make the C/AL code harder to understand.

Creating the Word Template for Use by Automation


First, task is to create a Word template that we will use to create letters to customers that qualify for a discount. To create the template, we will add mail merge fields for displaying data that is extracted from Microsoft Dynamics NAV that you want included in the customer letter, such as the customer's name, contact, and total sales.

You will create and save the template on the computer running the Microsoft Dynamics NAV Windows client, because you will configure the automation object to run on the client.

  • On the computer running Microsoft Dynamics NAV Windows client, open Word and create a new document.


WordAutomation-1

  • Choose where you want to insert the fields. Then, on the Insert tab, in the Text group, choose Quick Parts, and then choose Field.


WordAutomation-2

  • In the Categories list, select Mail Merge.

  • In the Field names list, select MergeField.

  • In the Field Name box under Field Properties, type Contact. This field will display the name of your contact person at the customer site as taken from the Customer table.

  • Choose OK to add the field.


WordAutomation-3

  • Repeat steps as above to add the remaining fields as follows:


Field name Description Underlying table
NameThe name of the customer.Customer
AddressThe address of the customer.Customer
Sales (LCY)The total amount that the customer has purchased from you.Customer
Company NameThe name of your company.Company Information


  • Save the Word document as a template with the name Discount.dotx in folder of your choice.


WordAutomation-4

Creating the Codeunit and Declaring the Variables


The next step is to create the codeunit that calls Word and creates the letter.

To create the codeunit


  • In Object Designer, choose Codeunit, and then choose the New button to create a new codeunit.

  • On the View menu, choose Properties to open the Properties window of the codeunit.

  • In the TableNo field, choose the AssistEdit button to open the Table List window.

  • In the Table List window, select the Customer table, and then choose OK.


WordAutomation-5

  • Close the Properties window.


To declare the variables


  • Choose the OnRun Trigger and on the View menu, choose C/AL Locals, and then choose the Variables tab.

  • On a blank line, type wdApp in the Name field and set the Data Type field to Automation.


Note

When you create an Automation variable, some hidden events are also created for it. If you want to delete the variable, be aware that the events are also not deleted. This can cause issues if you then create a variable with the same name.

  • In the Subtype field, choose the AssistEdit button. The Automation Object List window is displayed.

  • In the Automation Server field, choose the AssistEdit button.

  • In the Automation Server List, select Microsoft Word 15.0 Object Library if you are running Word 2013, or select Microsoft Word 14.0 Object Library if you are running Word 2010, and then choose OK.

  • From the list of classes in the Automation Object List, select the Application class, and then choose OK.


WordAutomation-6

  • Repeat steps above to add the following two Automation variables:


Name Data type Subtype Class
wdDocAutomationMicrosoft Word 14.0/15.0 Object LibraryDocument
wdRangeAutomationMicrosoft Word 14.0/15.0 Object LibraryRange


  • Add the following variables.


Name Data type Subtype Length
CompanyInfoRecordCompany Information
TemplateNameText250


  • Close the C/AL Locals window.


Writing the C/AL Code


Before you start writing the C/AL code that uses Automation, you must do some initial processing. You start by calculating the Sales (LCY) FlowField. Then, you check whether the customer qualifies for a discount. Finally, you retrieve the information from the Company Information and User tables that you use to fill in some of the fields in the letter.

To write the C/AL code


  • In the C/AL Editor, add the following lines of code to the OnRun section.


  CALCFIELDS("Sales (LCY)");CompanyInfo.GET;


  • To create an instance of Word before using it, enter the following line of code.


 CREATE(wdApp, FALSE, TRUE);


  • This statement creates the Automation object with the wdApp variable.


    1. The first Boolean parameter in the statement (FALSE) tells the CREATE function to try to reuse an already running instance of the Automation server that is referenced by Automation before creating a new instance. If you change this to TRUE, then the CREATE function always creates a new instance of the Automation server.

    2. The second Boolean parameter in the statement creates the Automation object on the client. This is necessary to use this codeunit on a page in the Microsoft Dynamics NAV Windows client.


  • Enter the following lines of code to add a new document to Word that uses the template that you designed earlier. If required, replace C:\Users\atripathi5283\Desktop\Nav-2015\Word Letter with the correct folder path to the template that you defined in the procedure.


 TemplateName := C:\Users\atripathi5283\Desktop\Nav-2015\Word Letter\Discount.dotx';wdDoc := wdApp.Documents.Add(TemplateName);wdApp.ActiveDocument.Fields.Update;


  • Because the Add method of the Documents collection requires that you pass the path to the template by reference, you must set up the TemplateName variable to hold this information. You will get a compilation error if you put the path into the call as a literal string.

  • The Documents property returns a Documents collection that represents all open documents. You can also see that the Documents collection object has an Add method, and that the Add method has the following syntax.

  • expression.Add(Template, NewTemplate, Document Type, Visible)

  • expression is a required argument, and it must be an expression that returns a Documents object. All the arguments are optional. You will use Template to open a new document that is based on your template.

  • For the syntax in the C/AL Symbol Menu, note that the Documents property returns an object of type DOCUMENTS, which is a user-defined type. The property returns a Documents class or IDispatch interface. This information helps the compiler perform a better type check during compilation. The following statement can also pass both the compile-time and the run-time type checks.

  • wdDoc := wdApp.Documents.Add(TemplateName);

  • Finally, the Add method returns a Document class. While you did not need to declare a C/AL variable for the interim Documents class, you have declared a variable for the wdDoc return value,.

  • The third line contains a call that must be made to ensure that the template works as intended.

  • wdApp.ActiveDocument.Fields.Update;


Transferring Data to Word


Now you can transfer the actual data from the Customer record to the placeholder fields in the Word document.

You have set up the first three fields in the template so that they can contain the contact, name, and address of the customer and you can transfer the data.

To transfer data to Word


  • Transfer the data by adding the following lines of code.


 wdRange := wdAPP.ActiveDocument.Fields.Item(1).Result; wdRange.Text := Contact; wdRange.Bold := 1; wdRange := wdAPP.ActiveDocument.Fields.Item(2).Result; wdRange.Text := Name; wdRange.Bold := 1; wdRange := wdAPP.ActiveDocument.Fields.Item(3).Result; wdRange.Text := Address; wdRange.Bold := 1;


  • You cannot use the fields directly as variables and make an assignment such as Fields.Item(3) := Address. Instead, you use the Result property of the field. This property returns the result of the field as a range. You place this range in the wdRange Automation variable that you declared.

  • You then set the Text property of the range to the desired values, which is the name of your contact person and the name and address of the customer. Finally, you add bold formatting.

  • The data you are transferring must be in text format. If it is not in text format, then you get a compilation error. wdRange.Text expects arguments to be of type BSTR, which maps to either Text or Code. This means that any data that is not Text or Code must be converted before it is passed to Word. To convert a field to Text, you use the FORMAT function. All the fields that are transferred in this step are in text format, so no conversion is needed and the FORMAT function is not used. However, in this example, you also need to transfer the Sales (LCY) field, which is a Decimal field. To see how to convert the Sales (LCY) field, go to the next step.

  • To transfer and format the data from the Sales (LCY) field, add the following code.


 wdRange := wdAPP.ActiveDocument.Fields.Item(4).Result;wdRange.Text := FORMAT("Sales (LCY)");wdRange.Bold := 0;


  • To transfer the information from the Company Information table, add the following code.


 wdRange := wdApp.ActiveDocument.Fields.Item(5).Result;wdRange.Text := CompanyInfo.Name;


  • To complete the processing in Word, add the following code.


 wdApp.Visible := TRUE;wdApp.ActiveDocument.Fields.Unlink;


  • The first statement opens Word and shows you the letter that was created. The second statement makes the fields work as placeholders.


WordAutomation-7

  • Save and compile the codeunit


To-Do List


Although this code will work, you must add a few things to make it complete:

  • We recommend that you do not use a hardcoded template name. You should keep the template name in a table, and the user should select it from a page. You can then have different templates for different types of letters that you want to send to your customers.

  • You should add some error-handling code. For example, the CREATE call fails if the user does not have Word installed or if the installation has been corrupted. You should check the return value of CREATE and give an appropriate message if it fails.

  • The user should get a message if the customer does not qualify for the discount. In the example, the codeunit closes without any message.


Calling the Codeunit from the Customer Card

The final task is to ensure that you can call the codeunit from the Customer Card page in the Microsoft Dynamics NAV Windows client.

To call the codeunit from the Customer card page in the Microsoft Dynamics NAV Windows client


  • Open Object Designer, and then choose Page.

  • Select the Customer Card page and then choose Design.

  • On the View menu, choose Page Actions.

  • To add a new action, locate the action container with the subtype set to ActionItems.

  • Right-click the next line after the ActionItems container, and then choose New.

  • In the Caption field of the new line, type Word Letter.

  • Set the Type field to Action.

  • With the new action selected, on the View menu, choose Properties.

  • In the RunObject field, type codeunit Discount Letter.


Note

If you saved the codeunit that you created in the previous procedure under a different name, then substitute Discount Letter with the name that you used.

  • Use the arrow buttons to make sure that the new action is indented only once from the ActionItems container above it


WordAutomation-8

  • Save and compile the Customer Card page.


To run the Customer Card and view the Word letter

  1. In Object Designer, choose the Page

  2. Select the Customer Card page, and then choose Run.

  3. In the ribbon, on the Actions tab, choose the Word Letter


The letter document opens in Word.

WordAutomation-9

Next Steps


The letter that you have just created only contains five fields and sample body text. Before you can use this letter in an actual situation, you will need to add some more fields, such as the name and address of your own company, the date, and the currency code, and the main text of the letter. It will also need some formatting to make it look more attractive. If you alter the order in which the fields appear in the template, you must change the numbering of the fields in the codeunit to ensure that the correct data is inserted into the appropriate fields.


Friday, 7 August 2015

Implementing Security Certificates to support login over a WAN

Today we will set up an environment to test integrating certificates into a configuration for connecting computers running the Microsoft Dynamics NAV Windows client or Microsoft Dynamics NAV Web Server components to Microsoft Dynamics NAV Server instances over a wide area network (WAN) with the chain trust configuration.

What all we need to get our today’s exercise done?

To complete this process, we will need:

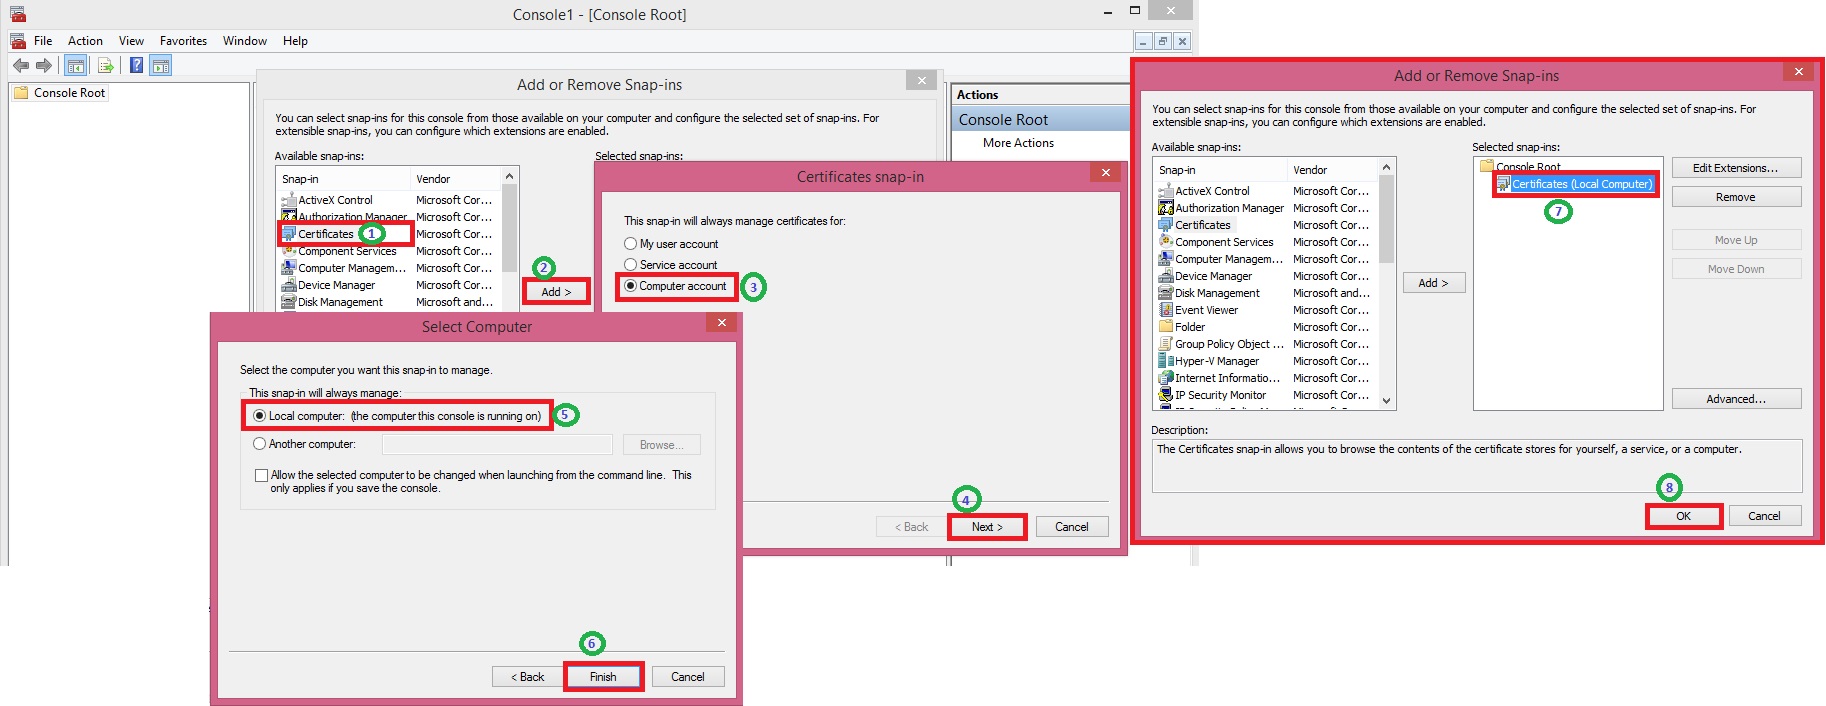
  • The Certificates snap-in for Microsoft Management Console (MMC). If you do not already have this snap-in installed, then follow these steps:


    • Choose Start, choose Run, and then type Mmc.exe.

    • In the console, on the File menu, choose Add/Remove Snap-in.


Certificate-1


    • In the Add Standalone Snap-in dialog box, select Certificates, choose Computer Account, choose Local Computer, and then choose Add.


Certificate-2

Certificate-3

  • The makecert.exe utility. The makecert.exe utility is installed with Microsoft Visual Studio and Microsoft Windows SDK.


We created and installed a root certification authority (CA) and a server certificate on the computer running Microsoft Dynamics NAV Server in previous posts.

If not please follow below posts and then return here to continue.

Previous Step Link- How to create a root CA and a private key file by using the makecert.exe utility

Previous Step Link- How to create certificate revocation list for the root certification authority

Previous Step Link- How to create and install a test certificate for the Microsoft Dynamics NAV Server computer

Previous Step Link- How to grant access to the certificate’s private key to the service account for the Microsoft Dynamics NAV Server

How to modify the Microsoft Dynamics NAV Server configuration file to support login over a WAN

  • Start the Microsoft Dynamics NAV Server Administration tool.

  • Stop the Microsoft Dynamics NAV Server instance.


Certificate-17

  • Modify the following settings for the Microsoft Dynamics NAV Server instance in the Microsoft Dynamics NAV Server Administration tool.


Key New value Description
ClientServicesCredentialType(General tab)NavUserPassword or UsernameThis parameter is on the General tab in the Microsoft Dynamics NAV Server Administration tool. The default value is Windows. When you change it to NavUserPassword or Username, client users who connect to the server are prompted for user name and password credentials.
CertificateThumbprint(Client Services tab)Value of the Thumbprint field in the previous postThe default value is <key>. Remove any leading or trailing spaces in the thumbprint.

Certificate-18

  • Choose Save.

  • Restart the Microsoft Dynamics NAV Server instance.


To modify the Microsoft Dynamics NAV Windows client configuration file to add certificate information

  • Open the ClientUserSettings.config configuration file.


The location of this file is Users\<username>\AppData\Roaming\Microsoft\Microsoft Dynamics NAV.

By default, this file is hidden. Therefore, you may have to change your folder options in Windows Explorer to view hidden files.
Certificate-19

  • Modify the following settings.


Key New value Description
ClientServicesCredentialTypeNavUserPassword or UsernameThe default value is Windows. When you change it to NavUserPassword or Username, client users who connect to the server are prompted for user name and password credentials
DnsIdentityThe subject name of the service certificateThe default value is <identity>.For this exercise, set the key to NavServiceCert.

Certificate-20
I am using NavUserPassword as credential Type in this example.

  • Save and close the ClientUserSettings.config file.


When you start the client, you are prompted for a valid user name and password for the server domain.
Certificate-21

Enter your User Name and Password to Login, I have created one for my testing as below:
Certificate-22
To modify the Microsoft Dynamics NAV Web client configuration file to add certificate information

  1. On the computer that is installed the Microsoft Dynamics NAV Web Server components, open the installation folder for the Microsoft Dynamics NAV Web client. By default, the folder is C:\Program Files\Microsoft Dynamics NAV\80\Web Client.

  2. Open the web.config file in a text editor, such as Notepad.

  3. Find the <DynamicsNavSettings> element, and then change the following settings:


Key New value Description
ClientServicesCredentialTypeNavUserPassword or UsernameThe default value is Windows. When you change it to NavUserPassword or Username, client users who connect to the server are prompted for user name and password credentials.
DnsIdentityThe subject name of the service certificateFor this exercise, set the key to NavServiceCert.


  1. Save the web.config file.


This too works as above, credentials will be asked when you open WebClient.

While writing this post I am not having Web Client installed on my computer so unable include screen shots for same.


How to grant access to the certificate’s private key to the service account for Microsoft Dynamics NAV Server

To start with this exercise you need to first create certificate and certificate revocation list, if not yet created refer to previous post.

Previous Step Link- How to create a root CA and a private key file by using the makecert.exe utility

Previous Step Link- How to create certificate revocation list for the root certification authority

Previous Step Link- How to create and install a test certificate for the Microsoft Dynamics NAV Server computer

Let’s start with this exercise:

  • In the left pane of MMC, expand the Certificates (Local Computer) node, expand the Personal node, and then select the Certificates subfolder.

  • In the right pane, right-click the NavServiceCert certificate, choose All Tasks, and then choose Manage Private Keys.

  • In the Permissions for NavServiceCert private keys dialog box, choose Add.


In the Select Users, Computers, Service Accounts, or Groups dialog box, enter the name of the service account that is used by Microsoft Dynamics NAV Server By default, the service account is NETWORK SERVICE. Choose OK when done.
Certificate-15
Security Note

In a production environment, you run Microsoft Dynamics NAV Server under a dedicated domain user account instead of the less secure NETWORK SERVICE account. Because this is a test implementation, the NETWORK SERVICE account is acceptable.

  • In the Permissions for NavServiceCert private keys dialog box, select the account, and then select the Allow check box next to Full Control. Choose OK when done.

  • In the right pane, double-click the NavServiceCert certificate.

  • In the Certificate dialog box, choose the Details tab, and then select the Thumbprint field.


Copy or note the value of the Thumbprint field.
Certificate-16
In next step we will Implement Security Certificates and configure Microsoft Dynamics Server and update configuration file for Windows & Web Clients to support login over a WAN.

Next Step Link- Implementing Security Certificates.