Saturday, 29 August 2015

ADCS Overview

The Automated Data Capture System (ADCS) solution provides a way for Microsoft Dynamics NAV to communicate with handheld devices through web services. You can test your solution by using the VT100 plug-in.

Note: MS recommend that you install Microsoft Dynamics NAV Server and the VT100 plug-in on separate computers.

Overview and Architecture

ADCS enables you to accurately capture data for inbound, outbound, and internal documents, primarily for warehouse activities.

For example, you can have users scan the bar codes of items in your warehouse as they perform daily tasks, and that information is recorded from these handheld device activities in Microsoft Dynamics NAV.
ADCS-16
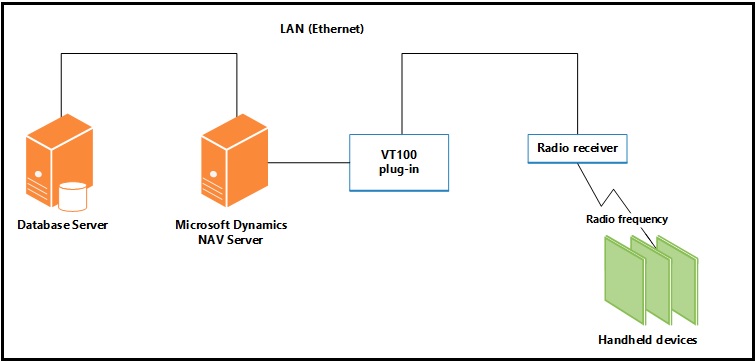
Microsoft Dynamics NAV Server processes the data coming to in from the handheld devices via the plug-in and sends the appropriate response back to the handheld devices via the plug-in.

An XML format is used to send and receive the data.

The VT100 plug-in makes sure that the response from Microsoft Dynamics NAV is directed to the correct handheld device. This reduces the load on the server.

The VT100 plug-in provides the link between the server and the Access Points for the handheld devices and acts as a virtual Telnet server.

All connection requests and data transmissions are handled by this service, and the incoming native protocol is transformed into standard XML that the server can interpret.

After a request has been transformed, the request is forwarded by the VT100 plug-in to the server.

When a reply is received, it is converted from XML into the native protocol of the handheld device.

Function keys are mapped using an XSLT file that you can modify. After the data has been transformed and formatted, it is forwarded to the handheld device.

Design Overview

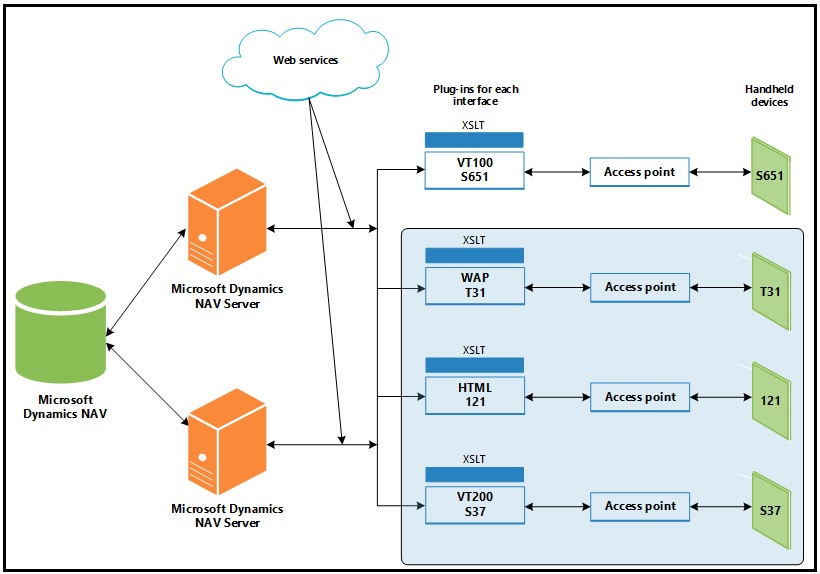
The following illustration provides a simple diagram of ADCS. The part of the illustration that is shaded, which does not include ADCS, represents what could be developed.
ADCS-17
Consider the following when you deploy an ADCS solution:

You can configure multiple instances of Microsoft Dynamics NAV Server on a single computer, but each instance can only access one company.

Therefore, if you want to access several companies from the same computer, you must configure several Microsoft Dynamics NAV Server instances for NAS Services.

You can only install one instance of the VT100 plug-in on a single computer. The VT100 plug-in can only serve one company but it can communicate with multiple instances of Microsoft Dynamics NAV Server.

This means that all of the instances of the server that use the same VT100 plug-in can only access the same company.

If you want to communicate with more than one company, you must install the VT100 plug-in on more than one computer, one for each company.

Each of the VT100 plug-in installations must then use a separate Microsoft Dynamics NAV Server to access one of the companies.

Note: You can also install the VT100 plug-in multiple times on the same computer, one for each company.

Supported Devices

An ADCS device includes devices such as bar code readers or optical character readers that are used to mechanize the entry of information into the database.

All character-based handheld devices that have a VT100 interface will work with ADCS, although you may have to implement minor adjustments with some models.

When you use a handheld device, you must be able to connect either the Access Point or the RF terminal to the IP or port address of the ADCS server.

If you want to use a graphics-based handheld device, you will have to develop your own plug-in.

You can connect multiple handheld devices to the VT100 plug-in.

However, if performance becomes an issue, you can always add an additional Microsoft Dynamics NAV Server and direct the VT100 plug-in to also connect with the new server to improve performance.

For Step wise Step Installation & Configuration, please follow below posts in order listed below:

Automated Data Capture System Requirements

Installing ADCS

How to: Add Users for ADCS

How to: Enable Web Services for ADCS

How to: Configure ADCS Options

How to: Test the ADCS Connection

How to: Test the ADCS Connection

The following procedure demonstrates how to use Windows Services and Telnet to test your Automated Data Capture System connection.

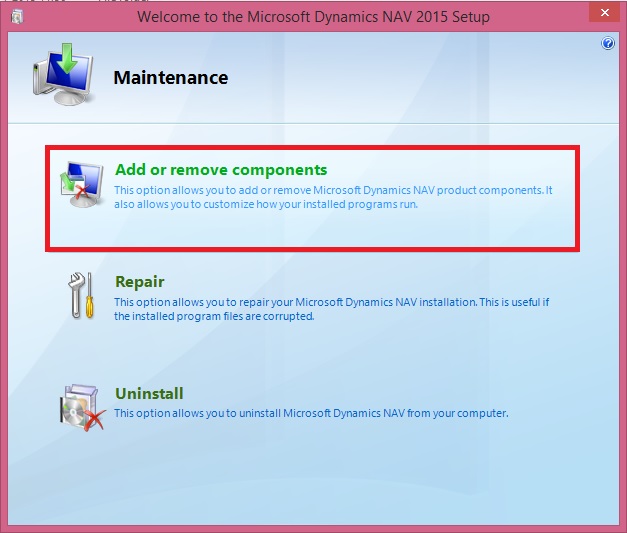
Before you can begin, you must install the ADCS component as part of a customized installation of Microsoft Dynamics NAV. For more information, see my earlier post Installing ADCS

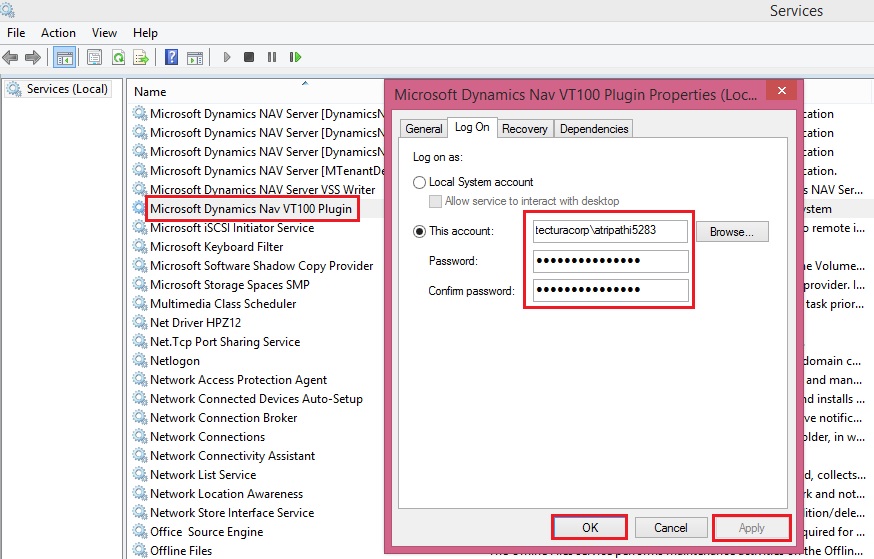
To configure and start the Microsoft Dynamics NAV VT100 Plugin service

From the Windows Start menu, in the Start Search box, enter services.msc, and then press the Enter key. The Services window opens.

Right-click the Microsoft Dynamics NAV VT100Plugin service, and then choose Properties.

To specify the user account that the service can use to log on, choose the Log On tab.
ADCS-11
To specify an account, choose This account, choose Browse, and then specify a user account in the Select User dialog box. When you are finished, choose the OK button. The format is as follows:

<Domain>\<Windows User ID>

Note: To complete testing, you must also add the same user to Microsoft Dynamics NAV, with an appropriate permission set.

Type the password for the user account in Password and in Confirm password, and then choose the OK button.

On the General tab, choose Start.

To verify that the service is running

Start the Windows Event Viewer. From the Windows Start menu, in the Start Search box, enter eventvwr.msc, and then press the Enter key.

In the Windows Logs console tree, choose Application, and then locate event information for the Microsoft Dynamics NAV VT100 Plugin.
ADCS-12
Testing Your Connection

In the following procedure, you will open a terminal connection and use HyperTerminal to simulate using handheld devices. HyperTerminal is a program that you can use to connect to other computers, Telnet sites, bulletin board systems (BBSs), online services, and host computers. HyperTerminal connections are made using a modem, a null modem cable (used to emulate modem communication), or an Ethernet connection.

Note: HyperTerminal is no longer included with Windows. You can usually find a free downloadable version on the Internet.

To test your ADCS connection

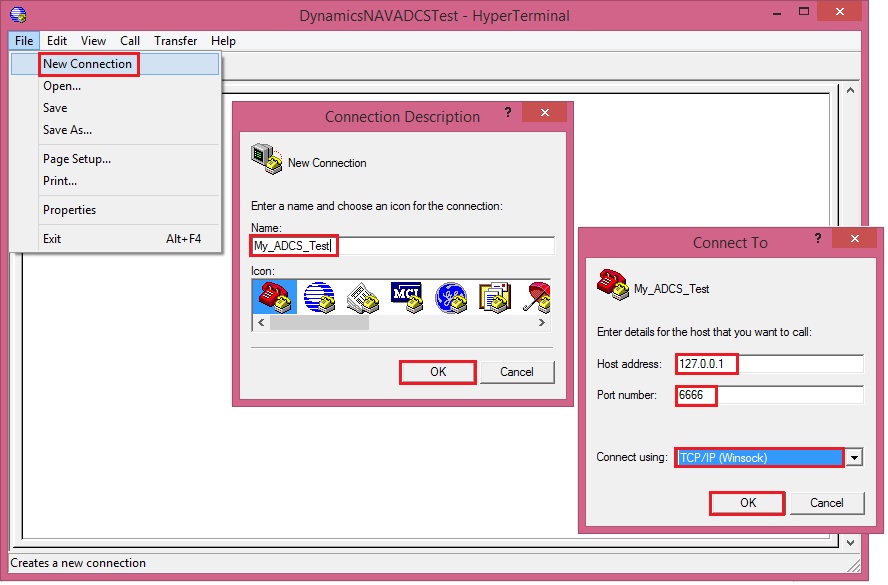
Start your HyperTerminal application.

Enter a name for the connection. Choose the OK button.

In the Connect Using list, select TCP/IP (Winsock).

The following table describes the details of a local installation on one machine.


DetailDescriptionExample
Host AddressIP address of the machine that is running the VT100 Plug-in service.localhost
Port NumberPort number that the VT100 Plug-in is listening on.6666

Choose the OK button. The HyperTerminal window opens.
ADCS-13
Enter a user ID and password. Press Enter after every step.
ADCS-14
Select a warehouse activity option. For example, enter 1 in the Choose field if you want to simulate working with pick documents.
ADCS-15
You can review the data about warehouse picks in Microsoft Dynamics NAV. For example, you can use the data in the CRONUS International Ltd. demonstration database to send information from and to Microsoft Dynamics NAV.

Note: To see the interaction between Microsoft Dynamics NAV and ADCS, in CRONUS International Ltd., you can use warehouse activities that are located in the White warehouse. It is preconfigured to use ADCS.

How to: Configure ADCS Options

Before you can work with Automated Data Capture Systems (ADCS), you have to configure Microsoft Dynamics NAV by modifying the VT100Plugin configuration file.

Important: Modification of the configuration file should only be performed by a system administrator.

To modify and update the ADCS configuration file for the terminal listener

Locate and open the NavisionVT100Plugin.exe.config configuration file. It is typically located in the following location: C:\Program Files (x86)\Microsoft Dynamics NAV\80\Automated Data Capture System.
ADCS-9
For the Terminal element, update the attributes in the configuration file using attributes as described in the following table. You specify the attribute values in quotation marks.


AttributeDescription
listenIPRequired. IP address that specifies where to listen for terminal connections.
listenPortRequired. Positive integer that specifies the port number to listen for terminal connections.
stylesheetRequired. Path to transformation style sheet, which transforms warehouse functions to terminal keycodes. Two style sheets are provided with the ADCS installation.
screenLinesOptional. Positive integer that specifies the number of screen lines. The default is 5.
screenWidthOptional. Positive integer that specifies the screen width. The default is 30.
codePageOptional. Positive integer that specifies the codepage. The default is the system codepage defined in HKey_Local_Machine\SYSTEM\CurrentControlSet\Control\Nls\CodePage\ACP.
terminalTimeoutOptional. Positive integer that specifies the terminal time-out in milliseconds. The default is 65000 and cannot be fewer than 6000.
debugDirectoryOptional. Output directory for debug data.

For the Endpoints element, update the attributes in the configuration file and modify an endpoint to support your processes. You can also add more endpoints. The following table provides some options.


AttributeDescription
defaultTypeOptional. defaultType is an attribute of the Endpoints element. It specifies what type of endpoint to use when no type is specified, if you want to customize it. The default is the NavEndpoint type.
nameRequired. Endpoint name. The name must be unique.
urlRequired. Endpoint URL address.

Note: This attribute does not have to be included if the clientEndpointName attribute is specified.
typeOptional. Fully qualified name of a non-default endpoint.
clientEndpointNameOptional. Windows Communications Foundation client endpoint configuration name. If specified, a WCF configuration with the specified name must exist.

The following example describes the XML for a Terminal element and the Endpoints element. It adds one endpoint for Microsoft Dynamics NAV.

In my case the config file will be as below:
ADCS-10
======================================================================

<?xml version="1.0"?>

<configuration>

<configSections>

<section name="VT100" type="Microsoft.Dynamics.Nav.Adcs.Configuration.VT100ConfigurationSection, Microsoft.Dynamics.Nav.VT100Plugin"/>

</configSections>

<VT100>

<Warehouse>

<Endpoints>

<add name="NavWSEndpoint" url="http://indel-axt5283n1.tecturacorp.net:8047/DynamicsNAV80/WS/CRONUS%20International%20Ltd./Codeunit/ADCS"/>

<!-- Azure deployment example: -->

<!--<add name="NavWSEndpoint" url="https://CloudService:7047/DynamicsNAV/WS/CRONUS%20International%20Ltd/Codeunit/ADCS" UserName="NavUser" Password="NavUserPassword" />-->

</Endpoints>

</Warehouse>

<Terminal listenPort="6666" listenIP="127.0.0.1" stylesheet="VT100_W2k_and_OtherClients.xsl"/>

</VT100>

<startup><supportedRuntime version="v4.0" sku=".NETFramework,Version=v4.5"/></startup></configuration>

=============================================================================

Security

By default, the NavEndpoint uses the security settings that you have specified for web services generally. You can configure additional security by changing the configuration of Microsoft Dynamics NAV Server and matching that configuration in the VT100Plugin configuration service.

How to: Enable Web Services for ADCS

To use Automated Data Capture System, you must enable the ADCS web service.

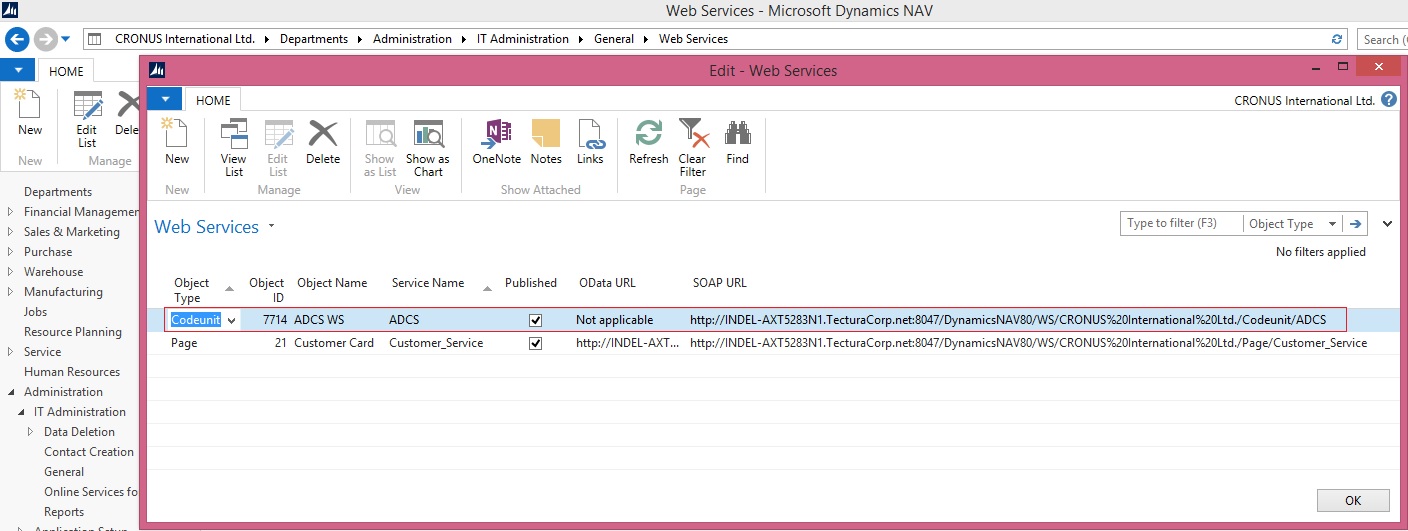
To enable and publish the ADCS web service

Start the RoleTailored client.

In the Search box, enter Web Services, and then choose the related link.

On the Home tab, choose New.

In the Web Services window, enter the following information on a new line:


FieldValue
Object TypeCodeunit
Object ID7714
Service NameADCS

Important: It is required that you name the service ADCS.

Select the Published check box.

Choose the OK button.
ADCS-7
To verify that the web service has been published
In a web browser window, enter a URL in the following format: http://<web services path>/Services. The following example demonstrates the results.

In my case:
http://indel-axt5283n1.tecturacorp.net:8047/DynamicsNAV80/WS/Services

You see the following XML information if the ADCS web service is published.
ADCS-8
To verify that the codeunit is performing as expected, enter a URL in the following format: http://<web services path>/Codeunit/<Service Name>.

http://indel-axt5283n1.tecturacorp.net:8047/DynamicsNAV80/WS/CRONUS%20International%20Ltd./Codeunit/ADCS

Information about the ADCS web service is displayed.

How to: Add Users for ADCS

You can add any user as a user of an Automated Data Capture System (ADCS). When you do this, the user must also provide a password. Optionally, you can also provide a connection that identifies the ADCS user as a warehouse employee. The ADCS user password can be different from the Windows logon password of the user.

To add an ADCS user

In the Search box, enter ADCS Users, and then choose the related link.

On the Home tab, choose New to add a new user.

In the Name field, enter a name for the user. The name cannot contain more than 20 characters, including spaces.

In the Password field, enter a password. The password is masked.
ADCS-5
To indicate that a warehouse employee is an ADCS user

In the Search box, enter Warehouse Employees, and then choose the related link.

If needed, add a new warehouse employee

On the Home tab, in the Manage group, choose Edit List.

Select a warehouse employee from the list. In the ADCS User field, choose the drop-down arrow, and then select the name of an ADCS user from the list.

Note : The default warehouse for the employee should be one that uses ADCS
ADCS-6

Installing ADCS

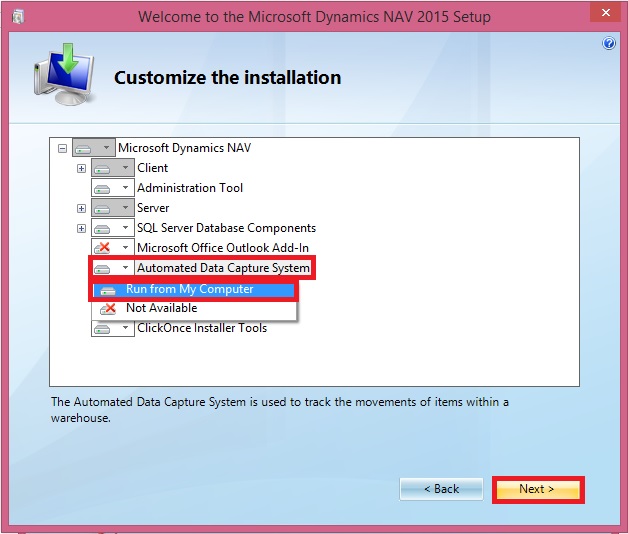
To install ADCS, you must customize the list of installation components to include ADCS, which is not included in one of the predefined Installation Options.

Run the Setup from the Product DVD
ADCS-1

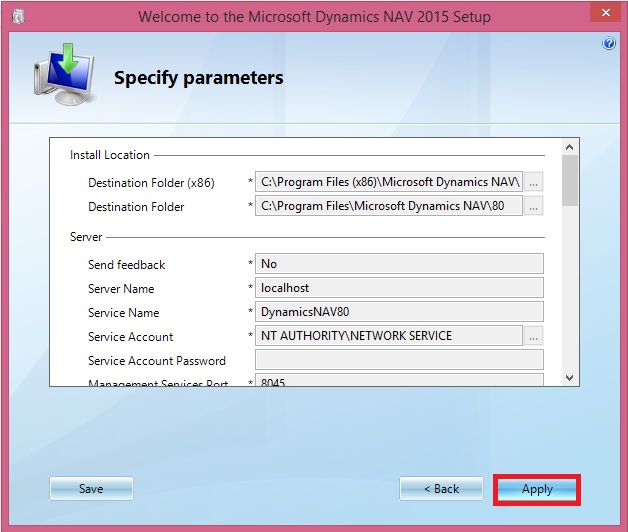
ADCS-2

ADCS-3

ADCS-4

Automated Data Capture System Requirements

The following table shows the minimum system requirements for Automated Data Capture System (ADCS) for Microsoft Dynamics NAV 2015.


Additional softwareMSXML version 6.0.

Telnet or Microsoft Windows HyperTerminal.

VT100 Plug-in for each computer on which you install ADCS.

Microsoft Loopback Adapter.
Additional informationHyperTerminal is no longer included with Windows.

VT100 Plug-in acts as a virtual Telnet server.

The Automated Data Capture System (ADCS) is a Microsoft Dynamics NAV tool that lets you accurately capture data for inbound, outbound, and internal documents, primarily for warehouse activities. With ADCS, company employees use handheld devices and radio frequency technology to continuously validate warehouse inventories.

Security filter—record-level security

Security filters—record level security/access control can be explained by for accessing G/L Accounts. Let's take an example where we want the user to view only balance sheet G/L Accounts.

To accomplish the record-level security, we use security filters from the Permissions window. Click on the Assist Edit button in the Security Filters field in the Permissions window and select the field on which we want to apply filters.
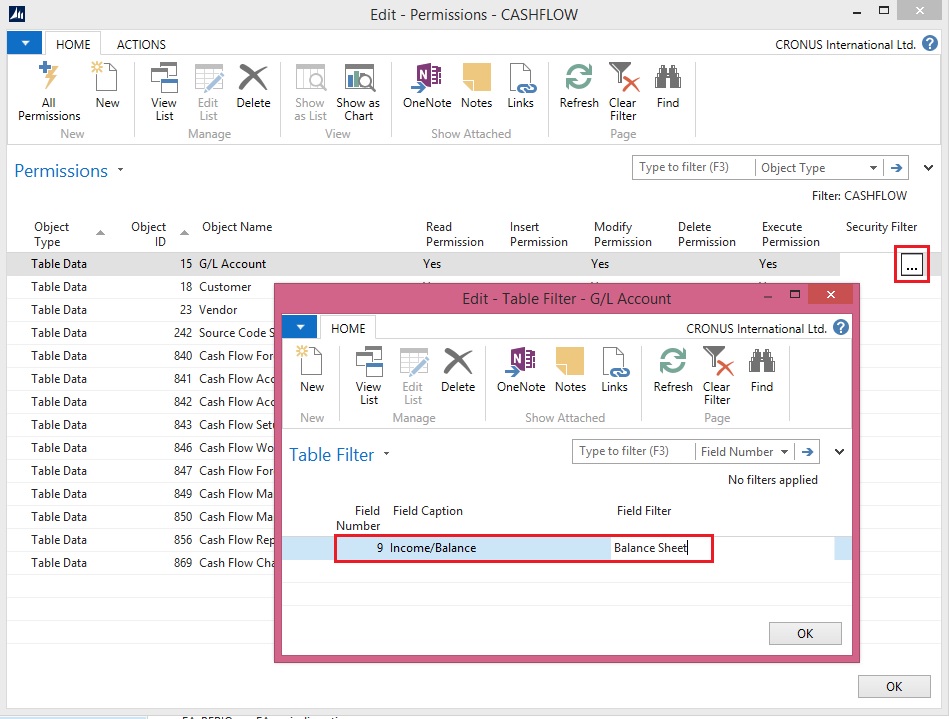
SecurityFilter

Record-level security is available only if we are using the SQL database, need not to mention for NAV 2015.

How to: Set Security Filters

You set security filters to limit the access that a user has to data in a table. You set security filters on permission sets, which you assign to users.

To set a security filter

In the Search box, enter Permission Sets, and then choose the related link.

On the Permission Sets page, select the permission set to which you want to add a security filter, and then choose Permissions.

On the Permissions page, on the row for the table data to which you want to add a security filter, in the Security Filter column, choose the AssistEdit button.

The Table Filter page opens.

In the Table Filter page, in the Field Number column, select the field on which you want to limit a user's access.

For example, if you want to create a security filter so that a user can view only sales with a specific salesperson code, then choose the field number for the Salesperson Code field.

The Field Caption column in the Table Filter page is filled in automatically after you select the field number.

In the Field Filter column, enter the value of field that you want to use to limit access.

For example, to limit a user's access to only Annette Hill's sales, enter AH, which is the salesperson code for Annette Hill, in the Field Filter column.

Note

Record level security filters do not support wildcard characters. This means that you cannot use * and ? in the filters. You can use other symbols, delimiters and, operators, such as, <, >, |, &, .., and =. If you do not enter an operator, then the default operator = is used.

Security filters support Unicode characters. The maximum length of a security filter is 200 characters, including all field names, delimiters, symbols, and operators that used in the filter.

When multiple permission sets that refer to the same table data are assigned to a user, they are combined so that the least restrictive filter is used. You should not repeat a table in multiple permission sets if you plan to combine those permissions sets for one user.

Security Filter Modes

Query objects and Record objects, including both explicit record variables and implicit records on pages, reports, or XMLports, have a property named SecurityFiltering, which describes how security filters are applied.

The possible values of the SecurityFiltering property are: Filtered, Validated, Ignored, Disallowed

Filtered

If a record is set to Filtered, then any security filters that have been set are respected for this instance of the record. To the user, it is as if records outside the security filters that do not exist.

An example scenario in which you use the Filtered value is that one salesperson is not allowed to view customers, sales quotes, or sales orders that belong to another salesperson. When the salesperson opens a list of customers or sales documents, or runs reports such as the Customer - Top 10 List report, he sees his filtered view of customers, sales quotes, and sales orders.

Validated

If a record is set to Validated, then any security filters that have been set are respected for this instance of the record, and an error occurs if the code attempts to access a record that is outside the range of the security filters.

An example scenario in which you use the Validated value is that one parts purchaser in a warehouse is responsible for only one location and can view and create purchase orders for only that location. However, some purchase orders have lines for multiple locations. Only a parts purchaser who has access to all locations should be allowed to post these purchase orders that have lines for multiple locations. All other purchasers receive an error.

If security filters have been set, then the Validated value decreases performance.

The Validated value is used mainly for compatibility with the security model in earlier versions of Microsoft Dynamics NAV. MS recommend that you use the other modes when you implement your security model.

Ignored

If a record is set to Ignored, then any security filters that have been set are ignored for this instance of the record.

An example scenario in which you use the Ignored value is that one salesperson is not allowed to view customers, sales quotes, or sales orders that belong to another salesperson. However, to post his sales orders, the salesperson must have access to all entries in the Customer Ledger Entry table so that the posting algorithm can find the last sales order entry number and generate the correct number for the next entry. In the code that posts sales orders, you set the SecurityFiltering property of the record variable to Ignored, but for record variables in other parts of the code, you set the SecurityFiltering property to either Filtered or Validated.

When you set the SecurityFiltering property on a record to Ignored, the administrator who sets a security filter is not informed that the security filter will be ignored. You must be careful when you set the SecurityFiltering property that it does not cause unintended information disclosure.

Disallowed

If a record is set to Disallowed, then setting any security filter on the record causes an error.

An example scenario in which you use the Disallowed value is that you have batch jobs that must be run only by users who have access to all records in the related tables, otherwise the batch jobs can cause incorrect and potentially harmful results. The partner developer sets record variables on these batch jobs to Disallowed so that a user who does not have access to all records in the related tables receives an error.

Important

It is not supported to change the default Filtered value of the SecurityFiltering property on implicit records on pages.

If you keep the default values after you upgrade from Microsoft Dynamics NAV 2009 to Microsoft Dynamics NAV 2015, then the behavior is the same in all cases except the following:

In earlier versions, the COUNT Function (Record) ignored security filters and always returned the total number of records unless you called the SETPERMISSIONFILTER function to get a filtered count. In Microsoft Dynamics NAV 2015, the COUNT function adheres to the SecurityFiltering property.

In earlier versions, on a page, you could modify or insert a record outside of the range of your security filters but in Microsoft Dynamics NAV 2015, you cannot.

Note

For Query variables, the Validated value of the SecurityFiltering property is not allowed.

Security Filters and FlowFields

If you set a security filter on a table that is used in a FlowField calculation, then the calculated value of the FlowField is filtered, based on the security filter and the security filter mode of the record variable for the record in the table.

For example, if you set a security filter so that a user can only view sales with a specific salesperson code, and if the security filter mode is Filtered, then when the user views a FlowField that calculates total sales, the user can see the total of only those sales that have the specific salesperson code. In earlier versions of Microsoft Dynamics NAV, the security filter mode value was Validated and in this example, the user received an error.

Programming Examples

For these examples, you have a table that has 100 records. Each record has an ID field that is the primary key of the table. The values of the ID field that are currently in the database range from 1 to 100. In this example, you set a security filter on the table data for ID=1..50. Then, in a codeunit you create a record variable for the table.


Security filter modeExample
FilteredIf you set the SecurityFiltering property on the record variable to Filtered, then the code behaves as if records with ID values from 1 to 50 are the only records that exist.

If you call the FIND, FINDFIRST, FINDLAST, or FINDSET function on the record variable without any additional filters besides the security filter, then the function only finds records with ID values from 1 to 50.

If you call the DELETEALL function, then it successfully deletes records with ID values from 1 to 50. It does not delete records with ID values greater than 50, and it does not return an error.

If you modify a record, for example, by calling the MODIFY function on a record with an ID value less than 50, then the function succeeds. If you call the MODIFY function on a record with an ID value greater than 50, then it fails because you do not have access to the record.

If you insert a record with an ID less than 50 and the record does not already exist, the INSERT function succeeds. If you insert a record with an ID greater than 50 and the record does not already exist, it fails because you do not have access to the record.

If you call the GET function on a record with an ID value less than 50, then the function succeeds. If you call the GET function on a record with an ID value greater than 50, then it fails.
ValidatedIf you set the SecurityFiltering property on the record variable to Validated, then the code behaves as if records with ID values from 1 to 100 exist, but you only have access to the records that are specified by the security filter.

If you call the FIND, FINDFIRST, FINDLAST, or FINDSET function on the record variable without additional filters, it finds all 100 records, but a NEXT function call to the record with ID value 51 fails because you do not have access to it.

If you call the DELETEALL function, it fails because it finds all 100 records but you do not have access to all of them.

If you modify a record with an ID value less than 50, it succeeds. If you modify a record with an ID value greater than 50, it fails.

If you insert a record with an ID less than 50 and the record does not already exist, it succeeds. If you insert a record with an ID greater than 50 and the record does not already exist, it fails.
IgnoredIf you set the SecurityFiltering property on the record variable to Ignored, then the code behaves as if all security filters that are set do not exist for that instance of the record.

Any of the FIND functions find all 100 records.

The DELETEALL function deletes all 100 records.

You can insert and modify records in any range, regardless of security filters.
DisallowedIf you set the SecurityFiltering property on the record variable to Disallowed, then as long as a security filter is set on the record, any code that uses the record variable causes an error.

Performance Impact of Security Filtering Mode

If security filters are set on a table, then setting the SecurityFiltering property to Validated on a record instance of that table causes a decrease in performance.

The Microsoft Dynamics NAV Server must go through every record in the table to validate the record instead of adding the filters to the query that is sent to SQL Server.

If security filters are not set, then setting the SecurityFiltering property to Validated has no performance impact.

Note

MS recommend that you change commonly used record variables from the default value of Validated to either Filtered or Ignored to improve performance.
Filtering on Dimension Values

Microsoft Dynamics NAV supports unlimited dimensions and unlimited dimension values. You can create as many as you want, and you can use those all across the application.

However two of these dimensions have got special treatment by setting them up them as global dimensions.

Why special? Answer could be because the global dimensions values are stored directly on the records they belong to. All other dimension values are stored in a separate table.

This means that you can filter on these two dimensions. In many places in the standard application, these Global Dimension are used on Filter fields that can be used to filter FlowFields.

However, to get any data on any of the other dimensions, you would have to rely on Analysis Views to retrieve the information.

In Microsoft Dynamics NAV 2013 onwards version, the dimensions functionality has been heavily redesigned.

Instead of storing all individual dimension values for each record in separate tables, each unique combination of dimensions and values gets an ID, and this dimension set ID is stored directly on the record that those values belong to.

With this change, all information about dimensions and their values are directly stored on the record.

Since all the required information is stored on the record, though somewhat indirectly, it will now be possible to filter on any dimension and any dimension value. As it turns out, it is, and it’s not that hard to do.

As mentioned, the records contain dimension set IDs, which are integers that represent the combination of dimension values for a specific record. The biggest problem is to convert a typical filter on a dimension into a filter of dimension set IDs.

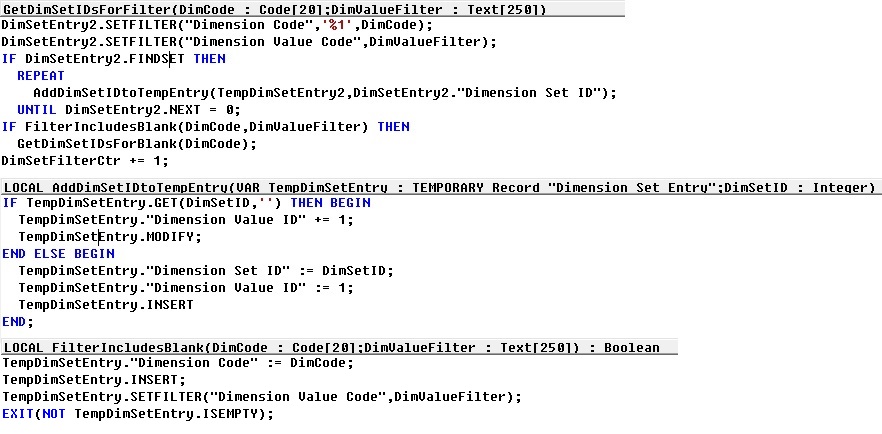
Fortunately, we already have a few functions in Microsoft Dynamics NAV that can provide that information. With these functions in mind, we can build a logic where you can input any combination of dimensions and dimension values in the form of filters, and you can then calculate the corresponding set of dimension set IDs. With all of these IDs, we can build one long filter string and use it to filter on the dimension set ID field. This enables, with relative ease, direct filtering on Dimension Values.

In Codeunit 408 – DimensionManagement we have functions which can help us getting our task done:

  • GetDimSetIDsForFilter


DimFilter-1

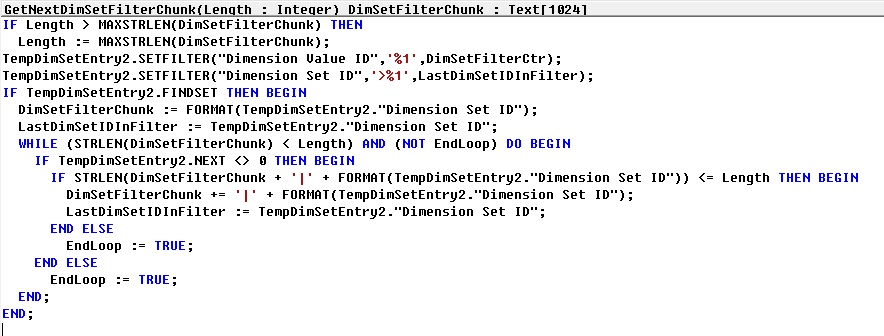
  • GetNextDimSetFilterChunk


DimFilter-2

In Codeunit 46 – SelectionFilterManagement we have functions which can help us getting our task done:

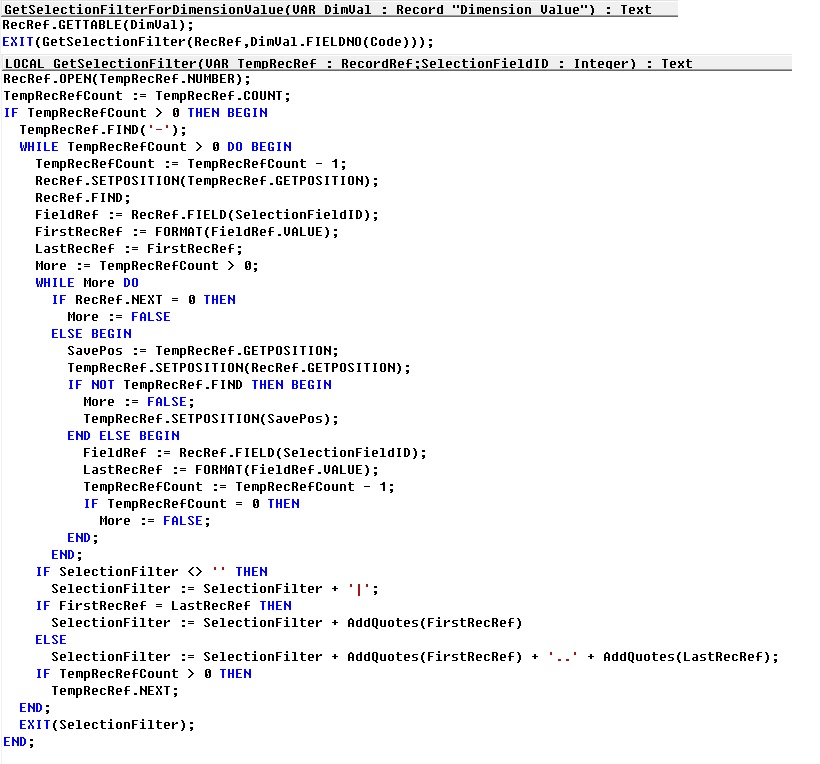
  • GetSelectionFilterForDimensionValue


DimFilter-3

Using these functions we can build our logic to retrieve the required records from tables filtering on Dim Set ID field.

Let’s see the pseudocode of logic to get our work done.

This logic applies to Dimension table. With all values for which filter need to be applied.
DimFilter-4

Before executing above piece of code we have to prepare a Dimension Value record with [Dimension Code + Code (filter)] values with all the required filters we wish to apply filter for.

We can also find out which records do not have a value for one or more dimensions, for this we will add [Dimension Code] but for [Code] we will not provide the value/filter or blank.

Make sure when you define variables of Dimension & Dimension Value don’t forget to set Temporary property to Yes.

Friday, 28 August 2015

How to: Install a Windows Client Control Add-in Assembly

Microsoft Dynamics NAV Windows client control add-ins are provided in one or more Microsoft Framework .NET-based assemblies, which are .dll files. Control add-in assemblies must be installed on the following computers:

  • Computers that are running the Microsoft Dynamics NAV Windows client. Any Microsoft Dynamics NAV Windows client instance that will use the control add-ins, must be installed with the control add-in assemblies. Control add-in assemblies are not installed with the default Microsoft Dynamics NAV Windows client installation.

  • Computer that is running the Microsoft Dynamics NAV Development Environment. After a control add-in is installed, you use the development environment to register the control add-in the Client Add-in table in the Microsoft Dynamics NAV database and set it up on pages.


Optionally, if a control add-in has the same name as the assembly, you can install the assembly on the computer that is running Microsoft Dynamics NAV Server instead of the client computer.

To install control add-in assemblies on the Microsoft Dynamics NAV Windows client

  • If needed, install the Microsoft Dynamics NAV Windows client on the computer.

  • On the computer that is running the Microsoft Dynamics NAV Windows client, copy the assemblies that contain the control add-ins to the Add-ins folder of the Microsoft Dynamics NAV Windows client installation.

    • By default, the path of this folder is C:\Program Files (x86)\Microsoft Dynamics NAV\80\RoleTailored Client\Add-ins.


You can also include assemblies in a subfolder of the Add-ins folder. This can be useful if you have multiple assemblies and dependencies.

To install control add-in assemblies on the development environment computer

  • If needed, install the development environment on the computer.

  • On the computer that is running the development environment, create a folder named Add-in in the development environment installation folder.

    • By default, the path of this folder is C:\Program Files\Microsoft Dynamics NAV\80\Classic. If the Add-in folder already exists, then ignore this step.


  • Copy the assemblies that contain the control add-ins to the Add-ins folder.


You can also include assemblies in a subfolder of the Add-ins folder. This can be useful if you have multiple assemblies and dependencies.

Installing Control Add-ins on Microsoft Dynamics Server for Automatic Deployment

If a control add-in has the same name as the assembly, then you can install the assembly on computer that is running Microsoft Dynamics NAV Server. When an operation from the client requires the control add-in, Microsoft Dynamics NAV Server automatically deploys the assembly to a temporary folder on the client computer.

For example, if Microsoft Dynamics NAV Windows client opens a page that contains a control add-in, Microsoft Dynamics NAV Server will find the control add-in assembly by name in the Add-ins folder. Then, it deploys the assembly to the client computer in the %TEMP%\Microsoft Dynamics NAV\Add-Ins folder of the user who is running the client. The deployed assembly will be then be used whenever the page is opened.

Similarly, if the development environment requires a control add-in, for example, when you compile an object, then the control add-in assembly will be deployed by the Microsoft Dynamics NAV Server to the local temporary folder for the current user on the computer that is running the development environment.

To be deployed, an assembly must comply with the following Microsoft Dynamics NAV Server configuration settings: Chunk Size, Max Upload Size, and Prohibited File Types.

If the control add-in assembly is updated and its version number changes, Microsoft Dynamics NAV Server will deploy the updated assembly to the client computer the next time that the client requests the assembly. The updated assembly is put in a subfolder of the %TEMP%\Microsoft Dynamics NAV\Add-Ins folder, where the subfolder has the assembly's version number as its name. This implementation means that you do have to remove the older versions of assemblies that are stored on the client computer.

Before Microsoft Dynamics NAV Server deploys an assembly to a client, the client looks for the assembly in the local Add-ins folder (for example, C:\Program Files (x86)\Microsoft Dynamics NAV\80\RoleTailored Client\Add-ins). If the assembly is not found, then the client will request the assembly from Microsoft Dynamics NAV Server.

To install the control add-in on Microsoft Dynamics NAV Server

  • On the computer that is running the Microsoft Dynamics NAV Server, copy the assembly that contains the control add-in to the Add-ins folder of the Microsoft Dynamics NAV Server installation.


By default, the path is C:\Program Files\Microsoft Dynamics NAV\80\Service\Add-ins.

How to: Set .NET Framework Types to Run on the Microsoft Dynamics NAV Windows Client or Microsoft Dynamics NAV Server Computers

Here is the brief description for how to set .NET Framework objects that are instantiated by DotNet variables to target either the Microsoft Dynamics NAV Windows client or Microsoft Dynamics NAV Server.

By default, a type is set to target Microsoft Dynamics NAV Server. However, you can set the type to target the Microsoft Dynamics NAV Windows client.

Setting the .NET Framework Type to Target the Microsoft Dynamics NAV Windows Client

To set a .NET Framework type instance to target the Microsoft Dynamics NAV Windows client, you must complete the following tasks:

  • Set the DotNet variable for the .NET Framework type to target the Microsoft Dynamics NAV Windows client.

  • Copy the .NET Framework assembly to the computer that is running the Microsoft Dynamics NAV Windows client.


You must copy the assembly to each computer that is running the Microsoft Dynamics NAV Windows client. If the assembly is included in the global assembly cache, then you do not have to do this task.

For the Microsoft Dynamics NAV Web client, you cannot implement Microsoft .NET Framework interoperability objects that target the client.

To set the .NET Framework type to target the Microsoft Dynamics NAV Windows client

  • In Object Designer, open the C/AL code of the Microsoft Dynamics NAV object that uses .NET Framework interoperability.

  • Do one of the following steps:

    • For a global variable, on the View menu, choose C/AL Globals.

    • For a local variable, select the trigger that uses the variable, and then on the View menu, choose C/AL Locals.


    • On the Variables tab, select the DotNet variable, and then on the View menu, choose Properties.

    • In the Properties window, set the RunOnClient property to Yes


To copy a .NET Framework assembly to a computer that is running the Microsoft Dynamics NAV Windows client


    • On the computer that is running the Microsoft Dynamics NAV Windows client, copy the.NET Framework assembly to the Add-ins folder of the Microsoft Dynamics NAV Windows client installation.


By default, the path of this folder is C:\Program Files\Microsoft Dynamics NAV\80\RoleTailored Client\Add-ins or C:\Program Files (x86)\Microsoft Dynamics NAV\80\RoleTailored Client\Add-ins.

You can also put assemblies in a subfolder of the Add-ins folder. This can be useful when you have multiple versions of the same assemblies and dependencies.

Setting the .NET Framework Type to Target Microsoft Dynamics NAV Server

To set a .NET Framework type instance to target Microsoft Dynamics NAV Server, you must complete the following tasks:

  • Set the variable for the NET Framework type to target Microsoft Dynamics NAV Server.

  • Copy the .NET Framework assembly to the computer that is running Microsoft Dynamics NAV Server.


If the assembly is included in the global assembly cache of the computer that is running Microsoft Dynamics NAV Server, then you do not have to do this task.

To set the .NET Framework type to target Microsoft Dynamics NAV Server

  • In the development environment, in Object Designer, open the object that uses the .NET Framework variable.

  • Do one of the following steps:

    • For a global variable, on the View menu, choose C/AL Globals.

    • For a local variable, in the C/AL Editor, select the trigger that uses the DotNet variable, and then on the View menu, choose C/AL Locals.


    • On the Variables tab, select the NET Framework variable type, and then on the View menu, choose Properties.

    • In the Properties window, set the RunOnClient property to No


To copy a .NET Framework assembly to the computer that is running Microsoft Dynamics NAV Server


    • On the computer that is running Microsoft Dynamics NAV Server, copy the.NET Framework assembly to the Add-ins folder of the Microsoft Dynamics NAV Server installation folder.


By default, the path of the Microsoft Dynamics NAV Server installation folder is C:\Program Files\Microsoft Dynamics NAV\80\Service\Add-ins.

You can also put assemblies in a subfolder of the Add-ins folder. This can be useful when you have multiple assemblies and dependencies.

If you are working in the development environment, to compile and test Microsoft Dynamics NAV objects, you must also copy the assembly to the Add-ins folder of the Microsoft Dynamics NAV Windows client installation on the computer that is running the development environment. By default, the path of this folder is C:\Program Files\Microsoft Dynamics NAV\80\RoleTailored Client\Add-ins or C:\Program Files (x86)\Microsoft Dynamics NAV\80\RoleTailored Client\Add-ins.

Automatic Deployment of Microsoft .NET Framework Interoperability and Control Add-in Assemblies

Microsoft Dynamics NAV 2015 makes it easier for the system administrators to deploy client-side assemblies for .NET Framework interoperability and client control add-ins on computers that are running the Microsoft Dynamics NAV Windows client or Microsoft Dynamics NAV Development Environment.

You can now install the assemblies in the Add-ins folder on the computer that is running Microsoft Dynamics NAV Server. By default, this is the C:\Program Files\Microsoft Dynamics NAV\80\Service\Add-ins folder.

When an operation from the client requires an assembly, Microsoft Dynamics NAV Server automatically deploys the assembly to a temporary folder on the client computer.

For example, if Microsoft Dynamics NAV Windows client opens a page that contains a control add-in, Microsoft Dynamics NAV Server will find the control add-in assembly by name in the Add-ins folder. Then, it deploys the assembly to the client computer in the %TEMP%\Microsoft Dynamics NAV\Add-Ins folder of the user who is running the client. Subsequently, the deployed assembly will be used whenever the page is opened.

Similarly, if the development environment requires a control add-in, for example, when you compile an object, then the control add-in assembly will be deployed by the Microsoft Dynamics NAV Server to the local temporary folder for the current user on the computer that is running the development environment.

Important:

To be deployed, an assembly must comply with the following Microsoft Dynamics NAV Server configuration settings: Chunk Size, Max Upload Size, and Prohibited File Types.

If a .NET Framework interoperability or control add-in assembly is updated and its version number changes, Microsoft Dynamics NAV Server will deploy the updated assembly to the client computer the next time that the client requests the assembly. The updated assembly is put in a subfolder of the %TEMP%\Microsoft Dynamics NAV\Add-Ins folder, where the subfolder has the assembly's version number as its name. This implementation means that you do have to remove the older versions of assemblies that are stored on the client computer.

To support compatibility with earlier version of Microsoft Dynamics NAV, before Microsoft Dynamics NAV Server deploys an assembly to a client, the client looks for the assembly in the local Add-ins folder (for example, C:\Program Files (x86)\Microsoft Dynamics NAV\80\RoleTailored Client\Add-ins). If the assembly is not found, then the client will request the assembly from Microsoft Dynamics NAV Server.

Javascript-based client add-ins have been using this deployment technique since Microsoft Dynamics NAV 2013 R2.

Adjust Item Costs/Prices... batch job

Just purchase one material on different rates with different vendors and consume it in manufacturing or do the negative adjustment and then run the batch job to see the effect.

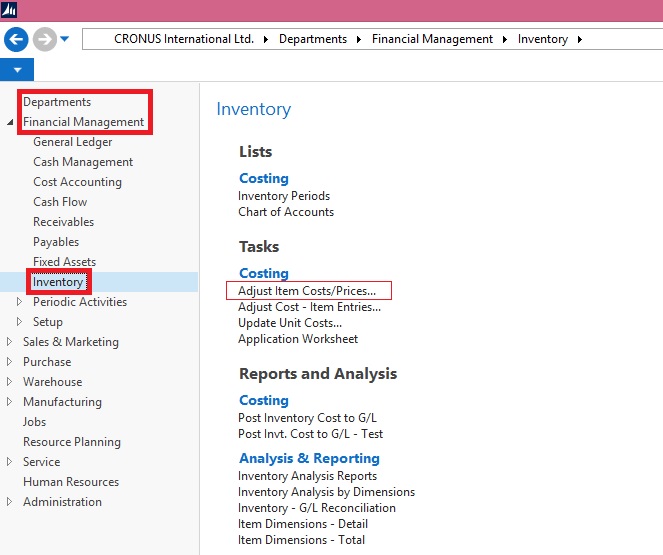
The batch job is in the inventory section of Finance Module.

BatchJob-1
All this Batch does is updating the CARD Costs and Prices for an Item; it really has no connection to the costs posted to inventory, and in terms of Sales only affects the default sales price of an item. A better name might be "Item Card Cost/Price Update"
BatchJob-2
To test an example, run the batch on a test database, leave the defaults, but change the Adjustment factor to 1.1.
BatchJob-3
When you run this, all the Item Card Prices will be increased by 10%
BatchJob-4

Most of the processes relating to costing, discuss posted documents and entries. Like Posted Sales Invoice and Posted Purchase receipt and Item ledger entry and Value Entry and General Ledger and GL entries. All these tables (and others) are used to calculate the actual costs and prices in Navision, and are what is used for Accounting reporting such as financial Statements. This is all covered under Inventory Costing. The batch processes (periodic Activities) "Post Inventory Cost to G/L" and "Adjust Cost - Item Entries" all belongs in this category. But on the other side BEFORE you post anything you need to do setup, and amongst all the setup, are the fields on the Item card which ARE NOT POSTED to the GL, but are used as the default values before posting. For example Unit Price from the Item card is copied into the Line of a Sales Order as a SUGGESTED sales price. But you can change it here and post a different price. Most of the numbers that you see on the Item card are just defaults or suggestions; they are not the final number that is posted to the GL. All of this is covered by Inventory Setup, and includes the Batch Process "Adjust Item Costs/Prices".

If you check the code you will find that:
BatchJob-5
In summary

Inventory Setup is what you do to setup Item Costs and Prices BEFORE they hit the GL. (including "Adjust Item Costs/Prices"). Inventory Costing is what you do with entries AFTER they are posted to correct any changes due to the difference between Expected costs and actual costs.
Just go through these steps and you will know what this batch job does-

1. Create a new Item. Complete all the fields with Unit cost and Unit price. Take a note of all the values you write.

2. Create a purchase order for any quantity with Unit cost other than what is on item card and post the order as received & invoiced.

3. Create a sales order with any quantity other than that of Item card and post as shipped and invoiced.

4. Check the invoicing tab on item card and make a note of all values.

5. Repeat steps 2 and 3 for two-three times by changing the cost and prices every time (also note the values)

6. Now run Adjust cost-item entries and check the Invoicing tab on card. The Cost fields must have updated, but not the prices.

7. Now run Adjust item-cost prices with adjustment factor 1.5 and check the values. The Unit price over the card must have been updated with 50%.

You can see that the batch job is used to change the prices (Sales prices) of items. After running this batch job, every time when you make a Sales order, the updated Price will be copied to Sales Order field "Unit price Excluding VAT".
BatchJob-6

Above listed all fields can be adjusted accordingly, specifying Adjustment Factor and Rounding Method.

Similarly it works for SKU also.

Give it a try to understand it more precisely. Follow above steps defined above.

Thursday, 27 August 2015

UI Elements Removal

Depending on the setting in the UI Elements Removal field in the Microsoft Dynamics NAV Server Administration tool, only UI elements on objects in the license or on objects that the user has permissions for will appear in the user interface.

For UI elements without a direct relation, you can use the AccessByPermission property to set a value for a table field or UI element that determines the permission mask for an object that a user must have to see and access the related page fields or UI element in the client

To make full use of the LicenseFileAndUserPermissions option in the UI Elements Removal field, it is recommended that you assign the special FOUNDATION permission set to the user along with the relevant application permission sets that define which application objects the user will access. In addition, you must make sure that the user’s application permission sets grant all the functionality access that is not granted by the FOUNDATION permission set alone

A couple of the application permission sets that are provided by Microsoft Dynamics NAV are adapted to support the FOUNDATION permission set for demonstration purposes. To experience how UI elements are removed for a user performing the task to create and edit a new customer, you can create a sample user interface based on the provided permission sets.

For more details see my earlier post AccessByPermission Property – in Navision 2015

Database Schema Synchronization

Microsoft Dynamics NAV 2015 introduces several improvements to the table schema synchronization process that improve performance and make it more explicit and controllable. The improvements give you with the flexibility to decide when and how the table changes are synchronized with corresponding tables in the SQL Server.

In Microsoft Dynamics NAV 2015, changes to the database schema are no longer synchronized automatically to the database when a client connects to a Microsoft Dynamics NAV Server instance. Instead, you specify when to synchronize schema changes in the development environment or the Microsoft Dynamics NAV 2015 Administration Shell.

For example, when you change a table object and compile the table, you can choose to synchronize the change to the database immediately or later. In a production environment, you apply changes to the database schema by running the Sync-NAVTenant Windows PowerShell cmdlet with the Mode parameter set to the relevant synchronization mode.

The schema synchronization design provides the following features and benefits:

  • On-demand schema synchronization and monitoring As a developer or system administrator, from the development environment or Microsoft Dynamics NAV 2015 Administration Shell, you control when to perform the schema synchronization and how to synchronize table changes.This enables you to plan and schedule the schema synchronization on a case-by-case basis. Additionally, you can monitor the progress and state of the business (tenant) database at any time.

  • Non-blocking and increased productivity Schema synchronization has become more granular. You perform schema synchronization for a single table or for all tables at the same time. When one table is being synchronized, you are no longer blocked from making changes to other tables.

  • Capability to provide additional instructions in upgrade codeunits By using upgrade codeunits, you can provide instruction for the schema synchronization to perform additional tasks, such as automatically moving or copying data into upgrade tables, validating the table changes before applying them, or forcefully applying them when it is required.


Please check my earlier post on this topic for more detailed information.

Schema Synchronization in Microsoft Dynamics Navision 2015

Data Upgrade Codeunit in Navision 2015 Part-1

Data Upgrade Codeunit in Navision 2015 Part-2

Data Upgrade - in Navision 2015

Microsoft Dynamics NAV 2015 introduces a new way of running the data upgrade logic that migrates data from the old table structure of an earlier Microsoft Dynamics NAV version to the new table structure of the current version.

The data upgrade process is now prepared and run with the help of new type of codeunit called the upgrade codeunit. The data upgrade process has been enhanced significantly to optimize the performance and provide developers with a superior tool for testing, automating, tracking progress and troubleshooting the data upgrade code. The new data upgrade approach has the following benefits and features:

  • Simplifies the upgrade environment because all steps are performed by the latest version of the Microsoft Dynamics NAV.

  • Increases the data upgrade performance because it is possible to run upgrade functions of upgrade codeunits in parallel (at the same time) and across companies.

  • Reduces the amount of code that is required to handle the data upgrade because several operations are now executed automatically by Microsoft Dynamics NAV Server.

  • Minimizes the number of manual actions that must be performed during the data upgrade, which makes the data upgrade process less error-prone.

  • Uses familiar upgrade toolkit design concepts, such as upgrade tables and upgrade functions.

  • Includes end-to-end sample Windows PowerShell scripts that perform a complete data upgrade.


Please check my earlier post on this topic for more detailed information.

Schema Synchronization in Microsoft Dynamics Navision 2015

Data Upgrade Codeunit in Navision 2015 Part-1

Data Upgrade Codeunit in Navision 2015 Part-2

Page Properties Not Supported by Microsoft Dynamics NAV Web Client

Most page properties that are supported in the Microsoft Dynamics NAV Windows client are also supported in the Microsoft Dynamics NAV Web client.

There are some properties that are not supported by Microsoft Dynamics NAV Web client and other properties that are either partially supported or behave differently in the Microsoft Dynamics NAV Windows client.

Unsupported Properties

The properties that are not supported by the Microsoft Dynamics NAV Web client. When a page that contains an unsupported property is displayed in a browser, the property is ignored. You do not receive an error but the property does not affect the page.

  • ChartPartID Property

  • ColumnSpan Property

  • ControlAddin Property

  • FreezeColumnID Property

  • RowSpan Property

  • RefreshOnActivate Property

  • ShowAsTree Property

  • Style Property

  • StyleExpr Property

  • SystemPartID Property


Partially Supported Properties

The properties that either do not have all the capabilities in the Microsoft Dynamics NAV Web client as they do in Microsoft Dynamics NAV Windows client or they behave differently than in the Microsoft Dynamics NAV Windows client.

  • AssistEdit Property

  • DrillDown Property

  • DrillDownPageID Property

  • GroupType Property

  • Importance Property

  • IndentationControls Property

  • PageType Property

  • PartType Property

Functions Not Supported by Microsoft Dynamics NAV Web Client

Below is the lists the C/AL functions and data types that are not supported or partially supported by Microsoft Dynamics NAV Web client.

Unsupported Functions

Functions that are not supported by the Microsoft Dynamics NAV Web client. If you use a function that is not supported, an error occurs at runtime.

  • CREATE Function (Automation)

  • ISCLEAR Function (Automation)

  • ACTIVATE Function (Debugger)

  • UPDATE Function (Dialog)


Partially Supported Functions

Functions that either do not have all the capabilities in the Microsoft Dynamics NAV Web client as they do in the Microsoft Dynamics NAV Windows client or they behave differently than in the Microsoft Dynamics NAV Windows client.

  • DOWNLOAD Function (File)

  • DOWNLOADFROMSTREAM Function (File)

  • HYPERLINK Function

  • PREVIEW Function (Report)

  • PRINTONLYIFDETAIL Function (Report)

  • REPORT.RUN Function

  • REPORT.RUNMODAL Function

  • UPLOAD Function (File)

  • UPLOADINTOSTREAM Function (File)

Not supported in Microsoft Dynamics NAV 2015

The following table provides an overview of the removed C/AL data types, functions, properties, and triggers in Microsoft Dynamics NAV 2015 since the previous version of Microsoft Dynamics NAV.


Data type, function, property, or trigger Not supported in Microsoft Dynamics NAV 2015  
BEEP FunctionNot supported on Microsoft Dynamics NAV Server.
Binary Data TypeThe Binary data type, used in earlier versions of Microsoft Dynamics NAV to store fixed lengths of binary data in a record, is not supported in Microsoft Dynamics NAV 2015. If you previously used the BINARY data type, consider using the BLOB Data Type instead.
BottomMargin PropertyNot supported in Microsoft Dynamics NAV 2015 reports.
COMMANDLINE FunctionNot supported in Microsoft Dynamics NAV 2015.
COUNTAPPROX FunctionNot supported in Microsoft Dynamics NAV 2015.
CREATETOTALS FunctionRedundant in Microsoft Dynamics NAV 2015 reports. We recommend that you use the SUM function in Visual Studio instead.
DataportsNot supported in Microsoft Dynamics NAV 2015. Use XMLports instead.
ENVIRON FunctionNot supported in Microsoft Dynamics NAV 2015.
EXPORT Function (BLOB)Not supported in Microsoft Dynamics NAV 2015.
EXPORTOBJECTS FunctionNot supported in Microsoft Dynamics NAV 2015. Use the finsql.exe executable with the ExportObjects command instead.
FormsNot supported in Microsoft Dynamics NAV 2015.
IMPORT Function (BLOB)Not supported in Microsoft Dynamics NAV 2015.
IMPORTOBJECTS FunctionNot supported in Microsoft Dynamics NAV 2015. Use the finsql.exe executable with the ImportObjects command instead.
ISSERVICETIER FunctionObsolete in Microsoft Dynamics NAV 2015, but still supported. This function always returns true.
KeyGroups PropertyNot supported in Microsoft Dynamics NAV 2015.

Optionally, you can build indexes in SQL Server management tools.
LANGUAGE functionNot supported in Microsoft Dynamics NAV 2015.
NEWPAGE FunctionNot supported in Microsoft Dynamics NAV 2015 reports.
NEWPAGEPERRECORD FunctionNot supported in Microsoft Dynamics NAV 2015 reports.
OBJECTID FunctionNot supported in Microsoft Dynamics NAV 2015 reports.
OnCreateHyperlink TriggerNot supported in Microsoft Dynamics NAV 2015 reports.
OnHyperlink TriggerNot supported in Microsoft Dynamics NAV 2015 reports.
OnPreSection TriggerNot supported in Microsoft Dynamics NAV 2015 reports.
OnPostSection TriggerNot supported in Microsoft Dynamics NAV 2015 reports.
OSVERSION FunctionNot supported in Microsoft Dynamics NAV 2015.
PAGENO FunctionNot supported in Microsoft Dynamics NAV 2015 reports.
PAPERSOURCE FunctionNot supported in Microsoft Dynamics NAV 2015 reports.
PaperSourceOtherPages PropertyNot supported on Microsoft Dynamics NAV 2015 reports.
RECORDLEVELLOCKING Function (Record and RecordRef)Not used in Microsoft Dynamics NAV 2015. The function is still available and compiles but always returns true.
READCONSISTENCY Function (Record and RecordRef)Not used in Microsoft Dynamics NAV 2015. The function is still available and compiles but because Microsoft Dynamics NAV 2015 uses SQL Server's locking mechanisms and does not use snapshots like earlier versions of Microsoft Dynamics NAV, the return value is always false.
RequestOptionsForm system variableNot supported in Microsoft Dynamics NAV 2015.
SAVEASHTML FunctionNot supported in Microsoft Dynamics NAV 2015 reports.
SAVEASXMLNot supported in Microsoft Dynamics NAV 2015 reports.
SETPERMISSIONFILTER Function (Record)Not supported in Microsoft Dynamics NAV 2015. Instead, you change the SecurityFiltering Property from Validated to Filtered.
SETPERMISSIONFILTER Function (RecordRef)Not supported in Microsoft Dynamics NAV 2015. Instead, you change the SecurityFiltering Property from Validated to Filtered.
SaveTableView propertyNot supported in Microsoft Dynamics NAV 2015.
SHELL FunctionNot supported in Microsoft Dynamics NAV 2015.
SHOWOUTPUT FunctionNot supported in Microsoft Dynamics NAV 2015 reports.
SYNCHRONIZEALLLOGINS FunctionNot supported in Microsoft Dynamics NAV 2015.
SYNCHRONIZESINGLELOGIN FunctionNot supported in Microsoft Dynamics NAV 2015
TOTALSCAUSEDBY FunctionNot supported in Microsoft Dynamics NAV 2015 reports.
URL FunctionNot supported on Microsoft Dynamics NAV 2015 reports.
VARIABLEACTIVE FunctionNot supported in Microsoft Dynamics NAV 2015.
VISIBLE FunctionNot supported in Microsoft Dynamics NAV 2015.
YIELD FunctionNot supported on Microsoft Dynamics NAV Server.

Development Environment Enhancements - in Navision 2015

Auto-generating of C/AL variable and parameter names for complex data types

In the C/AL Globals and C/AL Locals windows, when you add a variable or parameter that has the data type Codeunit, Page, Testpage, Report, Query, or XMLport, the Name field will be automatically generated just by setting the DataType and SubType fields. The generated name is based on the name that is assigned to the associated Microsoft Dynamics NAV object. You can change the generated name as you want.
DevelopmentEnvironmentEnhancement-1

Commenting and uncommenting multiple lines of C/AL Code

The development environment includes the Comment Selection and Uncomment Selection options, which enable you to comment and uncomment multiple lines of C/AL code with the click of a button.

For more information, see my earlier post Commenting and uncommenting multiple lines of C/AL Code

Non-default property values are bold

Microsoft Dynamics NAV objects have many properties that you can view and set from the Properties window in the development environment. Property values that are not the default value of the property appear as bold in the Properties window.
DevelopmentEnvironmentEnhancement-2

C/AL functions are local by default

Unlike in earlier Microsoft Dynamics NAV versions, now when you create a function in the C/AL code of a Microsoft Dynamics NAV object, such as a codeunit or page, the function is set as a local function by default. By default, the Local property of new functions is now set to Yes instead of to No. Being local means that the function is not accessible outside the object in which is it defined.

New Properties and Controls for Pages - in Navision 2015

ShowMandatory Property

With Microsoft Dynamics NAV a new property called ShowMandatory has been introduced on page fields. The ShowMandatory property is set on page fields and marks the field with a red asterisk on the UI.

You can refer this in my earlier post Show Mandatory Property

UpdatePropagation Property

In Microsoft Dynamics NAV a new property called UpdatePropagation is added to page fields. The introduction of this property makes it possible to update a parent page from a subpage automatically without using the page Refresh button.

You can refer this in my earlier post UpdatePropagation Property

Scope Property

In Microsoft Dynamics NAV a new property called Scope is added to page actions. The introduction of this property specifies the scope of an action to be either page-specific, or specific to a repeater control.

You can refer this in my earlier post Defining Action Scope for Microsoft Dynamics NAV Pages in Navision 2015

FixedLayout Control

Microsoft Dynamics NAV now supports using the FixedLayout control on the Microsoft Dynamics NAV Web client.

You can refer this in my earlier post Using a FixedLayout Control

Using a FixedLayout Control

Arrange Page Fields in Rows and Columns Using a FixedLayout Control

A FixedLayout group control is typically used to display statistical data.

Fields in a FixedLayout group control are displayed in a FastTab with a heading for each row and column.

Previous versions of Microsoft Dynamics NAV supported having a FixedLayout control directly under a ContentArea. In Microsoft Dynamics NAV 2013 and later versions of Microsoft Dynamics NAV, you must make sure that the FixedLayout control is nested in a Group control.

To arrange page fields in rows and columns

  1. Open the page in Page Designer.

  2. In Page Designer, insert a blank line where you want to locate the fields.

  3. Set the Type and SubType field to Group. In the Caption field, type the text that you want as the heading of the FastTab that contains the fields.

  4. On the next line, set the Type to Group and SubType field to FixedLayout.

  5. On the next line, set the Type and SubType field to Group. This defines the placeholder for the first column of fields. To add a heading to the column, type the text in the Caption field.

  6. On the next line, set the Type to Field. This defines the first field in the column. In the Caption field, type the text that you want to use as the heading for the row.

  7. Specify the data source for the field by doing one of the following:

    • If the data source is a field of the table that is associated with the page, then on the View menu, choose Field Menu, select the field, and then choose the OK button.

    • If the data source is a variable, then on the View menu, choose C/AL Globals or C/AL Locals, and then create the variable. After you create the variable, in the SourceExpr field in Page Designer, choose the AssistEdit button and select the variable.


  8. Repeat steps 6 and 7 to add the remaining fields in the first column.

  9. Repeat steps 5 through 8 to add group controls that define the remaining columns.


You do not need to specify captions for these fields. Only the captions of fields in the first column define the row headings.

To demonstrate above steps, find below screen shots which makes you understand the concept easily.

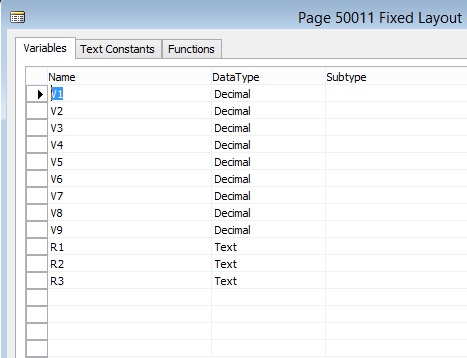
FixedLayout-1

We will create V1..V9 variable as decimal.

We will create R1..R3 variables as Text.

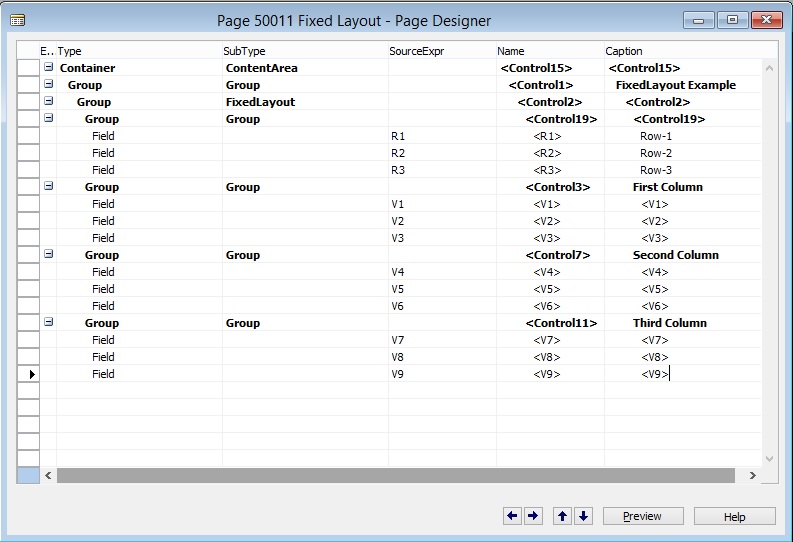
Next we will design and group the page as below:

FixedLayout-2

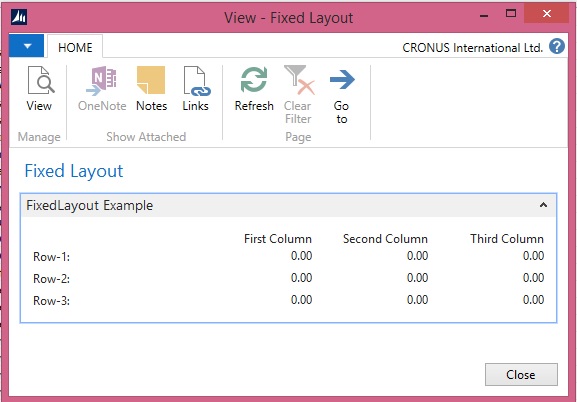
When we save and run the page we will get below output.

FixedLayout-3

You can use table fields or calculated variables.

You can nest the Layout for different views.

Monday, 24 August 2015

Using of Posting Groups

Posting groups in Microsoft Dynamics NAV are very important part of configuration process. All G/L Entries depends of correctly configured posting groups.

We can find a lot of them: General Business and Product Posting Groups, VAT Business and Product Posting Groups, Customer and Vendor Posting Groups, Inventory Posting Groups…

Sometime, it is very confusing how it works, especially for unexperienced people.

You can find good explanation on same in this post by Totovic.

Nicely explained, you should see it here. I feel must to see this post for every Navision Consultants either fresher or experienced.

Saturday, 22 August 2015

Uploading License to Tenant in Multitenant Environment

When we deploy solution for Multitenant Environment ever Tenant will be required a Separate License. Depending upon the License agreement with Microsoft every Tenant will either share same License or individual License.

Assume we are implementing Distributor Management System. Where every Tenant is a different Business entity linked with the Parent Group.

In this case the Server & Network is provided by the Parent Group and other Business group will share information but they will use their specific License to use the system, doesn’t matter who pays for fee.

In any case we need to upload License to each database in Multitenancy.

Import-NAVServerLicense

Imports a license file into a Microsoft Dynamics NAV database.

Syntax
Parameter Set: __AllParameterSets

Import-NAVServerLicense [-ServerInstance] <String> [-Database <LicenseDatabase> ] [-Force] [-Tenant <TenantId> ] [-Confirm] [-WhatIf] [ <CommonParameters>]

Parameter Set: LicenseDataSet

Import-NAVServerLicense [-LicenseData] <Byte[]> [-Force] [-Confirm] [-WhatIf] [ <CommonParameters>]

Parameter Set: LicenseFileSet

Import-NAVServerLicense [-LicenseFile] <String> [-Force] [-Confirm] [-WhatIf] [ <CommonParameters>]

Detailed Description

Use the Import-NAVServerLicense cmdlet to import a license file into a Microsoft Dynamics NAV database. If the Microsoft Dynamics NAV Server account specified does not have access to the location where the license file is stored, an error results. Check the Event Log on the Microsoft Dynamics NAV Server computer to see what permissions are required.

After importing a new license, restart all Microsoft Dynamics NAV Server instances to activate the license for client users.

Parameters

-Database<LicenseDatabase>

Specifies the database into which to import the license file. The possible values are described in the following list:
Default = 0

Default; overrides the license file currently in use.

Master = 1

Forces the license file to be global.

NavDatabase = 2

Forces the license file to be local and stored in the Microsoft Dynamics NAV database that is used by the specified Microsoft Dynamics NAV Server instance.
Tenant = 3

Forces the license file to be local and stored in the Microsoft Dynamics NAV database that is used by the tenant that is specified in the Tenant parameter.


Aliasesnone
Required?false
Position?named
Default Valuenone
Accept Pipeline Input?false
Accept Wildcard Characters?false

-Force

Forces the command to run without asking for user confirmation.


Aliasesnone
Required?false
Position?named
Default Valuenone
Accept Pipeline Input?false
Accept Wildcard Characters?false

-LicenseData<Byte[]>

Specifies the content retrieved from the certificate file by using the Get-Content cmdlet. For more information, see the examples.


Aliasesnone
Required?true
Position?2
Default Valuenone
Accept Pipeline Input?false
Accept Wildcard Characters?false

-LicenseFile<String>


Aliasesnone
Required?true
Position?2
Default Valuenone
Accept Pipeline Input?false
Accept Wildcard Characters?false

-ServerInstance<String>

Specifies the name of a Microsoft Dynamics NAV Server instance. The default instance name is DynamicsNAV80. You can specify either the full name of an instance (such as MicrosoftDynamicsNavServer$myinstance) or the short name (such as myinstance).


Aliasesnone
Required?true
Position?1
Default Valuenone
Accept Pipeline Input?True (ByValue, ByPropertyName)
Accept Wildcard Characters?false

-Tenant<TenantId>

Specifies the ID of the tenant in which you want to import the license, such as Tenant1. This parameter is required unless the specified service instance is not configured to run multiple tenants.


AliasesId
Required?false
Position?named
Default Valuenone
Accept Pipeline Input?True (ByPropertyName)
Accept Wildcard Characters?false

-Confirm

Prompts you for confirmation before running the cmdlet.


Required?false
Position?named
Default Valuefalse
Accept Pipeline Input?false
Accept Wildcard Characters?false

-WhatIf

Shows what would happen if the cmdlet runs. The cmdlet is not run.


Required?false
Position?named
Default Valuefalse
Accept Pipeline Input?false
Accept Wildcard Characters?false

<CommonParameters>

This cmdlet supports the common parameters: -Verbose, -Debug, -ErrorAction, -ErrorVariable, -OutBuffer, and -OutVariable.
Inputs

The input type is the type of the objects that you can pipe to the cmdlet.

  • System.String


You can pipe a string that contains a Microsoft Dynamics NAV Server instance name to the cmdlet.

Outputs

The output type is the type of the objects that the cmdlet emits.

  • None


This cmdlet does not generate any output.

Examples

This example imports a license file that is named "fin.flf" from the current directory into the default database.
C:\PS>Import-NAVServerLicense DynamicsNAV80 -LicenseData ([Byte[]]$(Get-Content -Path "fin.flf" -Encoding Byte))

This example imports a license file that is named "fin.flf" from the current directory into the local Microsoft Dynamics NAV database that is used by the MyInstance Microsoft Dynamics NAV Server instance.
C:\PS>Import-NAVServerLicense MyInstance -LicenseData ([Byte[]]$(Get-Content -Path "fin.flf" -Encoding Byte)) -Database NavDatabase

This example imports a license file that is named "fin.flf" from the current directory into the master database.
C:\PS>Import-NAVServerLicense 'MicrosoftDynamicsNavServer$MyInstance' -LicenseData ([Byte[]]$(Get-Content -Path "fin.flf" -Encoding Byte)) -Database Master

This example imports a license file that is named "fin.flf" from the current directory into the database that is used by the specified tenant, Tenant1.
C:\PS>Import-NAVServerLicense 'MicrosoftDynamicsNavServer$MyInstance' -LicenseData ([Byte[]]$(Get-Content -Path "fin.flf" -Encoding Byte)) -Database Tenant –Tenant Tenant1

Let import the license to the Tenants which we created in our earlier post.

If you missed previous post you can find it here. Adding Tenants to multitenancy Environment

I have created the Folder and placed my Tenants License in this.

License-1
Set-ExecutionPolicy unrestricted -Force

Import-Module 'C:\Program Files\Microsoft Dynamics NAV\80\Service\NavAdminTool.ps1'

Import-NAVServerLicense MTenantDemo -Tenant 'Tenant-1' -LicenseData ([Byte[]]$(Get-Content -Path "C:\User Data\NAV 2015\MultiTenantDemo\Tenant License\Tenant-1.flf" -Encoding Byte))

Import-NAVServerLicense MTenantDemo -Tenant 'Tenant-2' -LicenseData ([Byte[]]$(Get-Content -Path "C:\User Data\NAV 2015\MultiTenantDemo\Tenant License\Tenant-2.flf" -Encoding Byte))

Import-NAVServerLicense MTenantDemo -Tenant 'Tenant-3' -LicenseData ([Byte[]]$(Get-Content -Path "C:\User Data\NAV 2015\MultiTenantDemo\Tenant License\Tenant-3.flf" -Encoding Byte))

Import-NAVServerLicense MTenantDemo -Tenant 'Tenant-4' -LicenseData ([Byte[]]$(Get-Content -Path "C:\User Data\NAV 2015\MultiTenantDemo\Tenant License\Tenant-4.flf" -Encoding Byte))

Import-NAVServerLicense MTenantDemo -Tenant 'Tenant-5' -LicenseData ([Byte[]]$(Get-Content -Path "C:\User Data\NAV 2015\MultiTenantDemo\Tenant License\Tenant-5.flf" -Encoding Byte))

Copy the above Script and paste into the Microsoft Dynamics NAV 2015 Administration Shell.

License-2

Our License have now successfully uploaded to respective databases. As the message suggest we need to re-start the service so that new License comes into effect.

You can use above Script to Upload License to individual Tenants, License could be different or same depends how you discussed with Microsoft and purchased.

Adding Tenants to Multitenancy Environment

In my previous post Creating the Multitenant Environment, We were done with the basic setup for MultiTenantDatabase NAV (8-0) Demo_App, the first Tenant MultiTenantDatabase NAV (8-0) Demo.

All other Tenants can now be created in similar fashion.

It is recommended to create a tenant template, and in turn use this template to make other tenants.

To create a template follow bellow steps:

  • Remove all users leaving only Administrator Account as Super Permission.

  • Remove any Transaction data specific to Company and other Setups

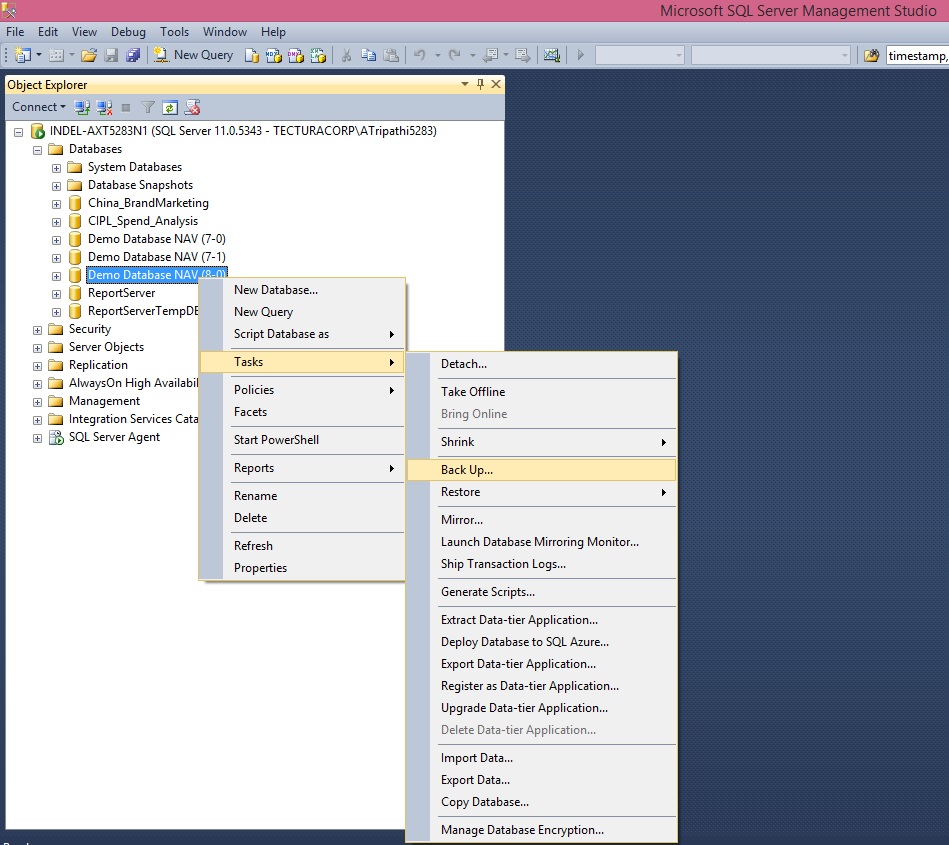
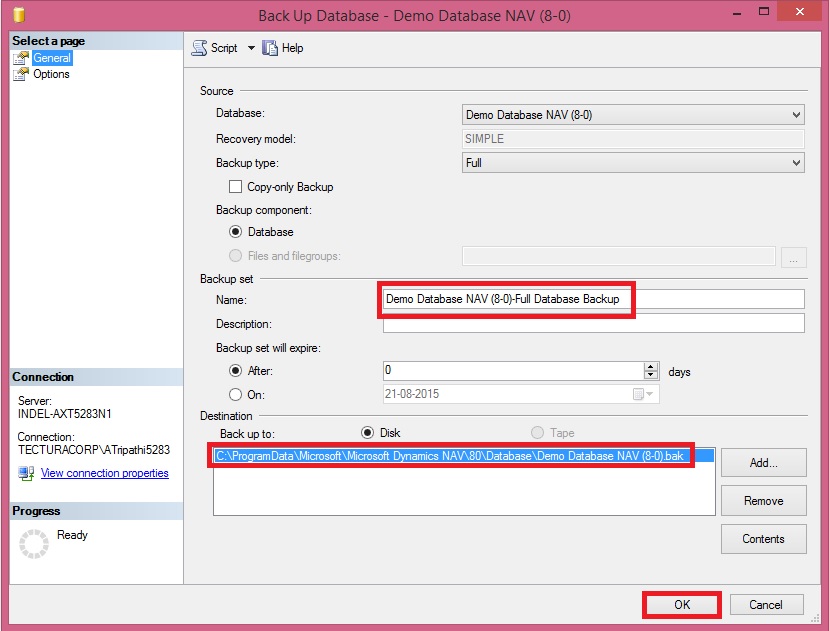
  • Take the backup of the database and keep it as template for other tenant’s database creation. Basically we will restore this database for each new tenant we need to add.


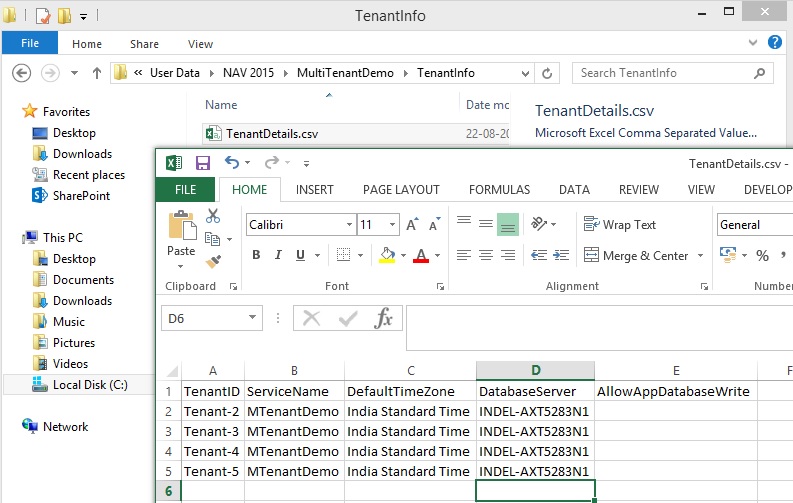
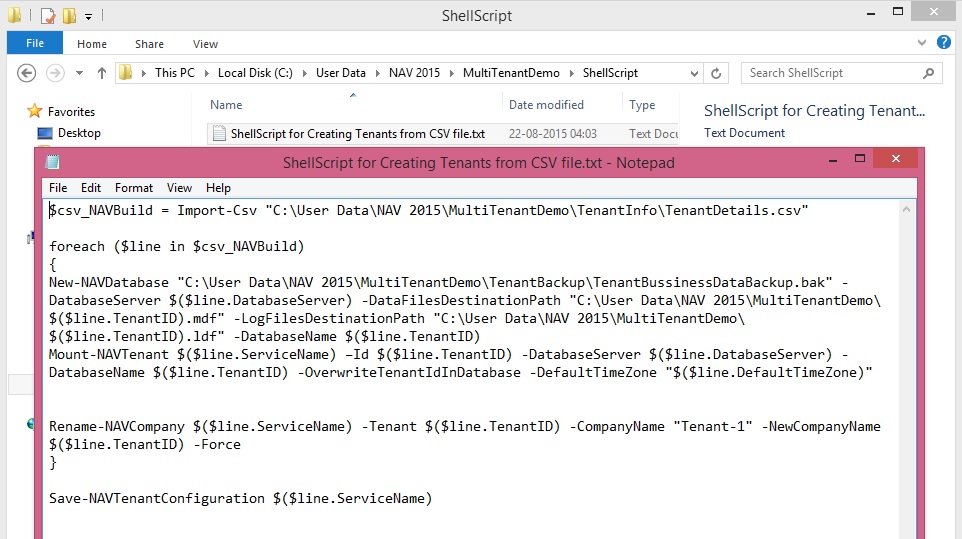
You can restore the database and mount it to the service one by one and rename the company name manually and do other modifications. But if you need to create 100 or 1000 tenants then this process will be quite time taking. To make this step easy we can use CSV file to store all necessary information and create a Shell Script to read information from CSV file and input as parameter to the commands to make this process fast and save with unnecessary effort.

Today I am going to discuss this, as a sample I have taken bare minimum information to get our task done. In real scenario many more things you may require but you can use this as a template and design your CSV and Script accordingly.

Let’s do the Preparation:

AddTenant-1
I have created the Folder structure as shown in above screen shot.

I will keep my CSV File in TenantInfo Folder.

AddTenant-2
I will store my Shell Script in ShellScript Folder.

AddTenant-3
$csv_NAVBuild = Import-Csv "C:\User Data\NAV 2015\MultiTenantDemo\TenantInfo\TenantDetails.csv"

foreach ($line in $csv_NAVBuild)
{
New-NAVDatabase "C:\User Data\NAV 2015\MultiTenantDemo\TenantBackup\TenantBussinessDataBackup.bak" -DatabaseServer $($line.DatabaseServer) -DataFilesDestinationPath "C:\User Data\NAV 2015\MultiTenantDemo\$($line.TenantID).mdf" -LogFilesDestinationPath "C:\User Data\NAV 2015\MultiTenantDemo\$($line.TenantID).ldf" -DatabaseName $($line.TenantID)
Mount-NAVTenant $($line.ServiceName) –Id $($line.TenantID) -DatabaseServer $($line.DatabaseServer) -DatabaseName $($line.TenantID) -OverwriteTenantIdInDatabase -DefaultTimeZone "$($line.DefaultTimeZone)"
Rename-NAVCompany $($line.ServiceName) -Tenant $($line.TenantID) -CompanyName "Tenant-1" -NewCompanyName $($line.TenantID) -Force
}

Save-NAVTenantConfiguration $($line.ServiceName)

I will place my tenant database template file in TenantBackup Folder prepared as per above discussed step. I will take the SQL backup and place the .bak file in this folder.

AddTenant-4
Creating and Mounting Tenants

It is possible to create PowerShell scripts that aids the setup of Tenants. Basically, what the script does, is:

  1. Calls a CSV file (Comma separated file) with settings for all the Tenants

  2. Restores and creates new Tenants based on the tenant template SQL backup

  3. Mounts the new database as a tenant on NAV Server Instance

  4. Renames the default company name to the specified company name

  5. Saves NAV tenant configurations of NAV Server Instance


Open the Microsoft Dynamics NAV 2015 Administrator Shell, Make sure you run it as Administrator. Copy and Paste your above created script.
AddTenant-5
On completion of execution of script, Verify your Tenants are Mounted to the Service using Microsoft Dynamics NAV 2015 Administration.
AddTenant-6
Verify using SQL Server Management your all database is created.

AddTenant-7

Verify that the database Files are created in Specified Folder in the Script.

AddTenant-8

Verify that you are able to login to each Tenant database in RTC.

AddTenant-9

Now you are done with Creating the Tenants and Mounting the same to the Navision Service using CSV file and Shell Script.

Shell Script had made your life so easy, think if manually you have to do it for 5000 tenants how much time will you take to get this task done.

Friday, 21 August 2015

Creating the Multitenant Environment

Before you start I will recommend to go through my earlier post on Multitenancy Concept & Overview here.

To start with the below steps you will require 2 Accounts preferably Domain Accounts:

  • An Account for running MS Dynamics Navision Service

  • An Administrator account for Database & RTC


How to setup these accounts and what permissions are required for these accounts I would recommend to go through my earlier post on Provisioning the Microsoft Dynamics NAV Server Account here.

Add both the above account to Navision Database with Super permission.

In order to create a multitenant environment (here for Demo Database NAV (8-0)), the following steps need to be done:

  • Take an SQL Backup of the running Demo Database NAV (8-0) database.


Multitenancy-1
Multitenancy-2
Multitenancy-3

  • Restore the newly made SQL Backup to a new database (MultiTenantDatabase NAV (8-0) Demo).


Multitenancy-4
Multitenancy-5
Multitenancy-6
Multitenancy-7

  • On the NAV Server, using the NAV 2015 Administration console, create a new NAV Server Instance named MTenantDemo


Multitenancy-8

  • Edit the instance and set the database to newly created MultiTenantDatabase NAV (8-0) Demo database, and set the instance to be started with NAV Service user.


Multitenancy-9
Multitenancy-10

  • Start MTenantDemo – and see if you can log in

  • Once you have confirmed the MultiTenantDatabase NAV (8-0) Demo database and MTenantDemo is running, split the database in an application part and a data part:

    • Open the NAV 2015 Administration Shell (or Windows PowerShell ISE and load the NavAdminTool)

    • Export the application part from the MultiTenantDatabase NAV (8-0) Demo database to a new database (MultiTenantDatabase NAV (8-0) Demo_App):


Export-NavApplication -DatabaseServer INDEL-AXT5283N1 -DatabaseName 'MultiTenantDatabase NAV (8-0) Demo' -DestinationDatabaseName 'MultiTenantDatabase NAV (8-0) Demo_App’


  • Remove the application part from the MultiTenantDatabase NAV (8-0) Demo database:


Remove-NAVApplication -DatabaseServer INDEL-AXT5283N1 -DatabaseName 'MultiTenantDatabase NAV (8-0) Demo'

Multitenancy-11
Multitenancy-12

  • Using the NAV 2015 Administration console, edit the MTenantDemo instance and set the database to newly created MultiTenantDatabase NAV (8-0) Demo_App database
    Multitenancy-13

  • And select Multitenant (set it to True):

  • Save and restart MTenantDemo


Multitenancy-14

  • Either through a Powershell commandlet in the NAV 2015 Administration Shell or by using the NAV 2015 Administration console mount a tenant named Tenant-1 on the MTenantDemo NAV Instance:


Multitenancy-15
Multitenancy-16
Multitenancy-17

  • Start NAV using the new tenant:


Multitenancy-18

  • In Companies rename the Company Name to Tenant-1

  • Take an SQL Backup using the MultiTenantDatabase NAV (8-0) Demo_App database, and call it “App_template.bak”

  • Take an SQL Backup using the MultiTenantDatabase NAV (8-0) Demo database, and call it “Tenant_template.bak”


You now have a template you can use when you want to create a application and a tenant.

Restore the Tenant Database as Tenant-2, Tenant-3, Tenant-4, Tenant-5 etc.

Mount the Tenant Databases to NAV Service MTenantDemo as per above steps.

Now you have One Application & 5 Business Data Tenants Mounted.

You will do development in Application Database MultiTenantDatabase NAV (8-0) Demo_App and then Sync your modifications to Business Data Databases named Tenant-1/2/3/4/5 etc.

To Sync your objects to Tenants you will use below script in NAV 2015 Administration Shell:
Set-ExecutionPolicy unrestricted –Force

Import-Module 'C:\Program Files\Microsoft Dynamics NAV\80\Service\NavAdminTool.ps1'

Sync-NAVTenant MTenantDemo -Force -Tenant ‘MultiTenantDatabase NAV (8-0) Demo’

I will explain in more detail on Creating Tenants, Synchronizing Tenants and uploading License for Tenants in more details in my next upcoming post.